官网资源下载
1、检查 /tmp 临时目录权限,将 /tmp 目录及所有子目录和文件的权限设置为所有用户可读、写和执行
[root@localhost ~]# chmod -R 777 /tmp
2、安装前检查相关依赖
2.1、查找是否安装了 libaio 包。libaio 是 Linux 下异步 I/O 库的一个实现,用于提供异步 I/O 支持。
[root@localhost ~]# rpm -qa|grep libaio
libaio-0.3.109-13.el7.x86_64
2.2、查找是否安装了 net-tools 包。net-tools 包含了一些网络管理工具,如 ifconfig、netstat 等。通过 rpm -qa 命令可以列出系统上所有已安装的 RPM 包,然后通过管道 | 将结果传递给 grep 命令,用于过滤出包含 “net-tools” 字样的行。
[root@localhost ~]# rpm -qa|grep net-tools
net-tools-2.0-0.25.20131004git.el7.x86_64
3、安装
3.1、将下载的安装包通过 finals hell等相关工具上传至CentOS 7中,切换路径并列出目录中的文件和子目录
3.1.1、 MySQL8.0需要的安装包如下
[root@localhost mysql80]# ll
总用量 489744
-rw-r--r--. 1 root root  47810444 4月  20 02:05 mysql-community-client-8.0.25-1.el7.x86_64.rpm
-rw-r--r--. 1 root root    193616 4月  20 02:04 mysql-community-client-plugins-8.0.25-1.el7.x86_64.rpm
-rw-r--r--. 1 root root    628904 4月  20 02:04 mysql-community-common-8.0.25-1.el7.x86_64.rpm
-rw-r--r--. 1 root root   4240320 4月  20 02:04 mysql-community-libs-8.0.25-1.el7.x86_64.rpm
-rw-r--r--. 1 root root 448614076 4月  20 02:08 mysql-community-server-8.0.25-1.el7.x86_64.rpm
3.1.2、MySQL 5.7 需要的安装包如下:
[root@rqtanc mysql57]# ll
总用量 252444
-rw-r--r--. 1 root root  45109364 4月  20 01:15 mysql-community-client-5.7.28-1.el7.x86_64.rpm
-rw-r--r--. 1 root root    318768 4月  20 01:13 mysql-community-common-5.7.28-1.el7.x86_64.rpm
-rw-r--r--. 1 root root   4374364 4月  20 01:13 mysql-community-libs-5.7.28-1.el7.x86_64.rpm
-rw-r--r--. 1 root root 208694824 4月  20 01:16 mysql-community-server-5.7.28-1.el7.x86_64.rpm
3.2 按序安装
3.2.1、安装 mysql-community-common-8.0.25-1.el7.x86_64.rpm(5.7同理)
[root@localhost mysql80]# rpm -ivh mysql-community-common-8.0.25-1.el7.x86_64.rpm
警告:mysql-community-common-8.0.25-1.el7.x86_64.rpm: 头V3 DSA/SHA1 Signature, 密钥 ID 5072e1f5: NOKEY
准备中...                          ################################# [100%]
正在升级/安装...
   1:mysql-community-common-8.0.25-1.e################################# [100%]
3.2.2、安装 mysql-community-client-plugins-8.0.25-1.el7.x86_64.rpm
[root@localhost mysql80]# rpm -ivh mysql-community-client-plugins-8.0.25-1.el7.x86_64.rpm
警告:mysql-community-client-plugins-8.0.25-1.el7.x86_64.rpm: 头V3 DSA/SHA1 Signature, 密钥 ID 5072e1f5: NOKEY
准备中...                          ################################# [100%]
正在升级/安装...
   1:mysql-community-client-plugins-8.################################# [100%]
3.2.3、 安装 mysql-community-libs-8.0.25-1.el7.x86_64.rpm (5.7同理)
[root@localhost mysql80]# rpm -ivh mysql-community-libs-8.0.25-1.el7.x86_64.rpm
警告:mysql-community-libs-8.0.25-1.el7.x86_64.rpm: 头V3 DSA/SHA1 Signature, 密钥 ID 5072e1f5: NOKEY
错误:依赖检测失败:
        mariadb-libs 被 mysql-community-libs-8.0.25-1.el7.x86_64 取代
3.2.3.1、 错误:依赖检测失败: mariadb-libs 被 mysql-community-libs-8.0.25-1.el7.x86_64 取代,执行以下命令,完成后 再次执行 3.2.3
[root@localhost mysql80]# yum remove mysql-libs
已加载插件:fastestmirror, langpacks
正在解决依赖关系
--> 正在检查事务
---> 软件包 mariadb-libs.x86_64.1.5.5.68-1.el7 将被 删除
--> 正在处理依赖关系 libmysqlclient.so.18()(64bit),它被软件包 2:postfix-2.10.1-9.el7.x86_64 需要
--> 正在处理依赖关系 libmysqlclient.so.18(libmysqlclient_18)(64bit),它被软件包 2:postfix-2.10.1-9.el7.x86_64 需要
--> 正在检查事务
---> 软件包 postfix.x86_64.2.2.10.1-9.el7 将被 删除
--> 解决依赖关系完成

依赖关系解决

===================================================================================================================================================================================
 Package                                     架构                                  版本                                             源                                        大小
===================================================================================================================================================================================
正在删除:
 mariadb-libs                                x86_64                                1:5.5.68-1.el7                                   @anaconda                                4.4 M
为依赖而移除:
 postfix                                     x86_64                                2:2.10.1-9.el7                                   @anaconda                                 12 M

事务概要
===================================================================================================================================================================================
移除  1 软件包 (+1 依赖软件包)

安装大小:17 M
是否继续?[y/N]:y
Downloading packages:
Running transaction check
Running transaction test
Transaction test succeeded
Running transaction
警告:RPM 数据库已被非 yum 程序修改。
  正在删除    : 2:postfix-2.10.1-9.el7.x86_64                                                                                                                                  1/2
  正在删除    : 1:mariadb-libs-5.5.68-1.el7.x86_64                                                                                                                             2/2
  验证中      : 1:mariadb-libs-5.5.68-1.el7.x86_64                                                                                                                             1/2
  验证中      : 2:postfix-2.10.1-9.el7.x86_64                                                                                                                                  2/2

删除:
  mariadb-libs.x86_64 1:5.5.68-1.el7

作为依赖被删除:
  postfix.x86_64 2:2.10.1-9.el7

完毕!
3.2.4 安装mysql-community-client-8.0.25-1.el7.x86_64.rpm (5.7同理)
[root@localhost mysql80]# rpm -ivh mysql-community-client-8.0.25-1.el7.x86_64.rpm
警告:mysql-community-client-8.0.25-1.el7.x86_64.rpm: 头V3 DSA/SHA1 Signature, 密钥 ID 5072e1f5: NOKEY
准备中...                          ################################# [100%]
正在升级/安装...
   1:mysql-community-client-8.0.25-1.e################################# [100%]
3.2.5 安装 mysql-community-server-8.0.25-1.el7.x86_64.rpm (5.7同理)
[root@localhost mysql80]# rpm -ivh mysql-community-server-8.0.25-1.el7.x86_64.rpm
警告:mysql-community-server-8.0.25-1.el7.x86_64.rpm: 头V3 DSA/SHA1 Signature, 密钥 ID 5072e1f5: NOKEY
准备中...                          ################################# [100%]
正在升级/安装...
   1:mysql-community-server-8.0.25-1.e################################# [100%]
3.3、查看MySQL安装版本
[root@localhost mysql80]# mysql --version
mysql  Ver 8.0.25 for Linux on x86_64 (MySQL Community Server - GPL)
3.4、初始化服务
[root@localhost mysql80]# mysqld --initialize --user=mysql
说明:initialize 选项默认以“安全”模式来初始化,将root 用户生成一个密码并标记为已过期,登录后重新设置,临时密码会保存在日志中。 查看密码执行以下命令:
[root@localhost mysql80]# cat /var/log/mysqld.log
2024-04-20T09:36:54.908453Z 0 [System] [MY-013169] [Server] /usr/sbin/mysqld (mysqld 8.0.25) initializing of server in progress as process 7431
2024-04-20T09:36:55.233056Z 1 [System] [MY-013576] [InnoDB] InnoDB initialization has started.
2024-04-20T09:37:03.480555Z 1 [System] [MY-013577] [InnoDB] InnoDB initialization has ended.
2024-04-20T09:37:10.045138Z 6 [Note] [MY-010454] [Server] A temporary password is generated for root@localhost: se)Xw%po6fuy
3.5、查看MySQL运行状态
[root@localhost mysql80]# systemctl status mysqld
● mysqld.service - MySQL Server
   Loaded: loaded (/usr/lib/systemd/system/mysqld.service; enabled; vendor preset: disabled)
   Active: inactive (dead)
     Docs: man:mysqld(8)
           http://dev.mysql.com/doc/refman/en/using-systemd.html
3.6、启动MySQL服务并再次查看运行状态
[root@localhost mysql80]# systemctl start mysqld
[root@localhost mysql80]# systemctl status mysqld
● mysqld.service - MySQL Server
   Loaded: loaded (/usr/lib/systemd/system/mysqld.service; enabled; vendor preset: disabled)
   Active: active (running) since 六 2024-04-20 02:43:42 PDT; 12s ago
     Docs: man:mysqld(8)
           http://dev.mysql.com/doc/refman/en/using-systemd.html
  Process: 14736 ExecStartPre=/usr/bin/mysqld_pre_systemd (code=exited, status=0/SUCCESS)
 Main PID: 15031 (mysqld)
   Status: "Server is operational"
    Tasks: 38
   CGroup: /system.slice/mysqld.service
           └─15031 /usr/sbin/mysqld

4月 20 02:42:44 localhost.localdomain systemd[1]: Starting MySQL Server...
4月 20 02:43:42 localhost.localdomain systemd[1]: Started MySQL Server.
3.7、查看MySQL服务是否自启动
[root@localhost mysql80]# systemctl list-unit-files|grep mysqld.service
mysqld.service                                enabled
3.7.1 、 如果不希望自行启动,执行以下命令进行设置
[root@localhost mysql80]# systemctl disable mysqld.service
Removed symlink /etc/systemd/system/multi-user.target.wants/mysqld.service.
[root@localhost mysql80]# systemctl list-unit-files|grep mysqld.service
mysqld.service                                disabled
3.7.2、 如果需要设置自行启动,执行以下命令进行设置
[root@localhost mysql80]# systemctl enable mysqld.service
Created symlink from /etc/systemd/system/multi-user.target.wants/mysqld.service to /usr/lib/systemd/system/mysqld.service.
[root@localhost mysql80]# systemctl list-unit-files|grep mysqld.service
mysqld.service                                enabled
4、MySQL登录
4.1、首次登录,执行 cat /var/log/mysqld.log 查看默认密码并进行登录
[root@localhost mysql80]# cat /var/log/mysqld.log
2024-04-20T09:36:54.908453Z 0 [System] [MY-013169] [Server] /usr/sbin/mysqld (mysqld 8.0.25) initializing of server in progress as process 7431
2024-04-20T09:36:55.233056Z 1 [System] [MY-013576] [InnoDB] InnoDB initialization has started.
2024-04-20T09:37:03.480555Z 1 [System] [MY-013577] [InnoDB] InnoDB initialization has ended.
2024-04-20T09:37:10.045138Z 6 [Note] [MY-010454] [Server] A temporary password is generated for root@localhost: se)Xw%po6fuy
2024-04-20T09:43:20.118202Z 0 [System] [MY-010116] [Server] /usr/sbin/mysqld (mysqld 8.0.25) starting as process 15031
2024-04-20T09:43:20.641330Z 1 [System] [MY-013576] [InnoDB] InnoDB initialization has started.
2024-04-20T09:43:37.479110Z 1 [System] [MY-013577] [InnoDB] InnoDB initialization has ended.
2024-04-20T09:43:40.281934Z 0 [System] [MY-011323] [Server] X Plugin ready for connections. Bind-address: '::' port: 33060, socket: /var/run/mysqld/mysqlx.sock
2024-04-20T09:43:42.214332Z 0 [Warning] [MY-010068] [Server] CA certificate ca.pem is self signed.
2024-04-20T09:43:42.214736Z 0 [System] [MY-013602] [Server] Channel mysql_main configured to support TLS. Encrypted connections are now supported for this channel.
2024-04-20T09:43:42.402257Z 0 [System] [MY-010931] [Server] /usr/sbin/mysqld: ready for connections. Version: '8.0.25'  socket: '/var/lib/mysql/mysql.sock'  port: 3306  MySQL Community Server - GPL.
[root@localhost mysql80]# mysql -uroot -p
Enter password:
Welcome to the MySQL monitor.  Commands end with ; or \g.
Your MySQL connection id is 8
Server version: 8.0.25

Copyright (c) 2000, 2021, Oracle and/or its affiliates.

Oracle is a registered trademark of Oracle Corporation and/or its
affiliates. Other names may be trademarks of their respective
owners.

Type 'help;' or '\h' for help. Type '\c' to clear the current input statement.

mysql>
4.2、修改密码
mysql> alter user 'root'@'localhost' identified by '123456';
Query OK, 0 rows affected (0.09 sec)
4.3、 退出并重新登录
5、远程连接
5.1、查看当前防火墙状态
[root@localhost mysql80]# systemctl status firewalld
● firewalld.service - firewalld - dynamic firewall daemon
   Loaded: loaded (/usr/lib/systemd/system/firewalld.service; enabled; vendor preset: enabled)
   Active: active (running) since 六 2024-04-20 00:38:18 PDT; 2h 35min ago
     Docs: man:firewalld(1)
 Main PID: 689 (firewalld)
    Tasks: 2
   CGroup: /system.slice/firewalld.service
           └─689 /usr/bin/python2 -Es /usr/sbin/firewalld --nofork --nopid

4月 20 00:38:10 localhost.localdomain systemd[1]: Starting firewalld - dynamic firewall daemon...
4月 20 00:38:18 localhost.localdomain systemd[1]: Started firewalld - dynamic firewall daemon.
4月 20 00:38:19 localhost.localdomain firewalld[689]: WARNING: AllowZoneDrifting is enabled. This is considered an insecure configuration option. It will be removed ...ng it now.
Hint: Some lines were ellipsized, use -l to show in full.
5.2、开放端口
[root@localhost mysql80]# firewall-cmd --zone=public --add-port=3306/tcp --permanent
success
5.3、重新加载防火墙
[root@localhost mysql80]# firewall-cmd --reload
5.4、验证:使用以下命令验证防火墙是否正确配置来允许 3306 端口的流量通过:
[root@localhost ~]# firewall-cmd --zone=public --list-ports
3306/tcp
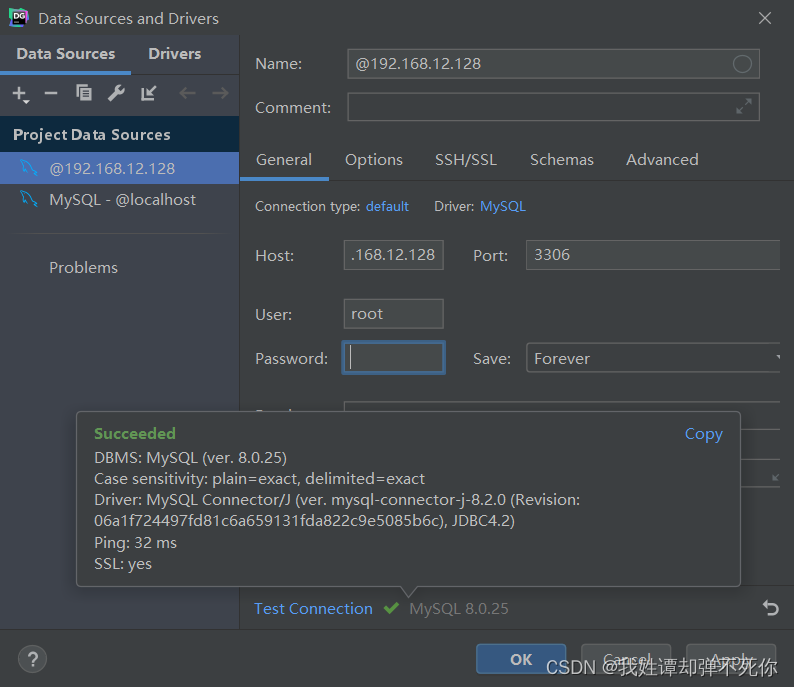
5.5、使用DataGrip等相关工具进行连接
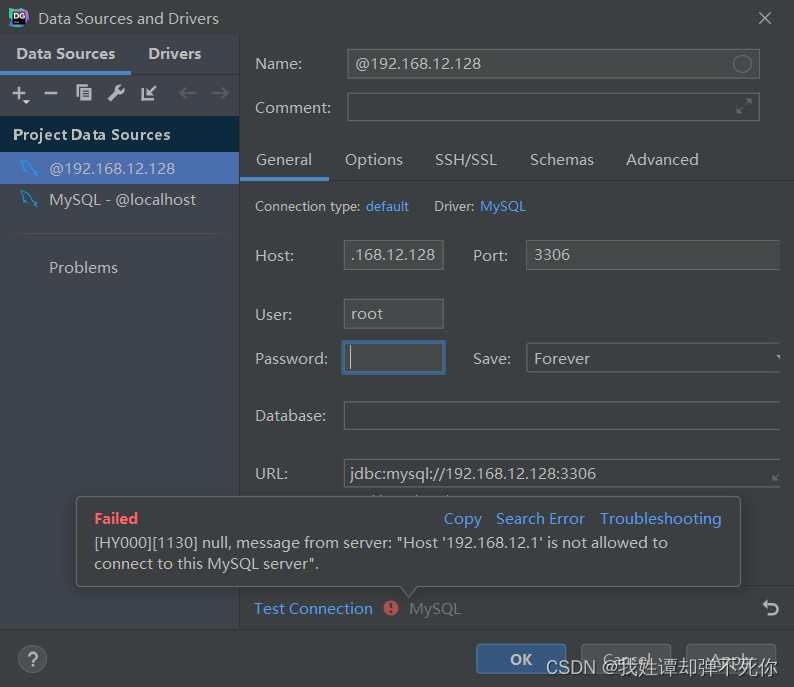
解决方式:
5.5.1登录mysql
[root@localhost ~]# mysql -uroot -p
Enter password:
Welcome to the MySQL monitor.  Commands end with ; or \g.
Your MySQL connection id is 19
Server version: 8.0.25 MySQL Community Server - GPL

Copyright (c) 2000, 2021, Oracle and/or its affiliates.

Oracle is a registered trademark of Oracle Corporation and/or its
affiliates. Other names may be trademarks of their respective
owners.

Type 'help;' or '\h' for help. Type '\c' to clear the current input statement.
5.5.2、查看相关数据库,使用mysql数据库,查看user表相关信息如下,root用户只允许本机连接
mysql> show databases;
+--------------------+
| Database           |
+--------------------+
| information_schema |
| mysql              |
| performance_schema |
| sys                |
+--------------------+
4 rows in set (1.54 sec)
mysql> use mysql;
Database changed
mysql> select host,user from user;
+-----------+------------------+
| host      | user             |
+-----------+------------------+
| localhost | mysql.infoschema |
| localhost | mysql.session    |
| localhost | mysql.sys        |
| localhost | root             |
+-----------+------------------+
4 rows in set (0.00 sec)
5.5.3、修改root 用户对应的host,建议严格校验,此处设置为允许任何客户端进行连接
mysql> update user set host = '%' where user = 'root';
Query OK, 1 row affected (2.21 sec)
Rows matched: 1  Changed: 1  Warnings: 0
5.5.4、刷新权限使其生效
mysql> flush privileges;
Query OK, 0 rows affected (0.64 sec)


![[阅读笔记29][AgentStudio]A Toolkit for Building General Virtual Agents](https://img-blog.csdnimg.cn/direct/dfeb73e7542148de810cc3ae9d62d93e.png)
