之前公司的同事写过一个微信小程序用的 合成海报的组件 非常十分好用 最近的项目是uni的 把组件改造一下也可以用 记录一下
<template>
	<view>
		<canvas type="2d" class="_mycanvas" id="my-canvas" canvas-id="my-canvas" :style="canCss" />
	</view>
</template>

<script>
	export default {
		name: "draw-2d",
		data() {
			return {

			};
		},
		methods: {
			getCanvas(canvasId) {
				return new Promise((r) => {
					this.createSelectorQuery().select(canvasId).fields({
						node: true
					}).exec(res => {
						// console.log(res);
						r(res[0].node)
					})
				})
			},
			// 给定一串文字样式 获取他在canvas的宽度
			async getTxtWidth(data) {
				// this.setData({
				// 	canCss: `width:${data.width}px;height:${data.height}px;`
				// })
				this.canCss=`width:${data.width}px;height:${data.height}px;`
				let canvasId = '#my-canvas'
				await this.loadFont(data)
				let canDom = await this.getCanvas(canvasId)
				canDom.width = data.width
				canDom.height = data.height
				let ctx = canDom.getContext('2d')
				let d = data.txt
				let font = ` ${d.weight || 'italic'} ${d.size || 30}px ${d.fontFamily || '微软雅黑'}`
				// console.log('font', font);
				ctx.font = font
				ctx.textAlign = d.align
				let tw = ctx.measureText(d.value)
				return tw
			},
			// 绘制图片
			drawImage(d, ctx, cav) {
				let img = cav.createImage()
				return new Promise((r) => {
					img.onerror = () => {
						console.log('下载失败');
						r()
					}
					img.onload = () => {
						ctx.save();
						if (d.isCir) {
							ctx.beginPath(); //开始绘制
							ctx.arc(d.w / 2 + d.x, d.h / 2 + d.y, d.w / 2, 0, Math.PI * 2, true);
							ctx
						.clip(); //画好了圆 剪切  原始画布中剪切任意形状和尺寸。一旦剪切了某个区域,则所有之后的绘图都会被限制在被剪切的区域内 这也是我们要save上下文的原因
						}
						if (d.radius) {
							// 需要裁剪圆角矩形图片
							ctx.save();
							ctx.beginPath();
							ctx.moveTo(d.x + d.radius, d.y);
							ctx.arcTo(d.x + d.w, d.y, d.x + d.w, d.y + d.h, d.radius);
							ctx.arcTo(d.x + d.w, d.y + d.h, d.x, d.y + d.h, d.radius);
							ctx.arcTo(d.x, d.y + d.h, d.x, d.y, d.radius);
							ctx.arcTo(d.x, d.y, d.x + d.w, d.y, d.radius);
							ctx.strokeStyle = 'transparent'
							ctx.closePath()
							ctx.stroke();
							ctx.clip();
						}
						ctx.drawImage(img, d.x, d.y, d.w, d.h)
						// if (d.border) {
						//   ctx.save()
						//   ctx.strokeStyle = d.border.color
						//   ctx.lineWidth = d.border.size
						//   ctx.strokeRect(d.x, d.y, d.w, d.h)
						//   ctx.restore()
						// }
						ctx.restore()
						r()
					}
					img.src = d.src
				})
			},
			// 绘制圆形
			drawCir(d, ctx) {
				ctx.save()
				ctx.beginPath();
				ctx.arc(d.x, d.y, d.size, d.size, 0 * Math.PI / 180, 360 * Math.PI / 180)
				if (d.border) {
					ctx.lineWidth = d.border
					ctx.strokeStyle = d.color
					ctx.stroke()
				} else {
					ctx.fillStyle = d.color
					ctx.fill()

				}
				ctx.restore()
			},
			// 绘制文字
			drawText(d, ctx) {
				let font = ` ${d.weight || 'italic'} ${d.size || 30}px ${d.fontFamily || '微软雅黑'}`
				// console.log('font', font);
				ctx.font = font
				ctx.textAlign = d.align
				let val = d.value
				let isSlice = false
				if (d.maxWidth) {
					let tw = ctx.measureText(val)
					// console.log('tw', tw);
					while (tw.width > d.maxWidth) {
						isSlice = true
						let len = val.pointLen()
						val = val.sliceByPoint(0, len - 1)
						tw = ctx.measureText(val + '...')
						// console.log('tw', tw);
					}
				}
				if (isSlice) {
					// console.log('裁剪过了 需要拼接');
					val = val + '...'
				}
				// console.log('val', val);
				ctx.fillStyle = d.color
				ctx.fillText(val, d.x, d.y)
				// 字体描边
				// ctx.strokeStyle = "blue";
				// ctx.font = " italic 40px 宋体";
				// ctx.strokeText("你好", d.x, d.y);
			},
			// 绘制需要自动换行的文字
			drawText1(d, ctx) {
				let font = ` ${d.weight || 'normal'} ${d.size || 16}px ${d.fontFamily || 'Arial'}`;
				ctx.font = font;
				ctx.textAlign = d.align || 'left';
				ctx.textBaseline = 'top'; // 确保文本从顶部开始绘制
				let str = d.value;
				let maxWidth = d.maxWidth // 默认设置为无限大,以确保没有限制

				let linesize = d.linesize || 100; // 默认行高为字体大小
				let initHeight = d.y
				let leftWidth = d.x
				var lineWidth = 0;
				var lastSubStrIndex = 0; //每次开始截取的字符串的索引
				for (let i = 0; i < str.length; i++) {
					lineWidth += ctx.measureText(str[i]).width;
					if (lineWidth > maxWidth) {
						console.log('str.substring(lastSubStrIndex, i)', str.substring(lastSubStrIndex, i),
							lastSubStrIndex, i);
						ctx.fillText(str.substring(lastSubStrIndex, i), leftWidth, initHeight); //绘制截取部分
						initHeight += linesize; //字体的高度
						lineWidth = 0;
						lastSubStrIndex = i;
						i--
						// titleHeight += 30;
					}
					if (i == str.length - 1) { //绘制剩余部分
						ctx.fillStyle = d.color
						ctx.fillText(str.substring(lastSubStrIndex, i + 1), leftWidth, initHeight);
					}
				}


			},
			// 绘制矩形
			drawRect(d, ctx) {
				ctx.save()
				if (d.border) {
					ctx.strokeStyle = d.color
					ctx.lineWidth = d.border
					ctx.strokeRect(d.x, d.y, d.w, d.h)
				} else {
					ctx.fillStyle = d.color
					ctx.fillRect(d.x, d.y, d.w, d.h)
				}
				ctx.restore()
			},
			loadFont(d) {
				if (!d.font) return
				let r1 = []
				d.font.map(v => {
					let p = new Promise((r) => {
						uni.loadFontFace({
							family: v.name,
							scopes: ['native'],
							source: d.cdn + v.src,
							global: true,
							complete: r
						})
					})
					r1.push(p)
				})
				return Promise.all(r1)

			},
			async goDraw(data) {
				console.log('async goDraw(data)');
				// this.setData({
				// 	canCss: `width:${data.width}px;height:${data.height}px;`
				// })
				this.canCss=`width:${data.width}px;height:${data.height}px;`
				let canvasId = '#my-canvas'
				await this.loadFont(data)

				let canDom = await this.getCanvas(canvasId)
				canDom.width = data.width
				canDom.height = data.height
				return new Promise(async r => {
					if (data.loading) uni.showLoading({
						title: '合成中'
					})
					let ctx = canDom.getContext('2d')
					for (let i = 0; i < data.data.length; i++) {
						let v = data.data[i]
						if (v.type == 'image') {
							if (v.isNeedCdn) {
								v.src = data.cdn + v.src
							}
							await this.drawImage(v, ctx, canDom)
						}
						if (v.type == 'text') {
							this.drawText(v, ctx)
						}
						if (v.type == 'text1') {
							this.drawText1(v, ctx)
						}
						if (v.type == 'rect') {
							this.drawRect(v, ctx)
						}
						if (v.type == 'cir') {
							this.drawCir(v, ctx)
						}
					}
					uni.canvasToTempFilePath({
						canvasId: canvasId,
						canvas: canDom,
						x: 0,
						y: 0,
						width: data.width,
						height: data.height,
						destWidth: data.width * data.scale,
						destHeight: data.height * data.scale,
						success: (file) => {
							if (data.loading) uni.hideLoading()
							r(file.tempFilePath)
						}
					}, this)
				})
				// return new Promise((r) => {
				//   uni.nextTick(() => {
				//   })
				// })
			}
		}
	}
</script>

<style lang="scss">
	._mycanvas {
		position: absolute;
		right: -1000000000px;
		top: -100000000px;
		/* top: 0;
  left: 0;
  width: 750rpx;
  background-color: pink; */

	}
</style>
这次用的组件是放在分包里了 顺便记录一下 分包调用组件
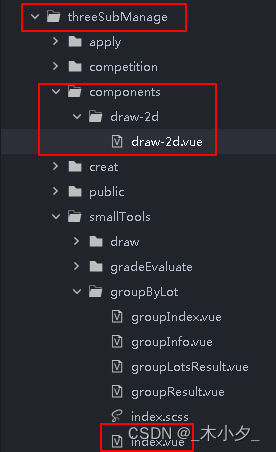
目录结构是这样子的 想在index.vue页面调用
<template>
	<Draw id='draw' ref='draw'></Draw>
</template>

<script>
	import Draw from '@/threeSubManage/components/draw-2d/draw-2d.vue'; // 引入draw组件
	export default {
		components: {
			Draw // 注册draw组件
		},
		}
</script>
重点来了 合成图片的函数是这样子
  async goDraw() {
    let cdn = 'http://192.168.1.1/cdn/'
    let width = 500, height = 400
    // || this.data.Url.imgUrl
    let font = [{ name: 'egg1', src: 'egg1.ttf' }]
    let data = [
      // 普通图片 需要拼接cdn 如果是头像或者后台返回的图片链接 isNeedCdn就不用填 默认false
      { type: 'image', x: 0, y: 0, w: width, h: height, src: 'share.jpg', isNeedCdn: true },
      // isCir 是否是圆形图片 一般用作头像
      { type: 'image', x: width - 120, y: 100, isCir: 1, w: 80, h: 80, src: 'mall/image.png', isNeedCdn: true },
      // 圆角图片 deg 就是被裁的px
      {
        type: 'image', x: width / 2 - 40 / 2, y: 20, radius: 10,
        // border: { size: 6, color: 'red' },
        w: 40, h: 40, src: 'event/share-h2.png', isNeedCdn: true
      },
      // 文字 size 是文件大小 color 颜色  fontfamily  字体
      {
        type: 'text', value: '居中的字阿阿阿阿', x: width / 2, y: height / 2,
        maxWidth: 300, //最大宽度
        size: 34, weight: '100',
        align: 'center', color: 'red', fontFamily: 'egg1'
      },
      {
        type: 'text', value: '靠左的文字阿阿阿阿', x: 10, y: 100,
        maxWidth: 300, //最大宽度
        size: 34, weight: '100',
        align: 'left', color: 'red', fontFamily: 'egg1'
      },
      {
        type: 'text', value: '靠右的文字阿阿阿阿', x: width - 10, y: 140,
        maxWidth: 300, //最大宽度
        size: 34, weight: '100',
        align: 'right', color: 'red', fontFamily: 'egg1'
      },
      //需要换行的文字,type传text1
            {
        type: 'text1', value: this.currentIns, x: 92 / 1.5, y: (713) / 1.5,
        maxWidth: 540 / 1.5, //最大宽度
        linesize: 64 / 1.5,
        size: 32 / 1.5, weight: '100',
        align: 'left', color: 'white', fontFamily: 'egg1'
      },
      // 矩形框 填充色为蓝色  没有border 默认就是背景填充
      { type: 'rect', x: 10, y: 10, w: 50, h: 50, color: 'blue', border: 0 },
      // 圆形框  填充色color
      { type: 'cir', x: width / 2, y: height - 80, border: 0, size: 40, color: 'red' },
    ]
    let d = { width, height, loading: true, font, scale: 2, cdn, data }
    let drawDom = this.selectComponent('#draw')
    // let r = await drawDom.goDraw(d)
    let r = await this.$refs.draw.goDraw(d);
    uni.previewImage({
      urls: [r]
    })
  },
文字、图片、矩形、圆角等等情况都考虑了 使用起来非常方便
有需要可以试一试哦~