前言
MobileSAM模型是在2023年发布的,其对之前的SAM分割一切大模型进行了轻量化的优化处理,模型整体体积缩小了60倍,运行速度提高40倍,但分割效果却依旧很好。
MobileSAM在使用方法上沿用了SAM模型的接口,因此可以与SAM模型的使用方法几乎可以无缝对接,真的是非常Nice。唯一的区别就是在模型加载的时候需要修改一点点。
一、环境配置

创建专属环境
conda create -n MobileSAM python=3.9

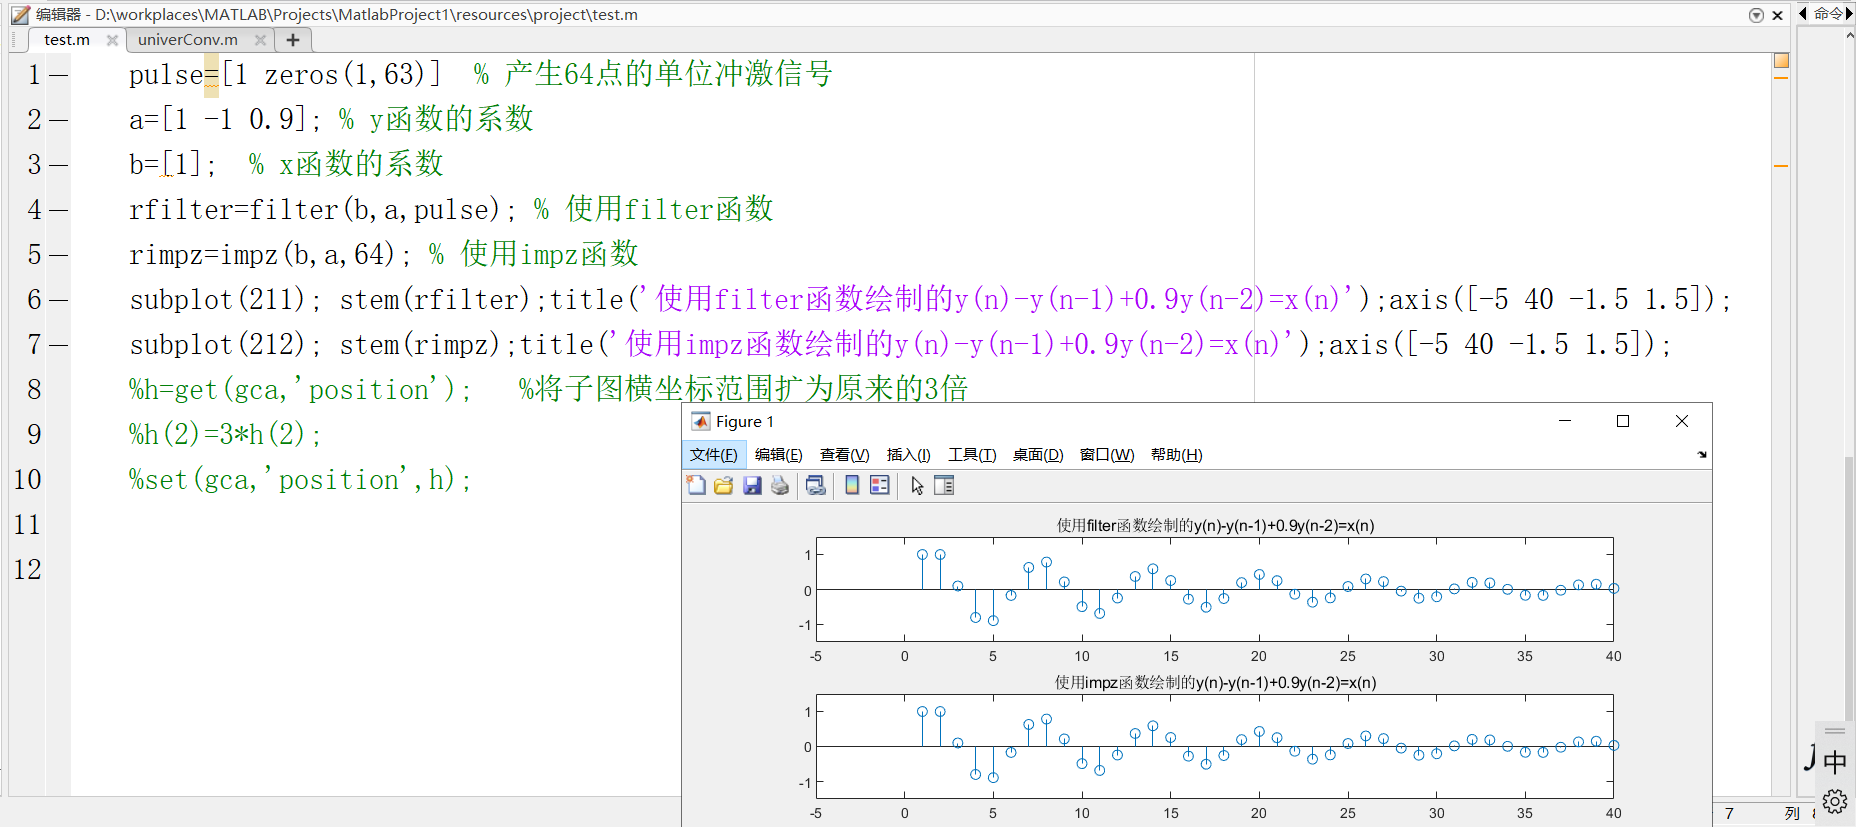
激活环境
conda activate MobileSAM 
安装 Pytorch 环境
pip install -i https://pypi.tuna.tsinghua.edu.cn/simple "torch-1.13.0+cu116-cp39-cp39-win_amd64.whl"
pip install -i https://pypi.tuna.tsinghua.edu.cn/simple "torchvision-0.14.0+cu116-cp39-cp39-win_amd64.whl"

二、代码测试
网页版使用
安装相关库
pip install -r requirements.txt
pip install gradio -i https://pypi.tuna.tsinghua.edu.cn/simple
pip install timm -i https://pypi.tuna.tsinghua.edu.cn/simple
代码运行
python app/app.py
点击链接进入下方的网页界面

在此就可以就行在网页上进行分割操作,下方是一些分割的图片:
Instructions for point mode(点模式说明)
-
Restart by click the Restart button(单击“重新启动”按钮重新启动)
-
Select a point with Add Mask for the foreground (Must)(选择具有“添加遮罩”的点作为前景(必须))
-
Select a point with Remove Area for the background (Optional)(选择具有“删除区域”的点作为背景(可选))
-
Click the Start Segmenting.(单击“开始分割”)


纯代码实现
Predictor 方法【提示点分割代码】
加载模型
def load_sam():
    # Selecting objects with SAM
    sam_checkpoint = "./weights/mobile_sam.pt"
    model_type = "vit_t"

    device = "cuda" if torch.cuda.is_available() else "cpu"

    sam = sam_model_registry[model_type](checkpoint=sam_checkpoint)
    sam.to(device=device)
    sam.eval()
    return SamPredictor(sam)
绘制结果
def show_mask(mask, ax, random_color=False):
    if random_color:
        color = np.concatenate([np.random.random(3), np.array([0.6])], axis=0)
    else:
        color = np.array([30 / 255, 144 / 255, 255 / 255, 0.6])
    h, w = mask.shape[-2:]
    mask_image = mask.reshape(h, w, 1) * color.reshape(1, 1, -1)
    ax.imshow(mask_image)


def show_points(coords, labels, ax, marker_size=375):
    pos_points = coords[labels == 1]
    neg_points = coords[labels == 0]
    ax.scatter(pos_points[:, 0], pos_points[:, 1], color='green', marker='*', s=marker_size, edgecolor='white',
               linewidth=1.25)
    ax.scatter(neg_points[:, 0], neg_points[:, 1], color='red', marker='*', s=marker_size, edgecolor='white',
               linewidth=1.25)


def show_box(box, ax):
    x0, y0 = box[0], box[1]
    w, h = box[2] - box[0], box[3] - box[1]
    ax.add_patch(plt.Rectangle((x0, y0), w, h, edgecolor='green', facecolor=(0, 0, 0, 0), lw=2))
单点得到掩码
# 使用 MobileSAM 从提示中得到掩码对象
# 选择需要分割的图像上的一个点。点以 (x,y) 格式输入到模型中,标签为 1(前景点)或 0(背景点)。
input_point = np.array([[400, 400]])
input_label = np.array([1])

# 使用 `SamPredictor.predict`进行预测
# 返回值:掩码、这些掩码的质量预测值和低分辨率掩码数值,这些数据可传递给下一次进行迭代预测。
# 当 `multimask_output=True`(默认设置)时,SAM 会输出 3 个掩码,其中 `scores` 给出了模型对这些掩码质量的估计值。
# 此设置用于模棱两可的输入提示,帮助模型区分与提示一致的不同对象。如果设置为 "false",则将返回单一掩码。
# 对于模棱两可的提示(如单点),建议使用 `multimask_output=True`,即使只需要单个掩码;可以通过选择在 `scores` 中返回的分数最高的掩码来选择最佳的单个掩码,这通常会产生更好的掩码。
masks, scores, logits = predictor.predict(
    point_coords=input_point,
    point_labels=input_label,
    multimask_output=True,
)

for i, (mask, score) in enumerate(zip(masks, scores)):
    plt.figure(figsize=(10, 10))
    plt.imshow(image)
    show_mask(mask, plt.gca())
    show_points(input_point, input_label, plt.gca())
    plt.title(f"Mask {i + 1}, Score: {score:.3f}", fontsize=18)
    plt.axis('off')
    plt.show()
多点得到掩码
# Specifying a specific object with additional points(指定具有附加点的特定对象)
# 单个输入点模棱两可,模型返回了多个与之一致的对象。要获得单一对象,可以提供多个点。
# 如果有上一次迭代的掩码,也可以提供给模型以帮助预测。
# 在使用多个提示指定单个对象时,可以通过设置 `multimask_output=False` 来得到单个掩码。
input_point = np.array([[400, 400], [450, 350]])
input_label = np.array([1, 1])

mask_input = logits[np.argmax(scores), :, :]  # Choose the model's best mask

masks, _, _ = predictor.predict(
    point_coords=input_point,
    point_labels=input_label,
    mask_input=mask_input[None, :, :],
    multimask_output=False,
)

plt.figure(figsize=(10, 10))
plt.imshow(image)
show_mask(masks, plt.gca())
show_points(input_point, input_label, plt.gca())
plt.axis('off')
plt.show()
多点得到掩码前景和背景
input_point = np.array([[400, 400], [100, 500]])
input_label = np.array([0, 1])

mask_input = logits[np.argmax(scores), :, :]  # Choose the model's best mask

masks, _, _ = predictor.predict(
    point_coords=input_point,
    point_labels=input_label,
    mask_input=mask_input[None, :, :],
    multimask_output=False,
)

plt.figure(figsize=(10, 10))
plt.imshow(image)
show_mask(masks, plt.gca())
show_points(input_point, input_label, plt.gca())
plt.axis('off')
plt.show()
通过方框得到掩码
input_box = np.array([190, 70, 460, 280])

masks, _, _ = predictor.predict(
    point_coords=None,
    point_labels=None,
    box=input_box[None, :],
    multimask_output=False,
)

plt.figure(figsize=(10, 10))
plt.imshow(image)
show_mask(masks[0], plt.gca())
show_box(input_box, plt.gca())
plt.axis('off')
plt.show()
SamAutomaticMaskGenerator 方法【一键全景分割代码】
Automatic mask generator (得到全部图像掩码)
# Automatic mask generation(自动生成掩码)
mask_generator = load_sam()

# To generate masks
masks = mask_generator.generate(image)

# Mask generation returns a list over masks, where each mask is a dictionary containing various data about the mask.
# These keys are:
# segmentation: the mask
# area: the area of the mask in pixels
# bbox: the boundary box of the mask in XYWH format
# predicted_iou: the model's own prediction for the quality of the mask
# point_coords: the sampled input point that generated this mask
# stability_score: an additional measure of mask quality
# crop_box: the crop of the image used to generate this mask in XYWH format

# Show all the masks overlayed on the image.
plt.figure(figsize=(20,20))
plt.imshow(image)
show_anns(masks)
plt.axis('off')
plt.show()
Automatic mask generation options
# Automatic mask generation options
# There are several tunable parameters in automatic mask generation that control how densely points are sampled and what the thresholds are for removing low quality or duplicate masks. Additionally, generation can be automatically run on crops of the image to get improved performance on smaller objects, and post-processing can remove stray pixels and holes. Here is an example configuration that samples more masks:
# 在自动掩模生成中有几个可调参数,用于控制采样点的密度以及去除低质量或重复掩模的阈值。此外,生成可以在图像的裁剪上自动运行,以提高较小对象的性能,后处理可以去除杂散像素和孔洞。
# 以下是一个示例配置,用于对更多掩码进行采样:
mask_generator_2 = SamAutomaticMaskGenerator(
    model=sam,
    points_per_side=32,
    pred_iou_thresh=0.86,
    stability_score_thresh=0.92,
    crop_n_layers=1,
    crop_n_points_downscale_factor=2,
    min_mask_region_area=100,  # Requires open-cv to run post-processing
)
masks2 = mask_generator_2.generate(image)
plt.figure(figsize=(20, 20))
plt.imshow(image)
show_anns(masks2)
plt.axis('off')
plt.show()
Onnx 推理【提示点分割代码】
模型转换(.pt 转 .onnx)
# 得到多个输出
python scripts/export_onnx_model.py --checkpoint ./weights/mobile_mul_sam.pt --model-type vit_t --output ./weights/mobile_mul_sam.onnx

# 得到单个输出
python scripts/export_onnx_model.py --checkpoint ./weights/mobile_single_sam.pt --model-type vit_t --return-single-mask --output ./weights/mobile_single_sam.onnx
量化onnx模型
onnx_model_path = 'mobile_single_sam.onnx'

onnx_model_quantized_path = "mobile_single_sam_quantized.onnx"
# 通过对模型进行量化和优化。我们发现,这显著改善了web运行时,而质量性能的变化可以忽略不计。
quantize_dynamic(
    model_input=onnx_model_path,
    model_output=onnx_model_quantized_path,
    optimize_model=True,
    per_channel=False,
    reduce_range=False,
    weight_type=QuantType.QUInt8,
)
onnx_model_path = onnx_model_quantized_path
使用onnx 模型
# Using an ONNX model
ort_session = onnxruntime.InferenceSession(onnx_model_path)

checkpoint = "../weights/mobile_sam.pt"
model_type = "vit_t"
sam = sam_model_registry[model_type](checkpoint=checkpoint)
sam.to(device='cpu')
predictor = SamPredictor(sam)
predictor.set_image(image)

image_embedding = predictor.get_image_embedding().cpu().numpy()
Onnx 推理参数
The ONNX model has a different input signature than SamPredictor.predict. The following inputs must all be supplied. Note the special cases for both point and mask inputs. All inputs are np.float32.
- image_embeddings: The image embedding from predictor.get_image_embedding(). Has a batch index of length 1.
- point_coords: Coordinates of sparse input prompts, corresponding to both point inputs and box inputs. Boxes are encoded using two points, one for the top-left corner and one for the bottom-right corner. Coordinates must already be transformed to long-side 1024. Has a batch index of length 1.
- point_labels: Labels for the sparse input prompts. 0 is a negative input point, 1 is a positive input point, 2 is a top-left box corner, 3 is a bottom-right box corner, and -1 is a padding point. If there is no box input, a single padding point with label -1 and coordinates (0.0, 0.0) should be concatenated.
- mask_input: A mask input to the model with shape 1x1x256x256. This must be supplied even if there is no mask input. In this case, it can just be zeros.
- has_mask_input: An indicator for the mask input. 1 indicates a mask input, 0 indicates no mask input.
- orig_im_size: The size of the input image in (H,W) format, before any transformation.
Additionally, the ONNX model does not threshold the output mask logits. To obtain a binary mask, threshold at sam.mask_threshold (equal to 0.0).
单点得到掩码
input_point = np.array([[250, 375]])
input_label = np.array([1])

# Add a batch index, concatenate a padding point, and transform.
onnx_coord = np.concatenate([input_point, np.array([[0.0, 0.0]])], axis=0)[None, :, :]
onnx_label = np.concatenate([input_label, np.array([-1])], axis=0)[None, :].astype(np.float32)

onnx_coord = predictor.transform.apply_coords(onnx_coord, image.shape[:2]).astype(np.float32)

# Create an empty mask input and an indicator for no mask.
onnx_mask_input = np.zeros((1, 1, 256, 256), dtype=np.float32)
onnx_has_mask_input = np.zeros(1, dtype=np.float32)

# Package the inputs to run in the onnx model
ort_inputs = {
    "image_embeddings": image_embedding,
    "point_coords": onnx_coord,
    "point_labels": onnx_label,
    "mask_input": onnx_mask_input,
    "has_mask_input": onnx_has_mask_input,
    "orig_im_size": np.array(image.shape[:2], dtype=np.float32)
}

# Predict a mask and threshold it.
masks, _, low_res_logits = ort_session.run(None, ort_inputs)
masks = masks > predictor.model.mask_threshold

plt.figure(figsize=(10,10))
plt.imshow(image)
show_mask(masks, plt.gca())
show_points(input_point, input_label, plt.gca())
plt.axis('off')
plt.show()
多点得到掩码
input_point = np.array([[250, 375], [490, 380], [375, 360]])
input_label = np.array([1, 1, 0])

# Use the mask output from the previous run. It is already in the correct form for input to the ONNX model.
onnx_mask_input = low_res_logits

# Transform the points as in the previous example.
onnx_coord = np.concatenate([input_point, np.array([[0.0, 0.0]])], axis=0)[None, :, :]
onnx_label = np.concatenate([input_label, np.array([-1])], axis=0)[None, :].astype(np.float32)

onnx_coord = predictor.transform.apply_coords(onnx_coord, image.shape[:2]).astype(np.float32)

# The `has_mask_input` indicator is now 1.
onnx_has_mask_input = np.ones(1, dtype=np.float32)

# Package inputs, then predict and threshold the mask.
ort_inputs = {
    "image_embeddings": image_embedding,
    "point_coords": onnx_coord,
    "point_labels": onnx_label,
    "mask_input": onnx_mask_input,
    "has_mask_input": onnx_has_mask_input,
    "orig_im_size": np.array(image.shape[:2], dtype=np.float32)
}

masks, _, _ = ort_session.run(None, ort_inputs)
masks = masks > predictor.model.mask_threshold

plt.figure(figsize=(10,10))
plt.imshow(image)
show_mask(masks, plt.gca())
show_points(input_point, input_label, plt.gca())
plt.axis('off')
plt.show()
points和box得到掩码
input_box = np.array([210, 200, 350, 500])
input_point = np.array([[275, 400]])
input_label = np.array([0])

# Add a batch index, concatenate a box and point inputs, add the appropriate labels for the box corners, and transform. There is no padding point since the input includes a box input.
onnx_box_coords = input_box.reshape(2, 2)
onnx_box_labels = np.array([2,3])

onnx_coord = np.concatenate([input_point, onnx_box_coords], axis=0)[None, :, :]
onnx_label = np.concatenate([input_label, onnx_box_labels], axis=0)[None, :].astype(np.float32)

onnx_coord = predictor.transform.apply_coords(onnx_coord, image.shape[:2]).astype(np.float32)

# Package inputs, then predict and threshold the mask.
onnx_mask_input = np.zeros((1, 1, 256, 256), dtype=np.float32)
onnx_has_mask_input = np.zeros(1, dtype=np.float32)

ort_inputs = {
    "image_embeddings": image_embedding,
    "point_coords": onnx_coord,
    "point_labels": onnx_label,
    "mask_input": onnx_mask_input,
    "has_mask_input": onnx_has_mask_input,
    "orig_im_size": np.array(image.shape[:2], dtype=np.float32)
}

masks, _, _ = ort_session.run(None, ort_inputs)
masks = masks > predictor.model.mask_threshold

plt.figure(figsize=(10, 10))
plt.imshow(image)
show_mask(masks[0], plt.gca())
show_box(input_box, plt.gca())
show_points(input_point, input_label, plt.gca())
plt.axis('off')
plt.show()
三、总结
从结果来看,MobileSAM相比于SAM,模型整体体积缩小了60倍,运行速度提高40倍,但分割效果却保持相当水平。个人认为,这对于视觉大模型在移动端的部署与应用是具有里程碑意义的。
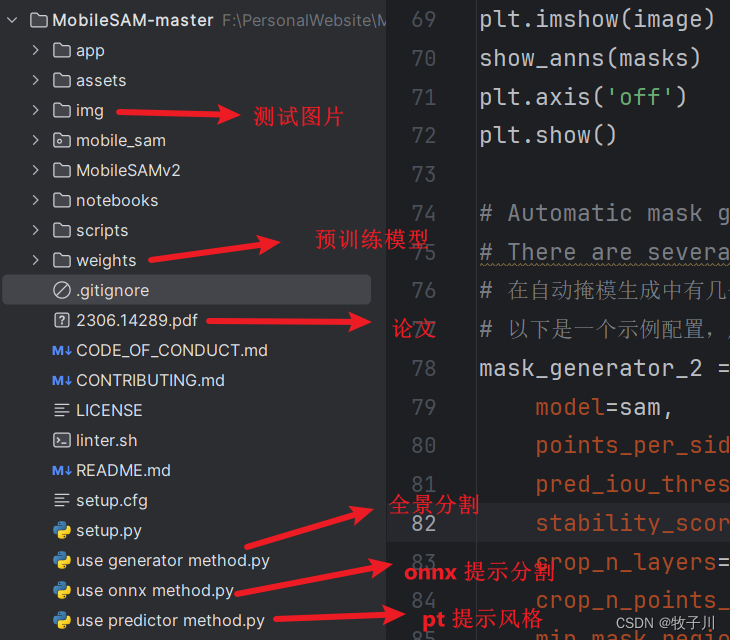
关于MobileSAM模型的相关代码、论文PDF、预训练模型、使用方法等,我都已打包好,供需要的小伙伴交流研究,获取方式如下:
关注公众号,回复:MobileSAM,即可获取MobileSAM相关代码、论文、预训练模型、使用方法示例等
四、链接作者
欢迎关注我的公众号:@AI算法与电子竞赛

硬性的标准其实限制不了无限可能的我们,所以啊!少年们加油吧!