简言
学习canvas如何绘制图片或视频。
绘制图像
给定一个图像,一般使用drawImage()方法绘制。
drawImage 绘制图像
Canvas 2D API 中的 CanvasRenderingContext2D.drawImage() 方法提供了多种在画布(Canvas)上绘制图像的方式。
语法:
指定绘制位置快速绘制:
drawImage(image, dx, dy);
指定绘制位置宽高快速绘制:
drawImage(image, dx, dy, dWidth, dHeight);
指定图像被绘制区域和绘制区域绘制:
drawImage(image, sx, sy, sWidth, sHeight, dx, dy, dWidth, dHeight);
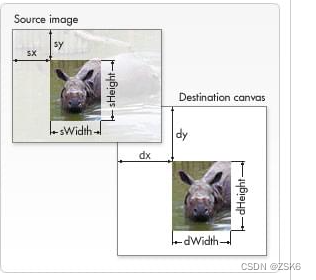
使用方法有三种
参数:
-
image
绘制到上下文的元素。允许任何的画布图像源,例如:HTMLImageElement、SVGImageElement (en-US)、HTMLVideoElement、HTMLCanvasElement、ImageBitmap、OffscreenCanvas 或 VideoFrame (en-US)。 -
sx 可选
需要绘制到目标上下文中的,image 的矩形(裁剪)选择框的左上角 X 轴坐标。可以使用 3 参数或 5 参数语法来省略这个参数。 -
sy 可选
需要绘制到目标上下文中的,image 的矩形(裁剪)选择框的左上角 Y 轴坐标。可以使用 3 参数或 5 参数语法来省略这个参数。 -
sWidth 可选
需要绘制到目标上下文中的,image 的矩形(裁剪)选择框的宽度。如果不说明,整个矩形(裁剪)从坐标的 sx 和 sy 开始,到 image 的右下角结束。可以使用 3 参数或 5 参数语法来省略这个参数。使用负值将翻转这个图像。 -
sHeight 可选
需要绘制到目标上下文中的,image的矩形(裁剪)选择框的高度。使用负值将翻转这个图像。 -
dx
image 的左上角在目标画布上 X 轴坐标。 -
dy
image 的左上角在目标画布上 Y 轴坐标。 -
dWidth
image 在目标画布上绘制的宽度。允许对绘制的 image 进行缩放。如果不说明,在绘制时 image 宽度不会缩放。注意,这个参数不包含在 3 参数语法中。 -
dHeight
image 在目标画布上绘制的高度。允许对绘制的 image 进行缩放。如果不说明,在绘制时 image 高度不会缩放。注意,这个参数不包含在 3 参数语法中。
注意
- 当 drawImage() 需要在 HTMLVideoElement 工作时,仅当 HTMLMediaElement.readyState 大于 1 时 drawImage() 才能正常工作。
- 在绘制,裁剪和/或缩放时,drawImage() 将始终使用源元素的固有尺寸(以 CSS 像素为单位)。
- 在某些旧版本浏览器中,drawImage() 将忽略图像中的所有 EXIF 元数据,包括方向。此行为在 iOS 设备上尤其麻烦。你应该自己检测方向并使用 rotate() 使其正确。
示例
const canvas = document.getElementById("canvas");
const ctx = canvas.getContext("2d");
const image = document.getElementById("source");

image.addEventListener("load", (e) => {
  ctx.drawImage(image, 33, 71, 104, 124, 21, 20, 87, 104);
});
ImageData 绘制图像
获得一个ImageData 对象后,使用putImageData()方法绘制。
可以通过CanvasRenderingContext2D.getImageData()获得一个ImageData 对象,用来描述 canvas 区域隐含的像素数据。
语法:
ImageData ctx.getImageData(sx, sy, sw, sh);
参数:
-
sx
将要被提取的图像数据矩形区域的左上角 x 坐标。 -
sy
将要被提取的图像数据矩形区域的左上角 y 坐标。 -
sw
将要被提取的图像数据矩形区域的宽度。 -
sh
将要被提取的图像数据矩形区域的高度。
getImageData()
CanvasRenderingContext2D.getImageData() 返回一个ImageData对象,用来描述 canvas 区域隐含的像素数据,这个区域通过矩形表示,起始点为*(sx, sy)、宽为sw、高为sh。*
putImageData()
CanvasRenderingContext2D.putImageData() 是 Canvas 2D API 将数据从已有的 ImageData 对象绘制到位图的方法。如果提供了一个绘制过的矩形,则只绘制该矩形的像素。此方法不受画布转换矩阵的影响。
语法:
void ctx.putImageData(imagedata, dx, dy);
void ctx.putImageData(imagedata, dx, dy, dirtyX, dirtyY, dirtyWidth, dirtyHeight);
参数:
-
imageData
ImageData,包含像素值的数组对象。 -
dx
源图像数据在目标画布中的位置偏移量(x 轴方向的偏移量)。 -
dy
源图像数据在目标画布中的位置偏移量(y 轴方向的偏移量)。 -
dirtyX 可选
在源图像数据中,矩形区域左上角的位置。默认是整个图像数据的左上角(x 坐标)。 -
dirtyY 可选
在源图像数据中,矩形区域左上角的位置。默认是整个图像数据的左上角(y 坐标)。 -
dirtyWidth 可选
在源图像数据中,矩形区域的宽度。默认是图像数据的宽度。 -
dirtyHeight 可选
在源图像数据中,矩形区域的高度。默认是图像数据的高度。
示例
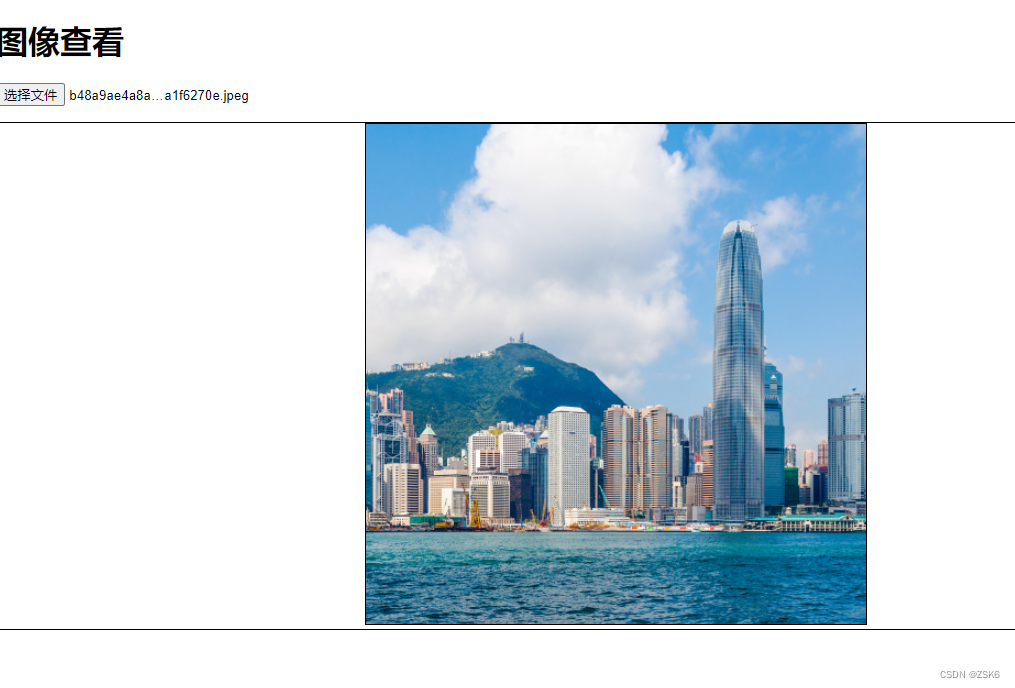
<!DOCTYPE html>
<html lang="en">

<head>
  <meta charset="UTF-8">
  <meta http-equiv="X-UA-Compatible" content="IE=edge">
  <meta name="viewport" content="width=device-width, initial-scale=1.0">
  <title>图像剪辑</title>
  <style>
    html,
    body {
      width: 100vw;
      height: 100%;
      margin: 0;
      padding: 0;
    }

    .box {
      box-sizing: border-box;
      width: 100%;
      height: 100%;
      padding: 24px;
    }

    .box-content {
      margin-top: 16px;
      box-sizing: border-box;
      width: 100%;
      /* height: 500px; */
      /* display: flex; */
      align-items: center;
      text-align: center;
      border: 1px solid #000;
    }

    #origin {
      width: 500px;
      height: 500px;
      border: 1px solid #000;
    }
  </style>
</head>

<body>
  <div class="box">
    <div>
      <h1>图像查看</h1>
      <input type="file" name="file" id="file">

    </div>
    <div class="box-content">
      <canvas id="origin" width="500" height="500">
      </canvas>

    </div>
    <div>
    </div>
  </div>
  <script>
    const file = document.getElementById('file');
    const origin = document.getElementById('origin');
    const ctx = origin.getContext('2d');
    const img = document.createElement('img');
    //  辅助线
    let fx = 0
    let fy = 0
    let showf = false
    //  图片缩放
    let scale = 1 //  图片缩放比例
    let dx = 0 //  图片偏移 x
    let dy = 0//  图片偏移 y
    let dw = origin.width
    let dh = origin.height


    let modify = false

    origin.addEventListener("mousedown", (e) => {
      modify = true
      showf = true
      lastX = e.offsetX
      lastY = e.offsetY
    });
    origin.addEventListener("mousemove", (e) => {
      if (!ctx) return

      let x = e.offsetX
      let y = e.offsetY


      if (modify) {
        fx = x
        fy = y

        dx += (x - lastX)
        dy += (y - lastY)
        lastX = x
        lastY = y
        drawOperatingLine()
      }
    })
    origin.addEventListener('mouseup', (e) => {
      if (modify) {
        modify = false
        showf = false

        drawOperatingLine()

      }
    })
    origin.addEventListener("contextmenu", (e) => {
      e.preventDefault()
      if (img.width > img.height) {
        scale = origin.width / img.width
      } else {
        scale = origin.height / img.height
      }
      dx = (origin.width - scale * img.width) / (origin.width / e.offsetX)
      dy = (origin.height - scale * img.height) / (origin.height / e.offsetY)
      drawOperatingLine()
    })

    origin.addEventListener('wheel', (e) => {
      const { deltaY } = e

      if (deltaY > 0) { // 下滑放大
        scale += 0.1
      } else if (scale > 0.1) { // 上滑缩小
        scale -= 0.1

      }
      dx = (origin.width - scale * img.width) / (origin.width / e.offsetX)
      dy = (origin.height - scale * img.height) / (origin.height / e.offsetY)

      drawOperatingLine()
    })

    file.addEventListener('change', (e) => {
      const file = e.target.files[0];

      const reader = new FileReader();
      reader.readAsDataURL(file);
      reader.onload = (e) => {
        img.src = e.target.result;
        img.onload = () => {
          //  更新图片缩放比例
          if (img.width > img.height) {
            scale = origin.width / img.width
          } else {
            scale = origin.height / img.height
          }
          drawOperatingLine(true)
        }

      }
    })
    //  绘制裁剪控制图像
    function drawOperatingLine(init = false) {

      ctx.clearRect(0, 0, origin.width, origin.height)
      //  绘制图像
      dx = init ? (origin.width - scale * img.width) / 2 : dx  //  图片偏移 x
      dy = init ? (origin.height - scale * img.height) / 2 : dy //  图片偏移 y
      dw = scale * img.width
      dh = scale * img.height
      ctx.drawImage(img, 0, 0, img.width, img.height, dx, dy, dw, dh);

      //  辅助线
      if (showf) {
        ctx.save()
        ctx.beginPath();
        ctx.strokeStyle = 'red'
        ctx.setLineDash([3, 3])
        ctx.moveTo(0, fy);
        ctx.lineTo(origin.width, fy);
        ctx.moveTo(fx, 0);
        ctx.lineTo(fx, origin.height);
        ctx.stroke();
        ctx.restore()
      }

    }


  </script>
</body>

</html>
结语
结束了。


