程序示例精选
Python+Django+Html河道垃圾识别网页系统
如需安装运行环境或远程调试,见文章底部个人QQ名片,由专业技术人员远程协助!
前言
这篇博客针对《Python+Django+Html河道垃圾识别网页系统》编写代码,代码整洁,规则,易读。 学习与应用推荐首选。
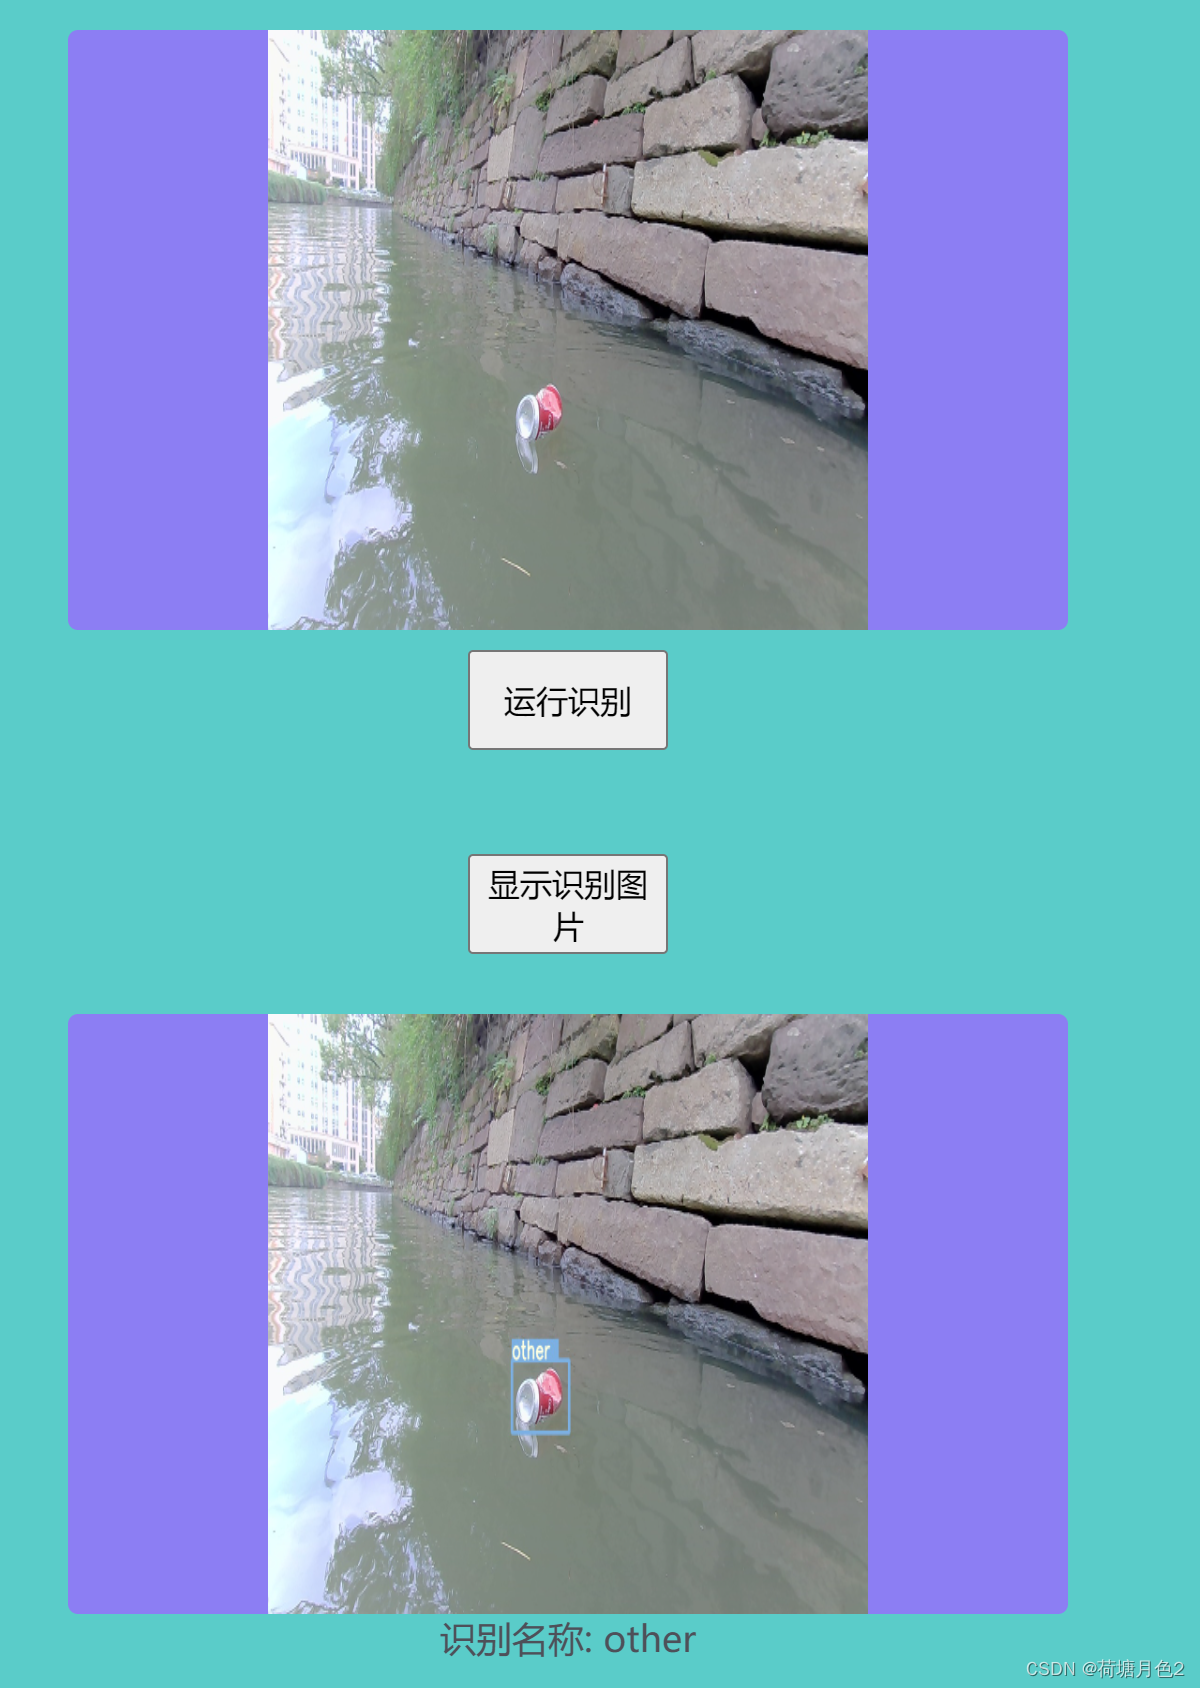
运行结果
文章目录
一、所需工具软件
二、使用步骤
1. 主要代码
2. 运行结果
三、在线协助
一、所需工具软件
1. Python, Pycharm
2. Django
二、使用步骤
代码如下(示例):
def detect(save_img=False):
    source, weights, view_img, save_txt, imgsz = opt.source, opt.weights, opt.view_img, opt.save_txt, opt.img_size
    webcam = source.isnumeric() or source.endswith('.txt') or source.lower().startswith(
        ('rtsp://', 'rtmp://', 'http://'))

    # Directories
    save_dir = Path(increment_path(Path(opt.project) / opt.name, exist_ok=opt.exist_ok))  # increment run
    (save_dir / 'labels' if save_txt else save_dir).mkdir(parents=True, exist_ok=True)  # make dir

    # Initialize
    set_logging()
    device = select_device(opt.device)
    half = device.type != 'cpu'  # half precision only supported on CUDA

    # Load model
    model = attempt_load(weights, map_location=device)  # load FP32 model
    stride = int(model.stride.max())  # model stride
    imgsz = check_img_size(imgsz, s=stride)  # check img_size
    if half:
        model.half()  # to FP16

    # Second-stage classifier
    classify = False
    if classify:
        modelc = load_classifier(name='resnet101', n=2)  # initialize
        modelc.load_state_dict(torch.load('weights/resnet101.pt', map_location=device)['model']).to(device).eval()

    # Set Dataloader
    vid_path, vid_writer = None, None
    if webcam:
        view_img = check_imshow()
        cudnn.benchmark = True  # set True to speed up constant image size inference
        dataset = LoadStreams(source, img_size=imgsz, stride=stride)
    else:
        save_img = True
        dataset = LoadImages(source, img_size=imgsz, stride=stride)

    # Get names and colors
    names = model.module.names if hasattr(model, 'module') else model.names
    colors = [[random.randint(0, 255) for _ in range(3)] for _ in names]

    # Run inference
    if device.type != 'cpu':
        model(torch.zeros(1, 3, imgsz, imgsz).to(device).type_as(next(model.parameters())))  # run once
    t0 = time.time()
    for path, img, im0s, vid_cap in dataset:
        img = torch.from_numpy(img).to(device)
        img = img.half() if half else img.float()  # uint8 to fp16/32
        img /= 255.0  # 0 - 255 to 0.0 - 1.0
        if img.ndimension() == 3:
            img = img.unsqueeze(0)

        # Inference
        t1 = time_synchronized()
        pred = model(img, augment=opt.augment)[0]

        # Apply NMS
        pred = non_max_suppression(pred, opt.conf_thres, opt.iou_thres, classes=opt.classes, agnostic=opt.agnostic_nms)
        t2 = time_synchronized()

        # Apply Classifier
        if classify:
            pred = apply_classifier(pred, modelc, img, im0s)

        # Process detections
        for i, det in enumerate(pred):  # detections per image
            if webcam:  # batch_size >= 1
                p, s, im0, frame = path[i], '%g: ' % i, im0s[i].copy(), dataset.count
            else:
                p, s, im0, frame = path, '', im0s, getattr(dataset, 'frame', 0)

            p = Path(p)  # to Path
            save_path = str(save_dir / p.name)  # img.jpg
            txt_path = str(save_dir / 'labels' / p.stem) + ('' if dataset.mode == 'image' else f'_{frame}')  # img.txt
            s += '%gx%g ' % img.shape[2:]  # print string
            gn = torch.tensor(im0.shape)[[1, 0, 1, 0]]  # normalization gain whwh
            if len(det):
                # Rescale boxes from img_size to im0 size
                det[:, :4] = scale_coords(img.shape[2:], det[:, :4], im0.shape).round()


                # Write results
                for *xyxy, conf, cls in reversed(det):
                    if save_txt:  # Write to file
                        xywh = (xyxy2xywh(torch.tensor(xyxy).view(1, 4)) / gn).view(-1).tolist()  # normalized xywh
                        line = (cls, *xywh, conf) if opt.save_conf else (cls, *xywh)  # label format
                        with open(txt_path + '.txt', 'a') as f:
                            f.write(('%g ' * len(line)).rstrip() % line + '\n')

                    if save_img or view_img:  # Add bbox to image
                        label = f'{names[int(cls)]} {conf:.2f}'
                        plot_one_box(xyxy, im0, label=label, color=colors[int(cls)], line_thickness=3)

            # Print time (inference + NMS)
            print(f'{s}Done. ({t2 - t1:.3f}s)')


            # Save results (image with detections)
            if save_img:
                if dataset.mode == 'image':
                    cv2.imwrite(save_path, im0)
                else:  # 'video'
                    if vid_path != save_path:  # new video
                        vid_path = save_path
                        if isinstance(vid_writer, cv2.VideoWriter):
                            vid_writer.release()  # release previous video writer

                        fourcc = 'mp4v'  # output video codec
                        fps = vid_cap.get(cv2.CAP_PROP_FPS)
                        w = int(vid_cap.get(cv2.CAP_PROP_FRAME_WIDTH))
                        h = int(vid_cap.get(cv2.CAP_PROP_FRAME_HEIGHT))
                        vid_writer = cv2.VideoWriter(save_path, cv2.VideoWriter_fourcc(*fourcc), fps, (w, h))
                    vid_writer.write(im0)

    if save_txt or save_img:
        s = f"\n{len(list(save_dir.glob('labels/*.txt')))} labels saved to {save_dir / 'labels'}" if save_txt else ''
        print(f"Results saved to {save_dir}{s}")

    print(f'Done. ({time.time() - t0:.3f}s)')

    print(opt)
    check_requirements()

    with torch.no_grad():
        if opt.update:  # update all models (to fix SourceChangeWarning)
            for opt.weights in ['yolov5s.pt', 'yolov5m.pt', 'yolov5l.pt', 'yolov5x.pt']:
                detect()
                strip_optimizer(opt.weights)
        else:
            detect()
运行结果

三、在线协助:
如需安装运行环境或远程调试,见文章底部个人 QQ 名片,由专业技术人员远程协助!
1)远程安装运行环境,代码调试
2)Visual Studio, Qt, C++, Python编程语言入门指导
3)界面美化
4)软件制作
5)云服务器申请
6)网站制作
当前文章连接:https://blog.csdn.net/alicema1111/article/details/132666851
个人博客主页:https://blog.csdn.net/alicema1111?type=blog
博主所有文章点这里:https://blog.csdn.net/alicema1111?type=blog
博主推荐:
Python人脸识别考勤打卡系统:
https://blog.csdn.net/alicema1111/article/details/133434445
Python果树水果识别:https://blog.csdn.net/alicema1111/article/details/130862842
Python+Yolov8+Deepsort入口人流量统计:https://blog.csdn.net/alicema1111/article/details/130454430
Python+Qt人脸识别门禁管理系统:https://blog.csdn.net/alicema1111/article/details/130353433
Python+Qt指纹录入识别考勤系统:https://blog.csdn.net/alicema1111/article/details/129338432
Python Yolov5火焰烟雾识别源码分享:https://blog.csdn.net/alicema1111/article/details/128420453
Python+Yolov8路面桥梁墙体裂缝识别:https://blog.csdn.net/alicema1111/article/details/133434445
Python+Yolov5道路障碍物识别:https://blog.csdn.net/alicema1111/article/details/129589741
Python+Yolov5跌倒检测 摔倒检测 人物目标行为 人体特征识别:https://blog.csdn.net/alicema1111/article/details/129272048
