文章目录
- 多流转换
- 1、分流操作
- 1.1、在flink 1.13版本中已弃用.split()进行分流
- 1.2、使用(process function)的侧输出流(side output)进行分流
- 2、基本合流操作
- 2.1、联合(Flink Stream Union)
- 2.2、连接(Flink Stream Connect)
- 2.2.1、连接流(ConnectedStreams)
- 2.2.2、处理函数CoProcessFunction
- 2.2.3、广播连接流(BroadcastConnectedStream)
- 2.3、关于流合并后水位线处理问题
- 3、基于时间的合流——双流联结(Flink Stream Join)
- 3.1、窗口联结(Flink Stream Window Join)
- 3.1.1、简述
- 3.1.2、window join 的流程概览
- 3.1.3、Window Join的处理流程
- 3.1.4、代码示例
- 3.2、间隔联结(Flink Stream Interval Join)
- 3.2.1、简述
- 3.2.1、间隔联结的原理
- 3.2.1、代码示例
- 3.3、窗口同组联结(Flink Stream Window CoGroup)
- 3.3.1、简述
- 3.3.2、代码示例
- 4、总结
多流转换
在生产应用中,会有很多使用多条流进行操作的业务场景,对流进行合流或者分流操作,例如以下场景
- 多样化数据:您可能有多个数据流,每个数据流包含不同的信息,您希望将它们组合起来以创建更完整的画面。例如,您可能有一个客户数据流和另一个购买数据流,您希望将它们组合起来创建一个客户购买数据流。
- 数据过滤和路由:您可能希望根据特定条件将单个数据流拆分为多个流,然后对每个流应用不同的操作。例如,你可能有一个传感器数据流,你想根据传感器的类型将数据路由到不同的流,或者你可能有一个日志数据流,你想根据严重性过滤数据日志。
- 实时分析:您可能有来自不同来源的多个数据流,并且您希望对它们执行实时分析。例如,您可能拥有传感器数据流、社交媒体数据和财务数据,并且希望实时关联它们以识别模式和异常。
- 错误处理:您可能有一个数据流,并且希望在单独的流中处理错误或异常值。例如,您可能有一个股票价格流,您希望在单独的流中检测和处理价格中的任何异常情况,以免它们干扰数据的正常处理。
- 迭代处理:一些算法,如机器学习算法,需要对相同数据进行多次迭代并更新模型。Flink 的迭代流允许执行这种类型的操作。
- 广播变量:有时我们有一个控制流需要应用于所有传入流,广播流允许高效地执行此操作。
具体取决于您的特定要求和您正在使用的数据的性质。了解用例和框架的功能,您可以使用它来构建强大的实时数据处理管道来满足您的需求。
1、分流操作
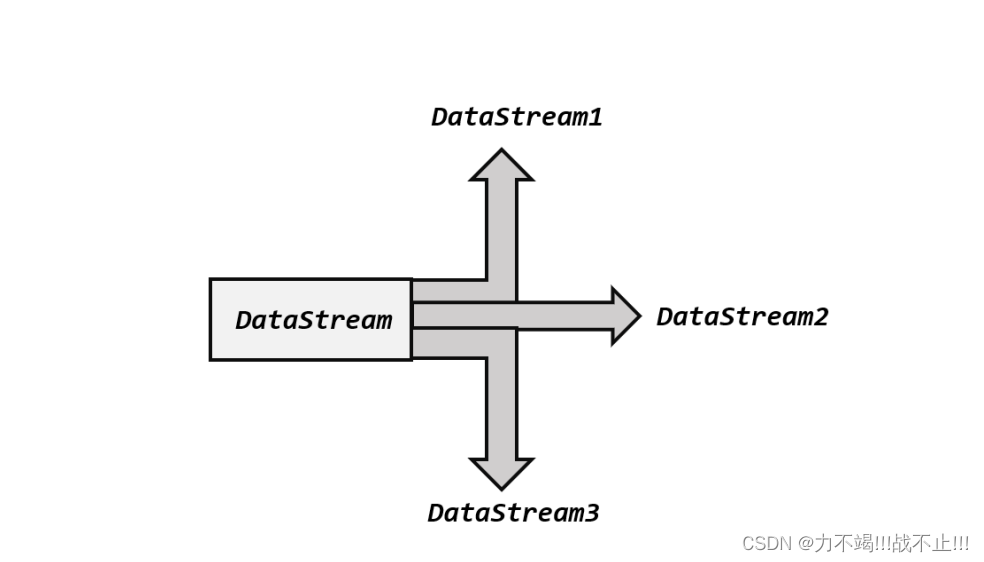
分流操作其实就是将单个流分为多条流,如下图所示,将单条DataStream分为3条DataStream
1.1、在flink 1.13版本中已弃用.split()进行分流
在 Flink 1.13 版本中,已经弃用了.split()方法,取而代之的是直接用处理函数(process function)的侧输出流(side output)。
1.2、使用(process function)的侧输出流(side output)进行分流
public class SlideOutPutTagTest {
    public static void main(String[] args) throws Exception {
        StreamExecutionEnvironment env = StreamExecutionEnvironment.getExecutionEnvironment();
        DataStream<Integer> dataStream = env.fromCollection(
                Arrays.asList(1, 3, 4, 99, 32, 222, 111, 333, 30, 29, 23, 1000, 100, 200, 300)
        );

        // define output tags for side outputs
        OutputTag<Integer> sideOutput1Tag = new OutputTag<Integer>("side-output1"){};
        OutputTag<Integer> sideOutput2Tag = new OutputTag<Integer>("side-output2"){};

        SingleOutputStreamOperator<Integer> main = dataStream
                .process(new ProcessFunction<Integer, Integer>() {
                    @Override
                    public void processElement(Integer value, Context ctx, Collector<Integer> out) throws Exception {
                        //route elements to different side outputs based on conditions
                        if (100 < value&& value < 500) {
                            ctx.output(sideOutput1Tag, value);
                        }
                        else if (value >500){
                            ctx.output(sideOutput2Tag, value);
                        }
                        else {
                            out.collect(value);
                        }
                    }
                });


        //retrieve side output streams
        DataStream<Integer> sideOutput1 = main.getSideOutput(sideOutput1Tag);
        DataStream<Integer> sideOutput2 = main.getSideOutput(sideOutput2Tag);

		//print stream info
        main.print("first stream");
        sideOutput1.print("second stream");
        sideOutput2.print("third stream");

        env.execute();
    }
}
运行结果

2、基本合流操作
2.1、联合(Flink Stream Union)
直接将多条流合在一起,叫作流的“联合”(union),如下图所示。
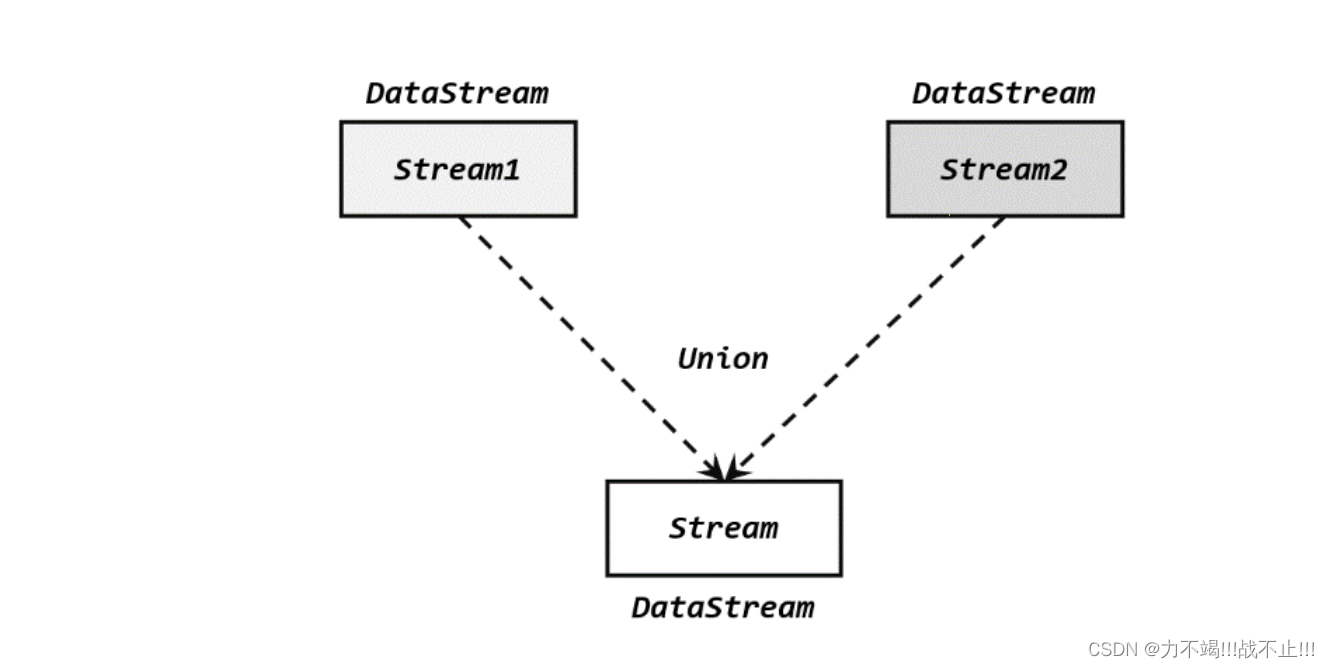
在代码中,我们只要基于 DataStream 直接调用.union()方法,传入其他 DataStream 作为参数,就可以实现流的联合了;得到的依然是一个 DataStream。
stream1.union(stream2, stream3, …)
⚠️注意:union()的参数可以是多个 DataStream,所以联合操作可以实现多条流的合并。
⚠️注意: Union操作可以应用于相同类型的流。这意味着如果您有两个流,stream1和stream2,您想要联合在一起,它们必须具有相同的数据类型。
代码示例
public class UnionExample2 {
    public static void main(String[] args) throws Exception {
        StreamExecutionEnvironment env = StreamExecutionEnvironment.getExecutionEnvironment();

        DataStream<Tuple2<Integer, String>> data1 = env.fromElements(
                new Tuple2<>(1, "first"),
                new Tuple2<>(2, "second"),
                new Tuple2<>(3, "third")
        );

        DataStream<Tuple2<Integer, String>> data2 = env.fromElements(
                new Tuple2<>(4, "fourth"),
                new Tuple2<>(5, "fifth"),
                new Tuple2<>(6, "sixth")
        );

        //多流联结
        DataStream<Tuple2<Integer, String>> unionData = data1.union(data2);

        unionData.map(new MapFunction<Tuple2<Integer, String>, Tuple2<String, String>>() {
            @Override
            public Tuple2<String, String> map(Tuple2<Integer, String> value) throws Exception {
                return new Tuple2<String, String>(value.f0.toString(), value.f1);
            }
        }).print("result");


        env.execute();
    }
}
运行结果

2.2、连接(Flink Stream Connect)
2.2.1、连接流(ConnectedStreams)
ConnectedStreams代表一对连接的流。当您需要以协调的方式将用户定义的函数应用于来自两个不同流的元素时使用它,例如,当您需要根据用户定义的条件连接来自两个流的元素时。
ConnectedStreams是在 a 流上调用connect方法的结果,该方法DataStream将另一个DataStream作为输入并返回一个ConnectedStreams对象。拥有一个ConnectedStreams对象后,您可以使用它来将 CoFlatMapFunction应用于两个连接流中的元素。
CoFlatMapFunction是一种特殊类型的用户定义函数,它接受两个输入流并产生一个输出流。它类似于FlatMapFunction,但它允许您以协调的方式处理来自两个输入流的元素。CoFlatMapFunction接受两个输入元素,一个来自每个连接的流,并产生一个输出元素。
public class ConnectedStreamTest {

    public static void main(String[] args) throws Exception {
        StreamExecutionEnvironment env = StreamExecutionEnvironment.getExecutionEnvironment();
        DataStream<Integer> dataStream1 = env.fromCollection(
                Arrays.asList(1, 3, 4, 99)
        );

        DataStream<Long> dataStream2 = env.fromCollection(
                Arrays.asList(32L, 222L, 111L, 333L)
        );


        ConnectedStreams<Integer, Long> connectedStreams = dataStream1.connect(dataStream2);
        SingleOutputStreamOperator<String> result = connectedStreams.map(
        		//Integer、Long类型流合并,输出String类型流
                new CoMapFunction<Integer, Long, String>() {
                    @Override
                    public String map1(Integer value) {
                        return "Integer: " + value;
                    }

                    @Override
                    public String map2(Long value) {
                        return "Long: " + value;
                    }
                });

        result.print();
        env.execute();
    }
}
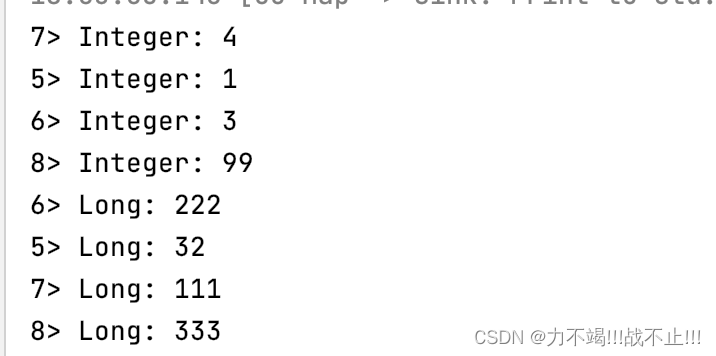
运行结果
2.2.2、处理函数CoProcessFunction
对于连接流 ConnectedStreams 的处理操作,需要分别定义对两条流的处理转换,因此接口中就会有两个相同的方法需要实现,用数字“1”“2”区分,在两条流中的数据到来时分别调
用。我们把这种接口叫作“协同处理函数”(co-process function)。与CoMapFunction 类似,如果是调用.flatMap()就需要传入一个CoFlatMapFunction,需要实现 flatMap1()、flatMap2()两个方法;而调用.process()时,传入的则是一个 CoProcessFunction。
代码示例
下面是一个简单的示例,该示例计算类型输入的String出现次数,并在收到类型输入时递减计数Integer。它使用 aValueState来存储计数并在每次收到输入时更新状态。该函数的输出是一个String表示输入已被看到的次数或输入类型Integer已被处理后的新计数。
import org.apache.flink.api.common.state.ValueState;
import org.apache.flink.api.common.state.ValueStateDescriptor;
import org.apache.flink.configuration.Configuration;
import org.apache.flink.streaming.api.datastream.DataStream;
import org.apache.flink.streaming.api.environment.StreamExecutionEnvironment;
import org.apache.flink.streaming.api.functions.co.CoProcessFunction;
import org.apache.flink.util.Collector;

import java.io.IOException;

public class CoProcessFuctionTest {
    public static void main(String[] args) throws Exception {
        StreamExecutionEnvironment env = StreamExecutionEnvironment.getExecutionEnvironment();

        DataStream<String> input1 = env.fromElements("foo", "bar", "baz");
        DataStream<Integer> input2 = env.fromElements(1, 2, 3);


        DataStream<String> output = input1.connect(input2)
                .keyBy(data -> data, data -> data)
                .process(new ExampleCoProcessFunction());

        output.print("result stream");
        env.execute("MyCoProcessFunction example");
    }

    public static class ExampleCoProcessFunction extends CoProcessFunction<String, Integer, String> {
        private ValueState<Integer> countState;

        @Override
        public void open(Configuration config) {
            countState = getRuntimeContext().getState(new ValueStateDescriptor<>("count", Integer.class));
        }

        @Override
        public void processElement1(String input1, Context ctx, Collector<String> out) throws IOException {
            Integer count = countState.value();
            if (count == null) {
                count = 0;
            }
            countState.update(count + 1);
            out.collect(input1 + " has been seen " + count + " times.");
        }

        @Override
        public void processElement2(Integer input2, Context ctx, Collector<String> out) throws IOException {
            Integer count = countState.value();
            if (count == null) {
                count = 0;
            }
            countState.update(count - 1);
            out.collect("Event of type 2 triggered. Count is now: " + count);
        }
    }

}
运行结果
result stream:3> foo has been seen 1 times.
result stream:8> bar has been seen 1 times.
result stream:10> baz has been seen 1 times.
result stream:10> Event of type 2 triggered. Count is now: 0
result stream:10> baz has been seen 2 times.
result stream:10> Event of type 2 triggered. Count is now: -1
result stream:3> foo has been seen 2 times.
result stream:1> Event of type 2 triggered. Count is now: 0
result stream:7> Event of type 2 triggered. Count is now: 0
result stream:8> bar has been seen 2 times.
result stream:9> Event of type 2 triggered. Count is now: 0
result stream:7> Event of type 2 triggered. Count is now: -1
result stream:9> Event of type 2 triggered. Count is now: -1
2.2.3、广播连接流(BroadcastConnectedStream)
BroadcastConnectedStream一种特殊类型的连接流,它允许您将边输入广播到数据流的所有任务。
BroadcastConnectedStream是通过broadcast在数据流上调用方法并将 BroadcastStream作为第二个输入传递给该connect方法来创建的。然后由BroadcastConnectedStream处理,BroadcastProcessFunction它允许您以只读模式访问辅助输入,这样您就可以使用广播数据的上下文来处理主输入流。
BroadcastConnectedStream是 Flink 中一个强大的特性,它允许你在一个数据流的所有任务之间共享大数据集和大状态,这样每个任务就不必保留自己的数据副本。这可以显着减少作业的内存开销并提高性能。
重要的是要注意,BroadcastConnectedStreams 不适合侧输入频繁变化的流式用例,因为广播数据不会随着侧输入更新而更新。
关于BroadcastConnectedStream的应用放到后面的文章中进行详解,因为这涉及到Flink 中的状态。
🍊下面只是一个很简单的示例,帮助你提前了解一下BroadcastConnectedStream.
import org.apache.flink.api.common.state.MapStateDescriptor;
import org.apache.flink.streaming.api.datastream.BroadcastStream;
import org.apache.flink.streaming.api.datastream.DataStream;
import org.apache.flink.streaming.api.environment.StreamExecutionEnvironment;
import org.apache.flink.streaming.api.functions.co.BroadcastProcessFunction;
import org.apache.flink.util.Collector;

public class BroadcastProcessFunctionTest {
    public static void main(String[] args) throws Exception {

        StreamExecutionEnvironment env = StreamExecutionEnvironment.getExecutionEnvironment();

        DataStream<String> input1 = env.fromElements("foo", "bar", "baz");
        DataStream<String> input2 = env.fromElements("Hello", "world!");

        BroadcastStream<String> broadcastStream = input2.broadcast(new MapStateDescriptor<>("side-input", String.class, String.class));

        DataStream<String> output = input1.connect(broadcastStream)
                .process(new ExampleBroadcastProcessFunction());

        output.print("result stream");

        env.execute();
    }


    public static class ExampleBroadcastProcessFunction extends BroadcastProcessFunction<String, String, String> {

		//处理广播数据流元素
        @Override
        public void processBroadcastElement(String sideInput, Context ctx, Collector<String> out) {
            out.collect(sideInput);
        }

		//处理普通数据流元素
        @Override
        public void processElement(String input, ReadOnlyContext ctx, Collector<String> out) throws Exception {
            out.collect(input + " " + "do nothing");
        }
    }

}
运行结果
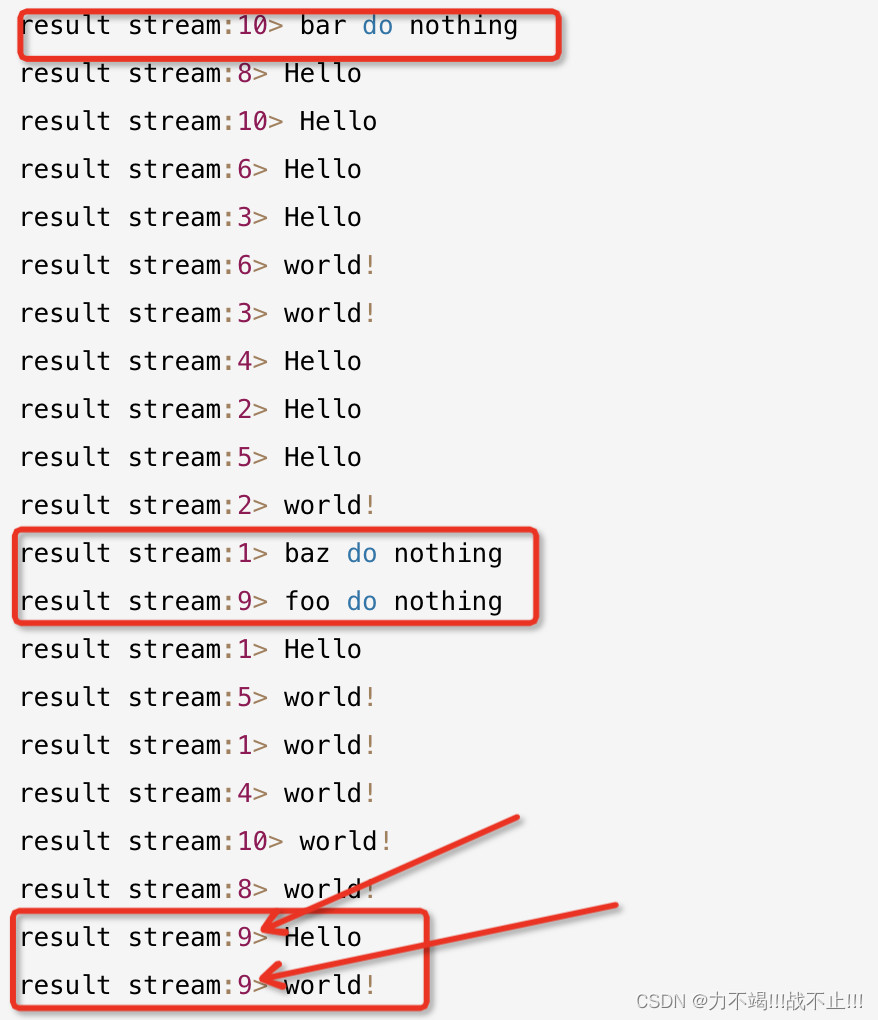
🍊由上面输出可以看出,广播流可以将元素通知到下游的所有task任务中,Hello和World!在每一个分区中都进行了广播
2.3、关于流合并后水位线处理问题
union在 Apache Flink 中使用合并两个流的操作时,水位线处理会变得更加复杂。水位线是一个时间戳,指示系统将不再处理具有更早时间戳的事件。在流中,水位线用于确定何时可以处理事件窗口以及何时可以清除状态。
当在合并两个流时,结果流的水位线是两个输入流的水位线中的最小值。这意味着如果其中一个输入流的水位线明显落后于另一个流,它可以阻止联合流的水位线并延迟窗口的处理和状态的清除。
由于 Flink 会在流的开始处,插入一个负无穷大(Long.MIN_VALUE)的水位线,所以合流后的 ProcessFunction 对应的处理任务,会为合并的每条流保存一个“分区水位线”,初始值都是 Long.MIN_VALUE;而此时算子任务的水位线是所有分区水位线的最小值,因此也是Long.MIN_VALUE。如下图所示

当后续两条流的水位线变化时,当前合并后的流的算子水位是两个输入流的水印中的最小值,如下图所示

通过这样做,两个流将具有一致的时间戳,因此联合流将具有一致的水印。还值得一提的是,还可以在union 之后执行keyBy,window等操作,但这取决于业务需求。
在 Flink 中合并流时,有多种方法可以处理水位线,具体取决于数据的特征和应用程序的要求。可能会考虑的一些策略包括:
- 在合并之前将水印单独分配给输入流:正如我在之前的回答中提到的,您可以使用
assignTimestampsAndWatermarks转换函数在合并输入流之前手动将水印分配给输入流。这有助于确保两个输入流具有一致的水印,从而提高联合流的性能。 - 使用考虑两个输入流的自定义水印生成器:您可以创建一个自定义水印生成器,它考虑两个输入流的水印并生成适合联合流的水印。例如,您可以创建一个水印生成器,它采用两个输入流的最小水印,或两个流的最大水印。
- 使用 Flink 的内置函数
MergingWatermarkAssigner:Flink 有一个内置MergingWatermarkAssigner函数,可以用来合并多个输入流的水印。它使用所有输入流的最小水印。 - 增加允许迟到的时间:也可以在处理窗口时增加允许迟到的时间,这有助于确保迟到的元素仍然被正确处理。当其他水印处理策略效果不佳时,可以将此方法用作最后的手段。
这些只是一些示例,在实践中,您应该根据数据的特征和应用程序的要求组合使用这些技术。
3、基于时间的合流——双流联结(Flink Stream Join)
3.1、窗口联结(Flink Stream Window Join)
3.1.1、简述
Flink 为这种场景专门提供了一个窗口联结(window join)算子,可以定义时间窗口,并将两条流中共享一个公共键(key)的数据放在窗口中进行配对处理。
窗口联结在代码中的实现,首先需要调用 DataStream 的.join()方法来合并两条流,得到一个 JoinedStreams;接着通过.where()和.equalTo()方法指定两条流中联结的 key;然后通过.window()开窗口,并调用.apply()传入联结窗口函数进行处理计算。通用调用形式如下:
stream1.join(stream2)
	   .where(<KeySelector>)
	   .equalTo(<KeySelector>)
	   .window(<WindowAssigner>)
	   .apply(<JoinFunction>)
- .where()的参数是键选择器(KeySelector),用来指定第一条流中的key; 而.equalTo()传入的 KeySelector 则指定了第二条流中的 key。两者相同的元素,如果在同一窗口中,就可以匹配起来,并通过一个“联结函数”(JoinFunction)进行处理了。
- .window()传入的就是窗口分配器,之前讲到的三种时间窗口都可以用在这里:滚动窗口(tumbling window)、滑动窗口(sliding window)和会话窗口(session window)。
- .apply()可以看作实现了一个特殊的窗口函数。注意这里只能调用.apply(),没有其他替代的方法。
- 传入的 JoinFunction 也是一个函数类接口,使用时需要实现内部的.join()方法。这个方法有两个参数,分别表示两条流中成对匹配的数据。JoinFunction 在源码中的定义如下:
 public interface JoinFunction<IN1, IN2, OUT> extends Function, Serializable {
  	OUT join(IN1 first, IN2 second) throws Exception;
  }
3.1.2、window join 的流程概览
- 定义输入流:第一步是定义要对其执行窗口连接的两个输入流。
- 定义窗口:接下来,您将定义执行连接操作的窗口。这可以使用 Flink 提供的窗口函数之一来完成,例如
TumblingEventTimeWindows、SlidingEventTimeWindows等。 - 定义键选择器:为了匹配同一窗口中的元素,您需要为两个流中的元素定义键选择器。键选择器用于从元素中提取键,然后用于匹配同一窗口中的元素。
- 执行连接:定义输入流、窗口和键选择器后,您可以通过调用
join其中一个输入流的方法并将另一个输入流作为参数传递来执行连接操作。 - 应用连接函数:然后您将定义一个连接函数,该函数应用于来自两个输入流的每对匹配元素。连接函数应采用两个参数(每个流中的一个元素)并返回一个表示连接结果的新元素。
- 获取输出流:最后,在使用定义的窗口和连接函数处理输入流后,您可以访问包含连接元素的输出流。
⚠️值得注意的是,窗口连接是一个阻塞操作,在对大型数据集进行窗口化时计算量很大。因此,推荐使用小窗口大并行的window join来优化性能。
3.1.3、Window Join的处理流程
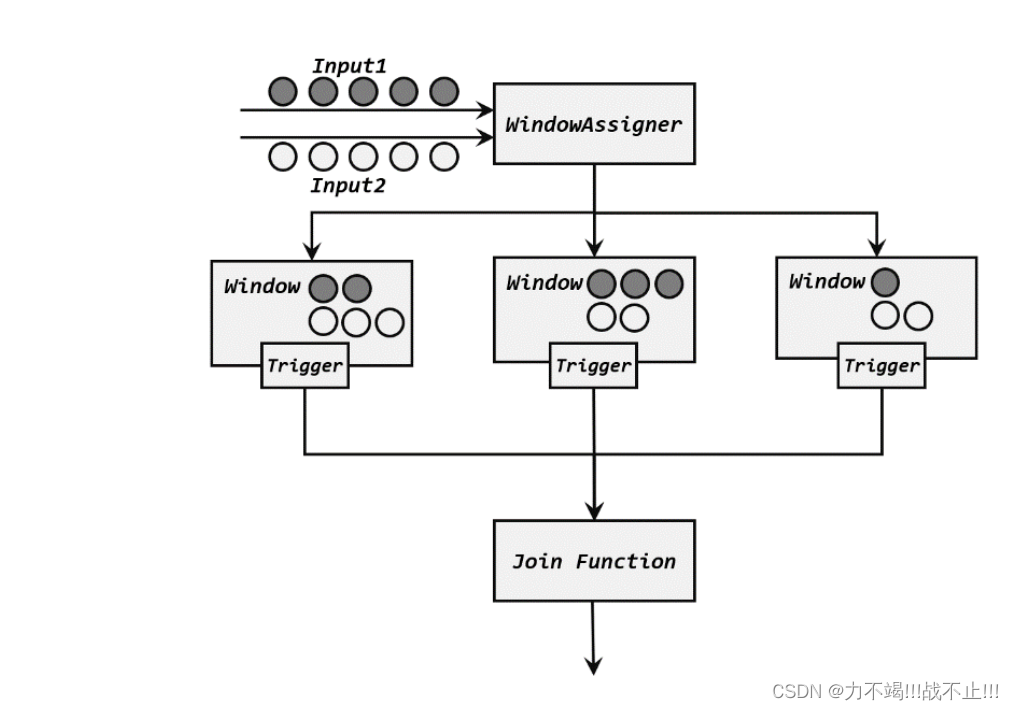
两条流的数据到来之后,首先会按照 key 分组、进入对应的窗口中存储;当到达窗口结束时间时,算子会先统计出窗口内两条流的数据的所有组合,也就是对两条流中的数据做一个笛卡尔积(相当于表的交叉连接,cross join),然后进行遍历,把每一对匹配的数据,作为参数(first,second)传入 JoinFunction 的.join()方法进行计算处理,得到的结果直接输出如下图所示。所以窗口中每有一对数据成功联匹配,JoinFunction 的.join()方法就会被调用一次,并输出一个结果。
其实仔细观察可以发现,窗口 join 的调用语法和我们熟悉的 SQL 中表的 join 非常相似,将每条流当作一张表,键选择器当作join的条件:
SELECT * FROM table1 t1, table2 t2 WHERE t1.id = t2.id;
3.1.4、代码示例
下面是一个订单和用户的流数据进行join,得到一个整合数据流
import lombok.AllArgsConstructor;
import lombok.Data;
import org.apache.flink.api.common.eventtime.SerializableTimestampAssigner;
import org.apache.flink.api.common.eventtime.WatermarkStrategy;
import org.apache.flink.api.common.functions.JoinFunction;
import org.apache.flink.api.java.functions.KeySelector;
import org.apache.flink.api.java.tuple.Tuple2;
import org.apache.flink.streaming.api.datastream.DataStream;
import org.apache.flink.streaming.api.environment.StreamExecutionEnvironment;
import org.apache.flink.streaming.api.windowing.assigners.TumblingEventTimeWindows;
import org.apache.flink.streaming.api.windowing.time.Time;

import java.util.Arrays;
import java.util.List;

public class WindowJoinTest {
    public static void main(String[] args) throws Exception {
        StreamExecutionEnvironment env = StreamExecutionEnvironment.getExecutionEnvironment();

        // create the order stream
        List<OrderInfo> orderList = Arrays.asList(
                new OrderInfo("1", "apple", 2, "user1"),
                new OrderInfo("2", "book", 3, "user2"),
                new OrderInfo("3", "monitor", 4, "user3"),
                new OrderInfo("4", "monitor", 1, "user4")
        );
        DataStream<OrderInfo> orderStream = env.fromCollection(orderList)
                .assignTimestampsAndWatermarks(
                        WatermarkStrategy.forMonotonousTimestamps()
                                .withTimestampAssigner(new SerializableTimestampAssigner() {
                                    @Override
                                    public long extractTimestamp(Object o, long l) {
                                        return System.currentTimeMillis();
                                    }
                                })
                );

        // create the user stream
        List<UserInfo> userList = Arrays.asList(
                new UserInfo("user1", "John Doe", "123-456-7890"),
                new UserInfo("user2", "Jane Smith", "234-567-8901"),
                new UserInfo("user3", "Bob Johnson", "345-678-9012")
        );
        DataStream<UserInfo> userStream = env.fromCollection(userList)
                .assignTimestampsAndWatermarks(
                        //定义水位线生成策略
                        WatermarkStrategy.forMonotonousTimestamps()
                                .withTimestampAssigner(new SerializableTimestampAssigner() {
                                    @Override
                                    public long extractTimestamp(Object o, long l) {
                                        //使用系统时间戳来充当水位线
                                        return System.currentTimeMillis();
                                    }
                                })
                );

        DataStream<CombinationInfo> combinationInfoDataStream = orderStream
                .join(userStream)
                .where(new KeySelector<OrderInfo, String>() {
                    @Override
                    public String getKey(OrderInfo order) {
                        return order.getUserId();
                    }
                })
                .equalTo(new KeySelector<UserInfo, String>() {
                    @Override
                    public String getKey(UserInfo user) {
                        return user.getUserId();
                    }
                })
                //定义窗口
                .window(TumblingEventTimeWindows.of(Time.seconds(5)))
                //两条数据流join数据返回一条数据流(OrderInfo + UserInfo => CombinationInfo)
                .apply(new JoinFunction<OrderInfo, UserInfo, CombinationInfo>() {
                    @Override
                    public CombinationInfo join(OrderInfo order, UserInfo user) {
                        CombinationInfo combinationInfo = new CombinationInfo();
                        combinationInfo.setOrderId(order.getOrderId());
                        combinationInfo.setProduct(order.getProduct());
                        combinationInfo.setCount(order.getCount());
                        combinationInfo.setUserId(order.getUserId());
                        combinationInfo.setName(user.getName());
                        combinationInfo.setPhone(user.getPhone());
                        return combinationInfo;
                    }
                });

        combinationInfoDataStream.print("combinationInfoDataStream");

        env.execute();
    }

    @Data
    public static class CombinationInfo {
        //订单id
        private String orderId;
        //下单产品
        private String product;
        //下单数量
        private int count;
        //用户id
        private String userId;
        //用户中文名称
        private String name;
        //用户手机号
        private String phone;

    }


    @Data
    @AllArgsConstructor
    public static class OrderInfo {
        //订单id
        private String orderId;
        //下单产品
        private String product;
        //下单数量
        private int count;
        //用户id
        private String userId;

        // ...
    }

    @Data
    @AllArgsConstructor
    public static class UserInfo {
        //用户id
        private String userId;
        //用户中文名称
        private String name;
        //用户手机号
        private String phone;

        // ...
    }

}
运行结果

从上面的运行结果来看,只有两条流中数据按 key 配对成功的那些;如果某个窗口中一条流的数据没有任何另一条流的数据匹配,那么就不会调用JoinFunction 的.join()方法,也就没有任何输出了。
3.2、间隔联结(Flink Stream Interval Join)
3.2.1、简述
在 Apache Flink 中, Interval Join是一种基于元素的时间戳应用于两个流的连接操作。间隔连接根据用户定义的间隔组合来自两个流的元素,并将用户定义的函数应用于每对匹配元素。
间隔连接类似于窗口连接,但它不是使用预定义的窗口,而是使用用户定义的间隔来匹配来自两个输入流的元素。
可以使用IntervalJoin运算符执行间隔连接,它允许您指定间隔和连接函数。
在有些场景下,我们要处理的时间间隔可能并不是固定的。比如,在交易系统中,需要实时地对每一笔交易进行核验,保证两个账户转入转出数额相等,也就是所谓的“实时对账”。两次转账的数据可能写入了不同的日志流,它们的时间戳应该相差不大,所以我们可以考虑只统计一段时间内是否有出账入账的数据匹配。这时显然不应该用滚动窗口或滑动窗口来处理— —因为匹配的两个数据有可能刚好“卡在”窗口边缘两侧,于是窗口内就都没有匹配了;会话窗口虽然时间不固定,但也明显不适合这个场景。 基于时间的窗口联结已经无能为力了。
为了应对这样的需求,Flink 提供了一种叫作“间隔联结”(interval join)的合流操作。顾名思义,间隔联结的思路就是针对一条流的每个数据,开辟出其时间戳前后的一段时间间隔,看这期间是否有来自另一条流的数据匹配。
间隔联结在代码中,是基于 KeyedStream 的联结(join)操作。DataStream 在 keyBy 得到KeyedStream 之后,可以调用.intervalJoin()来合并两条流,传入的参数同样是一个 KeyedStream,两者的 key 类型应该一致;得到的是一个 IntervalJoin 类型。后续的操作同样是完全固定的:先通过.between()方法指定间隔的上下界,再调用.process()方法,定义对匹配数据对的处理操作。调用.process()需要传入一个处理函数,这是处理函数家族的最后一员:“处理联结函数”ProcessJoinFunction。
通用调用形式如下:
stream1
	.keyBy(<KeySelector>)
	.intervalJoin(stream2.keyBy(<KeySelector>))
	.between(Time.milliseconds(-2), Time.milliseconds(1))
	.process (new ProcessJoinFunction<Integer, Integer, String(){
	@Override
	public void processElement(Integer left, Integer right, Context ctx,
	Collector<String> out) {
	out.collect(left + "," + right);
	}
});
3.2.1、间隔联结的原理
间隔联结具体的定义方式是,我们给定两个时间点,分别叫作间隔的“上界”(upperBound)和“下界”(lowerBound);于是对于一条流(不妨叫作 A)中的任意一个数据元素 a,就可以开辟一段时间间隔:[a.timestamp + lowerBound, a.timestamp + upperBound],即以 a 的时间戳为中心,下至下界点、上至上界点的一个闭区间:我们就把这段时间作为可以匹配另一条流数据的“窗口”范围。所以对于另一条流(不妨叫 B)中的数据元素 b,如果它的时间戳落在了这个区间范围内,a 和 b 就可以成功配对,进而进行计算输出结果。所以匹配的条件为:a.timestamp + lowerBound <= b.timestamp <= a.timestamp + upperBound这里需要注意,做间隔联结的两条流 A 和 B,也必须基于相同的 key;下界 lowerBound应该小于等于上界 upperBound,两者都可正可负;间隔联结目前只支持事件时间语义。
如图所示,我们可以清楚地看到间隔联结的方式:

Interval Join 背后的主要思想是匹配来自两个输入流的元素,这些元素的时间戳差异落在指定的间隔内。两个输入流的元素之间的时间戳差异是通过从第二个流的元素的时间戳中减去第一个流的元素的时间戳来计算的。
Interval Join 分两个阶段执行。首先,输入流根据它们的时间戳进行分区,以便将所有具有相似时间戳的元素一起处理。然后,通过比较分区内元素的时间戳来执行连接。对于第一个流中的每个元素,第二个流中落在指定区间内的元素将被识别,并将连接函数应用于每对匹配元素。
例如,以下代码执行间隔连接,其中时间间隔定义为 5 秒。
DataStream<EventA> streamA = ...;
DataStream<EventB> streamB = ...;

DataStream<MyOutput> output = streamA
    .intervalJoin(streamB)
    .between(Time.seconds(-5), Time.seconds(5))
    .process(new MyJoinFunction());
这段代码告诉 Flink 从 streaA 中获取所有元素,并为它们中的每一个匹配来自 streamB 的所有元素,这些元素在 streamA 的当前事件 -5s 和 streaA 的当前事件 +5s 之间的间隔中,然后将 join 函数应用于每个匹配。
3.2.1、代码示例
import lombok.AllArgsConstructor;
import lombok.Data;
import org.apache.flink.api.common.eventtime.SerializableTimestampAssigner;
import org.apache.flink.api.common.eventtime.WatermarkStrategy;
import org.apache.flink.api.common.functions.JoinFunction;
import org.apache.flink.api.java.tuple.Tuple3;
import org.apache.flink.streaming.api.datastream.DataStream;
import org.apache.flink.streaming.api.environment.StreamExecutionEnvironment;
import org.apache.flink.streaming.api.functions.co.ProcessJoinFunction;
import org.apache.flink.streaming.api.windowing.time.Time;
import org.apache.flink.util.Collector;

import java.util.Arrays;

public class IntervalJoinTest {
    public static void main(String[] args) throws Exception {
        StreamExecutionEnvironment env = StreamExecutionEnvironment.getExecutionEnvironment();

        DataStream<AEvent> streamA = env.fromCollection(Arrays.asList(
                new AEvent(100L, "A1"),
                new AEvent(2000L, "A2"),
                new AEvent(3000L, "A3"),
                new AEvent(10000L, "A4"),
                new AEvent(500L, "A5")
        )).assignTimestampsAndWatermarks(
                //定义水位线生成策略
                WatermarkStrategy.<AEvent>forMonotonousTimestamps()
                        .withTimestampAssigner(new SerializableTimestampAssigner<AEvent>() {

                            @Override
                            public long extractTimestamp(AEvent aEvent, long l) {
                                return aEvent.getTimestamp();
                            }
                        })
        );

        DataStream<BEvent> streamB = env.fromCollection(Arrays.asList(
                new BEvent(1000L, "A1", "data1"),
                new BEvent(2000L, "A2", "data2"),
                new BEvent(3000L, "B3", "data3"),
                new BEvent(16000L, "A4", "data4"),
                new BEvent(7000L, "B5", "data5")
        )).assignTimestampsAndWatermarks(
                //定义水位线生成策略
                WatermarkStrategy.<BEvent>forMonotonousTimestamps()
                        .withTimestampAssigner(new SerializableTimestampAssigner<BEvent>() {

                            @Override
                            public long extractTimestamp(BEvent bEvent, long l) {
                                return bEvent.getTimestamp();
                            }
                        })
        );

        DataStream<Tuple3<String, String, String>> joined = (DataStream<Tuple3<String, String, String>>) streamA
                .keyBy(AEvent::getId) //连接条件
                .intervalJoin(
                        streamB.keyBy(BEvent::getId) //连接条件
                )
                .between(Time.seconds(-5), Time.seconds(5))
                .upperBoundExclusive()
                .lowerBoundExclusive()
                .process(new MyJoinFunction());

        joined.print("Interval Join result");
        env.execute("Interval Join Example");
    }

    @Data
    @AllArgsConstructor
    static class AEvent {
        public long timestamp;
        public String id;
        //constructors, getters and setters...
    }

    @Data
    @AllArgsConstructor
    static class BEvent {
        public long timestamp;
        public String id;
        public String data;
        //constructors, getters and setters...
    }

    static class MyJoinFunction extends ProcessJoinFunction<AEvent, BEvent, Tuple3<String, String, String>> {

        @Override
        public void processElement(AEvent aEvent, BEvent bEvent, Context context, Collector<Tuple3<String, String, String>> collector) throws Exception {
            collector.collect(new Tuple3<>(aEvent.id, bEvent.id, bEvent.data));
        }
    }

}
运行结果

从上述运行结果来看,id为A4的数据并没有命中,原因是streamA流id为A4的时间是10s,streamB流id为A4的时间是16s,已经超过了5s的间隔时间
3.3、窗口同组联结(Flink Stream Window CoGroup)
3.3.1、简述
window co-group operation 是一种将两个流中的元素按 key 和 window 分组的操作。它类似于窗口连接,但不是连接元素,而是将它们组合在一起并将用户定义的函数应用于元素组。
它的用法跟 window join 非常类似,也是将两条流合并之后开窗处理匹配的元素,调用时只需要将.join()换为.coGroup()就可以了。
stream1.coGroup(stream2)
	   .where(<KeySelector>)
	   .equalTo(<KeySelector>)
	   .window(TumblingEventTimeWindows.of(Time.hours(1)))
	   .apply(<CoGroupFunction>)
与 window join 的区别在于,调用.apply()方法定义具体操作时,传入的是一个CoGroupFunction。这也是一个函数类接口,源码中定义如下:
public interface CoGroupFunction<IN1, IN2, O> extends Function, Serializable {
	void coGroup(Iterable<IN1> first, Iterable<IN2> second, Collector<O> out)
throws Exception;
}
coGroup 操作比窗口的 join 更加通用,不仅可以实现类似 SQL 中的“内连接”(inner join),也可以实现左外连接(left outer join)、右外连接(right outer join)和全外连接(full outer join)。事实上,窗口 join 的底层,也是通过 coGroup 来实现的。
3.3.2、代码示例
import org.apache.flink.api.common.eventtime.SerializableTimestampAssigner;
import org.apache.flink.api.common.eventtime.WatermarkStrategy;
import org.apache.flink.api.common.functions.CoGroupFunction;
import org.apache.flink.api.java.tuple.Tuple2;
import org.apache.flink.streaming.api.datastream.DataStream;
import org.apache.flink.streaming.api.environment.StreamExecutionEnvironment;
import org.apache.flink.streaming.api.windowing.assigners.TumblingEventTimeWindows;
import org.apache.flink.streaming.api.windowing.time.Time;
import org.apache.flink.util.Collector;

public class CoGroupTest {
    public static void main(String[] args) throws Exception {
        StreamExecutionEnvironment env = StreamExecutionEnvironment.getExecutionEnvironment();

        env.setParallelism(1);
        DataStream<Tuple2<String, Long>> stream1 = env
                .fromElements(
                        Tuple2.of("a", 1000L),
                        Tuple2.of("b", 1000L),
                        Tuple2.of("a", 2000L),
                        Tuple2.of("b", 2000L)
                ).assignTimestampsAndWatermarks(
                        WatermarkStrategy
                                .<Tuple2<String, Long>>forMonotonousTimestamps()
                                .withTimestampAssigner(
                                        new SerializableTimestampAssigner<Tuple2<String, Long>>() {
                                            @Override
                                            public long extractTimestamp(Tuple2<String,
                                                    Long> stringLongTuple2, long l) {
                                                return stringLongTuple2.f1;
                                            }
                                        })
                );
        DataStream<Tuple2<String, Long>> stream2 = env
                .fromElements(
                        Tuple2.of("a", 3000L),
                        Tuple2.of("b", 3000L),
                        Tuple2.of("a", 4000L),
                        Tuple2.of("b", 4000L)
                ).assignTimestampsAndWatermarks(
                        WatermarkStrategy.<Tuple2<String, Long>>forMonotonousTimestamps()
                                .withTimestampAssigner(
                                        new SerializableTimestampAssigner<Tuple2<String, Long>>() {
                                            @Override
                                            public long extractTimestamp(Tuple2<String,
                                                    Long> stringLongTuple2, long l) {
                                                return stringLongTuple2.f1;
                                            }
                                        })
                );

        stream1
                .coGroup(stream2)
                .where(r -> r.f0)
                .equalTo(r -> r.f0)
                .window(TumblingEventTimeWindows.of(Time.seconds(5)))
                .apply(new CoGroupFunction<Tuple2<String, Long>, Tuple2<String, Long>, String>() {
                    @Override
                    public void coGroup(Iterable<Tuple2<String, Long>> iter1,
                                        Iterable<Tuple2<String, Long>> iter2,
                                        Collector<String> collector) throws Exception {
                        collector.collect(iter1 + "=>" + iter2);
                    }
                })
                .print("coGroup result");
        env.execute();
    }
}
运行结果

4、总结
union,connect、 和join是可用于组合多个流的不同操作。
union:该union操作用于将多个流合并为一个流。它只是将一个流的元素附加到另一个流。输入流中的元素不会以任何方式组合或修改。union当您有多个具有相同类型元素的流并且您希望将它们作为一个流一起处理时,这很有用。connect: 该connect操作用于组合两个流并使用自定义CoProcessFunction.CoProcessFunction允许您定义如何根据类型处理来自两个输入流的元素。connect当您希望根据元素的类型对来自不同输入流的元素执行不同的操作时,该操作很有用。join:该join操作用于根据键和窗口组合来自两个流的元素。输入流中的元素根据用户定义的连接函数进行匹配并组合成新元素。join当您有两个具有相关数据的流并且您希望基于公共键组合它们和/或在时间窗口中执行操作时,此方法很有用。
就使用哪种操作而言,它实际上取决于具体用例你要实现的目标。以下是一些一般准则:
union当您想要将多个流与相同类型的元素组合在一起并将它们作为单个流处理时,这是最好的。connect当您有两个具有不同类型元素的流并且您希望根据它们的类型以不同方式处理它们时,这是最好的。join当您有两个具有相关数据的流并且您希望基于公共键和/或时间窗口组合它们时,这是最好的。
⚠️需要注意的是,在性能方面,如果流很大,join计算量可能很大,尤其是在对大型数据集进行窗口化时。建议使用小窗口大小和大并行度的连接来优化性能。

