ESP32 ECO3 及以上版本 的芯片支持 Secure Boot V1 和 Secure Boot V2。使用 ESP32 ECO3 版本的芯片推荐使用 Secure Boot V2, 此篇文档记录基于 ESP32 ECO3 芯片通过 Flash 下载工具开启 Secure Boot V2 的实现。
支持 Secure Boot V2 的产品如下:
| 芯片型号 | Secure Boot 版本 |
|---|---|
| ESP32 ECO3 及以上版本 | Secure Boot V1 & Secure Boot V2 ( RSA-PSS) |
| ESP32-S2 所有版本 | Secure Boot V2 ( RSA-PSS) |
| ESP32-S3 所有版本 | Secure Boot V2 ( RSA-PSS) |
| ESP32-C2 所有版本 | Secure Boot V2 ( ECDSA) |
| ESP32-C3 ECO3 及以上版本 | Secure Boot V2 ( RSA-PSS) |
| ESP32-C6 所有版本 | Secure Boot V2 (RSA-PSS or ECDSA) |
| ESP32-H2 所有版本 | Secure Boot V2 (RSA-PSS or ECDSA) |
Secure Boot V2 概述
基于 ESP32 ECO3 芯片开启Secure Boot V2 功能要求用户自行添加用于 Secure Boot V2 签名的私钥,且 ESP32 Secure Boot V2 需要使用 rsa3072 类型的私钥 Key。
用户可以通过如下方式生成用于 Secure Boot V2 签名的私钥 Key
- 通过 esptool 工具,运行如下指令生成 Secure Boot V2 签名的
私钥key
espsecure.py generate_signing_key secure_boot_signing_key.pem --version 2 --scheme rsa3072
secure_boot_signing_key.pem为生成的(自定义名称)的 key file 文件--version 2为选择secure boot V2版本--scheme rsa3072指定 Key 的类型

- 也可以安装 OpenSSL 环境,运行如下指令生成 RSA 3072 类型的指定 secure boot V2 签名的私钥 key
openssl genrsa -out my_secure_boot_signing_key.pem 3072

使用 Secure Boot V2 私钥 Key 给固件进行签名时,会基于 Secure Boot V2 的私钥 Key 生成 公钥和公钥的摘要。
公钥和公钥的摘要会保存在签名块中,签名块写在bootloader.bin和app.bin的固件的末尾,即 Secure Boot V2 仅对bootloader.bin和app.bin的固件进行签名。- Secure Boot V2 功能开启后,在固件启动时,会检查 二级引导程序(
bootloader.bin)是否被签名,然后被签名的二级引导程序(bootloader.bin)将用来验证被签名的app.bin, 验证通过,则固件会正常启动。
如果您正在使用 ESP32 ECO3 版本的芯片,并且希望开启 Secure Boot V2 的功能,从量产生产环境的角度考虑,我们推荐使用 Flash 下载工具(V3.9.6 及以上版本)来开启 Secure Boot V2 过程。
通过 Flash 下载工具 完成 Secure Boot V2 功能的实现流程如下:
- 基于Flash 下载工具导入
公钥的摘要 - 在下载固件过程直接将
公钥的摘要写入芯片的eFuse BLOCK2中 - 同时写 eFuse 控制位(
ABS_DONE_1)来开启 Secure Boot V2 的功能。 - 烧录开启 Secure Boot V2 功能的
签名固件
通过 Flash 下载工具完成 Secure Boot V2 功能,从操作流程上具有如下优点:
- 固件下载完成后,即完成了 Secure Boot V2 的全部流程
- 可规避在 Secure Boot V2 流程中出现
掉电或供电不稳带来的风险
使用 Flash 下载工具(v3.9.6)开启 Secure Boot V2 的具体流程如下:
1. 软件配置
-
在 esp-idf SDK 编译环境中运行如下指令
生成 Secure Boot V2 私钥 Key,参见:Enable Secure Boot V2 Externallyespsecure.py generate_signing_key secure_boot_signing_key.pem --version 2 --scheme rsa3072
-
基于 Secure Boot V2 私钥 Key
生成 公钥的摘要,参见:Enable Secure Boot V2 Externallyespsecure.py digest_rsa_public_key --keyfile secure_boot_signing_key.pem --output public_key_digest.bin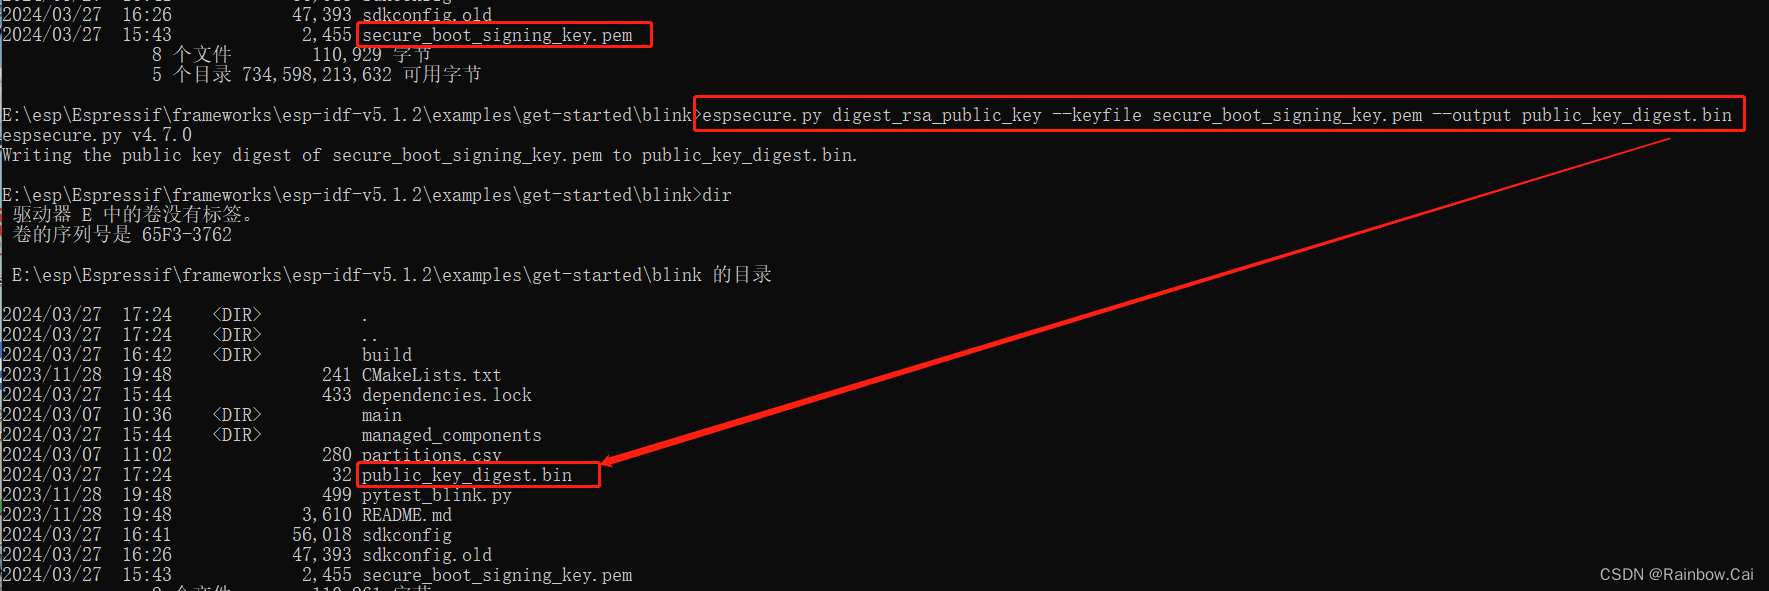
-
在软件配置中,将芯片版本设置为
ECO3版本,如下:→ Component config → Hardware Settings → Chip revision → Minimum Supported ESP32 Revision

-
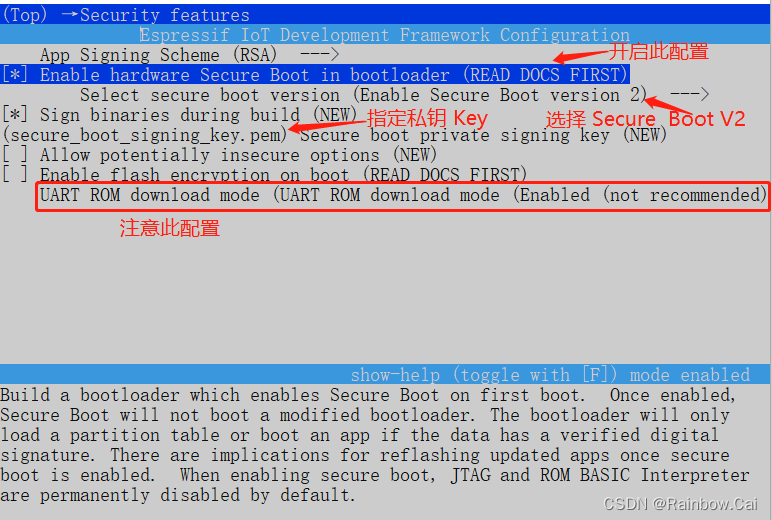
需要开启 Secure Boot V2 的软件配置,指定私钥 Key 文件路径
-
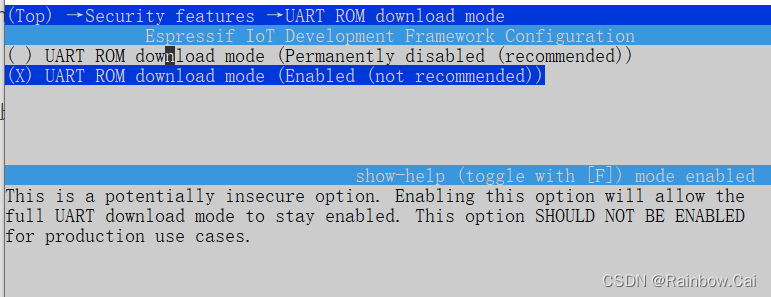
同时,注意
UART ROM download mode的设置,如果不希望禁用下载模式,推荐选择UART ROM download mode (Enabled (not recommended))模式→ Security features → UART ROM download mode
-
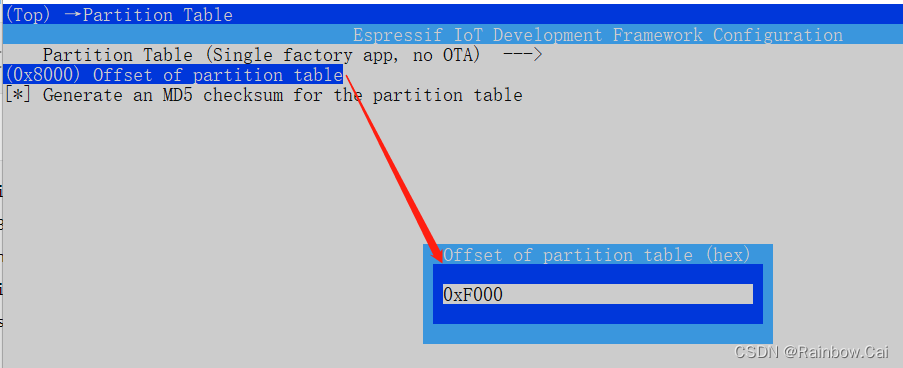
由于 Secure Boot V2 功能将
加大 Bootloader固件,因此需要增大分区表的偏移地址的设置,如下:默认是
0x8000, 可以调大为0xF000idf.py menuconfig —> Partition Table
2. 然后编译工程,获取编译固件:
-
使用如下指令编译当前工程
idf.py build -
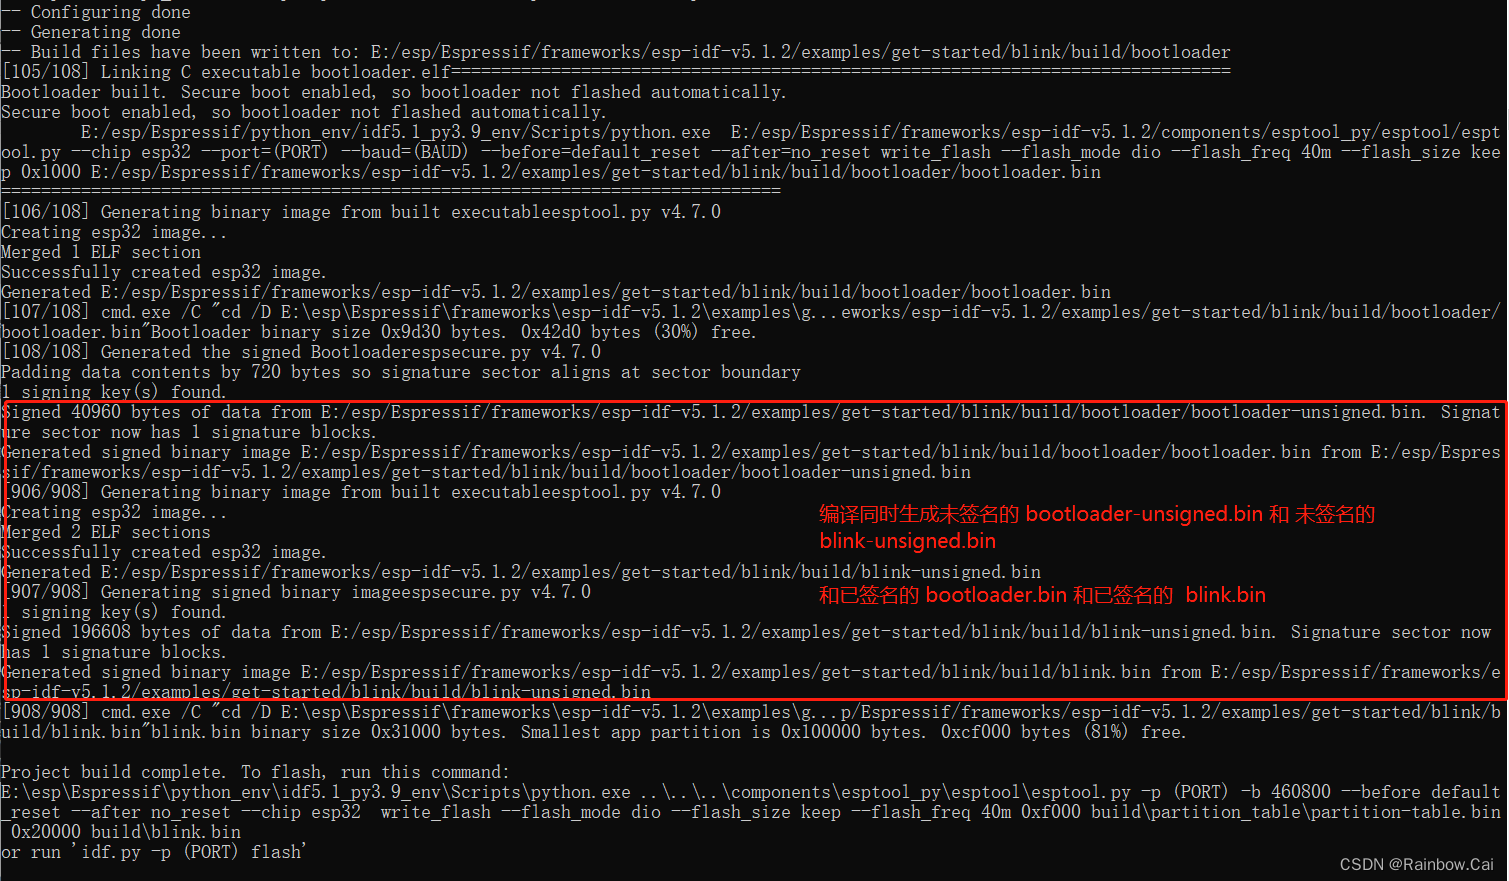
编译完成后会同时生成如下固件:
- 未签名的
bootloader-unsigned.bin - 未签名的
blink-unsinged.bin - 不被签名的
partition-table.bin - 已被签名的
bootloader.bin - 已被签名的
blink.bin
如下:
- 编译后的文件可以在本地路径下找到:
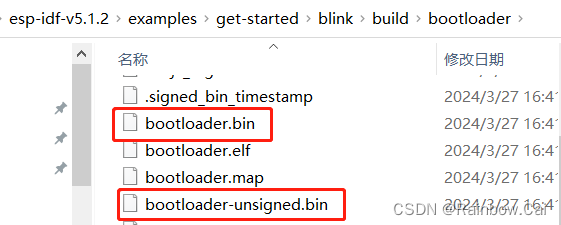

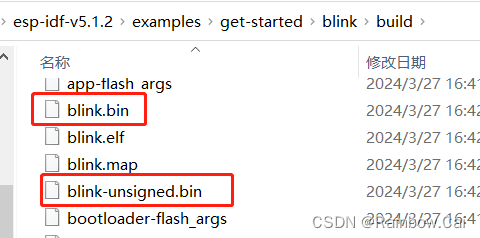
- 未签名的
-
通过编译完成的日志打印,可以看到
固件对应的下载地址如下:0x1000: bootloader.bin
0xf000: partition-table.bin
0x20000: blink.bin需要下载
被签名的 bootloader.bin和被签名的 blink.bin
3. Flash 下载工具 配置
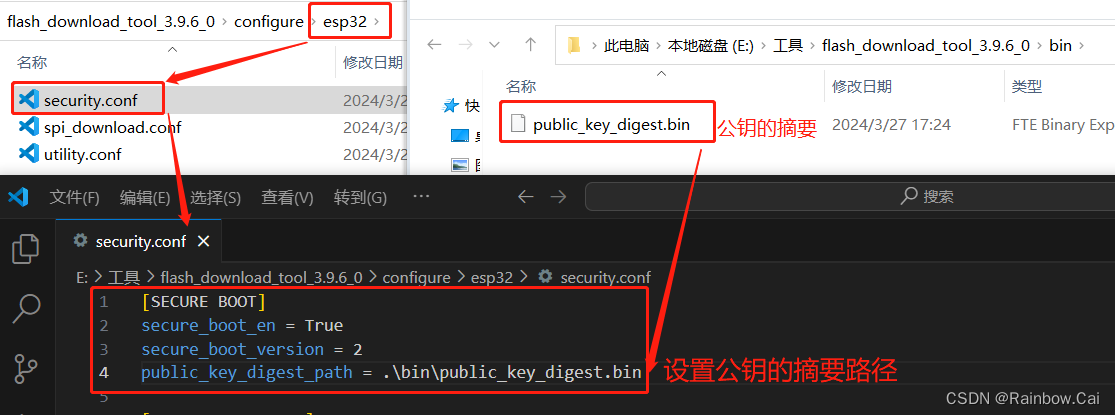
- 在 Flash 下载工具 中的
configure\esp32\security.conf配置文件中, 开启Secure Boot V2的配置选项,如下:
	[SECURE BOOT]
	secure_boot_en = True
	secure_boot_version = 2
	public_key_digest_path = .\bin\public_key_digest.bin
其中,public_key_digest_path = .\bin\public_key_digest.bin 是指定 Secure boot V2 Key 的公钥的摘要。
注意:此路径( .\bin\public_key_digest.bin)是基于 Flash 下载工具的路径为当前路径
将公钥的摘要文件放到 Flash 下载工具 中的
bin文件夹下
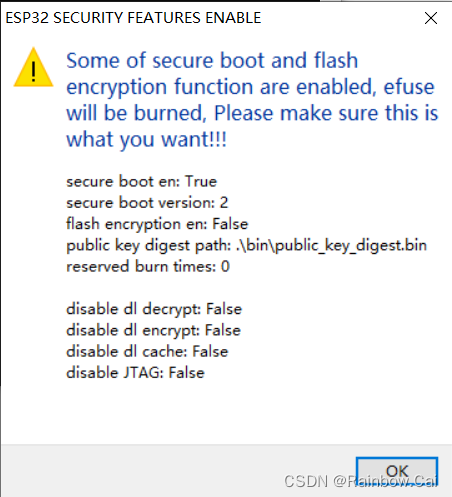
4. 重新启动 Flash 下载工具
开启 Flash 下载工具 后 ,将会读取 configure\esp32\security.conf 配置文件信息,如下:
5. 导入待下载的固件
按照不同的分区添加待下载的固件,并设置对应的下载地址,如下:
不支持直接导入
合并的固件

bootloader.bin和blink.bin为已签名的固件。
6. 烧写固件
固件将在下载过程中会将公钥的摘要写入到芯片 eFuse BLOCK2 中,并使能对应的 Secure Boot V2 的 eFuse 控制位(ABS_DONE_1),如下黑框日志:
test offset :  61440 0xf000
case ok
test offset :  131072 0x20000
case ok
..
Uploading stub...
Running stub...
Stub running...
Changing baud rate to 115200
Changed.
NO XMC flash  detected!
FLASH_CRYPT_CNT 0
ABS_DONE_0 False
ESP32 secure boot v2 skip generate key
burn secure key ...
Burn keys to blocks:
 - BLOCK2 -> [bf f7 73 1f b7 3c 4c 38 bc f7 68 f1 c6 8f 8e 2a d5 14 7d b6 78 b4 7d b9 9f 37 e8 5d 4f 86 68 78]
        Disabling write to key block

Burn keys in efuse blocks.
The key block will be read and write protected


Check all blocks for burn...
idx, BLOCK_NAME,          Conclusion
[00] BLOCK0               is not empty
        (written ): 0x0000000400100000000004310000a20000af94e68629432c00000000
        (to write): 0x00000000000000000000000000000000000000000000000000000100
        (coding scheme = NONE)
[02] BLOCK2               is empty, will burn the new value
.
This is an irreversible operation!
BURN BLOCK2  - OK (write block == read block)
BURN BLOCK0  - OK (all write block bits are set)
Reading updated efuses...
Successful
The efuses to burn:
  from BLOCK0
     - ABS_DONE_1

Burning efuses:

    - 'ABS_DONE_1' (Secure boot V2 is enabled for bootloader image) 0b0 -> 0b1


Check all blocks for burn...
idx, BLOCK_NAME,          Conclusion
[00] BLOCK0               is not empty
        (written ): 0x0000000400100000000004310000a20000af94e68629432c00000100
        (to write): 0x00000020000000000000000000000000000000000000000000000000
        (coding scheme = NONE)
.
This is an irreversible operation!
BURN BLOCK0  - OK (all write block bits are set)
Reading updated efuses...
Checking efuses...
Successful
Compressed 45056 bytes to 25294...
Compressed 3072 bytes to 104...
Compressed 200704 bytes to 104344...

 is stub and send flash finish
固件下载完成后,整个 Secure Boot V2 的流程也完成。
7. 运行固件:
固件将在第一次上电启动时:
- 检查 Secure Boot V2 功能是否被开启
- 然后验证被签名的固件
- 验证成功,则固件正常运行
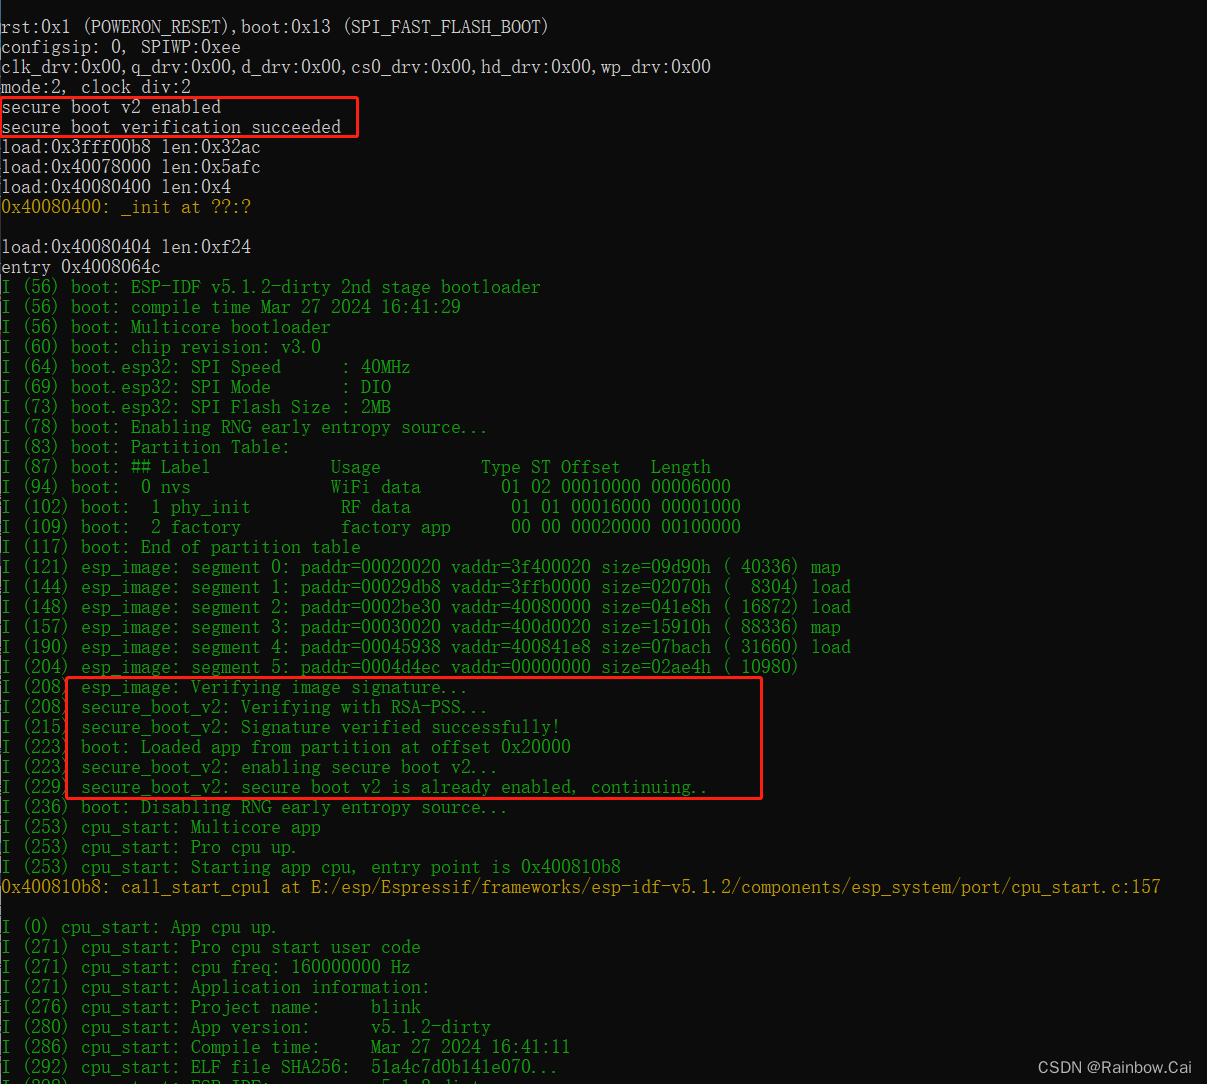
运行日志如下:
ets Jul 29 2019 12:21:46

rst:0x1 (POWERON_RESET),boot:0x13 (SPI_FAST_FLASH_BOOT)
configsip: 0, SPIWP:0xee
clk_drv:0x00,q_drv:0x00,d_drv:0x00,cs0_drv:0x00,hd_drv:0x00,wp_drv:0x00
mode:2, clock div:2
secure boot v2 enabled
secure boot verification succeeded
load:0x3fff00b8 len:0x32ac
load:0x40078000 len:0x5afc
load:0x40080400 len:0x4
0x40080400: _init at ??:?

load:0x40080404 len:0xf24
entry 0x4008064c
I (56) boot: ESP-IDF v5.1.2-dirty 2nd stage bootloader
I (56) boot: compile time Mar 27 2024 16:41:29
I (56) boot: Multicore bootloader
I (60) boot: chip revision: v3.0
I (64) boot.esp32: SPI Speed      : 40MHz
I (69) boot.esp32: SPI Mode       : DIO
I (73) boot.esp32: SPI Flash Size : 2MB
I (78) boot: Enabling RNG early entropy source...
I (83) boot: Partition Table:
I (87) boot: ## Label            Usage          Type ST Offset   Length
I (94) boot:  0 nvs              WiFi data        01 02 00010000 00006000
I (102) boot:  1 phy_init         RF data          01 01 00016000 00001000
I (109) boot:  2 factory          factory app      00 00 00020000 00100000
I (117) boot: End of partition table
I (121) esp_image: segment 0: paddr=00020020 vaddr=3f400020 size=09d90h ( 40336) map
I (144) esp_image: segment 1: paddr=00029db8 vaddr=3ffb0000 size=02070h (  8304) load
I (148) esp_image: segment 2: paddr=0002be30 vaddr=40080000 size=041e8h ( 16872) load
I (157) esp_image: segment 3: paddr=00030020 vaddr=400d0020 size=15910h ( 88336) map
I (190) esp_image: segment 4: paddr=00045938 vaddr=400841e8 size=07bach ( 31660) load
I (204) esp_image: segment 5: paddr=0004d4ec vaddr=00000000 size=02ae4h ( 10980)
I (208) esp_image: Verifying image signature...
I (208) secure_boot_v2: Verifying with RSA-PSS...
I (215) secure_boot_v2: Signature verified successfully!
I (223) boot: Loaded app from partition at offset 0x20000
I (223) secure_boot_v2: enabling secure boot v2...
I (229) secure_boot_v2: secure boot v2 is already enabled, continuing..
I (236) boot: Disabling RNG early entropy source...
I (253) cpu_start: Multicore app
I (253) cpu_start: Pro cpu up.
I (253) cpu_start: Starting app cpu, entry point is 0x400810b8
0x400810b8: call_start_cpu1 at E:/esp/Espressif/frameworks/esp-idf-v5.1.2/components/esp_system/port/cpu_start.c:157

I (0) cpu_start: App cpu up.
I (271) cpu_start: Pro cpu start user code
I (271) cpu_start: cpu freq: 160000000 Hz
I (271) cpu_start: Application information:
I (276) cpu_start: Project name:     blink
I (280) cpu_start: App version:      v5.1.2-dirty
I (286) cpu_start: Compile time:     Mar 27 2024 16:41:11
I (292) cpu_start: ELF file SHA256:  51a4c7d0b141e070...
I (298) cpu_start: ESP-IDF:          v5.1.2-dirty
I (303) cpu_start: Min chip rev:     v3.0
I (308) cpu_start: Max chip rev:     v3.99
I (313) cpu_start: Chip rev:         v3.0
I (318) heap_init: Initializing. RAM available for dynamic allocation:
I (325) heap_init: At 3FFAE6E0 len 00001920 (6 KiB): DRAM
I (331) heap_init: At 3FFB2968 len 0002D698 (181 KiB): DRAM
I (337) heap_init: At 3FFE0440 len 00003AE0 (14 KiB): D/IRAM
I (343) heap_init: At 3FFE4350 len 0001BCB0 (111 KiB): D/IRAM
I (350) heap_init: At 4008BD94 len 0001426C (80 KiB): IRAM
I (357) spi_flash: detected chip: generic
I (361) spi_flash: flash io: dio
W (365) spi_flash: Detected size(4096k) larger than the size in the binary image header(2048k). Using the size in the binary image header.
I (379) app_start: Starting scheduler on CPU0
I (383) app_start: Starting scheduler on CPU1
I (383) main_task: Started on CPU0
I (393) main_task: Calling app_main()
I (393) example: Example configured to blink GPIO LED!
I (393) gpio: GPIO[5]| InputEn: 0| OutputEn: 0| OpenDrain: 0| Pullup: 1| Pulldown: 0| Intr:0
I (403) example: Turning the LED OFF!
I (1413) example: Turning the LED ON!
I (2413) example: Turning the LED OFF!
I (3413) example: Turning the LED ON!
8. 检查 eFuse 信息
使用 esptool 工具运行如下指令来获取芯片的 eFuse 信息
espefuse.py -p COM4 summary
- 获取的芯片安全信息如下:
Security fuses:
UART_DOWNLOAD_DIS (BLOCK0)                         Disable UART download mode. Valid for ESP32 V3 and = False R/W (0b0)
                                                    newer; only
ABS_DONE_0 (BLOCK0)                                Secure boot V1 is enabled for bootloader image     = False R/W (0b0)
ABS_DONE_1 (BLOCK0)                                Secure boot V2 is enabled for bootloader image     = True R/W (0b1)
DISABLE_DL_ENCRYPT (BLOCK0)                        Disable flash encryption in UART bootloader        = False R/W (0b0)
DISABLE_DL_DECRYPT (BLOCK0)                        Disable flash decryption in UART bootloader        = False R/W (0b0)
KEY_STATUS (BLOCK0)                                Usage of efuse block 3 (reserved)                  = False R/W (0b0)
SECURE_VERSION (BLOCK3)                            Secure version for anti-rollback                   = 0 R/W (0x00000000)
BLOCK1 (BLOCK1)                                    Flash encryption key
   = 00 00 00 00 00 00 00 00 00 00 00 00 00 00 00 00 00 00 00 00 00 00 00 00 00 00 00 00 00 00 00 00 R/W
BLOCK2 (BLOCK2)                                    Security boot key
   = bf f7 73 1f b7 3c 4c 38 bc f7 68 f1 c6 8f 8e 2a d5 14 7d b6 78 b4 7d b9 9f 37 e8 5d 4f 86 68 78 R/-
BLOCK3 (BLOCK3)                                    Variable Block 3
   = 00 00 00 00 00 00 00 00 00 00 00 00 00 00 00 00 00 00 00 00 00 00 00 00 00 00 00 00 00 00 00 00 R/W

说明
- 开启 Secure Boot V2 功能后,支持读取芯片 eFuse 信息。
- 只要软件配置中没有禁用下载模式,也支持重新烧录固件。
- 重新下载的固件要求使用相同的 Secure Boot V2 的 私钥 Key 进行签名。
- 做 OTA 应用时,要求 OTA 固件被相同的 Secure Boot V2 的 私钥 Key 进行签名。


