在ROS上快速验证PID算法
前言
最近有在外面出差授课的工作任务,其中有一个环节是给大家讲述PID相关的内容,在制作相关PPT的时候查询了很多资料,但是写着写着突然意识到一个问题,PID已经在控制专业学习过程以及工程开发时间中那么常见了,继续去照本宣科的讲解其理论是否还有必要,随即开始想不如开发一个小DEMO,在ROS环境里验证PID算法实例。这也是这篇文章的由来了。
PID算法简介
-
比例(Proportional)(P):
计算当前偏差(设定值与实际值的差距),并乘以比例增益(Kp)。
输出对系统的当前状态进行纠正。
-
积分(Integral)(I):
累积偏差随时间的总和,并乘以积分增益(Ki)。
解决由于比例控制引入的静态误差,确保系统最终能够达到设定值。
-
微分(Derivative)(D):
计算偏差变化率,并乘以微分增益(Kd)。
抑制系统的振荡,提高系统的稳定性。
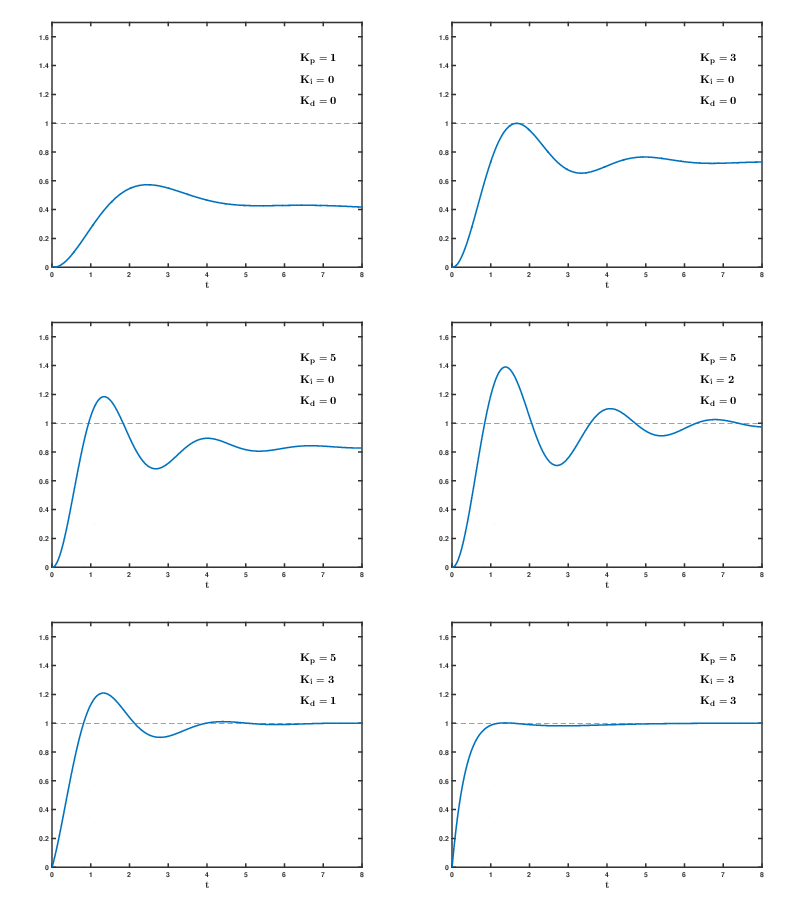
这里有一张比较形象的图可以用于简述其工作状态。
算法实现
首先实现其基类接口
    // pid.h
    #ifndef PID_H
    #define PID_H

    class PIDImpl;

    class PID {
    public:
        PID(double dt, double max, double min, double Kp, double Kd, double Ki);
        double calculate(double setPoint, double processValue);
        ~PID();

    private:
        PIDImpl* pimpl;
    };

    #endif //PID_H
再实现其算法计算
    #include "pid.h"
    #include <iostream>
    #include <cmath>

    class PIDImpl {
    public:
        PIDImpl(double dt, double max, double min, double Kp, double Kd, double Ki);
        ~PIDImpl();
        double calculate(double setPoint, double processValue);

    private:
        double _dt;
        double _max;
        double _min;
        double _Kp;
        double _Kd;
        double _Ki;
        double _pre_error;
        double _integral;
    };

    PID::PID(double dt, double max, double min, double Kp, double Kd, double Ki) {
        pimpl = new PIDImpl(dt, max, min, Kp, Kd, Ki);
    }

    double PID::calculate(double setPoint, double processValue) {
        return pimpl->calculate(setPoint, processValue);
    }

    PID::~PID() {
        delete pimpl;
    }

    PIDImpl::PIDImpl(double dt, double max, double min, double Kp, double Kd, double Ki) :
            _dt(dt),
            _max(max),
            _min(min),
            _Kp(Kp),
            _Kd(Kd),
            _Ki(Ki),
            _pre_error(0),
            _integral(0) {
    }
    /*
     - 比例(Proportional)(P):

        计算当前偏差(设定值与实际值的差距),并乘以比例增益(Kp)。
        输出对系统的当前状态进行纠正。

    - 积分(Integral)(I):

        累积偏差随时间的总和,并乘以积分增益(Ki)。
        解决由于比例控制引入的静态误差,确保系统最终能够达到设定值。

    - 微分(Derivative)(D):

        计算偏差变化率,并乘以微分增益(Kd)。
        抑制系统的振荡,提高系统的稳定性。
    */
    double PIDImpl::calculate(double setPoint, double processValue) {
        double error = setPoint - processValue;

        double Pout = _Kp * error;

        _integral += error * _dt;
        double Iout = _Ki * _integral;

        double derivative = (error - _pre_error) / _dt;
        double Dout = _Kd * derivative;

        double output = Pout + Iout + Dout;

        if (output > _max)
            output = _max;
        else if (output < _min)
            output = _min;

        _pre_error = error;

        return output;
    }

    PIDImpl::~PIDImpl() {
    }
最后如何实现其算法调用呢?
    //control.cpp
    #include "ros/ros.h"
    #include <tf/transform_listener.h>
    #include <nav_msgs/Odometry.h>
    #include <visualization_msgs/Marker.h>
    #include <std_srvs/Empty.h>
    #include "geometry.h"
    #include "pid.h"

    tf::Point Odom_pos;
    double Odom_yaw, Odom_v, Odom_w;
    ros::Publisher cmd_vel_pub, marker_pub;
    ros::Subscriber odom_sub;
    int num_slice = 50;
    double maxSpeed = 0.5, distanceConst = 0.5;
    // double dt = 0.1, maxT = M_PI, minT = -M_PI, Kp = 0.3, Ki = 0.05, Kd = 0.01;
    double dt = 0.1, maxT = M_PI, minT = -M_PI, Kp = 1, Ki = 0.02, Kd = 0.1;
    // double dtS = 0.1, maxS = maxSpeed, minS = 0.0, KpS = 0.08, KiS = 0.01, KdS = 0.005;
    double dtS = 0.1, maxS = maxSpeed, minS = 0.0, KpS = 0.1, KiS = 0.02, KdS = 0.1;


    void odomCallback(const nav_msgs::Odometry odom_msg) {
        tf::pointMsgToTF(odom_msg.pose.pose.position, Odom_pos);
        Odom_yaw = tf::getYaw(odom_msg.pose.pose.orientation);
        Odom_v = odom_msg.twist.twist.linear.x;
        Odom_w = odom_msg.twist.twist.angular.z;
    }

    void displayLane(bool isTrajectoryPushed, Geometry &geometry) {
        static visualization_msgs::Marker path;
        path.type = visualization_msgs::Marker::LINE_STRIP;
        path.header.frame_id = "odom";
        path.header.stamp = ros::Time::now();
        path.ns = "odom";
        path.id = 0;
        path.action = visualization_msgs::Marker::ADD;
        path.lifetime = ros::Duration();
        path.color.b = 1.0;
        path.color.a = 1.0;
        path.scale.x = 0.02;
        path.pose.orientation.w = 1.0;

        static int slice_index = 0;

        VECTOR2D *prev = nullptr, *current = nullptr;

        while (path.points.size() <= num_slice) {
            geometry_msgs::Point p;
            float angle = slice_index * 2 * M_PI / num_slice;
            slice_index++;
            p.x = 4 * cos(angle) - 0.5;
            p.y = 4 * sin(angle) + 1.0;
            p.z = 0;

            path.points.push_back(p);

            if (!isTrajectoryPushed) {
                VECTOR2D *temp = new VECTOR2D(p.x, p.y);
                geometry.trajectory.push_back(*temp);
                current = temp;

                if (prev != nullptr) {
                    geometry.path.push_back(geometry.getLineSegment(*prev, *current));
                }
                prev = current;
            }
        }

        if (prev != nullptr && current != nullptr && current != prev)
            geometry.path.push_back(geometry.getLineSegment(*prev, *current));

        marker_pub.publish(path);
    }

    int main(int argc, char **argv) {
        ros::init(argc, argv, "control");
        ros::NodeHandle n("~");
        tf::TransformListener m_listener;
        tf::StampedTransform transform;
        cmd_vel_pub = n.advertise<geometry_msgs::Twist>("cmd_vel", 1);
        marker_pub = n.advertise<visualization_msgs::Marker>("visualization_marker", 1);
        odom_sub = n.subscribe("odom", 10, odomCallback);
        ros::Rate loop_rate(10);

        geometry_msgs::Twist tw_msg;
        Geometry geometry;

        int frame_count = 0;
        PID pidTheta(dt, maxT, minT, Kp, Kd, Ki);
        PID pidVelocity(dtS, maxS, minS, KpS, KdS, KiS);

        double omega = 0.0;
        while (ros::ok()) {
            if (frame_count == 0)
                displayLane(false, geometry);
            else
                displayLane(true, geometry);

            double speed = maxSpeed;
            VECTOR2D current_pos;
            current_pos.x = Odom_pos.x();
            current_pos.y = Odom_pos.y();

            Geometry::LineSegment *lineSegment = geometry.getNearestLine(current_pos);
            Geometry::LineSegment lineSegmentPerpen = geometry.getMinimumDistanceLine(*lineSegment, current_pos);
            Geometry::LineSegment *nextLinesegment = geometry.getNextLineSegment(lineSegment);

            double targetDistanceWithEnd = geometry.getDistanceSquared(current_pos, lineSegment->endP);
            double targetDistanceWithStart = geometry.getDistanceSquared(current_pos, lineSegment->startP);
            double targetAngleWithPerpen = geometry.getGradient(current_pos, lineSegment->endP);

            double angleError = 0.0;

            VECTOR2D target = lineSegment->endP;
            double targetAngle = geometry.getGradient(current_pos, target);
            double distanceToClosestPath = abs(lineSegment->disatanceToAObj);
    double targetAnglePerpen = geometry.getGradient(current_pos, lineSegmentPerpen.endP);
            if (distanceToClosestPath < distanceConst) {

                double directional = targetAngle;

                double discripancy = targetAnglePerpen - directional;
                discripancy = geometry.correctAngle(discripancy);

                discripancy = 0.5* discripancy / distanceConst * abs(distanceToClosestPath);

                double combined = targetAngle + discripancy;

                angleError = combined - Odom_yaw;

            } else {
                angleError = targetAnglePerpen - Odom_yaw;
            }
            if (targetDistanceWithEnd < 0.5) {
                double futureAngleChange = nextLinesegment->gradient - lineSegment->gradient;
                futureAngleChange = geometry.correctAngle(futureAngleChange);
                futureAngleChange = futureAngleChange / distanceConst * abs(targetDistanceWithEnd);;
                double combined = targetAngle + futureAngleChange;
                angleError = combined - Odom_yaw;
            } else {
                angleError = geometry.getGradient(current_pos, lineSegmentPerpen.endP) - Odom_yaw;
            }

            double speedError = 0.0;

            if (targetDistanceWithStart < 0.7 || targetDistanceWithEnd < 0.7) {
                double targetDistance = std::min(targetDistanceWithStart, targetDistanceWithEnd);
                speedError = 0.3 * maxSpeed * exp(-abs(targetDistance));
                speed = pidVelocity.calculate(maxSpeed, -speedError);
            }

            angleError = geometry.correctAngle(angleError);
            double omega = pidTheta.calculate(0, -angleError);

            ROS_INFO("Odom_yaw %f, Angle Error: %f , omega: %f Speed %f", Odom_yaw, angleError, omega, Odom_v);

            tw_msg.linear.x = speed;
            tw_msg.angular.z = omega;
            cmd_vel_pub.publish(tw_msg);

            frame_count++;
            ros::spinOnce();
            loop_rate.sleep();
        }

        return 0;
    }
·
此处首先利用ROS中Marker工具绘制了一个半径为4的圆,其是有50个点组成的。为了验证PID,此处将50个点全部存储起来,用于当作基于小车当前位置的最近点。所以可以看到此处还调用了odom话题去获取当前位置。
剩下的就是将目标点和当前位置计算一个相对合适的速度和角速度了。实现上非常简单,但是可以在仿真环境下快速验证PID算法对小车控制的作用。
附件
具体内容请参考
- 在ROS上快速验证PID算法 - 古月居 (guyuehome.com)
