布局简介
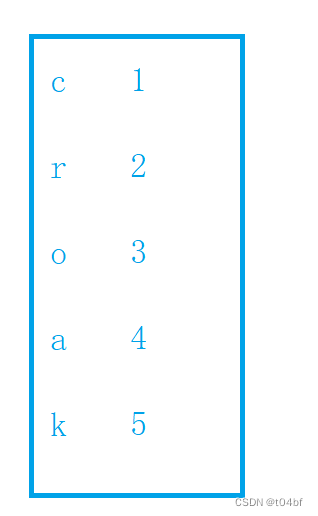
为什么要布局?通过布局拖动不影响鼠标拖动窗口的效果等优点.QT设计器布局比较固定,不方便后期修改和维护;在Qt里面布局分为四个大类 :
盒子布局:QBoxLayout
网格布局:QGridLayout
表单布局:QFormLayout
抽屉布局:QStackedLayout
分页显示:QTabWidget
分割器:Splitter
设置布局的基本步骤:
(1)创建控件
(2)创建布局管理类
(3)将控件添加到布局管理类中
(4)设置布局管理类为此时的窗口布局
QBoxLayout
一般使用它的两个子类QHBoxLayout 和 QVBoxLayout 负责水平和垂直布局
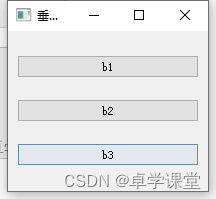
QVBoxLayout 基本使用
mainwindow.cpp(后面例程都在mainwindow.cpp演示):
#include "mainwindow.h"
#include <QApplication>
#include <QPushButton>
#include <QVBoxLayout>
#include <QHBoxLayout>
#include<QTextCodec>
#define chineseToQString(pChineseText)  QTextCodec::codecForName("GB2312")->toUnicode(pChineseText)

MainWindow::MainWindow(QWidget *parent)
    : QMainWindow(parent)
{
    this->setWindowTitle(chineseToQString("垂直布局"));
    QWidget* w=new QWidget;
    setCentralWidget(w);

    QVBoxLayout* vlayout=new QVBoxLayout;
    QPushButton* b1=new QPushButton("b1");
    QPushButton* b2=new QPushButton("b2");
    QPushButton* b3=new QPushButton("b3");

    vlayout->addWidget(b1);
    vlayout->addWidget(b2);
    vlayout->addWidget(b3);

    centralWidget()->setLayout(vlayout);
    this->resize(200, 160);
}
MainWindow::~MainWindow()
{

}
mainwindow.h
#ifndef MAINWINDOW_H
#define MAINWINDOW_H

#include <QMainWindow>

class MainWindow : public QMainWindow
{
    Q_OBJECT

public:
    MainWindow(QWidget *parent = 0);
    ~MainWindow();
};

#endif // MAINWINDOW_H
main.cpp
#include "mainwindow.h"
#include <QApplication>

int main(int argc, char *argv[])
{
    QApplication a(argc, argv);
    MainWindow w;
    w.show();

    return a.exec();
}
QHBoxLayout基本使用
#include "mainwindow.h"
#include <QApplication>
#include <QPushButton>
#include <QVBoxLayout>
#include <QHBoxLayout>
#include<QTextCodec>
#define chineseToQString(pChineseText)  QTextCodec::codecForName("GB2312")->toUnicode(pChineseText)

MainWindow::MainWindow(QWidget *parent)
    : QMainWindow(parent)
{
    this->setWindowTitle(chineseToQString("水平布局"));
    QWidget* w=new QWidget;
    setCentralWidget(w);

    QHBoxLayout* hlayout=new QHBoxLayout;
    QPushButton* b1=new QPushButton("b1");
    QPushButton* b2=new QPushButton("b2");
    QPushButton* b3=new QPushButton("b3");

    hlayout->addWidget(b1);
    hlayout->addWidget(b2);
    hlayout->addWidget(b3);

    centralWidget()->setLayout(hlayout);
    this->resize(100, 60);
}
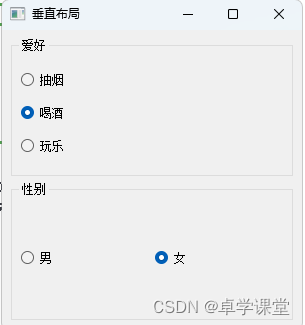
QHBoxLayout和QVBoxLayout综合使用
可以结合QGroupBox容器进行布局
#include "mainwindow.h"
#include <QApplication>
#include <QPushButton>
#include <QVBoxLayout>
#include <QHBoxLayout>
#include <QGroupBox>
#include <QRadioButton>
MainWindow::MainWindow(QWidget *parent)
    : QMainWindow(parent)
{
    this->setWindowTitle("垂直布局");
    QWidget* w=new QWidget;
    setCentralWidget(w);

    QVBoxLayout* container=new QVBoxLayout;

    QGroupBox *hobby_box = new QGroupBox("爱好");
    QVBoxLayout* v_layout=new QVBoxLayout;
    QRadioButton* btn1 = new QRadioButton("抽烟");
    QRadioButton* btn2 = new QRadioButton("喝酒");
    QRadioButton* btn3 = new QRadioButton("玩乐");
    v_layout->addWidget(btn1);
    v_layout->addWidget(btn2);
    v_layout->addWidget(btn3);
    hobby_box->setLayout(v_layout);

    QGroupBox* gender_box = new QGroupBox("性别");
    QHBoxLayout* h_layout = new QHBoxLayout();
    QRadioButton* btn4 =  new QRadioButton("男");
    QRadioButton* btn5 = new QRadioButton("女");
    h_layout->addWidget(btn4);
    h_layout->addWidget(btn5);
    gender_box->setLayout(h_layout);

    container->addWidget(hobby_box);
    container->addWidget(gender_box);

    centralWidget()->setLayout(container);
    this->resize(300, 300);
} 
垂直和水平布局技巧
可以根据需要灵活控制布局:
- addStretch:添加拉伸条
- setContentsMargins:设置边距
- setStretchFactor:设置拉伸因子
- setSpacing:设置每个控件之间距离
- itemAt:获取布局内的控件元素
QGridLayout
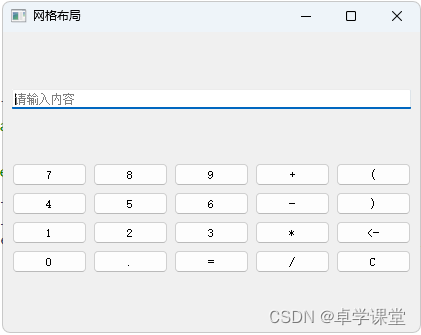
QGridLayout基本使用
网格布局,有的人称之为九宫格布局;示例如下:
#include "mainwindow.h"
#include <QApplication>
#include <QPushButton>
#include <QVBoxLayout>
#include <QHBoxLayout>
#include <QGroupBox>
#include <QRadioButton>
#include <QStringList>
#include <QLineEdit>
#include <QGridLayout>

MainWindow::MainWindow(QWidget *parent)
    : QMainWindow(parent)
{
    this->setWindowTitle("网格布局");
    QWidget* w=new QWidget;
    setCentralWidget(w);

    QVBoxLayout* container=new QVBoxLayout;

    QPushButton* m_buttons[20];
    const char* btnText[20] =
    {
        "7", "8", "9", "+", "(",
        "4", "5", "6", "-", ")",
        "1", "2", "3", "*", "<-",
        "0", ".", "=", "/", "C"
    };

    QLineEdit* edit = new QLineEdit();
    edit->setPlaceholderText("请输入内容");

    QGridLayout* grid = new QGridLayout();

    int line_number = 0;
    int col_number = 0;
    for(line_number = 0;line_number < 4;line_number++){
         // 此时line_number是第几行
        for(col_number = 0;col_number < 5;col_number++){
            // 此时col_number是第几列
            m_buttons[line_number*5 + col_number] = new QPushButton();
            m_buttons[line_number*5 + col_number]->setText(btnText[line_number*5 + col_number]);
            grid->addWidget(m_buttons[line_number*5 + col_number], line_number, col_number);
        }
    }
    container->addWidget(edit);
    container->addLayout(grid);

    centralWidget()->setLayout(container);
    this->resize(300, 300);
}
网格布局技巧
QFormLayout
QFormLayout基本使用
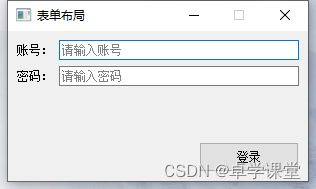
表单布局,一般适用于提交数据form表单。比如: 登录,注册类似的场景
#include "mainwindow.h"
#include <QApplication>
#include <QPushButton>
#include <QVBoxLayout>
#include <QHBoxLayout>
#include <QGroupBox>
#include <QRadioButton>
#include <QStringList>
#include <QLineEdit>
#include <QGridLayout>
#include <QFormLayout>
#include<QTextCodec>
#define chineseToQString(pChineseText)  QTextCodec::codecForName("GB2312")->toUnicode(pChineseText)

MainWindow::MainWindow(QWidget *parent)
    : QMainWindow(parent)
{
    this->setWindowTitle(chineseToQString("表单布局"));
    QWidget* w=new QWidget;
    setCentralWidget(w);

    QVBoxLayout* container=new QVBoxLayout;
    QFormLayout* form_layout = new QFormLayout();

    QLineEdit* edit1 = new QLineEdit();
    edit1->setPlaceholderText(chineseToQString("请输入账号"));
    form_layout->addRow(chineseToQString("账号:"), edit1);
    QLineEdit* edit2 = new QLineEdit();
    edit2->setPlaceholderText(chineseToQString("请输入密码"));
    form_layout->addRow((chineseToQString("密码:")), edit2);

    QPushButton* login_btn = new QPushButton(chineseToQString("登录"));
    login_btn->setFixedSize(100, 30);

    container->addLayout(form_layout);
    container->addWidget(login_btn,1,Qt::AlignRight);
    centralWidget()->setLayout(container);
    this->setFixedSize(300, 150);
}
表单布局技巧
QStackedLayout
QStackedLayout基本使用
抽屉式布局,或叫堆叠布局,提供了多页面切换的布局,一次只能看到一个界面。
#include "mainwindow.h"
#include <QApplication>
#include <QPushButton>
#include <QVBoxLayout>
#include <QHBoxLayout>
#include <QGroupBox>
#include <QRadioButton>
#include <QStringList>
#include <QLineEdit>
#include <QGridLayout>
#include <QFormLayout>
#include <QTextCodec>
#include <QListWidget>
#include <QLabel>
#include <QStackedLayout>
#define chineseToQString(pChineseText)  QTextCodec::codecForName("GB2312")->toUnicode(pChineseText)

MainWindow::MainWindow(QWidget *parent)
    : QMainWindow(parent)
{
    this->setWindowTitle(chineseToQString("抽屉/堆叠布局"));
    QWidget* w=new QWidget;
    setCentralWidget(w);

    QListWidget *listWidget = new QListWidget(); //创建一个列表
    listWidget->setMinimumWidth(150);
    listWidget->setFont(QFont("宋体",14));
    listWidget->addItem("QPushButton");
    listWidget->addItem("QLabel");
    listWidget->addItem("QLineEdit");

    //新建 3 个窗口,分别放置文本框、按钮和单行输入框
    QWidget *widget1 = new QWidget;
    widget1->setMinimumSize(400,400);
    QVBoxLayout* widget1Layout = new QVBoxLayout;
    QVBoxLayout* widget2Layout = new QVBoxLayout;
    QVBoxLayout* widget3Layout = new QVBoxLayout;

    QPushButton *but1 = new QPushButton(chineseToQString("这是一个按钮1"));
    QPushButton *but2 = new QPushButton(chineseToQString("这是一个按钮2"));
    widget1Layout->addWidget(but1);
    widget1Layout->addWidget(but2);
    widget1->setLayout(widget1Layout);

    QWidget *widget2 = new QWidget;
    widget2->setMinimumSize(400,400);
    QLabel *lab1 = new QLabel(chineseToQString("这是一个文本框1"));
    QLabel *lab2 = new QLabel(chineseToQString("这是一个文本框2"));
    widget2Layout->addWidget(lab1);
    widget2Layout->addWidget(lab2);
    widget2->setLayout(widget2Layout);

    QWidget *widget3 = new QWidget;
    widget3->setMinimumSize(400,400);
    QLineEdit* edit1 = new QLineEdit(chineseToQString("这是一个单行输入框1"));
    QLineEdit* edit2 = new QLineEdit(chineseToQString("这是一个单行输入框2"));
    widget3Layout->addWidget(edit1);
    widget3Layout->addWidget(edit2);
    widget3->setLayout(widget3Layout);

    //创建一个分组布局,将 3 个窗口添加到分组控件中
    QStackedLayout *stackedLayout = new QStackedLayout;
    stackedLayout->addWidget(widget1);
    stackedLayout->addWidget(widget2);
    stackedLayout->addWidget(widget3);

    QPushButton* changeBtn = new QPushButton(chineseToQString("点击切换界面"));

    QVBoxLayout* vLayout = new QVBoxLayout;
    QHBoxLayout* container=new QHBoxLayout;
    vLayout->addWidget(listWidget);
    vLayout->addWidget(changeBtn);
    container->addLayout(vLayout,1);
    container->addLayout(stackedLayout,4);
    centralWidget()->setLayout(container);

    //连接信号和槽,实现当点击列表中的某一项,切换分组布局管理器显示的控件
    QObject::connect(listWidget,&QListWidget::currentRowChanged,stackedLayout,&QStackedLayout::setCurrentIndex);
    connect(changeBtn,&QPushButton::clicked,this,[=](){//也可以通过点击按钮循环切换
        int nextPage = (stackedLayout->currentIndex() + 1) % stackedLayout->count();
        stackedLayout->setCurrentIndex(nextPage);
    });
    this->setMinimumSize(600, 400);
}

抽屉布局技巧
QTabWidget
提供了便捷的分页显示功能,类似于编辑器中打开不同文件

#include "mainwindow.h"
#include <QApplication>
#include <QPushButton>
#include <QVBoxLayout>
#include <QHBoxLayout>
#include <QGroupBox>
#include <QRadioButton>
#include <QStringList>
#include <QLineEdit>
#include <QGridLayout>
#include <QFormLayout>
#include <QTextCodec>
#include <QListWidget>
#include <QLabel>
#include <QStackedLayout>
#include <QTextEdit>

#define chineseToQString(pChineseText)  QTextCodec::codecForName("GB2312")->toUnicode(pChineseText)

MainWindow::MainWindow(QWidget *parent)
    : QMainWindow(parent)
{
    this->setWindowTitle(chineseToQString("QTabWidget"));
    QWidget* w=new QWidget;
    setCentralWidget(w);

    QTextEdit* text1 = new QTextEdit(this);
    QTextEdit* text2 = new QTextEdit(this);
    QTextEdit* text3 = new QTextEdit(this);
    text1->setStyleSheet("background-color: red");
    text2->setStyleSheet("background-color: blue");
    text3->setStyleSheet("background-color: green");

    QTabWidget* tWidget = new QTabWidget(this);
    tWidget->addTab(text1,"test1.txt");
    tWidget->addTab(text2,"test2.txt");
    tWidget->addTab(text3,"test3.txt");

    tWidget->setTabsClosable(true); //设置可以关闭
    connect(tWidget,&QTabWidget::tabCloseRequested,this,[=](int index){
        tWidget->removeTab(index);//点击关闭后关闭此Tab
    });

    QHBoxLayout* container=new QHBoxLayout;
    container->addWidget(tWidget);
    centralWidget()->setLayout(container);

    this->setMinimumSize(600, 400);
}
Splitter分割器
splitter允许用户通过拖动子部件之间的边界来控制它们的大小。任何数量的小部件都可以由单个拆分器控制。QSplitter的典型用法是创建几个小部件并使用 insertWidget()或addWidget()添加它们
#include "mainwindow.h"
#include <QApplication>
#include <QPushButton>
#include <QVBoxLayout>
#include <QHBoxLayout>
#include <QGroupBox>
#include <QRadioButton>
#include <QStringList>
#include <QLineEdit>
#include <QGridLayout>
#include <QFormLayout>
#include <QTextCodec>
#include <QListWidget>
#include <QLabel>
#include <QStackedLayout>
#include <QTextEdit>
#include <QSplitter>

#define chineseToQString(pChineseText)  QTextCodec::codecForName("GB2312")->toUnicode(pChineseText)

MainWindow::MainWindow(QWidget *parent)
    : QMainWindow(parent)
{
    this->setWindowTitle(chineseToQString("QSplitter"));
    QWidget* w=new QWidget;
    setCentralWidget(w);

    auto text1 = new QTextEdit(this);
    auto text2 = new QTextEdit(this);

    QSplitter* splitter = new QSplitter(this);
    splitter->addWidget(text1);
    splitter->addWidget(text2);
    splitter->setOpaqueResize(true);//设置为预览模式:false

    QVBoxLayout* container=new QVBoxLayout;
    container->addWidget(splitter);
    centralWidget()->setLayout(container);

    this->setMinimumSize(600, 400);
}鼠标放在中间的间隔上我们便可以左右拖动他们的距离

Splitter分割器技巧
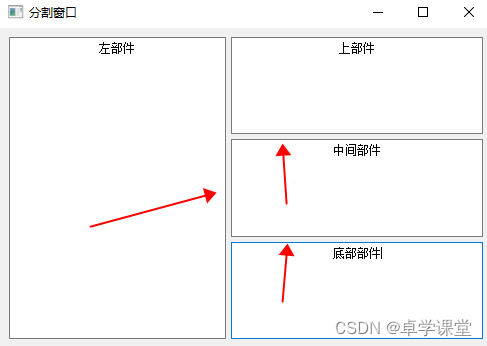
使用QSplitter实现分割窗口功能,整个对话框由四个窗口组成,各个窗口之间的大小可以任意拖拽来改变。
#include "mainwindow.h"
#include <QApplication>
#include <QPushButton>
#include <QVBoxLayout>
#include <QHBoxLayout>
#include <QGroupBox>
#include <QRadioButton>
#include <QStringList>
#include <QLineEdit>
#include <QGridLayout>
#include <QFormLayout>
#include <QTextCodec>
#include <QListWidget>
#include <QLabel>
#include <QStackedLayout>
#include <QTextEdit>
#include <QSplitter>

#define chineseToQString(pChineseText)  QTextCodec::codecForName("GB2312")->toUnicode(pChineseText)

MainWindow::MainWindow(QWidget *parent)
    : QMainWindow(parent)
{
    this->setWindowTitle(chineseToQString("分割窗口"));
    QWidget* w=new QWidget;
    setCentralWidget(w);

    QSplitter *splitterMain = new QSplitter(Qt::Horizontal, 0); //新建主分割窗口,水平分割

    QTextEdit *textLeft = new QTextEdit(chineseToQString("左部件"));
    textLeft->setAlignment(Qt::AlignCenter);//设置TextEdit对象中文本的对齐方式

    QSplitter *splitterRight = new QSplitter(Qt::Vertical);   //右分割窗口,并以主分割窗口作为父窗口
    splitterRight->setOpaqueResize(false);//若为true,则实时更新;否则在拖拽时显示一条虚线。

    QTextEdit *textUp = new QTextEdit(chineseToQString("上部件"));
    textUp->setAlignment(Qt::AlignCenter);

    QTextEdit *textMiddle = new QTextEdit(chineseToQString("中间部件"));
    textMiddle->setAlignment(Qt::AlignCenter);

    QTextEdit *textBottom = new QTextEdit(chineseToQString("底部部件"));
    textBottom->setAlignment(Qt::AlignCenter);

    splitterRight->addWidget(textUp);
    splitterRight->addWidget(textMiddle);
    splitterRight->addWidget(textBottom);

    textLeft->setParent(splitterMain);//左分割插入主分割窗口。
    splitterRight->setParent(splitterMain);//右边分割插入主分割窗口。
    splitterMain->setStretchFactor(1,1);//此函数用于设定:控件是否可伸缩。
    //第一个参数用于指定控件的序号。第二个函数大于0时,表示控件可伸缩,小于0时,表示控件不可伸缩。
    //splitterMain->setStretchFactor(1,0);//左右分割都可以伸缩

    QVBoxLayout* container=new QVBoxLayout;
    container->addWidget(splitterMain);
    centralWidget()->setLayout(container);

    this->setMinimumSize(400, 320);
}