院子摄像头的监控和禁止区域入侵检测相比,多了2个功能:1)如果检测到有人入侵,则把截图保存起来,2)如果检测到有人入侵,则向数据库插入一条事件数据。
打开checkingfence.py,添加如下代码:
# -*- coding: utf-8 -*-

'''
禁止区域检测主程序
摄像头对准围墙那一侧

用法:
python checkingfence.py
python checkingfence.py --filename tests/yard_01.mp4
'''

# import the necessary packages
from oldcare.track import CentroidTracker
from oldcare.track import TrackableObject
from imutils.video import FPS
import numpy as np
import imutils
import argparse
import time
import dlib
import cv2
import os
import subprocess

# 得到当前时间
current_time = time.strftime('%Y-%m-%d %H:%M:%S',
                             time.localtime(time.time()))
print('[INFO] %s 禁止区域检测程序启动了.'%(current_time))

# 传入参数
ap = argparse.ArgumentParser()
ap.add_argument("-f", "--filename", required=False, default = '',
    help="")
args = vars(ap.parse_args())

# 全局变量
prototxt_file_path='models/mobilenet_ssd/MobileNetSSD_deploy.prototxt'
# Contains the Caffe deep learning model files.
#We’ll be using a MobileNet Single Shot Detector (SSD),
#“Single Shot Detectors for object detection”.
model_file_path='models/mobilenet_ssd/MobileNetSSD_deploy.caffemodel'
output_fence_path = 'supervision/fence'
input_video = args['filename']
skip_frames = 30 # of skip frames between detections
# your python path
python_path = '/home/reed/anaconda3/envs/tensorflow/bin/python'

# 超参数
# minimum probability to filter weak detections
minimum_confidence = 0.80


# 物体识别模型能识别的物体(21种)
CLASSES = ["background", "aeroplane", "bicycle", "bird", "boat",
           "bottle", "bus", "car", "cat", "chair",
           "cow", "diningtable","dog", "horse", "motorbike",
           "person", "pottedplant", "sheep","sofa", "train",
           "tvmonitor"]

# if a video path was not supplied, grab a reference to the webcam
if not input_video:
    print("[INFO] starting video stream...")
    vs = cv2.VideoCapture(0)
    time.sleep(2)
else:
    print("[INFO] opening video file...")
    vs = cv2.VideoCapture(input_video)

# 加载物体识别模型
print("[INFO] loading model...")
net = cv2.dnn.readNetFromCaffe(prototxt_file_path, model_file_path)


# initialize the frame dimensions (we'll set them as soon as we read
# the first frame from the video)
W = None
H = None

# instantiate our centroid tracker, then initialize a list to store
# each of our dlib correlation trackers, followed by a dictionary to
# map each unique object ID to a TrackableObject
ct = CentroidTracker(maxDisappeared=40, maxDistance=50)
trackers = []
trackableObjects = {}

# initialize the total number of frames processed thus far, along
# with the total number of objects that have moved either up or down
totalFrames = 0
totalDown = 0
totalUp = 0

# start the frames per second throughput estimator
fps = FPS().start()

# loop over frames from the video stream
while True:
    # grab the next frame and handle if we are reading from either
    # VideoCapture or VideoStream
    ret, frame = vs.read()

    # if we are viewing a video and we did not grab a frame then we
    # have reached the end of the video
    if input_video and not ret:
        break

    if not input_video:
        frame = cv2.flip(frame, 1)

    # resize the frame to have a maximum width of 500 pixels (the
    # less data we have, the faster we can process it), then convert
    # the frame from BGR to RGB for dlib
    frame = imutils.resize(frame, width=500)
    rgb = cv2.cvtColor(frame, cv2.COLOR_BGR2RGB)

    # if the frame dimensions are empty, set them
    if W is None or H is None:
        (H, W) = frame.shape[:2]

    # initialize the current status along with our list of bounding
    # box rectangles returned by either (1) our object detector or
    # (2) the correlation trackers
    status = "Waiting"
    rects = []

    # check to see if we should run a more computationally expensive
    # object detection method to aid our tracker
    if totalFrames % skip_frames == 0:
        # set the status and initialize our new set of object trackers
        status = "Detecting"
        trackers = []

        # convert the frame to a blob and pass the blob through the
        # network and obtain the detections
        blob = cv2.dnn.blobFromImage(frame, 0.007843, (W, H), 127.5)
        net.setInput(blob)
        detections = net.forward()

        # loop over the detections
        for i in np.arange(0, detections.shape[2]):
            # extract the confidence (i.e., probability) associated
            # with the prediction
            confidence = detections[0, 0, i, 2]

            # filter out weak detections by requiring a minimum
            # confidence
            if confidence > minimum_confidence:
                # extract the index of the class label from the
                # detections list
                idx = int(detections[0, 0, i, 1])

                # if the class label is not a person, ignore it
                if CLASSES[idx] != "person":
                    continue

                # compute the (x, y)-coordinates of the bounding box
                # for the object
                box = detections[0, 0, i, 3:7]*np.array([W, H, W, H])
                (startX, startY, endX, endY) = box.astype("int")

                # construct a dlib rectangle object from the bounding
                # box coordinates and then start the dlib correlation
                # tracker
                tracker = dlib.correlation_tracker()
                rect = dlib.rectangle(startX, startY, endX, endY)
                tracker.start_track(rgb, rect)

                # add the tracker to our list of trackers so we can
                # utilize it during skip frames
                trackers.append(tracker)

    # otherwise, we should utilize our object *trackers* rather than
    #object *detectors* to obtain a higher frame processing throughput
    else:
        # loop over the trackers
        for tracker in trackers:
            # set the status of our system to be 'tracking' rather
            # than 'waiting' or 'detecting'
            status = "Tracking"

            # update the tracker and grab the updated position
            tracker.update(rgb)
            pos = tracker.get_position()

            # unpack the position object
            startX = int(pos.left())
            startY = int(pos.top())
            endX = int(pos.right())
            endY = int(pos.bottom())

            # draw a rectangle around the people
            cv2.rectangle(frame, (startX, startY), (endX, endY),
                (0, 255, 0), 2)

            # add the bounding box coordinates to the rectangles list
            rects.append((startX, startY, endX, endY))


    # draw a horizontal line in the center of the frame -- once an
    # object crosses this line we will determine whether they were
    # moving 'up' or 'down'
    cv2.line(frame, (0, H // 2), (W, H // 2), (0, 255, 255), 2)

    # use the centroid tracker to associate the (1) old object
    # centroids with (2) the newly computed object centroids
    objects = ct.update(rects)

    # loop over the tracked objects
    for (objectID, centroid) in objects.items():
        # check to see if a trackable object exists for the current
        # object ID
        to = trackableObjects.get(objectID, None)

        # if there is no existing trackable object, create one
        if to is None:
            to = TrackableObject(objectID, centroid)

        # otherwise, there is a trackable object so we can utilize it
        # to determine direction
        else:
            # the difference between the y-coordinate of the *current*
            # centroid and the mean of *previous* centroids will tell
            # us in which direction the object is moving (negative for
            # 'up' and positive for 'down')
            y = [c[1] for c in to.centroids]
            direction = centroid[1] - np.mean(y)
            to.centroids.append(centroid)

            # check to see if the object has been counted or not
            if not to.counted:
                # if the direction is negative (indicating the object
                # is moving up) AND the centroid is above the center
                # line, count the object
                if direction < 0 and centroid[1] < H // 2:
                    totalUp += 1
                    to.counted = True

                # if the direction is positive (indicating the object
                # is moving down) AND the centroid is below the
                # center line, count the object
                elif direction > 0 and centroid[1] > H // 2:
                    totalDown += 1
                    to.counted = True

                    current_time = time.strftime('%Y-%m-%d %H:%M:%S',
                                         time.localtime(time.time()))
                    event_desc = '有人闯入禁止区域!!!'
                    event_location = '院子'
                    print('[EVENT] %s, 院子, 有人闯入禁止区域!!!'
                                                      %(current_time))
                    cv2.imwrite(os.path.join(output_fence_path,
                                                   'snapshot_%s.jpg'
                           %(time.strftime('%Y%m%d_%H%M%S'))), frame)

                    # insert into database
                    command = '%s inserting.py --event_desc %s
                           --event_type 4 --event_location %s'
                           %(python_path, event_desc, event_location)
                    p = subprocess.Popen(command, shell=True)

        # store the trackable object in our dictionary
        trackableObjects[objectID] = to

        # draw both the ID of the object and the centroid of the
        # object on the output frame
        text = "ID {}".format(objectID)
        cv2.putText(frame, text, (centroid[0] - 10, centroid[1] - 10),
            cv2.FONT_HERSHEY_SIMPLEX, 0.5, (0, 255, 0), 2)
        cv2.circle(frame, (centroid[0], centroid[1]), 4,
                   (0, 255, 0), -1)

    # construct a tuple of information we will be displaying on the
    # frame
    info = [
        #("Up", totalUp),
        ("Down", totalDown),
        ("Status", status),
    ]

    # loop over the info tuples and draw them on our frame
    for (i, (k, v)) in enumerate(info):
        text = "{}: {}".format(k, v)
        cv2.putText(frame, text, (10, H - ((i * 20) + 20)),
            cv2.FONT_HERSHEY_SIMPLEX, 0.6, (0, 0, 255), 2)

    # show the output frame
    cv2.imshow("Prohibited Area", frame)

    k = cv2.waitKey(1) & 0xff
    if k == 27:
        break

    # increment the total number of frames processed thus far and
    # then update the FPS counter
    totalFrames += 1
    fps.update()

# stop the timer and display FPS information
fps.stop()
print("[INFO] elapsed time: {:.2f}".format(fps.elapsed())) # 14.19
print("[INFO] approx. FPS: {:.2f}".format(fps.fps())) # 90.43

# close any open windows
vs.release()
cv2.destroyAllWindows()
执行下行命令即可运行程序:
python checkingfence.py --filename tests/yard_01.mp4同学们如果可以把摄像头挂在高处,也可以通过摄像头捕捉画面。程序运行方式如下:
python checkingfence.py程序运行结果如下图:
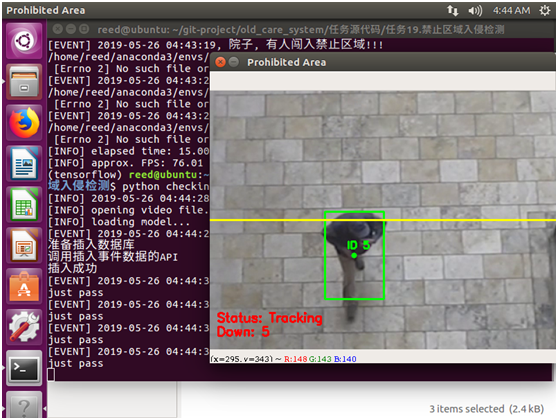
图1 程序运行效果
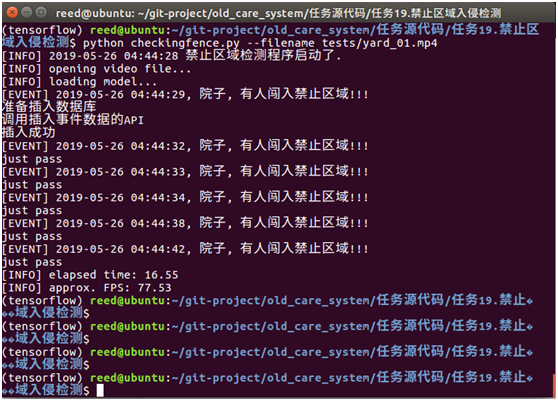
图2 程序运行控制台的输出
supervision/fence目录下出现了入侵的截图。
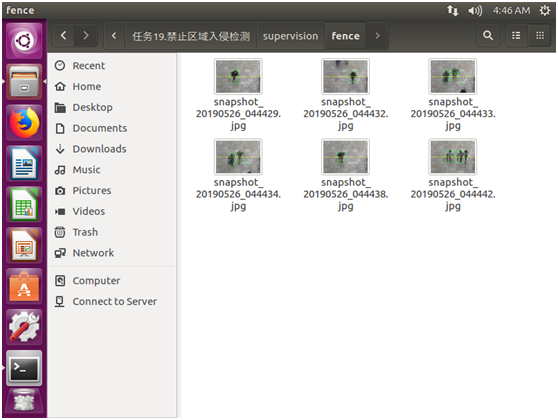
图3 入侵截图被保存