1. 物体检测
Object detection with deep learning and OpenCV
In the first part of today’s post on object detection using deep learning we’ll discuss Single Shot Detectors and MobileNets.
When combined together these methods can be used for super fast, real-time object detection on resource constrained devices (including the Raspberry Pi, smartphones, etc.)
From there we’ll discover how to use OpenCV’s dnn module to load a pre-trained object detection network.
This will enable us to pass input images through the network and obtain the output bounding box (x, y)-coordinates of each object in the image.
Finally we’ll look at the results of applying the MobileNet Single Shot Detector to example input images.
In a future blog post we’ll extend our script to work with real-time video streams as well.
Single Shot Detectors for object detection
Figure 1: Examples of object detection using Single Shot Detectors (SSD) from Liu et al.

图1 Examples of object detection using Single Shot Detectors (SSD) from Liu et al.
When it comes to deep learning-based object detection there are three primary object detection methods that you’ll likely encounter:
Faster R-CNNs (Girshick et al., 2015)
You Only Look Once (YOLO) (Redmon and Farhadi, 2015)
Single Shot Detectors (SSDs) (Liu et al., 2015)
参考资料:
Object detection with deep learning and OpenCV - PyImageSearch
三分钟搞懂深度学习:物体的识别和检测,以“找椅子”为例-36氪
Real-time object detection with deep learning and OpenCV - PyImageSearch
2. 物体追踪
The centroid tracking algorithm is a multi-step process. We will review each of the tracking steps in this section.
Step #1: Accept bounding box coordinates and compute centroids

图1 Step #1
To build a simple object tracking algorithm using centroid tracking, the first step is to accept bounding box coordinates from an object detector and use them to compute centroids.
The centroid tracking algorithm assumes that we are passing in a set of bounding box (x, y)-coordinates for each detected object in every single frame.
These bounding boxes can be produced by any type of object detector you would like (color thresholding + contour extraction, Haar cascades, HOG + Linear SVM, SSDs, Faster R-CNNs, etc.), provided that they are computed for every frame in the video.
Once we have the bounding box coordinates we must compute the “centroid”, or more simply, the center (x, y)-coordinates of the bounding box. Figure 1 above demonstrates accepting a set of bounding box coordinates and computing the centroid.
Since these are the first initial set of bounding boxes presented to our algorithm we will assign them unique IDs.
Step #2: Compute Euclidean distance between new bounding boxes and existing objects
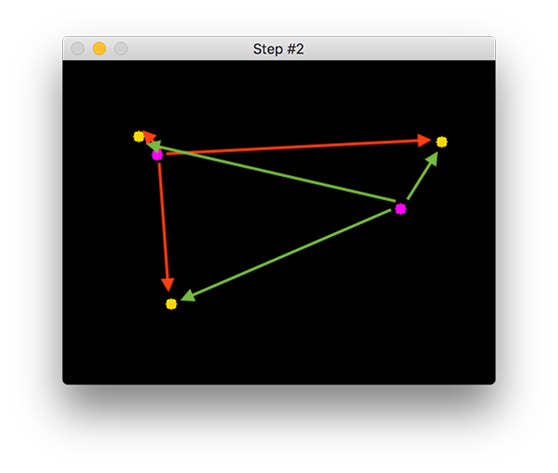
图2 Step #2
Three objects are present in this image for simple object tracking with Python and OpenCV. We need to compute the Euclidean distances between each pair of original centroids (red) and new centroids (green).
For every subsequent frame in our video stream we apply Step #1 of computing object centroids; however, instead of assigning a new unique ID to each detected object (which would defeat the purpose of object tracking), we first need to determine if we can associate the new object centroids (yellow) with the old object centroids (purple). To accomplish this process, we compute the Euclidean distance (highlighted with green arrows) between each pair of existing object centroids and input object centroids.
From Figure 2 you can see that we have this time detected three objects in our image. The two pairs that are close together are two existing objects.
We then compute the Euclidean distances between each pair of original centroids (yellow) and new centroids (purple). But how do we use the Euclidean distances between these points to actually match them and associate them? The answer is in Step #3.
Step #3: Update (x, y)-coordinates of existing objects

图3 Step #3
Our simple centroid object tracking method has associated objects with minimized object distances. What do we do about the object in the bottom left though?
The primary assumption of the centroid tracking algorithm is that a given object will potentially move in between subsequent frames, but the distance between the centroids for frames F_t and F_{t + 1} will be smaller than all other distances between objects.
Therefore, if we choose to associate centroids with minimum distances between subsequent frames we can build our object tracker.
In Figure 3 you can see how our centroid tracker algorithm chooses to associate centroids that minimize their respective Euclidean distances.
But what about the lonely point in the bottom-left?
It didn’t get associated with anything — what do we do with it?
Step #4: Register new objects
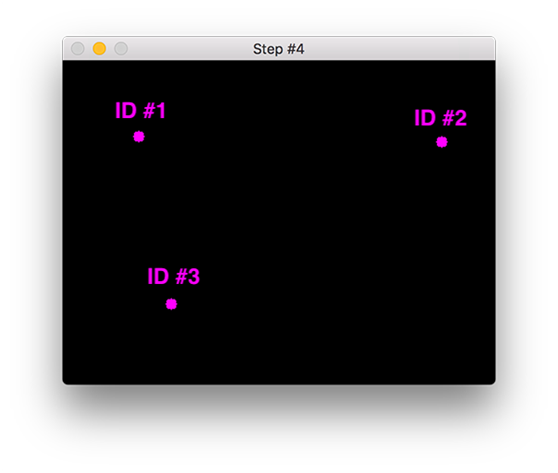
图4 Step #4
In our object tracking with Python and OpenCV example, we have a new object that wasn’t matched with an existing object, so it is registered as object ID #3.
In the event that there are more input detections than existing objects being tracked, we need to register the new object. “Registering” simply means that we are adding the new object to our list of tracked objects by:
Assigning it a new object ID
Storing the centroid of the bounding box coordinates for that object
We can then go back to Step #2 and repeat the pipeline of steps for every frame in our video stream.
Figure 4 demonstrates the process of using the minimum Euclidean distances to associate existing object IDs and then registering a new object.
Step #5: Deregister old objects
Any reasonable object tracking algorithm needs to be able to handle when an object has been lost, disappeared, or left the field of view.
Exactly how you handle these situations is really dependent on where your object tracker is meant to be deployed, but for this implementation, we will deregister old objects when they cannot be matched to any existing objects for a total of N subsequent frames.
参考资料:Simple object tracking with OpenCV - PyImageSearch
3. 禁止区域入侵检测
本次任务完整代码存放在 任务源代码/任务19. 禁止区域入侵检测 中。
本次任务的目录层级结构如下图所示:
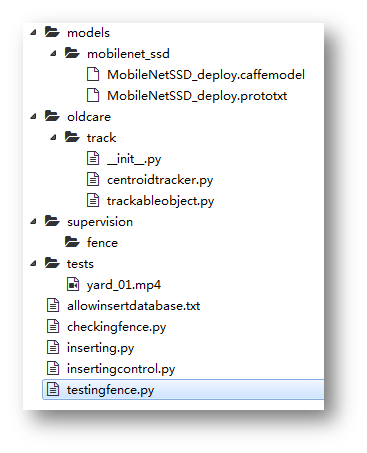
图1 目录结构
models: 物体检测模型;这些开源模型是别人已经训练好的。
oldcare.track: 物体追踪相关的类。
supervision/fence: 检测到有人闯入,则把截图放到该目录下。
tests: 测试视频。
testingfence.py: 禁止区域入侵检测。
checkingfence.py: 院子摄像头的监控主程序。
禁止区域入侵检测可以用在多个场景,如把摄像头放到图书馆门口统计进入图书馆的人数。它是物体检测+物体追踪技术的结合。物体检测目的是识别出人这个物体,物体追踪则是追踪检测到的这个人。
代码中有大量注释,请同学们参考注释理解代码。
在oldcare.track中打开__init__.py,添加如下代码:
# import the necessary packages from .centroidtracker import CentroidTracker from .trackableobject import TrackableObject
  打开trackableobject.py,添加如下代码:
class TrackableObject:
    def __init__(self, objectID, centroid):
        # store the object ID, then initialize a list of centroids
        # using the current centroid
        self.objectID = objectID
        self.centroids = [centroid]

        # initialize a boolean used to indicate if the object has
        # already been counted or not
        self.counted = False
打开centroidtracker.py,添加如下代码:
# import the necessary packages
from scipy.spatial import distance as dist
from collections import OrderedDict
import numpy as np

class CentroidTracker:
    def __init__(self, maxDisappeared=50, maxDistance=50):
        # initialize the next unique object ID along with two ordered
        # dictionaries used to keep track of mapping a given object
        # ID to its centroid and number of consecutive frames it has
        # been marked as "disappeared", respectively
        self.nextObjectID = 0
        self.objects = OrderedDict()
        self.disappeared = OrderedDict()

        # store the number of maximum consecutive frames a given
        # object is allowed to be marked as "disappeared" until we
        # need to deregister the object from tracking
        self.maxDisappeared = maxDisappeared

        # store the maximum distance between centroids to associate
        # an object -- if the distance is larger than this maximum
        # distance we'll start to mark the object as "disappeared"
        self.maxDistance = maxDistance

    def register(self, centroid):
        # when registering an object we use the next available object
        # ID to store the centroid
        self.objects[self.nextObjectID] = centroid
        self.disappeared[self.nextObjectID] = 0
        self.nextObjectID += 1

    def deregister(self, objectID):
        # to deregister an object ID we delete the object ID from
        # both of our respective dictionaries
        del self.objects[objectID]
        del self.disappeared[objectID]

    def update(self, rects):
        # check to see if the list of input bounding box rectangles
        # is empty
        if len(rects) == 0:
            # loop over any existing tracked objects and mark them
            # as disappeared
            for objectID in list(self.disappeared.keys()):
                self.disappeared[objectID] += 1

                # if we have reached a maximum number of consecutive
                # frames where a given object has been marked as
                # missing, deregister it
                if self.disappeared[objectID] > self.maxDisappeared:
                    self.deregister(objectID)

            # return early as there are no centroids or tracking info
            # to update
            return self.objects

        # initialize an array of input centroids for the current frame
        inputCentroids = np.zeros((len(rects), 2), dtype="int")

        # loop over the bounding box rectangles
        for (i, (startX, startY, endX, endY)) in enumerate(rects):
            # use the bounding box coordinates to derive the centroid
            cX = int((startX + endX) / 2.0)
            cY = int((startY + endY) / 2.0)
            inputCentroids[i] = (cX, cY)

        # if we are currently not tracking any objects take the input
        # centroids and register each of them
        if len(self.objects) == 0:
            for i in range(0, len(inputCentroids)):
                self.register(inputCentroids[i])

        # otherwise, are are currently tracking objects so we need to
        # try to match the input centroids to existing object
        # centroids
        else:
            # grab the set of object IDs and corresponding centroids
            objectIDs = list(self.objects.keys())
            objectCentroids = list(self.objects.values())

            # compute the distance between each pair of object
            # centroids and input centroids, respectively -- our
            # goal will be to match an input centroid to an existing
            # object centroid
            D = dist.cdist(np.array(objectCentroids), inputCentroids)

            # in order to perform this matching we must (1) find the
            # smallest value in each row and then (2) sort the row
            # indexes based on their minimum values so that the row
            # with the smallest value as at the *front* of the index
            # list
            rows = D.min(axis=1).argsort()

            # next, we perform a similar process on the columns by
            # finding the smallest value in each column and then
            # sorting using the previously computed row index list
            cols = D.argmin(axis=1)[rows]

            # in order to determine if we need to update, register,
            # or deregister an object we need to keep track of which
            # of the rows and column indexes we have already examined
            usedRows = set()
            usedCols = set()

            # loop over the combination of the (row, column) index
            # tuples
            for (row, col) in zip(rows, cols):
                # if we have already examined either the row or
                # column value before, ignore it
                if row in usedRows or col in usedCols:
                    continue

                # if the distance between centroids is greater than
                # the maximum distance, do not associate the two
                # centroids to the same object
                if D[row, col] > self.maxDistance:
                    continue

                # otherwise, grab the object ID for the current row,
                # set its new centroid, and reset the disappeared
                # counter
                objectID = objectIDs[row]
                self.objects[objectID] = inputCentroids[col]
                self.disappeared[objectID] = 0

                # indicate that we have examined each of the row and
                # column indexes, respectively
                usedRows.add(row)
                usedCols.add(col)

            # compute both the row and column index we have NOT yet
            # examined
            unusedRows = set(range(0,D.shape[0])).difference(usedRows)
            unusedCols = set(range(0,D.shape[1])).difference(usedCols)

            # in the event that the number of object centroids is
            # equal or greater than the number of input centroids
            # we need to check and see if some of these objects have
            # potentially disappeared
            if D.shape[0] >= D.shape[1]:
                # loop over the unused row indexes
                for row in unusedRows:
                    # grab the object ID for the corresponding row
                    # index and increment the disappeared counter
                    objectID = objectIDs[row]
                    self.disappeared[objectID] += 1

                    # check to see if the number of consecutive
                    # frames the object has been marked "disappeared"
                    # for warrants deregistering the object
                    if self.disappeared[objectID]>self.maxDisappeared:
                        self.deregister(objectID)

            # otherwise, if the number of input centroids is greater
            # than the number of existing object centroids we need to
            # register each new input centroid as a trackable object
            else:
                for col in unusedCols:
                    self.register(inputCentroids[col])

        # return the set of trackable objects
        return self.objects
打开testingfence.py,添加如下代码:
# -*- coding: utf-8 -*-

'''
测试电子围栏
摄像头对准围墙那一侧

用法:
python testingfence.py
python testingfence.py --filename tests/yard_01.mp4
'''

# import the necessary packages
from oldcare.track import CentroidTracker
from oldcare.track import TrackableObject
from imutils.video import FPS
import numpy as np
import imutils
import time
import dlib
import cv2
import argparse

# 传入参数
ap = argparse.ArgumentParser()
ap.add_argument("-f", "--filename", required=False, default = '',
    help="")
args = vars(ap.parse_args())

# 全局变量
prototxt_file_path='models/mobilenet_ssd/MobileNetSSD_deploy.prototxt'
# # Contains the Caffe deep learning model files. We’ll be using a
#MobileNet Single Shot Detector (SSD), “Single Shot Detectors for
#object detection”.
model_file_path ='models/mobilenet_ssd/MobileNetSSD_deploy.caffemodel'
input_video = args['filename']
skip_frames = 30 # of skip frames between detections

# 超参数
# minimum probability to filter weak detections
minimum_confidence = 0.80


# 物体识别模型能识别的物体(21种)
CLASSES = ["background", "aeroplane", "bicycle", "bird", "boat",
           "bottle", "bus", "car", "cat", "chair",
           "cow", "diningtable","dog", "horse", "motorbike",
           "person", "pottedplant", "sheep","sofa", "train",
           "tvmonitor"]

# 加载物体识别模型
print("[INFO] loading model...")
net = cv2.dnn.readNetFromCaffe(prototxt_file_path, model_file_path)

# if a video path was not supplied, grab a reference to the webcam
if not input_video:
    print("[INFO] starting video stream...")
    vs = cv2.VideoCapture(0)
    time.sleep(2)
else:
    print("[INFO] opening video file...")
    vs = cv2.VideoCapture(input_video)

# initialize the frame dimensions (we'll set them as soon as we read
# the first frame from the video)
W = None
H = None

# instantiate our centroid tracker, then initialize a list to store
# each of our dlib correlation trackers, followed by a dictionary to
# map each unique object ID to a TrackableObject
ct = CentroidTracker(maxDisappeared=40, maxDistance=50)
trackers = []
trackableObjects = {}

# initialize the total number of frames processed thus far, along
# with the total number of objects that have moved either up or down
totalFrames = 0
totalDown = 0
totalUp = 0

# start the frames per second throughput estimator
fps = FPS().start()

# loop over frames from the video stream
while True:
    # grab the next frame and handle if we are reading from either
    # VideoCapture or VideoStream
    ret, frame = vs.read()

    # if we are viewing a video and we did not grab a frame then we
    # have reached the end of the video
    if input_video and not ret:
        break

    if not input_video:
        frame = cv2.flip(frame, 1)

    # resize the frame to have a maximum width of 500 pixels (the
    # less data we have, the faster we can process it), then convert
    # the frame from BGR to RGB for dlib
    frame = imutils.resize(frame, width=500)
    rgb = cv2.cvtColor(frame, cv2.COLOR_BGR2RGB)

    # if the frame dimensions are empty, set them
    if W is None or H is None:
        (H, W) = frame.shape[:2]

    # initialize the current status along with our list of bounding
    # box rectangles returned by either (1) our object detector or
    # (2) the correlation trackers
    status = "Waiting"
    rects = []

    # check to see if we should run a more computationally expensive
    # object detection method to aid our tracker
    if totalFrames % skip_frames == 0:
        # set the status and initialize our new set of object trackers
        status = "Detecting"
        trackers = []

        # convert the frame to a blob and pass the blob through the
        # network and obtain the detections
        blob = cv2.dnn.blobFromImage(frame, 0.007843, (W, H), 127.5)
        net.setInput(blob)
        detections = net.forward()

        # loop over the detections
        for i in np.arange(0, detections.shape[2]):
            # extract the confidence (i.e., probability) associated
            # with the prediction
            confidence = detections[0, 0, i, 2]

            # filter out weak detections by requiring a minimum
            # confidence
            if confidence > minimum_confidence:
                # extract the index of the class label from the
                # detections list
                idx = int(detections[0, 0, i, 1])

                # if the class label is not a person, ignore it
                if CLASSES[idx] != "person":
                    continue

                # compute the (x, y)-coordinates of the bounding box
                # for the object
                box = detections[0, 0, i, 3:7] *np.array([W, H, W, H])
                (startX, startY, endX, endY) = box.astype("int")

                # construct a dlib rectangle object from the bounding
                # box coordinates and then start the dlib correlation
                # tracker
                tracker = dlib.correlation_tracker()
                rect = dlib.rectangle(startX, startY, endX, endY)
                tracker.start_track(rgb, rect)

                # add the tracker to our list of trackers so we can
                # utilize it during skip frames
                trackers.append(tracker)

    # otherwise, we should utilize our object *trackers* rather than
    #object *detectors* to obtain a higher frame processing throughput
    else:
        # loop over the trackers
        for tracker in trackers:
            # set the status of our system to be 'tracking' rather
            # than 'waiting' or 'detecting'
            status = "Tracking"

            # update the tracker and grab the updated position
            tracker.update(rgb)
            pos = tracker.get_position()

            # unpack the position object
            startX = int(pos.left())
            startY = int(pos.top())
            endX = int(pos.right())
            endY = int(pos.bottom())

            # draw a rectangle around the people
            cv2.rectangle(frame, (startX, startY), (endX, endY),
                (0, 255, 0), 2)

            # add the bounding box coordinates to the rectangles list
            rects.append((startX, startY, endX, endY))


    # draw a horizontal line in the center of the frame -- once an
    # object crosses this line we will determine whether they were
    # moving 'up' or 'down'
    cv2.line(frame, (0, H // 2), (W, H // 2), (0, 255, 255), 2)

    # use the centroid tracker to associate the (1) old object
    # centroids with (2) the newly computed object centroids
    objects = ct.update(rects)

    # loop over the tracked objects
    for (objectID, centroid) in objects.items():
        # check to see if a trackable object exists for the current
        # object ID
        to = trackableObjects.get(objectID, None)

        # if there is no existing trackable object, create one
        if to is None:
            to = TrackableObject(objectID, centroid)

        # otherwise, there is a trackable object so we can utilize it
        # to determine direction
        else:
            # the difference between the y-coordinate of the *current*
            # centroid and the mean of *previous* centroids will tell
            # us in which direction the object is moving (negative for
            # 'up' and positive for 'down')
            y = [c[1] for c in to.centroids]
            direction = centroid[1] - np.mean(y)
            to.centroids.append(centroid)

            # check to see if the object has been counted or not
            if not to.counted:
                # if the direction is negative (indicating the object
                # is moving up) AND the centroid is above the center
                # line, count the object
                if direction < 0 and centroid[1] < H // 2:
                    totalUp += 1
                    to.counted = True

                # if the direction is positive (indicating the object
                # is moving down) AND the centroid is below the
                # center line, count the object
                elif direction > 0 and centroid[1] > H // 2:
                    totalDown += 1
                    to.counted = True

        # store the trackable object in our dictionary
        trackableObjects[objectID] = to

        # draw both the ID of the object and the centroid of the
        # object on the output frame
        text = "ID {}".format(objectID)
        cv2.putText(frame, text, (centroid[0] - 10, centroid[1] - 10),
            cv2.FONT_HERSHEY_SIMPLEX, 0.5, (0, 255, 0), 2)
        cv2.circle(frame, (centroid[0], centroid[1]), 4,
                   (0, 255, 0), -1)

    # construct a tuple of information we will be displaying on the
    # frame
    info = [
        #("Up", totalUp),
        ("Down", totalDown),
        ("Status", status),
    ]

    # loop over the info tuples and draw them on our frame
    for (i, (k, v)) in enumerate(info):
        text = "{}: {}".format(k, v)
        cv2.putText(frame, text, (10, H - ((i * 20) + 20)),
            cv2.FONT_HERSHEY_SIMPLEX, 0.6, (0, 0, 255), 2)

    # show the output frame
    cv2.imshow("Frame", frame)

    k = cv2.waitKey(1) & 0xff
    if k == 27:
        break

    # increment the total number of frames processed thus far and
    # then update the FPS counter
    totalFrames += 1
    fps.update()

# stop the timer and display FPS information
fps.stop()
print("[INFO] elapsed time: {:.2f}".format(fps.elapsed())) # 14.19
print("[INFO] approx. FPS: {:.2f}".format(fps.fps())) # 90.43

# close any open windows
vs.release()
cv2.destroyAllWindows()
      执行下行命令即可运行程序:


python testingfence.py --filename tests/yard_01.mp4
      如果同学们可以把摄像头挂在高处,也可以通过摄像头捕捉画面。程序运行方式如下:


python testingfence.py
     程序运行结果如下图:
程序运行结果如下图:
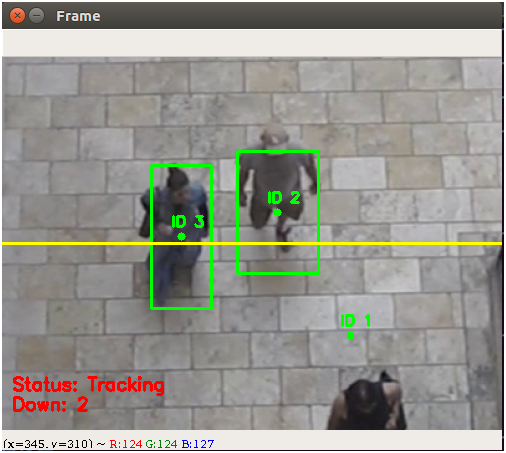
图2 程序运行效果