在2014年的ImageNet图像识别大赛中,一个名叫GoogleNet的网络架构大放异彩。GoogleNet使用了一种叫作Inception的结构。其实GoogleNet本质上就是一种Inception网络,而一个Inception网络又是由多个Inception模块和少量的汇聚层堆叠而成。
Inception模块
在Inception网络结构中,一个卷积层包含多个不同大小的卷积操作,成为Inception模块。Inception模块使用1x1、3x3、5x5等不同大小的卷积核,并将得到的特征映射在深度上拼接(堆叠)起来作为输出特征映射。
GoogleNet的Inception模块结构如图所示:

Inception模块采用了4组平行的特征抽取方式。分别为1x1、3x3、5x5的卷积和3x3的池化层。同时,为了提高计算效率,减少参数数量,Inception模块在进行3x3和5x5的卷积之前和3x3的池化层后进行一次1x1卷积来减少特征映射的深度,其实本质上就是通过1x1卷积来改变输出的通道数量。最后所谓特征映射在深度上拼接其实就是在通道维度上进行合并。
下面我们来实现一下GoogleNet的Inception模块:
import torch.nn as nn
import torch
import torch.optim as optim
import torchvision.transforms as transforms
from torch.nn import functional as F

# 构建inception模块
class Inception(nn.Module):
    # c1,c2,c3,c4代码每一路输出的通道数,这些通道最后进行拼接成为最终输出
    def __init__(self, in_channels, c1, c2, c3, c4) -> None:
        super(Inception, self).__init__()
        # 线路1,1x1卷积层
        self.p1 = nn.Sequential(nn.Conv2d(in_channels, c1, kernel_size=1), nn.ReLU())
        # 线路2,1x1卷积层
        self.p2_1 = nn.Sequential(nn.Conv2d(in_channels, c2[0], kernel_size=1), nn.ReLU())
        # 线路2,3x3卷积层,填充1
        self.p2_2 = nn.Sequential(nn.Conv2d(c2[0], c2[1], kernel_size=3, padding=1), nn.ReLU())
        # 线路3,1x1卷积层
        self.p3_1 = nn.Sequential(nn.Conv2d(in_channels, c3[0], kernel_size=1), nn.ReLU())
        # 线路3,5x5卷积层
        self.p3_2 = nn.Sequential(nn.Conv2d(c3[0], c3[1], kernel_size=5, padding=2), nn.ReLU())
        # 线路4,3x3池化层
        self.p4_1 = nn.MaxPool2d(kernel_size=3, stride=1, padding=1) # MaxPool2d的stride默认跟kernel_size一样
        # 线路4,1x1卷积层
        self.p4_2 = nn.Sequential(nn.Conv2d(in_channels, c4, kernel_size=1), nn.ReLU())

    def forward(self, x):
        p1 = self.p1(x)
        p2 = self.p2_2(self.p2_1(x))
        p3 = self.p3_2(self.p3_1(x))
        p4 = self.p4_2(self.p4_1(x))
        print("p1.shape:{},p2.shape:{},p3.shape:{},p4.shape:{}".format(p1.shape, p2.shape, p3.shape, p4.shape))
        # 在通道维度上拼接
        return torch.cat((p1, p2, p3, p4), dim=0)

if __name__ == '__main__':
    x = torch.zeros(3, 224, 224)
    m = Inception(3, 192, (96,208), (16,48), 64)
    print(m(x).shape)
# 输出:
p1.shape:torch.Size([192, 224, 224]),p2.shape:torch.Size([208, 224, 224]),p3.shape:torch.Size([48, 224, 224]),p4.shape:torch.Size([64, 224, 224])
torch.Size([512, 224, 224])
这里我们是完全根据inception模块的结构图来实现的,我们假设线路1的输出通道数192,线路2的输出通道数(96,208),线路3的输出通道数(16,48),线路四的输出通道数64。可以看到输入一个3*224*224的张量,最终输出如下:线路1输出192*224*224,线路2输出208*224*224,线路3输出48*224*224,线路4输出64*224*224,按第0维通道维拼接,结果为512*224*224。
这里要注意两个问题,首先拼接的维度选择,我们这里因为维度0是通道维,所以torch.cat函数中选择dim=0,完整模型代码中,dim=1,这是因为第0维一般是批量数batch_size。第二个问题是,池化层MaxPool2d的stride=1不能忘,因为MaxPool2d默认的stride是和kernel_size一样的,如果不指定,那么线路4的3x3池化层输出会变成3*75*75,[(224-3+2*1)/3+1=75],导致线路四最终输出为64*75*75,如果这样的话,就无法按通道维度拼接了,因为[192,224,224],[208,224,224],[48,224,224]和[64,75,75]前三个张量无法和最后一个张量拼接。
Googlenet网络模型
完整的googlenet网络架构如下:
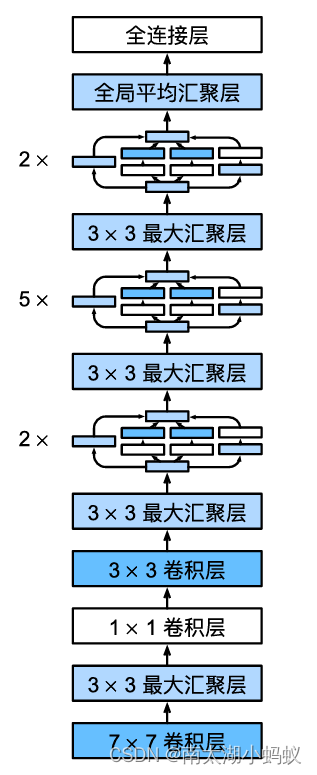
具体流程如下:
输入为3x224x224的张量
1.经过7x7的卷积层,输出64通道,步幅为2,填充为3,输出大小为64x112x112
2.经过3x3的池化层,通道数不变,步幅为2,填充为1,输出大小为64x56x56
3.经过1x1的卷积层,输出64通道,输出大小为64x56x56
4.经过3x3的卷积层,输出192通道,步幅为1,填充为1,输出大小为192x56x56
5.经过3x3的池化层,通道数不变,步幅为2,填充为1,输出大小为192x2828
6.经过两个Inception模块:
1)第一个Inception,输入通道数192,输出通道数为 64+128+32+32=256,由于Inception模块并不改变特征输出的长宽大小,所以输出大小为256x28x28
2)第二个Inception,输入通道数256,输出通道数为128+192+96+64=480,输出大小为480x28x28
7.经过3x3池化层,通道数不变,步幅为2,填充为1,输出大小为480x14x14
8.经过五个Inception模块:
1)第一个Inception,输入通道数480,输出通道数192+208+48+64=512,输出大小为512x14x14
2)第二个Inception,输入通道数512,输出通道数160+224+64+64=512,输出大小为512x14x14
3)第三个Inception,输入通道数512,输出通道数128+256+64+64=512,输出大小为512x14x14
4)第四个Inception,输入通道数512,输出通道数112+228+64+64=528,输出大小为528x14x14
5)第五个Inception,输入通道数528,输出通道数256+320+128+128=832,输出大小为832x14x14
9.经过3x3池化层,通道数不变,步幅为2,填充为1,输出大小为832x7x7
10.经过两个Inception模块:
1)第一个Inception,输入通道数832,输出通道数256+320+128+128=832,输出大小为832x7x7
2)第二个Inception,输入通道数832,输出通道数384+384+128+128=1024,输出大小为1024x7x7
11.经过全局平均汇聚层,输出1024x1x1
12.全连接层,输出10个分类结果。
下面我们实现一下代码:
class GoogleNet(nn.Module):
    def __init__(self, num_classes) -> None:
        super(GoogleNet, self).__init__()
        b1 = nn.Sequential(nn.Conv2d(3, 64, kernel_size=7, stride=2, padding=3),
                           nn.ReLU(),
                           nn.MaxPool2d(kernel_size=3, stride=2, padding=1))
        b2 = nn.Sequential(nn.Conv2d(64, 64, kernel_size=1),
                           nn.Conv2d(64, 192, kernel_size=3, stride=1, padding=1),
                           nn.ReLU(),
                           nn.MaxPool2d(kernel_size=3, stride=2, padding=1))
        b3 = nn.Sequential(Inception(192, 64, (96,128), (16,32), 32),
                           Inception(256, 128, (128,192), (32,96), 64),
                           nn.MaxPool2d(kernel_size=3, stride=2, padding=1))
        b4 = nn.Sequential(Inception(480, 192, (96,208), (16,48), 64),
                           Inception(512, 160, (112,224), (24,64), 64),
                           Inception(512, 128, (128,256), (24,64), 64),
                           Inception(512, 112, (144,288), (32,64), 64),
                           Inception(528, 256, (160,320), (32,128), 128),
                           nn.MaxPool2d(kernel_size=3, stride=2, padding=1))
        b5 = nn.Sequential(Inception(832, 256, (160,320), (32,128), 128),
                           Inception(832, 384, (192,384), (48,128), 128),
                           nn.AdaptiveAvgPool2d((1,1)),
                           nn.Flatten())
        self.features = nn.Sequential(b1,b2,b3,b4,b5)
        self.classifier = nn.Sequential(
            nn.Linear(1024, num_classes)
        )

    def forward(self, x):
        x =self.features(x)
        print(x.shape)
        x = self.classifier(x)
        return x

if __name__ == '__main__':
    X = torch.rand(size=(1,3,224,224))
    net = GoogleNet(num_classes=10)
    X = net(X)
    print('output shape:', X.shape)
# 输出:
p1.shape:torch.Size([1, 64, 28, 28]),p2.shape:torch.Size([1, 128, 28, 28]),p3.shape:torch.Size([1, 32, 28, 28]),p4.shape:torch.Size([1, 32, 28, 28])
p1.shape:torch.Size([1, 128, 28, 28]),p2.shape:torch.Size([1, 192, 28, 28]),p3.shape:torch.Size([1, 96, 28, 28]),p4.shape:torch.Size([1, 64, 28, 28])
p1.shape:torch.Size([1, 192, 14, 14]),p2.shape:torch.Size([1, 208, 14, 14]),p3.shape:torch.Size([1, 48, 14, 14]),p4.shape:torch.Size([1, 64, 14, 14])
p1.shape:torch.Size([1, 160, 14, 14]),p2.shape:torch.Size([1, 224, 14, 14]),p3.shape:torch.Size([1, 64, 14, 14]),p4.shape:torch.Size([1, 64, 14, 14])
p1.shape:torch.Size([1, 128, 14, 14]),p2.shape:torch.Size([1, 256, 14, 14]),p3.shape:torch.Size([1, 64, 14, 14]),p4.shape:torch.Size([1, 64, 14, 14])
p1.shape:torch.Size([1, 112, 14, 14]),p2.shape:torch.Size([1, 288, 14, 14]),p3.shape:torch.Size([1, 64, 14, 14]),p4.shape:torch.Size([1, 64, 14, 14])
p1.shape:torch.Size([1, 256, 14, 14]),p2.shape:torch.Size([1, 320, 14, 14]),p3.shape:torch.Size([1, 128, 14, 14]),p4.shape:torch.Size([1, 128, 14, 14])
p1.shape:torch.Size([1, 256, 7, 7]),p2.shape:torch.Size([1, 320, 7, 7]),p3.shape:torch.Size([1, 128, 7, 7]),p4.shape:torch.Size([1, 128, 7, 7])
p1.shape:torch.Size([1, 384, 7, 7]),p2.shape:torch.Size([1, 384, 7, 7]),p3.shape:torch.Size([1, 128, 7, 7]),p4.shape:torch.Size([1, 128, 7, 7])
torch.Size([1, 1024])
output shape: torch.Size([1, 10])
可以看到,每一路的大小都输出来了,最终得到分类结果。这里要注意一点,之前的Inception模块中的按通道拼接操作,由于这里加入了batch_size,所以合并的torch.cat函数dim=1,也就是按维度1来进行拼接。
下面我们来测试一下,尝试一下该数据集在cifar-10上的训练效果:
根据我们上一次在VGG中阐述的批量归一化层的作用,我们同样在Inception模块中引入批量归一化层:
# 构建inception模块
class Inception(nn.Module):
    # c1,c2,c3,c4代码每一路输出的通道数,这些通道最后进行拼接成为最终输出
    def __init__(self, in_channels, c1, c2, c3, c4) -> None:
        super(Inception, self).__init__()
        # 线路1,1x1卷积层
        self.p1 = nn.Sequential(nn.Conv2d(in_channels, c1, kernel_size=1), nn.BatchNorm2d(c1), nn.ReLU())
        # 线路2,1x1卷积层
        self.p2_1 = nn.Sequential(nn.Conv2d(in_channels, c2[0], kernel_size=1), nn.BatchNorm2d(c2[0]), nn.ReLU())
        # 线路2,3x3卷积层,填充1
        self.p2_2 = nn.Sequential(nn.Conv2d(c2[0], c2[1], kernel_size=3, padding=1), nn.BatchNorm2d(c2[1]), nn.ReLU())
        # 线路3,1x1卷积层
        self.p3_1 = nn.Sequential(nn.Conv2d(in_channels, c3[0], kernel_size=1), nn.BatchNorm2d(c3[0]), nn.ReLU())
        # 线路3,5x5卷积层
        self.p3_2 = nn.Sequential(nn.Conv2d(c3[0], c3[1], kernel_size=5, padding=2), nn.BatchNorm2d(c3[1]), nn.ReLU())
        # 线路4,3x3池化层
        self.p4_1 = nn.MaxPool2d(kernel_size=3, stride=1, padding=1) # MaxPool2d的stride默认跟kernel_size一样
        # 线路4,1x1卷积层
        self.p4_2 = nn.Sequential(nn.Conv2d(in_channels, c4, kernel_size=1), nn.BatchNorm2d(c4), nn.ReLU())

    def forward(self, x):
        p1 = self.p1(x)
        p2 = self.p2_2(self.p2_1(x))
        p3 = self.p3_2(self.p3_1(x))
        p4 = self.p4_2(self.p4_1(x))
        #print("p1.shape:{},p2.shape:{},p3.shape:{},p4.shape:{}".format(p1.shape, p2.shape, p3.shape, p4.shape))
        # 在通道维度上拼接
        return torch.cat((p1, p2, p3, p4), dim=1)
然后,用cifar-10数据集进行训练,我将cifar-10数据集放大至224x224进行训练。
# 加载cifar数据集
import torchvision.datasets as datasets
from torchvision.transforms.functional import InterpolationMode
transform = transforms.Compose([transforms.Resize((224, 224), interpolation=InterpolationMode.BICUBIC),
                            transforms.ToTensor(),
                            transforms.Normalize(mean=[0.4914, 0.4822, 0.4465], std=[0.247, 0.2435, 0.2616]) # 此为训练集上的均值与方差
                            ])
train_dataset_cifar = datasets.CIFAR10('./data', train=True, transform=transform, download=True)
test_dataset_cifar = datasets.CIFAR10('./data', train=False, transform=transform, download=True)
train_loader_cifar = torch.utils.data.DataLoader(dataset=train_dataset_cifar, batch_size=24, shuffle=True)
test_loader_cifar = torch.utils.data.DataLoader(dataset=test_dataset_cifar, batch_size=24, shuffle=False)
train(net, train_loader_cifar, test_loader_cifar, lr=0.01, epochs=10)
训练和测试结果如下:
Epoch 1, Loss: 1.4117, Time 00:04:44
Epoch 2, Loss: 0.8174, Time 00:04:42
Epoch 3, Loss: 0.5929, Time 00:05:07
Epoch 4, Loss: 0.4710, Time 00:05:05
Epoch 5, Loss: 0.3846, Time 00:05:13
Epoch 6, Loss: 0.3080, Time 00:05:18
Epoch 7, Loss: 0.2601, Time 00:05:03
Epoch 8, Loss: 0.2079, Time 00:04:58
Epoch 9, Loss: 0.1662, Time 00:04:50
Epoch 10, Loss: 0.1411, Time 00:04:50

Test Accuracy: 83.74%
可以看到,仅仅训练了10个epoch,测试精度就达到了83.74%。下次我们来看看微软亚洲研究院何凯明大神等人提出的一个里程碑式的卷积神经网络:残差网络ResNet。


