目录
1. 原论文论文:https://arxiv.org/abs/1703.10593
2. 代码
2.1 下采样
2.2 残差块
2.3 上采样模块
2.4 生成器代码
3. 判别器
3.1 判别器组件
3. 2 判别器
4. 训练
4.1 输入数据
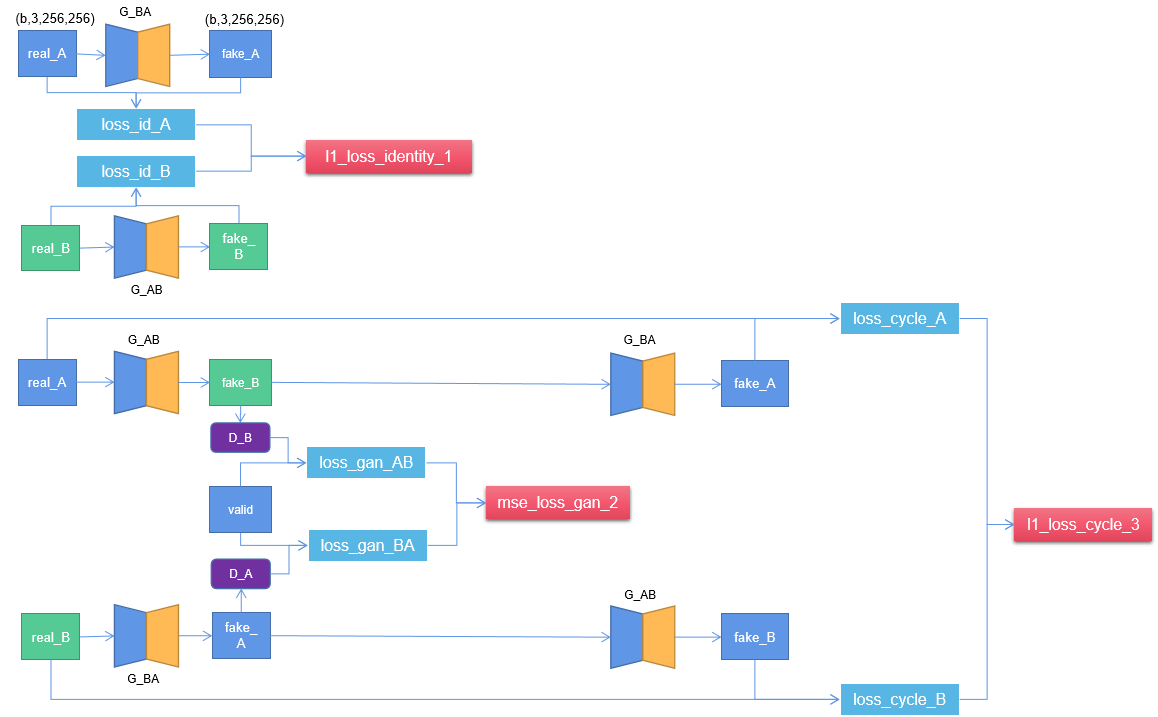
4.2 生成器loss函数结构图
4.3 判别器loss结构图
1. 原论文
论文:https://arxiv.org/abs/1703.10593
pytorch源码:GitHub - junyanz/pytorch-CycleGAN-and-pix2pix: Image-to-Image Translation in PyTorch

论文框架:

(1)输入领域A图片real_A,经过生成网络G_AB,生成领域B图片fake_B;
(2)fake_B再输入G_BA生成网络,生成real_A,即G_BA(G_AB(real_A)) = real_A;
(3)reconstructed image 和 输入图片real_A直接求loss,得到生成器损失;
(4)fake_B和real_B之间求生成器loss。
下面将结合代码,深入理解整个过程。
2. 代码
这里参考pytorch版本:GitHub - eriklindernoren/PyTorch-GAN: PyTorch implementations of Generative Adversarial Networks.
实现libtorch版本。
其中,生成器G_AB 和 G_BA是同一个网络,框架细节如下。

是一个先下采样,再接残差块,再上采样的全卷积网络。
2.1 下采样
下采样模块是由conv2d+InstanceNorm2d+Relu组成,其中conv2d使其scale/2,channels/2.
// Down sampling : 通过conv2d进行两次下采样,同时double channels
class DownSampleImpl : public torch::nn::Module {
public:
	DownSampleImpl(int in_channels, int out_channels);
	torch::Tensor forward(torch::Tensor x);
private:
	torch::nn::Conv2d conv1{ nullptr };
	torch::nn::InstanceNorm2d bn1{ nullptr };
	torch::nn::ReLU relu1{ nullptr };
};
TORCH_MODULE(DownSample);
DownSampleImpl::DownSampleImpl(int in_channels, int out_channels) {
	conv1 = torch::nn::Conv2d(torch::nn::Conv2dOptions(in_channels, out_channels, 3).stride(2).padding(1));
	bn1 = torch::nn::InstanceNorm2d(out_channels);
	relu1 = torch::nn::ReLU(true);
	register_module("generator downsample pad1", conv1);
	register_module("generator downsample bn1", bn1);
	register_module("generator downsample relu1", relu1);
}
torch::Tensor DownSampleImpl::forward(torch::Tensor x) {
	x = conv1(x);
	x = bn1(x);
	x = relu1(x);
	return x;
}
2.2 残差块
每个残差块由 conv2d+InstanceNorm2d+Relu,再接conv2d+InstanceNorm2d组成。
输入到残差块的特征图shape: (b,3,256,256);
输出特征图的shape: (b,3,256,256). 即不改变维度。
// two conv2d+bn+relu. keep feature scale.
class ResidualBlockImpl : public torch::nn::Module {
public:
	ResidualBlockImpl(int in_channels);
	torch::Tensor forward(torch::Tensor x);
private:
	torch::nn::ReflectionPad2d pad1{ nullptr };
	torch::nn::Conv2d conv1{ nullptr };
	torch::nn::InstanceNorm2d bn1{ nullptr };
	torch::nn::ReLU relu1{ nullptr };

	torch::nn::ReflectionPad2d pad2{ nullptr };
	torch::nn::Conv2d conv2{ nullptr };
	torch::nn::InstanceNorm2d bn2{ nullptr };
};
TORCH_MODULE(ResidualBlock);
ResidualBlockImpl::ResidualBlockImpl(int in_channels) {
	pad1 = torch::nn::ReflectionPad2d(1);
	conv1 = torch::nn::Conv2d(torch::nn::Conv2dOptions(in_channels, in_channels, 3));
	bn1 = torch::nn::InstanceNorm2d(in_channels);
	relu1 = torch::nn::ReLU(true);

	pad2 = torch::nn::ReflectionPad2d(1);
	conv2 = torch::nn::Conv2d(torch::nn::Conv2dOptions(in_channels, in_channels, 3));
	bn2 = torch::nn::InstanceNorm2d(in_channels);
	register_module("block pad1", pad1);
	register_module("block conv1", conv1);
	register_module("block bn1", bn1);

	register_module("block pad2", pad2);
	register_module("block conv2", conv2);
	register_module("block bn2", bn2);
}
torch::Tensor ResidualBlockImpl::forward(torch::Tensor x) {
	x = pad1(x);
	x = conv1(x);
	x = bn1(x);
	x = relu1(x);

	x = pad2(x);
	x = conv2(x);
	x = bn2(x);
	return x;
}
2.3 上采样模块
上采样模块由UpSample+Conv2d+InstanceNorm2d+ReLU组成。
用到两次上采样模块,维度变化(b,256,64,64)->(b,128,128,128)->(b,64,256,256)
/// <summary>
/// 两次上采样,(b,256,64,64)->(b,128,128,128)->(b,64,256,256)
/// </summary>
class UpSampleBlockImpl : public torch::nn::Module {
public:
	UpSampleBlockImpl(int in_channels, int out_channels);
	torch::Tensor forward(torch::Tensor x);
private:
	torch::nn::Upsample up{ nullptr };
	torch::nn::Conv2d conv{ nullptr };
	torch::nn::InstanceNorm2d bn{ nullptr };
	torch::nn::ReLU relu{ nullptr };
};
TORCH_MODULE(UpSampleBlock);
UpSampleBlockImpl::UpSampleBlockImpl(int in_channels, int out_channels) {
	up = torch::nn::Upsample(upsample_options(std::vector<double>({2, 2})));
	conv = torch::nn::Conv2d(torch::nn::Conv2dOptions(in_channels, out_channels, 3).padding(1));
	bn = torch::nn::InstanceNorm2d(out_channels);
	relu = torch::nn::ReLU(true);

	register_module("generator UpSampleBlock upsample", up);
	register_module("generator UpSampleBlock conv", conv);
	register_module("generator UpSampleBlock bn", bn);
	register_module("generator UpSampleBlock relu", relu);
}
torch::Tensor UpSampleBlockImpl::forward(torch::Tensor x) {
	x = up(x);
	x = conv(x);
	x = bn(x);
	x = relu(x);
	return x;
}
最后再接一个conv2d,将通道数变成3即可输出生成的图像。
2.4 生成器代码

可以直接看forward函数,有5个步骤
(1)先是一个conv+bn+relu,预处理模块, size: (b,3,256,256) ->(b,64,256,256);
(2)然后是两次下采样,提取特征,size: (b,64,256,256) - > (b,128,128,128) -> (b,256,64,64);
(3)再接多个残差块,提取特征, size: (b,256,64,64) -> (b,256,64,64);
(4)上采样,size: (b,256,64,64)->(b,128,128,128)->(b,64,256,256);
(5)最后接一个输出层,即conv2d+bn+relu,size: (b,64,256,256) -> (b,3,256,256);
/// <summary>
/// 下采样,res_blocks,上采样,output layer.
/// </summary>
class GeneratorResNetImpl : public torch::nn::Module {
public:
	GeneratorResNetImpl(std::vector<int> input_shape, int num_residual_blocks);
	torch::Tensor forward(torch::Tensor x);
private:
	torch::nn::Sequential _make_layer(int in_channels, int blocks);
	torch::nn::ReflectionPad2d pad1{ nullptr };
	torch::nn::Conv2d conv1{ nullptr };
	torch::nn::InstanceNorm2d bn1{ nullptr };
	torch::nn::ReLU relu1{ nullptr };
	// down
	DownSample down1{ nullptr };
	DownSample down2{ nullptr };
	// res
	torch::nn::Sequential res_blocks = torch::nn::Sequential();
	// up
	UpSampleBlock up1{ nullptr };
	UpSampleBlock up2{ nullptr };
	// output layer
	torch::nn::ReflectionPad2d pad2{ nullptr };
	torch::nn::Conv2d conv2{ nullptr };
	torch::nn::Tanh tanh2{ nullptr };
};
TORCH_MODULE(GeneratorResNet);

torch::nn::Sequential GeneratorResNetImpl::_make_layer(int in_channels, int blocks)
{
	torch::nn::Sequential layers;
	for (int i = 0; i < blocks; i++) {
		layers->push_back(ResidualBlock(in_channels));
	}
	return layers;
}
GeneratorResNetImpl::GeneratorResNetImpl(std::vector<int> input_shape, int num_residual_blocks)
{
	int channels = input_shape[0];  // 3
	int out_channels = 64;
	// 1, conv+bn+relu. (256+6-7+2*0)/1+1 = 256
	pad1 = torch::nn::ReflectionPad2d(channels);
	conv1 = torch::nn::Conv2d(torch::nn::Conv2dOptions(channels, out_channels, 7));
	bn1 = torch::nn::InstanceNorm2d(out_channels);
	relu1 = torch::nn::ReLU(true);
	int in_channels = out_channels;

	// 2, Down sampling: 通过conv2d两次下采样,并且double channels
	down1 = DownSample(in_channels, out_channels*2);
	down2 = DownSample(out_channels * 2, out_channels*4);
	in_channels = out_channels * 4;  // 256 = 64*4

	// 3, Residual blocks: keep feature scale and channel unchange.
	res_blocks = _make_layer(in_channels, num_residual_blocks);  // (b,256,64,64)

	// 4, Up sampling: up+conv+bn+relu. halve channels and keep feature scale unchange.
	up1 = UpSampleBlock(in_channels, in_channels/2);  // (b,128,128,128)
	up2 = UpSampleBlock(in_channels / 2, in_channels / 4);  // (b,64,256,256)
	in_channels = in_channels / 4;  // 64

	// 5, output layer: pad+conv+tanh. change channels and keep feature scale unchange.
	pad2 = torch::nn::ReflectionPad2d(channels);  // 3
	conv2 = torch::nn::Conv2d(torch::nn::Conv2dOptions(in_channels, channels, 7));  // (b,64,256,256)->(b,3,256,256)
	tanh2 = torch::nn::Tanh();

	register_module("generator pad1", pad1);
	register_module("generator conv1", conv1);  // 一定要注册,不然不会使用cuda
	register_module("generator bn1", bn1);
	register_module("generator relu1", relu1);
	register_module("generator down1", down1);
	register_module("generator down2", down2);
	register_module("generator res_blocks", res_blocks);
	register_module("generator up1", up1);
	register_module("generator up2", up2);
	register_module("generator pad2", pad2);
	register_module("generator conv2", conv2);
	register_module("generator tanh2", tanh2);
}
torch::Tensor GeneratorResNetImpl::forward(torch::Tensor x) {  // (b,3,256,256)
	// 1, conv+bn+relu. (256+6-7+2*0)/1+1 = 256
	x = pad1(x);
	x = conv1(x);
	x = bn1(x);
	x = relu1(x);   // (b,64,256,256)

	// 2, Down sampling: 通过conv2d两次下采样,并且double channels
	x = down1(x);  // (b,128,128,128)
	x = down2(x);  // (b,256,64,64)

	// 3, Residual blocks: keep feature scale and channel unchange.
	x = res_blocks->forward(x);  // (b,256,64,64)

	// 4, Up sampling: up+conv+bn+relu. halve channels and keep feature scale unchange.
	x = up1(x);  // (b,128,128,128)
	x = up2(x);  // (b,64,256,256)

	// 5, output layer: pad+conv+tanh. change channels and keep feature scale unchange.
	x = pad2(x);
	x = conv2(x);
	x = tanh2(x);  // (b, 3, 256, 256)
	std::cout << x.sizes() << std::endl;
	return x;
}
3. 判别器

输入的是生成图图片(b,3,256,256),经过5次卷积,输出的是判别分数(b,1,16,16).
3.1 判别器组件
判别器组件是由conv2d+InstanceNorm2d+relu组成. 改变通道和scale.
/// <summary>
/// Conv2d + bn + relu
/// 其中kernel_size设置成4,跟patchGan有关。
/// </summary>
class DiscriminatorBlockImpl : public torch::nn::Module {
public:
	DiscriminatorBlockImpl(int in_channels, int out_channels, bool normalize = true);
	torch::Tensor forward(torch::Tensor x);
private:
	bool normalize = true;
	torch::nn::Conv2d conv{ nullptr };
	torch::nn::InstanceNorm2d bn{ nullptr };
	torch::nn::LeakyReLU relu{ nullptr };
};
TORCH_MODULE(DiscriminatorBlock);
DiscriminatorBlockImpl::DiscriminatorBlockImpl(int in_channels, int out_channels, bool normalize) {
	this->normalize = normalize;
	conv = torch::nn::Conv2d(torch::nn::Conv2dOptions(in_channels, out_channels, 4).stride(2).padding(1));
	if (normalize) bn = torch::nn::InstanceNorm2d(out_channels);
	relu = torch::nn::LeakyReLU(torch::nn::LeakyReLUOptions().negative_slope(0.2).inplace(true));

	register_module("DiscriminatorBlock conv", conv);
	if (normalize) register_module("DiscriminatorBlock bn", bn);
	register_module("DiscriminatorBlock relu", relu);
}
torch::Tensor DiscriminatorBlockImpl::forward(torch::Tensor x) {
	x = conv(x);
	if (this->normalize)
		x = bn(x);
	x = relu(x);
	return x;
}
3. 2 判别器
// (b,3,256,256)->(b,512,16,16)
torch::nn::Sequential _make_discriminator_blocks(int in_channels, int out_channels) {
	torch::nn::Sequential layers;
	layers->push_back(DiscriminatorBlock(in_channels, out_channels, false));
	layers->push_back(DiscriminatorBlock(out_channels, out_channels*2, true));
	layers->push_back(DiscriminatorBlock(out_channels * 2, out_channels * 4, true));
	layers->push_back(DiscriminatorBlock(out_channels * 4, out_channels * 8, true));
	return layers;
}
class DiscriminatorImpl : public torch::nn::Module {
public:
	DiscriminatorImpl(std::vector<int> input_shape);
	torch::Tensor forward(torch::Tensor x);
public:
	std::vector<int> output_shape_hw;
	//std::vector<int> output_shape;
private:
	torch::nn::Sequential discriminator_blocks{ nullptr };
	torch::nn::ZeroPad2d pad{ nullptr };
	torch::nn::Conv2d conv{ nullptr };
};
TORCH_MODULE(Discriminator);
DiscriminatorImpl::DiscriminatorImpl(std::vector<int> input_shape) {
	int channels = input_shape[0], height = input_shape[1], width = input_shape[2];
	// Calculate output shape of image discriminator (PatchGAN)
	this->output_shape_hw = { 1, height / int(pow(2,4)), width / int(pow(2,4)) };  // 外部调用,
	//this->output_shape = std::vector<int>({ 1, height / int(pow(2,4)), width / int(pow(2,4)) });
	// 1, dis blocks
	discriminator_blocks = _make_discriminator_blocks(channels, 64);  // (b,512,16,16)
	// 2, zeropad
	pad = torch::nn::ZeroPad2d(torch::nn::ZeroPad2dOptions({ 1, 0, 1, 0 }));  // left,right,up,down
	// 3, conv
	conv = torch::nn::Conv2d(torch::nn::Conv2dOptions(512, 1, 4).padding(1));

	register_module("Discriminator discriminator_blocks", discriminator_blocks);
	register_module("Discriminator pad", pad);
	register_module("Discriminator conv", conv);
}
torch::Tensor DiscriminatorImpl::forward(torch::Tensor x) {  // (b,3,256,256)
	x = discriminator_blocks->forward(x);  // (b,3,256,256)->(b,512,16,16)
	x = pad(x);  // (b,512,17,17)
	x = conv(x);  // (b,1,16,16)
	std::cout << x.sizes() << std::endl;
	return x;
}
4. 训练
4.1 输入数据
real_A和real_B分别是领域A和领域B图片,valid和fake分别是全1和全0矩阵。
real_A和real_B size: (b,3,256,256);
valid和fake size: (b,1,16,16).
// Set model input:
torch::Tensor real_A = batch.data.toType(torch::kF32).to(torch::kCUDA);  // (b,3,256,256)
torch::Tensor real_B = batch.target.toType(torch::kF32).to(torch::kCUDA);  // (b,3,256,256)
torch::Tensor valid = torch::ones({ real_A.size(0), D_A->output_shape_hw.at(0), D_A->output_shape_hw.at(1), D_A->output_shape_hw.at(2) }, torch::kF32).to(torch::kCUDA);  // (32,1,16,16).
torch::Tensor fake = torch::zeros({ real_A.size(0), D_A->output_shape_hw.at(0), D_A->output_shape_hw.at(1), D_A->output_shape_hw.at(2) }, torch::kF32).to(torch::kCUDA);  // (32,1,16,16).
4.2 生成器loss函数结构图
/*
----------------------
	Train Generators
----------------------
*/
// 1, Identity loss: cycGan可加可不加,加上identity loss生成的效果更好。
// 生成器G用来生成y风格图像,那么把y送入G,应该仍然生成y,G(y) = y,只有这样才能保证具有生成y风格的能力。
// 如果不加该loss,那么生成器可能会自主地修改图像的色调,使得整体的颜色产生变化。
torch::Tensor loss_id_A = l1_loss_identity(G_BA(real_A), real_A);  // G_BA(A) = A, 保证生成的A接近A
torch::Tensor loss_id_B = l1_loss_identity(G_AB(real_B), real_B);  // G_AB(B) = B, 保证生成的B接近B
torch::Tensor loss_identity = (loss_id_A + loss_id_B) / 2;

// 2, Gan loss: 让生成的图像更能称之为图像,也就是生成的图像更真实。但它不保证能生成到我们想要的图像。
torch::Tensor fake_B = G_AB(real_A);
torch::Tensor loss_GAN_AB = mse_loss_gan(D_B(fake_B), valid);  // 由A生成B, D_B分数越高越好,D_AB(G_AB(A)) = 1
torch::Tensor fake_A = G_BA(real_B);
torch::Tensor loss_GAN_BA = mse_loss_gan(D_A(fake_A), valid);  // # 由B生成A, D_A分数越高越好,D_BA(G_BA(B)) = 1
torch::Tensor loss_GAN = (loss_GAN_AB + loss_GAN_BA) / 2;

// 3, Cycle loss: 保证生成器的输出图片与输入图片只是风格不同,而内容相同
torch::Tensor loss_cycle_A = l1_loss_cycle(G_BA(fake_B.detach()), real_A);  // G_BA(G_AB(A)) = A
torch::Tensor loss_cycle_B = l1_loss_cycle(G_AB(fake_A), real_B);  // G_BA(G_AB(A)) = A
torch::Tensor loss_cycle = (loss_cycle_A + loss_cycle_B) / 2;

// total g loss: loss_gan + 10*loss_cycle + 5*loss_identity
torch::Tensor loss_G = loss_GAN + lambda_cyc * loss_cycle + lambda_id * loss_identity;
loss_G.backward();
4.3 判别器loss结构图
待续。。。
