vue2
- 简介
- 第一天
- 第二天
- 第三天
- 第四天
- 第五天
- 第六天
- 第七天
- 第八天
- 第九天
网课链接(半个月拿下)
简介
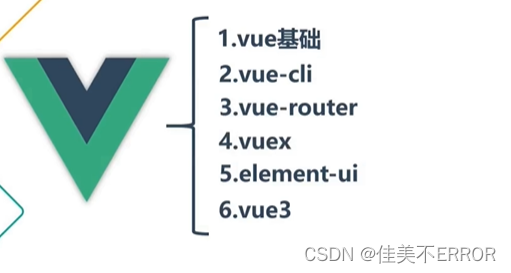
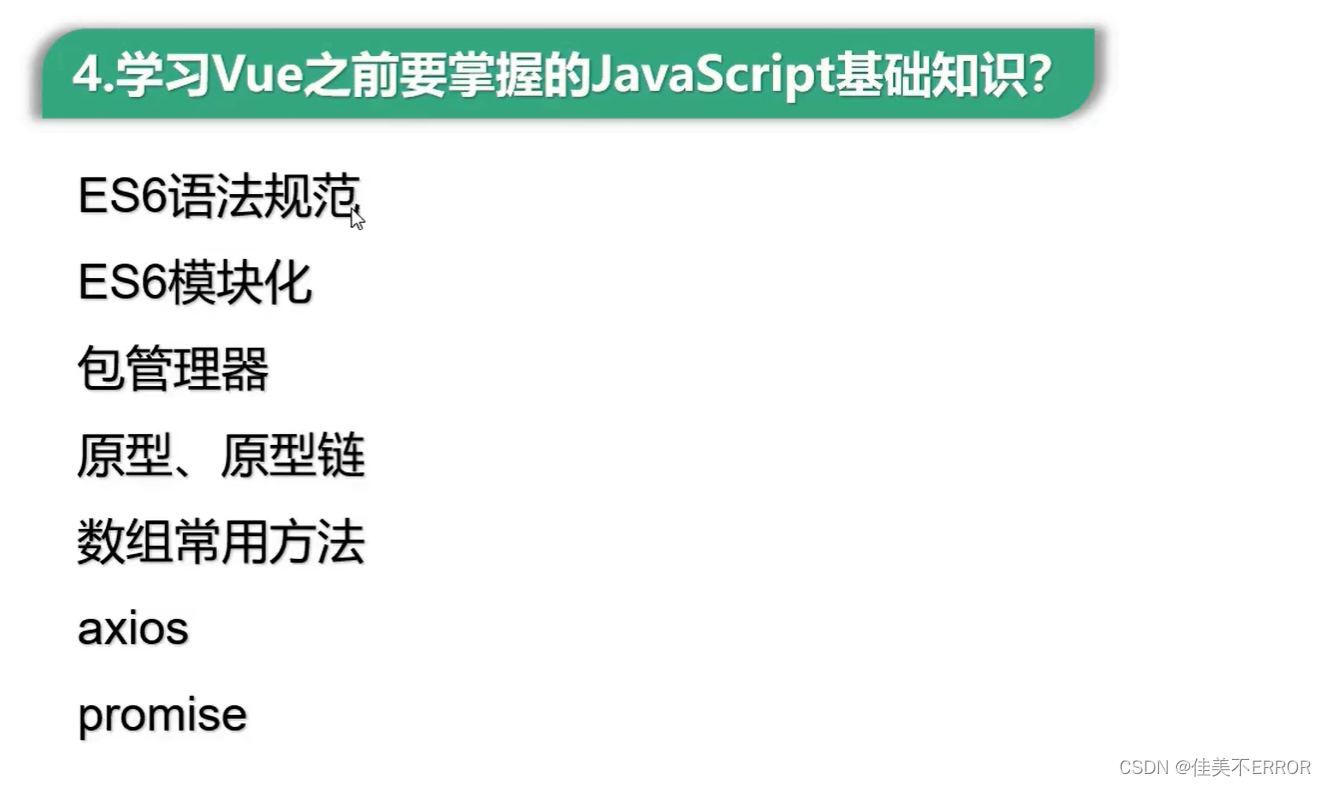
需要提前会的东西
中文文档链接点下面
vue.js
要会查文档用API
第一天
清除提示1
再文档中下载开发版本+浏览器安装vue devtools插件
打开允许访问URL

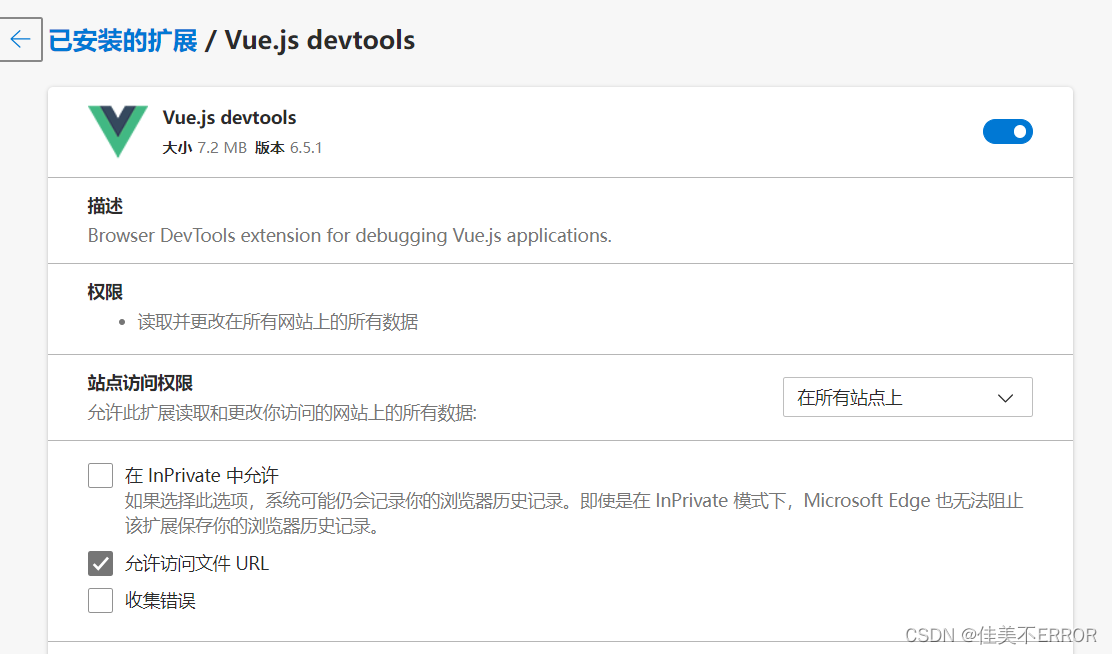
浏览器链接位置
……///……
这个直接在浏览器中安装的拓展在后续学习中时不时出现问题,建议直接从网盘下载工具
网盘链接如下
链接: https://pan.baidu.com/s/1ev2zbUIghU_Eo264_ArPWw?pwd=4dzp 提取码: 4dzp 复制这段内容后打开百度网盘手机App,操作更方便哦
……///……
清除提示2
直接写入下面代码,如果没有清除直接回vue.js文档改为txt格式用快捷键ctrl f 查找productionTip,把true改为false,再把文件后缀改回去
<script type="text/javascript">
        Vue.config.productionTip = false //以阻止 vue 在启动时生成生产提示。
    </script>
hello小案例
<!DOCTYPE html>
<html lang="en">
<head>
    <meta charset="UTF-8">
    <meta name="viewport" content="width=device-width, initial-scale=1.0">
    <title>Document</title>
    <script type="text/javascript" src="vue.js"></script>
</head>
<body>
    <!-- 准备好一个容器 -->
    <div id="root">
        <h1>hello,{{name}}</h1>
    </div>

    <script type="text/javascript">
        Vue.config.productionTip = false //以阻止 vue 在启动时生成生产提示。

        //创建vue实例
        const x = new Vue({
            el:'#root',  //el用于指定当前vue实例为哪个容器服务
            data:{       //data用于存储数据数据供el所指定容器使用
                name:'你好'
            }
        })
    </script>
</body>
</html>
分析
<body>
    <!-- 准备好一个容器 -->
    <div id="root">
        <h1>hello,{{name.toUpperCase()}},{{address}}</h1>
    </div>

    <script type="text/javascript">
        Vue.config.productionTip = false //以阻止 vue 在启动时生成生产提示。

        //创建vue实例
        const x = new Vue({
            el:'#root',  //el用于指定当前vue实例为哪个容器服务
            data:{       //data用于存储数据数据供el所指定容器使用
                name:'你好',
                address:'长沙'
            }
        })
    </script>
</body>

第二天
模板语法

<!DOCTYPE html>
<html lang="en">
<head>
    <meta charset="UTF-8">
    <meta name="viewport" content="width=device-width, initial-scale=1.0">
    <title>Document</title>
    <script type="text/javascript" src="vue.js"></script>
</head>
<body>
    <!-- 准备好一个容器 -->
    <div id="root">
        <h1>插值语法</h1>
        <h3>你好,{{name}}</h3>
        <hr/>
        <h1>指令语法</h1>
        <a v-bind:href="school.url.toUpperCase()" x="hello">点我学习vue{{school.name}}</a>
        <a :href="school.url" x="hello">快去学习{{school.name}}</a>
    </div>
</body>

    <script type="text/javascript">
        Vue.config.productionTip = false //以阻止 vue 在启动时生成生产提示。

        new Vue({
            el:'#root',
            data:{
                name:'jack',
                school:{
                    name:'哈哈',
                    url:'http://www.atguigu.com'
                }
          }
        })

    </script>

</html>
数据绑定

<body>
    <!-- 准备好一个容器 -->
    <div id="root">
    <!-- 简写 -->
    单向数据绑定:<input type="text" :value="name"><br/>
    双向数据绑定:<input type="text" v-model="name"><br/>
    </div>
</body>
    <script type="text/javascript">
        Vue.config.productionTip = false //以阻止 vue 在启动时生成生产提示。

        new Vue({
            el:'#root',  //el用于指定当前vue实例为哪个容器服务
            data:{       //data用于存储数据数据供el所指定容器使用
                name:'你好'
            }
        })
    </script>
el与data的两种写法
学到组件data必须使用函数式

<body>

    <div id="root">
        <h1>你好,{{name}}</h1>
    </div>
</body>
    <script type="text/javascript">
        Vue.config.productionTip = false //以阻止 vue 在启动时生成生产提示。

        //el两种写法
        /* 第一种
         new Vue({
            el:'#root',  //el用于指定当前vue实例为哪个容器服务
            data:{       //data用于存储数据数据供el所指定容器使用
                name:'你好'
            }
        }) */
        /* 第二种
        const v = new Vue({
            data:{
                name:'哈哈'
            }
        })
        console.log(v)
        v.$mount('#root') //挂载 */


        //data两种写法
        new Vue({
            el:'#root',
            //第一种写法,对象式
            /* data:{       //data用于存储数据数据供el所指定容器使用
                name:'你好'
            } */

            //第二种,函数式
            data:function(){
                return{
                    name:'哈哈'
                }
            }
        })
    </script>
第三天
object.defineProperty方法
    <script type="text/javascript">
        let number = 18
        let person = {
            name:'张三',
            sex:'男',

        }
        Object.defineProperty(person,'age',{
          /*   value:18,
            enumerable:true, //控制属性是否可以枚举
            writable:true,  //控制属性是否可以被修改
            configurable:true  //控制属性是否可以被删除
     */
            get(){
                console.log('有人读取了age属性了')
                return number
            },
            set(value){
                console.log('有人修改了age属性,且值是',value)
                number = value
            }
    })
    </script>
数据代理
    <script type="text/javascript">
        let obj = {x:100}
        let obj2 = {y:200}

        Object.defineProperty(obj2,'x',{
            get(){
                return obj.x
            },
            set(value){
                obj.x = value
            }
        })
    </script>
vue中的数据代理
<div id="root">
    <h2>学校名称:{{name}}</h2>
    <h2>学校地址:{{address}}</h2>
</div>
</body>

<script type="text/javascript">
Vue.config.productionTip = false
const vm = new Vue({
    el:'#root',
    data:{
        name:'尚硅谷',
        address:'长沙',
    }
})
</script>
事件处理
<div id="root">
    <h2>欢迎来到{{name}}学习</h2>
    <button v-on:click="showInfo">点我提示信息</button>
</div>
</body>

<script type="text/javascript">
    Vue.config.productionTip = false

    const vm = new Vue({
        el:'#root',
        data:{
            name:'尚硅谷'
        },
        methods: {
            showInfo(event){
                // console.log(this)//此处this是vm
                alert('同学你好')
            }
        },
    })
</script>
<div id="root">
    <h2>欢迎来到{{name}}学习</h2>
    <!-- <button v-on:click="showInfo">点我提示信息</button> -->
    <button @click="showInfo1">点我提示信息1</button>
    <button @click="showInfo2(66,$event)">点我提示信息2(传参)</button>
</div>
</body>

<script type="text/javascript">
    Vue.config.productionTip = false

    const vm = new Vue({
        el:'#root',
        data:{
            name:'尚硅谷'
        },
        methods: {
            showInfo1(event){
                // console.log(this)//此处this是vm
                alert('同学你好')
            },
            showInfo2(number,a){
                console.log(number,a)
            }
        }
    })
</script>
事件修饰符

<div id="root">
    <h2>欢迎来到{{name}}学习</h2>
    <a href="http://www/atguigu.com" @click.prevent="shoowInfo">点我提示信息</a>
    <!-- 阻止事件冒泡 -->
    <div class="demo1" @click="showInfo">
        <button @click.stop="showInfo">点我提示信息</button>
    </div>
</div>
</body>

<script type="text/javascript">
    new Vue({
        el:'#root',
        data:{
            name:'尚硅谷'
        },
        methods: {
            showInfo(e){
                e.stopPropagation()
                alert('同学你好!')
            }
        },
    })
</script>
键盘事件

<div id="root">
        <h2>欢迎来到{{name}}学习</h2>
        <input type="text" placeholder="按下回车提示输入" @keyup.caps-lock="showInfo">
    </div>
</body>

<script type="text/javascript">
    Vue.config.productionTip = false

    new Vue({
        el:'#root',
        data:{
            name:'尚硅谷'
        },
        methods: {
            showInfo(e){
                console.log(e.target.value)
            }
        },
    })
</script>
计算属性
<!-- 准备好一个容器 -->
<div id="root">
    姓: <input type="text" v-model="firstName"><br><br>
    名: <input type="text" v-model="lastName"><br><br>
    <!-- 拼接姓名实现"张-三"联动 -->
    <!-- 第一种实现:使用插值语法(字符串的slice方法,左闭右开截取字符串) ,麻烦-->
    姓名: <span>{{firstName.slice(0,3)}}-{{lastName}}</span><br><br>


    <!-- 第二种实现:使用methods,每次用到都会调用一次,而计算属性只调用第一次就欧了-->
    姓名: <span>{{fullName()}}</span><br><br>
    姓名: <span>{{fullName()}}</span><br><br>
    姓名: <span>{{fullName()}}</span><br><br>
    姓名: <span>{{fullName()}}</span><br><br>
    姓名: <span>{{fullName()}}</span>
</div>

<script>
    const vm = new Vue({
        el: '#root',
        data: {
            firstName: '张',
            lastName: '三'
        },
        methods: {
            fullName() {
                console.log('调用')
                return this.firstName + '-' + this.lastName;
            }
        }
    })
</script>
<!-- 准备好一个容器 -->
<div id="root">
    姓: <input type="text" v-model="firstName"><br><br>
    名: <input type="text" v-model="lastName"><br><br>
    <!-- 拼接姓名实现"张-三"联动 -->

    <!-- 使用计算属性,只调用一次,非常奈斯,节省内存 -->
    姓名: <span>{{fullName}}</span><br><br>
    姓名: <span>{{fullName}}</span><br><br>
    姓名: <span>{{fullName}}</span><br><br>
    姓名: <span>{{fullName}}</span><br><br>
    姓名: <span>{{fullName}}</span><br><br>
    姓名: <span>{{fullName}}</span>
</div>

<script>
    const vm = new Vue({
        el: '#root',
        data: {
            firstName: '张',
            lastName: '三'
        },
        computed: {
            //计算属性里面的属性要写成对象的形式,每个对象里面都有getter和setter
            //这个fullName实际上就是firstName和lastName经过一番计算得到的玩意儿,直接给到vm身上
            fullName: {
                //get有什么用?当有人读取fullName时,get调用,返回值作为fullName的值
                //get什么时候调用? 1.初次读取fullName  2.get里用到的数据发生了改变
                get() {
                    console.log('fullName被读了');
                    // console.log(this);//此处的this是vm
                    return this.firstName + '-' + this.lastName;
                },

                //set什么时候调用? fullName被手动修改时调用
                //这里边呢有个连锁反应,我手动修改vm.fullName导致firstName和lastName被修改,Vue模板重新解析
                //页面刷新,firstName和lastName的修改又导致get被重新执行(依赖的数据变了),返回新的fullName
                //计算属性计算属性,就是一直在计算,所以要想改fullName,必须改它依赖的值
                set(val) {
                    let arr = val.split('-');
                    this.firstName = arr[0];
                    this.lastName = arr[1];
                }
            }
        }
    })
</script>
简写
只考虑读取不考虑修改时可使用
<!-- 准备好一个容器 -->
<div id="root">
    姓: <input type="text" v-model="firstName"><br><br>
    名: <input type="text" v-model="lastName"><br><br>
    <!-- 拼接姓名实现"张-三"联动 -->

    <!-- 使用计算属性,只调用一次,非常奈斯,节省内存 -->
    姓名: <span>{{fullName}}</span>
</div>

<script>
    const vm = new Vue({
        el: '#root',
        data: {
            firstName: '张',
            lastName: '三'
        },
        computed: {
            fullName() {
                console.log('fullName被读了');
                return this.firstName + '-' + this.lastName;
            }

        }
    })
</script>
天气案例
<div id="root">
    <!-- 实现点击按钮切换天气 -->
    <!-- 写法1:利用插值语法和三元表达式 -->
    <h2>今天天气很{{isHot ? '炎热': '寒冷'}}</h2>

    <!-- 写法2:利用计算属性 -->
    <h2>今天天气很{{info}}</h2>
    <!--    绑定事件的时候:@xxx="yyy" yyy可以写一些简单的语句,但是最好别这么干-->
    <!--    <button @click="isHot = !isHot">切换天气</button>-->
    <button @click='change'>点击切换天气</button>
</div>
<script>
    new Vue({
        el: '#root',
        data: {
            isHot: true
        },
        methods: {
            change() {
                this.isHot = !this.isHot;
            }
        },
        computed: {
            info() {
                //注意这里的isHot要加this
                return this.isHot ? '炎热' : '寒冷';
            }
        },
    })
</script>
监视属性
<div id="root">
    <!-- 实现点击按钮切换天气 -->
    <!-- 写法1:利用插值语法和三元表达式 -->
    <h2>今天天气很{{isHot ? '炎热': '寒冷'}}</h2>

    <!-- 写法2:利用计算属性 -->
    <h2>今天天气很{{info}}</h2>
    <!--    绑定事件的时候:@xxx="yyy" yyy可以写一些简单的语句,但是最好别这么干-->
    <!--    <button @click="isHot = !isHot">切换天气</button>-->
    <button @click='change'>点击切换天气</button>
</div>
<script>
    new Vue({
        el: '#root',
        data: {
            isHot: true
        },
        methods: {
            change() {
                this.isHot = !this.isHot;
            }
        },
        computed: {
            info() {
                //注意这里的isHot要加this
                return this.isHot ? '炎热' : '寒冷';
            }
        },
        watch: {
            isHot: {
                immediate: true,   //初始化时先调用一次handler
                //当isHot被修改时调用handler函数
                handler(newVal, oldVal) {
                    console.log('isHot被修改了', '改之前是' + oldVal, '改之后是' + newVal);
                }
            },
            //watch不只可以监视data中的属性,还可以监视计算属性
            info: {
                immediate: true,   //初始化时先调用一次handler
                //当isHot被修改时调用handler函数
                handler(newVal, oldVal) {
                    console.log('info被修改了', '改之前是' + oldVal, '改之后是' + newVal);
                }
            }
        }
    })
</script>
通过vm.$watch监视
const vm = new Vue({
    el: '#root',
    data: {
        isHot: true
    },
    methods: {
        change() {
            this.isHot = !this.isHot;
        }
    },
    computed: {
        info() {
            //注意这里的isHot要加this
            return this.isHot ? '炎热' : '寒冷';
        }
    }
})

	vm.$watch('isHot', {
	    immediate: true,   //初始化时先调用一次handler
	    //当isHot被修改时调用handler函数
	    handler(newVal, oldVal) {
	        console.log('isHot被修改了', '改之前是' + oldVal, '改之后是' + newVal);
	    }
	})

	vm.$watch('info', {
	    immediate: true,   //初始化时先调用一次handler
	    //当isHot被修改时调用handler函数
	    handler(newVal, oldVal) {
	        console.log('info被修改了', '改之前是' + oldVal, '改之后是' + newVal);
	    }
	})
深度监视
   <!-- 准备一个容器 -->
    <div id="root">
        <h3>a的值是:{{numbers.a}}</h3>
        <button @click="numbers.a++">点我实现a+1</button>
        <h3>b的值是:{{numbers.b}}</h3>
        <button @click="numbers.b++">点我实现b+1</button>
        <h3>我tm就非要强制让number变</h3>
        <button @click="numbers = {a:666, b:999}">点我改变numbers</button>
    </div>
    <script>
        const vm = new Vue({
            el: '#root',
            data: {
                isHot: true,
                numbers: {
                    a: 1,
                    b: 2
                }
            },
            watch: {
                //监视多级结构中某个属性的变化,使用引号包起来(之前不加引号都是简写形式)
                'numbers.a': {
                    handler() {
                        console.log('a被改变了');
                    }
                },
                //如果下面这么写,即使ab变了也不会执行handler,因为这么写意思是监视numbers这个属性
                //而这个属性值是一个对象,只要numbers对象的地址不变就不变,除非像上面div写的暴力方法
                 numbers: {
                     handler() {
                         console.log('numbers改变了');
                     }
                 },

                //但是如果加个deep,就可以监视多级结构中某个属性的变化,ab变了numbers也变
                numbers: {
                    deep: true,
                    handler() {
                        console.log('numbers改变了');
                    }
                },
            }
        })
    </script>
简写
	//复杂形式
	vm.$watch('isHot', {
	    //当isHot被修改时调用handler函数
	    handler(newVal, oldVal) {
	        console.log('isHot被修改了', '改之前是' + oldVal, '改之后是' + newVal);
	    }
	})
	//简写形式
	vm.$watch('isHot',function (newVaule,oldVaule) {
	        console.log(newVaule,oldVaule);
	    })
计算属性对比监视属性
计算
const vm = new Vue({
    el: '#root',
    data: {
        firstName: '张',
        lastName: '三'
    },
    computed: {
        fullName() {
            console.log('fullName被读了');
            return this.firstName + '-' + this.lastName;
        }

    }
})
监视
   const vm = new Vue({
        el: '#root',
        data: {
            firstName: '张',
            lastName: '三',
            fullName: '张-三'
        },
        watch: {
            firstName: {
                handler(newVal, oldVal) {
                    this.fullName = newVal + '-' + this.lastName;
                }
            },
            lastName: {
                handler(newVal, oldVal) {
                    this.fullName = this.firstName + '-' + newVal;
                }
            },
        }
    })
computed能完成的功能,watch都可以完成
第四天
绑定class样式
<div id="root">
    <!--   1. 绑定class样式--字符串写法,适用于样式的类名不确定,需要动态指定-->
    <div class="basic" :class="mood" @click="changeMood">{{name}}</div>

    <!--   2. 绑定class样式--数组写法,适用于要绑定的样式个数不确定,名字也不确定-->
    <div class="basic" :class="classArr" @click="removeStyle3">{{name}}</div><br>

    <!--   3. 绑定class样式--对象写法,适用于要绑定的样式个数确定,名字也确定,要动态决定用不用-->
    <div class="basic" :class="classObj">{{name}}</div><br>
    <button @click="useStyle1">点击添加样式1</button>
    <button @click="useStyle2">点击添加样式2</button>

</div>
<script>
    const vm = new Vue({
        el: '#root',
        data: {
            name: 'zzy',
            mood: 'normal',
            classArr: ['style1', 'style2', 'style3'],
            classObj: {
                style1: false,
                style2: false
            }
        },
        methods: {
            changeMood() {
                // this.mood = 'happy';
                //点击实现随机切换样式
                const arr = ['happy', 'sad', 'normal'];
                const index = Math.floor(Math.random() * 3);  //获取0-3之间的整数不包括3
                this.mood = arr[index];
            },
            //点击去掉style3样式
            removeStyle3() {
                this.classArr.pop();
            },
            //点击添加样式1
            useStyle1() {
                this.classObj.style1 = true;
                // this.classObj.style2 = true;
            },
            //点击添加样式2
            useStyle2() {
                // this.classObj.style1 = true;
                this.classObj.style2 = true;
            }
        }
    })
</script>
绑定style样式
<!--    绑定style样式--对象写法-->
<div class="basic" :class="classArr" :style="styleObj" >{{name}}</div><br>
<!--    绑定style样式--数组写法(非常不常用)-->
<div class="basic" :class="classArr" :style="[styleObj,styleObj2]" >{{name}}</div>
<script>
new Vue({
    el:'#root',
    data: {
        name: 'zzy',
        styleObj:{
        	//驼峰命名法
            fontSize:'50px',
            color:'red'
        },
        styleObj2:{
     	   //驼峰命名法
            backgroundColor:'green'
        }
   }
})
</script>
条件渲染
<body>
    <!-- 准备好一个容器 -->
<div id="root">

    <!-- 1.v-show="false" => 相当于display:none -->
    <h2 v-show="false">我的名字叫{{name}}</h2>
    <h2 v-show="1 === 3">我的名字叫{{name}}</h2>
    <!-- 等价于<h2 style="display: none;">我的名字叫{{name}}</h2> -->

    <!-- 2.v-if="false" => 彻底删除标签了 -->
    <h2 v-if="false">我的名字叫{{name}}</h2>
    <h2 v-if="1 === 3">我的名字叫{{name}}</h2>


    <!-- 实现功能:随着n递增展示不同的div -->
    <h2>当前n的值是:{{n}}</h2>
    <button v-on:click="n++">点击n+1</button>

    <!-- 这里的v-if,v-else-if,v-else和基础js里的一样儿 -->
    <div v-if="n === 1">Angular</div>
    <div v-else-if="n === 2">React</div>
    <div v-else-if="n === 3">Vue</div>
    <div v-else>哈哈</div>

    <!-- v-if和template的配合使用(v-show不行)
    template不会影响页面结构,页面运行后会自动去掉,但是可以配合v-if控制多个元素整体显示
    而且不会影响css拿节点-->
    <template v-if="n === 1">
        <div>哈哈1</div>
        <div>哈哈2</div>
        <div>哈哈3</div>
    </template>

</div>

<script>
    const vm = new Vue({
        el: '#root',
        data: {
            name: 'zzy',
            n: 0
        }
    })
</script>
列表渲染
    <!-- 准备好一个容器 -->
      <div id="root">
        <ul>
            <li v-for="(p,index) in persons" :key="p.id">
                <!-- 遍历数组的话,index是索引值,p是数组每个元素 -->
                {{p.name}}----{{p.age}}----{{index}}
            </li>

            <li v-for="(p,index) of games" :key="index">
                <!-- 遍历对象的话,index就是属性名,p是属性值 -->
                {{p}}---{{index}}
            </li>

            <li v-for="(p,index) of str" :key="index">
                <!-- 遍历字符串的话,index就是索引值,p是每个字符 -->
                {{p}}---{{index}}
            </li>

            <li v-for="(p,index) of 5" :key="index">
                <!-- 遍历指定次数的话,index就是索引值,p是从1开始数 -->
                {{p}}---{{index}}
            </li>
        </ul>
    </div>
//下面同上
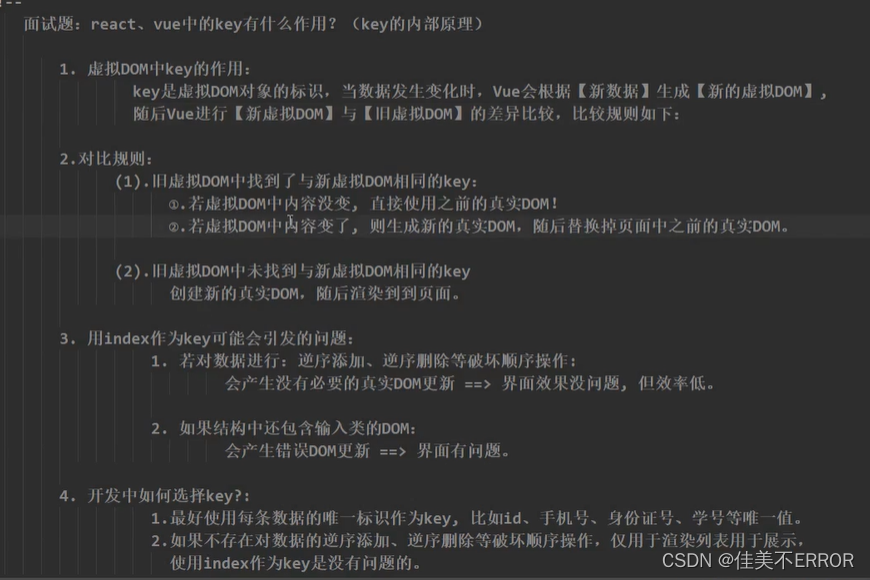
key作用和原理
   <!-- 准备好一个容器 -->
    <div id="root">
        <h1>人员列表</h1>
        <button @click="add">点击添加老刘</button>
        <ul>
            <li v-for="(p,index) in persons" :key="p.id">
                <!-- 遍历数组的话,index是索引值,p是数组每个元素 -->
                {{p.name}}----{{p.age}}----{{index}}
                <input type="text">
            </li>
        </ul>
    </div>

    <script>
        const vm = new Vue({
            el: '#root',
            data: {
                persons: [
                    { id: '001', name: '张三', age: 23 },
                    { id: '002', name: '李四', age: 18 },
                    { id: '003', name: '王五', age: 10 }
                ]
            },
            methods: {
                add() {
                    const p = { id: 004, name: '老刘', age: 90 };
                    this.persons.unshift(p);
                }
            },
        })
    </script>
列表过滤
<!-- 准备好一个容器 -->
<div id="root">
    <h1>人员列表</h1>
     <input type="text" placeholder="请输入关键字" v-model="keyword" @keyup.enter="search">
    <ul>
        <li v-for="(p,index) in newPersons" :key="p.id">
            {{p.name}}----{{p.age}}----{{p.sex}}
        </li>
    </ul>
</div>

<script>
        const vm = new Vue({
            el: '#root',
            data: {
                keyword: '',
                persons: [
                    { id: '001', name: '冯万宁儿', age: 23, sex: '男' },
                    { id: '002', name: '屁及万儿', age: 18, sex: '男' },
                    { id: '003', name: '及丽热巴', age: 10, sex: '女' },
                    { id: '004', name: '冯小刚儿', age: 60, sex: '男' }
                ],
                 newPersons: []
            },
            methods: {
                search() {
                    this.newPersons = this.persons.filter((ele, index) => {
                        const arr = ele.name.split('');    //先把每个对象的name分割为数组
                        //数组里是不包含空字符串的,所以这样如果keyword=''是筛不出来东西的
                        const flag = arr.includes(this.keyword);   //判断数组中是否包含当前vue中的keyword
                        return flag;   //筛选出来包含keyword的对象,组成一个新数组
                    })
                }
            },

        })
</script>
用watch瑕疵实现
    <!-- 准备好一个容器 -->
<div id="root">
    <h1>人员列表</h1>
       <!-- <input type="text" placeholder="请输入关键字" v-model="keyword" @keyup.enter="search"> -->
       <input type="text" placeholder="请输入关键字" v-model="keyword">
    <ul>
        <li v-for="(p,index) in newPersons" :key="p.id">
            {{p.name}}----{{p.age}}----{{p.sex}}
        </li>
    </ul>
</div>

<script>
        const vm = new Vue({
            el: '#root',
            data: {
                keyword: '',
                persons: [
                    { id: '001', name: '冯万宁儿', age: 23, sex: '男' },
                    { id: '002', name: '屁及万儿', age: 18, sex: '男' },
                    { id: '003', name: '及丽热巴', age: 10, sex: '女' },
                    { id: '004', name: '冯小刚儿', age: 60, sex: '男' }
                ],
                 newPersons: []
            },
            watch: {
                keyword: {
                    //页面上来由于newPersons是空,不会显示数据,想要让页面初始化就显示所有人,就要加个immediate: true
                    //这样就可以让handler函数初始化时先调用一次,由于开始keyword=''
                    // 而字符串里都包含空字符串,就可以先筛选出来,初始化所有人物信息
                    immediate: true,
                    handler(newVal, oldVal) {
                        this.newPersons = this.persons.filter((ele) => {
                            //判断keyword变化后的新值在不在每个对象的name中,并返回一个新的数组
                            return ele.name.includes(newVal);
                            //有个点要注意,字符串里面是有空字符串的
                        });
                    }
                }
            }
        })
</script>
用computed完美实现
<!-- 准备好一个容器 -->
<div id="root">
    <h1>人员列表</h1>
    <!-- <input type="text" placeholder="请输入关键字" v-model="keyword" @keyup.enter="search"> -->
    <input type="text" placeholder="请输入关键字" v-model="keyword">
    <ul>
        <li v-for="(p,index) in newPersons" :key="p.id">
            {{p.name}}----{{p.age}}----{{p.sex}}
        </li>
    </ul>
</div>

<script>
    const vm = new Vue({
        el: '#root',
        data: {
            keyword: '',
            persons: [
                { id: '001', name: '冯万宁儿', age: 23, sex: '男' },
                { id: '002', name: '屁及万儿', age: 18, sex: '男' },
                { id: '003', name: '及丽热巴', age: 10, sex: '女' },
                { id: '004', name: '冯小刚儿', age: 60, sex: '男' }
            ],
            //newPersons: []
        },
        computed: {
            newPersons: {
                get() {
                    return this.persons.filter((ele) => {
                        return ele.name.includes(this.keyword);
                    })
                }
            }
        }
    })
</script>
列表排序
<!-- 准备好一个容器 -->
<div id="root">
    <h1>人员列表</h1>
    <input type="text" placeholder="请输入关键字" v-model="keyword">
    <button @click="sortType = 0">原顺序</button>
    <button @click="sortType = 1">年龄降序</button>
    <button @click="sortType = 2">年龄升序</button>
    <ul>
        <li v-for="(p,index) in newPersons" :key="p.id">
            {{p.name}}----{{p.age}}----{{p.sex}}
        </li>
    </ul>
</div>

<script>
    const vm = new Vue({
        el: '#root',
        data: {
            sortType: 0,   //0原顺序,1年龄降序,2年龄升序
            keyword: '',
            persons: [
                { id: '001', name: '冯万宁儿', age: 23, sex: '男' },
                { id: '002', name: '屁及万儿', age: 18, sex: '男' },
                { id: '003', name: '及丽热巴', age: 10, sex: '女' },
                { id: '004', name: '冯小刚儿', age: 60, sex: '男' }
            ],
        },
        computed: {
            newPersons() {
                //先过滤,再排序
                const arr = this.persons.filter((p) => {
                    return p.name.indexOf(this.keyword) !== -1
                })

                // 或者if(this.sortType)
                if (this.sortType !== 0) {
                    arr.sort((a, b) => this.sortType === 1 ? b.age - a.age : a.age - b.age)
                }

                return arr
            }
        }
    })
</script>
更新时的问题
<!-- 准备好一个容器 -->
<div id="root">
    <h1>人员列表</h1>
    <button @click="updateNing">更新冯万宁儿</button>
    <ul>
        <li v-for="(p,index) in persons" :key="p.id">
            {{p.name}}----{{p.age}}----{{p.sex}}
        </li>
    </ul>
</div>

<script>
    const vm = new Vue({
        el: '#root',
        data: {
            persons: [
                { id: '001', name: '冯万宁儿', age: 23, sex: '男' },
                { id: '002', name: '屁及万儿', age: 18, sex: '男' },
                { id: '003', name: '及丽热巴', age: 10, sex: '女' },
                { id: '004', name: '冯小刚儿', age: 60, sex: '男' }
            ],
        },
        methods: {
            updateNing() {
                // this.persons[0].name = '冯千宁儿';     //奏效
                // this.persons[0].age = 66;        //奏效
                // this.persons[0].sex = '女';      //奏效

                this.persons[0] = { id: '001', name: '冯千宁儿', age: 66, sex: '女' };
                //上面这么写,也奏效,数据实际上已经改了,但是Vue监测不到所以没更新到页面,为啥捏?
            }
        }
    })
</script>

监测数据的原理
	let data = {
	    name: 'zzy',
	    age: 18
	}

	//创建一个监视的实例对象,用来监视data中数据的变化
	const obs = new Observer(data);
	const vm = {};
	vm._data = obs;

	//创建一个类似vm._data的构造函数
	function Observer(obj) {
	    //1.创建一个数组接收传入对象的属性名
	    let arr = Object.keys(obj);  //['name','age']
	    //2.遍历属性名,让Observer实例对data中的每个数据进行数据代理
	    arr.forEach((k) => {
	        Object.defineProperty(this, k, {
	            get() {
	                //有人想读实例中的属性值,我就把data中对应的属性值拿过来
	                return obj[k];
	            },
	            set(val) {
	                //有人想改实例中的属性值,我就把data中对应的属性值更改(数据代理)
	                console.log(`${k}被改了,我要重新解析模板,生成虚拟DOM,开始diff算法`);
	                obj[k] = val;
	            }
	        })
	    })
	}
案例Vue.set()使用
<div id="root">
    <h2>我的名字:{{name}}</h2>
    <h2>我的年龄:{{age}}</h2>
    <h3 v-if="sex">我的性别:{{sex}}</h3>
    <button @click="addmySex">点击添加我的性别</button>
    <hr>
    <h2>她的名字:{{girlfriend.name}}</h2>
    <button @click="addherSex">点击添加性别,属性值为女</button>
    <h2 v-if="girlfriend.sex">她的性别:{{girlfriend.sex}}</h2> <!-- undefined不显示,也不报错 -->
    <h2>她的年龄:对外{{girlfriend.age.fakeAge}},真实{{girlfriend.age.realAge}}</h2>
    <h2>朋友们</h2>
    <ul>
        <li v-for="p in girlfriend.friends" :key="p.id">
            {{p.name}}----{{p.age}}
        </li>
    </ul>
</div>
<script>
    const vm = new Vue({
        el: '#root',
        data: {
            name: 'zzy',
            age: 18,
            girlfriend: {
                name: 'ht',
                // sex: '女',
                age: {
                    realAge: 23,
                    fakeAge: 18
                }
            }
        },
        methods: {
            addherSex() {
                // Vue.set(this.girlfriend, 'sex', '女');
                this.$set(this.girlfriend, 'sex', '女');  //vm.$set(vm.girlfriend, 'sex', '女');
            },
            addmySex() {
                Vue.set(this, 'sex', '男');
            }
        },
    })
</script>
(说实话,我没听懂……)所以我又听了一遍
Vue监测数组
<div id="root">
    <h2>我的名字:{{name}}</h2>
    <h2>我的年龄:{{age}}</h2>
    <hr>

    <h2>她的名字:{{girlfriend.name}}</h2>

    <button @click="addHobby">点击替换'跳'的爱好</button>
    <h2>爱好</h2>
    <ul>
        <li v-for="(h,index) in girlfriend.hobby" :key="index">
            {{h}}
        </li>
    </ul>
</div>
<script>
    const vm = new Vue({
        el: '#root',
        data: {
            name: 'zzy',
            age: 18,
            girlfriend: {
                name: 'ht',
                hobby: ['唱', '跳', 'rap']
            }
        },
        methods: {
            addHobby() {
                //除了那7个方法外,set方法也可以改变数组实现响应式
                Vue.set(this.girlfriend.hobby, 1, '打游戏');
            }
        },
    })
</script>
案例
<div id="root">
    <button @click="addSex">添加一个性别属性,默认为女</button>
    <button @click="addHeight">添加一个身高属性,默认为170</button><br>
    <button @click="girlfriend.age.realAge--">年龄-1</button>
    <button @click="addFriend">在列表前加一个朋友</button><br>
    <button @click="updateFriend">修改第一个朋友的名字为张三</button>
    <button @click="addHobby">添加一个爱好</button><br>
    <button @click="updateHobby">修改第一个爱好为散步</button>
    <button @click="removeHobby">过滤掉爱好中的跳</button>

    <h2>名字:{{girlfriend.name}}</h2>
    <h2>年龄:对外{{girlfriend.age.fakeAge}},真实{{girlfriend.age.realAge}}</h2>
    <h2 v-if="girlfriend.sex">性别:{{girlfriend.sex}}</h2>
    <h2 v-if="girlfriend.height">身高:{{girlfriend.height}}</h2>

    <h2>朋友们</h2>
    <ul>
        <li v-for="p in girlfriend.friends" :key="p.id">
            {{p.name}}----{{p.age}}
        </li>
    </ul>

    <h2>爱好</h2>
    <ul>
        <li v-for="(h,index) in girlfriend.hobby" :key="index">
            {{h}}
        </li>
    </ul>
</div>
<script>
    const vm = new Vue({
        el: '#root',
        data: {
            name: 'zzy',
            age: 18,
            girlfriend: {
                name: 'ht',
                // sex: '女',
                age: {
                    realAge: 23,
                    fakeAge: 18
                },
                friends: [
                    { id: 001, name: 'jack', age: 10 },
                    { id: 002, name: 'rose', age: 8 },
                ],
                hobby: ['唱', '跳', 'rap']
            }
        },
        methods: {
            addSex() {
                Vue.set(this.girlfriend, 'sex', '女');
            },
            addHeight() {
                this.$set(this.girlfriend, 'height', 170);
            },
            addFriend() {
                this.girlfriend.friends.unshift({ id: '003', name: 'alice', age: 5 });  //有效写法
            },
            updateFriend() {
                this.girlfriend.friends[0].name = '张三';
            },
            addHobby() {
                this.girlfriend.hobby.push('打游戏');
            },
            updateHobby() {
                // this.girlfriend.hobby[0] = '散步';  //无效写法
                // this.girlfriend.hobby.splice(0, 1, '散步');   //有效写法
                Vue.set(this.girlfriend.hobby, 0, '散步');   //有效写法
            },
            removeHobby() {
                // 变更方法,顾名思义,会变更调用了这些方法的原始数组。相比之下,也有非变更方法
                // 例如 filter()、concat() 和 slice()。它们不会变更原始数组,而总是返回一个新数组。
                // 当使用非变更方法时,可以用新数组替换旧数组:
                this.girlfriend.hobby = this.girlfriend.hobby.filter((ele) => {
                    return ele !== '跳';
                })
            }
        },
    })
</script>
**代码参考与——DantinZhang
**
第五天
收集表单数据
   <!-- 准备好一个容器 -->
    <div id="root">
        <form v-on:submit.prevent="demo">
            <!-- v-model.trim去掉收集的首尾空格 -->
            账号:<input type="text" v-model.trim="userInfo.account"> <br><br>
            密码:<input type="password" v-model="userInfo.password"><br><br>
            <!--下面是 双向绑定修饰符:收集到的必须是数字类型(Vue内部做了数据转换) -->
            年龄:<input type="number" v-model.number="userInfo.age"><!-- v-model.number经常和type="number"一起用 --><br><br>

            性别:
            男<input type="radio" name="sex" value="male" v-model="userInfo.sex">
            女<input type="radio" name="sex" value="female" v-model="userInfo.sex"><br><br>
            爱好:
            抽烟<input type="checkbox" value="smoke" v-model="userInfo.hobby">
            喝酒<input type="checkbox" value="drink" v-model="userInfo.hobby">
            跳舞<input type="checkbox" value="dance" v-model="userInfo.hobby"><br><br>
            玩哪个游戏?
            <select v-model="userInfo.game">
                <option value="saibo">赛博朋克2077</option>
                <option value="ditie">地铁:离去</option>
                <option value="dipingxian">地平线4</option>
                <option value="nfsmw">极品飞车21:热度</option>
                <option value="dabiaoge">荒野大镖客2</option>
            </select><br><br>

            <!-- v-model.lazy可以实现不用实时收集,输入框焦点离开了再收集 -->
            其他信息: <textarea v-model.lazy="userInfo.other"></textarea><br><br>
            <input type="checkbox" v-model="userInfo.agree">阅读并接受<a href="http://www.baidu.com">用户协议</a>
            <button>提交</button>
        </form>
    </div>

    <script>
        const vm = new Vue({
            el: '#root',
            data: {
                userInfo: {
                    account: '',
                    password: '',
                    age: '',
                    sex: 'female',
                    //hobby的数据类型影响着多选框收集到的数据类型
                    hobby: [],
                    game: 'nf smw',
                    other: '',
                    agree: '',
                },
            },
            methods: {
                demo() {
                    // console.log(JSON.stringify(this._data));  //一般不建议直接访问_data,建议用个对象包住数据
                    console.log(JSON.stringify(this.userInfo));  //只是这么写的话,所有双向绑定都要加userInfo前缀
                }
            },
        })
    </script>
v-model的三个修饰符
v-model.lazy:实现不用实时收集,输入框失去焦点再收集
v-model.number:输入的字符串收集为数字(Vue内部做了数据转换),经常和type="number"一起用
v-model.trim:收集时去掉输入的首尾空格
过滤器格式化时间戳
dayjs
   <!-- 准备一个容器 -->
    <div id="hello">
        <h1>当前时间是:{{time}}</h1>

        <!-- 计算属性实现 -->
        <h1>当前时间是:{{formatTime}}</h1>
        <!-- 方法实现 -->
        <h1>当前时间是:{{getformatTime()}}</h1>
        <!-- 过滤器实现 time传给timeFormater,然后返回值替换整个部分-->
        <h1>当前时间是:{{time | timeFormater}}</h1>
        <!-- 过滤器实现(传参)-->
        <h1>当前时间是:{{time | timeFormater('YYYY——MM——DD')}}</h1>
        <!-- 过滤器的串联,一层一层往后传,后面的接受的是前面的返回值-->
        <h1>当前时间是:{{time | timeFormater('YYYY——MM——DD') | mySlice}}</h1>
		<!-- 下面这个打开控制台看元素节点就明白了 -->
        <h3 :x="name | mySlice">DJ</h3>
    </div>

    <script>
        // 全局过滤器
        Vue.filter('mySlice', function (val) {
            return val.slice(0, 4);
        })

        const vm = new Vue({
            el: '#hello',
            data: {
                time: 1660472948789,
                name: 'zhangziying'
            },
            computed: {
                formatTime: {
                    get() {
                        return dayjs(this.time).format('YYYY年MM月DD日 HH:mm:ss');
                    }
                }
            },
            methods: {
                getformatTime() {
                    return dayjs(this.time).format('YYYY年MM月DD日 HH:mm:ss');
                }
            },
            // 局部过滤器
            filters: {
                //第一个参数是管道符 | 前边那玩意儿
                //第二个参数str来个默认值,如果传了str就给,不传就用默认值
                timeFormater(val, str = 'YYYY年MM月DD日 HH:mm:ss') {
                    // console.log(val);
                    return dayjs(this.time).format(str);
                },
                mySlice(val) {
                    //这里的val是上一个过滤器的返回值
                    return val.slice(0, 4);
                }
            }
        })
    </script>
内置指令
v-bind : 单向绑定解析表达式, 可简写为 :xxx
v-model : 双向数据绑定
v-for : 遍历数组/对象/字符串
v-on : 绑定事件监听, 可简写为@
v-if : 条件渲染(动态控制节点是否存存在)
v-else : 条件渲染(动态控制节点是否存存在)
v-show : 条件渲染 (动态控制节点是否展示)

v-text指令:
1.作用:向其所在的节点中渲染文本内容。
2.与插值语法的区别:v-text会替换掉节点中的所有内容,{{xx}}则不会

v-html指令:
作用:向指定节点中渲染包含html结构的内容。
与插值语法的区别:
(1)v-html会替换掉节点中所有的内容,{{xx}}则不会,这点和v-text一样。
(2)v-html可以识别html结构,这点和v-text区别,v-text不能渲染标签。

严重注意:v-html有安全性问题!!!!
(1)在网站上动态渲染任意HTML是非常危险的,容易导致XSS攻击。
(2)一定要在可信的内容上使用v-html,永不要用在用户提交的内容上!


v-cloak指令(没有值):
(1)本质是一个特殊属性,Vue实例创建完毕并接管容器后,会删掉v-cloak属性。
(2)使用css配合v-cloak可以解决网速慢时页面展示出{{xxx}}的问题,先隐藏标签,然后Vue渲染完了之后删除v-cloak,那么就能显示渲染完之后的页面了


v-once指令:
(1)v-once所在节点在初次动态渲染后,就视为静态内容了,也就是只读一次。
(2)以后数据的改变不会引起v-once所在结构的更新,可以用于优化性能。

v-pre指令:
(1)跳过其所在节点的编译过程。
(2)可利用它跳过:没有使用指令语法、没有使用插值语法的节点,会加快编译。
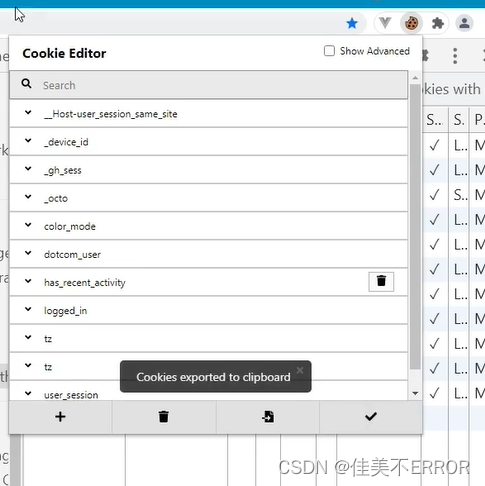
cookie

批量编辑器
自定义指令
函数式
   <!-- 准备一个容器 -->
    <div id="hello">
        <h1>当前n值是:<span v-text="n"></span></h1>
        <h1>放大十倍后的n值是:<span v-big="n"></span></h1>
        <button @click="n++">点我n+1</button>
    </div>

    <script>
        const vm = new Vue({
            el: '#hello',
            data: {
                n: 1
            },
            directives: {
                //一、函数式
                // 需求1:定义一个v-big指令,和v-text功能类似,但会把绑定的数值放大10倍。
                //第一个参数是指令所在的标签,第二个参数是一个存着指令值的对象
                big(element, binding) {
                    //big函数何时会被调用?
                    //1.指令与元素成功绑定时(一上来,没放入页面之前)  2.指令所在的模板被重新解析时
                    console.log('我被调用了');
                    element.innerText = binding.value * 10;
                },
            }
        })
    </script>
对象式
   <!-- 准备一个容器 -->
    <div id="hello">
        <h1>当前n值是:<span v-text="n"></span></h1>
        <button @click="n++">点我n+1</button>
		<!-- 在输入框中显示n的值动态变化 -->
        <input v-fbind:value="n">
    </div>

    <script>
        const vm = new Vue({
            el: '#hello',
            data: {
                n: 1
            },
            directives: {
                // 需求2:定义一个v-fbind指令,和v-bind功能类似,但可以让其所绑定的input元素默认获取焦点。
                //函数无法实现该需求
                // fbind(element, binding) {
                //     element.innerText = binding.value * 10;
                //     //下面这个focus,必须在放到页面之后才调用
                //     element.focus(); //不奏效,因为big函数调用时还没放入页面
                // }
                //二、对象式
                fbind: {
                    // 指令与元素成功绑定时(一上来,没放入页面之前)
                    bind(element, binding) {
                        element.value = binding.value;
                    },
                    // 指令所在元素被插入页面时
                    inserted(element, binding) {
                        element.focus();
                    },
                    // 指令所在的模板被重新解析时
                    update(element, binding) {
                        element.value = binding.value;
                    }
                }
            }
        })
    </script>
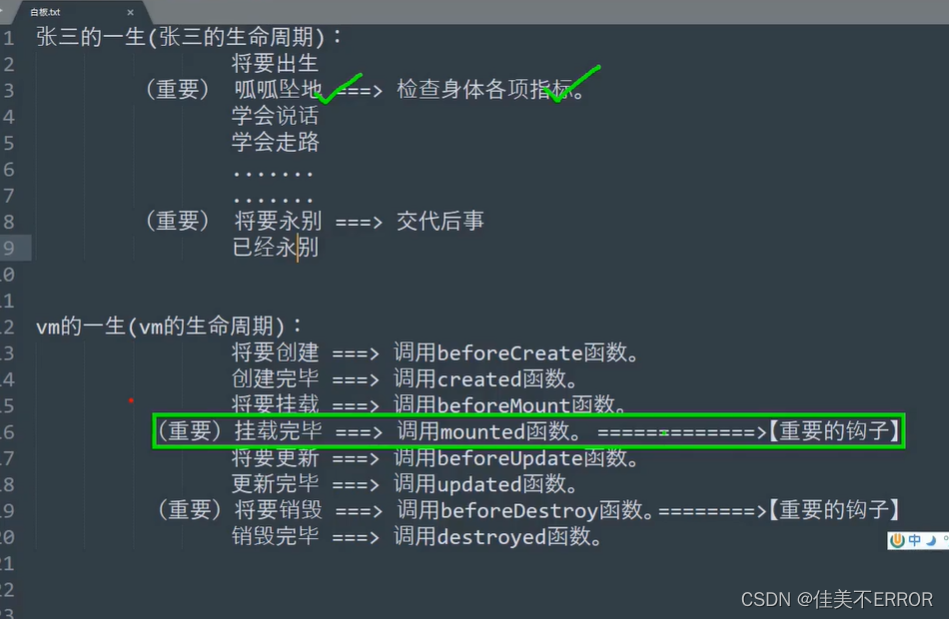
生命周期
 <script type="text/javascript">
        new Vue({
            el:'#root',
            data:{
                a:false,
                opacity:1
            },
            methods: {

            },
            mounted() {
                console.log('mounted',this)
                setInterval(()=>{
                    this.opacity -=0.01
                    if(this.opacity<=0) this.opacity = 1
                },16)
            },
        })
    </script>
生命周期图示
八个钩子
   <!-- 准备一个容器 -->
    <div id="hello">
        <h1>欢迎来到{{n}}年代</h1>
        <button @click="add">点击n+1</button>
    </div>

    <script>
        const vm = new Vue({
            el: '#hello',
            data: {
                n: 1
            },
            methods: {
                add() {
                    this.n++;
                }
            },
            beforeCreate() {
                console.log('beforeCreate');
                console.log(this);
                // debugger;
            },
            created() {
                console.log('created');
            },
            beforeMount() {
                console.log('beforeMount');
            },
            mounted() {
                console.log('mounted');
            },
            beforeUpdate() {
                console.log('beforeUpdate');
            },
            updated() {
                console.log('updated');
            },
            beforeDestroy() {
                console.log('beforeDestroy');
            },
            destryed() {
                console.log('destryed');
            }
        })
    </script>
案例
<!-- 准备一个容器 -->
<div id="hello">
    <h1 :style="{opacity: opacity}">欢迎来到2024</h1>
    <button @click="stop">点击停止闪烁</button>
</div>

<script>
    const vm = new Vue({
        el: '#hello',
        data: {
            opacity: 1
        },
        methods: {
            stop() {
                // clearInterval(this.timer);  vm自杀可以这么写,他杀需要写在beforeDestroy中
                this.$destroy();  //vm自杀
            }
        },
        //挂载意思就是放在页面上
        //挂载函数,Vue完成模板的解析并把*初始的(只调用一次)*真实DOM放入页面后(完成挂载)调用mounted
        mounted() {
            this.timer = setInterval(() => {
                console.log('计时器调用');
                this.opacity -= 0.01;
                if (this.opacity <= 0) this.opacity = 1;  //js里玩儿小数一般碰不到0
            }, 16)
        },

        beforeDestroy() {
            console.log('vm即将被销毁');
            // 为什么vm的后事需要写在这里,是因为vm很有可能是被别人干掉的
            clearInterval(this.timer);
        },

    })

    //通过外部的定时器实现(不推荐)
    // setInterval(() => {
    //     vm.opacity -= 0.01;
    //     if (vm.opacity <= 0) vm.opacity = 1;  //js里玩儿小数一般碰不到0
    // }, 16);
</script>
第六天
使用组件
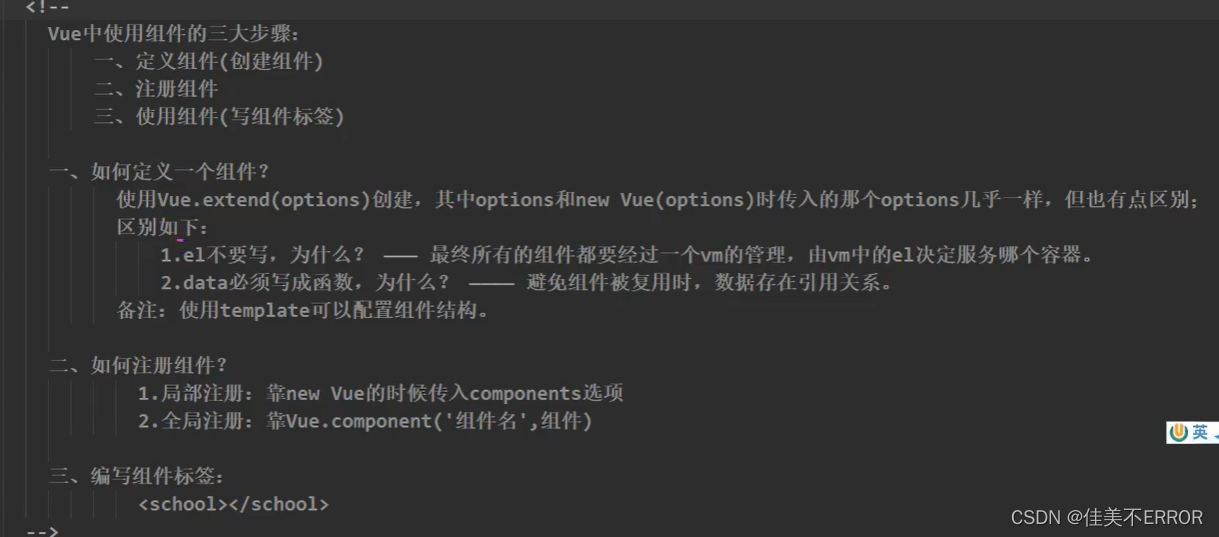
<div id="root">
    <hello></hello>
    <hr>
    <h1>{{msg}}</h1>
    <school></school>
     <hr>
    <student></student>
 </div>
 <div id="root2">
    <hello></hello>
 </div>

<script type="text/javascript">
    //创建school组件
    const school = Vue.extend({
        template:`
        <div>
        <h2>学校名称:{{schoolName}}</h2>
        <h2>学校地址:{{address}}</h2>
        <button @click="showName">点我提示校名</button>
        </div>
        `,
        data(){
            return{
                schoolName:'尚硅谷',
                address:'长沙'
            }
        },
        methods: {
            showName(){
                alert(this.schoolName)
            }
        },
    })
     //创建student组件
     const student = Vue.extend({
        template:`
        <div>
            <h2>学生姓名:{{studentName}}</h2>
            <h2>学生年龄:{{age}}</h2>
        </div>
        `,
        data(){
            return{
                studentName:'张三',
                age:18
            }
        }
    })

    const hello = Vue.extend({
        template:`
        <div>
            <h2>你好啊!</h2>
            </div>
        `,
        data(){
            return{
                name:'Tom'
            }
        }
    })

    //全局注册组件
    Vue.component('hello',hello)

    //创建vm
    new Vue({
        el:'#root',
        //注册组件(局部注册)
        components:{
           school,
           student
        }
    })

    new Vue({
        el:'#root2',
    })
</script>
注意点
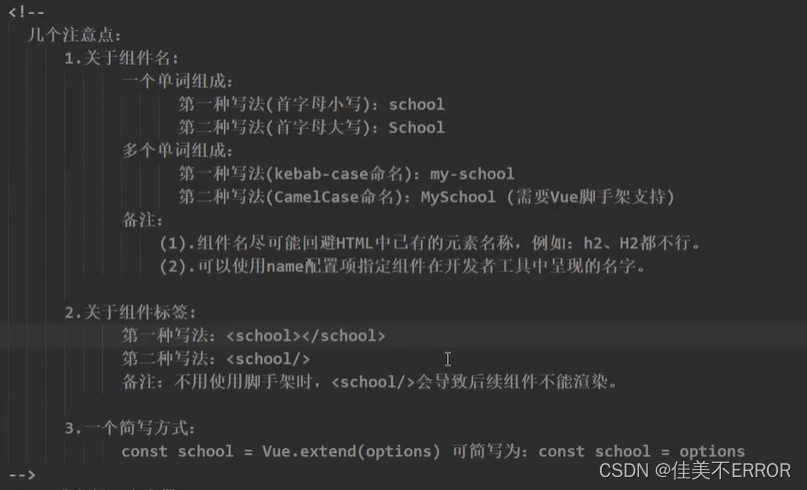
组件的嵌套
 <div id="root">
    <app></app>
  </div>
   <script type="text/javascript">
    //定义student组件
    const student = Vue.extend({
        name:'student',
        template:`
        <div>
            <h2>学生姓名:{{name}}</h2>
            <h2>学生年龄:{{age}}</h2>
        </div>
        `,
        data(){
            return{
                name:'张三',
                age:18
            }
        }
    })

    //定义school组件
    const school = Vue.extend({
        name:'school',
        template:`
        <div>
            <h2>学校名称:{{name}}</h2>
            <h2>学校地址:{{address}}</h2>
            <student></student>
            </div>
        `,
        data(){
            return{
                name:'尚硅谷',
                address:'北京'
            }
        },
        //注册组件(局部)
        components:{
            student
        }
    })

    //定义hello组件
    const hello = Vue.extend({
        template:`
        <h1>{{msg}}</h1>
        `,
        data(){
            return{
                msg:'欢迎来到尚硅谷学习'
            }
        }
    })

    //定义app组件
    const app = Vue.extend({
        template:`
        <div>
            <hello></hello>
            <school></school>
            </div>
        `,
        components:{
            school,
            hello
        }
    })

    //创建vm
    new Vue({
        el:'#root',
        //注册组件(局部)
        components:{
            app
        }
    })
   </script>
VueComponent
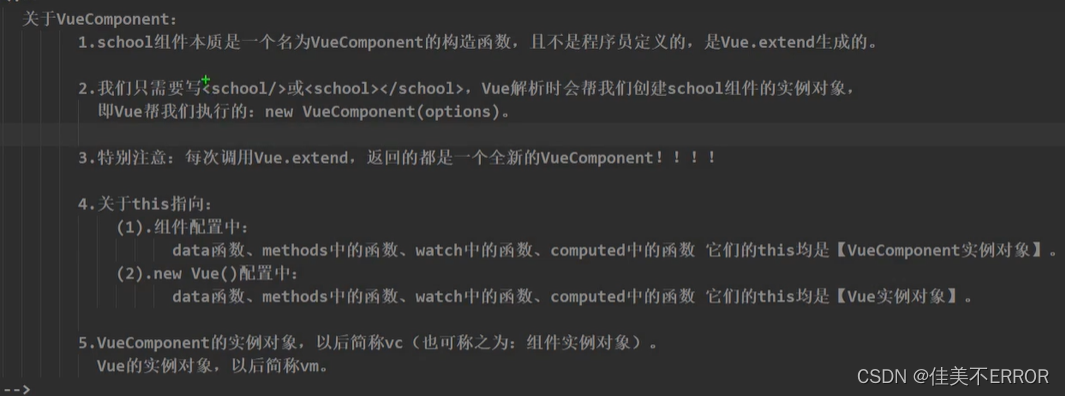
<div id="root">
    <hello></hello>
    <school></school>
  </div>
   <script type="text/javascript">
    //定义student组件

    //定义school组件
    const school = Vue.extend({
        name:'school',
        template:`
        <div>
            <h2>学校名称:{{name}}</h2>
            <h2>学校地址:{{address}}</h2>
            <button @click="showName">点我提示学校名</button>
            </div>
        `,
        data(){
            return{
                name:'尚硅谷',
                address:'北京'
            }
        },
        methods: {
            showName(){
            // alert(this.name)
            console.log('showName',this)
        }
        },
    })

    const test = Vue.extend({
        template:`<span>hahahaha</span>`,
    })

   //定义hello组件
   const hello = Vue.extend({
    template:`
    <div>
        <h2>{{msg}}</h2>
        <test></test>
        </div>
    `,
    data(){
        return{
            msg:'你好'
        }
    },
    components:{
        test
    }
   })

//    console.log('@',school)
//    console.log('#',hello)
    //定义app组件

    //创建vm
    new Vue({
        el:'#root',
        //注册组件(局部)
        components:{
            school,
            hello
        }
    })
   </script>
重要的内置关系

<div id="root">

  </div>

  <script type="text/javascript">
    //定义一个构造函数
    function Demo(){
        this.a = 1
        this.b = 1
    }
    //创建一个Demo的实例对象
    const d = new Demo()

    console.log(Demo.prototype)//显示原型属性
    console.log(d._proto_)//隐式原型属性
    console.log(Demo.prototype === d._proto_)


    //程序员通过显示原型属性对象,追加一个x属性,值为99
    Demo.prototype.x = 99

    console.log('@',d)
  </script>
单文件组件
School.vue
<template>
        <div class="demo">
        <h2>学校名称:{{schoolName}}</h2>
        <h2>学校地址:{{address}}</h2>
        <button @click="showName">点我提示校名</button>
        </div>
</template>

<script>
//组件交互相关代码(数据、方法等等)
//Vue.extend可省略
export default {
    name:'School',
    data(){
            return{
                schoolName:'尚硅谷',
                address:'长沙'
            }
        },
        methods: {
            showName(){
                alert(this.schoolName)
            }
        },
}
   // export default school  默认暴露
</script>

<style>
/* 组件样式 */
.demo{
    background-color:pink;
}
</style>
app.vue
<v +回车 调出架子
<template>
  <div>
    <School></School>
  </div>
</template>

<script>
    //引入组件
    import School from './School.vue'

    export default {
        name:'App',
        components:{
            School
        }
    }
</script>

<style>

</style>
main.js
import App from './App.vue'

new Vue({
    el:'#root',
    template:`<App></App>`,
    components:{App},
})
index.html
<!DOCTYPE html>
<html lang="en">
<head>
    <meta charset="UTF-8">
    <meta name="viewport" content="width=device-width, initial-scale=1.0">
    <title>Document</title>
</head>
<body>
    <div id="root">
        <!-- <App></App> -->
    </div>
    <!-- <script type="text/javascript" src="../vue.js"></script>
    <script type="text/javascript" src="./main.js"></script> -->
</body>
</html>
Vue脚手架
是Vue官方提供的标准化开发工具
开发文档
建议先安装node.js
教程
vue安装步骤:
npm install -g @vue/cli
vue
一定要记得目录,别待会找不到
vue create name
选好用2还是3
再按指示操作
npm run serve
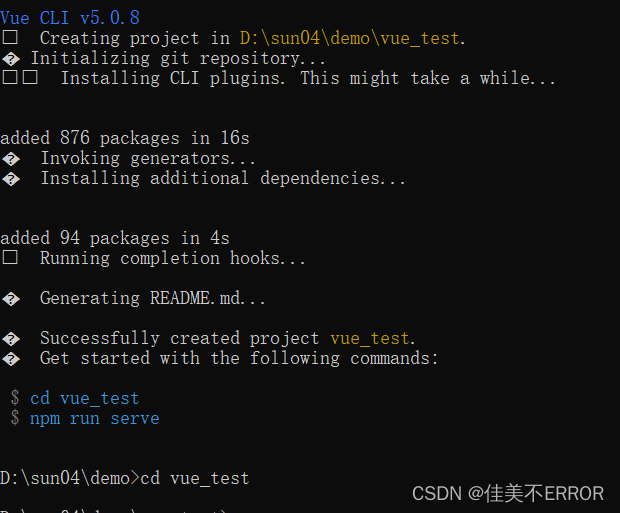
单词别写错了

emmmmNetwork: unavailable怎么解决……
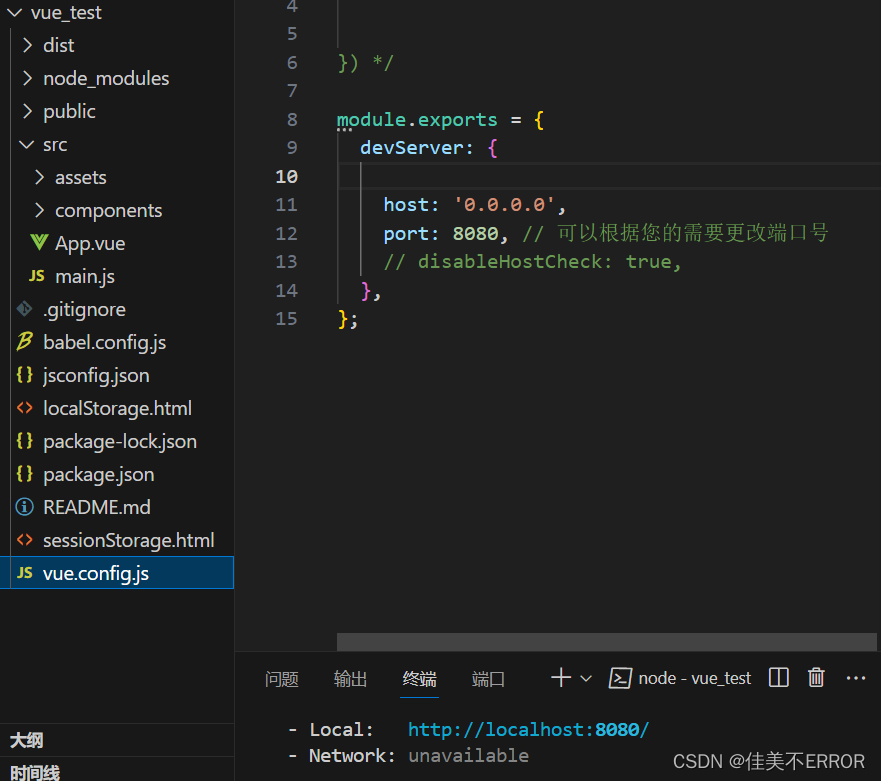
等大佬救我……
解决了,这个IP号填错了,每个wifi有对应的号,点开wifi进入属性,看ipv4复制就行


本地存储也跟着解决了,,,,加油加油
然后复制链接回车
停止工程可以按两次ctrl +c
(报错可能是权限问题,命令提示符用管理员身份进)
进入文件
调出终端快捷键:ctrl + ~
├── node_modules
├── public
│   ├── favicon.ico: 页签图标
│   └── index.html: 主页面
├── src
│   ├── assets: 存放静态资源
│   │   └── logo.png
│   │── component: 存放组件
│   │   └── HelloWorld.vue
│   │── App.vue: 汇总所有组件
│   │── main.js: 入口文件
├── .gitignore: git版本管制忽略的配置
├── babel.config.js: babel的配置文件
├── package.json: 应用包配置文件
├── README.md: 应用描述文件
├── package-lock.json:包版本控制文件
index.html
<!DOCTYPE html>
<html lang="">
  <head>
    <meta charset="utf-8">
    <!-- 针对IE浏览器的一个特殊配置,含义是让IE浏览器以最高的渲染级别渲染页面 -->
    <meta http-equiv="X-UA-Compatible" content="IE=edge">
    <!-- 开启移动端的理想视口 -->
    <meta name="viewport" content="width=device-width,initial-scale=1.0">
   <!--  配置页签图标  -->                                                                                                                                                                                                                                                                                                                                                                                                                                                                                                                                                                                                                                                                                           -->
    <link rel="icon" href="<%= BASE_URL %>favicon.ico">
    <!-- 配置网页标题 -->
    <title><%= htmlWebpackPlugin.options.title %></title>
  </head>
  <body>
    <!-- 当浏览器不支持js时noscript中元素就会被渲染 -->
    <noscript>
      <strong>We're sorry but <%= htmlWebpackPlugin.options.title %> doesn't work properly without JavaScript enabled. Please enable it to continue.</strong>
    </noscript>
    <!-- 容器 -->
    <div id="app"></div>
    <!-- built files will be auto injected -->
  </body>
</html>
main.js
//入口文件
//引入Vue
import Vue from 'vue'
//引入App组件,它是所有组件的父组件
import App from './App.vue'
//关闭vue的生产提示
Vue.config.productionTip = false
//创建Vue实例对象---vm
new Vue({
  render: h => h(App),
}).$mount('#app')
render函数
扮演了vue中解析template模板的那块儿代码
ref属性
被用来给元素或子组件注册引用信息(id的替代者)
应用在html标签上获取的是真实DOM元素,应用在组件标签上是组件实例对象(vc)
使用方式:
1、打标识:
…
或2、获取:this.$refs.xxx
<template>
    <div>
        <h1 v-text="msg" ref="title"></h1>
        <button @click="showDom" ref="btn">点我输出上方的DOM元素</button>
        <MySchool111 ref="school" id="school"></MySchool111>
    </div>
</template>

<script>
// 如果组件没写名字,那么就用的import后面起的名字
import MySchool111 from './compoments/MySchool.vue';

export default {
    name: 'Appppp',  //这里如果写名字,开发者工具里看的就是这个名字
    components: {
        MySchool111
    },
    data() {
        return {
            msg: '从蓬莱写到仙台,哥们儿代码信手拈来'
        }
    },
    methods: {
        showDom() {
            // console.log(document.getElementById('title')); //这种写法拿不到组件
            console.log(this.$refs.title); //拿到h1真实DOM元素标签
            console.log(this.$refs.btn); //拿到button真实DOM元素标签
            console.log(this.$refs.school); //拿到组件的实例(MySchool的vc)

            //如果这么写,拿到的是组件template中的内容,相当于给根的div加了个id="school"
            console.log(document.getElementById('school'));
        }
    },
}
</script>
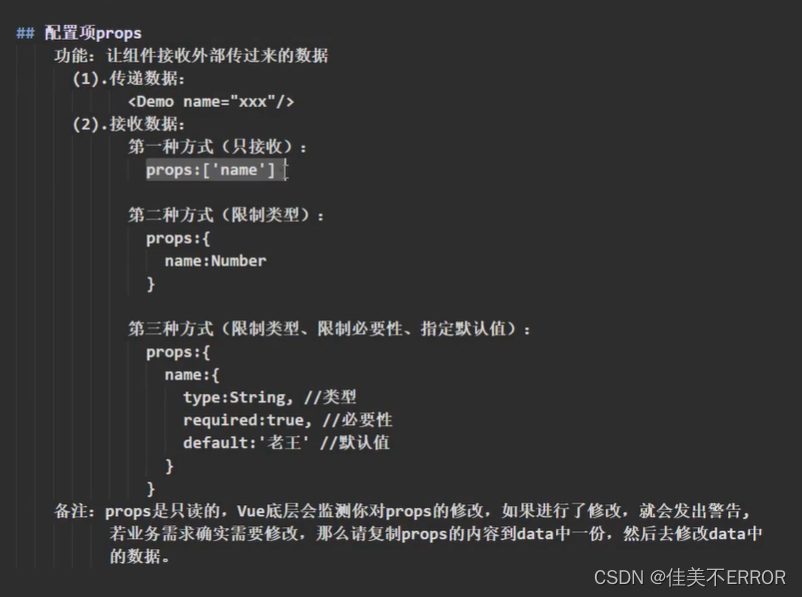
props配置
让组件接收外部传过来的数据。
props这个配置项就类似微信转账,App那边的标签里传过来,这边得接一下子
<template>
    <div>
        <!-- 加个单项数据绑定,引号里面就不是字符串了,就是表达式了 -->
        <Student name="李四" sex="女" :age="20"></Student>
        <Student name="王五" sex="男" :age="20 + 1" />
        <!-- <Student name="zzy" sex="男" age="20" /> -->
    </div>
</template>
简单接收
props: ['name', 'age', 'sex']
接收的同时对数据进行类型限制
props: {
    name: String,
    age: Number,
    sex: String
}
接收时同时对数据:进行类型校验+默认值指定+必要性限制
props: {
        name: {
            type: String,   //name的类型是字符串
            required: true  //name是必须填的
        },
        age: {
            type: Number, //age的类型时数值
            default: 99  //age可以不填,不填就是99
        },
        sex: {
            type: String,   //sex的类型是字符串
            required: true  //sex是必须填的
        }
    }
Student.vue
<template>
    <div>
        <h1>{{ msg }}</h1>
        <h2>学生名称:{{ name }}</h2>
        <h2>学生性别:{{ sex }}</h2>
        <!-- 实现年龄+1 要加v-bind把引号里的东西变成js表达式,否则是字符串+1-->
        <!-- <h2>学生年龄:{{ age*1+1 }}</h2> 强制类型转换一下-->
        <h2>学生年龄age:{{ age + 1 }}</h2>
        <h2>学生年龄myAge:{{ myAge + 1 }}</h2>
        <button @click="updateAge">尝试修改收到的年龄</button>
    </div>
</template>

<script>
export default {
    name: 'Student',
    data() {
        return {
            msg: '从蓬莱写到仙台,哥们儿代码信手拈来',
            //想要修改age,就要用一个新的变量myAge来接收传进来的值
            //然后页面显示myAge就能实现修改,props里的东西是只读的
            myAge: this.age
            // name: 'zzy',
            // age: 18,
            // sex: '男'
        }
    },
    methods: {
        updateAge() {
            // this.age++;  //会报错但是能改但是不建议改
            this.myAge++;
        }
    },
    //props这个配置项就类似微信转账,App那边的标签里传过来,这边得接一下子
    //props中的内容优先级最高,先接这边的数据放vc里,再去读data,若有重复不会覆盖
    props: ['name', 'age', 'sex']
}
</script>
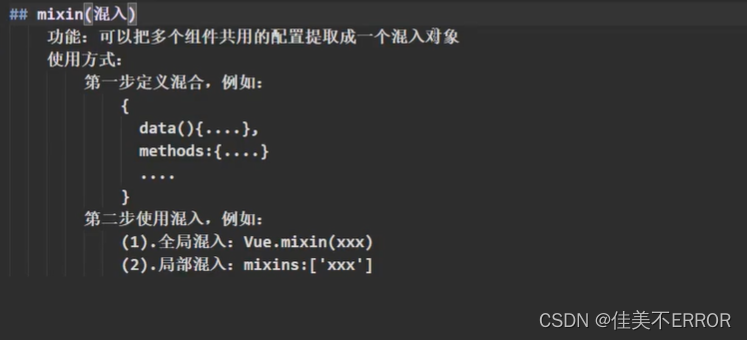
mixin(混入)
功能:可以把多个组件共用的配置提取成一个混入对象
Student.vue
<template>
  <div>
    <h2 @click="showName">学生姓名:{{name}}</h2>
    <h2>学生性别:{{sex}}</h2>
  </div>
</template>

<script>

import {hunhe,hunhe2}from '../mixin'
export default {
    name:'Student',
    data(){
            return{
                name:'张三',
                sex:'男'
            }
        },
        mixins:[hunhe,hunhe2]
}
</script>

<style>

</style>
School.vue
<template>
        <div >
        <h2 @click="showName">学校名称:{{name}}</h2>
        <h2>学校地址:{{address}}</h2>
        <!-- <button @click="showName">点我提示校名</button> -->
        </div>
</template>

<script>
//组件交互相关代码(数据、方法等等)
//Vue.extend可省略
import {hunhe,hunhe2}from '../mixin'
export default {
    name:'School',
    data(){
            return{
                name:'尚硅谷',
                address:'长沙'
            }
        },
        mixins:[hunhe,hunhe2]
}
   // export default school  默认暴露
</script>

<style>

</style>
mixin.js
export const hunhe = {
    methods: {
        showName(){
            alert(this.name)
        }
    },
    mounted() {
        console.log('你好')
    },
}
export const hunhe2 = {
    data(){
        return{
            x:100,
            y:200
        }
    }
}
插件
功能:用于增强Vue
本质:包含install方法的一个对象,install的第一个参数是Vue,第二个以后的参数是插件使用者传递的数据。
使用插件Vue.use()
//在main.js中引入插件并起个名儿
import plugins from './plugins';
//使用插件,要在new Vue之前使用
Vue.use(plugins, 1, 2, 3);
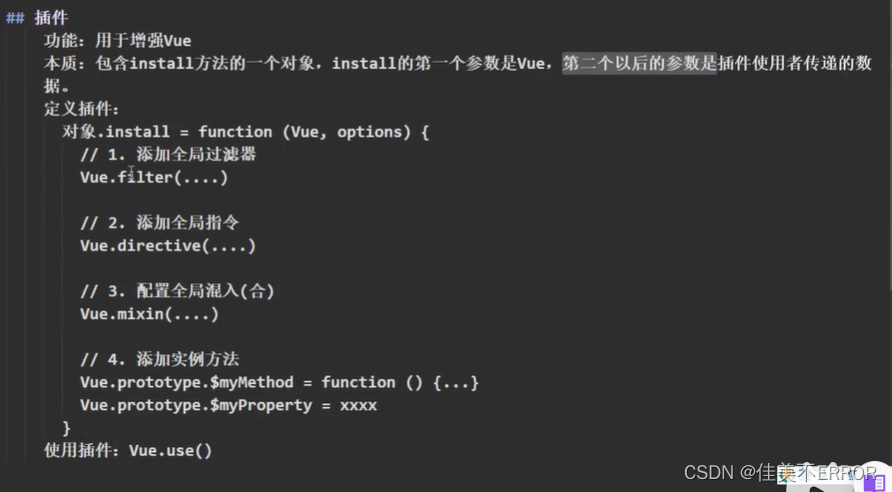
定义插件:可以在另一个js中配置插件,然后通过import引入到main.js中
const plusobj = {
    install(Vue, x, y, z) {
        console.log(Vue);  //第一个参数是Vue构造函数
        console.log(x, y, z); //后面的参数是使用者传进来的东西123

        //1.定义一个全局过滤器
        Vue.filter('mySlice', function (val) {
            return val.slice(0, 4);  //返回值别忘了
        });

        //2.定义一个全局自定义指令,元素默认获取焦点
        Vue.directive('fbind', {
            bind(el, binding) {
                el.value = binding.value;
            },
            inserted(el) {
                el.focus();
            },
            update(el, binding) {
                el.value = binding.value;
            }
        })

        //3.定义一个全局混合,不用引入就能给所有的vm和vc
        Vue.mixin({
            data() {
                return {
                    x: 1,
                    y: 2
                }
            }
        })

        //4.给Vue的原型对象添加实例方法,vm和vc都能用
        Vue.prototype.hello = () => { alert('hello!') }
    }
}

export default plusobj;
scoped样式
作用:让样式在局部生效,防止冲突。
写法:
指定使用 less写法:
备注:
查看webpack所有版本 当前项目文件目录>npm view webpack versions
安装less版本7当前项目文件目录>npm i less-loader@7
第七天
TodoList案例
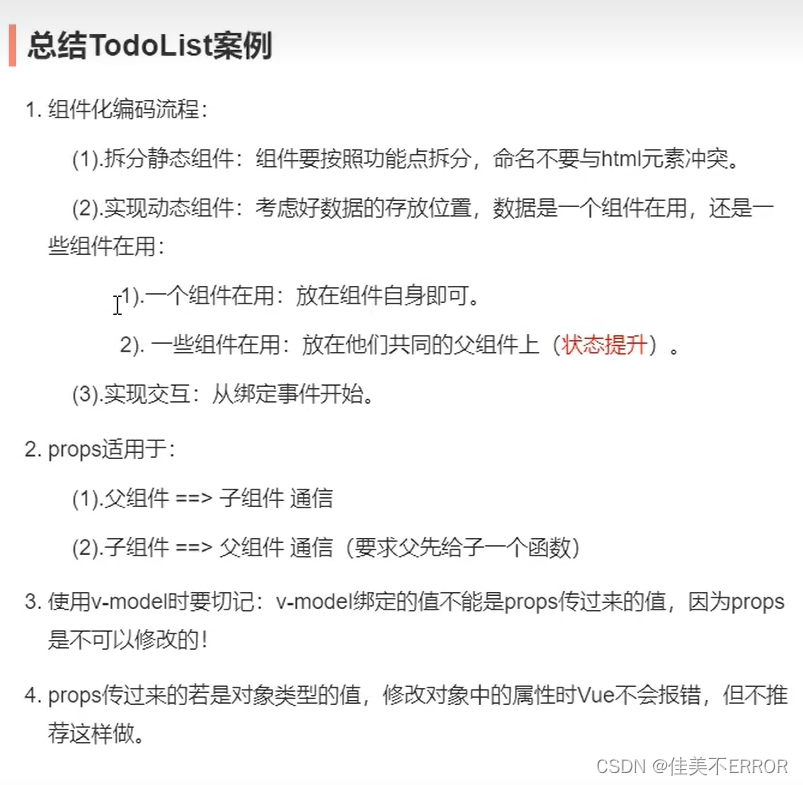
app.vue
<template>
	<div id="root">
		<div class="todo-container">
			<div class="todo-wrap">
				<MyHeader :addTodo="addTodo"/>
				<MyList :todos="todos" :checkTodo="checkTodo" :deleteTodo="deleteTodo"/>
				<MyFooter :todos="todos" :checkAllTodo="checkAllTodo" :clearAllTodo="clearAllTodo"/>
			</div>
		</div>
	</div>
</template>

<script>
	import MyHeader from './components/MyHeader'
	import MyList from './components/MyList'
	import MyFooter from './components/MyFooter.vue'

	export default {
		name:'App',
		components:{MyHeader,MyList,MyFooter},
		data() {
			return {
				//由于todos是MyHeader组件和MyFooter组件都在使用,所以放在App中(状态提升)
				todos:[
					{id:'001',title:'抽烟',done:true},
					{id:'002',title:'喝酒',done:false},
					{id:'003',title:'开车',done:true}
				]
			}
		},
		methods: {
			//添加一个todo
			addTodo(todoObj){
				this.todos.unshift(todoObj)
			},
			//勾选or取消勾选一个todo
			checkTodo(id){
				this.todos.forEach((todo)=>{
					if(todo.id === id) todo.done = !todo.done
				})
			},
			//删除一个todo
			deleteTodo(id){
				this.todos = this.todos.filter( todo => todo.id !== id )
			},
			//全选or取消全选
			checkAllTodo(done){
				this.todos.forEach((todo)=>{
					todo.done = done
				})
			},
			//清除所有已经完成的todo
			clearAllTodo(){
				this.todos = this.todos.filter((todo)=>{
					return !todo.done
				})
			}
		}
	}
</script>

<style>
	/*base*/
	body {
		background: #fff;
	}
	.btn {
		display: inline-block;
		padding: 4px 12px;
		margin-bottom: 0;
		font-size: 14px;
		line-height: 20px;
		text-align: center;
		vertical-align: middle;
		cursor: pointer;
		box-shadow: inset 0 1px 0 rgba(255, 255, 255, 0.2), 0 1px 2px rgba(0, 0, 0, 0.05);
		border-radius: 4px;
	}
	.btn-danger {
		color: #fff;
		background-color: #da4f49;
		border: 1px solid #bd362f;
	}
	.btn-danger:hover {
		color: #fff;
		background-color: #bd362f;
	}
	.btn:focus {
		outline: none;
	}
	.todo-container {
		width: 600px;
		margin: 0 auto;
	}
	.todo-container .todo-wrap {
		padding: 10px;
		border: 1px solid #ddd;
		border-radius: 5px;
	}
</style>
MyFooter.vue
<template>
	<div class="todo-footer" v-show="total">
		<label>
			<!-- <input type="checkbox" :checked="isAll" @change="checkAll"/> -->
			<input type="checkbox" v-model="isAll"/>
		</label>
		<span>
			<span>已完成{{doneTotal}}</span> / 全部{{total}}
		</span>
		<button class="btn btn-danger" @click="clearAll">清除已完成任务</button>
	</div>
</template>

<script>
	export default {
		name:'MyFooter',
		props:['todos','checkAllTodo','clearAllTodo'],
		computed: {
			//总数
			total(){
				return this.todos.length
			},
			//已完成数
			doneTotal(){
				//此处使用reduce方法做条件统计
				/* const x = this.todos.reduce((pre,current)=>{
					console.log('@',pre,current)
					return pre + (current.done ? 1 : 0)
				},0) */
				//简写
				return this.todos.reduce((pre,todo)=> pre + (todo.done ? 1 : 0) ,0)
			},
			//控制全选框
			isAll:{
				//全选框是否勾选
				get(){
					return this.doneTotal === this.total && this.total > 0
				},
				//isAll被修改时set被调用
				set(value){
					this.checkAllTodo(value)
				}
			}
		},
		methods: {
			/* checkAll(e){
				this.checkAllTodo(e.target.checked)
			} */
			//清空所有已完成
			clearAll(){
				this.clearAllTodo()
			}
		},
	}
</script>

<style scoped>
	/*footer*/
	.todo-footer {
		height: 40px;
		line-height: 40px;
		padding-left: 6px;
		margin-top: 5px;
	}

	.todo-footer label {
		display: inline-block;
		margin-right: 20px;
		cursor: pointer;
	}

	.todo-footer label input {
		position: relative;
		top: -1px;
		vertical-align: middle;
		margin-right: 5px;
	}

	.todo-footer button {
		float: right;
		margin-top: 5px;
	}
</style>
MyHeader.vue
<template>
	<div class="todo-header">
		<input type="text" placeholder="请输入你的任务名称,按回车键确认" v-model="title" @keyup.enter="add"/>
	</div>
</template>

<script>
	import {nanoid} from 'nanoid'
	export default {
		name:'MyHeader',
		//接收从App传递过来的addTodo
		props:['addTodo'],
		data() {
			return {
				//收集用户输入的title
				title:''
			}
		},
		methods: {
			add(){
				//校验数据
				if(!this.title.trim()) return alert('输入不能为空')
				//将用户的输入包装成一个todo对象
				const todoObj = {id:nanoid(),title:this.title,done:false}
				//通知App组件去添加一个todo对象
				this.addTodo(todoObj)
				//清空输入
				this.title = ''
			}
		},
	}
</script>

<style scoped>
	/*header*/
	.todo-header input {
		width: 560px;
		height: 28px;
		font-size: 14px;
		border: 1px solid #ccc;
		border-radius: 4px;
		padding: 4px 7px;
	}

	.todo-header input:focus {
		outline: none;
		border-color: rgba(82, 168, 236, 0.8);
		box-shadow: inset 0 1px 1px rgba(0, 0, 0, 0.075), 0 0 8px rgba(82, 168, 236, 0.6);
	}
</style>
MyItem.vue
<template>
	<li>
		<label>
			<input type="checkbox" :checked="todo.done" @change="handleCheck(todo.id)"/>
			<!-- 如下代码也能实现功能,但是不太推荐,因为有点违反原则,因为修改了props -->
			<!-- <input type="checkbox" v-model="todo.done"/> -->
			<span>{{todo.title}}</span>
		</label>
		<button class="btn btn-danger" @click="handleDelete(todo.id)">删除</button>
	</li>
</template>

<script>
	export default {
		name:'MyItem',
		//声明接收todo、checkTodo、deleteTodo
		props:['todo','checkTodo','deleteTodo'],
		methods: {
			//勾选or取消勾选
			handleCheck(id){
				//通知App组件将对应的todo对象的done值取反
				this.checkTodo(id)
			},
			//删除
			handleDelete(id){
				if(confirm('确定删除吗?')){
					//通知App组件将对应的todo对象删除
					this.deleteTodo(id)
				}
			}
		},
	}
</script>

<style scoped>
	/*item*/
	li {
		list-style: none;
		height: 36px;
		line-height: 36px;
		padding: 0 5px;
		border-bottom: 1px solid #ddd;
	}

	li label {
		float: left;
		cursor: pointer;
	}

	li label li input {
		vertical-align: middle;
		margin-right: 6px;
		position: relative;
		top: -1px;
	}

	li button {
		float: right;
		display: none;
		margin-top: 3px;
	}

	li:before {
		content: initial;
	}

	li:last-child {
		border-bottom: none;
	}

	li:hover{
		background-color: #ddd;
	}

	li:hover button{
		display: block;
	}
</style>
MyList.vue
<template>
	<ul class="todo-main">
		<MyItem
			v-for="todoObj in todos"
			:key="todoObj.id"
			:todo="todoObj"
			:checkTodo="checkTodo"
			:deleteTodo="deleteTodo"
		/>
	</ul>
</template>

<script>
	import MyItem from './MyItem'

	export default {
		name:'MyList',
		components:{MyItem},
		//声明接收App传递过来的数据,其中todos是自己用的,checkTodo和deleteTodo是给子组件MyItem用的
		props:['todos','checkTodo','deleteTodo']
	}
</script>

<style scoped>
	/*main*/
	.todo-main {
		margin-left: 0px;
		border: 1px solid #ddd;
		border-radius: 2px;
		padding: 0px;
	}

	.todo-empty {
		height: 40px;
		line-height: 40px;
		border: 1px solid #ddd;
		border-radius: 2px;
		padding-left: 5px;
		margin-top: 10px;
	}
</style>
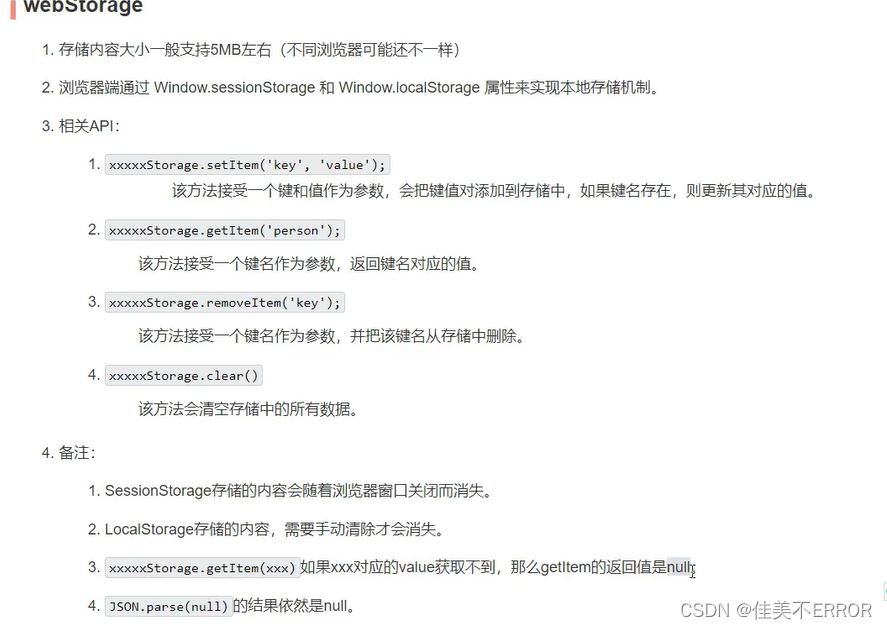
浏览器本地存储
上面Network: unavailable问题没解决下面也会有问题,服啦

localStorage.html
<!DOCTYPE html>
<html>
	<head>
		<meta charset="UTF-8" />
		<title>localStorage</title>
	</head>
	<body>
		<h2>localStorage</h2>
		<button onclick="saveData()">点我保存一个数据</button>
		<button onclick="readData()">点我读取一个数据</button>
		<button onclick="deleteData()">点我删除一个数据</button>
		<button onclick="deleteAllData()">点我清空一个数据</button>

		<script type="text/javascript" >
			let p = {name:'张三',age:18}

			function saveData(){
				localStorage.setItem('msg','hello!!!')
				localStorage.setItem('msg2',666)
				localStorage.setItem('person',JSON.stringify(p))
			}
			function readData(){
				console.log(localStorage.getItem('msg'))
				console.log(localStorage.getItem('msg2'))

				const result = localStorage.getItem('person')
				console.log(JSON.parse(result))

				// console.log(localStorage.getItem('msg3'))
			}
			function deleteData(){
				localStorage.removeItem('msg2')
			}
			function deleteAllData(){
				localStorage.clear()
			}
		</script>
	</body>
</html>
sessionStorage.html
<!DOCTYPE html>
<html>
	<head>
		<meta charset="UTF-8" />
		<title>sessionStorage</title>
	</head>
	<body>
		<h2>sessionStorage</h2>
		<button onclick="saveData()">点我保存一个数据</button>
		<button onclick="readData()">点我读取一个数据</button>
		<button onclick="deleteData()">点我删除一个数据</button>
		<button onclick="deleteAllData()">点我清空一个数据</button>

		<script type="text/javascript" >
			let p = {name:'张三',age:18}

			function saveData(){
				sessionStorage.setItem('msg','hello!!!')
				sessionStorage.setItem('msg2',666)
				sessionStorage.setItem('person',JSON.stringify(p))
			}
			function readData(){
				console.log(sessionStorage.getItem('msg'))
				console.log(sessionStorage.getItem('msg2'))

				const result = sessionStorage.getItem('person')
				console.log(JSON.parse(result))

				// console.log(sessionStorage.getItem('msg3'))
			}
			function deleteData(){
				sessionStorage.removeItem('msg2')
			}
			function deleteAllData(){
				sessionStorage.clear()
			}
		</script>
	</body>
</html>
第八天
组件自定义事件

累了,毁灭吧
第九天
动画效果
Test.vue
<template>
  <div>
    <button @click="isShow =!isShow">显示/隐藏</button>
    <transition name="hello" appear>
        <h1 v-show="isShow" class="come">你好啊</h1>
    </transition>

    <!-- <transition name="h2" appear>
        <h2 v-show="isShow">尚硅谷</h2>
    </transition> -->
      </div>
</template>

<script>
    export default {
        name:'Test',
        data(){
            return{
                isShow:true
            }
        },
    }
</script>

<style scoped>
h1{
    border-color: orange;
}

.hello-enter-active{
    animation: atguigu 1s linear;
}
.hello-leave-active{
    animation: atguigu 1s linear reverse;
}

@keyframes atguigu {
    from{
        transform: translateX(-100px);
    }
    to{
        transform: translateX(0px);
    }
}

</style>
过渡效果
Test2.vue
<template>
    <div>
      <button @click="isShow =!isShow">显示/隐藏</button>
      <transition name="hello" appear>
          <h1 v-show="isShow">你好啊</h1>
      </transition>

      <!-- <transition name="h2" appear>
          <h2 v-show="isShow">尚硅谷</h2>
      </transition> -->
        </div>
  </template>

  <script>
      export default {
          name:'Test',
          data(){
              return{
                  isShow:true
              }
          },
      }
  </script>

  <style scoped>
  h1{
      border-color: orange;
      transform: 0.5s linear;
  }

  .hello-enter,.hello-leave-to{
       transform: translateX(-100%);
  }

  .hello-enter-active,.hello-leave-active{
    transform: 0.5s linear;
  }

  .hello-enter-to,.hello-leave{
    transform: translateX(0);
  }


  </style>
app.vue
<template>
  <div >
    <Test></Test>
    <Test2></Test2>
   </div>
</template>

<script>
import Test from './components/Test.vue'
import Test2 from './components/Test2.vue';

export default {
  name: 'App',
  components: {
    Test,Test2
  },
}
</script>

<style>

</style>
样式库
Animate.css
链接位置
安装npm install animate.css+引入import ‘animate.css’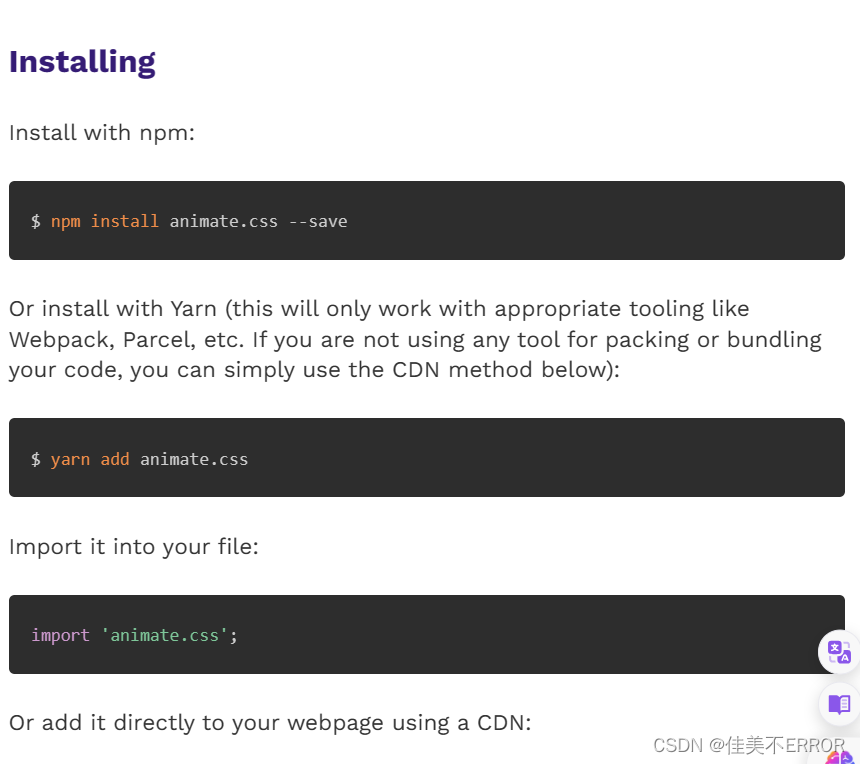
Test3.vue
<template>
    <div>
      <button @click="isShow =!isShow">显示/隐藏</button>
      <transition-group
         appear
         name="animate_animated animate_bounce"
         enter-active-class="animate_swing"
         leave-active-class="animate_backOutUp"
         >
          <h1 v-show="!isShow" key="1">你好啊</h1>
          <h1 v-show="isShow" key="2">尚硅谷</h1>
      </transition-group>


        </div>
  </template>

  <script>
    import 'animate.css'
      export default {
          name:'Test',
          data(){
              return{
                  isShow:true
              }
          },
      }
  </script>

  <style scoped>
  h1{
      border-color: orange;
      transform: 0.5s linear;
  }


  </style>
配置代理
引入axios
npm i axios
app.vue
<template>
  <div >
<button @click="getStudents">获取学生信息</button>
   </div>
</template>

<script>
import axios from 'axios'
export default {
  name: 'App',
  methods:{
    getStudents(){
      axios.get('http://localhost:8080/students').then(
        response =>{
          console.log('请求成功了',response.data)
        },
        error=>{
          console.log('请求失败了',error.message)
        }
      )
    }
  },
}
</script>

<style>

</style>
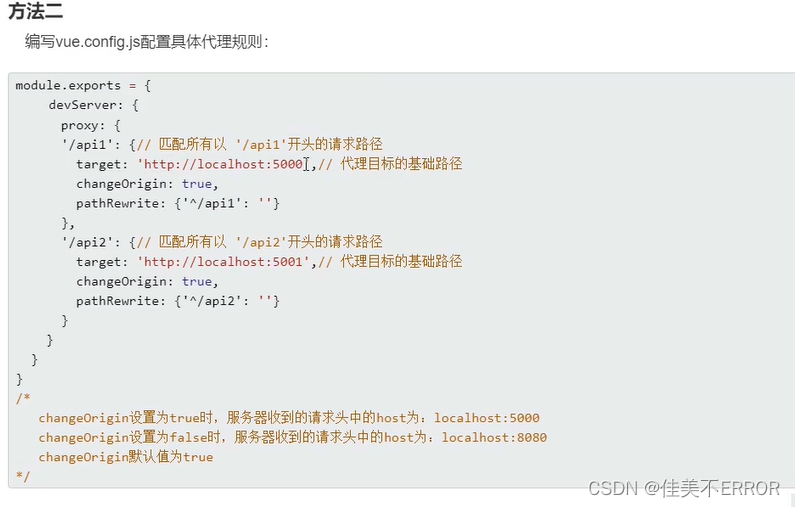
vue.config.js
module.exports = {
    pages:{
        index:{
            entry:'src/main.js',
        },
    },
    lintOnSave:false,
    devServer: {
        proxy: 'http://localhost:5000'
      }
}
第二种配置代理
app.vue
<template>
  <div >
<button @click="getStudents">获取学生信息</button>
<button @click="getCars">获取汽车信息</button>

   </div>
</template>

<script>
import axios from 'axios'
export default {
  name: 'App',
  methods:{
    getStudents(){
      axios.get('http://localhost:8080/atguigu/students').then(
        response =>{
          console.log('请求成功了',response.data)
        },
        error=>{
          console.log('请求失败了',error.message)
        }
      )
    },
    getCars(){
      axios.get('http://localhost:8080/demo/cars').then(
        response =>{
          console.log('请求成功了',response.data)
        },
        error=>{
          console.log('请求失败了',error.message)
        }
      )
    }
  },
}
</script>

<style>

</style>
vue.config.js
module.exports = {
    pages:{
        index:{
            entry:'src/main.js',
        },
    },
    lintOnSave:false,
    devServer: {
        proxy: {
          '/atguigu': {
            target: 'http://localhost:5000',
            pathRewrite:{'^/atguigu':''},
           /*  ws: true,  //用于支持websocket
            changeOrigin: true */
          },
          '/demo':{
            target:'http://localHost:5001',
            pathRewrite:{
                '^/demo':''
            },
          }
          /* '/foo': {
            target: '<other_url>'
          } */
        }
      }
}
github案例
List.vue
<template>
    <div class="row">
		<!-- 展示用户列表 -->
		<div v-show="info.users.length" class="card" v-for="user in info.users" :key="user.login">
			<a :href="user.html_url" target="_blank">
				<img :src="user.avatar_url" style='width: 100px'/>
			</a>
			<p class="card-text">{{user.login}}</p>
		</div>
		<!-- 展示欢迎词 -->
		<h1 v-show="info.isFirst">欢迎使用!</h1>
		<!-- 展示加载中 -->
		<h1 v-show="info.isLoading">加载中....</h1>
		<!-- 展示错误信息 -->
		<h1 v-show="info.errMsg">{{info.errMsg}}</h1>
	</div>
</template>

<script>
    export default {
        name:'List',
        data(){
            info:{
				return{
				isFirst:true,
				isLoading:false,
				errMsg:'',
                users:[]
            }
			}
        },
		mounted(){
			/* this.$bus.$on('getUsers',(isFirst,isLoading,errMsg,users)=>{
				console.log('我是List组件',users)
				this.isFirst=isFirst
				this.isLoading=isLoading
				this.errMsg=errMsg
				this.users=users
			}) */
			this.$bus.$on('updateListDate',(dataObj)=>{
				this.info={
					...this.info,...dataObj
				}
				console.log(this)
			})
			/* this.$bus.$on('getFirst',(isFirst)=>{
				this.isFirst=isFirst
			}) */
		},
    }
</script>

<style>

</style>
Search.vue
<template>
<section class="jumbotron">
<h3 class="jumbotron-heading">Search Github Users</h3>
<div>
<input type="text" placeholder="enter the name you search" v-model="keyWord"/>
<button @click="searchUsers">Search</button>
</div>
</section>
</template>
<script>
import axios from 'axios'
export default {
name:'Search',
data() {
return {
keyWord:''
}
},
methods: {
searchUsers(){
//请求前更新List的数据
this.$bus.$emit('updateListData',{isLoading:true,errMsg:'',users:[],isFirst:false})
axios.get(`https://api.github.com/search/users?q=${this.keyWord}`).then(
response => {
console.log('请求成功了')
//请求成功后更新List的数据
this.$bus.$emit('updateListData',{isLoading:false,errMsg:'',users:response.data.items})
},
error => {
//请求后更新List的数据
this.$bus.$emit('updateListData',{isLoading:false,errMsg:error.message,users:[]})
}
)
}
},
}
</script>
vue-resource
安装
npm i vue-resource
这个文档太长了,,,换个新文档写了

