目录
一.准备基础代码
Mybatis的通用配置
二. 基本CURD操作
1.查询-根据id查询一条
2.查询-查询数量
3.删除
4.新增
获取主键值
5.修改
6.查询-模糊查询
预编译SQL
#{}与${}的区别【面试题】
三. Mybatis的方法参数与结果集
1.SQL里取方法参数的值
2.查询结果集的封装
方案一:SQL语句里给字段起别名
方案二:使用@Results和@Result手动映射
四.Mybatis的XML映射文件
1.介绍
2.用法
3.示例
4.给idea配置代码模板
五、Mybatis的动态SQL【重点】
1. 动态SQL介绍
2. if标签和where标签
3. set标签
4. foreach标签
5. sql标签和include标签
一.准备基础代码
把基础工程《资料\00.基础工程\web09-mybatis-curd》拷贝到不含中文、空格、特殊字符的目录里,然后使用idea直接open打开项目
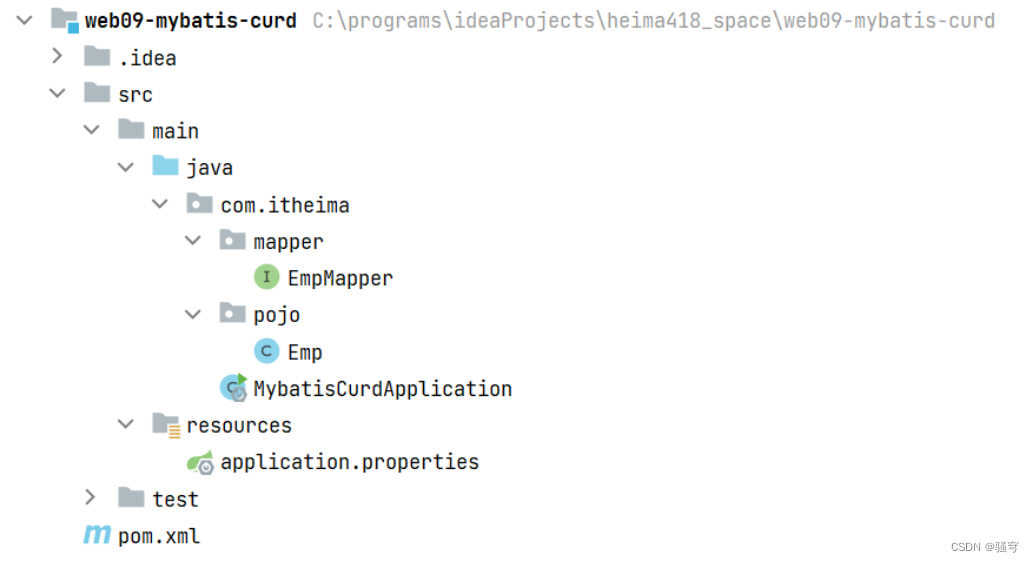
准备基础环境
-
依赖pom.xml
<properties>
        <maven.compiler.source>11</maven.compiler.source>
        <maven.compiler.target>11</maven.compiler.target>
        <project.build.sourceEncoding>UTF-8</project.build.sourceEncoding>
    </properties>

    <parent>
        <groupId>org.springframework.boot</groupId>
        <artifactId>spring-boot-starter-parent</artifactId>
        <version>2.7.3</version>
    </parent>

    <dependencies>
        <dependency>
            <groupId>org.mybatis.spring.boot</groupId>
            <artifactId>mybatis-spring-boot-starter</artifactId>
            <version>2.2.2</version>
        </dependency>

        <dependency>
            <groupId>com.mysql</groupId>
            <artifactId>mysql-connector-j</artifactId>
            <version>8.0.33</version>
            <scope>runtime</scope>
        </dependency>

        <dependency>
            <groupId>org.projectlombok</groupId>
            <artifactId>lombok</artifactId>
            <optional>true</optional>
        </dependency>

        <dependency>
            <groupId>org.springframework.boot</groupId>
            <artifactId>spring-boot-starter-test</artifactId>
            <scope>test</scope>
        </dependency>
    </dependencies>
配置文件application.properties
spring.datasource.driver-class-name=com.mysql.cj.jdbc.Driver
spring.datasource.url=jdbc:mysql://localhost:3306/db4
spring.datasource.username=root
spring.datasource.password=root
引导类
import org.springframework.boot.SpringApplication;
import org.springframework.boot.autoconfigure.SpringBootApplication;

@SpringBootApplication
public class MybatisCurdApplication {
    public static void main(String[] args) {
        SpringApplication.run(MybatisCurdApplication.class, args);
    }
}
查询所有员工
-
实体类
import lombok.Data;

import java.time.LocalDate;
import java.time.LocalDateTime;

@Data
public class Emp {
    private Integer id;
    private String username;
    private String password;
    private String name;
    private Integer gender;
    private String image;
    private Integer job;
    private LocalDate entrydate;
    private Integer deptId;
    private LocalDateTime createTime;
    private LocalDateTime updateTime;
}
EmpMapper
import com.itheima.pojo.Emp;
import org.apache.ibatis.annotations.Select;

import java.util.List;

@Mapper
public interface EmpMapper {
    @Select("select * from emp")
    List<Emp> queryAll();
}
功能测试
import com.itheima.mapper.EmpMapper;
import com.itheima.pojo.Emp;
import org.junit.jupiter.api.Test;
import org.springframework.beans.factory.annotation.Autowired;
import org.springframework.boot.test.context.SpringBootTest;

import java.util.List;

@SpringBootTest
public class CurdTest {
    @Autowired
    private EmpMapper empMapper;

    @Test
    public void testQueryAll(){
        List<Emp> emps = empMapper.queryAll();
        emps.forEach(System.out::println);
    }
}
Mybatis的通用配置
Mybatis的日志输出
直接修改application.properties,增加配置:
mybatis.configuration.log-impl=org.apache.ibatis.logging.stdout.StdOutImplMybatis下划线与驼峰命名转换
直接修改application.properties,增加配置:
#开启下划线与驼峰命名的自动映射。
# 如果设置为true,那么数据库里下划线命名风格的字段,会自动映射到Java里驼峰式命名的属性
# 比如:数据库字段是dept_id, Java里的成员变量名是deptId。 Mybatis会认为这两个是对应的
mybatis.configuration.map-underscore-to-camel-case=true
基本CURD操作
使用Mybatis,无论什么功能,都只需要:
-
在Mapper接口里写一个方法
-
给方法配置SQL语句:用注解
二. 基本CURD操作
1.查询-根据id查询一条
EmpMapper:实现功能
/**
 * 0. 先准备好SQL语句
 * 1. 方法的参数:根据SQL语句需要的参数来定
 *      这些参数都是给SQL语句使用。SQL语句里需要几个参数,方法上就要加几个形参
 *      SQL语句里要获取参数值,如果方法只有一个参数,写法是:#{随意写},建议写成#{参数名}
 * 2. 方法的返回值:根据我们想要得到什么结果来定
 *      我们期望Mybatis帮我们把查询结果封装成什么对象。
 *      写成Emp,Mybatis就会把查询的结果封装成一个Emp对象
 *      注意:实体类里的属性名,要和表的字段名 一致(相同,或者符合下划与驼峰命名的规则)
 */
@Select("select * from emp where id = #{id}")
Emp queryById(Integer id);
CurdTest:功能测试
@Test
public void testQueryById(){
    Emp emp = empMapper.queryById(1);
    System.out.println("emp = " + emp);
}
2.查询-查询数量
EmpMapper:实现功能
/**
 * 查询数量:SQL语句 select count(*) from emp
 * 方法要参数吗?不需要。因为SQL语句不需要参数
 * 方法返回值是什么类型?能够封装查询结果即可,可使用int、long
 */
@Select("select count(*) from emp")
int queryCount();
CurdTest:功能测试
@Test
public void testQueryCount(){
    int count = empMapper.queryCount();
    System.out.println("count = " + count);
}
3.删除
EmpMapper:实现功能
/**
 * 根据id删除一个员工:delete from emp where id = ?
 * 配置查询语句:@Select
 * 配置新增语句:@Insert
 * 配置修改语句:@Update
 * 配置删除语句:@Delete
 */
@Delete("delete from emp where id = #{id}")
void deleteById(Integer id);
CurdTest:功能测试
@Test
public void testDeleteById(){
    empMapper.deleteById(17);
}
4.新增
EmpMapper:实现功能
/**
 * 插入一条员工数据:
 * INSERT INTO emp (id, username, password, name, gender, image, job, entrydate, dept_id, create_time, update_time)
 * VALUES (16, 'songyuanqiao', '123456', '宋远桥', 1, '16.jpg', 2, '2010-01-01', 2, '2023-08-19 10:39:37', '2023-08-19 10:39:37');
 *
 * 方法的参数:
 *      如果SQL语句需要的参数过多,方法的形参可以使用一个实体类
 *      SQL语句里使用 #{JavaBean的属性名}
 *      注意:
 *          不要写成 '#{JavaBean属性名}'
 *          #{属性名}的顺序,必须与前边的字段顺序是一致对应的
 */
@Insert("INSERT INTO emp (username, password, name, gender, image, job, entrydate, dept_id, create_time, update_time)\n" +
        "VALUES (#{username}, #{password}, #{name}, #{gender}, #{image}, #{job}, #{entrydate}, #{deptId}, #{createTime}, #{updateTime})")
void insert(Emp emp);
CurdTest:功能测试
@Test
public void testInsert(){
    Emp emp = new Emp();
    emp.setUsername("tom");
    emp.setPassword("123");
    emp.setName("汤姆");
    emp.setGender(1);
    emp.setCreateTime(LocalDateTime.now());
    emp.setUpdateTime(LocalDateTime.now());
    empMapper.insert(emp);
}
获取主键值
如果执行insert时,需要获取数据的主键值,我们可以做:
-
在Mapper接口里插入的方法上,再增加注解:
@Options(useGeneratedKeys=true, keyProperty="JavaBean里的属性名")
/**
     * 插入一条员工数据:
     * INSERT INTO emp (id, username, password, name, gender, image, job, entrydate, dept_id, create_time, update_time)
     * VALUES (16, 'songyuanqiao', '123456', '宋远桥', 1, '16.jpg', 2, '2010-01-01', 2, '2023-08-19 10:39:37', '2023-08-19 10:39:37');
     *
     * 方法的参数:
     *      如果SQL语句需要的参数过多,方法的形参可以使用一个实体类
     *      SQL语句里使用 #{JavaBean的属性名}
     *      注意:
     *          不要写成 '#{JavaBean属性名}'
     *          #{属性名}的顺序,必须与前边的字段顺序是一致对应的
     * 如果插入数据之后,需要获取数据的主键值:@Options
     *      useGeneratedKeys:利用数据库的主键自增得到主键值
     *      keyProperty:把得到的主键值,存储到参数实体类对象的哪个属性上
     */
    @Options(useGeneratedKeys = true, keyProperty = "id")
    @Insert("INSERT INTO emp (username, password, name, gender, image, job, entrydate, dept_id, create_time, update_time)\n" +
            "VALUES (#{username}, #{password}, #{name}, #{gender}, #{image}, #{job}, #{entrydate}, #{deptId}, #{createTime}, #{updateTime})")
    void insert(Emp emp);
5.修改
EmpMapper:实现功能
/**
 * 修改id为19的数据:
 * UPDATE emp SET username = 'jerry', password = '123', name = '杰瑞', gender = 1, image = null, job = null, entrydate = null, dept_id = null, create_time = '2023-08-19 14:54:29', update_time = '2023-08-19 14:54:29' WHERE id = 19;
 */
@Update("UPDATE emp SET username = #{username}, password = #{password}, name = #{name}, gender = #{gender}, image = #{image}, job = #{job}, " +
        "entrydate = #{entrydate}, dept_id = #{deptId}, create_time = #{createTime}, update_time = #{updateTime} WHERE id = #{id}")
void updateById(Emp emp);
CurdTest:功能测试
@Test
public void testUpdateById(){
    Emp emp = empMapper.queryById(19);

    emp.setUsername("robin li");
    emp.setGender(2);

    empMapper.updateById(emp);
}
6.查询-模糊查询
EmpMapper:实现功能
/**
     * 模糊查询:查询姓名里包含“张”的员工列表
     * select * from emp where name like '%张%';
     * SQL语句里拼接字符串函数:concat(字符串1, 字符串2, 字符串3,....)
     */
    @Select("select * from emp where name like concat('%', #{name}, '%')")
    List<Emp> queryByName1(String name);

    @Select("select * from emp where name like '%${name}%'")
    List<Emp> queryByName2(String name);
CurdTest:功能测试
  @Test
    public void testQueryByName1(){
        List<Emp> list = empMapper.queryByName1("张");
        list.forEach(System.out::println);
    }

    @Test
    public void testQueryByName2(){
        List<Emp> list = empMapper.queryByName2("张");
        list.forEach(System.out::println);
    }
预编译SQL
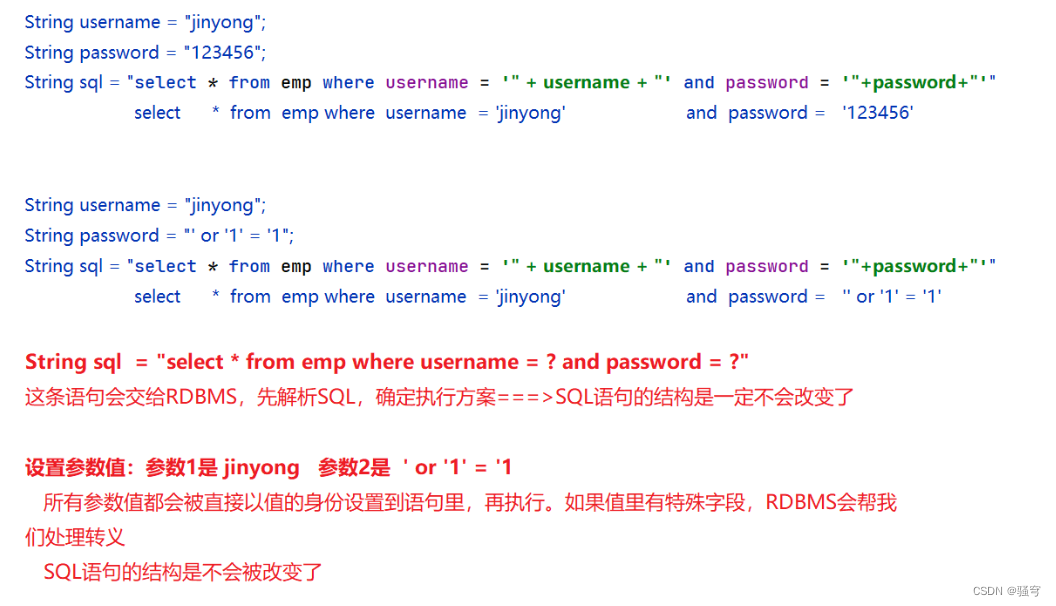
预编译:不是Mybatis的概念,而是JDBC的概念。
-
不使用预编译:RDBMS先编译SQL(解析SQL语句,确定SQL的执行方案);再执行SQL语句,得到结果
-
使用了预编译:先把SQL语句进行解析确定执行方案;然后设置参数值执行SQL
好处1-预编译执行SQL性能更高

好处2-可以防止SQL注入漏洞
#{}与${}的区别【面试题】
-
#{}:底层使用的是预编译方式。更安全,因为可以防止SQL注入漏洞
执行SQL的性能更高
-
${}:没有使用预编译,是直接拼接SQL字符串不安全,可能存在SQL注入漏洞
执行SQL的性能不如预编译
三. Mybatis的方法参数与结果集
1.SQL里取方法参数的值
如果方法只有一个参数:
-
如果参数是简单值(8种基本数据类型及包装类、String),SQL语句里取参数值是:
#{参数名} -
如果参数是JavaBean对象,SQL语句里取JavaBean的属性值:
#{属性名}
如果方法有多个参数,SQL语句里取参数值:
-
从SpringBoot2版本开始:
#{形参名} -
在SpringBoot2以前版本:【了解】
首先,给方法参数起名称,添加注解:
@Param("名称")然后,在SQL语句里使用:
#{名称}获取对应参数值
/**
     * 需求:根据姓名、性别、入职时间范围 搜索员工信息
     * SQL:select * from emp where name like ? and gender = ? and entrydate between ? and ?
     * 如果方法有多个参数,SQL语句里取参数值:#{参数名称}。从SpringBoot2开始提供的功能
     */
@Select("select * from emp where name like concat('%',#{name}, '%') and gender = #{gender} and entrydate between #{begin} and #{end}")
List<Emp> queryEmpList(String name,
                       Integer gender,
                       LocalDate begin,
                       LocalDate end);

@Select("select * from emp where name like concat('%',#{a}, '%') and gender = #{b} " +
        "and entrydate between #{c} and #{d}")
List<Emp> queryEmpList2(@Param("a") String name,
                        @Param("b") Integer gender,
                        @Param("c") LocalDate begin,
                        @Param("d") LocalDate end);
2.查询结果集的封装
Mybatis会自动帮我们把查询的结果集封装成实体类对象,前提条件是:
-
要么 JavaBean的属性名,和 表的字段名完全相同。
比如:字段名是
gender,Emp类里的属性名也叫gender -
要么 JavaBean的属性名,和 表的字段名按照 下划线与驼峰映射 是一致的。
比如:字段名是
dept_id,Emp类里属性名是deptId前提:开启下划线与驼峰的命名转换,修改application.properties配置文件,添加参数
mybatis.configuration.map-underscore-to-camel-case=true
如果JavaBean的属性名和字段名完全不匹配,就需要处理这种情况
@Data
@NoArgsConstructor
@AllArgsConstructor
public class Employee {
    private Integer id;
    /*对应的字段名是username*/
    private String uname;
    /*对应的字段名是password*/
    private String pword;
    private String name;
    private Integer gender;
    private String image;
    private Integer job;
    private LocalDate entrydate;
    private Integer deptId;
    private LocalDateTime createTime;
    private LocalDateTime updateTime;
}
方案一:SQL语句里给字段起别名
/**
 * JavaBean属性名 与  表字段名 完全不匹配:
 * SQL语句里给字段起别名,别名和JavaBean属性名相同
 */
@Select("select id, username as uname, password as pword,name,gender,image,job," +
        "entrydate,dept_id,create_time, update_time from emp")
List<Employee> queryEmployeeList2();方案二:使用@Results和@Result手动映射
只需要把不同的字段配置一下,如果字段和属性名匹配,就不需要做配置
/**
 * JavaBean属性名 与  表字段名 完全不匹配:
 * 我们使用@Results和@Result注解,手动设置一下,哪个字段对应哪个属性
 *      注解1:@Results,用于配置当前查询里所有字段的映射关系
 *      注解2:@Result,用于配置某一个字段与属性的对应关系
 *          property:写的是JavaBean的属性名
 *          column:写的是表里的字段名
 */
@Select("select * from emp")
@Results({
        @Result(property = "uname", column = "username"),
        @Result(property = "pword", column = "password")
})
List<Employee> queryEmployeeList3();
四.Mybatis的XML映射文件
1.介绍
Mybatis的SQL语句,可以使用注解直接配置到Mapper接口里的方法上,也可以定义到XML文件里
-
如果SQL语句写到接口里的方法上:注解方式,适合于简单SQL或者固定不变的SQL
-
如果SQL语句写到XML文件里:xml方式,更适合于复杂SQL或者动态变化的SQL
注意:XML方式和注解方式可以同时使用,但是要注意
-
一个方法的SQL语句,要么用注解方式配置,要么用XML方式配置,不能重复配置
2.用法
XML文件的要求:
-
XML文件的位置:要和Mapper同一包下,按照maven规范,要放到resources里边的同名文件夹下
-
XML文件的名称:要和Mapper接口的名称相同
XML内容的要求:
-
根标签
<mapper namespace="Mapper接口的全限定类名">:表示当前XML是给哪个Mapper接口配置语句的 -
在mapper标签里边,配置SQL语句:
-
select标签:配置select语句,SQL语句写到标签里边。需要配置id属性和resultType属性
-
id属性:配置方法名。表示当前SQL语句是给哪个方法配置的
-
resultType属性:告诉Mybatis要把查询结果中的每一行数据,封装成什么对象
-
-
insert标签:配置insert语句,SQL语句写到标签里边。需要配置id属性
-
id属性:配置方法名。表示当前SQL语句是给哪个方法配置的
-
-
update标签:配置update语句,SQL语句写到标签里边。需要配置id属性
-
id属性:配置方法名。表示当前SQL语句是给哪个方法配置的
-
-
delete标签:配置delete语句,SQL语句写到标签里边。需要配置id属性
-
id属性:配置方法名。表示当前SQL语句是给哪个方法配置的
-
-
3.示例
Mapper接口
/**
 * 使用XML方式配置SQL语句
 * XML文件的位置:Mapper接口在什么包,XML文件就必须在同包下。
 *      在resources目录下右键,创建Directory文件夹,以/为分隔符,千万不要以.为分隔符。
 *      比如:com/itheima/mapper
 * XML文件的名称:Mapper接口叫什么名字,XML文件也叫什么名字
 *
 */
List<Emp> queryEmpListXml(String name,Integer gender,LocalDate begin,LocalDate end);
XML映射文件
<?xml version="1.0" encoding="UTF-8" ?>
<!DOCTYPE mapper
        PUBLIC "-//mybatis.org//DTD Mapper 3.0//EN"
        "http://mybatis.org/dtd/mybatis-3-mapper.dtd">
<!--
mapper标签:根标签
    namespace:要写Mapper接口的全限定类名。表示当前xml文件,是给哪个Mapper接口配置的
mapper的子标签:
    select标签:配置select语句,SQL语句写到标签里边
    insert标签:配置insert语句,SQL语句写到标签里边
    update标签:配置update语句,SQL语句写到标签里边
    delete标签:配置delete语句,SQL语句写到标签里边
    以上标签都有的属性:
        id:写方法名。表示当前语句是给哪个方法配置的
        resultType:select标签专用的属性
            用于告诉Mybatis,SQL查询语句的结果,要封装成什么对象
            写JavaBean的全限定类名,不需要写List、Set等等
-->
<mapper namespace="com.itheima.mapper.EmpMapper">
    <select id="queryEmpListXml" resultType="com.itheima.pojo.Emp">
        select * from emp
         where name like concat('%',#{name}, '%')
           and gender = #{gender}
           and entrydate between #{begin} and #{end}
    </select>
</mapper>
功能测试
@Test
public void testQueryEmpListXml(){
    LocalDate begin = LocalDate.of(2010, 1, 1);
    LocalDate end = LocalDate.of(2015, 12, 31);
    List<Emp> emps = empMapper.queryEmpListXml("张", 1, begin, end);
    for (Emp emp : emps) {
        System.out.println("emp = " + emp);
    }
}
4.给idea配置代码模板
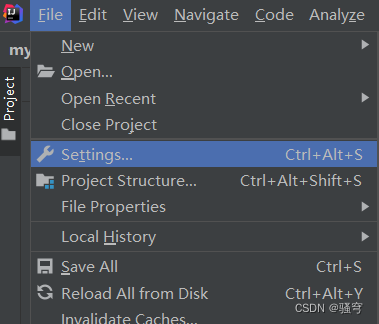
配置方式:File | Settings | Editor | Live Templates
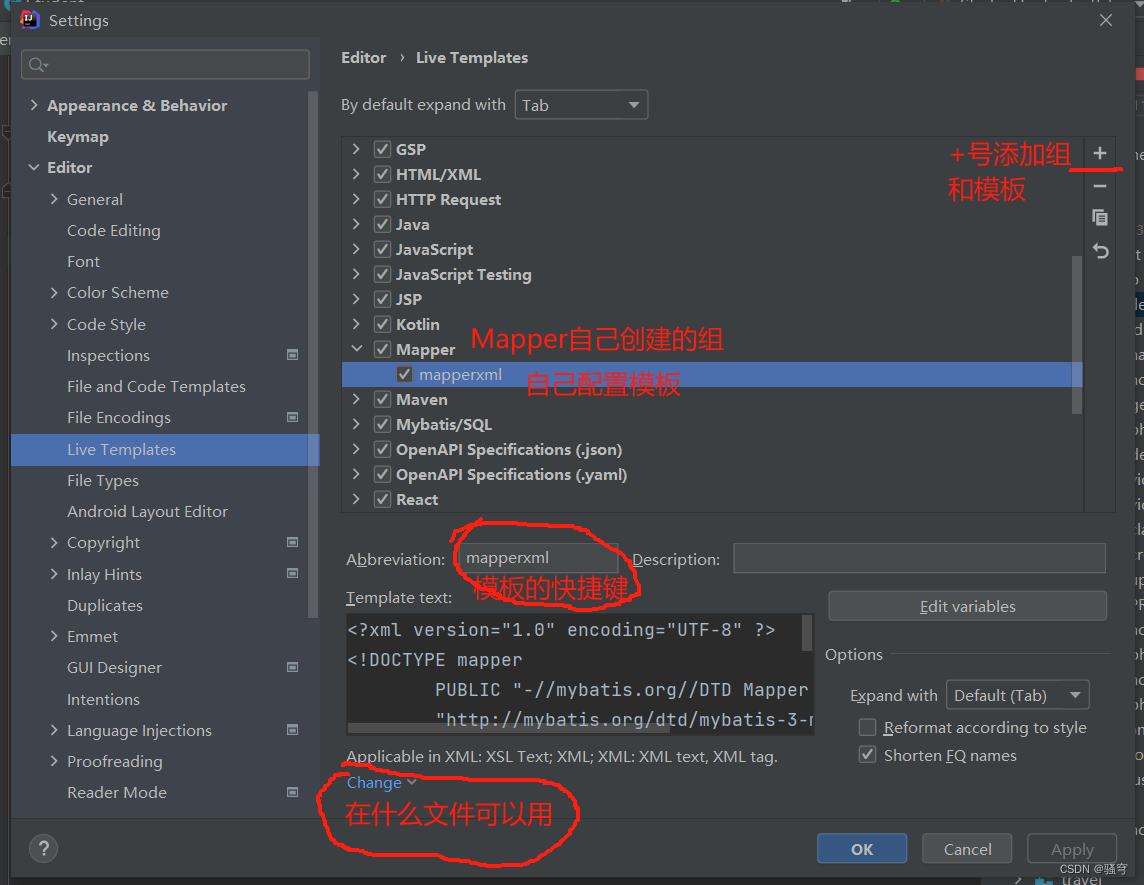
<?xml version="1.0" encoding="UTF-8" ?>
<!DOCTYPE mapper
        PUBLIC "-//mybatis.org//DTD Mapper 3.0//EN"
        "http://mybatis.org/dtd/mybatis-3-mapper.dtd">
<mapper namespace="$namespace$">
    $END$
</mapper>
五、Mybatis的动态SQL【重点】
1. 动态SQL介绍
当进行多条件搜索时,搜索条件通常是不确定的,导致SQL语句的条件也是不确定的:需要根据条件,来确定要拼接哪些查询条件。这样的SQL语句,就是所谓的动态SQL
Mybatis提供了一些xml的标签,用于实现动态SQL语句:
-
if标签:用于判断
-
where标签:用于代替where关键字
-
set标签:用于代替set关键字
-
-
foreach标签:用于循环遍历
-
sql标签和include标签:用于抽取重用sql片段
2. if标签和where标签
if标签:用于进行判断。如果判断为true,标签里的sql才会生效
<if test="判断条件">
如果判断为true,这里的内容才会生效
</if>
where标签:用于代替where关键字,它可以帮我们处理多余的and和or,还有处理我们的空集合,不是null
演示:
Mapper接口
     /**
     * 动态SQL:根据条件查询员工。根据name和gender动态查询
     */
    List<Emp> searchEmp1(String name, Integer gender);
XML映射
<!--
    if标签:用于判断
      语法:
        <if test="判断条件表达式">
            如果判断为true,这里的内容将会生效
        </if>
      判断条件表达式:其实使用的是OGNL的表达式语法:
        名称,取对应参数的值。#{}是怎么取参数值的,这里也怎么取参数值
        判断运算:>, <, >=, <=, ==, !=
        逻辑运算:&&, ||, ! 或者 and or not
        调用参数的属性或者方法
    where标签:用于代替where关键字
        还会帮我们处理掉SQL语句里多余的and关键字
        使用了where标签之后,建议给所有的条件前边都加上and
    -->
    <select id="searchEmp1" resultType="com.itheima.pojo.Emp">
        select * from emp
        <where>
            <!-- 如果参数name值非空 并且不是空串,就添加上name的条件-->
            <if test="name!=null and name.length()>0">
                and name like concat('%',#{name}, '%')
            </if>
            <!-- 如果参数gender非空,就添加上gender的条件 -->
            <if test="gender!=null">
                and gender = #{gender}
            </if>
        </where>
    </select>
3. set标签
set标签:用于代替update语句里的set关键字,可以帮我们处理多余的逗号
Mapper
void update(Emp emp);XML映射
<!--
set标签:用于代替update语句里的set关键字
    可以帮我们处理掉多余的,逗号
    把所有要修改的字段sql片段,都写到set标签里边
-->
<update id="update">
    update emp
    <set>
        <if test="username!=null and username.length()>0">username=#{username},</if>
        <if test="password!=null and password.length()>0">password= #{password},</if>
        <if test="name!=null and name.length()>0">name= #{name},</if>
        <if test="gender!=null">gender= #{gender},</if>
        <if test="image!=null and image.length()>0">image= #{image},</if>
        <if test="entrydate!=null">entrydate= #{entrydate},</if>
        <if test="deptId!=null">dept_id= #{deptId},</if>
        <if test="updateTime!=null">update_time= #{updateTime}</if>
    </set>
    where id = #{id}
</update>
4. foreach标签
foreach标签:用于循环遍历,比如我们的批量删除,多个数据
Mapper
void batchDelete(List<Integer> ids);XML映射
<!--
foreach标签:
    collection:被循环的集合或数组
    item:定义一个变量名,通过这个变量名可以获取集合或数组里的每个值
    separator:拼接每个值时候,使用的分隔符
    open:拼接结果的前缀部分
    close:拼接结果的后缀部分
假如:ids值是 1,2,3
循环拼接的结果是:
    delete from emp where id in (1,2,3)
    (1,2,3)
for(Integer id:ids){}
-->
<delete id="batchDelete">
    delete from emp where
    <foreach collection="ids" open="id in(" item="id" separator="," close=")">
        #{id}
    </foreach>
</delete>
5. sql标签和include标签
sql标签:定义一个sql片段
include标签:引用一个sql片段
用法 :如果多条SQL语句里,有某些片段是完全相同的,可以使用sql标签抽取出去,需要使用时用include引用即可
<!--定义一个SQL片段-->
<sql id="selectEmp">select * from emp</sql>

<!-- 引用一个SQL片段 -->
<select id="queryEmpListXml" resultType="com.itheima.pojo.Emp">
    <!--利用include标签,引用:select * from emp-->
    <include refid="selectEmp"></include>
    where name like concat('%',#{name}, '%')
    and gender = #{gender}
    and entrydate between #{begin} and #{end}
</select>
