目录
一、Sql编写高级特性-批量增删
1.SQL-foreach-批量删除
1.1.批量删除方法
1.2编写SQL
1.3.编写测试
2.动态SQL-foreach-批量插入
2.1.映射器批量插入方法
2.2.编写SQL
2.3.编写测试
二、Sql编写高级特性-多对一
1.多对一保存
1.1.创建员工部门Domain
1.2.创建员工部门表
1.3.部门DeptMapper映射器
1.4.编写DeptMapper.xml映射文件
1.5.员工EmployeMapper映射器
1.6.员工EmployeeMapper.xml映射文件
3多对一查询-嵌套结果
4多对一查询-嵌套查询
5懒加载配置
三.Sql编写高级特性-一对多
1.一对多保存
四.缓存的使用
1.一级缓存
2.二级缓存
一、Sql编写高级特性-批量增删
当我们在删除多条数据,或者添加多条数据时,我们可能会选择for循环的方式调用mapper逐条删除或添加,如果有N条数据你就会调用N次mapper,这样的代码无疑是非常消耗性能的,我们可以通过MyBatis的动态SQL foreach来实现批量删除和批量添加,调用一次mapper就能添加n条数据,提升性能。
1.SQL-foreach-批量删除
有的时候我们需要对数据进行批量操作,如根据多个ID查询,或者根据多个ID删除,我们可以通过 in(1,2) 来实现,编写如下SQL
SELECT * from employee where id in (1,2); //批量查询
DELETE from employee where id in (3,4) //批量删除
那么在MyBastis怎么批量删除呢?
1.1.批量删除方法
批量删除方法,参数是一个LIST,即:根据多个ID来删除。
public interface EmployeeMapper {
//...
int batchDelete(List<Long> ids);
}
1.2编写SQL
<delete id="batchDelete" parameterType="list">
DELETE FROM employee
where id in
<foreach collection="list" open="(" item="id" separator="," close=")" >
#{id}
</foreach>
</delete>
这里稍微麻烦,我们的目的是要把 list参数中的多个 id值 动态的拼接成 where id in (1,2); 这种效果,这里用到了 foreach 循环
-
collection指的是集合或者数组,这里接受两种值,如果是集合就写 “list”,如果是数组就写“array” -
open开始元素,我们需要使用“( ” 作为开始 -
item循环的每一个元素,这里的每一个元素就是list中的每一个id -
separator分隔符,我们拼接后的sql需要使用“,”来分割多个ID -
close结束元素,我们需要使用“ )”作为结束 -
#{id}循环的内容,这里是把id的值取出来了,比如循环三次就如同 : (#{id},#{id},#{id})
根据上面的配置,这个循环会在最前面加上 "(" , 后面加上“)” , 然后取出每个item的值即ID ,然后使用分隔符“,”进行分割,最终形成 (1,2) 这种效果。
1.3.编写测试
@Test
    public void batchDelete() {
        try(SqlSession sqlSession = MyBatisUtil.openSession()){
            EmployeeMapper employeeMapper = sqlSession.getMapper(EmployeeMapper.class);
            employeeMapper.batchDelete(Arrays.asList(11L,12L));
            sqlSession.commit();
        }
    }
2.动态SQL-foreach-批量插入
批量插入和批量删除都可以使用foreach来实现
2.1.映射器批量插入方法
public interface EmployeeMapper {
int batchInsert(List<Employee> employees);
//....
}
2.2.编写SQL
我们来回顾一下我们以前批量insert的SQL语法
INSERT INTO employee(username,age,sex) VALUES("ls",11,1),("ww",12,1),("cq",13,1)
那么这个语法在MyBatis中怎么实现呢?修改SQL映射文件,添加SQL:
<insert id="batchInsert" parameterType="list">
INSERT INTO employee(username,age,sex) VALUES
<foreach collection="list" item="emp" separator=",">
(#{emp.username},#{emp.age},#{emp.sex})
</foreach>
</insert>
这里跟批量删除有点不一样 ,我们需要的效果是 VALUES ("ls",11,1),("ww",12,1),("cq",13,1) 这种,你观察它其实没有开始符号和结束符号,因为每个值前面都有 ”(“以及”)“ ,所以不能使用 open和close 。这里的循环内容为 (#{emp.username},#{emp.age},#{emp.sex}) ,比如循环两次,用“ , ”分割就是:
(#{emp.username},#{emp.age},#{emp.sex}) , (#{emp.username},#{emp.age},#{emp.sex}) 效果。这里的item的值是emp,其实是一个Employee对象,因为list中装的就是Employee对象,当 #{xx}被替换成对应的值之后就形成了VALUES ("ls",11,1),("ww",12,1)这种效果
2.3.编写测试
 @Test
public void batchInsert() {
try(SqlSession sqlSession = MyBatisUtil.openSession()){
  EmployeeMapper employeeMapper = sqlSession.getMapper(EmployeeMapper.class);
        //批量插入
                 employeeMapper.batchInsert(Arrays.asList(
                        new Employee("ww",11,true),
                        new Employee("cq",12,true),
                        new Employee("zl",13,true)
                ));
                  sqlSession.commit();
       }
  }
二、Sql编写高级特性-多对一
对象关联关系理解
-
一对一:一个用户对应一个身份证号 , 一个支付宝账号对应一个余额宝账号
任意 一方放一个外键
-
多对一:多个员工属于同一个部门
在多方设计一个外键关联就OK
-
一对多:一个部门下面有多个员工
还是在多方设计一个外键来处理
- 多对多:一个学生可以有多个老师,一个老师也可以有多个学生 。站在任何一方思考都是一对多,那就是多对多。
关联查询方式-ResultMap(关联映射)
什么叫做关联查询!就是我们在查询数据的时候,把关联对象一起查询出来。 比如查询员工的时候要查询他所对应部门信息,首先来说查询出来要有对象来放。所以需要设计关联对象类来访,案例如下
public class Employee
{
//自己信息
private Long id;
private String name;
private Department dept;
}
查询方式有两种:
-- 方案1:嵌套查询,发送N+1条,效率低
select * from t_employee -- where id =1; select * from t_department where id =1
-- 方案2:嵌套结果 一条sql,效率高 SELECT e.*, d.id did, d.NAME dname FROM t_employee e LEFT JOIN t_department d ON e.dept_id = d.id
1.多对一保存
1.1.创建员工部门Domain
建立对象之间的关系,Employee中包含Dept对象
public class Dept {
    private Long id;
    private String name;
    private String sn;

//--------------------

public class Employee {

    private Long id;
    private String username;
    private String password;
    private Integer age;
    //关系:多对一
    private Dept dept;

    public Employee() {
    }

    public Employee(String username, String password, Integer age, Dept dept) {
        this.username = username;
        this.password = password;
        this.age = age;
        this.dept = dept;
    }
1.2.创建员工部门表
建立表之间的关系,employee中有detp_id外键ID
CREATE TABLE `dept` (
`id` bigint(20) NOT NULL AUTO_INCREMENT,
`name` varchar(255) DEFAULT NULL,
`sn` varchar(255) DEFAULT NULL,
PRIMARY KEY (`id`)
) ENGINE=InnoDB AUTO_INCREMENT=2 DEFAULT CHARSET=utf8;
--------------------------------------------CREATE TABLE `employee` (
`id` bigint(20) NOT NULL AUTO_INCREMENT,
`username` varchar(255) DEFAULT NULL,
`password` varchar(255) DEFAULT NULL,
`age` int(11) DEFAULT NULL,
`dept_id` bigint(20) DEFAULT NULL,
PRIMARY KEY (`id`)
) ENGINE=InnoDB AUTO_INCREMENT=2 DEFAULT CHARSET=utf8;
1.3.部门DeptMapper映射器
编写DeptMapper,insert方法
public interface DeptMapper {
void insert(Dept dept);
}
1.4.编写DeptMapper.xml映射文件
编写DeptMapper.xml,insert方法
<?xml version="1.0" encoding="UTF-8" ?>
<!DOCTYPE mapper PUBLIC "-//mybatis.org//DTD Mapper 3.0//EN"
"http://mybatis.org/dtd/mybatis-3-mapper.dtd"><!--
namespace:命名空间 ,sql坐标(SQL在哪儿)
-->
<mapper namespace="cn.lzh.mapper.DeptMapper"><insert id="insert" useGeneratedKeys="true" keyColumn="id" keyProperty="id">
INSERT INTO dept(name,sn) values (#{name},#{sn})
</insert>
</mapper>
1.5.员工EmployeMapper映射器
EmployeMapper,insert方法
public interface EmployeeMapper {
void insert(Employee employee);
}
1.6.员工EmployeeMapper.xml映射文件
编写EmployeeMapper.xml的insert方法的SQL
<!-- 1.多对一保存:#{dept.id} 取员工对象中关联的的 dept对象的id属性-->
<insert id="insert" useGeneratedKeys="true" keyColumn="id" keyProperty="id">
INSERT INTO
employee(username,password,age,dept_id)
VALUES
(#{username},#{password},#{age},#{dept.id})
</insert>
2.多对一修改
<update id="updateById" parameterType="cn.lzh.mybatis._03_many_2_one.domain.Employee">
update employee
<set>
<if test="username != null and username != ''">
username = #{username}
</if>
<if test="dept != null and dept.id != null">
dept_id = #{dept.id}
</if>
</set>
</update>
3多对一查询-嵌套结果
<select id="selectAll" resultType="cn.lzh.mybatis._03_many_2_one.domain.Employee">
select id,username,age,sex,dept_id
from employee
</select>
<select id="selectAll" resultType="cn.lzh.mybatis._03_many_2_one.domain.Employee">
select
e.id,
e.username,
e.age,
e.sex,d.id,
d.name
from employee e join dept d on d.id = e.dept_id
</select>
但是这个SQL也查询不到关联对象 ,ResultType只能根据查询的列把对应的值封装到实体类的属性中,Employee中的Dept是一个自定义的字段,如果查询的列明和对象中的属性名不一致,就需要用到resultMap。如下:
<resultMap id="baseResultMap" type="cn.lzh.mybatis._03_many_2_one.domain.Employee">
<id column="e_id" property="id" />
<result column="age" property="age" />
<result column="username" property="username" />
<result column="sex" property="sex" />
<result column="age" property="age" />
<!-- 处理关联对象的映射
property="dept" :对employee.dept属性的映射
javaType="..Dept" : employee.dept的类型 -->
<association property="dept" javaType="cn.lzh.mybatis._03_many_2_one.domain.Dept">
<id column="d_id" property="id" />
<result column="name" property="name" />
</association>
</resultMap>
<select id="selectAll" resultMap="baseResultMap">
select
e.id as e_id,
e.username,
e.age,
e.sex,d.id as d_id,
d.name
from employee e join dept d on d.id = e.dept_id
</select>
4多对一查询-嵌套查询
上面的方式是第一种查询方式,我们叫着嵌套结果,意思就是查询的SQL使用JSON连表的方式把要查询的内容employee和dept全部查询出来 ,然后使用ResultMap来处理结果。
还有一种方式叫嵌套查询,这种方式在查询SQL的时候,只需要查询employee表即可,不需要去连表查询Dept,而是在ResultMap中额外发一个子SQL去查询emloyee关联的dept的数据,然后映射给Employee。
总结一下区别:前者是在SQL连表查询出两个表的内容,然后在ResultMap处理关系,映射结果。而后者是在SQL查询不连表,而是在ResultMap额外发SQL查询管理的对象。
1.修改xml,使用嵌套查询
<resultMap id="baseResultMap2" type="cn.lzh.mybatis._03_many_2_one.domain.Employee">
<id column="e_id" property="id" />
<result column="age" property="age" />
<result column="username" property="username" />
<result column="sex" property="sex" />
<result column="age" property="age" />
<association property="dept"
javaType="cn.lzh.mybatis._03_many_2_one.domain.Dept"
column="dept_id" select="cn.lzh.mybatis._03_many_2_one.mapper.DeptMapper.selectById"
/>
</resultMap><select id="selectAll2" resultMap="baseResultMap">
select
e.id as e_id,
e.username,
e.age,
e.sex,
e.dept_id
from employee
</select>
这里我们的SQL并没有去关联dept,但是在resultMap处理结果集的时候,使用了<association 来映射 dept,
-
select="....DeptMapper.selectById" : 这里的意思是额外发一条SQL去查询当前employee关联的dept
-
column="dept_id" :额外SQL的参数使用 employee表中的dept_id,
在deptMapper.xml编写查询的SQL
<mapper namespace="cn.lzh.mybatis._03_many_2_one.mapper.DeptMapper">
<select id="selectById" resultType="cn.lzh.mybatis._03_many_2_one.domain.Dept">
select id,name from dept where id = #{id}
</select>
//....
5懒加载配置
开启懒加载配置
<settings>
    <!--延迟加载总开关  true 开启延迟加载  false关闭延迟加载,即关联查询的时候会立刻查询关联对象-->
    <setting name="lazyLoadingEnabled" value="true"/>
    <!--侵入式延迟加载开关:
    侵入式延迟: 执行对主加载对象的查询时,不会执行对关联对象的查询。但当要访问主加载对象的详情属性时,就会马上执行关联对象的select查询
    默认是false
    查询主加载对象的任何属性时,都要执行关联对象的查询-->
    <setting name="aggressiveLazyLoading" value="false"/>
    <!-- lazyLoadTriggerMethods:指定对象的方法触发一次延迟加载。默认值:equals() clone() hashCode() ) toString() -->
    <setting name="lazyLoadTriggerMethods" value=""/>
</settings>
三.Sql编写高级特性-一对多
1.一对多保存
1.建立对象之间关系
//一对多,一方
public class ProductType {
private Long id;
private String name;//维护关系
private List<Product> productList = new ArrayList<>();
----------------------------------------------------------------
//一对多,多
public class Product {
private Long id;
private String productName;
private Long productTypeId;
并且建立表的关系
2.编写ProductTypeMapper接口,insert方法
3.编写ProductMapper接口,insert方法
4.编写ProductTypeMapper.xml,insert方法
<?xml version="1.0" encoding="UTF-8" ?>
<!DOCTYPE mapper PUBLIC "-//mybatis.org//DTD Mapper 3.0//EN"
"http://mybatis.org/dtd/mybatis-3-mapper.dtd"><!--
namespace:命名空间 ,sql坐标(SQL在哪儿)
-->
<mapper namespace="cn.lzh.mapper.ProductTypeMapper">
<insert id="insert" useGeneratedKeys="true" keyColumn="id" keyProperty="id">
INSERT INTO product_type(name) values (#{name})
</insert>
</mapper>
5.编写ProductMapper.xml,insert方法
<?xml version="1.0" encoding="UTF-8" ?>
<!DOCTYPE mapper PUBLIC "-//mybatis.org//DTD Mapper 3.0//EN"
"http://mybatis.org/dtd/mybatis-3-mapper.dtd"><!--
namespace:命名空间 ,sql坐标(SQL在哪儿)
-->
<mapper namespace="cn.lzh.mapper.ProductMapper">
<insert id="insert" useGeneratedKeys="true" keyColumn="id" keyProperty="id">
INSERT INTO product(product_name,product_type_id)values (#{productName},#{productTypeId})
</insert>
</mapper>
6.编写Dao
public class ProductDaoImpl implements IProductDao {
@Override
public void insert(Product product) {
try(SqlSession sqlSession = MyBatisUtil.openSession()){
ProductMapper mapper = sqlSession.getMapper(ProductMapper.class);
mapper.insert(product);
sqlSession.commit();
}
}
7.编写测试
public class One2ManyTest {
private IProductTypeDao productTypeDao = new ProductTypeDaoImpl();
private IProductDao productDao = new ProductDaoImpl();@Test
public void testAddProductType(){ProductType productType = new ProductType();
productType.setName("鼠标");
productTypeDao.insert(productType);productType.setProductList(Arrays.asList(
new Product("鼠标2",productType.getId()),
new Product("鼠标3",productType.getId()),
new Product("鼠标4",productType.getId())
));productType.getProductList().forEach( product -> {
productDao.insert(product);
});
}}
四.缓存的使用
1.一级缓存
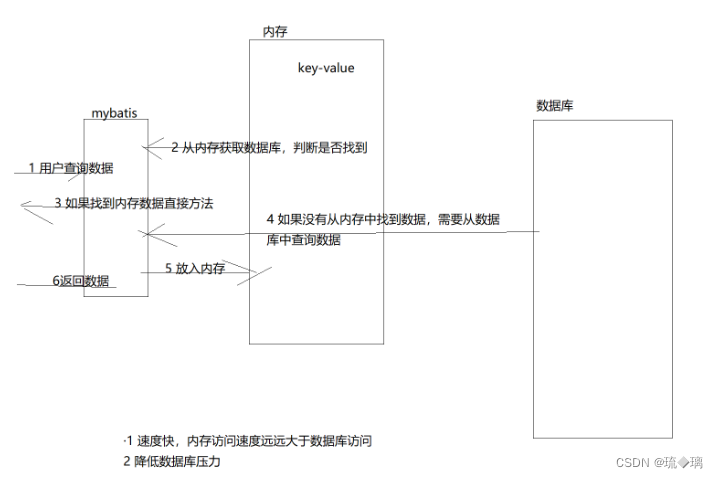
一级缓存默认开启,在SqlSession中,要命中一级缓存需要使用同一个SqlSession发送相同的SQL。
 //通过ID查询
    @Override
    public Product selectById(Long id) throws IOException {
        try(
            //4.得到SqlSession : sql回话对象,用来执行Sql语句,包括事务的提交,回滚等
            SqlSession sqlSession = MyBatisUtil.openSession();
        ){

            ProductMapper mapper = sqlSession.getMapper(ProductMapper.class);
            //一级缓存: 相同的SqlSession,相同的SQL
            //第一次查询 ,走MySql 把结果 以    sql=对象  的方式缓存到SqlSession
            //第二次查询,还是这个SqlSesion,还是这个SQL,那么就会命中缓存 , 直接返回值
            mapper.selectById(id);
            mapper.selectById(id);
        }
        return null;
    }
2.二级缓存
二级缓存在SqlSessionFactory中,要命中的条件是同一个SqlSessionFactory,发送相同的SQL。缓存是以namespace为单位的,不同namespace下的操作互不影响。
mapper.xml增加:
<cache /> 开启二级缓存
mybatis-config.xml :开启二级缓存
<settings>
<setting name="cacheEnabled" value="true"></setting>
</settings>
实体类实现序列化接口
class Employee implement Serilizable{
...
}
测试二级缓存 ,测试的时候,sqlSession执行完之后要提交事务,才能看到二级缓存效果。
1 一级是Sqlsession级别,一般我们不会直接使用,框架为了关联查询提高效率
2 二级缓存是SqlSessionFactory(整个应用中只有一份),可以使用来增强效率。


