文章目录
- 一、使用轴类型的时间序列date
- 1.1 使用 plotly.express
- 1.2 使用 graph_objects
- 二、Dash 中的时间序列
- 三、日期轴上的不同图表类型
- 3.1 相对股票代码值的条形图
- 3.2 多面区域图
- 四、配置刻度标签
- 五、将刻度标签移动到期间的中间
- 六、用直方图总结时间序列数据
- 七、显示期间数据
- 八、混合期间数据的悬停模板
一、使用轴类型的时间序列date
时间序列可以使用plotly.express函数(px.line、px.scatter等px.bar)或plotly.graph_objects图表对象(go.Scatter等go.Bar)来表示。有关此类图表的更多示例,请参阅折线图和散点图或条形图的文档。
对于金融应用,Plotly 也可用于创建K线图和OHLC 图表,默认为日期轴。
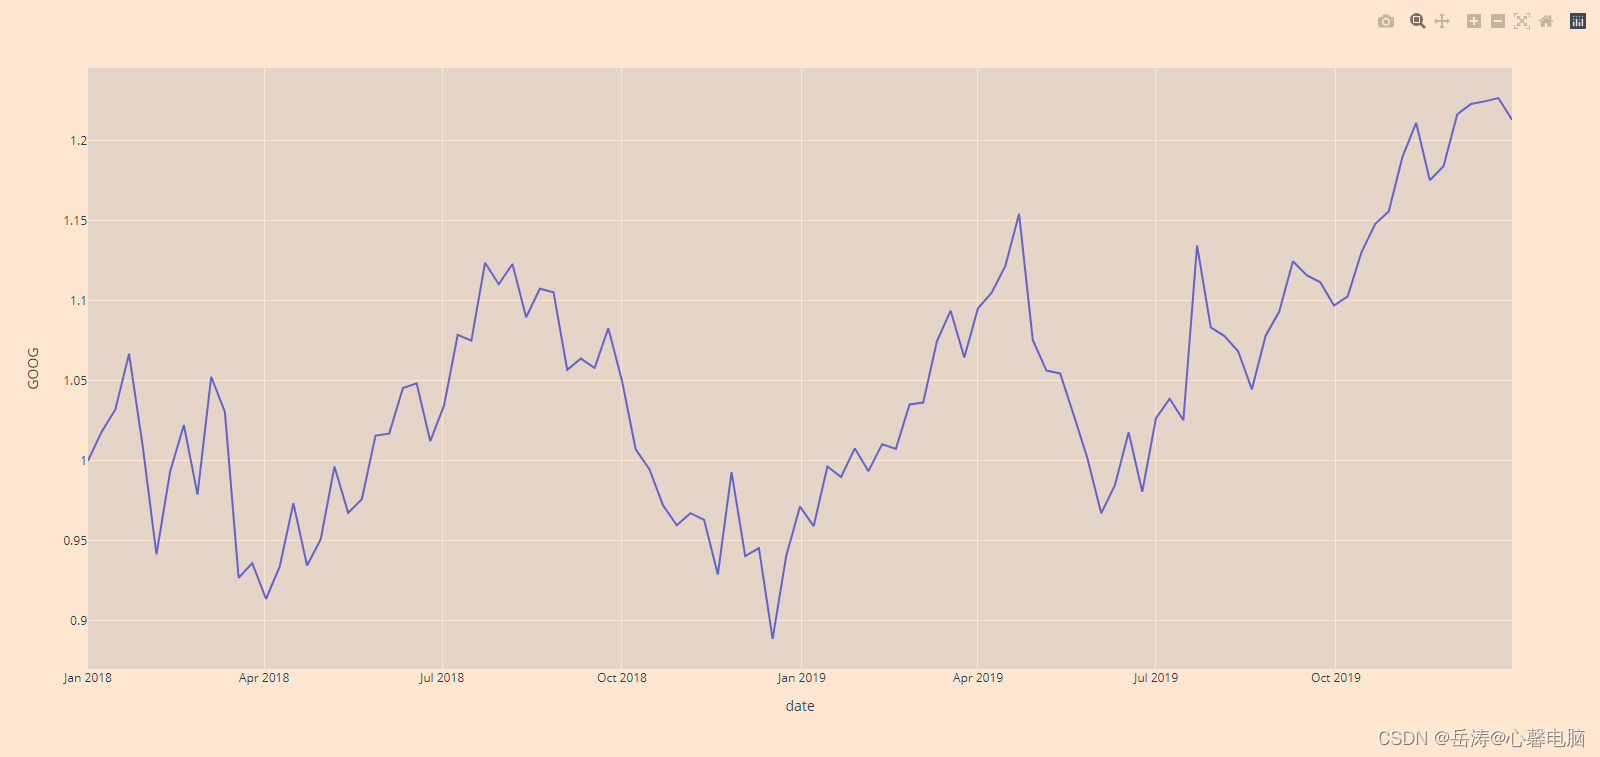
当相应的数据是 ISO 格式的日期字符串或者它们是date pandas 列或datetime NumPy 数组时,Plotly 会自动将轴类型设置为日期格式。
1.1 使用 plotly.express
# Using plotly.express
import plotly.express as px

df = px.data.stocks()
print(df)
'''
           date      GOOG      AAPL      AMZN        FB      NFLX      MSFT
0    2018-01-01  1.000000  1.000000  1.000000  1.000000  1.000000  1.000000
1    2018-01-08  1.018172  1.011943  1.061881  0.959968  1.053526  1.015988
2    2018-01-15  1.032008  1.019771  1.053240  0.970243  1.049860  1.020524
3    2018-01-22  1.066783  0.980057  1.140676  1.016858  1.307681  1.066561
4    2018-01-29  1.008773  0.917143  1.163374  1.018357  1.273537  1.040708
..          ...       ...       ...       ...       ...       ...       ...
100  2019-12-02  1.216280  1.546914  1.425061  1.075997  1.463641  1.720717
101  2019-12-09  1.222821  1.572286  1.432660  1.038855  1.421496  1.752239
102  2019-12-16  1.224418  1.596800  1.453455  1.104094  1.604362  1.784896
103  2019-12-23  1.226504  1.656000  1.521226  1.113728  1.567170  1.802472
104  2019-12-30  1.213014  1.678000  1.503360  1.098475  1.540883  1.788185

[105 rows x 7 columns]
'''
fig = px.line(df, x='date', y="GOOG")
fig.show()
1.2 使用 graph_objects
# Using graph_objects
import plotly.graph_objects as go

import pandas as pd
# 'https://raw.githubusercontent.com/plotly/datasets/master/finance-charts-apple.csv'
df = pd.read_csv('f:/finance-charts-apple.csv')
print(df)
'''
           Date   AAPL.Open   AAPL.High  ...        mavg          up   direction
0    2015-02-17  127.489998  128.880005  ...  117.927667  129.114281  Increasing
1    2015-02-18  127.629997  128.779999  ...  118.940333  130.038244  Increasing
2    2015-02-19  128.479996  129.029999  ...  119.889167  130.884089  Decreasing
3    2015-02-20  128.619995  129.500000  ...  120.763500  131.741551  Increasing
4    2015-02-23  130.020004  133.000000  ...  121.720167  133.067817  Increasing
..          ...         ...         ...  ...         ...         ...         ...
501  2017-02-10  132.460007  132.940002  ...  124.498666  134.503328  Decreasing
502  2017-02-13  133.080002  133.820007  ...  125.205166  135.589534  Increasing
503  2017-02-14  133.470001  135.089996  ...  125.953499  136.731280  Increasing
504  2017-02-15  135.520004  136.270004  ...  126.723499  137.901963  Decreasing
505  2017-02-16  135.669998  135.899994  ...  127.504333  138.805366  Decreasing

[506 rows x 11 columns]
'''

fig = go.Figure([go.Scatter(x=df['Date'], y=df['AAPL.High'])])
fig.show()

二、Dash 中的时间序列
Dash是使用 Plotly 图形在 Python 中构建分析应用程序的最佳方式。要运行下面的应用程序,运行pip install dash,单击“下载”以获取代码并运行python app.py。
开始使用官方 Dash 文档,了解如何使用Dash Enterprise轻松设计和部署此类应用程序。
import dash
from dash import html, dcc
from dash.dependencies import Input, Output
import plotly.express as px

df = px.data.stocks()
print(df)

app = dash.Dash(__name__)

app.layout = html.Div([
    dcc.Dropdown(
        id="ticker",
        options=[{"label": x, "value": x}
                 for x in df.columns[1:]],
        value=df.columns[1],
        clearable=False,
    ),
    dcc.Graph(id="time-series-chart"),
])

@app.callback(
    Output("time-series-chart", "figure"),
    [Input("ticker", "value")])
def display_time_series(ticker):
    fig = px.line(df, x='date', y=ticker)
    return fig

app.run_server(debug=True)

三、日期轴上的不同图表类型
任何类型的笛卡尔图表都可以放在date轴上,例如这个相对股票代码值的条形图。
3.1 相对股票代码值的条形图
import plotly.express as px

df = px.data.stocks(indexed=True)-1
print(df)

fig = px.bar(df, x=df.index, y="GOOG")
fig.show()

3.2 多面区域图
import plotly.express as px

df = px.data.stocks(indexed=True)-1
print(df)

fig = px.area(df, facet_col="company", facet_col_wrap=2)
fig.show()

四、配置刻度标签
默认情况下,刻度标签(和可选刻度)与特定的网格线相关联,并表示时间的瞬间,例如“2018 年 2 月 1 日 00:00”。刻度标签可以使用tickformat属性(接受d3时间格式格式化字符串)进行格式化,只显示月份和年份,但它们仍然默认代表一个瞬间,所以在下图中,标签的文本“Feb 2018 " 跨越 1 月的部分时间和 2 月的部分时间。该dtick属性控制网格线之间的间距,"M1"设置表示“1个月”。此属性还接受毫秒数,可以通过乘以 放大到天数246060*1000。
‘\n’日期轴刻度标签具有特殊属性,即in第一个实例之后的任何部分对于tickformat每个唯一值仅在第二行出现一次,如下例中的年份编号。要在每个刻度标签上显示年份编号,’
‘应使用’\n’.
请注意,默认情况下,悬停标签中 X 和 Y 值的格式与相应轴的刻度标签的格式相匹配,因此在将刻度标签自定义为“月”等宽泛的内容时,通常需要自定义悬停标签到更窄的东西,比如实际日期,如下所示。
import plotly.express as px
df = px.data.stocks()
print(df)

fig = px.line(df, x="date", y=df.columns,
              hover_data={"date": "|%B %d, %Y"},
              title='自定义标签')
fig.update_xaxes(
    dtick="M1",
    tickformat="%b\n%Y")
fig.show()

五、将刻度标签移动到期间的中间
4.10 中的新功能
通过将ticklabelmode属性设置为"period"(默认为"instant"),我们可以将刻度标签移动到它们所代表的周期的中间。网格线保留在每个月初(感谢dtick=“M1”),但标签现在跨越它们所指的月份。
import plotly.express as px
df = px.data.stocks()
fig = px.line(df, x="date", y=df.columns,
              hover_data={"date": "|%B %d, %Y"},
              title='用 ticklabelmode="period 自定义标签"')
fig.update_xaxes(
    dtick="M1",
    tickformat="%b\n%Y",
    ticklabelmode="period")
fig.show()

六、用直方图总结时间序列数据
Plotly直方图是强大的数据聚合工具,甚至可以在日期轴上工作。histfunc="avg在下图中,我们传入每日数据,并通过设置和将其显示为每月平均值xbins_size=“M1”。
import plotly.express as px
import plotly.graph_objects as go
import pandas as pd
# 'https://raw.githubusercontent.com/plotly/datasets/master/finance-charts-apple.csv'
df = pd.read_csv('f:/finance-charts-apple.csv')

fig = px.histogram(df, x="Date", y="AAPL.Close", histfunc="avg", title="日期轴上的直方图")
fig.update_traces(xbins_size="M1")
fig.update_xaxes(showgrid=True, ticklabelmode="period", dtick="M1", tickformat="%b\n%Y")
fig.update_layout(bargap=0.1)
fig.add_trace(go.Scatter(mode="markers", x=df["Date"], y=df["AAPL.Close"], name="daily"))
fig.show()

七、显示期间数据
4.11 中的新功能
例如,如果您的数据编码为“1 月 1 日”或“1 月 31 日”实际上是指整个 1 月份收集的数据,例如,您可以将跟踪配置为在开始结束时显示它们的标记,或在月中使用xperiod和xperiodalignment属性。在下面的示例中,原始数据均使用当月 10 日的 X 值进行编码,但被分成月周期,xperiod="M1"然后在周期的开始、中间和结束时显示。
import plotly.graph_objects as go
import pandas as pd

df = pd.DataFrame(dict(
    date=["2020-01-10", "2020-02-10", "2020-03-10", "2020-04-10", "2020-05-10", "2020-06-10"],
    value=[1,2,3,1,2,3]
))

fig = go.Figure()
fig.add_trace(go.Scatter(
    name="Raw Data",
    mode="markers+lines", x=df["date"], y=df["value"],
    marker_symbol="star"
))
fig.add_trace(go.Scatter(
    name="Start-aligned",
    mode="markers+lines", x=df["date"], y=df["value"],
    xperiod="M1",
    xperiodalignment="start"
))
fig.add_trace(go.Scatter(
    name="Middle-aligned",
    mode="markers+lines", x=df["date"], y=df["value"],
    xperiod="M1",
    xperiodalignment="middle"
))
fig.add_trace(go.Scatter(
    name="End-aligned",
    mode="markers+lines", x=df["date"], y=df["value"],
    xperiod="M1",
    xperiodalignment="end"
))
fig.add_trace(go.Bar(
    name="Middle-aligned",
    x=df["date"], y=df["value"],
    xperiod="M1",
    xperiodalignment="middle"
))
fig.update_xaxes(showgrid=True, ticklabelmode="period")
fig.show()

八、混合期间数据的悬停模板
v5.0 中的新功能
x当与或x unifiedhovermodes 和 usinghovertemplate一起显示具有混合大小的周期(即季度和月度)的周期数据时,可以使用该xhoverformat属性来控制每个周期的 X 值如何显示,并且%{xother}可以使用特殊的 hover-template 指令来控制如何显示与悬停点不共享确切 X 坐标的点的 X 值。%{xother}当 X 值是悬停在其上的值时,将返回一个空字符串,否则将返回(%{x}). 特殊%{xother}的%{xother}和%{xother}变体将分别在括号之前、之后或周围显示空格。
import plotly.graph_objects as go

fig = go.Figure()

fig.add_trace(go.Bar(
    x=["2020-01-01", "2020-04-01", "2020-07-01"],
    y=[1000, 1500, 1700],
    xperiod="M3",
    xperiodalignment="middle",
    xhoverformat="Q%q",
    hovertemplate="%{y}%{_xother}"
))

fig.add_trace(go.Scatter(
    x=["2020-01-01", "2020-02-01", "2020-03-01",
      "2020-04-01", "2020-05-01", "2020-06-01",
      "2020-07-01", "2020-08-01", "2020-09-01"],
    y=[1100,1050,1200,1300,1400,1700,1500,1400,1600],
    xperiod="M1",
    xperiodalignment="middle",
    hovertemplate="%{y}%{_xother}"
))

fig.update_layout(hovermode="x unified")
fig.show()






![[Linux理论基础1]----手写和使用json完成[序列化和反序列化]](https://img-blog.csdnimg.cn/7c48388057d349b3b443568051f6f8e7.png)


