目录
auto关键字
使用原因
历史背景
C++11中的auto
auto的使用案例
auto + 指针/引用
同一行定义多个变量
typeid关键字
基于范围的for循环
范围for的语法
范围for的使用条件
指针空值nullptr
C++98中的指针空值
C++11中的指针空值
auto关键字
使用原因
随着程序越来越复杂,程序中用到的类型也越来越复杂,经常体现在:
- 类型难于拼写
#include <string>
#include <map>
int main()
{
 std::map<std::string, std::string> m{ { "apple", "苹果" }, { "orange",
"橙子" },
   {"pear","梨"} };
 std::map<std::string, std::string>::iterator it = m.begin();
 while (it != m.end())
 {
 //....
 }
 return 0;
}

//std::map<std::string, std::string>::iterator是一个类型- 含义不明确导致容易出错
我们可以用typedef给类型取别名
#include <string>
#include <map>
typedef std::map<std::string, std::string> Map;
int main()
{
 Map m{ { "apple", "苹果" },{ "orange", "橙子" }, {"pear","梨"} };
 Map::iterator it = m.begin();
 while (it != m.end())
 {
 //....
 }
 return 0;
}使用typedef给类型取别名确实可以简化代码,但是typedef有会遇到新的难题:
#include <stdio.h>

typedef char* pstring;
int main()
{
     const pstring p1;    // 编译失败,const char* p1,指针需要初始化
     const pstring* p2;   // 编译成功,因为p2的类型是const* char*
     char** p3 = NULL;    //初始化的二级指针p3
     return 0;
}
为什么p2的类型不是char** 而是const* char*:
const在*左侧:可以改变指向(改换门庭)const在*右侧:可以改变原来指向的内容(内部改革)
char* const 表示可以更改字符指针所指向的字符中的内容,但是不可以指向其它字符
历史背景
早期C++中,auto 关键字用于指示变量是自动存储器的局部变量,即显式指定变量类型:
int main() {
    auto int x = 5; // 显示将 x 声明为 int 类型
    return 0;
}
很明显,这种用法与直接声明变量没有太大区别,并不能实现编译时类型推导
C++11中的auto
基本概念:C++11中,auto不再是一个存储类型指示符,而是一个类型指示符,它会指示编译器在编译阶段推导出被auto修饰的变量的类型
注意事项:
1、auto修饰的变量必须进行初始化(编译器会根据初始化表达式来推导auto的实际类型)
#include <stdio.h>

int TestAuto()
{
    return 10;
}

int main()
{
    int a = 10;

    auto b = a;

    auto c = 'a';

    auto d = TestAuto();

    auto e;//wrong,未进行初始化

    cout << typeid(b).name() << endl;
    cout << typeid(c).name() << endl;
    cout << typeid(d).name() << endl;

    return 0;
}2、auto不能作为函数的参数(编译器无法对该参数的实际类型进行推导)
void TestAuto(auto a)
{}3、auto不能直接用来声明数组(没有为什么就是规定)
void TestAuto()
{
    int a[] = {1,2,3};
    auto b[] = {4,5,6};
}4、最新的C++标准允许auto做函数的返回值(但是不太推荐?)
auto TestAuto(int a)
{
    return a;
}
但是如果有多个相关联的函数都使用auto做返回值呢?
int f2()
{
    int ret = 1;
    return ret;
}

auto f1()
{
    auto x = f2();
    return x;
}

auto TestAuto()
{
    auto a = f1();
    return a;
}

int main()
{
    auto it = TestAuto();
    return 0
}
想要知道it的类型就要去TestAuto看a的类型,a的类型又要去f1函数看x的类型,x的类型又要去f2函数看ret的类型,很明显这很麻烦
5、为了避免与C++98中的auto发生混淆,C++11只保留了auto作为类型指示符的用法
6、auto在实际中最常见的优势用法就是C++11提供的新式for循环,还有lambda表达式等
auto的使用案例
auto + 指针/引用
- auto修饰指针类型时,auto和auto*没有任何区别(auto*能让人一眼看出来就是指针类型)
int x = 10;
auto ptr1 = &x; // ptr1 被推断为 int* 类型
auto* ptr2 = &x; // ptr2 也被推断为 int* 类型

std::cout << *ptr1 << std::endl; // 输出 x 的值:10
std::cout << *ptr2 << std::endl; // 输出 x 的值:10

// 修改原始变量的值
x = 20;

std::cout << *ptr1 << std::endl; // 输出修改后的 x 值:20
std::cout << *ptr2 << std::endl; // 同样输出修改后的 x 值:20
- auto修饰引用时,必须加&(不加&,c的类型就是整型,而非x的别名)
int x = 10;
auto c = x; // c 被推断为 int 类型
auto& ref = x; // ref 被推断为 int&(x 的引用)类型

x = 20;

std::cout << x << std::endl; // 输出 20
std::cout << c << std::endl; // 输出 10
std::cout << ref << std::endl; // 输出 20

c = 30;

std::cout << x << std::endl; // 输出仍然是 20,因为 c 是一个独立的变量而非对原始变量的引用。
同一行定义多个变量
在同一行声明多个变量时,变量类型必须相同,否则编译报错,因为编译器实际只对第一个类型进行推导,然后用推导出来的类型定义其他变量
void TestAuto()
{
    auto a = 1, b = 2;
    auto c = 3, d = 4.0;  // 该行代码会编译失败,因为c和d的初始化表达式类型不同
}
typeid关键字
格式: typeid(变量名).name()
功能:显示变量类型
#include <iostream>
using namespace std;
typedef char* pstring;

int main()
{
    const pstring* p2;
    cout <<typeid(p2).name() << endl;
    return 0;
}
基于范围的for循环
范围for的语法
在C++98中如果要遍历一个数组,可以按照以下方式进行:
void TestFor()
{
    int array[] = { 1, 2, 3, 4, 5 };
    for (int i = 0; i < sizeof(array) / sizeof(array[0]); ++i)
         array[i] *= 2;

    for (int* p = array; p < array + sizeof(array)/ sizeof(array[0]); ++p)
         cout << *p << endl;
}
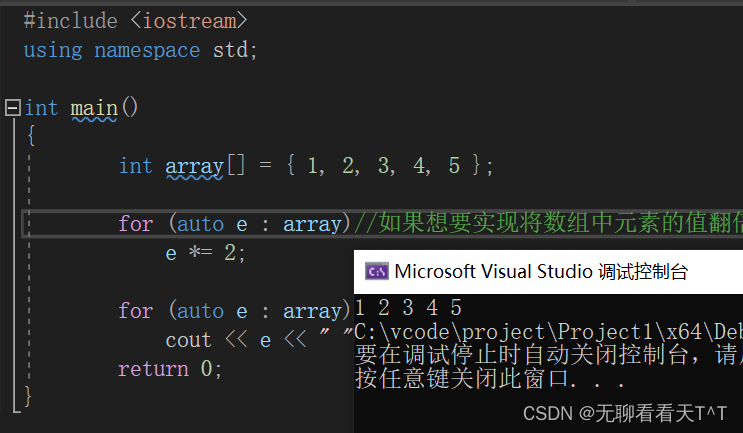
但对于数组这样的有范围的集合而言,由程序员来说明循环的范围是多余的,有时候还会容易犯错,因此C++11中引入了基于范围的for循环:
格式:for(迭代变量:被迭代的范围)
- 迭代变量:每次循环中被赋予容器或数组中当前元素值的那个变量
- 被迭代的范围: 数组就是数组名、类就是begin和end
void TestFor()
{
    int array[] = { 1, 2, 3, 4, 5 };

    for(auto& e : array)//如果想要实现将数组中元素的值翻倍,就得加上引用&,否则e只是一个拷贝
         e *= 2;

    for(auto e : array)
         cout << e << " ";
    return 0;
}
#include <iostream>
using namespace std;

int main()
{
        int array[] = { 1, 2, 3, 4, 5 };

        for (auto e : array)//如果想要实现将数组中元素的值翻倍,就得加上引用&,否则e只是一个拷贝
            e *= 2;

        for (auto e : array)
            cout << e << " ";
        return 0;
}
范围for的使用条件
1、for循环迭代的范围必须确定
- 数组的范围:数组首元素和最后一个元素之间的范围(个数)
- 类的范围:begin和end就是for循环迭代的范围
void TestFor(int array[])
{
    for(auto& e : array)//wrong,for的范围不确定
        cout<< e <<endl;
}
2、迭代的对象要实现++和==的操作
指针空值nullptr
C++98中的指针空值
在之前的C/C++中我们习惯的会在声明一个指针时就将该指针初始化:
void TestPtr()
{
    int* p1 = NULL;
    int* p2 = 0;
}
NULL实际上是一个宏,位于C语言的头文件stddef.h中:
#ifndef NULL
#ifdef __cplusplus
#define NULL   0
#else
#define NULL   ((void *)0)
#endif
#endif
可以看到,NULL在C++中会被定义为字面常量0而在C语言中会被定义成无类型指针(void*)的常量,所以在C++中使用NULL初始化指针时会遇到一些问题:
void f(int)
{
     cout<<"f(int)"<<endl;
}

void f(int*)
{
     cout<<"f(int*)"<<endl;
}

int main()
{
     f(0);
     f(NULL);
     f((int*)NULL);
     return 0;
}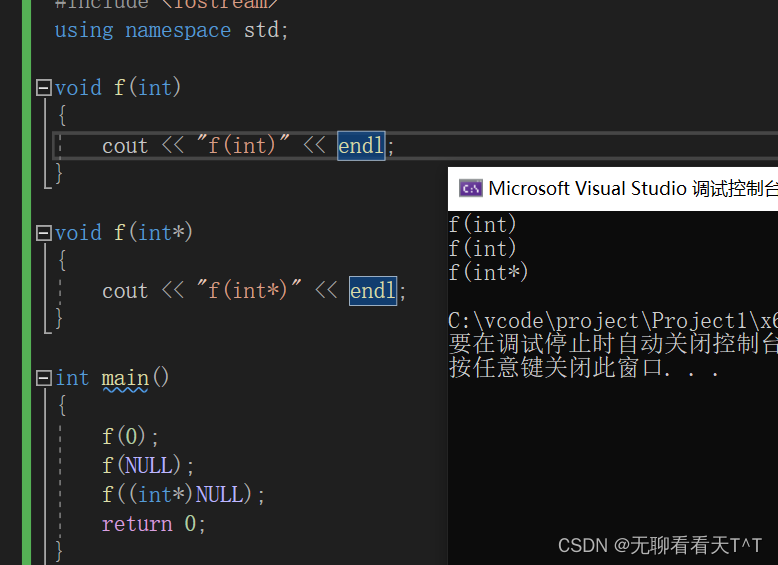
这段程序的本意是想通过f(NULL)调用指针版本的,但是由于在C++环境下NULL会被定义成0,因此与程序的初衷相悖。
C++11中的指针空值
基本概念:为了解决NULL在C++中会被翻译成0,C++11引入了新的关键字nullptr
作用:用于表示空指针
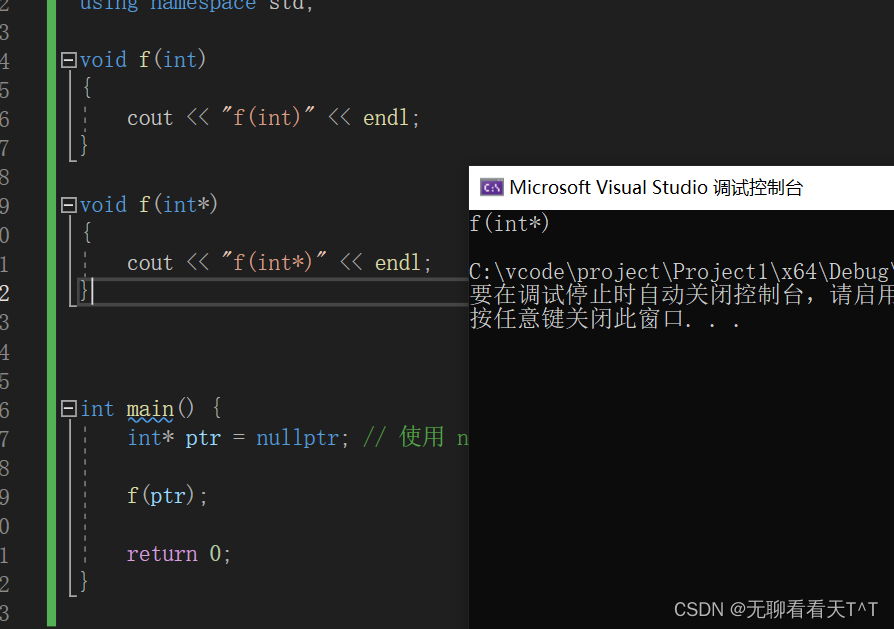
注意事项:
- 使用nullptr表示空指针时,不需要包含头文件
- 在C++11中,sizeof(nullptr) 与 sizeof((void*)0)所占的字节数相同
- 为了提高代码的健壮性,在后续表示指针空值时建议最好使用nullptr
~over~
