文章目录
- 前言
- 一、组件效果
- 二、组件代码
- 使用
- 总结
前言
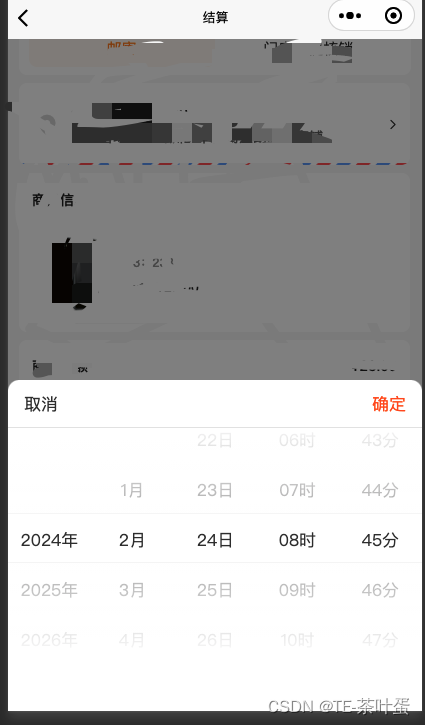
uniapp小程序开发系列。本文实现一个简单时间选择控件。uniapp用个心仪时间控件真的麻烦。官方给得要么年月日,要么时分。产品只要年月日时分。这该怎么玩。旧项目没有引入ui框架,我也不想去引入,不然高低整一个vant 小程序版的。
uniapp生态中,有个插件市场,找了一通,是有时间控件。但是引入也是麻烦。没必要。下文基于网友给的案例再稍微改了改。对了 这是vue2 的 。
一、组件效果
二、组件代码
时间控件的实现代码,区分了闰年平年。需要秒的话,可以自行修改。
<template>
  <div class="date-time" v-if="visible">
    <div class="mask" @click.stop="close" />
    <div class="box">
      <div class="header">
        <div class="determine" @click.stop="close">取消</div>
        <div class="determine" @click.stop="confirm" :style="{color: themes.theme1 || '#FF4E09',}">确定</div>
      </div>

      <picker-view  :indicator-style="indicatorStyle" :value="value" @change="bindChange"
        class="picker-view">
        <picker-view-column>
          <view class="item" v-for="(item,index) in years" :key="index">{{item}}年</view>
        </picker-view-column>
        <picker-view-column>
          <view class="item" v-for="(item,index) in months" :key="index">{{item}}月</view>
        </picker-view-column>
        <picker-view-column>
          <view class="item" v-for="(item,index) in days" :key="index">{{item}}日</view>
        </picker-view-column>
        <picker-view-column>
          <view class="item" v-for="(item,index) in hours" :key="index">{{item}}时</view>
        </picker-view-column>
        <picker-view-column>
          <view class="item" v-for="(item,index) in minutes" :key="index">{{item}}分</view>
        </picker-view-column>
      </picker-view>
    </div>
  </div>
</template>
<script>
  export default {
    data() {
      return {
        years: [],
        year: null,
        months: [],
        month: null,
        days: [],
        day: null,
        hours: [],
        hour: null,
        minutes: [],
        minute: null,
        value: [],
        indicatorStyle: `height: 50px;`,
        timeValue: ''
      }
    },
    props: {
      visible: {
        type: Boolean,
        default: false
      },
      themes: {
        type: Object,
        default() {
          return {};
        },
      },
      interviewTime: {
        type: String,
        default() {
          return '';
        },
      }
    },
    mounted() {
      this.init();
    },
    watch: {
      visible: {
        handler(newValue, oldValue) {
          if (newValue) {
            if (this.interviewTime) {
              this.init(this.interviewTime);
            }
          }
        },
        immediate: false,
        deep: true
      }
    },
    methods: {
      init(interviewTime) {
        const date = interviewTime ? new Date(interviewTime) : new Date();
        const years = []
        const year = date.getFullYear()
        const months = []
        const month = date.getMonth() + 1
        const days = []
        const day = date.getDate()
        const hours = []
        const hour = date.getHours()
        const minutes = []
        const minute = date.getMinutes()

        let isDay = 30;
        if (month == 2) {
          if((year%4==0 && year%100!=0)||(year%400==0)){
            console.log('闰年')
            isDay = 29;
          }else {
            isDay = 28;
             console.log('平年')
          }
        } else if ([1,3,5,7,8,10,12].includes(month)) {
          isDay = 31;
        } else {
          isDay = 30;
        }

        for (let i = date.getFullYear(); i <= date.getFullYear()+2; i++) {
          years.push(i)
        }
        for (let i = 1; i <= 12; i++) {
          months.push(i)
        }
        for (let i = 1; i <= isDay; i++) {
          days.push(i)
        }
        for (let i = 0; i <= 23; i++) {
          if (i < 10) {
            hours.push('0' + i)
          } else {
            hours.push(i)
          }
        }
        for (let i = 0; i <= 59; i++) {
          if (i < 10) {
            minutes.push('0' + i)
          } else {
            minutes.push(i)
          }
        }

        this.years = years
        this.year = year
        this.months = months
        this.month = month
        this.days = days
        this.day = day
        this.hours = hours
        this.hour = hour
        this.minutes = minutes
        this.minute = minute
        this.value = [0, month-1, day-1, hour, minute]
      },
      bindChange: function (e) {
        const val = e.detail.value
        console.log('日期变化',val)
        let year = this.years[val[0]]
        let isDay = 30, days = [];
        if (val[1]+1 == 2) {
            if((val[0]%4==0 && year%100!=0)||(year%400==0)){
            console.log('闰年')
            isDay = 29;
          }else {
            isDay = 28;
             console.log('平年')
          }
        } else if ([1,3,5,7,8,10,12].includes(val[1]+1)) {
          isDay = 31;
        } else {
          isDay = 30;
        }

        for (let i = 1; i <= isDay; i++) {
          days.push(i)
        }
        this.days = days;
        this.year = this.years[val[0]]
        this.month =  this.months[val[1]]
        this.day = this.days[val[2]]
        this.hour = this.hours[val[3]]
        this.minute = this.minutes[val[4]]
      },
      // 补0
      padZeroStr(originStr){
         if(+originStr < 10){
            return  String(originStr).padStart(2,'0')
         }
         return originStr + ''
      },
      close(){
        this.$emit('update:visible', false);
      },
      confirm() {
        let monthStr = this.padZeroStr(this.month)
        let dayStr = this.padZeroStr(this.day)
        let hourStr = this.padZeroStr(this.hour)
        let minuteStr = this.padZeroStr(this.minute)
        this.timeValue = `${this.year}/${monthStr}/${dayStr} ${hourStr}:${minuteStr}:00`;
        this.$emit('confirmPickDate', this.timeValue);
        this.$emit('update:visible', false);
      },
    },
  }
</script>
<style lang="scss" scoped>
  .date-time {
    position: fixed;
    top: 0;
    left: 0;
    width: 100%;
    height: 100vh;
    z-index: 99999;
    .mask {
      position: absolute;
      top: 0;
      background: rgba(0, 0, 0, 0.5);
      width: 100%;
      height: 100vh;
    }
    .box {
      position: absolute;
      width: 100%;
      bottom: 0;
      background-color: #fff;
      border-radius: 20rpx 20rpx 0 0;
      overflow: hidden;
      height: 600rpx;
      .header {
        height: 88rpx;
        padding: 0 30rpx;
        border-bottom: 1rpx solid #e5e5e5;
        display: flex;
        align-items: center;
        justify-content: space-between;
        .determine {
          color: #333333;
          font-size: 32rpx;
          font-family: PingFang SC, PingFang SC-Regular;
          font-weight: 400;
        }
      }
      .picker-view {
        width: 100%;
        height: 400rpx;
      }
      .item {
        height: 100rpx;
        line-height: 100rpx;
        align-items: center;
        justify-content: center;
        text-align: center;
        font-size: 32rpx;
        font-family: PingFang SC-Regular, PingFang SC;
        font-weight: 400;
        color: #333333;
      }
    }
  }
</style>
使用
在你需要的文件引入组件。
<template>
  <view class="example-body" @click="showDatePickClick">
                       <view class="uni-input" style="text-align: right;" >{{interviewTime.substring(0,16)}}</view>
			           <my-date-picker  :visible.sync="visible" :interviewTime="interviewTime" @confirmPickDate="confirmPickDate" />
		            </view>
</template>
<script>
import myDatePicker from '../components/date-picker.vue';

export default {
    name: "XXXX-XX",
    props: {
        address: Array
    },
    components: {
        myDatePicker
    },
    data() {

        return {
            interviewTime:'',
            visible:false
        }
    },
    mounted(){
        this.interviewTime = this.getDate()
    },

    methods: {
        confirmPickDate(dateStr){
           console.log('confirmPickDate',dateStr)
           this.interviewTime = dateStr
           this.$emit("getPickDate", dateStr);
        },
        showDatePickClick(){
            console.log('showDatePickClick')
            this.visible = true
        },
        getDate(type) {
            const date = new Date();
            let year = date.getFullYear();
            let month = date.getMonth() + 1;
            let day = date.getDate();

            month = month > 9 ? month : '0' + month;
            day = day > 9 ? day : '0' + day;
            return `${year}/${month}/${day} 00:00:00`;
        }
    }
}
</script>

<style scoped>
.example-body {
        width: 270px;
        height: 30px;
		background-color: #fff;
	}
</style>
总结
以上就是今天要讲的内容,本文讨论了用uniapp 实现小程序时间选择组件 仅仅支持 年月日时分 的简单版本。

