项目地址:https://gitee.com/wyu_001/mypygame/tree/master/game
可执行程序
这个游戏主要使用pygame库编写俄罗斯方块游戏,demo主要演示了pygame开发游戏的主要设计方法和实现代码
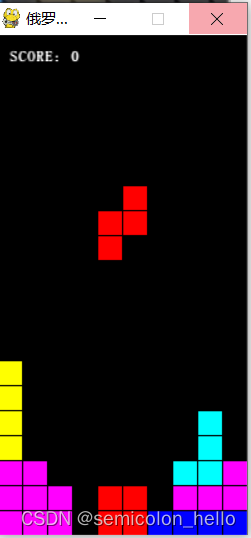
下面是游戏界面截图
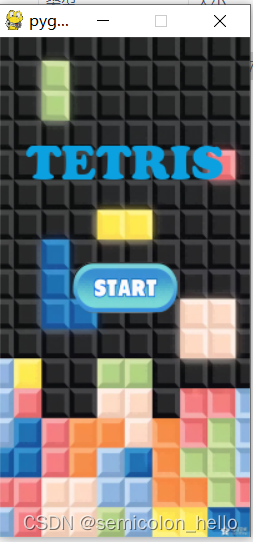
游戏主界面:
直接上代码:
# !/usr/bin/env python3
# -*- encoding: utf-8 -*-
'''
  @author: spring.wang
  @license:
  @contact: wyu_01@163.com
  @software: tetris
  @file: tetris1.py
  @time: 2024/2/20 17:26
  @description:

  pyinstaller.exe  -F -w --distpath D:\myproject\python\pygame\bin\tetris  --workpath D:\myproject\python\pygame\bin\temp --specpath D:\myproject\python\pygame\bin\temp D:\myproject\python\pygame\game\tetris.py

  '''

import pygame
import random
import time
import sys

# 游戏窗口尺寸
WINDOW_WIDTH = 200
WINDOW_HEIGHT = 400

# 方块尺寸
BLOCK_SIZE = 20

# 初始化 Pygame
pygame.init()

# 初始化窗口
window = pygame.display.set_mode((WINDOW_WIDTH, WINDOW_HEIGHT))

class Block:
    def __init__(self, shape, color):
        self.shape = shape
        self.color = color
        self.x = WINDOW_WIDTH // 2 - BLOCK_SIZE
        self.y = 0
        self.timer = 0
        self.fall_speed = 10
        self.move_speed = 1
        self.max_speed = 3

    def set_speed(self):

        self.move_speed += 1
        if self.move_speed > self.max_speed:
            self.move_speed = self.max_speed

    def reset_speed(self):
        self.move_speed = 1

    def move_up(self):
        self.y -= BLOCK_SIZE

    def move_down(self):
        self.y += BLOCK_SIZE

    def move_left(self):
        self.x -= BLOCK_SIZE

    def move_right(self):
        self.x += BLOCK_SIZE

    def rotate(self):
        self.shape = [[row[i] for row in self.shape][::-1] for i in range(len(self.shape[0]))]
        # print(self.shape)

    def draw(self):
        for i in range(len(self.shape)):
            for j in range(len(self.shape[i])):
                if self.shape[i][j] == 1:
                    pygame.draw.rect(window, self.color,
                                     (self.x + j * BLOCK_SIZE, self.y  + i * BLOCK_SIZE, BLOCK_SIZE, BLOCK_SIZE))


class Tetris:

    # 方块颜色
    BLACK = (0, 0, 0)
    CYAN = (0, 255, 255)
    YELLOW = (255, 255, 0)
    PURPLE = (255, 0, 255)
    GREEN = (0, 255, 0)
    RED = (255, 0, 0)
    ORANGE = (255, 165, 0)
    BLUE = (0, 0, 255)
    WHITE = (255, 255, 255)
    # 定义方块形状
    SHAPES = [
      [[1, 1, 1, 1]],
      [[1, 1], [1, 1]],
      [[1, 1, 0], [0, 1, 1]],
      [[0, 1, 1], [1, 1, 0]],
      [[1, 1, 1], [0, 1, 0]],
      [[1, 1, 1], [1, 0, 0]],
      [[1, 1, 1], [0, 0, 1]]
    ]

    # 定义方块颜色
    COLORS = [CYAN, YELLOW, PURPLE, GREEN, RED, ORANGE, BLUE]

    def __init__(self):
        self.score = 0
        self.timer = 0
        self.fall_speed = 1
        self.FPS = 60
        self.game_running = True

        pygame.display.set_caption("俄罗斯方块")
        self.clock = pygame.time.Clock()

        self.grid = [[self.BLACK] * (WINDOW_WIDTH // BLOCK_SIZE) for _ in range(WINDOW_HEIGHT // BLOCK_SIZE)]
        self.block = Block(random.choice(self.SHAPES), random.choice(self.COLORS))

        self.key_down_time = None
        self.key_left_time = None
        self.key_right_time = None

        self.down_flag = True
        self.direction = 0
    def draw_grid(self):
        for x in range(0, WINDOW_WIDTH, BLOCK_SIZE):
            pygame.draw.line(window, self.BLACK, (x, 0), (x, WINDOW_HEIGHT))
        for y in range(0, WINDOW_HEIGHT, BLOCK_SIZE):
          pygame.draw.line(window, self.BLACK, (0, y), (WINDOW_WIDTH, y))

    def check_collision(self):
        for i in range(len(self.block.shape)):
            for j in range(len(self.block.shape[i])):
                if self.block.shape[i][j] == 1:
                    if self.block.y + (i + 1) * BLOCK_SIZE >= WINDOW_HEIGHT or \
                            self.block.x + j * BLOCK_SIZE < 0 or \
                            self.block.x + j * BLOCK_SIZE >= WINDOW_WIDTH or \
                            self.grid[self.block.y // BLOCK_SIZE + i + 1][self.block.x // BLOCK_SIZE + j] != self.BLACK:
                        return True
        return False

    def event_handler(self):
        # 处理事件
        for event in pygame.event.get():
            if event.type == pygame.QUIT:
                self.game_running = False
                pygame.quit()
                sys.exit()
            elif event.type == pygame.KEYDOWN:
                if event.key == pygame.K_LEFT:
                    self.key_left_time = time.time()
                    self.block.move_left()
                    if self.check_collision():
                        self.block.move_right()
                elif event.key == pygame.K_RIGHT:
                    self.key_right_time = time.time()
                    self.block.move_right()
                    if self.check_collision():
                        self.block.move_left()
                elif event.key == pygame.K_DOWN:
                    if not self.check_collision():
                        self.key_down_time = time.time()
                        self.block.move_down()
                elif event.key == pygame.K_UP:
                    self.block.rotate()
                    if self.check_collision():
                        for _ in range(3):
                            self.block.rotate()
            elif event.type == pygame.KEYUP:
                if event.key == pygame.K_LEFT:
                    self.key_left_time = None
                    self.down_flag = True
                    self.timer = 0
                    self.direction = 0
                if event.key == pygame.K_RIGHT:
                    self.key_right_time = None
                    self.down_flag = True
                    self.timer = 0
                    self.direction = 0
                if event.key == pygame.K_DOWN:
                    self.key_down_time = None
                    self.timer=0
    def update(self):
        if self.timer >= 1 / self.fall_speed:
            self.timer -= 1 / self.fall_speed

            if not self.check_collision() and self.down_flag:
                self.block.move_down()
            elif not self.check_collision():
                if self.direction == 1:
                    self.block.move_left()
                    if self.check_collision():
                        self.block.move_right()
                if self.direction == 2:
                    self.block.move_right()
                    if self.check_collision():
                        self.block.move_left()
            else:
                for i in range(len(self.block.shape)):
                    for j in range(len(self.block.shape[i])):
                        if self.block.shape[i][j] == 1:
                            # print(block.y // BLOCK_SIZE + i, block.x // BLOCK_SIZE + j,i,j)
                            self.grid[self.block.y // BLOCK_SIZE + i][self.block.x // BLOCK_SIZE + j] = self.block.color

                self.score += self.clear_rows()

                if self.score%20 == 0 and self.score != 0 :
                    self.fall_speed += 1
                self.block = Block(random.choice(self.SHAPES), random.choice(self.COLORS))

                if self.check_collision():
                    self.game_running = False

        current_time = time.time()
        if self.key_down_time is not None and (current_time - self.key_down_time) > 0.1:  # 假设0.1秒后开始加速
            self.key_down_time = current_time
            self.timer += 1 / self.fall_speed*2

        if self.key_left_time is not None and (current_time - self.key_left_time) > 0.1:  # 假设0.1秒后开始加速
            self.key_left_time = current_time
            self.down_flag = False
            self.direction = 1
            self.timer += 1 / self.fall_speed*20

        if self.key_right_time is not None and (current_time - self.key_right_time) > 0.1:  # 假设0.1秒后开始加速
            self.key_right_time = current_time
            self.down_flag = False
            self.direction = 2
            self.timer += 1 / self.fall_speed*20
        # 绘制
        window.fill(self.BLACK)

        for i in range(len(self.grid)):
            for j in range(len(self.grid[i])):
                pygame.draw.rect(window, self.grid[i][j], (j * BLOCK_SIZE, i * BLOCK_SIZE, BLOCK_SIZE, BLOCK_SIZE), 0)

        self.block.draw()
        self.draw_grid()
        self.draw_score()
        pygame.display.flip()

    def clear_rows(self):
        full_rows = []
        for i in range(len(self.grid)):
            if not self.BLACK in self.grid[i]:
                full_rows.append(i)

        for row in full_rows:
            del self.grid[row]
            self.grid.insert(0, [self.BLACK] * (WINDOW_WIDTH // BLOCK_SIZE))

        return len(full_rows)

    def draw_score(self):
        font = pygame.font.Font('resource/font/simfang.ttf', 12)
        font.set_bold(True)
        text = font.render("SCORE: " + str(self.score), True, self.WHITE)
        window.blit(text, (10, 10))

    def game_over(self):
        font = pygame.font.Font('resource/font/COOPBL.TTF', 24)
        text = font.render("GAME OVER", True, self.RED)
        window.blit(text, (WINDOW_WIDTH // 2 - text.get_width() // 2, WINDOW_HEIGHT // 2 - text.get_height() // 2))

        pygame.display.flip()
        pygame.time.wait(2000)

    def play_music(self):
        pygame.mixer.init()
        pygame.mixer.music.load('resource/music/gotime.mp3')
        pygame.mixer.music.play(-1)

    def run(self):
        self.play_music()
        self.game_running = True

        while self.game_running:
            dt = self.clock.tick(self.FPS) / 1000
            self.timer += dt
            self.event_handler()
            self.update()
        self.game_over()

class ImageButton():
    def __init__(self, x, y, image_normal, image_hover=None):
        self.rect = image_normal.get_rect(topleft=(x, y))
        self.normal_image = image_normal
        self.hover_image = image_hover if image_hover is not None else image_normal
        self.image = self.normal_image
        self.clicked = False

    def draw(self):
        mouse_pos = pygame.mouse.get_pos()
        if self.rect.collidepoint(mouse_pos):
            self.image = self.hover_image
        else:
            self.image = self.normal_image

        window.blit(self.image, self.rect)

    def check_click(self):
        mouse_pressed = pygame.mouse.get_pressed()[0]
        if self.rect.collidepoint(pygame.mouse.get_pos()) and mouse_pressed:
            self.clicked = True
            return True
        else:
            self.clicked = False
            return False

def draw_title():

    font = pygame.font.Font('resource/font/COOPBL.TTF', 40)
    text = font.render("TETRIS", True, (11, 161, 225))
    window.blit(text, (WINDOW_WIDTH // 2 - text.get_width() // 2, WINDOW_HEIGHT // 4 - text.get_height() // 2))


if __name__ == "__main__":

    # 创建开始按钮
    # 加载开始按钮图片(确保图片文件路径正确)
    start_button_img_normal = pygame.image.load('resource/icon/start.png')
    start_button_img_hover = pygame.image.load('resource/icon/start_hover.png')  # 可选:如果需要鼠标悬停效果

    background_image = pygame.image.load('resource/icon/back.png')

    start_button = ImageButton(WINDOW_WIDTH // 2 - start_button_img_normal.get_width() // 2,
                               WINDOW_HEIGHT // 2 - start_button_img_normal.get_height() // 2,
                               start_button_img_normal,
                               start_button_img_hover)
    # 游戏主循环
    running = True
    while running:
        for event in pygame.event.get():
            if event.type == pygame.QUIT:
                running = False
            elif event.type == pygame.MOUSEBUTTONDOWN:
                if start_button.check_click():
                    Tetris().run()
        window.fill((0, 0, 0))  # 填充背景色
        window.blit(background_image, (0, 0))  # 绘制背景图片
        draw_title()
        start_button.draw()  # 绘制按钮
        pygame.display.flip()

    pygame.quit()


![[AutoSar]BSW_Com1 Can通信入门](https://img-blog.csdnimg.cn/direct/12c52b1869b144c0bb2232c082feeccc.png)