准备
启动fabric测试网络。
这里默认已经完成了Fabric测试网络搭建以及运行。
后续会出Fabric安装,现在不会的就先去看别的博客
配置
1.在test-network 文件夹下面建立explorer文件夹:
mkdir explorer
2. 配置文件
2.1下载配置文件
先进文件夹
cd explorer
下载配置文件。注意:如果出现网络问题则先sudo vi /etc/hosts,在里面添加185.199.110.133 raw.githubusercontent.com。但是可能还是会很慢,如果没耐心可以跳到2.2。
wget https://raw.githubusercontent.com/hyperledger/blockchain-explorer/main/examples/net1/config.json
wget https://raw.githubusercontent.com/hyperledger/blockchain-explorer/main/examples/net1/connection-profile/test-network.json -P connection-profile
wget https://raw.githubusercontent.com/hyperledger/blockchain-explorer/main/docker-compose.yaml
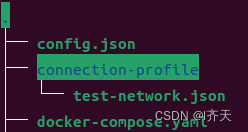
成功后文件目录如下:
2.2自行配置
如果2.1成功则跳过此步骤。
可以直接打开wget后面的网址,复制里面的内容,然后创建文件。test-network.json需要额外放到connection-profile文件夹下(需要自行创建)
2.3修改配置文件
可以先看一下运行的测试网络名sudo docker network ls,我的结果如下图:

配置config.json,里面的name替换成前面的fabric_test(自行查看)。
{
	"network-configs": {
		"test-network": {
			"name": "fabric_test",
			"profile": "./connection-profile/test-network.json"
		}
	},
	"license": "Apache-2.0"
}
配置docker-compose.yaml,external主要是为了在关闭网络的时候跳过fabric_test。端口可以自行设计,例如设为9090:8080
...
networks:
  mynetwork.com:
    external:
      name: fabric_test
...
		volumes:
		      - ./config.json:/opt/explorer/app/platform/fabric/config.json
		      - ./connection-profile:/opt/explorer/app/platform/fabric/connection-profile
		      - ./organizations:/tmp/crypto
		      - walletstore:/opt/explorer/wallet
		    ports:
		      - 8080:8080
...
配置test-network.json,主要看一下priv_sk名字对不对得上。
"path": "/tmp/crypto/peerOrganizations/org1.example.com/users/Admin@org1.example.com/msp/keystore/priv_sk"
完整版如下:
config.json
{
	"network-configs": {
		"test-network": {
			"name": "fabric_test",
			"profile": "./connection-profile/test-network.json"
		}
	},
	"license": "Apache-2.0"
}
docker-compose.yaml
# SPDX-License-Identifier: Apache-2.0
version: '2.1'
volumes:
  pgdata:
  walletstore:

networks:
  mynetwork.com:
    external:
      name: fabric_test

services:

  explorerdb.mynetwork.com:
    image: hyperledger/explorer-db:latest
    container_name: explorerdb.mynetwork.com
    hostname: explorerdb.mynetwork.com
    environment:
      - DATABASE_DATABASE=fabricexplorer
      - DATABASE_USERNAME=hppoc
      - DATABASE_PASSWORD=password
    healthcheck:
      test: "pg_isready -h localhost -p 5432 -q -U postgres"
      interval: 30s
      timeout: 10s
      retries: 5
    volumes:
      - pgdata:/var/lib/postgresql/data
    networks:
      - mynetwork.com

  explorer.mynetwork.com:
    image: hyperledger/explorer:latest
    container_name: explorer.mynetwork.com
    hostname: explorer.mynetwork.com
    environment:
      - DATABASE_HOST=explorerdb.mynetwork.com
      - DATABASE_DATABASE=fabricexplorer
      - DATABASE_USERNAME=hppoc
      - DATABASE_PASSWD=password
      - LOG_LEVEL_APP=info
      - LOG_LEVEL_DB=info
      - LOG_LEVEL_CONSOLE=debug
      - LOG_CONSOLE_STDOUT=true
      - DISCOVERY_AS_LOCALHOST=false

    volumes:
      - ./config.json:/opt/explorer/app/platform/fabric/config.json
      - ./connection-profile:/opt/explorer/app/platform/fabric/connection-profile
      - ./organizations:/tmp/crypto
      - walletstore:/opt/explorer/wallet
    ports:
      - 8080:8080
    depends_on:
      explorerdb.mynetwork.com:
        condition: service_healthy
    networks:
      - mynetwork.com
test-network.json
{
	"name": "test-network",
	"version": "1.0.0",
	"client": {
		"tlsEnable": true,
		"adminCredential": {
			"id": "exploreradmin",
			"password": "exploreradminpw"
		},
		"enableAuthentication": true,
		"organization": "Org1MSP",
		"connection": {
			"timeout": {
				"peer": {
					"endorser": "300"
				},
				"orderer": "300"
			}
		}
	},
	"channels": {
		"mychannel": {
			"peers": {
				"peer0.org1.example.com": {}
			}
		}
	},
	"organizations": {
		"Org1MSP": {
			"mspid": "Org1MSP",
			"adminPrivateKey": {
				"path": "/tmp/crypto/peerOrganizations/org1.example.com/users/Admin@org1.example.com/msp/keystore/priv_sk"
			},
			"peers": ["peer0.org1.example.com"],
			"signedCert": {
				"path": "/tmp/crypto/peerOrganizations/org1.example.com/users/Admin@org1.example.com/msp/signcerts/Admin@org1.example.com-cert.pem"
			}
		}
	},
	"peers": {
		"peer0.org1.example.com": {
			"tlsCACerts": {
				"path": "/tmp/crypto/peerOrganizations/org1.example.com/peers/peer0.org1.example.com/tls/ca.crt"
			},
			"url": "grpcs://peer0.org1.example.com:7051"
		}
	}
}
2.4组织文件复制
将test-network下的organization文件夹复制到explorer文件夹下sudo cp -rf ../organizations/ ../explorer/
3.运行
输入sudo docker-compose up -d启动网络,结果如图:

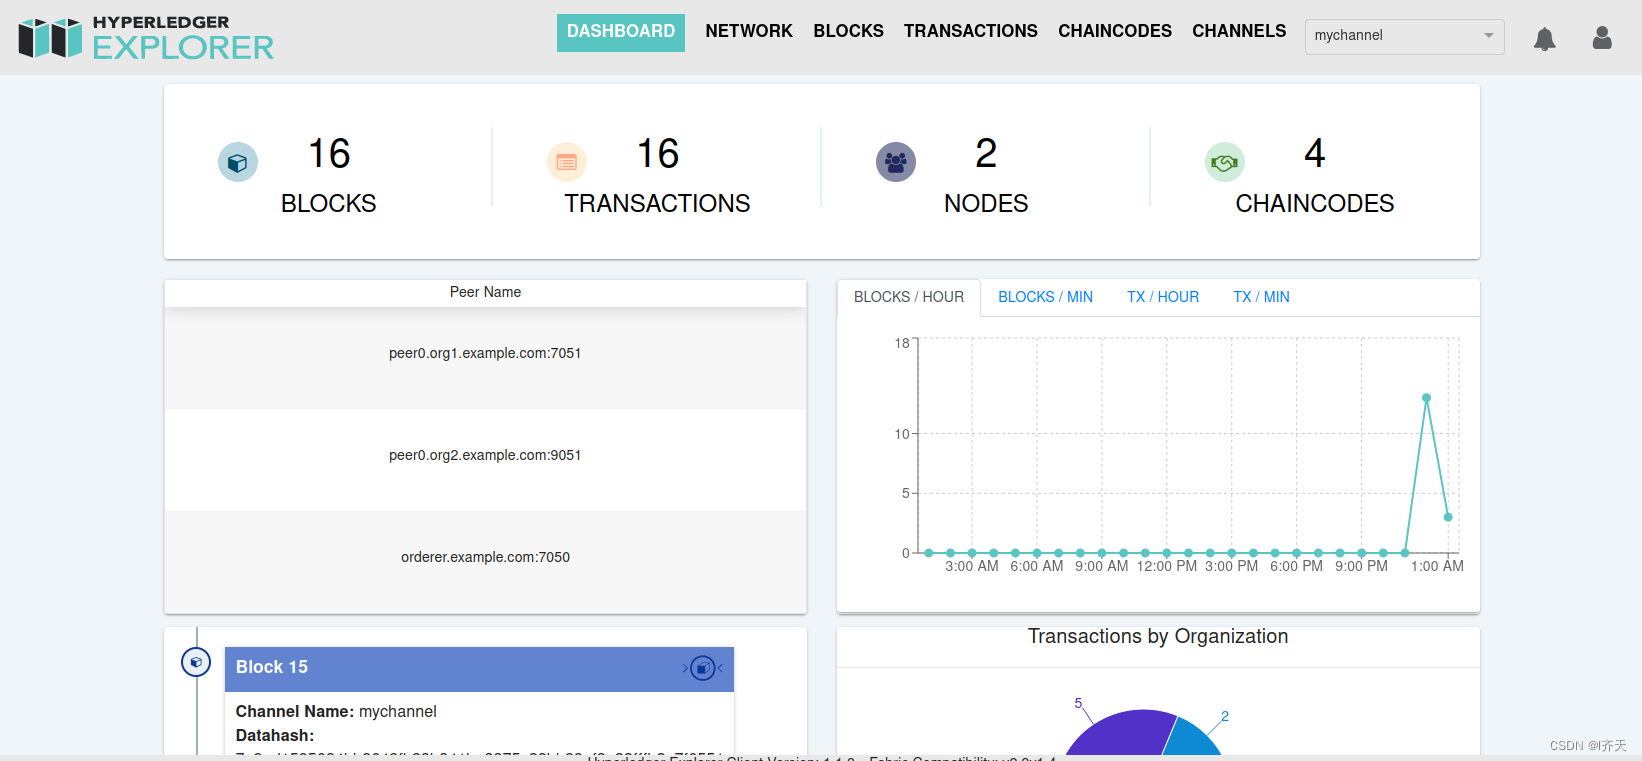
之后在网页输入localhost:8080,账号密码在test-network.json设置,默认为"id": “exploreradmin”,
“password”: “exploreradminpw”。登录之后如下图所示(CHAINCODE之类的是我安装之后的数值,不重要)
![Isaac Sim 机器人仿真器介绍、安装与 Docker [1]](https://img-blog.csdnimg.cn/3ccf549e4387408f89b7b08d5acfb609.png)


