点击查看:LearnSpringBoot08starter
点击查看:LearnSpringBoot08starterTest
点击查看更多的SpringBoot教程
一、主要流程
1. 先创建空的project
2. 打开空的project 结构 图选中model 点击+
3. 创建 model(Maven)启动器
提醒:创建启动器 model在旧版本intelliJ IDEA 左边有 Maven 选项,应该选择 Maven,新版本里没有了,所以选择Spring initializr, 等创建完手动修改pom.xml文件
4.创建自动配置model
二、mystarter-spring-boot-starter模块里的pom.xml文件配置信息
<?xml version="1.0" encoding="UTF-8"?>
<project xmlns="http://maven.apache.org/POM/4.0.0"
         xmlns:xsi="http://www.w3.org/2001/XMLSchema-instance"
         xsi:schemaLocation="http://maven.apache.org/POM/4.0.0 http://maven.apache.org/xsd/maven-4.0.0.xsd">
    <modelVersion>4.0.0</modelVersion>

    <groupId>org.example.mystarter</groupId>
    <artifactId>mystarter-spring-boot-starter</artifactId>
    <version>1.0-SNAPSHOT</version>

    <properties>
        <maven.compiler.source>20</maven.compiler.source>
        <maven.compiler.target>20</maven.compiler.target>
        <project.build.sourceEncoding>UTF-8</project.build.sourceEncoding>
    </properties>

<!--    启动器-->
    <dependencies>
<!--        引入自动配置-->
        <dependency>
            <groupId>com.example.mystarter</groupId>
            <artifactId>mystarter-spring-boot-starter-autoconfigurer</artifactId>
            <version>0.0.1-SNAPSHOT</version>
        </dependency>
    </dependencies>

</project>
三、mystarter-spring-boot-starter-autoconfigurer模块里的pom.xml文件配置信息
<?xml version="1.0" encoding="UTF-8"?>
<project xmlns="http://maven.apache.org/POM/4.0.0" xmlns:xsi="http://www.w3.org/2001/XMLSchema-instance"
	xsi:schemaLocation="http://maven.apache.org/POM/4.0.0 https://maven.apache.org/xsd/maven-4.0.0.xsd">
	<modelVersion>4.0.0</modelVersion>
	<parent>
		<groupId>org.springframework.boot</groupId>
		<artifactId>spring-boot-starter-parent</artifactId>
		<version>3.1.1</version>
		<relativePath/> <!-- lookup parent from repository -->
	</parent>
	<groupId>com.example.mystarter</groupId>
	<artifactId>mystarter-spring-boot-starter-autoconfigurer</artifactId>
	<version>0.0.1-SNAPSHOT</version>
	<name>mystarter-spring-boot-starter-autoconfigurer</name>
	<description>mystarter-spring-boot-starter-autoconfigurer</description>
	<properties>
		<java.version>17</java.version>
	</properties>

	<dependencies>
		<dependency>
			<groupId>org.springframework.boot</groupId>
			<artifactId>spring-boot-starter</artifactId>
		</dependency>

<!--		https://docs.spring.io/spring-boot/docs/3.1.1/reference/html/configuration-metadata.html#appendix.configuration-metadata.annotation-processor
	https://blog.csdn.net/Zhangsama1/article/details/129198456
	使用spring-boot-configuration-processor,作用就是将自己的配置自己创建的配置类生成元数据信息,这样就能在自己的配置文件中显示出来非常的方便
	例如:在application.yml中自定义配置信息,使用开发工具做自定义信息提示
-->
		<dependency>
			<groupId>org.springframework.boot</groupId>
			<artifactId>spring-boot-configuration-processor</artifactId>
			<optional>true</optional>
		</dependency>
	</dependencies>

</project>
四、LearnSpringBoot08starter工程结构图
五、mystarter-spring-boot-starter-autoconfigurer核心代码
HelloProperties.java代码
package com.example.mystarter;

import org.springframework.boot.context.properties.ConfigurationProperties;

@SuppressWarnings("ConfigurationProperties")
@ConfigurationProperties(prefix = "test.hello")
public class HelloProperties {
    private String prefix;
    private String suffix;


    public String getPrefix() {
        return prefix;
    }

    public void setPrefix(String prefix) {
        this.prefix = prefix;
    }

    public String getSuffix() {
        return suffix;
    }

    public void setSuffix(String suffix) {
        this.suffix = suffix;
    }
}
HelloService.java代码
package com.example.mystarter;

public class HelloService {

    HelloProperties helloProperties;
    public String sayHello(String name){
        return helloProperties.getPrefix() + "-" + name + helloProperties.getSuffix();
    }

    public HelloProperties getHelloProperties() {
        return helloProperties;
    }

    public void setHelloProperties(HelloProperties helloProperties) {
        this.helloProperties = helloProperties;
    }
}
HelloServiceAutoConfiguration.java代码
package com.example.mystarter;

import org.springframework.beans.factory.annotation.Autowired;
import org.springframework.boot.autoconfigure.condition.ConditionalOnWebApplication;
import org.springframework.boot.context.properties.EnableConfigurationProperties;
import org.springframework.context.annotation.Bean;
import org.springframework.context.annotation.Configuration;

/*
https://blog.csdn.net/Zhangsama1/article/details/129198456
在SpringBoot2.7.x版本之后,慢慢不支持META-INF/spring.factories文件了,需要导入的自动配置类可以放在/META-INF/spring/org.springframework.boot.autoconfigure.AutoConfiguration.imports文件中
 */
@Configuration
@ConditionalOnWebApplication// 在web应用上生效
@EnableConfigurationProperties(HelloProperties.class)
public class HelloServiceAutoConfiguration {
    @Autowired
    HelloProperties helloProperties;

    @Bean
    public HelloService helloService(){
        HelloService helloService = new HelloService();
        helloService.setHelloProperties(helloProperties);
        return helloService;
    }
}
org.springframework.boot.autoconfigure.AutoConfiguration.imports代码
com.example.mystarter.HelloServiceAutoConfiguration
六、将自动配置model和启动器model安装到Maven仓库
7、创建新的工程测试自定义starter
LearnSpringBoot08starterTest工程结构图
pom.xml代码
<?xml version="1.0" encoding="UTF-8"?>
<project xmlns="http://maven.apache.org/POM/4.0.0" xmlns:xsi="http://www.w3.org/2001/XMLSchema-instance"
	xsi:schemaLocation="http://maven.apache.org/POM/4.0.0 https://maven.apache.org/xsd/maven-4.0.0.xsd">
	<modelVersion>4.0.0</modelVersion>
	<parent>
		<groupId>org.springframework.boot</groupId>
		<artifactId>spring-boot-starter-parent</artifactId>
		<version>3.1.1</version>
		<relativePath/> <!-- lookup parent from repository -->
	</parent>
	<groupId>com.example</groupId>
	<artifactId>LearnSpringBoot08starterTest</artifactId>
	<version>0.0.1-SNAPSHOT</version>
	<name>LearnSpringBoot08starterTest</name>
	<description>LearnSpringBoot08starterTest</description>
	<properties>
		<java.version>17</java.version>
	</properties>
	<dependencies>

		<!--	引入自定义的启动器	-->
		<dependency>
			<groupId>org.example.mystarter</groupId>
			<artifactId>mystarter-spring-boot-starter</artifactId>
			<version>1.0-SNAPSHOT</version>
		</dependency>

		<dependency>
			<groupId>org.springframework.boot</groupId>
			<artifactId>spring-boot-starter-web</artifactId>
		</dependency>

		<dependency>
			<groupId>org.springframework.boot</groupId>
			<artifactId>spring-boot-starter-test</artifactId>
			<scope>test</scope>
		</dependency>
	</dependencies>

	<build>
		<plugins>
			<plugin>
				<groupId>org.springframework.boot</groupId>
				<artifactId>spring-boot-maven-plugin</artifactId>
			</plugin>
		</plugins>
	</build>

</project>
HelloController.java代码
package com.example.learnspringboot08startertest.controller;

import com.example.mystarter.HelloService;
import org.springframework.beans.factory.annotation.Autowired;
import org.springframework.web.bind.annotation.GetMapping;
import org.springframework.web.bind.annotation.RestController;

@RestController
public class HelloController {
    @Autowired
    HelloService helloService;
    @GetMapping("/hello")
    public String hell(){
        return helloService.sayHello("test01");
    }
}
application.properties
server.port=8086
test.hello.prefix=CUSTOM STARTER
test.hello.suffix=HELLO WORD
八、测试结果
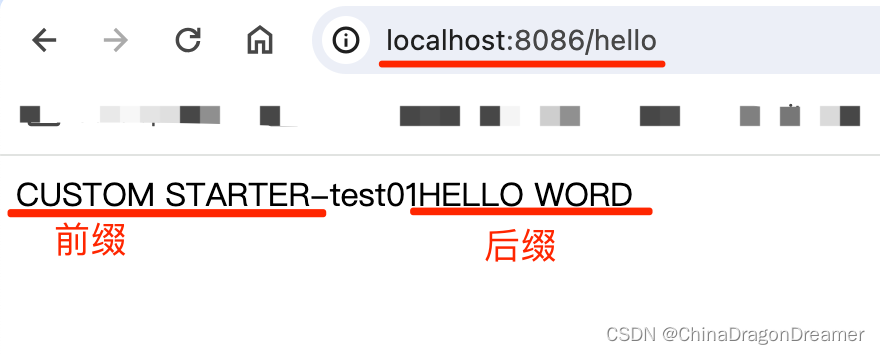
启动LearnSpringBoot08starterTest工程,在浏览器地址栏访问:http://localhost:8086/hello


