SpringSecurity入门到精通
- **********************************************************
- **************** SpringSecurity 介绍 ****************
- **********************************************************
- 一、入门
- 1.简介与选择
- 2.入门案例-默认的登录和登出接口
- 3.登录经过了哪些步骤
- 二、基础的自定义认证
- 1.自定义UserDetailsService - 实现用户信息获取
- 2.替换默认密码处理PasswordEncoder - 实现密码比对
- 3.自定义登录接口 - 替换默认登录接口
- 4.放行登录接口配置
- 5.登录失败自定义异常处理
- 6.增加拦截器/过滤器验证登录状态
- 7.登出接口与Token续签
- 三、自定义授权
- 1.UserDetails增加存储权限信息并通过getAuthorities返回
- 2.UserDetailsService中封装权限和角色到UserDetails
- 3.使用PreAuthorize验证权限
- 4.自定义授权异常响应
- 四、其他关键信息
- 1.自定义权限认证方法
- 2.一些钩子函数
- **********************************************************
- ******************** OAuth2.0 介绍 *******************
- **********************************************************
- 一、OAuth2.0 介绍
- 1.授权码模式
- 2.简化模式
- 3.密码模式
- 4.客户端模式
- 5.自带接口介绍
- 二、Springcloud集成OAuth2:授权
- 1.引入依赖
- 2.提供Springsecurity配置
- 2.1 自定义UserDetailsService的实现类,获取用户信息和权限信息
- 2.2 自定义UserDetails实现类,用以封装UserDetailsService的信息返回
- 2.3 配置SpringSecurity的配置类WebSecurityConfigurerAdapter
- 3.配置OAuth:AuthorizationServerConfigAdapter
- 4.验证授权码模式
- 5.验证简化模式
- 6.验证密码模式
- 7.验证客户端模式
- 8.验证原生接口-令牌有效性:/oauth/check_token
- 三、Springcloud集成OAuth2:资源
- 2.编写配置类
- 3.添加一个测试接口
- 4.总结
**********************************************************
**************** SpringSecurity 介绍 ****************
**********************************************************
一、入门
SpringSecurity当下最主流的两种认证授权框架之一,另一个则是Shiro。在2021之前shiro的使用还是比较多的,但随着SpringBoot越来越流行,SpringSecurity也越来越流行,主要还是因为SpringSecurity的配置越来越简洁了,不会像之前那样复杂。而shiro是Apache下的认证授权框架,典型特点事轻量易上手,使用起来也比较简洁。SpringSecurity则是相对来说重一些,不过同时可支持自定义的配置也会多一些,所以他的可扩展性要高于Shiro,随着Spring生态的发展,SpringSecurity则越来越受欢迎了,这篇文章用以总结SpringSecurity的常用功能
1.简介与选择
安装框架的核心功能都是认证与授权,无论是哪种安全框架,均是如此,SpringSecurity自然也是如此。
认证:验证当前用户是否是系统的合法用户
授权:对合法用户进行权限授予,用户携带授权信息方可正常访问系统资源或接口
目前Spring生态内对于集成SpringSecurity更友好,所以越来越多得项目均是选择SpringSecurity作为认证授权的框架,其实说是SpringSecurity是相较于Shiro难一些,不过都很简单,只需要花个半天到一天的时间就可以学会使用。
2.入门案例-默认的登录和登出接口
这一节先展示下SpringSecurity的Demo,了解下SpringSecurity默认提供的登录和登出功能。
-
1.导入依赖
这里使用的是父工程进行管理的项目,
SpringBoot版本是2.6.11
SpringCloud版本是2021.0.4
SpringCloud- Alibaba 版本是2021.0.4.0<!-- security依赖 --> <dependency> <groupId>org.springframework.boot</groupId> <artifactId>spring-boot-starter-security</artifactId> </dependency> <!-- web依赖 --> <dependency> <groupId>org.springframework.boot</groupId> <artifactId>spring-boot-starter-web</artifactId> </dependency> <!-- lombok --> <dependency> <groupId>org.projectlombok</groupId> <artifactId>lombok</artifactId> </dependency> -
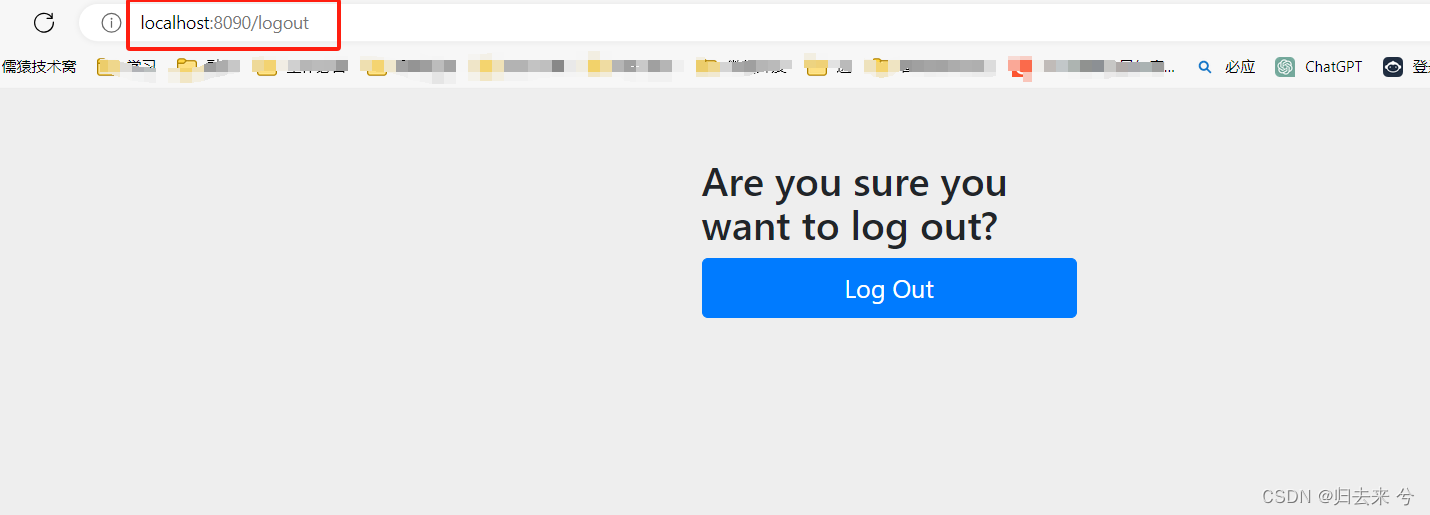
2.直接启动工程后访问他的登录接口
无需提供任何配置,导入依赖后可以直接启动工程,下面是默认的登录和登出接口
默认登录接口:http://localhost:port/login
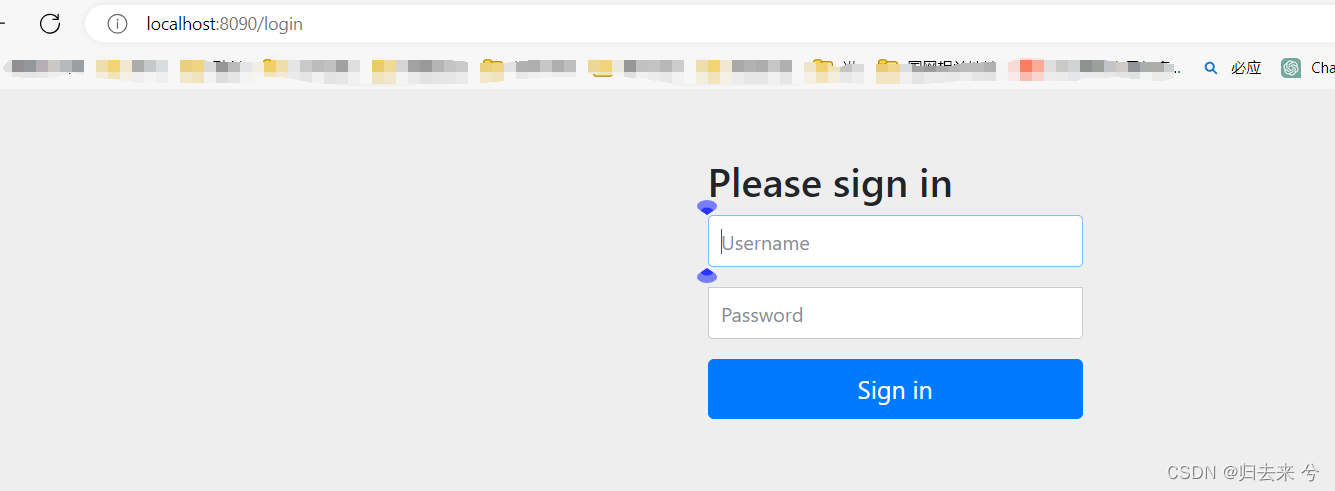
默认登出接口:http://localhost:port/logout
-
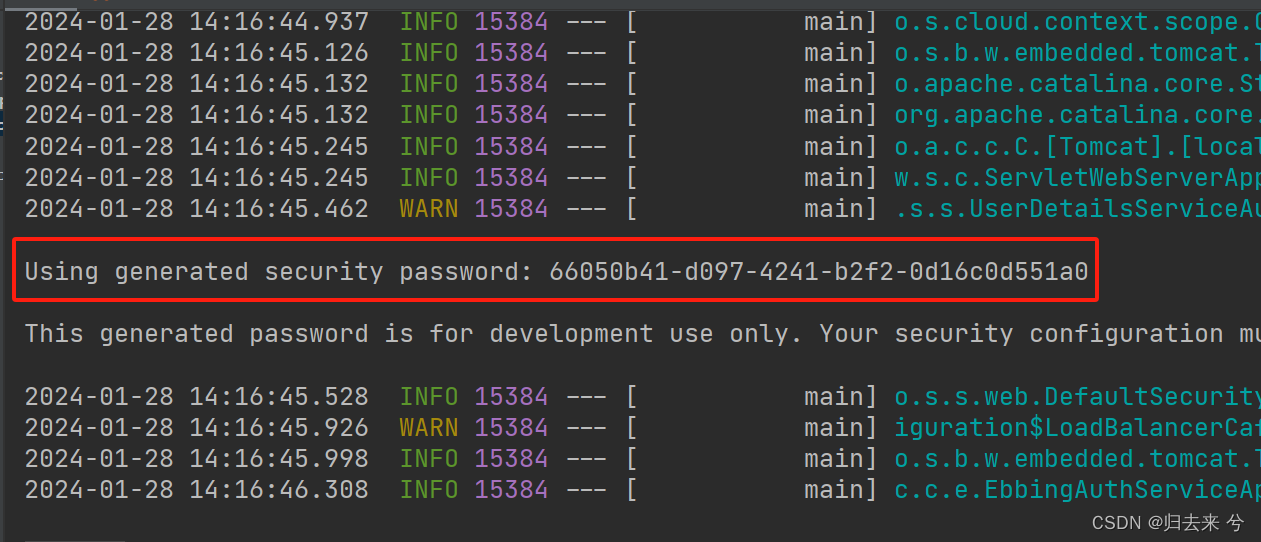
3 登录系统
这里使用默认用户user,密码在项目启动时动态生成的,每次重启都会重新生成一个,位置如下,此时我们可以写一个web接口进行验证, 如果不登录是无法访问到web接口的,若是完成登录这可以正常访问web接口。
登录后会跳转一个白页,当然这样的登录控制是不可能满足我们需要的,首先我们需要的用户信息是需要从数据库获取,然后密码存储在数据库肯定是密文,那么需要更换密码比对等。
3.登录经过了哪些步骤
在这个前端发起登录请求时会经过过滤器链的处理,其中以下标出的可以先做认识下:
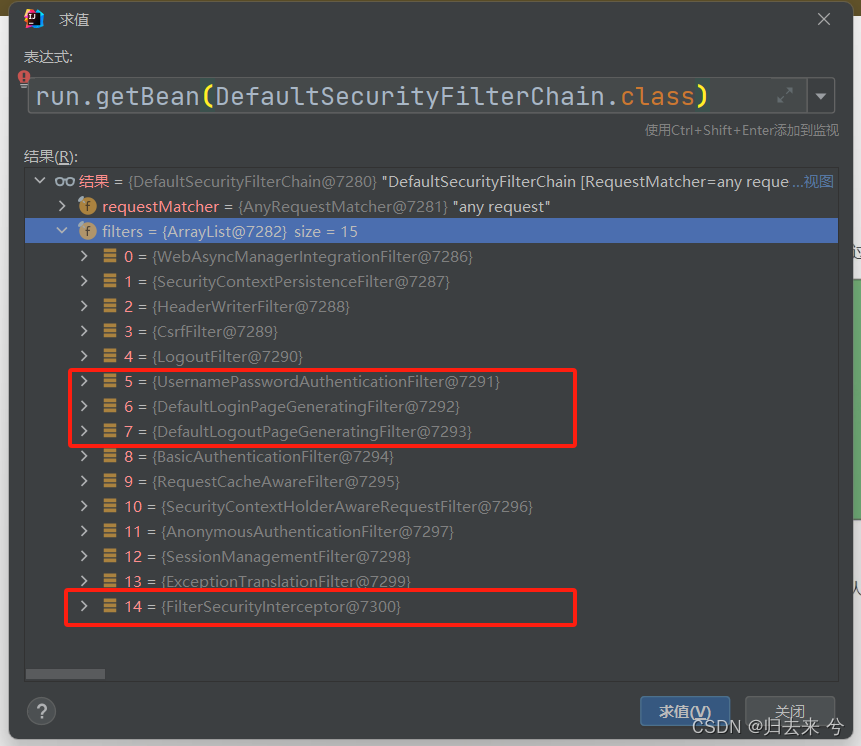
- UsernamePasswordAuthenticationFilter : 验证用户密码,进行授权
- DefaultLoginPageGeneratingFilter 提供默认登录页
- DefaultLogoutPageGeneratingFilter 提供默认登出页
- FilterSecurityInterceptor 授权
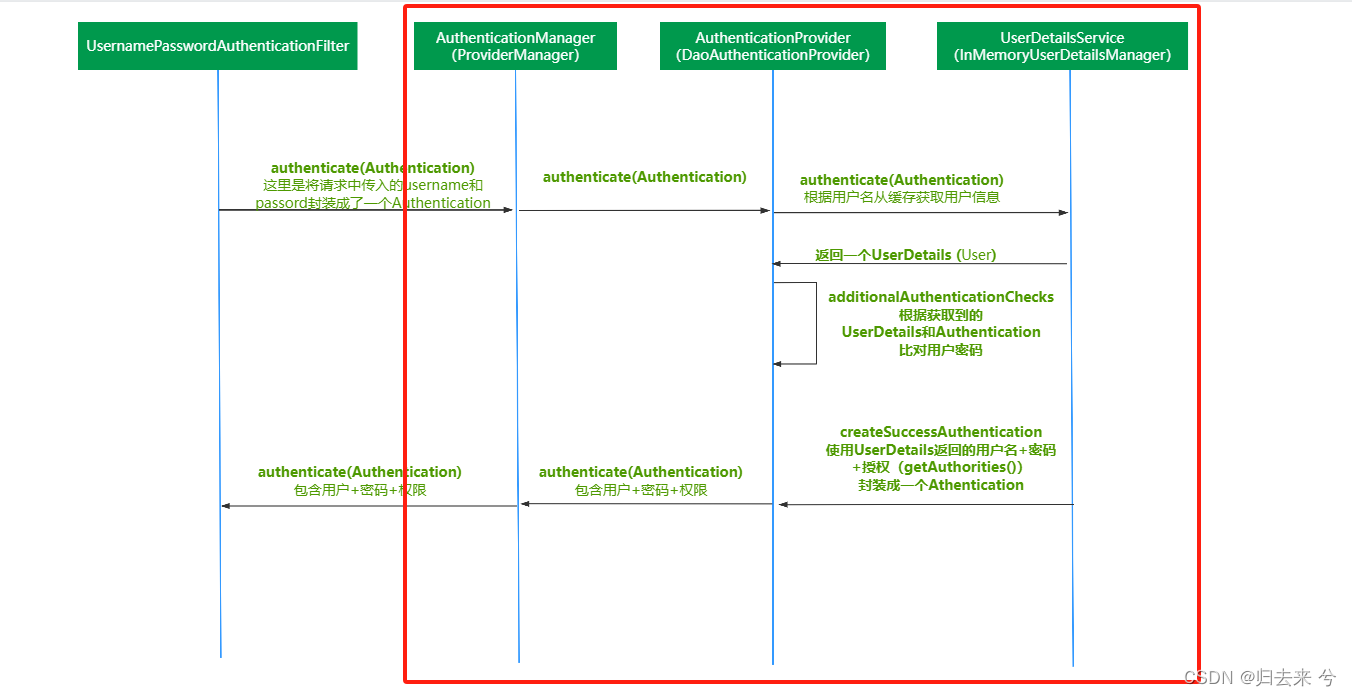
这几个过滤器需要着重说下的是UsernamePasswordAuthenticationFilter,这个过滤器是在我们不使用自定义登录时SpringSecurity提供的用于认证和授权的一个过滤器(自定义以后系统会自动剔除),下面先简单说下他的处理过程,方便第二部分理解为什么要替换这些类或者接口的实现。
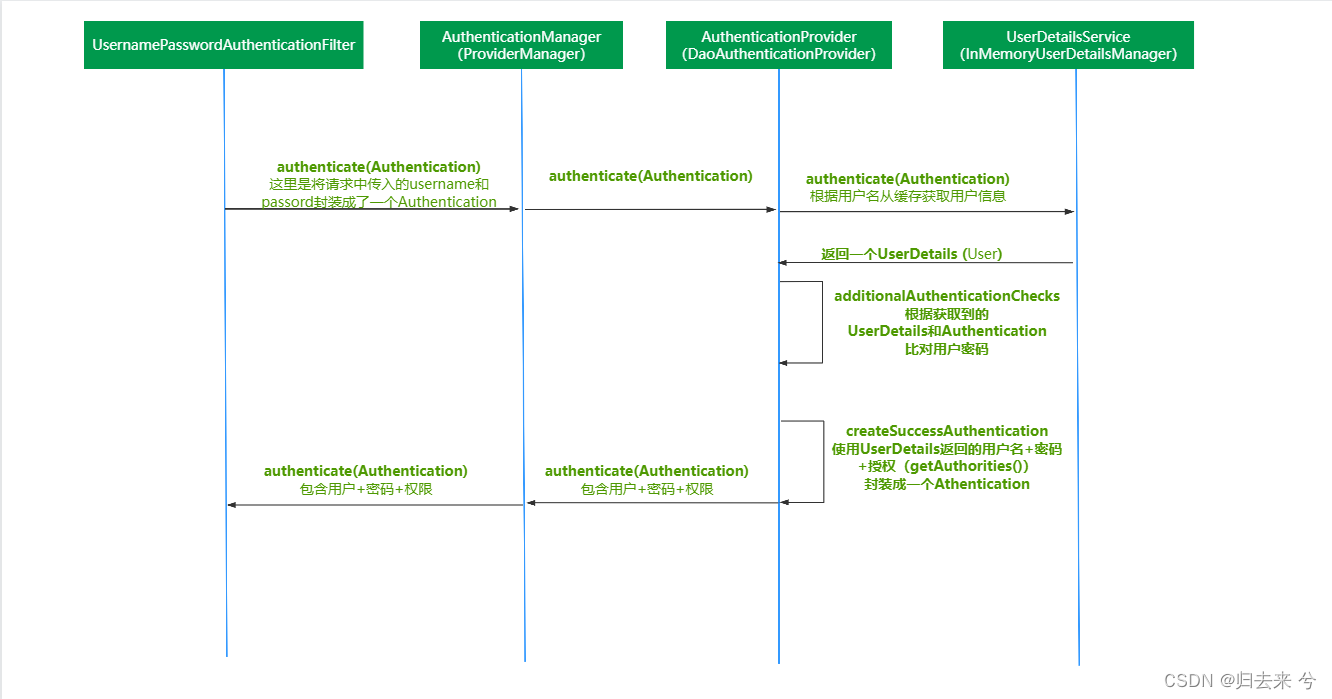
1-UsernamePasswordAuthenticationFilter.attemptAuthentication
尝试开始进行认证,该方法获取用户名密码形成token,然后调用
2-AuthenticationManager.authenticate(实际执行ProviderManager.authenticate)
这里仍然不是最终验证的地方,会继续向下调用
3-AuthenticationProvider.authenticate(实际执行DaoAuthenticationProvider.authenticate)
这个方法的内部先是获取UserDetails的对象这里通过 retrieveUser -> UserDetailsService.loadUserByUsername,默认场景下返回的是User(UserDetails的实现类),这个user则是从内存中去获取的信息
这个方法的内部再通过additionalAuthenticationChecks方法传入token,user等验证密码是否正确
所有认证完成后返回一个Authentication对象给到调用者。
这样便完成了一次简单的认证了,这也是入门案例的执行流程。
二、基础的自定义认证
通过上面的一部分的第3节可以大概知道了认证的流程,那么下面我们做bean的替换时就会比较清晰的知道为什么要替换了
1.自定义UserDetailsService - 实现用户信息获取
上面介绍了UserDetailsService的作用是为了获取到一个UserDetails,如果我们不做更改系统返回的是User,这个User是SpringSecurity提供的一个UserDetails的实现类,那如果我们想要从数据库获取用户信息,就至少需要做两个事情。
①从新实现UserDetailsService的loadUserByUsername方法,从数据库抓取用户和密码
②自定义一个UserDetails,以满足真实的需要
根据上面的分析,我们先建立一个UserDetails的实现类,供使用,在这之前先建立一个用户的信息的类
// 这是基础的用户信息的POJO
@Data
@Accessors(chain = true)
public class UserDTO {
    private String username;
    private String password;
}
然后我们就可以实现自己的UserDetails了,如下
package com.cheng.ebbingauthservice.security.bean;

import com.cheng.ebbingauthservice.dto.UserDTO;
import lombok.Data;
import org.springframework.security.core.GrantedAuthority;
import org.springframework.security.core.userdetails.UserDetails;
import java.util.Collection;

/**
 * @author pcc
 * @version 1.0.0
 * @description SpringSecurity通过这个类获取到用户信息
 */
@Data
public class UserDetailItem implements UserDetails {

    private UserDTO userDTO;

    @Override
    public Collection<? extends GrantedAuthority> getAuthorities() {
        return null;
    }

    @Override
    public String getPassword() {
        return userDTO.getPassword();
    }

    @Override
    public String getUsername() {
        return userDTO.getUsername();
    }
	// 以下方法应该根据用户的真实场景进行设置,这里因为不提供这些属性,均设置为true,且不会更改
    @Override
    public boolean isAccountNonExpired() {
        return true;
    }

    @Override
    public boolean isAccountNonLocked() {
        return true;
    }

    @Override
    public boolean isCredentialsNonExpired() {
        return true;
    }

    @Override
    public boolean isEnabled() {
        return true;
    }
}
然后还需要提供一个UserDetailsService的实现类交给Spring,用以实现从数据库获取用户信息,如下
package com.cheng.ebbingauthservice.security.service.impl;

import com.cheng.ebbingauthservice.dto.UserDTO;
import com.cheng.ebbingauthservice.security.bean.UserDetailItem;
import org.springframework.security.core.userdetails.UserDetails;
import org.springframework.security.core.userdetails.UserDetailsService;
import org.springframework.security.core.userdetails.UsernameNotFoundException;
import org.springframework.stereotype.Component;

/**
 * @author pcc
 * @version 1.0.0
 * @description 这个类的作用是通过用户名获取用户信息进行返回,
 *               Springsecurity借助返回的用户信息对用户进行认证和授权
 */
@Component
public class UserDetailsServiceImpl implements UserDetailsService {
    @Override
    public UserDetails loadUserByUsername(String username) throws UsernameNotFoundException {

        // 假如这里是通过数据库获取到的用户信息,为了方便直接写死了
        if(username.equals("admin")){
            UserDetailItem userDetailItem = new UserDetailItem();
            UserDTO userDTO = new UserDTO();
            userDTO.setUsername("admin").setPassword("$2a$10$FWHmOGJVs/GNVqA.bPvnbu1au.oxKAJ7wK8bfbD6NpE5XbwdZtCpu");
            userDetailItem.setUserDTO(userDTO);
            return userDetailItem;
        }
        throw new UsernameNotFoundException("用户名或密码错误");
    }
}
注意这里使用的密码是密文的,默认的密码处理器是无法验证的,所以需要更换下对应的密码处理器,见下面
2.替换默认密码处理PasswordEncoder - 实现密码比对
这里还需要说的是这个密码,默认的密码处理并不好用,是明文存储且还得加上莫名其妙的前缀,所以这里会进行替换默认的密码编码器,上面代码中密码是使用的BCryptPasswordEncoder进行生成的密码,他的真实值是1234,所以这里还需要替换下密码的编码器,只需要将其注入到Spring中即可
package com.cheng.ebbingauthservice.security.config;

import org.springframework.context.annotation.Bean;
import org.springframework.context.annotation.Configuration;
import org.springframework.security.crypto.bcrypt.BCryptPasswordEncoder;

/**
 * @author pcc
 * @version 1.0.0
 * @description 更换默认的密码解析器
 */
@Configuration
public class SecurityConfig{

    @Bean
    public BCryptPasswordEncoder getPasswordEncoder() {
        return new BCryptPasswordEncoder();
    }
}
到这里其实我们已经完成了用户信息从数据库获取的操作(写死的,这里就不加数据库信息了),不过只支持一个用户admin的登录,且密码是1234,重起服务验证下,发现登录正常,说明配置并没有问题。

3.自定义登录接口 - 替换默认登录接口
登录接口肯定是不可能使用SpringSecurity提供的默认的接口,所以这个也是需要更换掉的,首先我们需要提供一个登录接口,那登录接口该如何实现登录呢?这里就需要看看原有的登录流程是如何是如何实现认证的了。根据第一章第3部分可以知道,认证是发生在AuthenticationProvider.authenticate 这个方法内部的,所以我们只需要获取AuthenticationProvider,或者他上次的方法都是可以实现认证的,所以我们有两个选择只要是从容器中获取到其中之一即可实现认证了:AuthenticationProvider、AuthenticationManager。
那要怎么获取到这两个的其中一个呢,SpringSecurity提供了一个适配类WebSecurityConfigurerAdapter,用以实现获取SpringSecurity流程中的类,或者为SpringSecurity增加配置,这里就需要借助这个类,我们使用普通的配置类继承这个WebSecurityConfigurerAdapter类即可,然后重写相关方法就行。下面是这个类的所有可重写的方法,可以发现只有两个和我们的目标有关,所以我们只能利用AuthenticationManager来实现了
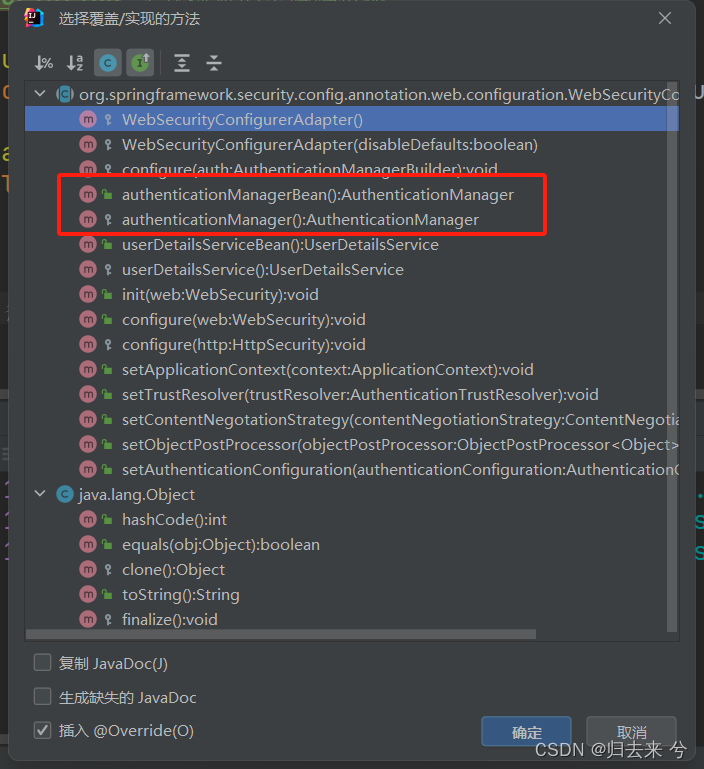
将AuthenticationManager注入到Spring容器,方便Controller中获取进行用户认证
package com.cheng.ebbingauthservice.security.config;

import org.springframework.context.annotation.Bean;
import org.springframework.context.annotation.Configuration;
import org.springframework.security.authentication.AuthenticationManager;
import org.springframework.security.config.annotation.web.configuration.WebSecurityConfigurerAdapter;
import org.springframework.security.crypto.bcrypt.BCryptPasswordEncoder;

/**
 * @author pcc
 * @version 1.0.0
 * @description SpringSecurity配置类
 */
@Configuration
public class SecurityConfig extends WebSecurityConfigurerAdapter {

    @Bean
    public BCryptPasswordEncoder getPasswordEncoder() {
        return new BCryptPasswordEncoder();
    }

	@Bean
    @Override
    protected AuthenticationManager authenticationManager() throws Exception {
        return super.authenticationManager();
    }
}
下面就可以写登录接口了,登录接口如下,上面已经将AuthenticationManager 注入到了Spring容器内,所以可以直接通过Resource获取到这个bean,所以可以直接使用他的认证方法进行认证:
package com.cheng.ebbingauthservice.controller;

import com.cheng.ebbingauthservice.dto.UserDTO;
import com.cheng.ebbingauthservice.testjwt.JWTUtil;
import lombok.extern.slf4j.Slf4j;
import org.springframework.security.authentication.AuthenticationManager;
import org.springframework.security.authentication.UsernamePasswordAuthenticationToken;
import org.springframework.security.core.Authentication;
import org.springframework.security.core.AuthenticationException;
import org.springframework.web.bind.annotation.PostMapping;
import org.springframework.web.bind.annotation.RequestBody;
import org.springframework.web.bind.annotation.RestController;
import javax.annotation.Resource;
import java.util.HashMap;
import java.util.Map;

/**
 * @author pcc
 * @version 1.0.0
 * @className AuthController
 * @date 2023-12-13 15:59
 */
@Slf4j
@RestController
public class AuthController {

    @Resource
    AuthenticationManager authenticationManager;

    //自定义登录接口
    @PostMapping("/auth/login")
    public String login(@RequestBody UserDTO userDTO){
        // 根据源码可以知道,使用的Authentication其实是UsernamePasswordAuthenticationToken
        UsernamePasswordAuthenticationToken authentication = new UsernamePasswordAuthenticationToken(userDTO.getUsername(),userDTO.getPassword());
        // 根据源码可以知道只有认证通过才会返回Authentication,其他会抛出异常

        Authentication authenticate = null;
        try {
            authenticate = authenticationManager.authenticate(authentication);
        } catch (AuthenticationException e) {
            throw new RuntimeException(e);
        }

        // 登录成功后生成token
        Map<String,Object> tokenMap = new HashMap<>();
        tokenMap.put("username",userDTO.getUsername());
        String tokenBySHA256 = JWTUtil.getTokenBySHA256(tokenMap);
        log.info("登录成功,生成token:{} ",tokenBySHA256);
        return tokenBySHA256;
    }


}
这是简单的一个接口,用以模拟登录,只能是用来说明如何实现的登录,如果想要 用于生产还有很多需要改动的地方。需要解释的地方有两个,一个是并没有直接验证登录成功与否的地方,验证是否登录成功其实在第一节的3部分已经说了是在过滤器内部完成的,其实不需要我们手动来做,如果验证失败SpringSecurity会直接使用HttpServletResponse将请求响应该客户端,此时authenticate 之后的代码并不会执行,所以一旦前端收到了token说明验证肯定是通过了的,第二个事情是这里使用了JWT的Token,这里不做JWT的解释,需要的了解和工具类的从这里复制即可:https://java-dream.blog.csdn.net/article/details/135880226
4.放行登录接口配置
此时进行登录,肯定是无法成功的,因为我们调用登录接口的话,肯定提示401告诉我们没有认证,所以还需要配置下接口放行,让SpringSecurity不拦截登录接口的请求。如何配置放行接口呢,SpringSecurity提供了WebSecurityConfigurerAdapter这个适配器类,我们只需要重写这里的方法就可以为我们提供对应的功能,上面已经通过这个类获取到了AuthenticationManager ,这里通过configure方法类实现对SpringSecurity的配置更改,代码如下:
注意:一旦重写了configure方法,那么SpringSecurity就不会再使用默认的UsernamPasswordAuthenticationFilter过滤器了,会将该过滤器从过滤链中剔除,认证就必须使用自定义认证(也可以手动加回来,不过没有必要),所以我们自定义的接口需要获取AuthenticationManager来进行认证了。
 @Override
 protected void configure(HttpSecurity http) throws Exception {
     // 这里配置SpringSecurity的信息
     http
             .csrf().disable()// 禁用csrf
             .sessionManagement().sessionCreationPolicy(SessionCreationPolicy.STATELESS)//不使用session
             .and() // 重新返回一个HttpSecurityBuilder
             .authorizeRequests() // 配置接口的拦截
             .antMatchers("/auth/login").anonymous()// 放行接口
             .anyRequest().authenticated();// 拦截接口
 }
上面的配置信息,格式看起来会有些奇怪,之所以会这么写是因为各个方法的返回类型都有一个and方法,and方法返回的类型都是HttpSecurityBuilder的子类,所以可以实现通过and方法来进行重复链式调用的目的。
上面的代码的的含义详见代码注释。
到这里已经可以实现自定义的登录接口了,验证下:

可以看到正常返回了JWT的token,说明我们登录成功了。
5.登录失败自定义异常处理
上面虽然登录成功了,但是还会有一个比较严重的问题,就是如果用户名或者密码失败此时登录异常却无法返回自定义异常信息。会提示我们403,这个原因是因为SpringSecurity在登录场景中有15个过滤器(默认时),其中有一个是ExceptionTranslationFilter,该过滤器的作用是获取并转换异常,在认证过程中的异常信息,都会被这个过滤器处理掉,所以如果我们想要自定义认证的异常信息,是需要我们手动进行改造这块的。首先我们需要有一个自己的异常处理类,根据处理器的源码可以知道,这个类应该是AuthenticationException的实现类,在默认的处理类中这是将错误码置为了403,所以默认的处理肯定是不能用的

这里写个类实现AuthenticationException类,如下:
package com.cheng.ebbingauthservice.security.exception;

import lombok.extern.slf4j.Slf4j;
import org.springframework.security.core.AuthenticationException;
import org.springframework.security.web.AuthenticationEntryPoint;
import javax.servlet.ServletException;
import javax.servlet.http.HttpServletRequest;
import javax.servlet.http.HttpServletResponse;
import java.io.IOException;
import java.io.PrintWriter;
import java.util.HashMap;
import java.util.Map;

/**
 * @author pcc
 * @version 1.0.0
 * @description SpringSecurity自定义处理类
 */
@Slf4j
public class AuthenticationExceptionEntryPoint implements AuthenticationEntryPoint {
    @Override
    public void commence(HttpServletRequest request, HttpServletResponse response, AuthenticationException authException) throws IOException, ServletException {
        log.info("异常类:{}",authException.getClass().getName());
        // 这里只做简单输出
        response.setContentType("application/json;charset=UTF-8");
        Map<String,String> map = new HashMap<>();
        map.put("code","401");
        map.put("msg","认证失败,请重新登录!");
        PrintWriter writer = response.getWriter();
        writer.print(map);
        writer.flush();
        writer.close();
    }
}
这里这是简单的将信息统一返回给前端,并没有根据异常类型进行分别处理,其实AuthenticationException下有很多异常类型,我们是可以根据不同类型进行不同处理的,这里到后面整合Oauth2都是要改的 ,所以知道是怎么回事就可以了。然后就是需要将我们自定义的异常处理交给SpringSecurity就可以了,不出意外依然是使用WebSecurityConfigurerAdapter,这里提供的正好有一个认证异常的处理,可以供我们自定义认证类异常信息(即使不属于认证异常的异常在过滤器链中也被转成了此类异常)如下:
    @Override
    protected void configure(HttpSecurity http) throws Exception {
        // 这里配置SpringSecurity的信息
        http
                .authenticationEntryPoint(new AuthenticationExceptionEntryPoint()) // 自定义认证异常处理
                .and()
                .csrf().disable()// 禁用csrf
                .sessionManagement().sessionCreationPolicy(SessionCreationPolicy.STATELESS)//不使用session
                .and() // 重新返回一个HttpSecurityBuilder
                .authorizeRequests() // 配置接口的拦截
                .antMatchers("/auth/login").anonymous()// 放行接口
                .anyRequest().authenticated();// 拦截接口
    }
到这里我们就可以验证认证失败的场景了,如下所示,可以发现认证失败已经可以正常返回异常信息了,而不是只会返回403。

到这里为止,一个基本的认证就完成了。
6.增加拦截器/过滤器验证登录状态
上面已经完成了登录接口,也成功获取了Token,也可以兼容登录失败的场景了,那如何使用Token进行请求系统资源呢?这种场景无疑是需要借助拦截器或者过滤器来实现的,既然SpringSecurity提供了过滤器链,那么我们肯定是使用过滤器来处理了。
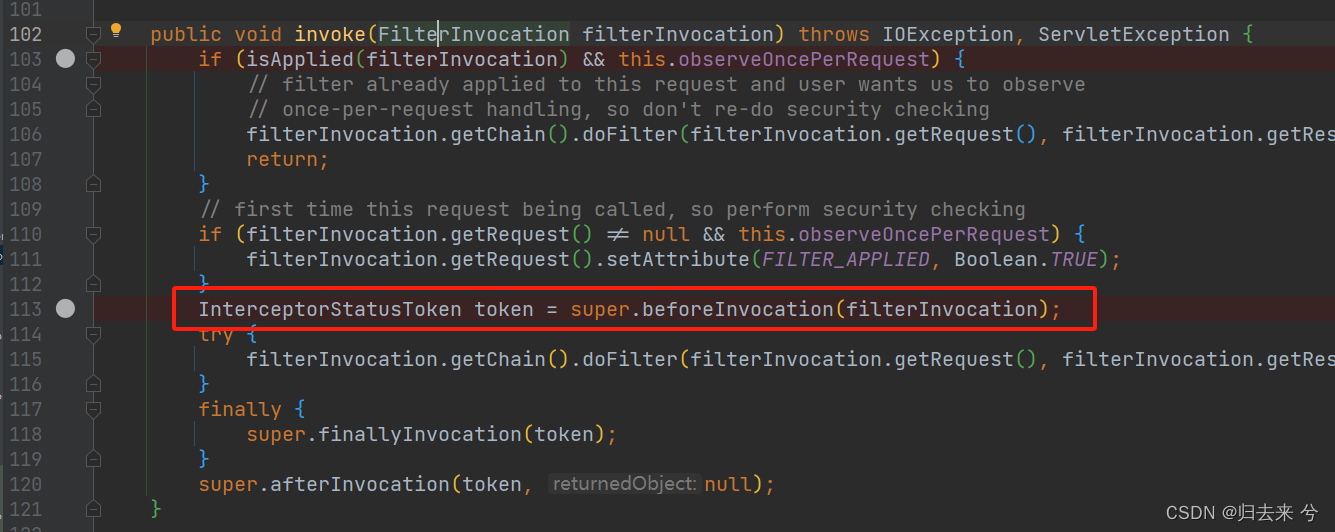
思路:增加一个过滤器对于携带Token的请求进行处理,获取到用户名密码,那获取到用户名和密码以后怎么保证后面的认证可以正常通过呢?这里需要简单说下SpringSecurity的源码,在过滤器链中有一个这个过滤器FilterSecurityInterceptor,他有如下的三个处理,见下面三个图片:
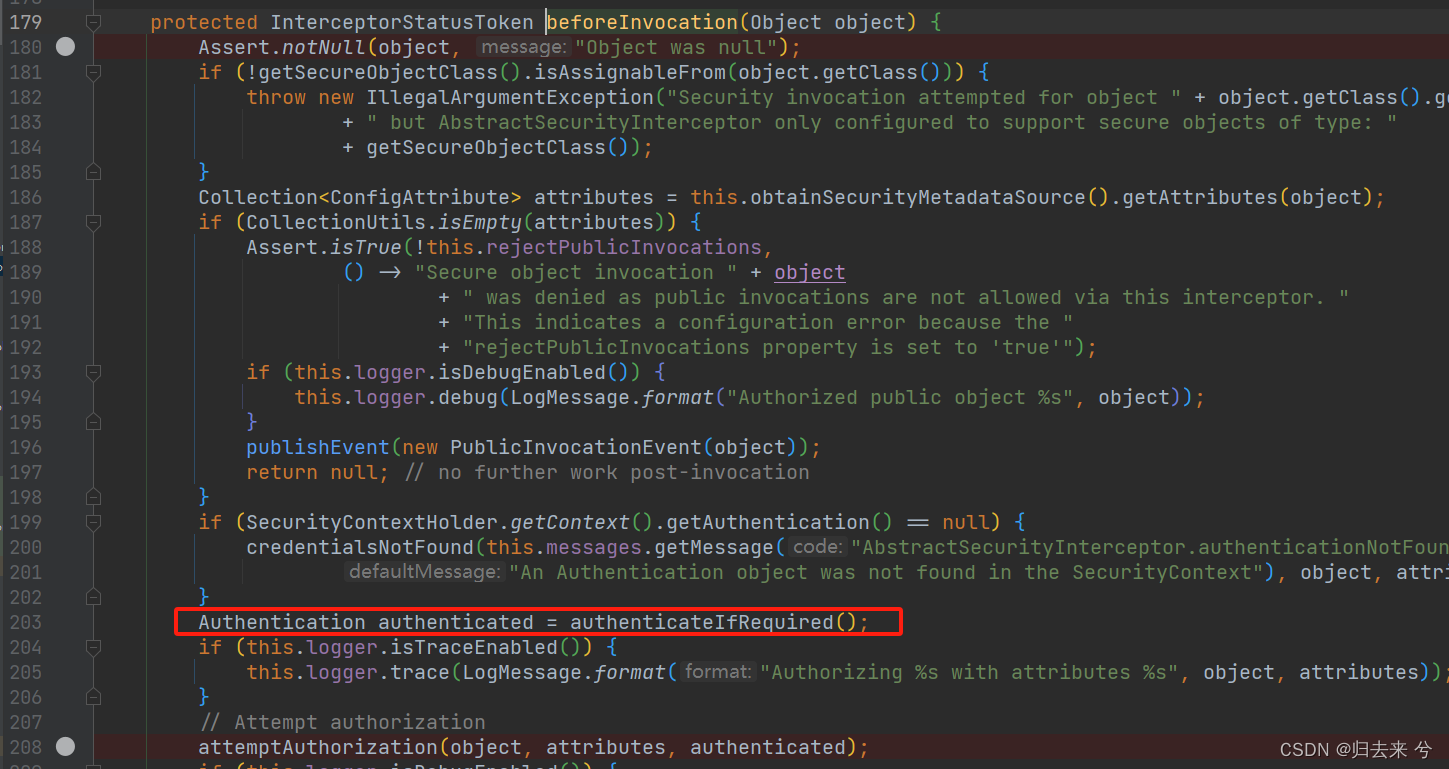
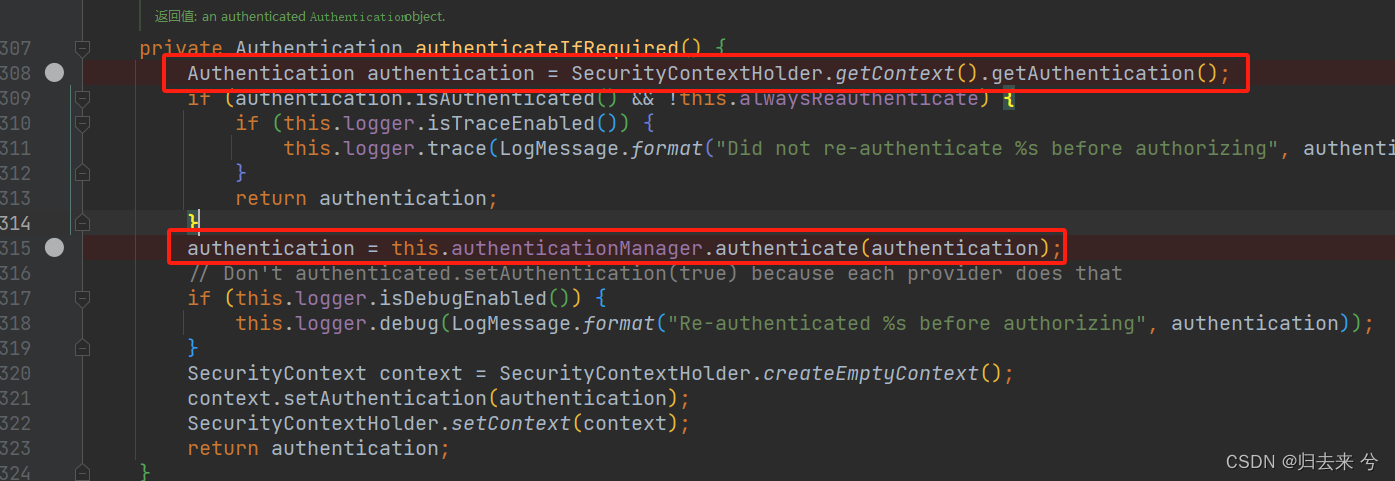
到这一张截图应该就会很清晰了,在UsernamePasswordAuthenticationFilter中也是有这样一块代码的,这块代码是调用在第一节的3部分已经说了,其实是通过AuthenticationManager---->AuthenticationProvidor---->UserDetailsService,然后获取到用户信息,和上面从SecurityContextHolder中获取的Authentication进行比对,然后在providor中验了密码是否正确,正确就返回一个Authentication,其实真正的类型是UsernamePasswordAuthenticationToken。如此便完成了认证。
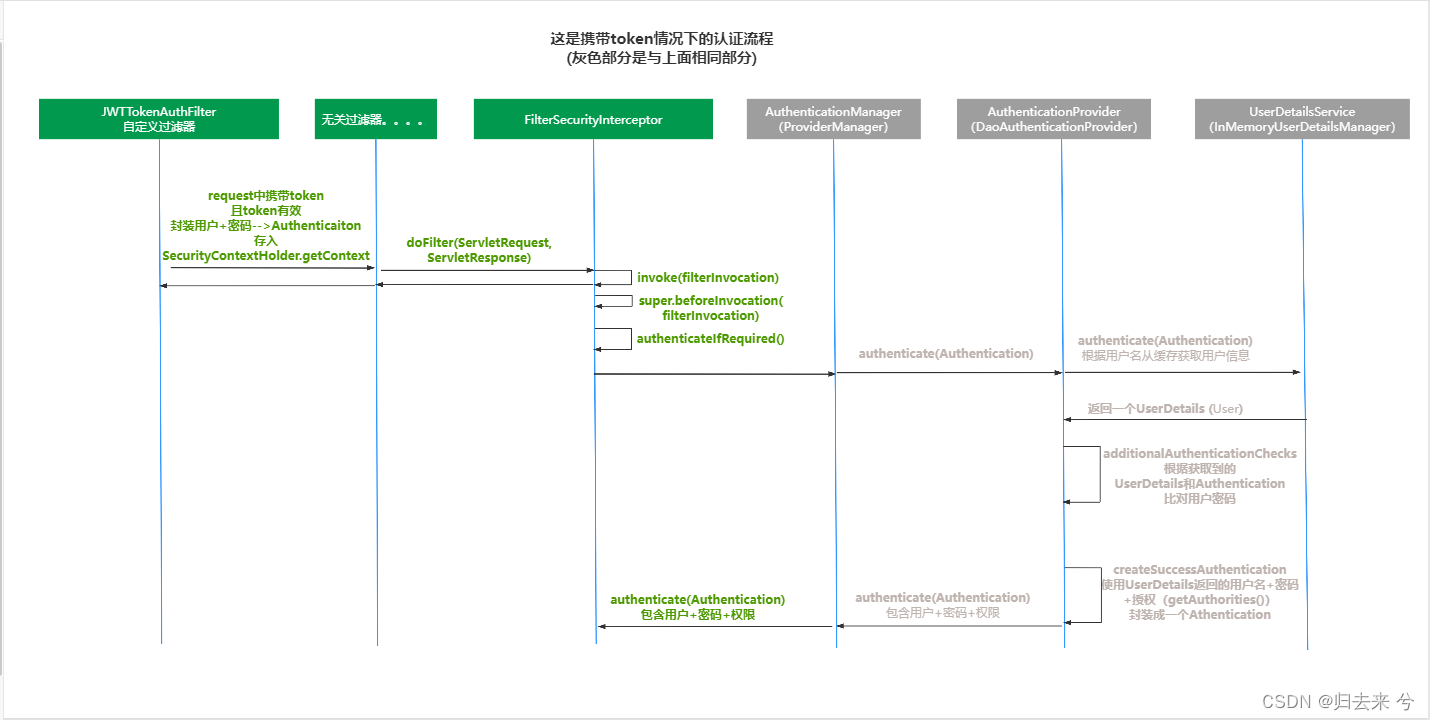
下面通过时序图说明上面的过程灰色部分和原认证流程相同:
authentication = this.authenticationManager.authenticate(authentication);
看清楚这块代码我们其实就清楚携带Token应该怎么完成认证了,很明显这里是从SecurityContextHolder中获取的Authentication,所以我们只需要将Token中的信息验证通过后放入到这里后面就可以自动认证了,下面是新增的Token过滤器的代码,有一点需要说下我这里只是做演示所以把username、password都放在了JWT里,但是真实使用时不要这么做,应该根据JWT中存储的用户名去数据库找密码,解密后再放入到Authentication中
package com.cheng.ebbingauthservice.security.filter;

import com.cheng.ebbingauthservice.testjwt.JWTUtil;
import org.springframework.security.authentication.UsernamePasswordAuthenticationToken;
import org.springframework.security.core.context.SecurityContextHolder;
import org.springframework.util.StringUtils;
import org.springframework.web.filter.OncePerRequestFilter;

import javax.servlet.FilterChain;
import javax.servlet.ServletException;
import javax.servlet.http.HttpServletRequest;
import javax.servlet.http.HttpServletResponse;
import java.io.IOException;

/**
 * @author pcc
 * @version 1.0.0
 * @description 描述下这个类吧
 */
public class JWTTokenAuthFilter extends OncePerRequestFilter {
    @Override
    protected void doFilterInternal(HttpServletRequest request, HttpServletResponse response, FilterChain filterChain) throws ServletException, IOException {
        /**
         * 1.获取请求头中的token,无Token直接方向
         * 2.验证token是否有效,无效也放行
         * 3.有效将用户id存入Authentication中,并交给SecurityContextHoler
         * 4.继续向后执行
         */
        String authorization = request.getHeader("Authorization");
        if(!StringUtils.isEmpty(authorization) && authorization.startsWith("Bearer ")){
            String token = authorization.substring(7);
            // token有效
            if(JWTUtil.verifyToken(token,"SHA256")){
                // 这里假设token里携带了用户名密码(真实场景中别从这里获取)
                UsernamePasswordAuthenticationToken authenticationToken = new UsernamePasswordAuthenticationToken(
                        JWTUtil.parseClaimsJws(token,"SHA256","username"),
                        JWTUtil.parseClaimsJws(token,"SHA256","password")
                );

                SecurityContextHolder.getContext().setAuthentication(authenticationToken);
            }
        }

        filterChain.doFilter(request,response);

    }
}
然后还需要将我们新增的过滤器交给SpringSecurity的过滤器链来处理,位置就加载原来的用户密码过滤器之前就可以UsernamePasswordAuthenticationFilter,如下:
package com.cheng.ebbingauthservice.security.config;

import com.cheng.ebbingauthservice.security.exception.AccessDeniedExceptionHandler;
import com.cheng.ebbingauthservice.security.exception.AuthenticationExceptionEntryPoint;
import com.cheng.ebbingauthservice.security.filter.JWTTokenAuthFilter;
import org.springframework.context.annotation.Bean;
import org.springframework.context.annotation.Configuration;
import org.springframework.security.authentication.AuthenticationManager;
import org.springframework.security.config.annotation.web.builders.HttpSecurity;
import org.springframework.security.config.annotation.web.configuration.WebSecurityConfigurerAdapter;
import org.springframework.security.config.http.SessionCreationPolicy;
import org.springframework.security.crypto.bcrypt.BCryptPasswordEncoder;
import org.springframework.security.web.authentication.UsernamePasswordAuthenticationFilter;

/**
 * @author pcc
 * @version 1.0.0
 * @description SpringSecurity配置类
 */
@Configuration
public class SecurityConfig extends WebSecurityConfigurerAdapter {

    @Bean
    public BCryptPasswordEncoder getPasswordEncoder() {
        return new BCryptPasswordEncoder();
    }

    @Bean
    @Override
    protected AuthenticationManager authenticationManager() throws Exception {
        return super.authenticationManager();
    }

	// 注意重写该方法后,UsernamePasswordAuthenticationFilter将会被剔除
    @Override
    protected void configure(HttpSecurity http) throws Exception {
        // 这里配置SpringSecurity的信息
        http
                .authenticationEntryPoint(new AuthenticationExceptionEntryPoint()) // 自定义认证异常处理
                .and()
                .csrf().disable()// 禁用csrf
                .sessionManagement().sessionCreationPolicy(SessionCreationPolicy.STATELESS)//不使用session
                .and() // 重新返回一个HttpSecurityBuilder
                .authorizeRequests() // 配置接口的拦截
                .antMatchers("/auth/login").anonymous()// 放行接口
                .anyRequest().authenticated();// 拦截接口

        // 添加JWT过滤器-将其放在认证之前即可
        http.addFilterBefore(new JWTTokenAuthFilter(), UsernamePasswordAuthenticationFilter.class);

    }
}
如此我们便可以使用Token完成认证了,下面验证使用token进行访问系统:

只要我们正常把用户名密码的信息放到了SecurityContextHolder中就是可以实现得了,这里还需要注意的是SecurityContextHolder这里真正使用的是SecurityContextHolder.getContext使用的是一个策略模式,真正使用的策略这里是ThreadLocalSecurityContextHolderStrategy,这个策略的context使用的是ThreadLocal,所以可以实现每个线程的用户信息的隔离,而不会出现不同线程的用户信息的交叉。(简单说下ThreadLocal隔离原理,详细看java源码:使用的是Thread中的ThreadLocalMap进行存储,所以每个线程唯一,他的键是ThreadLocal,值就是我们设置的值,所以每个ThreadLocal只会有一个值)。
上面已经说了含Token的处理方式,不含Token的有两种处理策略,一种是直接放行,放行的话后面的过滤器同样会验证登录状态会正常提示,还有一种是验证是不是放行接口不是放行接口就直接返回异常,不过还是直接放行来的简单,这里就直接放行了,后面的过滤器也可以正常处理到这个逻辑。
7.登出接口与Token续签
上面已经实现了完整的认证,那么退出系统怎么实现呢?通常退出系统需要我们取消token的有效性,或者将token的过期时间直接到期,这里使用的是JWTToken,很明显JWT是无状态的,一旦签发Token就无法收回了,所以我们首先应该解决的是JWT的无状态。
通常有两种方式来解决Token的无状态
- 1.增加黑名单
登出接口的token增加黑名单,访问时就可以控制token失效了,但是黑名单不好做token的续签 - 2.增加白名单
白名单就是登录完成后将token对应的用户信息+token以用户为主键存入redis,这样JWT就会有了状态。当携带token请求时,先判断token是否有效,有效再判断对应的用户主键的key在redis是否存在,存在还应该判断对应的token是否一致(防止重复签发token),全部验
证通过才是正常的登录请求。
验证token有效:是基础的验证
验证是否存在redis:是给与token状态,说明token是通过登录接口生成的
验证redis中的token是否一致:防止重复签发,或者退出后使用原token登录
经过上面三步的验证是可以保证当前token是最近签发的一个token而且是有效的,不过这里肯定是破坏了JWT的无状态的,其实测试不使用JWT只是使用一个普通的字符换也是可以达到同样的效果的。
然后说下token的续签,token续签一般是在认证完成时同时颁发一个刷新用的token,前端需要刷新token时只需要将需要刷新的token和刷信用的token传过来,然后生成一个新的token返回即可。这里的token续签是需要更换token的,如果只是使用普通字符串然后进行签名作为token笔者感觉会更好,也不用使用刷新token也不用前端参与,可以完全由后端逻辑控制token的刷新,而且不需要更换token,这个对前端是很有好的。
这里就不写登出接口与Token续签的代码了,相对于之前的代码来说并没有新的api,之前的api已经可以实现。本位最后会给出一个认证服务的全部代码(包含所有场景可以直接应用于生产),可以直接下载使用的那种。
三、自定义授权
上面已经介绍完了认证的部分,在认证时我们自定义的接口是这样的处理逻辑(下图标红部分),由这个流程很清晰知道,授权信息是从UserDetails中的getAuthorities()方法获取的,返回是一个List<GrantedAuthority>即可,而UserDetails的对象正式我们自己定义的UserDetailItem(代码在认证部分),所以我们只需要将信息封装到UserDetailItem里面即可,然后使用getAuthorities()可以正常获取到这个歌信息组装返回就行。
那要怎么封装进去呢?UserDetails在哪里产生的自然就在哪里封装了,很明显他是在UserDetailsService的实现类中产生的,所以我们应该在自定义的UserDetailsServiceImpl(代码在认证部分)中将授权信息进行封装返回。所以很明显我们需要两步,其他就是自动的,就无需我们操作了。
- 1.UserDetailItem 新增存储权限和角色的集合,getAuthorities()方法返回封装的权限和集合信息
- 2.UserDetailsServiceImpl中将权限和集合信息放入到UserDetailItem
1.UserDetails增加存储权限信息并通过getAuthorities返回
代码如下,这里需要注意的是无论是菜单权限和角色都是作为一个字符串放到一个集合里的,之所以这么放,是因为SpringSecurity在验证权限时,无论验证菜单还是角色都是从SecurityContextHolder.getContext.getAuthentication的 Collection<GrantedAuthority> authorities 这个额属性里取得,并不会分开存储菜单权限和角色,所以我们存时也需要存到一起。
package com.cheng.ebbingauthservice.security.bean;

import com.cheng.ebbingauthservice.dto.UserDTO;
import lombok.Data;
import org.springframework.security.core.GrantedAuthority;
import org.springframework.security.core.authority.SimpleGrantedAuthority;
import org.springframework.security.core.userdetails.UserDetails;
import java.util.Collection;
import java.util.List;
import java.util.stream.Collectors;

/**
 * @author pcc
 * @version 1.0.0
 * @description SpringSecurity通过这个类获取到用户信息
 */
@Data
public class UserDetailItem implements UserDetails {

    private UserDTO userDTO;

    private List<String> permissions;
    private List<String> roles;

    @Override
    public Collection<? extends GrantedAuthority> getAuthorities() {
        // 初始化权限
        List<SimpleGrantedAuthority> collect = permissions.stream().map(SimpleGrantedAuthority::new).collect(Collectors.toList());
        // 初始化角色,这里加前缀是因为角色和菜单权限都是存储到一起的
        // 需要使用前缀区分,而且在使用hasRole验证角色时,默认比较就是加前缀的,所以这里增加前缀
        roles.stream().map(item -> new SimpleGrantedAuthority("ROLE_"+item)
        ).forEach(collect::add);
        return collect;
    }

	//。。。。。。
	// 省略无关代码,需要的话请根据认证部分补全
	//。。。。。。
}
2.UserDetailsService中封装权限和角色到UserDetails
上面已经实现了UserDetailsService的实现类了UserDetailsServiceImpl,这里进行变动,此外这里这是演示就直接写死了,方便测试,真实场景肯定是从数据库获取的权限和角色数据:
package com.cheng.ebbingauthservice.security.service.impl;

import com.cheng.ebbingauthservice.dto.UserDTO;
import com.cheng.ebbingauthservice.security.bean.UserDetailItem;
import org.springframework.security.core.userdetails.UserDetails;
import org.springframework.security.core.userdetails.UserDetailsService;
import org.springframework.security.core.userdetails.UsernameNotFoundException;
import org.springframework.stereotype.Component;
import java.util.Arrays;

/**
 * @author pcc
 * @version 1.0.0
 * @description 这个类的作用是通过用户名获取用户信息进行返回,
 *               Springsecurity借助返回的用户信息对用户进行认证和授权
 */
@Component
public class UserDetailsServiceImpl implements UserDetailsService {
    @Override
    public UserDetails loadUserByUsername(String username) throws UsernameNotFoundException {

        // 假如这里是通过数据库获取到的用户信息,为了方便直接写死了
        if(username.equals("admin")){
            UserDetailItem userDetailItem = new UserDetailItem();
            UserDTO userDTO = new UserDTO();
            // 这里直接写死用户名和密码,实际应该从数据库获取
            userDTO.setUsername("admin").setPassword("$2a$10$FWHmOGJVs/GNVqA.bPvnbu1au.oxKAJ7wK8bfbD6NpE5XbwdZtCpu");
            userDetailItem.setUserDTO(userDTO);

            // 这里写死权限,实际应该从数据库获取
            userDetailItem.setPermissions(Arrays.asList("menuOne", "menuTwo","menuThree"));
            // 这里写死角色,实际应该从数据库获取
            userDetailItem.setRoles(Arrays.asList("roleOne", "roleTwo"));
            return userDetailItem;
        }
        throw new UsernameNotFoundException("用户名或密码错误");
    }
}
3.使用PreAuthorize验证权限
代码已经修改完了,下面就是权限验证了,权限验证需要借助注解PreAuthorize,使用这个注解,需要我们开启对这个注解的支持,我们需要在启动类上增加这个注解:
@EnableGlobalMethodSecurity(prePostEnabled = true)
在PreAuthorize这个注解内部我们可以写表达式用于权限验证,SpringSecurity默认提供了以下几种验证方式
- @PreAuthorize(“hasAuthority(‘权限名1’)”):验证菜单或者功能权限,只要具有权限“权限名1”即可验证通过
- @PreAuthorize(“hasAnyAuthority(‘权限名1’,‘权限名2’)”):验证菜单或者功能权限,只要具有权限“权限名1”、“权限名2”其中一个即可验证通过
- @PreAuthorize(“hasRole(‘角色名1’)”):验证角色,只要具有“角色名1”即可通过
- @PreAuthorize(“hasAnyRole(‘角色名1’,‘角色名2’)”):验证角色,只要具有“角色名1”、“角色名2”其中一个即可通过
在上面的2中我们将权限信息已经放入了进去,SpringSecurity会拿信息与这个注解进行比对,上面我们放入了菜单权限:menuOne、menuTwo、menuThree,这里使用menuOne进行验证,接口代码如下:
    @PreAuthorize("hasAuthority('menuOne')")
    @PostMapping("/testAccess")
    public String testAccess(){
        return "success";
    }
访问结果如下:

也可以进行角色验证,都是ok的,这里不做一一展示了。
4.自定义授权异常响应
在认证部分我们自定义了认证的异常,授权也是类似的定义,都是需要借助WebSecurityConfigurerAdapter(绝大部分的扩展都是需要依赖他),可以找到配置认证异常的地方,可以很明显看到需要设置认证异常的地方,就是下面了accessDeniedHandler:
package com.cheng.ebbingauthservice.security.config;

import com.cheng.ebbingauthservice.security.exception.AccessDeniedExceptionHandler;
import com.cheng.ebbingauthservice.security.exception.AuthenticationExceptionEntryPoint;
import com.cheng.ebbingauthservice.security.filter.JWTTokenAuthFilter;
import org.springframework.context.annotation.Bean;
import org.springframework.context.annotation.Configuration;
import org.springframework.security.authentication.AuthenticationManager;
import org.springframework.security.config.annotation.web.builders.HttpSecurity;
import org.springframework.security.config.annotation.web.configuration.WebSecurityConfigurerAdapter;
import org.springframework.security.config.http.SessionCreationPolicy;
import org.springframework.security.crypto.bcrypt.BCryptPasswordEncoder;
import org.springframework.security.web.authentication.UsernamePasswordAuthenticationFilter;

/**
 * @author pcc
 * @version 1.0.0
 * @description SpringSecurity配置类
 */
@Configuration
public class SecurityConfig extends WebSecurityConfigurerAdapter {

    @Bean
    public BCryptPasswordEncoder getPasswordEncoder() {
        return new BCryptPasswordEncoder();
    }

    @Bean
    @Override
    protected AuthenticationManager authenticationManager() throws Exception {
        return super.authenticationManager();
    }

    @Override
    protected void configure(HttpSecurity http) throws Exception {
        // 这里配置SpringSecurity的信息
        http
                .csrf().disable()// 禁用csrf
                .sessionManagement().sessionCreationPolicy(SessionCreationPolicy.STATELESS);//不使用session

        // 配置认证相关处理
        http
                .authorizeRequests() // 配置接口的拦截
                .antMatchers("/auth/login").anonymous()// 配置放行接口
                .anyRequest().authenticated()//  其余接口都需要认证
                .and()
                .exceptionHandling()
                .authenticationEntryPoint(new AuthenticationExceptionEntryPoint()) // 自定义认证异常处理
                .accessDeniedHandler(new AccessDeniedExceptionHandler());// 自定义授权异常处理


        // 添加JWT过滤器-将其放在认证之前即可
        http
                .addFilterBefore(new JWTTokenAuthFilter(), UsernamePasswordAuthenticationFilter.class);


    }
}
AccessDeniedExceptionHandler这就是自定义的异常了,他是需要实现接口AccessDeniedHandler,这里只是做简单的提示前端用户,AccessDeniedExceptionHandler代码如下:
package com.cheng.ebbingauthservice.security.exception;

import lombok.extern.slf4j.Slf4j;
import org.springframework.security.access.AccessDeniedException;
import org.springframework.security.web.access.AccessDeniedHandler;
import javax.servlet.ServletException;
import javax.servlet.http.HttpServletRequest;
import javax.servlet.http.HttpServletResponse;
import java.io.IOException;
import java.io.PrintWriter;

/**
 * @author pcc
 * @version 1.0.0
 * @description 授权异常处理类
 */
@Slf4j
public class AccessDeniedExceptionHandler implements AccessDeniedHandler {
    @Override
    public void handle(HttpServletRequest request, HttpServletResponse response, AccessDeniedException accessDeniedException) throws IOException, ServletException {
        log.info("权限不足,拒绝访问!");
        response.setContentType("application/json;charset=utf-8");

        PrintWriter writer = response.getWriter();
        writer.write("{\"code\":403,\"msg\":\"拒绝访问\"}");
        writer.flush();
        writer.close();
    }
}
这样当使用注解PreAthorize进行权限校验时,如果不通过就会进入我们自定义的异常了。
四、其他关键信息
这里补充一些可能会碰到的问题
1.自定义权限认证方法
一般项目都会自己定义权限校验的方法,而不是使用默认的hasAthority,当然了使用默认的也基本是够用的,其实无需自己写的,不过若是有定制化的需求,是可以自己写的,SpringSecurity比Shiro强的地方就在于,大部分场景都是支持自己定义的,自己定义时需要关注以下问题:
- 1.自定义的类需要交给Spring管理
- 2.自定义的认证方法需要通过Spring-EL表示式放入到注解中
下面是PIG中自己定义的认证方法,和默认的没啥区别其实可以不重写,建议有需要再重写:
@Slf4j
@Component("pms")
public class PermissionService {

	/**
	 * 判断接口是否有xxx:xxx权限
	 * @param permission 权限
	 * @return {boolean}
	 */
	public boolean hasPermission(String permission) {
		if (StrUtil.isBlank(permission)) {
			return false;
		}
		Authentication authentication = SecurityContextHolder.getContext().getAuthentication();
		if (authentication == null) {
			return false;
		}
		Collection<? extends GrantedAuthority> authorities = authentication.getAuthorities();
		return authorities.stream().map(GrantedAuthority::getAuthority).filter(StringUtils::hasText)
				.anyMatch(x -> PatternMatchUtils.simpleMatch(permission, x));
	}

}
如果使用这个自定义的注解,应该这么写,这里@pms是指从Spring容器中获取bean。
@PreAuthorize("@pms.hasPermission('menuOne')")
2.一些钩子函数
大部分框架都会有一些流程的钩子函数,流程执行到了某些场景就会触发,SpringSecurity同样提供了登录成功、登录失败、登出成功等的钩子函数,我们也是需要通过WebSecurityConfigurerAdapter来进行配置,很简单这里就不展示写法了,只需要实现对应的函数式接口,然后把实现类传进去即可,这里列举下传入的位置(位置详见注释):
package com.cheng.ebbingauthservice.security.config;

import com.cheng.ebbingauthservice.security.exception.AccessDeniedExceptionHandler;
import com.cheng.ebbingauthservice.security.exception.AuthenticationExceptionEntryPoint;
import com.cheng.ebbingauthservice.security.filter.JWTTokenAuthFilter;
import org.springframework.context.annotation.Bean;
import org.springframework.context.annotation.Configuration;
import org.springframework.security.authentication.AuthenticationManager;
import org.springframework.security.config.annotation.web.builders.HttpSecurity;
import org.springframework.security.config.annotation.web.configuration.WebSecurityConfigurerAdapter;
import org.springframework.security.config.http.SessionCreationPolicy;
import org.springframework.security.crypto.bcrypt.BCryptPasswordEncoder;
import org.springframework.security.web.authentication.UsernamePasswordAuthenticationFilter;

/**
 * @author pcc
 * @version 1.0.0
 * @description SpringSecurity配置类
 */
@Configuration
public class SecurityConfig extends WebSecurityConfigurerAdapter {

    @Bean
    public BCryptPasswordEncoder getPasswordEncoder() {
        return new BCryptPasswordEncoder();
    }

    @Bean
    @Override
    protected AuthenticationManager authenticationManager() throws Exception {
        return super.authenticationManager();
    }

    @Override
    protected void configure(HttpSecurity http) throws Exception {
        // 这里配置SpringSecurity的信息
        http
                .csrf().disable()// 禁用csrf
                .sessionManagement().sessionCreationPolicy(SessionCreationPolicy.STATELESS);//不使用session

        // 配置认证相关处理
        http
                .authorizeRequests() // 配置接口的拦截
                .antMatchers("/auth/login").anonymous()// 配置放行接口
                .anyRequest().authenticated()//  其余接口都需要认证
                .and()
                .formLogin()// form表单登录,默认就是这种,写出来是为了设置成功失败处理器
//                .successHandler() // 登录成功处理器,函数式接口提供实现即可
//                .failureHandler() // 登录失败处理器,函数式接口提供实现即可
                .and()
                .logout()
//                .logoutSuccessHandler() // 登出成功处理器,函数式接口提供实现接口
                .and()
                .exceptionHandling()
                .authenticationEntryPoint(new AuthenticationExceptionEntryPoint()) // 自定义认证异常处理
                .accessDeniedHandler(new AccessDeniedExceptionHandler());// 自定义授权异常处理


        // 添加JWT过滤器-将其放在认证之前即可
        http
                .addFilterBefore(new JWTTokenAuthFilter(), UsernamePasswordAuthenticationFilter.class);


    }
}
**********************************************************
******************** OAuth2.0 介绍 *******************
**********************************************************
一、OAuth2.0 介绍
OAuth 2.0(Open Authorization 2.0)是一个开放标准,用于授权不同服务之间共享用户资源的安全协议。它允许用户提供在不透露他们的凭据的情况下授权第三方应用访问其受限资源。OAuth 2.0被广泛应用于互联网应用、移动应用和API的身份验证和授权。比如微信的电脑端登录、比如英雄联盟使用QQ、微信登录等都是使用了OAuth2的协议标准。在OAuth2中有以下角色需要认识,我们以使用微信登录英雄联盟为例来进行形象的说明。
-
资源所有者(Resource Owner):
资源所有者是拥有受保护资源的用户或系统的实体。在这个例子中就是想要登录英雄联盟的玩家。 -
客户端(Client):
客户端是请求访问受保护资源的应用程序。这里的客户端是指我们电脑或者手机上的影响联盟客户端。 -
授权服务器(Authorization Server):
授权服务器负责验证资源所有者并授权客户端的请求,颁发访问令牌(Access Token)给客户端。这个例子里的授权服务器是指微信服务。 -
资源服务器(Resource Server):
资源服务器存储和提供受保护资源,只有在收到有效的访问令牌时才会向客户端提供资源。这个例子里的资源服务器是指英雄联盟服务端,他是资源的拥有者,需要客户端持有访问令牌才可以访问。 -
授权码(Authorization Code):
授权码是用于交换访问令牌的中间凭据。客户端首先是携带认证信息到授权服务器获取授权码,然后才能拿授权码换取到访问令牌。 -
访问令牌(Access Token):
访问令牌是代表资源所有者允许客户端访问受保护资源的凭据。客户端在向资源服务器请求受保护资源时必须提供有效的访问令牌。访问令牌其实就是一串字符串。
上面这些角色只有在授权码模式(应用最广泛的模式)中全部都有,其他模式中并不是都有上面这些角色,OAuth2支持四种授权模式,可以根据使用场景不同选择不同的授权模式,其中应用最多的有两种:授权码模式和密码模式,授权码模式被广泛应用于三方登录就比如上面说的使用微信登录英雄联盟,密码模式被广泛应用于普通的系统登录功能。
下面介绍各个授权模式
1.授权码模式
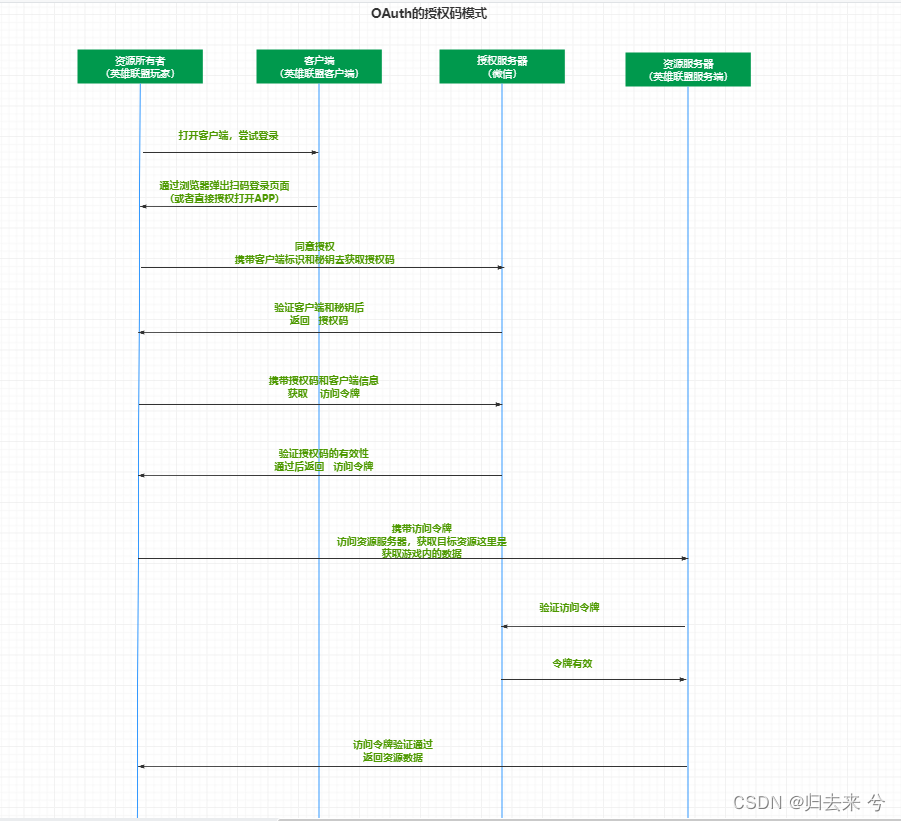
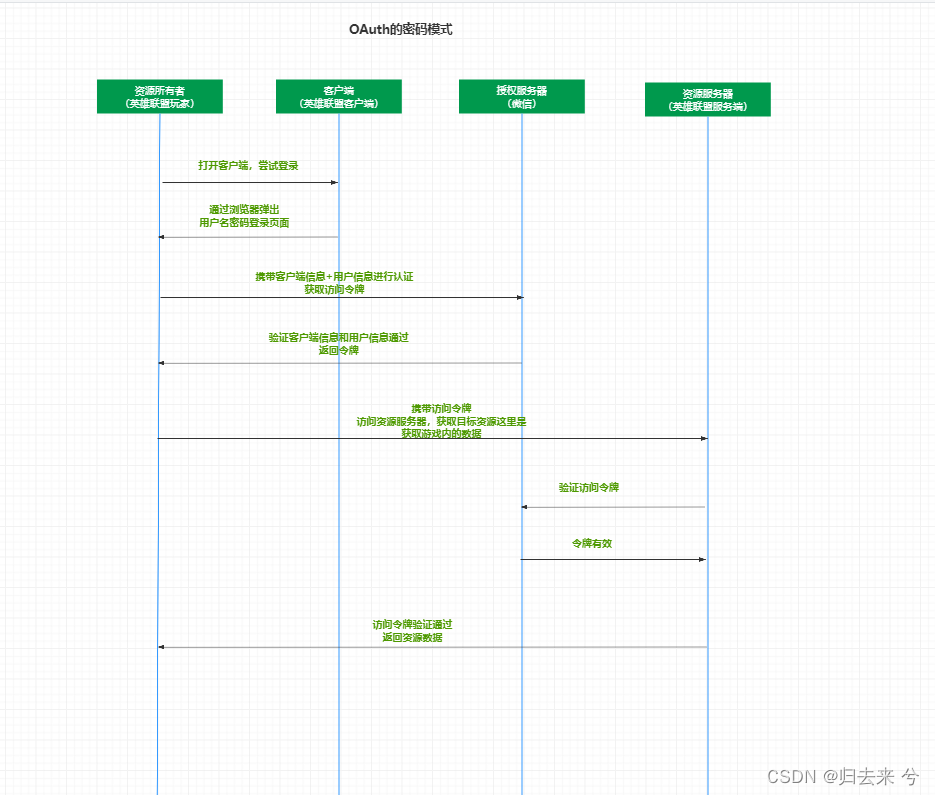
授权码模式应用十分广泛,现在基本主流常用的app都是支持三方系统登录的,三方系统登录过程其实就是使用的OAuth2的授权码模式,他可以完美的帮我们解决多系统间的互信问题,而且使用OAuth2的授权码模式对于各方都是有好处的,比如使用微信登录英雄联盟来说。对于用户来说减少了注册登录等繁琐过程,方便与微信好友互动。对于微信来说用户的依赖程度提升,用户人群使用率提高产品进一步扩大影响,对于英雄联盟来说,用户体验提升无需繁琐的注册用户更容易接受产品有利于英雄联盟的推广等。那微信登录影响联盟到底是个什么过程呢,我们用一个UML图来进行说明。
2.简化模式
简化模式是相对于授权码模式来说的,简化模式简化了获取授权码的过程,原获取授权码的过程获取到的是访问令牌,这种方式基本不会使用,存在安全隐患,可能会把访问令牌直接暴露出来,因此基本不会使用,可以只做了解即可。
3.密码模式
密码模式就是直接传输用户和密码进行获取访问令牌的一种模式,这种模式使用的也挺多,被广泛应用于系统登录的功能。比如后端框架pigx、ruoyi等都有使用这种方式进行系统登录。
4.客户端模式
客户端模式则更简单了,只需要提供客户端的id和秘钥即可换取到访问令牌,不需要用户信息即可实现令牌的获取,这种方式一般也不会用,了解即可。
5.自带接口介绍
Oauth默认提供了一些接口,这些接口是直接可以使用的,而不需要我们自己定义,有如下接口:
-
授权码接口(Authorization Code Interface):
路径:/oauth/authorize, /oauth/confirm_access, /oauth/error
作用:/oauth/authorize 用户授权页展示可在浏览器打开,/oauth/confirm_access 在页面点击同意后调用该接口,后端会将授权码通过传入的url传递给客户端。/oauth/error 授权过程中的错误信息会重定向到这里展示 -
令牌端点(Token Endpoint):
路径:/oauth/token
作用:用于颁发访问令牌和刷新令牌,客户端可以通过发送请求到此端点来获取访问令牌和刷新令牌。 -
端点暴露(Endpoint Exposure):
路径:/oauth/check_token, /oauth/token_key
作用:这些端点用于向外部暴露OAuth 2.0相关的信息,如令牌的验证、密钥的获取等。 /oauth/token_key 主要应用在JWT中。 -
用户信息端点(User Info Endpoint):
路径:/oauth/userinfo
作用:用于获取经过认证用户的信息,客户端可以通过发送请求到此端点来获取用户的个人信息,如用户名、电子邮件等。 -
令牌撤销端点(Token Revocation Endpoint):
路径:/oauth/revoke
作用:用于撤销访问令牌和刷新令牌,客户端可以通过发送请求到此端点来主动撤销令牌。
二、Springcloud集成OAuth2:授权
OAuth的集成一般分为授权和资源服务两部分,授权则是客户端获取访问令牌的过程,资源服务器则是用户需要携带访问令牌才可以访问的服务
1.引入依赖
集成SpringCloud和Oauth最好的依赖是下面这个,而不是其他的spring-cloud-oauth等的依赖,不过Spring官方已经提供了一个更好地授权框架当然也是基于Security和Oauth的不过,需要最低JDK17才可以用,所以目前还不会广泛被使用,目前就使用下面的依赖即可。
SpringBoot版本是2.6.11
SpringCloud版本是2021.0.4
SpringCloud- Alibaba 版本是2021.0.4.0
<!-- 这是一个springsecurity 和 oauth2 均包含的包 -->
 <dependency>
     <groupId>org.springframework.security.oauth.boot</groupId>
     <artifactId>spring-security-oauth2-autoconfigure</artifactId>
 </dependency>
其他依赖都是些和认证授权关系不大的依赖,这里展示下:
<!-- 引入bootstrap依赖,不引入这个依赖是无法使用bootstrap配置文件的 -->
<dependency>
    <groupId>org.springframework.cloud</groupId>
    <artifactId>spring-cloud-starter-bootstrap</artifactId>
</dependency>

<dependency>
    <groupId>org.springframework.boot</groupId>
    <artifactId>spring-boot-starter-web</artifactId>
</dependency>
<dependency>
    <groupId>org.springframework.cloud</groupId>
    <artifactId>spring-cloud-starter-loadbalancer</artifactId>
</dependency>
<dependency>
    <groupId>org.springframework.cloud</groupId>
    <artifactId>spring-cloud-starter-openfeign</artifactId>
</dependency>

<dependency>
    <groupId>org.springframework.boot</groupId>
    <artifactId>spring-boot-starter-test</artifactId>
    <scope>test</scope>
</dependency>
<dependency>
    <groupId>org.projectlombok</groupId>
    <artifactId>lombok</artifactId>
</dependency>
2.提供Springsecurity配置
上面已经介绍了SpringSecurity,他的配置这里基本都是需要的。配置的作用就不介绍了,第一部分的Security已经介绍过了。这里就直接写配置内容,不做详细介绍了
2.1 自定义UserDetailsService的实现类,获取用户信息和权限信息
这里密码是使用的是BCryptPasswordEncoder,后面会提供这块配置
package com.cheng.ebbingauthservice.security.service;

import com.cheng.ebbingauthservice.dto.UserDTO;
import com.cheng.ebbingauthservice.security.UserDetails.UserDetailsItem;
import org.springframework.context.annotation.Primary;
import org.springframework.security.core.userdetails.UserDetails;
import org.springframework.security.core.userdetails.UserDetailsService;
import org.springframework.security.core.userdetails.UsernameNotFoundException;
import org.springframework.security.crypto.bcrypt.BCryptPasswordEncoder;
import org.springframework.stereotype.Component;
import org.springframework.util.Assert;

import java.util.Arrays;

/**
 * @author pcc
 * @version 1.0.0
 * @description 加载用户信息
 */
@Primary
@Component
public class UserDetailsServiceImpl implements UserDetailsService {
    @Override
    public UserDetails loadUserByUsername(String username) throws UsernameNotFoundException {
        Assert.notNull(username,"用户名不能为空");
        // 这里假设是根据传进来的用户名去数据库查询的信息
        if(username.equals("admin")){

            UserDTO userDTO = new UserDTO()
                    .setUsername("adimin")
                    // BCryptPasswordEncoder 加密后的密码
                    .setPassword("$2a$10$tIKF1HNodKoKIUVdOUTEMuGYmPYD.ii4POVlMoGQwWr6iQKZKULEO")
                    .setPermissions(Arrays.asList("menuOne", "menuTwo", "menuThree"))
                    .setRoles(Arrays.asList("roleOne", "roleTwo"));

            UserDetailsItem userDetailsItem = new UserDetailsItem();
            userDetailsItem.setUserDTO(userDTO);
            return userDetailsItem;
        }
        throw new UsernameNotFoundException("用户名未找到");
    }

    public static void main(String[] args) {
        BCryptPasswordEncoder bCryptPasswordEncoder = new BCryptPasswordEncoder();
        String encode = bCryptPasswordEncoder.encode("112233");
        System.out.println(encode);
    }
}
2.2 自定义UserDetails实现类,用以封装UserDetailsService的信息返回
package com.cheng.ebbingauthservice.security.UserDetails;

import com.cheng.ebbingauthservice.dto.UserDTO;
import lombok.Data;
import org.springframework.security.core.GrantedAuthority;
import org.springframework.security.core.authority.SimpleGrantedAuthority;
import org.springframework.security.core.userdetails.UserDetails;
import java.util.Collection;
import java.util.List;
import java.util.stream.Collectors;

/**
 * @author pcc
 * @version 1.0.0
 * @description 描述下这个类吧
 */
@Data
public class UserDetailsItem implements UserDetails {

    private UserDTO userDTO;


    @Override
    public Collection<? extends GrantedAuthority> getAuthorities() {
        // 权限信息
        List<SimpleGrantedAuthority> collect = userDTO.getPermissions().stream().map(SimpleGrantedAuthority::new).collect(Collectors.toList());
        // 添加角色信息
        userDTO.getRoles().stream().forEach(item->collect.add(new SimpleGrantedAuthority("ROLE_"+item)));
        return collect;
    }

    @Override
    public String getPassword() {

        return userDTO.getPassword();
    }

    @Override
    public String getUsername() {
        return userDTO.getUsername();
    }

    @Override
    public boolean isAccountNonExpired() {
        return true;
    }

    @Override
    public boolean isAccountNonLocked() {
        return true;
    }

    @Override
    public boolean isCredentialsNonExpired() {
        return true;
    }

    @Override
    public boolean isEnabled() {
        return true;
    }
}
下面是封装了用户信息和权限信息的实体,在上面代码有使用
package com.cheng.ebbingauthservice.dto;

import lombok.Data;
import lombok.experimental.Accessors;
import java.util.List;

/**
 * @author pcc
 * @version 1.0.0
 * @description 描述下这个类吧
 */
@Data
@Accessors(chain = true)
public class UserDTO {
    private String username;
    private String password;
    private List<String> permissions;
    private List<String> roles;
}
2.3 配置SpringSecurity的配置类WebSecurityConfigurerAdapter
都是熟悉常用的配置,这里不做解释了,上面说的密码编码器也在这里
package com.cheng.ebbingauthservice.security.config;

import com.cheng.ebbingauthservice.security.handler.FailureHandler;
import com.cheng.ebbingauthservice.security.handler.LogoutHandler;
import com.cheng.ebbingauthservice.security.handler.SuccessHandler;
import com.cheng.ebbingauthservice.security.service.UserDetailsServiceImpl;
import org.springframework.context.annotation.Bean;
import org.springframework.context.annotation.Configuration;
import org.springframework.security.authentication.AuthenticationManager;
import org.springframework.security.config.annotation.authentication.builders.AuthenticationManagerBuilder;
import org.springframework.security.config.annotation.web.builders.HttpSecurity;
import org.springframework.security.config.annotation.web.configuration.EnableWebSecurity;
import org.springframework.security.config.annotation.web.configuration.WebSecurityConfigurerAdapter;
import org.springframework.security.core.userdetails.UserDetailsService;
import org.springframework.security.crypto.bcrypt.BCryptPasswordEncoder;

/**
 * @author pcc
 * @version 1.0.0
 * @description srpingsecurity 配置类
 */
@Configuration
@EnableWebSecurity
public class WebSecurityConfigurer extends WebSecurityConfigurerAdapter {


    /**
     *
     * @return
     * 注:自定义密码编码器,适用于springsecurity和oauth2
     */
    @Bean
    public BCryptPasswordEncoder getPasswordEncoder() {
        return new BCryptPasswordEncoder();
    }

    /**
     *
     * @return
     * @throws Exception
     * 注 : 配置认证管理器,springsecurity通过认证管理器来实现认证
     */
    @Bean
    @Override
    public AuthenticationManager authenticationManagerBean() throws Exception {
        return super.authenticationManager();
    }

    /**
     * @return
     * @throws Exception
     * 注: 配置加载用户信息(用户名、密码、权限、角色等信息)
     */
    @Bean
    @Override
    public UserDetailsService userDetailsServiceBean() throws Exception {
        return new UserDetailsServiceImpl();
    }

    /**
     *  配置认证信息
     * @param auth the {@link AuthenticationManagerBuilder} to use
     * @throws Exception
     * 注: 这个配置一定不可以省略,如果省略会造成栈溢出,导致了springsecurity和oauth2之间的循环调用
     *      自定义用户认证的用户信息加载服务
     */
    @Override
    protected void configure(AuthenticationManagerBuilder auth) throws Exception {
        auth.userDetailsService(new UserDetailsServiceImpl());
    }

    @Override
    protected void configure(HttpSecurity http) throws Exception {

        // 这里配置SpringSecurity的信息
        http
                .csrf().disable()// 禁用csrf
                .authorizeRequests() // 配置接口的拦截
                .antMatchers("/customer/**").anonymous()// 配置放行接口
                .anyRequest().authenticated()//  其余接口都需要认证
                .and()
                .formLogin()// form表单登录,默认就是这种,写出来是为了设置成功失败处理器
        ;
    }
}
3.配置OAuth:AuthorizationServerConfigAdapter
上面已经配置完了SpringSecurity的配置项,这里需要真正开始配置OAuth2的内容了,最为核心的就是他的配置类AuthorizationServerConfigAdapter,其实也就只有这一个配置类需要配置。这个配置类的核心是配置三块内容:客户端信息配置,端点配置(配置如何认证),安全配置(放行和拦截相关的配置)。下面是具体的配置信息:
package com.cheng.ebbingauthservice.security.config;

import com.cheng.ebbingauthservice.security.service.UserDetailsServiceImpl;
import org.springframework.beans.factory.annotation.Autowired;
import org.springframework.context.annotation.Configuration;
import org.springframework.http.HttpMethod;
import org.springframework.security.authentication.AuthenticationManager;
import org.springframework.security.oauth2.config.annotation.configurers.ClientDetailsServiceConfigurer;
import org.springframework.security.oauth2.config.annotation.web.configuration.AuthorizationServerConfigurerAdapter;
import org.springframework.security.oauth2.config.annotation.web.configuration.EnableAuthorizationServer;
import org.springframework.security.oauth2.config.annotation.web.configurers.AuthorizationServerEndpointsConfigurer;
import org.springframework.security.oauth2.config.annotation.web.configurers.AuthorizationServerSecurityConfigurer;

/**
 * @author pcc
 * @version 1.0.0
 * @description oauth2的配置类
 */
@Configuration
@EnableAuthorizationServer
public class AuthorizationServerConfigurer extends AuthorizationServerConfigurerAdapter {

    /**
     * 用户认证 Manager
     */
    @Autowired
    private AuthenticationManager authenticationManager;

    /**
     *
     * @param endpoints
     * @throws Exception
     * 注: 认证端点的配置,注入springsecurity的认证管理器,
     *      并指定自定义的用户信息服务接口
     */
    @Override
    public void configure(AuthorizationServerEndpointsConfigurer endpoints) throws Exception {
        // 自定义 加载用户信息的接口
        endpoints
                .allowedTokenEndpointRequestMethods(HttpMethod.GET, HttpMethod.POST)
                .authenticationManager(authenticationManager)
                .userDetailsService(new UserDetailsServiceImpl());
    }

    /**
     *
     * @param oauthServer
     * @throws Exception
     * 注: 安全相关的配置
     */
    @Override
    public void configure(AuthorizationServerSecurityConfigurer oauthServer) throws Exception {
        oauthServer
                // 允许表单认证,无论客户端是否登录,都允许访问令牌验证端点 /oauth/check_token
                .allowFormAuthenticationForClients().checkTokenAccess("permitAll()");
                // 只有已经认证通过的用户才能访问 令牌验证端点:/oauth/check_token
//                .checkTokenAccess("isAuthenticated()");
    }

    /**
     *
     * @param clients
     * @throws Exception
     * 注: 客户端相关的配置,这里使用的是内存客户端配置,正常应该从数据库读取
     */
    @Override
    public void configure(ClientDetailsServiceConfigurer clients) throws Exception {
        clients
                // 使用内存中的客户端信息
                .inMemory()
                //  客户端账号、密码。
                .withClient("ebbing-web").secret("$2a$10$JlsT1rU3UC8U/nPU4ZEiTev7sLs9Awu3S0b3TBDFghHtsJxUd6quG")
                // 授权模式,refresh_token 唯一的作用是启用刷新token
                .authorizedGrantTypes("refresh_token","authorization_code","implicit","password","","client_credentials")
                // 授权范围-不同的服务
                .scopes("customer", "space")
                // 访问令牌的有效期,单位秒
                .accessTokenValiditySeconds(3600)
                // 刷新令牌的有效期,单位秒
                .refreshTokenValiditySeconds(3600*24*7)
                // 这个地址,获取授权码后会使用这个地址进行传送授权码,获取令牌(授权码模式)也需要传递这个地址
                .redirectUris("https://www.baidu.com")
                // 这个配置和授权码模式相关:false会跳转授权页面
                .autoApprove(false);

    }

}
4.验证授权码模式
申请授权码需要调用下面的接口,这是SpringcloudOauth提供的默认接口,这里解释下下面的参数的具体意思:
- client_id:客户端id,必须是存在的客户端id
- response_type :授权码模式必须传code,表示获取到的是授权码
- scope:授权范围,必须是后端后者数据库中存在的授权范围
- redirect_uri:回调地址,验证通过后授权服务器会向这个地址发送授权码
http://localhost:8090/oauth/authorize?client_id=ebbing-web&response_type=code&scope=space&redirect_uri=https://www.baidu.com

可以看到上面已经正常获取到了授权码,下面就是通过授权码获取token的过程了,这个接口也是默认提供的,这里解释下参数:
- client_id:客户端id,必须匹配
- client_secret:客户端秘钥,必须匹配
- grant_type:授权类型,授权码模式必须传authorization_code
- code:授权码,上面接口获取到的,且只能用一次
- redirect_uri:重定向uri与上面获取授权码一致
http://localhost:8090/oauth/token?client_id=ebbing-web&client_secret=1234&grant_type=authorization_code&code=wYAiJK&redirect_uri=https://www.baidu.com

可以看到这里就顺利获取到了访问令牌了。
5.验证简化模式
简化模式和授权码模式有些相似,区别是在授权码模式获取授权码的阶段,简化模式获取的是token,所以简化模式获取token不需要使用/oauth/token这个接口,只需要使用/oauth/authorize 这个接口就可以直接获取到token了,操作接口如下:
http://localhost:8090/oauth/authorize?client_id=ebbing-web&response_type=token&scope=space&redirect_uri=https://www.baidu.com
注意上面地址和授权码模式中唯一的区别是参数response_type=token,这里响应的是token,而不是授权码中的token了

可以看到这里回调地址直接传递的是token而不是code了。
6.验证密码模式
密码模式常用与单系统登录,比如常见的pigx框架,也是采用这种方式进行认证登录的,还有若依等。密码模式只需要使用/oauth/token接口接口,不需要使用/oauth/authorize接口,密码模式我们需要传递客户端的id和秘钥同时还需要传递用户的认证信息(用户名+密码)这样才可以获取到我们需要的访问令牌,下面是请求示例:
localhost:8090/oauth/token?client_id=ebbing-web&client_secret=1234&grant_type=password&username=admin&password=1234
参数没有特别特殊的,就不重复介绍了

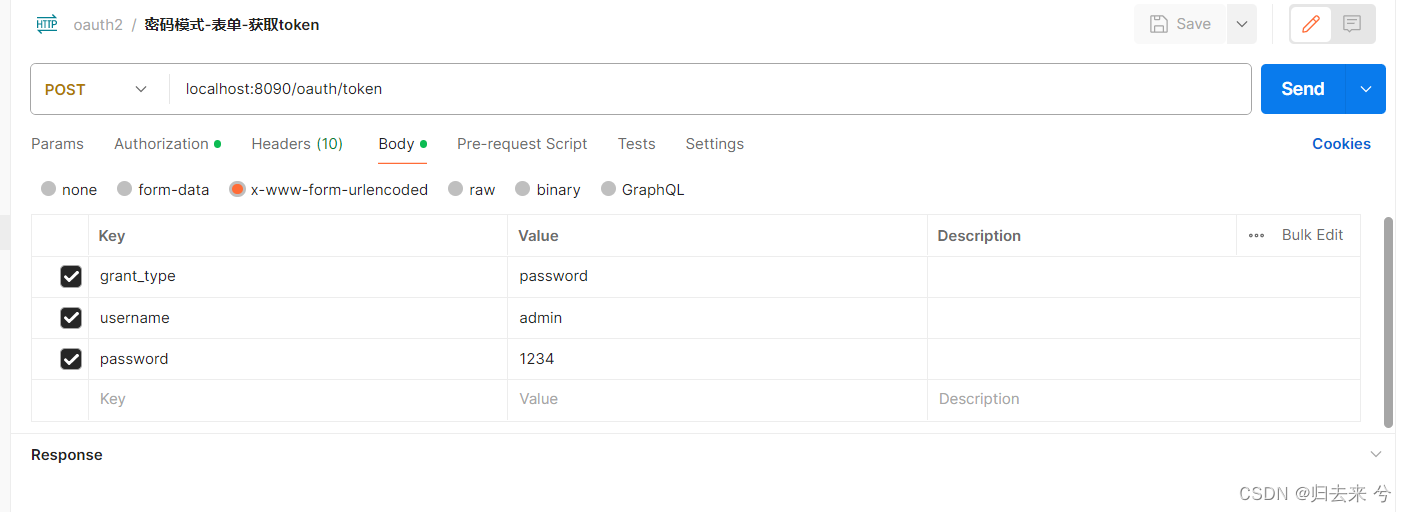
可以看到这里正常获取到了token了,上面是使用的是非表单的方式进行认证的,我们上面在配置时配置了支持表单认证,我们再验证下表单认证,表单认真时请求头添加信息:
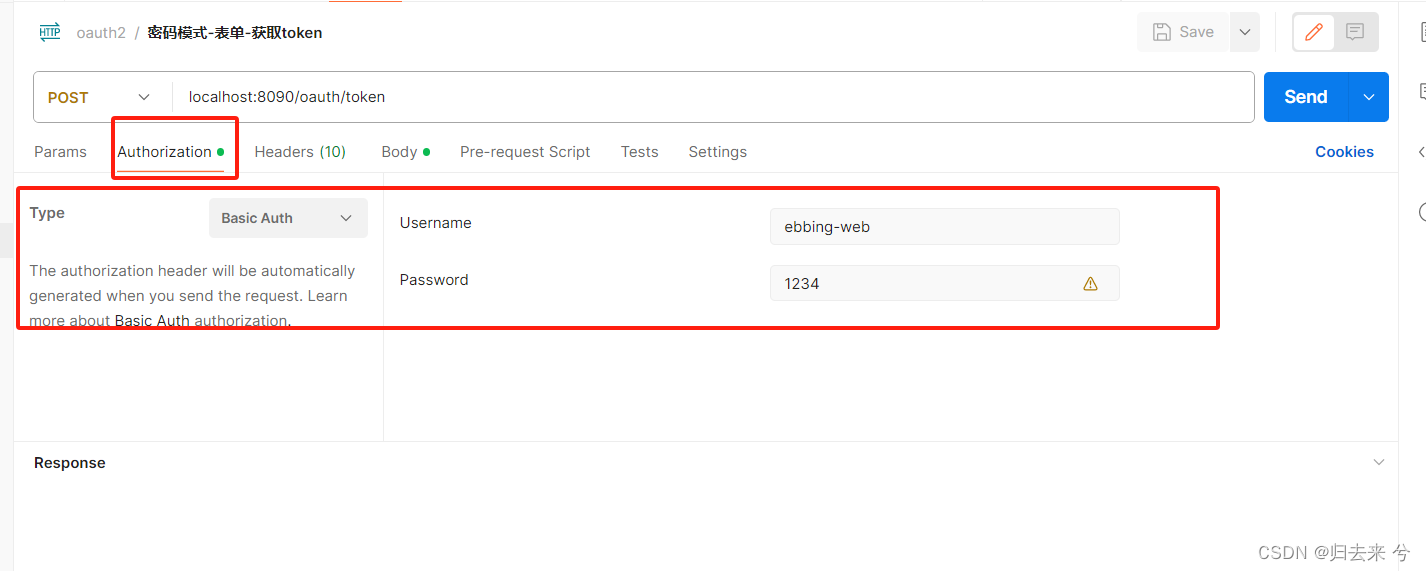
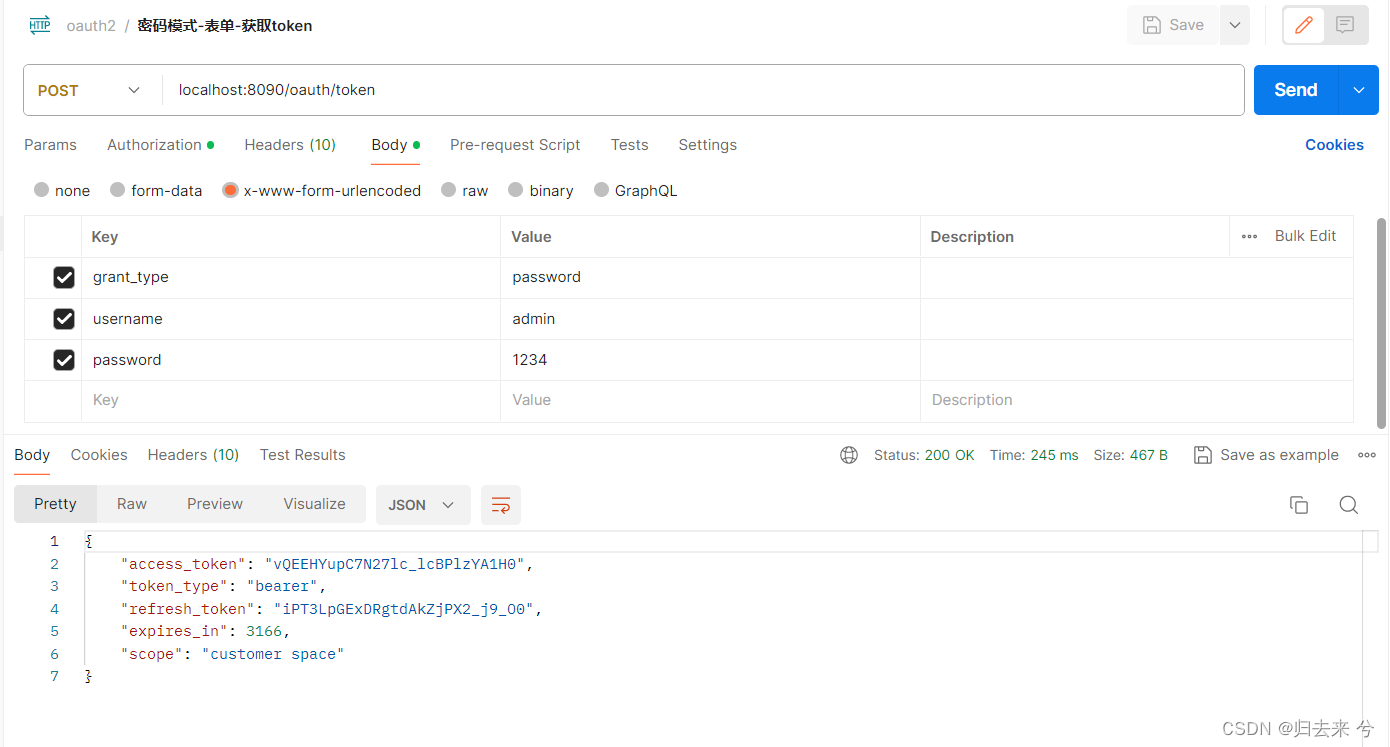
这是表单携带信息:
这是请求结果展示:
7.验证客户端模式
客户端模式也是比较简单的一种,只需要提供客户端信息就可以获取到token了,基本不会使用,下面做下获取展示:
localhost:8090/oauth/token?client_id=ebbing-web&client_secret=1234&grant_type=client_credentials
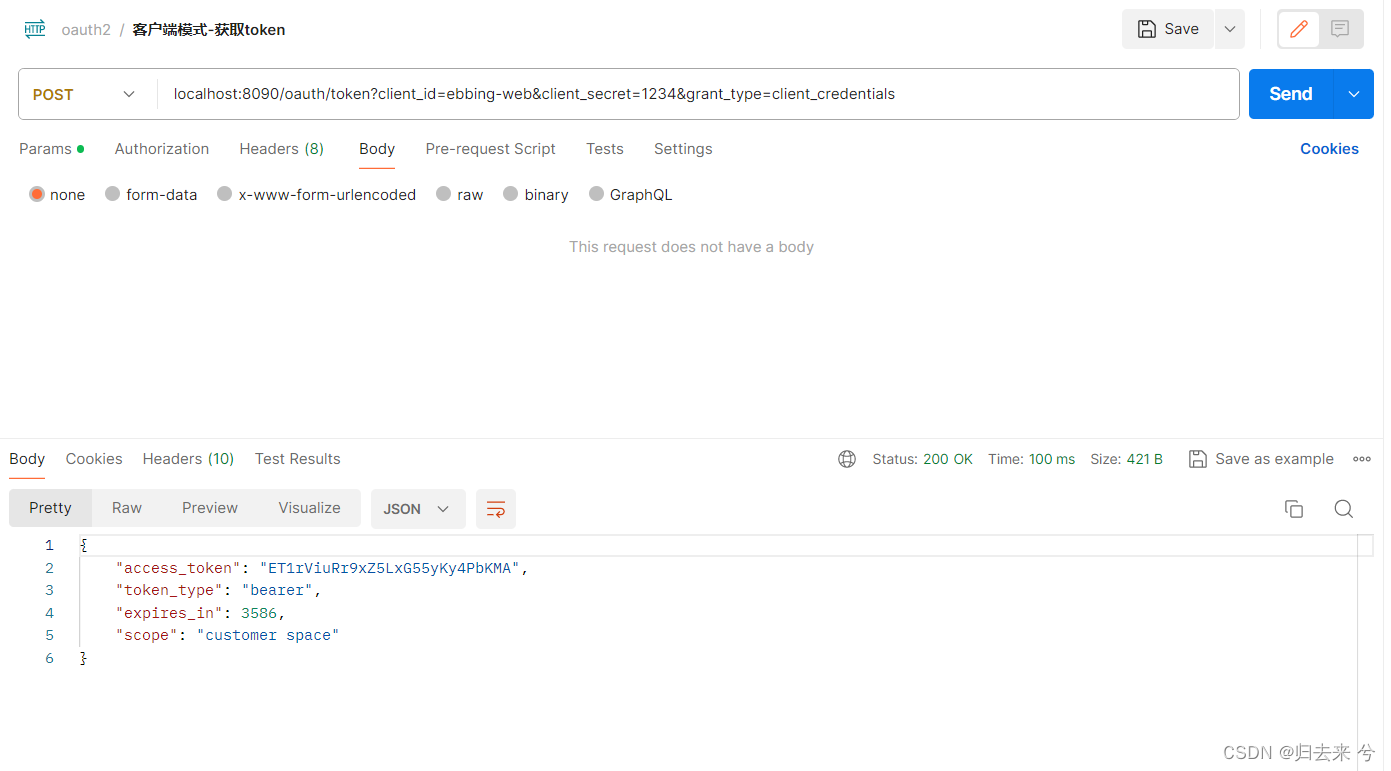
到这里四种模式就验证完了,四种模式中真正被广泛使用的是授权码模式(最安全的、广泛应用于三方登录),密码模式(使用广泛,常应用原生登录),其他的简化模式常用与单页面应用(无后端的服务)不过使用频率较少,客户端模式基本不会使用(有较大的安全隐患)。
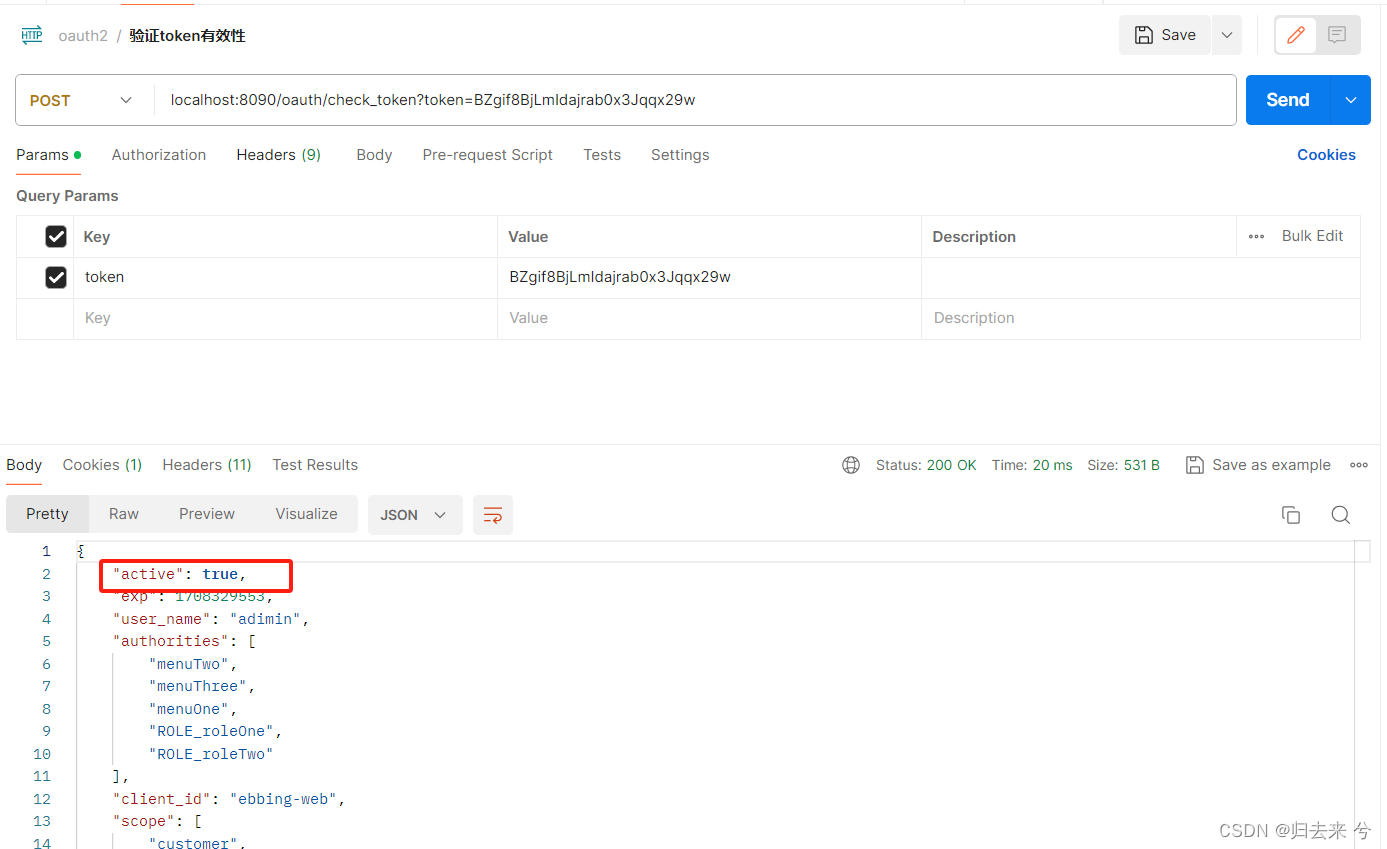
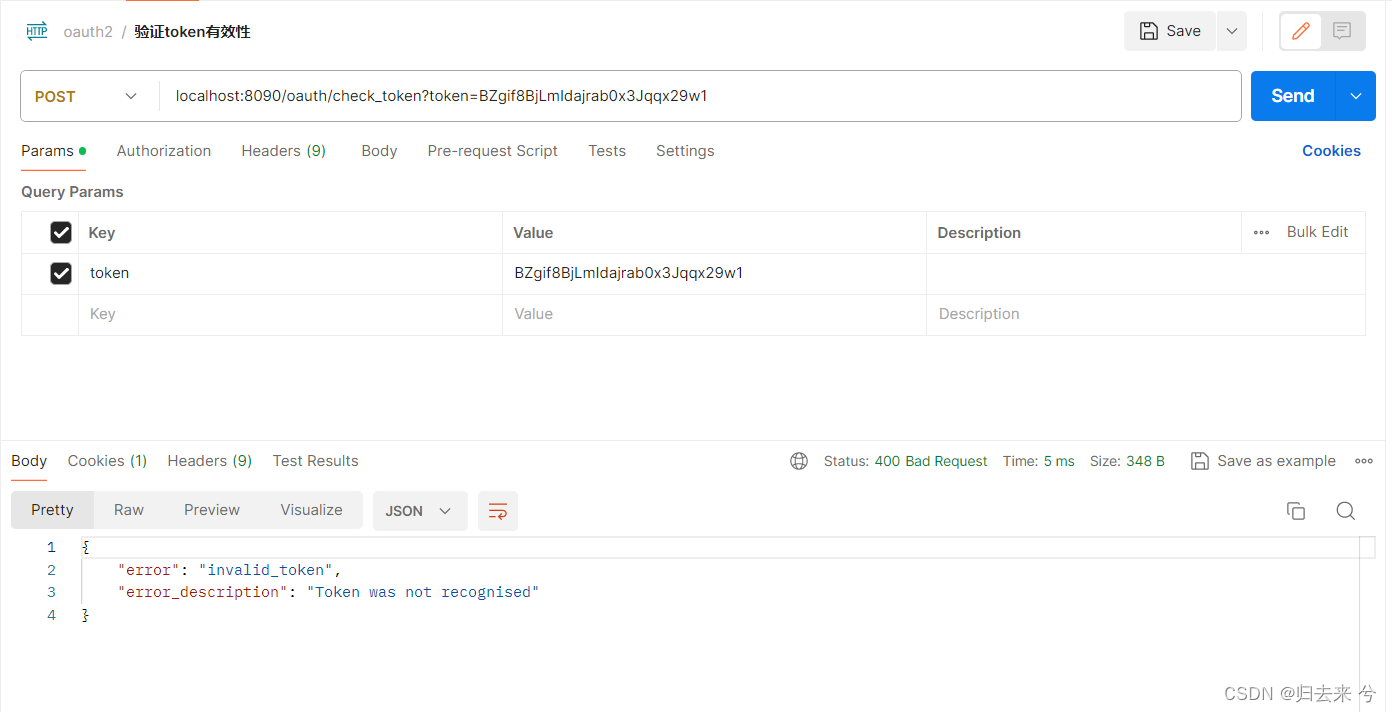
8.验证原生接口-令牌有效性:/oauth/check_token
上面已经可以正常获取到访问令牌token了,集成环境默认提供token的验证接口/oauth/check_token,这里展示使用。
localhost:8090/oauth/check_token?token=BZgif8BjLmIdajrab0x3Jqqx29w
token无效时返回,如下
9.验证原生接口-客户信息获取:/oauth/userinfo
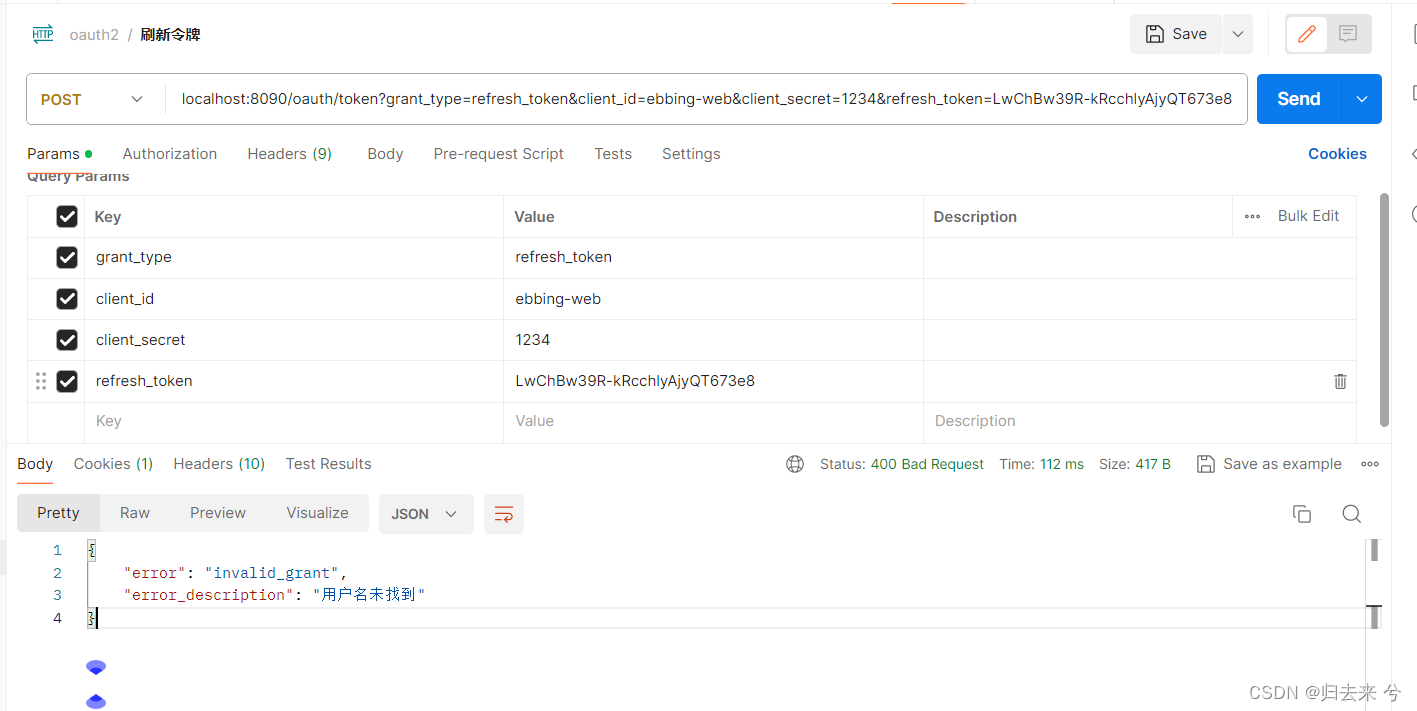
10.验证原生接口-刷新token:/oauth/token
localhost:8090/oauth/token?grant_type=refresh_token&client_id=ebbing-web&client_secret=1234&refresh_token=LwChBw39R-kRcchlyAjyQT673e8
这里未刷新成功,暂不清楚原因,先做记录:
11.验证原生接口-撤销令牌:/oauth/revoke
三、Springcloud集成OAuth2:资源
资源服务一般和授权服务不是一个服务器,所以这里使用一个新的服务 测试资源服务。
1.导入依赖
这里使用的依赖,和上面认证授权使用的依赖相同,多余的需要使用web的依赖
<!-- 这是一个springsecurity 和 oauth2 均包含的包 -->
<dependency>
    <groupId>org.springframework.security.oauth.boot</groupId>
    <artifactId>spring-security-oauth2-autoconfigure</artifactId>
</dependency>
<dependency>
    <groupId>org.springframework.boot</groupId>
    <artifactId>spring-boot-starter-web</artifactId>
</dependency>

<dependency>
    <groupId>org.springframework.boot</groupId>
    <artifactId>spring-boot-starter-test</artifactId>
    <scope>test</scope>
</dependency>
<dependency>
    <groupId>org.projectlombok</groupId>
    <artifactId>lombok</artifactId>
    <version>1.18.22</version>
    <scope>compile</scope>
</dependency>
2.编写配置类
配置类信息如下,配置项并不复杂,详细释义见注释。
package com.cheng.ebbing.message.CheckOAuth2;

import org.springframework.context.annotation.Configuration;
import org.springframework.security.config.annotation.method.configuration.EnableGlobalMethodSecurity;
import org.springframework.security.config.annotation.web.builders.HttpSecurity;
import org.springframework.security.config.http.SessionCreationPolicy;
import org.springframework.security.oauth2.config.annotation.web.configuration.EnableResourceServer;
import org.springframework.security.oauth2.config.annotation.web.configuration.ResourceServerConfigurerAdapter;
import org.springframework.security.oauth2.config.annotation.web.configurers.ResourceServerSecurityConfigurer;
import org.springframework.security.oauth2.provider.token.RemoteTokenServices;
import org.springframework.security.oauth2.provider.token.ResourceServerTokenServices;

/**
 * @author pcc
 * @version 1.0.0
 * @description 资源服务配置类
 */
@Configuration
@EnableResourceServer // 资源服务注解
@EnableGlobalMethodSecurity(prePostEnabled = true) // 启用方法安全设置
public class ResourceServerConfigurer extends ResourceServerConfigurerAdapter {

    @Override
    public void configure(ResourceServerSecurityConfigurer resources) throws Exception {
        resources
                .resourceId("space") // 设置当前服务的资源id,与授权过程的scope对应
                .tokenServices(tokenServices())
                .stateless(true);// 无状态配置,服务端不保存会话数据,即无session概念,每次请求均进行验证
    }

    private ResourceServerTokenServices tokenServices() {
        RemoteTokenServices remoteTokenServices = new RemoteTokenServices();
        remoteTokenServices.setCheckTokenEndpointUrl("http://localhost:8090/oauth/check_token");
        remoteTokenServices.setClientId("ebbing-web");
        remoteTokenServices.setClientSecret("1234");
        return remoteTokenServices;

    }

    @Override
    public void configure(HttpSecurity http) throws Exception {
        http.authorizeRequests()
                // 所有请求都必须拥有space的访问范围权限,或者拥有ROLE_ADMIN的角色权限,这里的space与授权时保持一致
                .antMatchers("/**").access("#oauth2.hasScope('space')or hasRole('ROLE_ADMIN')")
                .and().csrf().disable()
                // 不使用session,请求无状态即每次必须使用token进行访问
                .sessionManagement().sessionCreationPolicy(SessionCreationPolicy.STATELESS);
    }
}
3.添加一个测试接口
代码比较简单,如下:
package com.cheng.ebbing.message.CheckOAuth2;

import lombok.extern.slf4j.Slf4j;
import org.springframework.security.access.prepost.PreAuthorize;
import org.springframework.web.bind.annotation.RequestMapping;
import org.springframework.web.bind.annotation.RestController;

/**
 * @author pcc
 * @version 1.0.0
 * @description 描述下这个类吧
 */
@Slf4j
@RestController
public class TestController {

	// 这个权限需要登录的用户具有才可以
    @PreAuthorize("hasAuthority('menuOne')")
    @RequestMapping(value ="/testOauth")
    public String test(){
       log.info("访问成功");
       return "Success !";
    }
}
下面就可以进行验证了,只需要我们再头部信息中放入token即可,如下:

可以发现使用token是可以正常访问的,如果使用错误的token则会有如下提示:
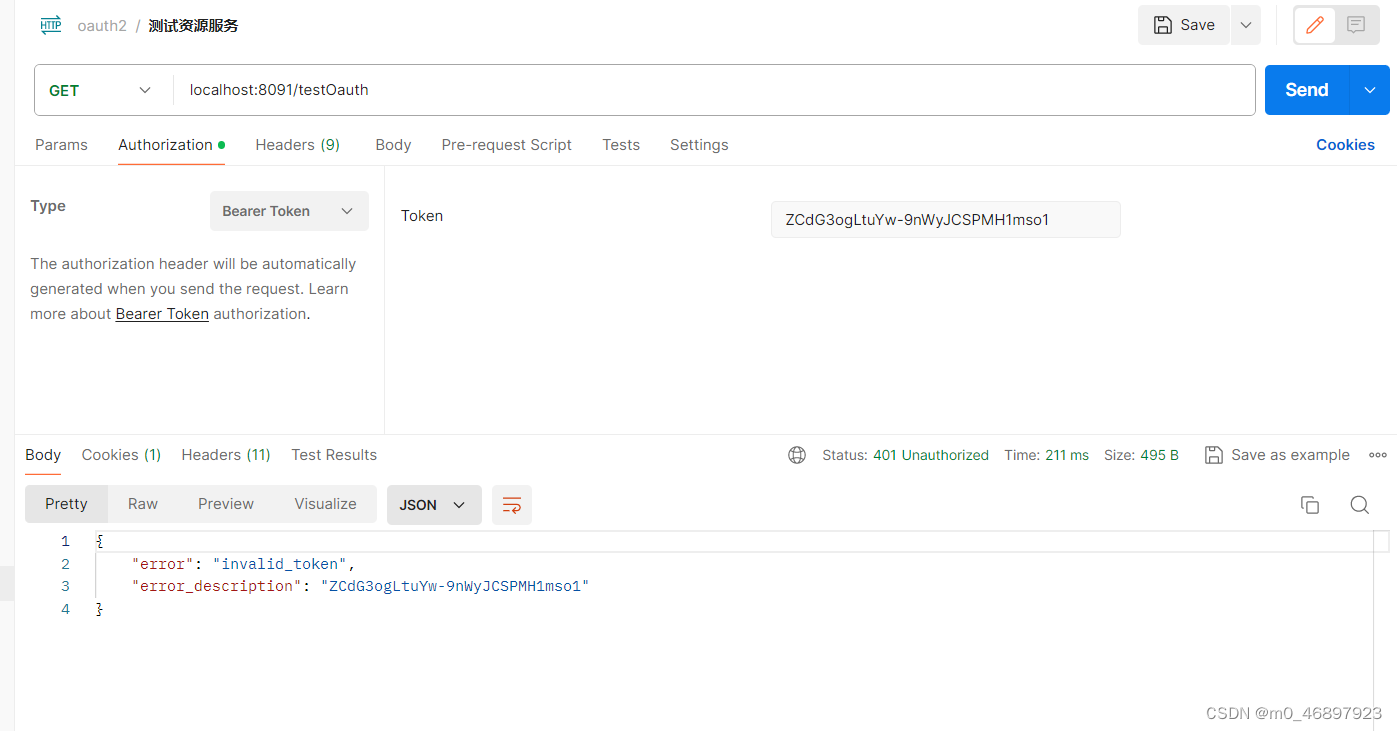
4.总结
这里的OAuth使用,有一些不足,包括token的存储,客户端信息的存储,用户信息的获取等,这些都是直接写死的,并没有从数据库去获取,token也没有存入到redis,这些都不是标准的操作,不过主体架构是没有什么问题的,这里就不做继续的扩展了,如果想要直接可用的例子,建议使用pigx的免费版,
这里是pig的git地址: https://github.com/pig-mesh/pig
这是pig的学习文档: https://www.yuque.com/pig4cloud/pig/gbvadw
pigx提供了OAuth2的登录方案,可以帮我们省略大量的操作,建议使用,同时也可以参考pigx的配置和写法继续学习OAuth2.0


![[office] EXCEL怎么制作大事记图表- #学习方法#其他](https://img-blog.csdnimg.cn/img_convert/4da21016c26200855505d9d7541ad3f9.jpeg)