目录
一、Spring MVC的组件详解
1.1 处理器映射器
1.1.1 处理器映射器的继承体系
1.2 处理器适配器和处理器
1.2.1 处理器适配器的继承体系
1.2.2 处理器适配器和处理器的对应关系
第一个适配器:org.springframework.web.servlet.mvc.method.annotation.RequestMappingHandlerAdapter
第二个适配器:org.springframework.web.servlet.mvc.HttpRequestHandlerAdapter
第三个适配器:org.springframework.web.servlet.mvc.SimpleControllerHandlerAdapter
1.2.3 处理器:HandlerMethod
1.2.3.1 ServletInvocableHandlerMethod源码
1.2.3.2 InvocableHandlerMethod源码
1.2.3.3 总结
1.3 视图解析器
1.3.1 不需要视图解析器的场景分析
第一种:String 类型
第二种:void,即没有返回值
第三种:ModelAndView 类型
二、执行流程介绍
2.1 执行流程图
2.2 Spring MVC 源码分析
2.2.1 初始化阶段
1、MultipartResolver(多文件上传组件)
2、LocaleResolver(本地语言环境组件)
3、ThemeResolver(模板主题处理组件)
4、HandlerMappings(处理器映射器)
5、HandlerAdapters (初始化处理器适配器)
6、HandlerExceptionResolvers(异常处理组件)
7、RequestToViewNameTranslator(视图预处理器组件)
8、ViewResolvers(视图解析器)
9、FlashMapManager(FlashMap管理器)
2.2.2 运行调用阶段
2.2.2.1 准备工作
FrameworkServlet.java
FrameworkServlet.java
2.2.2.2 处理请求
1 getHandler(HttpServletRequest request) 获取处理器执行链(处理器+拦截器)
1.1 getHandler(HttpServletRequest request)
1.1.1 getHandlerInternal(HttpServletRequest request)获取Handler
1.1.1.1 lookupHandler(lookupPath, request)根据给定url path和request获取Handler
1.1.1.1.1 Match内部类
1.1.1.1.2 getMappingsByUrl()
1.1.1.1.3 addMatchingMappings()
1.1.1.1.4 对于多个请求匹配后的排序,获取最合适的那一个
1.1.2 getHandlerExecutionChain(Object handler, HttpServletRequest request)
1.1.2.1 HandlerExecutionChain处理器执行链
1.1.2.1.1 HandlerInterceptor拦截器
2 HandlerAdapter getHandlerAdapter(Object handler),根据Handler获取HandlerAdapter处理器适配器
DispatcherServlet.java
2.1 supports(Object handler)
2.2 applyPreHandle() 应用前置拦截器
3 HandlerAdapter.handle() 利用处理器适配器,执行处理器方法完成对请求的处理
3.1 handleInternal(HttpServletRequest,HttpServletResponse,HandlerMethod)
3.1.1 invokeHandlerMethod(HttpServletRequest,HttpServletResponse,HandlerMethod)
3.1.1.1 invokeAndHandle(ServletWebRequest,ModelAndViewContainer,Object)
3.1.1.1.1 invokeForRequest(NativeWebRequest,ModelAndViewContainer,Object)
3.1.1.1.1.1 getMethodArgumentValues(request) 解析出request对象中要传入处理器方法的参数
3.1.1.1.1.2 doInvoke(args) 传入从request解析出来的参数值,去执行处理器方法
3.1.1.2 getModelAndView(mavContainer, modelFactory, webRequest)
2.2.2.3 视图解析
2.2.2.3.1 ModelAndView
2.2.2.3.2 视图解析器(ViewResolver)
2.2.2.3.3 视图(View)
1 DispatcherServlet类中的processDispatchResult()方法
1.1 DispatcherServlet类中的processHandlerException()方法
1.2 DispatcherServlet类中的render()方法
1.2.1 DispatcherServlet类中的resolveViewName()方法
1.2.1.1 AbstractCachingViewResolver类中的resolveViewName()方法
1.2.1.1.1 UrlBasedViewResolver类中的createView()方法
1.2.1.1.1.1 UrlBasedViewResolver类中的buildView()方法
1.2.1.1.1.2 UrlBasedViewResolver类中的applyLifecycleMethods()方法
1.2.2 AbstractView类中的render()方法
1.2.2.1 InternalResourceView类中的renderMergedOutputModel()方法
三、总结
一、Spring MVC的组件详解
在讲解执行流程之前,我们先详细讲解一下Spring MVC的几个重要的组件。
1.1 处理器映射器
它指的是:HandlerMapping 是在 Spring 的 3.1 版本之后加入的。它的出现,可以让使用者更加轻松的去配置 SpringMVC 的请求路径映射。
Spring MVC(Spring框架的一部分)中有多种不同的HandlerMapping实现,它们用于确定请求应该由哪个控制器处理。这些HandlerMapping的选择通常依赖于你的应用程序配置和需求。以下是一些常见的HandlerMapping实现:
- BeanNameUrlHandlerMapping:
- 这是Spring MVC默认的HandlerMapping实现之一。
- 它根据请求的URL路径中的Bean名称来匹配处理程序。
- 例如,如果有一个名为"/hello"的Bean,当请求"/hello"时,它将被映射到该Bean处理。
- ControllerClassNameHandlerMapping:
- 这是另一个Spring MVC默认的HandlerMapping实现之一。
- 它根据控制器类的名称来匹配请求。
- 例如,如果有一个控制器类名为"HelloController",当请求"/hello"时,它将被映射到该控制器。
- RequestMappingHandlerMapping:
- 这是最常用的HandlerMapping实现之一。
- 它根据@Controller注解和@RequestMapping注解来确定请求的处理程序。
- 这种方式更加灵活,可以根据注解中的路径和条件来匹配请求。
- DefaultServletHandlerMapping:
- 用于将请求映射到Servlet容器默认的Servlet(通常是Servlet容器的默认Servlet,用于处理静态资源)。
- 这是为了处理静态资源,如CSS、JavaScript和图片等。
- SimpleUrlHandlerMapping:
- 允许你通过配置URL和处理程序的映射关系,将请求映射到特定的处理程序。
- 这种方式非常灵活,可以自定义URL和处理程序的映射。
- ResourceHttpRequestHandler:
- 用于处理静态资源的HandlerMapping。
- 通常用于处理文件上传和下载等功能。
这些HandlerMapping实现可以根据你的应用程序需求进行组合和定制,以满足不同的URL映射和处理要求。通常,RequestMappingHandlerMapping和BeanNameUrlHandlerMapping是最常用的HandlerMapping实现,分别用于注解驱动的控制器映射和基于Bean名称的映射。
下面是这些处理器映射器的继承体系,这个需要着重了解,因为这些映射器都有很多继承的父类,在后面的源码讲解中有很多方法都并不是使用的这些映射器实现类本身的方法,而是使用它们父类的方法。
1.1.1 处理器映射器的继承体系

1.2 处理器适配器和处理器
要清晰的认识 Spring MVC 的处理器适配器,就先必须知道适配器以及它的作用。我们先通过下图,直观的了解一下:

通过上面三张图,我们可以直观的感受到,它是把不同的接口都转换成了 USB 接口。 代入到我们 SpringMVC 中,就是把不同的handler控制器(也叫处理器),最终都可以看成是适配器类型,从而执行适配器中定义的方法就相当于执行了控制器的方法。更深层次的是,我们可以把公共的功能都定义在适配器中,从而减少每种控制器中都有的重复性代码。
在后面我们学习了Spring MVC 的执行过程源码之后,就能知道其实执行控制器方法,本质调用的是前端控制器 DispatcherServlet 的 doDispatch 方法,而该方法中会调用HandlerAdapter 的 handle 方法,这个handle 方法实际调用了我们自己写的控制器方法(Controller中的方法)。而我们写的控制方法名称各不一样,它是通过 handle 方法进行反射调用的。但是我们不知道的是,其实 SpringMVC 中处理器适配器也有多个实现类。
1.2.1 处理器适配器的继承体系

1.2.2 处理器适配器和处理器的对应关系
前面我们说了处理器适配器有多个实现类,其实对应着的处理器类型也有多个。
Spring MVC采用适配器模式来适配调用指定Handler,当使用Spring MVC时,不同类型的处理器适配器(HandlerAdapter)用于将不同类型的处理器与Spring MVC框架集成。以下是不同类型的处理器适配器以及它们对应的处理器类型,并且我将介绍一下这些适配器和处理器:
1. RequestMappingHandlerAdapter:
- 处理器类型:HandlerMethod(通常是使用@RequestMapping注解映射请求路径的方法)
- 介绍:
- RequestMappingHandlerAdapter适配器用于将@RequestMapping注解标记的处理器方法(HandlerMethod)与请求匹配。它对应的处理器需要使用@Controller修饰。该适配器也是当前最常用的适配器。
- HandlerMethod是Spring MVC中最常用的处理器类型。它们是通过在控制器类的方法上使用注解(例如@RequestMapping)定义的。HandlerMethod根据请求的URL和其他条件来选择要执行的方法,并执行相应的业务逻辑。它们可以返回视图或数据。
2. HttpRequestHandlerAdapter:
- 处理器类型:HttpRequestHandler
- 介绍:
- HttpRequestHandlerAdapter适配器用于将HttpRequestHandler处理器与请求匹配。它对应的处理器需要实现 HttpRequestHandler 接口。
- HttpRequestHandler是一个接口,通常由实现它的类来处理请求。这种处理器类型更适合处理底层的HTTP请求,例如文件上传和处理静态资源。该处理一般用于业务自行处理请求,不需要通过ModelAndView转到视图的场景。实现HttpRequestHandler的类需要实现`handleRequest`方法来处理请求。
3. SimpleControllerHandlerAdapter:
- 处理器类型:Controller
- 介绍:
- SimpleControllerHandlerAdapter适配器用于将传统的Controller处理器与请求匹配(不是很常用了)。它对应的处理器需要实现 Controller 接口。
- Controller是标准处理器,返回ModelAndView。这个处理器适配器用于将传统的Controller(控制器)与Spring MVC框架整合。这种方式不太常见,因为现代的Spring MVC应用程序更倾向于使用注解控制器(@Controller)和HandlerMethod。
4. WebSocketHandlerAdapter:
- 处理器类型:WebSocketHandler
- 介绍:
- WebSocketHandlerAdapter适配器用于将WebSocket处理器与WebSocket请求匹配。
- WebSocketHandler用于处理WebSocket请求。WebSocket是一种双向通信协议,用于实时应用程序,例如在线聊天和协作工具。WebSocketHandlerAdapter允许Spring MVC应用程序处理WebSocket连接和消息。
5. ServletHandlerAdapter:
- 处理器类型:Servlet
- 介绍:
- ServletHandlerAdapter适配器用于将Servlet作为处理器与请求匹配。
- Servlet这个处理器适配器用于将Servlet作为处理器与Spring MVC框架整合。这通常与传统的Servlet结合使用,以处理某些请求,例如处理与Spring MVC无关的请求。
这些处理器适配器允许Spring MVC应用程序处理不同类型的请求,并与各种处理器类型(例如HandlerMethod、HttpRequestHandler等)进行集成。根据应用程序的需求和场景,你可以选择适当的处理器适配器以及相应类型的处理器来实现业务逻辑。通常,大多数现代Spring MVC应用程序主要使用RequestMappingHandlerAdapter与HandlerMethod(@RequestMapping注解的方法)来处理请求。
下面简单介绍几个常用的适配器和处理器的写法。
第一个适配器:org.springframework.web.servlet.mvc.method.annotation.RequestMappingHandlerAdapter
这个适配器是我们实际开发中采用最多的。它对应的控制器写法要求:需要使用注解@Controller 来修饰控制器(处理器)。
@Controller
public class HelloControler {
    @RequestMapping("hello")
    public String sayHello() {
        System.out.println("控制器方法执行了");
        return "success";
    }
}
同时要求我们在 springmvc.xml 中配置:
<!-- 只需要注册适配器 -->
<bean id="requestMappingHandlerAdapter" class="org.springframework.web.servlet.mvc.method.annotation.RequestMappingHandlerAdapter"></bean>
第二个适配器:org.springframework.web.servlet.mvc.HttpRequestHandlerAdapter
使用此控制器适配器,对应的控制器写法要求:需要实现 HttpRequestHandler 接口
public class HelloController3 implements HttpRequestHandler {
    @Override
    public vode handleRequest(HttpServletRequest request, HttpServletResponse response) throws ServletException, IOException {
        request.getRequestDispatcher("/WEB-INF/jsp/hello.jsp").forward(request, response);
    }
}
同时要求我们在 springmvc.xml 中添加:
<!--注册Controller控制器-->
<bean name="/sayhello3" class="com.baiqi.web.controller.HelloController3"></bean>
<!--注册HttpRequestHandlerAdapter适配器-->
<bean id=" httpRequestHandlerAdapter" class="org.springframework.web.servlet.mvc.HttpRequestHandlerAdapter"></bean>第三个适配器:org.springframework.web.servlet.mvc.SimpleControllerHandlerAdapter
使用此控制器适配器,对应的控制器写法要求:需要实现 Controller 接口
// 处理器(控制器)
// 使用SimpleControllerHandlerAdapter处理器适配器时,对应的处理器需要实现Controller接口
public class HelloController2 implements Controller {
    @Override
    public ModelAndView handleRequest(HttpServletRequest httpServletRequest,
            HttpServletResponse httpServletResponse) throws Exception {
        ModelAndView mv = new ModelAndView();
        mv.setViewName("success");
        return mv;
    }
 }
同时要求我们在 springmvc.xml 中添加:
<!--向Spring容器中装配SimpleControllerHandlerAdapter处理器适配器-->
<bean id="simpleControllerHandlerAdapter " class="org.springframework.web.servlet.mvc.SimpleControllerHandlerAdapter"></bean>
<!--向Spring容器中装配HelloController2处理器-->
<bean name="/sayhello2" class="com.baiqi.web.controller.HelloController2"></bean>
上面讲解了这么多种适配器的配置方法,其实通常情况下我们都是直接配置:
<mvc:annotation‐driven></mvc:annotation‐driven>使用该标签就相当于把所有类型的适配器都注册了。它还会将处理器映射器给注册进来。
1.2.3 处理器:HandlerMethod
我们现在最常用的写法就是@Controller + @RequestMapping,所以我们平时最常用的就是这个类型的处理器。因为HandlerMethod还关系到后面我们的源码分析,所以这里单独讲解一下它的源码。
源码:
public class HandlerMethod {

    /** Logger that is available to subclasses. */
    protected final Log logger = LogFactory.getLog(getClass());

    // 对应标注了 @Controller 的那个 bean,可以是对象实例也可以是一个 bean 名称
    private final Object bean;

    // bean 容器
    @Nullable
    private final BeanFactory beanFactory;

    // bean 的类型
    private final Class<?> beanType;

    // 目标方法
    private final Method method;

    // 被桥接的方法,不过一般都跟 method 这个字段的值一样,目的也就是为了找到要执行的目标方法
    private final Method bridgedMethod;

    // 封装的参数信息
    private final MethodParameter[] parameters;

    // 响应码状态
    @Nullable
    private HttpStatus responseStatus;

    // 响应码对应的原因
    @Nullable
    private String responseStatusReason;

    // 通过下面 createWithResolvedBean 获取 HandlerMethod 的时候,会把 this 对象传递来
    @Nullable
    private HandlerMethod resolvedFromHandlerMethod;


    // 构造函数,给上述几个字段赋值
    public HandlerMethod(Object bean, Method method) {
        Assert.notNull(bean, "Bean is required");
        Assert.notNull(method, "Method is required");
        this.bean = bean;
        this.beanFactory = null;
        this.beanType = ClassUtils.getUserClass(bean);
        this.method = method;
        this.bridgedMethod = BridgeMethodResolver.findBridgedMethod(method);
        this.parameters = initMethodParameters();
        evaluateResponseStatus();
        this.description = initDescription(this.beanType, this.method);
    }

    // 构造方法
    public HandlerMethod(Object bean, String methodName, Class<?>... parameterTypes) throws NoSuchMethodException {
        ... 省略
    }

    // 构造方法
    public HandlerMethod(String beanName, BeanFactory beanFactory, Method method) {
        ... 省略
    }

    // 通过 handlerMethod 复制出来一个新的 HandlerMothod, 在上篇文章中通过 HandlerMothod 类型的 Handler 来创建一个新的 ServletInvocableHandlerMethod 类型的时候,就是通过调用这个构造方法
    protected HandlerMethod(HandlerMethod handlerMethod) {
        Assert.notNull(handlerMethod, "HandlerMethod is required");
        this.bean = handlerMethod.bean;
        this.beanFactory = handlerMethod.beanFactory;
        this.beanType = handlerMethod.beanType;
        this.method = handlerMethod.method;
        this.bridgedMethod = handlerMethod.bridgedMethod;
        this.parameters = handlerMethod.parameters;
        this.responseStatus = handlerMethod.responseStatus;
        this.responseStatusReason = handlerMethod.responseStatusReason;
        this.description = handlerMethod.description;
        this.resolvedFromHandlerMethod = handlerMethod.resolvedFromHandlerMethod;
    }

    // 构造方法
    private HandlerMethod(HandlerMethod handlerMethod, Object handler) {
        ... 省略
    }

    // 针对方法的参数来生成参数的包装类
    private MethodParameter[] initMethodParameters() {
        int count = this.bridgedMethod.getParameterCount();
        MethodParameter[] result = new MethodParameter[count];
        for (int i = 0; i < count; i++) {
            result[i] = new HandlerMethodParameter(i);
        }
        return result;
    }

    // 如果方法上标注了 @ResponseStatus, 会返回该注解中的响应码和响应原因
    private void evaluateResponseStatus() {
        ResponseStatus annotation = getMethodAnnotation(ResponseStatus.class);
        if (annotation == null) {
            annotation = AnnotatedElementUtils.findMergedAnnotation(getBeanType(), ResponseStatus.class);
        }
        if (annotation != null) {
            this.responseStatus = annotation.code();
            this.responseStatusReason = annotation.reason();
        }
    }


    //...省略一些 get 方法

    // 判断该方法的返回值是否是 void
    public boolean isVoid() {
        return Void.TYPE.equals(getReturnType().getParameterType());
    }

    // 获取方法上的注解
    @Nullable
    public <A extends Annotation> A getMethodAnnotation(Class<A> annotationType) {
        return AnnotatedElementUtils.findMergedAnnotation(this.method, annotationType);
    }
    public <A extends Annotation> boolean hasMethodAnnotation(Class<A> annotationType) {
        return AnnotatedElementUtils.hasAnnotation(this.method, annotationType);
    }

    // 通过 bean 来创建 HandlerMethod,如果此时bean还没有被创建出来,会调用 getBean 方法先创建 bean 实例,此外还会将 this 对象赋值给 resolvedFromHandlerMethod
    public HandlerMethod createWithResolvedBean() {
        Object handler = this.bean;
        if (this.bean instanceof String) {
            Assert.state(this.beanFactory != null, "Cannot resolve bean name without BeanFactory");
            String beanName = (String) this.bean;
            handler = this.beanFactory.getBean(beanName);
        }
        return new HandlerMethod(this, handler);
    }

    // 类似 toString 方法
    public String getShortLogMessage() {
        return getBeanType().getName() + "#" + this.method.getName() +
                "[" + this.method.getParameterCount() + " args]";
    }

    // 返回值的类型
    private class ReturnValueMethodParameter extends HandlerMethodParameter {

        @Nullable
        private final Object returnValue;

        public ReturnValueMethodParameter(@Nullable Object returnValue) {
            super(-1);
            this.returnValue = returnValue;
        }

        protected ReturnValueMethodParameter(ReturnValueMethodParameter original) {
            super(original);
            this.returnValue = original.returnValue;
        }

        @Override
        public Class<?> getParameterType() {
            return (this.returnValue != null ? this.returnValue.getClass() : super.getParameterType());
        }

        @Override
        public ReturnValueMethodParameter clone() {
            return new ReturnValueMethodParameter(this);
        }
    }

}
可以看到 HandlerMethod 保存了 bean 的信息,也就是 Controller 的信息,由此可知是哪个对象,然后 method成员属性中保存了对应的方法信息,可以知道要调用哪个方法,所以一个 @Controller 有多少个 @RequestMapping 标注的方法,就会有多少个 HandlerMethod。可是感觉这有点像一个实体类一样,并没有什么执行方法,虽然知道了 bean 信息和方法信息,但是通过这个类并没有办法来触发方法的执行,这个时候我们可以看下前面的文章,上一篇文章中分析 Controller 方法的时候是怎么执行的呢?我们应该留意到有一步是把 HandlerMethod 类型的实例转化为了 ServletInvocableHandlerMethod 类型的实例。所以下面继续分析一下这个类型又是干嘛的。
1.2.3.1 ServletInvocableHandlerMethod源码
public class ServletInvocableHandlerMethod extends InvocableHandlerMethod {

    // 发生异常时的回调方法
    private static final Method CALLABLE_METHOD = ClassUtils.getMethod(Callable.class, "call");

    // 用于处理方法的返回值
    @Nullable
    private HandlerMethodReturnValueHandlerComposite returnValueHandlers;


    // 构造函数
    public ServletInvocableHandlerMethod(Object handler, Method method) {
        super(handler, method);
    }
    public ServletInvocableHandlerMethod(HandlerMethod handlerMethod) {
        super(handlerMethod);
    }

    // 设置处理返回值的 HandlerMethodReturnValueHandler
    public void setHandlerMethodReturnValueHandlers(HandlerMethodReturnValueHandlerComposite returnValueHandlers) {
        this.returnValueHandlers = returnValueHandlers;
    }

    // 通过该方法来触发目标方法的执行
    public void invokeAndHandle(ServletWebRequest webRequest, ModelAndViewContainer mavContainer,
            Object... providedArgs) throws Exception {
        // 执行目标方法
        Object returnValue = invokeForRequest(webRequest, mavContainer, providedArgs);
        // 设置响应状态
        setResponseStatus(webRequest);

        if (returnValue == null) {
            if (isRequestNotModified(webRequest) || getResponseStatus() != null || mavContainer.isRequestHandled()) {
                disableContentCachingIfNecessary(webRequest);
                mavContainer.setRequestHandled(true);
                return;
            }
        }
        else if (StringUtils.hasText(getResponseStatusReason())) {
            mavContainer.setRequestHandled(true);
            return;
        }
        // 设置该标识代表请求未处理完成
        mavContainer.setRequestHandled(false);
        Assert.state(this.returnValueHandlers != null, "No return value handlers");
        try {
            // 处理目标方法的返回值
            this.returnValueHandlers.handleReturnValue(
                    returnValue, getReturnValueType(returnValue), mavContainer, webRequest);
        }
        catch (Exception ex) {
            if (logger.isTraceEnabled()) {
                logger.trace(formatErrorForReturnValue(returnValue), ex);
            }
            throw ex;
        }
    }

    // 设置响应状态
    private void setResponseStatus(ServletWebRequest webRequest) throws IOException {
        HttpStatus status = getResponseStatus();
        if (status == null) {
            return;
        }

        HttpServletResponse response = webRequest.getResponse();
        if (response != null) {
            String reason = getResponseStatusReason();
            if (StringUtils.hasText(reason)) {
                response.sendError(status.value(), reason);
            }
            else {
                response.setStatus(status.value());
            }
        }

        // To be picked up by RedirectView
        webRequest.getRequest().setAttribute(View.RESPONSE_STATUS_ATTRIBUTE, status);
    }

    // 请求是否被修改
    private boolean isRequestNotModified(ServletWebRequest webRequest) {
        return webRequest.isNotModified();
    }

    private void disableContentCachingIfNecessary(ServletWebRequest webRequest) {
        if (isRequestNotModified(webRequest)) {
            HttpServletResponse response = webRequest.getNativeResponse(HttpServletResponse.class);
            Assert.notNull(response, "Expected HttpServletResponse");
            if (StringUtils.hasText(response.getHeader(HttpHeaders.ETAG))) {
                HttpServletRequest request = webRequest.getNativeRequest(HttpServletRequest.class);
                Assert.notNull(request, "Expected HttpServletRequest");
            }
        }
    }

    private String formatErrorForReturnValue(@Nullable Object returnValue) {
        return "Error handling return value=[" + returnValue + "]" +
                (returnValue != null ? ", type=" + returnValue.getClass().getName() : "") +
                " in " + toString();
    }

    // 处理异步情形下需要获取到的 ServletInvocableHandlerMethod, 这是一个内部类
    ServletInvocableHandlerMethod wrapConcurrentResult(Object result) {
        return new ConcurrentResultHandlerMethod(result, new ConcurrentResultMethodParameter(result));
    }


    // 继承该类本身,处理异步的情形
    private class ConcurrentResultHandlerMethod extends ServletInvocableHandlerMethod {
        //... 省略代码
    }

}
从上面可以看出,该类是 InvocableHandlerMethod 的子类,且提供了 invokeAndHandle 方法,盲猜就是为了补充 HandlerMethod 没有调用目标方法的功能,所以重点可以放在该方法上,可以该方法中通过 invokeForRequest 去调用目标方法,而 invokeForRequest 是它的父类 InvocableHandlerMethod 才有的方法,所以还需要研究下 InvocableHandlerMethod。
1.2.3.2 InvocableHandlerMethod源码
public class InvocableHandlerMethod extends HandlerMethod {

    private static final Object[] EMPTY_ARGS = new Object[0];


    @Nullable
    private WebDataBinderFactory dataBinderFactory;

    // 用来解析请求参数
    private HandlerMethodArgumentResolverComposite resolvers = new HandlerMethodArgumentResolverComposite();

    // 用来获取形参名
    private ParameterNameDiscoverer parameterNameDiscoverer = new DefaultParameterNameDiscoverer();

    // 构造函数
    public InvocableHandlerMethod(HandlerMethod handlerMethod) {
        super(handlerMethod);
    }
    public InvocableHandlerMethod(Object bean, Method method) {
        super(bean, method);
    }
    public InvocableHandlerMethod(Object bean, String methodName, Class<?>... parameterTypes)
            throws NoSuchMethodException {

        super(bean, methodName, parameterTypes);
    }

    //.. 省略 set 方法

    // 获取参数值,然后执行目标方法
    @Nullable
    public Object invokeForRequest(NativeWebRequest request, @Nullable ModelAndViewContainer mavContainer,
            Object... providedArgs) throws Exception {
        // 获取参数值
        Object[] args = getMethodArgumentValues(request, mavContainer, providedArgs);
        if (logger.isTraceEnabled()) {
            logger.trace("Arguments: " + Arrays.toString(args));
        }
        // 传入参数调用目标方法
        return doInvoke(args);
    }

    // 获取参数值
    protected Object[] getMethodArgumentValues(NativeWebRequest request, @Nullable ModelAndViewContainer mavContainer,
            Object... providedArgs) throws Exception {

        MethodParameter[] parameters = getMethodParameters();
        if (ObjectUtils.isEmpty(parameters)) {
            return EMPTY_ARGS;
        }

        Object[] args = new Object[parameters.length];
        for (int i = 0; i < parameters.length; i++) {
            MethodParameter parameter = parameters[i];
            parameter.initParameterNameDiscovery(this.parameterNameDiscoverer);
            args[i] = findProvidedArgument(parameter, providedArgs);
            if (args[i] != null) {
                continue;
            }
            if (!this.resolvers.supportsParameter(parameter)) {
                throw new IllegalStateException(formatArgumentError(parameter, "No suitable resolver"));
            }
            try {
                args[i] = this.resolvers.resolveArgument(parameter, mavContainer, request, this.dataBinderFactory);
            }
            catch (Exception ex) {
                // Leave stack trace for later, exception may actually be resolved and handled...
                if (logger.isDebugEnabled()) {
                    String exMsg = ex.getMessage();
                    if (exMsg != null && !exMsg.contains(parameter.getExecutable().toGenericString())) {
                        logger.debug(formatArgumentError(parameter, exMsg));
                    }
                }
                throw ex;
            }
        }
        return args;
    }

    // 执行目标方法
    @Nullable
    protected Object doInvoke(Object... args) throws Exception {
        ReflectionUtils.makeAccessible(getBridgedMethod());
        try {
            // 父类的 getBridgedMethod 获取到目标方法,通过反射执行
            return getBridgedMethod().invoke(getBean(), args);
        }
        catch (IllegalArgumentException ex) {
            assertTargetBean(getBridgedMethod(), getBean(), args);
            String text = (ex.getMessage() != null ? ex.getMessage() : "Illegal argument");
            throw new IllegalStateException(formatInvokeError(text, args), ex);
        }
        catch (InvocationTargetException ex) {
            // Unwrap for HandlerExceptionResolvers ...
            Throwable targetException = ex.getTargetException();
            if (targetException instanceof RuntimeException) {
                throw (RuntimeException) targetException;
            }
            else if (targetException instanceof Error) {
                throw (Error) targetException;
            }
            else if (targetException instanceof Exception) {
                throw (Exception) targetException;
            }
            else {
                throw new IllegalStateException(formatInvokeError("Invocation failure", args), targetException);
            }
        }
    }

}
该类是 ServletInvocableHandlerMethod 的父类,同时又是 HandlerMethod 的子类,该类可以方法的请求参数值,也可以获取到父类的 bean 和目标方法,然后给其传入参数通过反射来执行目标方法。
1.2.3.3 总结
从上面的分析可以知道 HandlerMethod 保存了 Controller 对象和目标方法,但是却没有给出执行目标方法的接口。InvocableHandlerMethod 作为 HandlerMethod 子类对其进行了增强,增加了解析请求参数值和执行目标方法的功能,但是它好像跟 Servlet 没有什么关系,没法跟 HTTP 联系起来,所以又有了 ServletInvocableHandlerMethod, 它是对 InvocableHandlerMethod 的进一步增强。ServletInvocableHandlerMethod 借助父类就有了执行目标方法的功能,此外添加了对 @ResponseStatus 的支持,通过 HandlerMethodReturnValueHandlerComposite 来继续操作返回值以及对异步结果的处理,用来跟 Servlet 的 API 对接。
1.3 视图解析器
首先,我们得先了解一下 Spring MVC 中的视图。视图的作用是渲染模型数据,将模型里的数据以某种形式呈现给客户。 为了实现视图模型和具体实现技术的解耦,Spring 在 org.springframework.web.servlet 包中定义了 一个高度抽象的 View 接口。 我们的视图是无状态的,所以他们不会有线程安全的问题。无状态是指对于每一个请求,都会创建 一个 View 对象。
在 Spring MVC 中常用的视图类型(View接口的实现类):

接下来就是了解视图解析器的作用:ViewResolver负责将处理结果生成View视图,ViewResolver首先根据逻辑视图名解析成物理视图名(即具体的页面地址),再生成View视图对象,最后对View进行渲染将处理结果通过页面展示给用户。
视图对象是由视图解析器负责实例化。 视图解析器的作用是将逻辑视图转为物理视图,所有的视图解析器都必须实现 ViewResolver 接口。 Spring MVC 为逻辑视图名的解析提供了不同的策略,可以在 Spring WEB 上下文中配置一种或多种解析策略, 并指定他们之间的先后顺序。每一种映射策略对应一个具体的视图解析器实现类。程序员可以选择 一种视图解析器 或混用多种视图解析器。可以通过 order 属性指定解析器的优先顺序,order 越小优先级越高, Spring MVC 会按视图解析器顺序的优先顺序对逻辑视图名进行解析,直到解析成功并返回视图对象,否则抛出 ServletException 异常。
在 Spring MVC 中常用的视图解析器类型(ViewResolver 接口的实现类):

1.3.1 不需要视图解析器的场景分析
在分析之前,我们先需要回顾下控制器方法的返回值,此处我们都是以注解@Controller 配置控制器为例,控制器的方法返回值其实支持三种方式:
第一种:String 类型
返回的String其实就是逻辑视图名称,借助视图解析器,可以在指定位置为我们找到对应扩展名的视图。视图可以是 JSP, HTML 或者其他的控制器方法上的 RequestMapping 映射地址。前往指定视图的方式,默认是请求转发,可以通过 redirect:前缀控制其使用重定向。
第二种:void,即没有返回值
因为我们在控制器方法的参数中可以直接使用原始 SerlvetAPI 对象 HttpServletRequest 和 HttpServletResponse 对象,所以无论是转发还是重定向都可以轻松实现,这种情况就无需使用返回值。
第三种:ModelAndView 类型
其实我们跟踪源码可以发现在 DispatcherServlet 中的 doDispatch 方法执行时,HandlerAdapter 的 handle 方法的返回值就是 ModelAndView,只有我们的控制器方法定义为 void 时,才不会返回此类型。当返回值是 String 的时候其实也会创建 ModelAndView 并返回。
通过上面三种控制器方法返回值,我们可以再深入的剖析一下请求之后进行响应的方式,其实无外乎就三种:
第一种:请求转发
第二种:重定向
第三种:直接使用 Response 对象获取流对象输入。可以是字节流也可以是字符流。
接下来我们就分析,这三种方式的本质区别。 其中请求转发和重定向的区别相信大家已经很熟悉了。但是它们的共同点呢?就是都会引发页面的跳转。 在我们的实际开发中,如果我们不需要页面跳转,即基于 ajax 的异步请求,用 json 数据交互时,即可不配置任何视图解析器。前后端交互是通过 json 数据的,利用@RequestBody 和@ResponseBody 实现数据到Java对象的绑定(当然还要借助类似 Jackson 开源框架)。
二、执行流程介绍
2.1 执行流程图
我们先来梳理一下Spring MVC的执行流程,以返回视图来进行响应的Spring MVC执行流程为例:
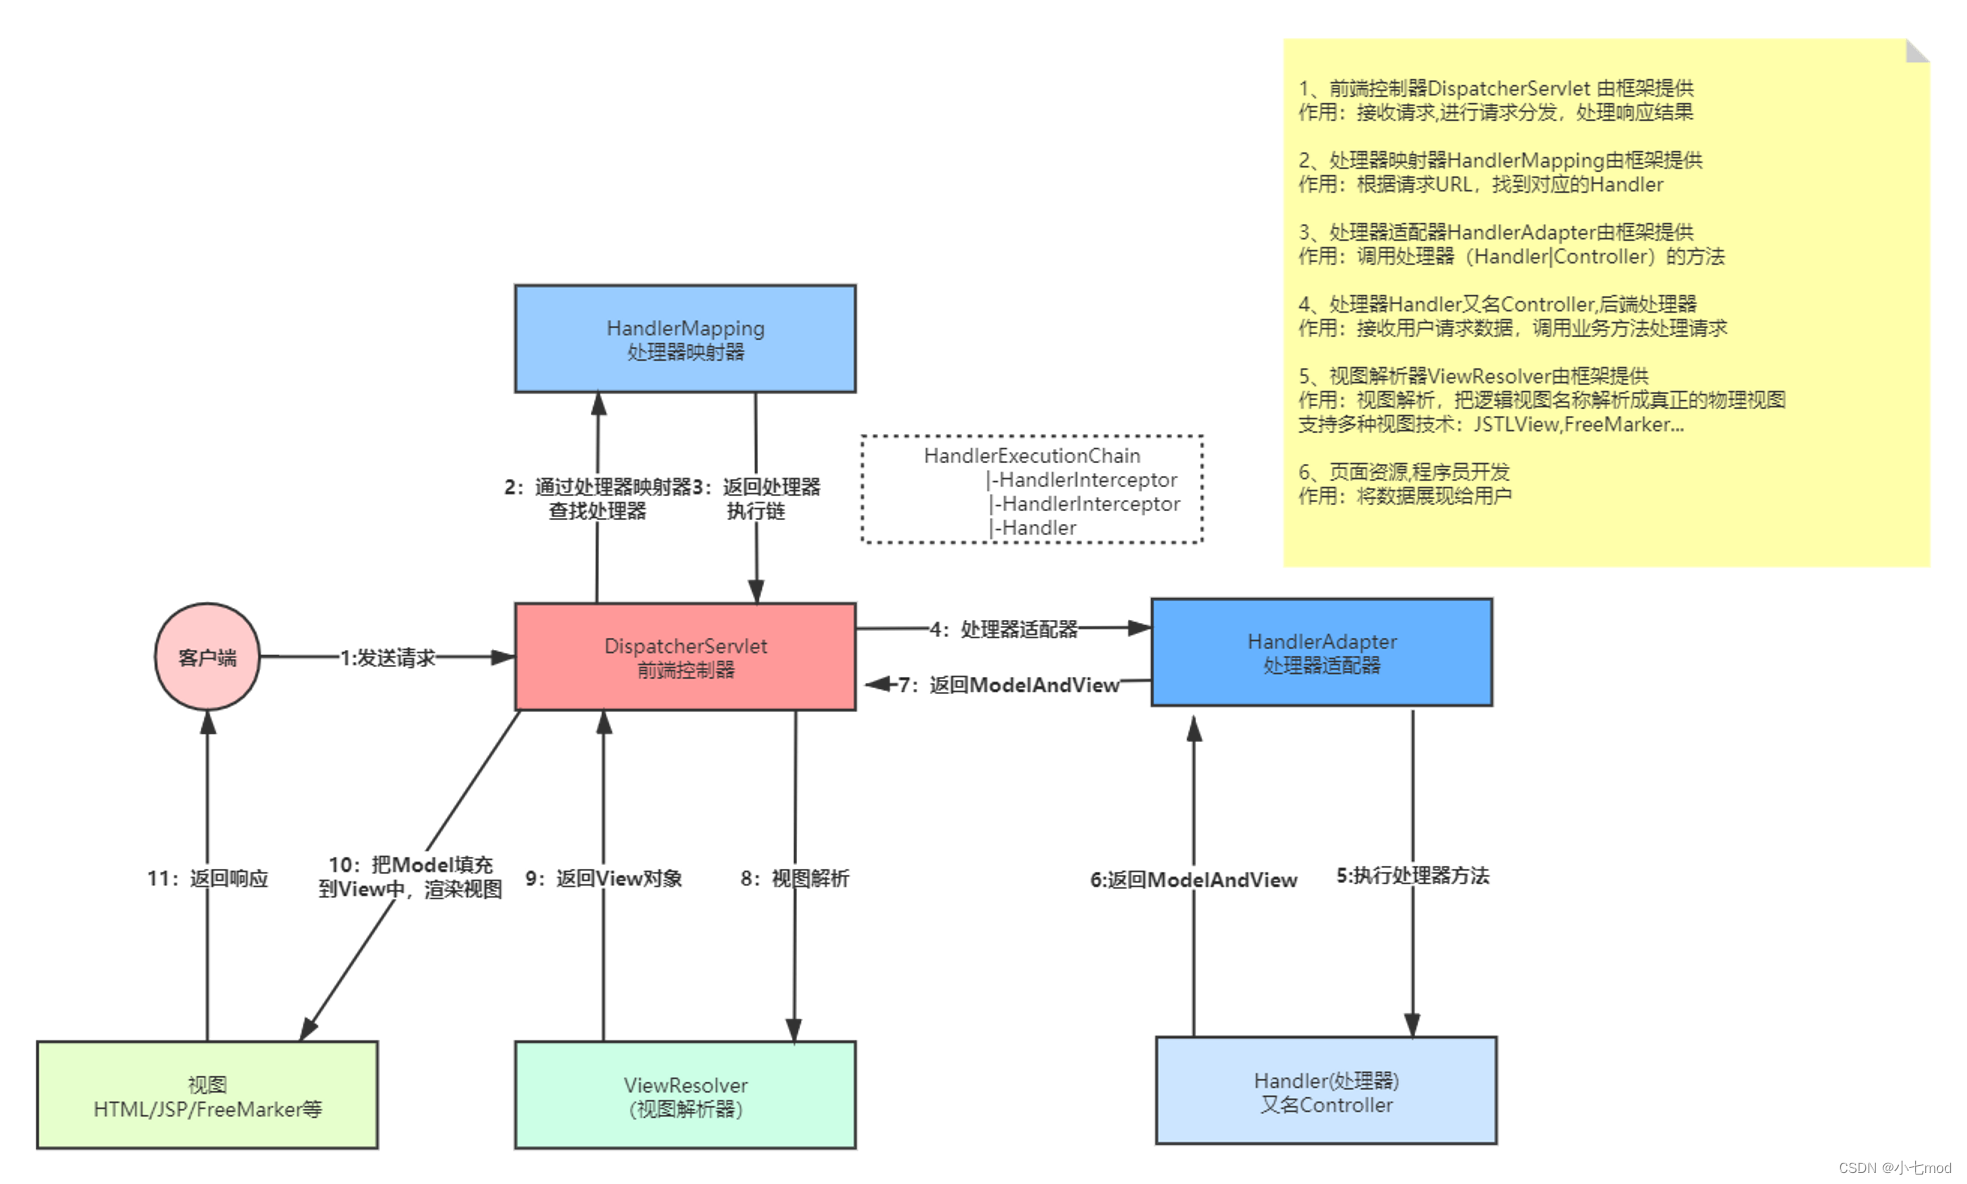
- 用户发送请求至前端控制器DispatcherServlet。
- DispatcherServlet收到请求调用HandlerMapping处理器映射器。
- 处理器映射器找到具体的处理器(可以根据xml配置、注解进行查找),生成处理器对象及处理器拦截器(如果有则生成)一并返回给DispatcherServlet(处理器Handler和处理器拦截器HandlerInterceptor一并封装到处理器执行链HandlerExecutionChain中返回给前端控制器)。
- DispatcherServlet调用HandlerAdapter处理器适配器。
- HandlerAdapter经过适配调用具体的处理器方法(Controller,也叫后端控制器)。
- Controller执行完成返回ModelAndView(里面存放了model数据和视图信息)。
- HandlerAdapter将controller执行结果ModelAndView返回给DispatcherServlet。
- DispatcherServlet将ModelAndView传给ViewReslover视图解析器。
- ViewReslover解析后返回具体View。(根据给的视图信息,例如视图名,来拼接出真正视图的路径,来获取到View对象)
- DispatcherServlet根据View进行渲染视图(将模型数据填充至视图中,这个是视图对象View实现的)。
- DispatcherServlet响应用户。
2.2 Spring MVC 源码分析
根据上面的学习,我们知道了DispatcherServlet 是Spring MVC 中的前端控制器(Front Controller),负责接收Request 并将Request 转发给对应的处理组件。HanlerMapping 是Spring MVC 中完成url 到Controller(handler处理器) 映射的组件。DispatcherServlet 接收Request,然后从HandlerMapping 查找处理Request 的Controller(handler处理器)。最后从Controller找到对应请求的方法来处理Request,并返回ModelAndView 对象。Controller 是SpringMVC中负责处理Request 的组件(类似于Struts2 中的Action),ModelAndView 是封装结果视图的组件。最后就是视图解析器解析ModelAndView 对象并返回对应的视图给客户端。
我们先简单介绍一下Spring MVC底层的做了哪些工作,Spring MVC Web容器初始化时会建立所有url 和Controller 中的Method 的对应关系,保存到HandlerMapping(确切的说是存储到HandlerMapping接口的实现类中的一个Map类型的成员属性)中,这样就可以根据客户端传过来的Request中请求的url 快速定位到具体要用哪个Controller类的哪个方法处理处理请求。
我们再讲一下Spring将请求的url和Controller类的处理方法的对应关系保存到Map<url,HandlerMethod>中的具体流程。Spring MVC Web 容器启动时会通知Spring IoC容器(加载Bean的定义信息和初始化所有单例Bean),然后Spring MVC会遍历IoC容器中的Bean,就能获取到每一个HandlerMethod bean的beanName,然后再依次获取每一个Controller中的所有方法的访问url(Controller类的路径 + 方法的路径),然后将url和HandlerMethod保存到一个Map中,这样就就建立起了对方法的请求url和Controller类处理方法之间的对应关系;
这样就可以根据客户端发送过来的Request中的请求url快速定位到对应的Controller类的方法。拿到了要执行的方法后,接下来的任务就是参数绑定,把Request中参数绑定到方法的形式参数上,这一步是整个请求处理过程中最复杂的一个步骤,这一步我们在后面会详细讲解。
根据上面分析的Spring MVC 工作机制,下面我们从三个部分来分析Spring MVC 的源码:
- ApplicationContext 初始化时用Map 保存所有url 和Controller 类的对应关系;
- 根据请求url 找到对应的Controller,并从Controller 中找到处理请求的方法;
- Request 参数绑定到方法的形参,执行方法处理请求,并返回结果视图。
2.2.1 初始化阶段
我们先来说一下Spring MVC的核心前端控制器DispatcherServlet这个类,其实这个类本质就是一个Servlet的子类HttpServlet,我们来看一下它的继承体系:

继承ApplicationContextAware可以获取Bean的ApplicationContext上下文。
我们开始来分析源码,我们从Spring MVC执行流程的最开源开始分析,首先找到DispatcherServlet 这个类,必然是寻找init()方法。然后,我们发现其init()初始化方法其实在其父类HttpServletBean 中,其源码如下:
HttpServletBean.java
public final void init() throws ServletException {
    if (logger.isDebugEnabled()) {
        logger.debug("Initializing servlet '" + getServletName() + "'");
    }
    // Set bean properties from init parameters.
    // 根据初始化参数来设置bean属性。
    PropertyValues pvs = new ServletConfigPropertyValues(getServletConfig(), this.requiredProperties);
    if (!pvs.isEmpty()) {
        try {
            // 定位资源
            BeanWrapper bw = PropertyAccessorFactory.forBeanPropertyAccess(this);
            // 加载配置信息
            ResourceLoader resourceLoader = new ServletContextResourceLoader(getServletContext());
            bw.registerCustomEditor(Resource.class, new ResourceEditor(resourceLoader, getEnvironment()));
            initBeanWrapper(bw);
            bw.setPropertyValues(pvs, true);
        }
        catch (BeansException ex) {
            if (logger.isErrorEnabled()) {
                logger.error("Failed to set bean properties on servlet '" + getServletName() + "'", ex);
            }
            throw ex;
        }
    }
    // Let subclasses do whatever initialization they like.
    // 模板方法,可以让子类去自定义
    // 这是真正实现初始化ServletBean的方法
    initServletBean();
    if (logger.isDebugEnabled()) {
        logger.debug("Servlet '" + getServletName() + "' configured successfully");
    }
}
我们看到在上面这段代码中, 又调用了一个重要的initServletBean() 方法。这个方法是由HttpServletBean类的子类FrameworkServlet(这是一个抽象类)实现的,进入initServletBean()方法看到以下源码:
FrameworkServlet.java
protected final void initServletBean() throws ServletException {
    getServletContext().log("Initializing Spring FrameworkServlet '" + getServletName() + "'");
    if (this.logger.isInfoEnabled()) {
        this.logger.info("FrameworkServlet '" + getServletName() + "': initialization started");
    }
    long startTime = System.currentTimeMillis();
    try {
        // 初始化WebApplicationContext,本质就是初始化IoC容器。这是这个方法最关键的地方
        this.webApplicationContext = initWebApplicationContext();
        initFrameworkServlet();
    }
    catch (ServletException ex) {
        this.logger.error("Context initialization failed", ex);
        throw ex;
    }
    catch (RuntimeException ex) {
        this.logger.error("Context initialization failed", ex);
        throw ex;
    }
    if (this.logger.isInfoEnabled()) {
        long elapsedTime = System.currentTimeMillis() - startTime;
        this.logger.info("FrameworkServlet '" + getServletName() + "': initialization completed in " +
                elapsedTime + " ms");
    }
}
上面这个方法核心实现是在initWebApplicationContext()方法中完成的。initWebApplicationContext()方法的源码如下:
FrameworkServlet.java
private boolean refreshEventReceived = false;

protected WebApplicationContext initWebApplicationContext() {
    WebApplicationContext rootContext =
            WebApplicationContextUtils.getWebApplicationContext(getServletContext());
    WebApplicationContext wac = null;
    if (wac == null) {
        // No context instance is defined for this servlet -> create a local one
        // 这里会去创建Web IoC容器,这一步就将DispatcherServlet创建出来了
        wac = createWebApplicationContext(rootContext);
    }
    if (!this.refreshEventReceived) {
        // Either the context is not a ConfigurableApplicationContext with refresh
        // support or the context injected at construction time had already been
        // refreshed -> trigger initial onRefresh manually here.
        // 该方法用于初始化Spring MVC的九大组件,这里其实最终调用的是FrameworkServlet的子类DispatcherServlet中的onRefresh()方法
        onRefresh(wac);
    }
    return wac;
}
上面这段代码中createWebApplicationContext()方法会去执行初始化Web IoC容器,最终会调用refresh()方法来初始化IoC容器,在以前的笔记中对的IoC容器的初始化细节我们已经详细掌握,在此不再赘述。完成了Web IoC容器初始化之后,我们重点关注它下面的那个方法onRefresh(),用于初始化Spring MVC九大组件。这个方法onRefresh()最终是在DisptcherServlet 中实现的,来看源码:
DisptcherServlet.java
@Override
protected void onRefresh(ApplicationContext context) {
    // 调用DisptcherServlet的initStrategies方法,初始化Spring MVC的九大组件
    initStrategies(context);
}

/**
 * Initialize the strategy objects that this servlet uses.
 * <p>May be overridden in subclasses in order to initialize further strategy objects.
 */
// 初始化策略
protected void initStrategies(ApplicationContext context) {
    // 多文件上传的组件
    initMultipartResolver(context);
    // 初始化本地语言环境
    initLocaleResolver(context);
    // 初始化模板处理器
    initThemeResolver(context);
    // 初始化处理器映射器
    initHandlerMappings(context);
    // 初始化处理器适配器
    initHandlerAdapters(context);
    // 初始化异常拦截器
    initHandlerExceptionResolvers(context);
    // 初始化视图预处理器
    initRequestToViewNameTranslator(context);
    // 初始化视图解析器
    initViewResolvers(context);
    // 初始化FlashMap管理器
    initFlashMapManager(context);
}
到这一步就完成了Spring MVC 的九大组件的初始化。这里我们简单介绍一下这九个组件。
1、MultipartResolver(多文件上传组件)
其实这是一个大家很熟悉的组件,MultipartResolver 用于处理上传请求,通过将普通的Request 包装成MultipartHttpServletRequest 来实现。MultipartHttpServletRequest可以通过getFile() 直接获得文件,如果是多个文件上传,还可以通过调用getFileMap得到Map<FileName, File> 这样的结构。MultipartResolver 的作用就是用来封装普通的request,使其拥有处理文件上传的功能。
2、LocaleResolver(本地语言环境组件)
在上面我们有看到ViewResolver 的resolveViewName()方法,需要两个参数。那么第二个参数Locale 是从哪来的呢,这就是LocaleResolver 要做的事了。LocaleResolver用于从request 中解析出Locale, 在中国大陆地区,Locale 当然就会是zh-CN 之类,用来表示一个区域。这个类也是i18n 的基础。
3、ThemeResolver(模板主题处理组件)
从名字便可看出,这个类是用来解析主题的。主题,就是样式,图片以及它们所形成的显示效果的集合。Spring MVC 中一套主题对应一个properties 文件,里面存放着跟当前主题相关的所有资源,如图片,css 样式等。创建主题非常简单,只需准备好资源,然后新建一个"主题名.properties" 并将资源设置进去,放在classpath 下,便可以在页面中使用了。Spring MVC 中跟主题有关的类有ThemeResolver, ThemeSource 和Theme。ThemeResolver 负责从request 中解析出主题名, ThemeSource 则根据主题名找到具体的主题, 其抽象也就是Theme, 通过Theme 来获取主题和具体的资源。
4、HandlerMappings(处理器映射器)
HandlerMapping 是用来查找Handler 的,也就是处理器,具体的表现形式可以是类也可以是方法。比如,标注了@RequestMapping 的每个method 都可以看成是一个Handler,由Handler 来负责实际的请求处理。HandlerMapping 在请求到达之后,它的作用便是找到请求相应的处理器Handler 和Interceptors(这两个会被封装进处理器执行链中)。
5、HandlerAdapters (初始化处理器适配器)
从名字上看,这是一个适配器。因为Spring MVC 中Handler 可以是任意形式的,只要能够处理请求便行,但是把请求交给Servlet 的时候,由于Servlet 的方法结构都是如doService(HttpServletRequest req, HttpServletResponse resp) 这样的形式,让固定的Servlet 处理方法调用Handler 来进行处理,这一步工作便是HandlerAdapter 要做的事。
6、HandlerExceptionResolvers(异常处理组件)
从这个组件的名字上看,这个就是用来处理Handler 过程中产生的异常情况的组件。具体来说,此组件的作用是根据异常设置ModelAndView, 之后再交给render()方法进行渲染, 而render() 便将ModelAndView 渲染成页面。不过有一点,HandlerExceptionResolver 只是用于解析对请求做处理阶段产生的异常,而渲染阶段的异常则不归他管了,这也是Spring MVC 组件设计的一大原则分工明确互不干涉。
7、RequestToViewNameTranslator(视图预处理器组件)
这个组件的作用,在于从Request 中获取viewName. 因为ViewResolver 是根据ViewName 查找View, 但有的Handler 处理完成之后,没有设置View 也没有设置ViewName, 便要通过这个组件来从Request 中查找viewName。
8、ViewResolvers(视图解析器)
视图解析器,相信大家对这个应该都很熟悉了。因为通常在SpringMVC 的配置文件中,都会配上一个该接口的实现类来进行视图的解析。这个组件的主要作用,便是将String类型的视图名和Locale 解析为View 类型的视图。这个接口只有一个resolveViewName()方法,返回值为View类型。从方法的定义就可以看出,Controller 层返回的String 类型的视图名viewName,最终会在这里被解析成为View。View 是用来渲染页面的,也就是说,它会将程序返回的参数和数据填入模板中,最终生成html 文件。ViewResolver 在这个过程中,主要做两件大事,即,ViewResolver 会找到渲染所用的模板(使用什么模板来渲染?)和所用的技术(其实也就是视图的类型,如JSP 啊还是其他什么Blabla 的)填入参数。默认情况下,Spring MVC 会为我们自动配置一个InternalResourceViewResolver,这个是针对JSP 类型视图的。
9、FlashMapManager(FlashMap管理器)
说到FlashMapManager,就得先提一下FlashMap。FlashMap 用于重定向Redirect时的参数数据传递,比如,在处理用户订单提交时,为了避免重复提交,可以处理完post 请求后redirect 到一个get 请求,这个get 请求可以用来显示订单详情之类的信息。这样做虽然可以规避用户刷新重新提交表单的问题,但是在这个页面上要显示订单的信息,那这些数据从哪里去获取呢,因为redirect重定向是没有传递参数这一功能的,如果不想把参数写进url(其实也不推荐这么做,url 有长度限制不说,把参数都直接暴露,感觉也不安全), 那么就可以通过flashMap 来传递。只需要在redirect 之前, 将要传递的数据写入request ( 可以通过ServletRequestAttributes.getRequest() 获得) 的属性OUTPUT_FLASH_MAP_ATTRIBUTE 中,这样在redirect 之后的handler中Spring 就会自动将其设置到Model 中,在显示订单信息的页面上,就可以直接从Model 中取得数据了。而FlashMapManager 就是用来管理FlashMap 的。
接下来,我们来看url和Controller的关系是如何建立的呢?这个其实是在上面初始化创建处理器映射器的时候建立的对应关系。HandlerMapping是个接口,先来看一下HandlerMapping 的实现类,会看到一个AbstractDetectingUrlHandlerMapping,可以看到其实现了ApplicationContextAware,在Spring容器会检测容器中的所有Bean,如果发现某个Bean实现了ApplicationContextAware接口,Spring容器会在创建该Bean之后,自动调用该Bean的setApplicationContextAware()方法。setApplicationContextAware()这个方法,就是我们构建url和Controller关系的起点,我们先看一下处理器映射器的类图再慢慢去寻找这个方法是在哪里开始执行的:
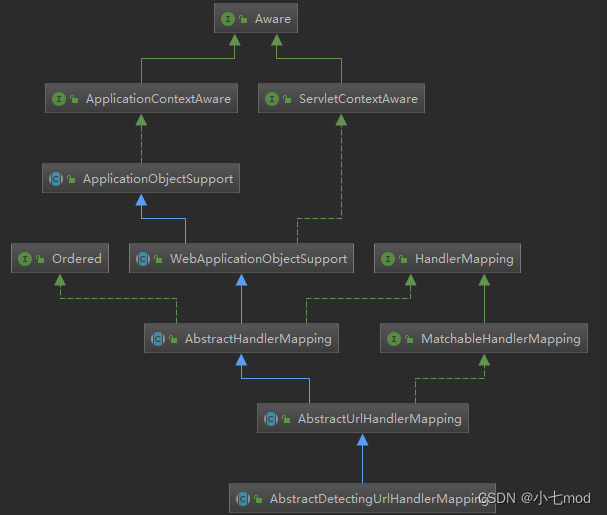
最后我们找啊找,会在ApplicationObjectSupport 发现了这个执行起点setApplicationContext()方法,继而在这个方法内调用到了HandlerMapping的子类AbstractDetectingUrlHandlerMapping中的initApplicationContext()方法。
ApplicationObjectSupport.java
@Override
public final void setApplicationContext(@Nullable ApplicationContext context) throws BeansException {
    if (context == null && !isContextRequired()) {
        // Reset internal context state.
        this.applicationContext = null;
        this.messageSourceAccessor = null;
    }
    else if (this.applicationContext == null) {
        // Initialize with passed-in context.
        if (!requiredContextClass().isInstance(context)) {
            throw new ApplicationContextException(
                    "Invalid application context: needs to be of type [" + requiredContextClass().getName() + "]");
        }
        this.applicationContext = context;
        this.messageSourceAccessor = new MessageSourceAccessor(context);
        // 初始化方法
        initApplicationContext(context);
    }
    else {
        // Ignore reinitialization if same context passed in.
        if (this.applicationContext != context) {
            throw new ApplicationContextException(
                    "Cannot reinitialize with different application context: current one is [" +
                    this.applicationContext + "], passed-in one is [" + context + "]");
        }
    }
}

protected void initApplicationContext(ApplicationContext context) throws BeansException {
    // 这里调用到了AbstractDetectingUrlHandlerMapping的initApplicationContext方法
    initApplicationContext();
}
AbstractDetectingUrlHandlerMapping.java
@Override
public void initApplicationContext() throws ApplicationContextException {
    // 调用父类的方法,初始化ApplicationContext
    super.initApplicationContext();
    // 完成初始化之后,开始构建Controller 和url 的对应关系
    detectHandlers();
}
detectHandlers()方法是需要我们重点关注的。
// 建立当前ApplicationContext 中的所有Controller类和url(Controller类路径 + 方法路径)的对应关系
protected void detectHandlers() throws BeansException {
    ApplicationContext applicationContext = obtainApplicationContext();
    if (logger.isDebugEnabled()) {
        logger.debug("Looking for URL mappings in application context: " + applicationContext);
    }
    // 获取ApplicationContext容器中所有bean的Name
    String[] beanNames = (this.detectHandlersInAncestorContexts ?
            BeanFactoryUtils.beanNamesForTypeIncludingAncestors(applicationContext, Object.class) :
            applicationContext.getBeanNamesForType(Object.class));
    // Take any bean name that we can determine URLs for.
    // 遍历beanNames,并找到这些bean对应的url(全路径)
    for (String beanName : beanNames) {
        // 找bean上的所有url(Controller 上的url+方法上的url),该方法由对应的子类实现
        String[] urls = determineUrlsForHandler(beanName);
        if (!ObjectUtils.isEmpty(urls)) {
            // URL paths found: Let's consider it a handler.
            // 依次保存这个beanName和它所有的url的对应关系,put it to Map<urls,beanName>,
            // 该方法在父类AbstractUrlHandlerMapping中实现
            registerHandler(urls, beanName);
        }
        else {
            if (logger.isDebugEnabled()) {
                logger.debug("Rejected bean name '" + beanName + "': no URL paths identified");
            }
        }
    }
}


/** 获取Controller中所有方法的url,返回的是url数组。由子类实现,根据我们配置Controller路径的方法不同(xml配置方法或注解配置方法),这个方法就会由不同的子类实现,典型的模板模式**/
protected abstract String[] determineUrlsForHandler(String beanName);
determineUrlsForHandler(String beanName)方法的作用是获取每个Controller 中的url,不同的子类有不同的实现,这是一个典型的模板设计模式。因为开发中我们用的最多的就是用注解来配置Controller 中的url,BeanNameUrlHandlerMapping 是AbstractDetectingUrlHandlerMapping 的子类,处理注解形式的url 映射。所以我们这里以BeanNameUrlHandlerMapping 来进行分析。我们看BeanNameUrlHandlerMapping 是如何查beanName 上所有映射的url。
BeanNameUrlHandlerMapping.java
// 返回beanName对应的Controller中所有方法的url数组
protected String[] determineUrlsForHandler(String beanName) {
    List<String> urls = new ArrayList<>();
    if (beanName.startsWith("/")) {
        urls.add(beanName);
    }
    // 这里调用的是父类的方法,父类中会根据beanName获取其所有的别名,然后再遍历别名,如果别名以"/"开头,则加入到urls中
    String[] aliases = obtainApplicationContext().getAliases(beanName);
    for (String alias : aliases) {
        if (alias.startsWith("/")) {
            urls.add(alias);
        }
    }
    return StringUtils.toStringArray(urls);
}
通过方法,就获得了Controller中所有方法的全url数组。
下面再去建立url和Controller的对应关系。将它们之间的关系添加到Map中。
AbstractUrlHandlerMapping.java
protected void registerHandler(String[] urlPaths, String beanName) throws BeansException, IllegalStateException {
    Assert.notNull(urlPaths, "URL path array must not be null");
    // 遍历每一个url,以此将每一个url和beanName注册到handlerMap中
    for (String urlPath : urlPaths) {
        // 将当前遍历到的urlPath和beanName注册到handlerMap中。handlerMap是HandlerMapping实现类的成员属性。
        registerHandler(urlPath, beanName);
    }
}

protected void registerHandler(String urlPath, Object handler) throws BeansException, IllegalStateException {
    Assert.notNull(urlPath, "URL path must not be null");
    Assert.notNull(handler, "Handler object must not be null");
    Object resolvedHandler = handler;
    // Eagerly resolve handler if referencing singleton via name.
    if (!this.lazyInitHandlers && handler instanceof String) {
        String handlerName = (String) handler;
        ApplicationContext applicationContext = obtainApplicationContext();
        if (applicationContext.isSingleton(handlerName)) {
            resolvedHandler = applicationContext.getBean(handlerName);
        }
    }
    // 从handlerMap中获取urlPath对应的handler
    Object mappedHandler = this.handlerMap.get(urlPath);
    // 如果handlerMap中已经存在urlPath对应的handler
    // 则抛出异常
    if (mappedHandler != null) {
        if (mappedHandler != resolvedHandler) {
            throw new IllegalStateException(
                    "Cannot map " + getHandlerDescription(handler) + " to URL path [" + urlPath +
                    "]: There is already " + getHandlerDescription(mappedHandler) + " mapped.");
        }
    }
    // 如果handlerMap中不存在urlPath对应的handler
    // 则将urlPath和handler放入handlerMap中
    else {
        if (urlPath.equals("/")) {
            if (logger.isTraceEnabled()) {
                logger.trace("Root mapping to " + getHandlerDescription(handler));
            }
            setRootHandler(resolvedHandler);
        }
        else if (urlPath.equals("/*")) {
            if (logger.isTraceEnabled()) {
                logger.trace("Default mapping to " + getHandlerDescription(handler));
            }
            setDefaultHandler(resolvedHandler);
        }
        else {
            // 将url和handler放入handlerMap中,构建起了全url和Controller之间的映射关系
            this.handlerMap.put(urlPath, resolvedHandler);
            if (logger.isTraceEnabled()) {
                logger.trace("Mapped [" + urlPath + "] onto " + getHandlerDescription(handler));
            }
        }
    }
}
到这里HandlerMapping 组件就已经建立所有url 和Controller 的对应关系。
2.2.2 运行调用阶段
下面我们进入到真正的请求调用阶段的源码分析。这一步的起点就是由从客户端发送过来的请求触发的。
2.2.2.1 准备工作
Spring MVC是基于Servlet的,所以请求来了之后也适合Servlet一样,会进入到service()方法。
FrameworkServlet.java
@Override
protected void service(HttpServletRequest request, HttpServletResponse response)
        throws ServletException, IOException {
    HttpMethod httpMethod = HttpMethod.resolve(request.getMethod());
    if (httpMethod == HttpMethod.PATCH || httpMethod == null) {
        processRequest(request, response);
    }
    else {
        // 执行HttpServlet中的service方法
        super.service(request, response);
    }
}
HttpServlet.java
protected void service(HttpServletRequest req, HttpServletResponse resp)
        throws ServletException, IOException {
    String method = req.getMethod();
    // 这里就根据请求类型来进行相应的处理
    if (method.equals(METHOD_GET)) {
        long lastModified = getLastModified(req);
        if (lastModified == -1) {
            // servlet doesn't support if-modified-since, no reason
            // to go through further expensive logic
            doGet(req, resp);
        } else {
            long ifModifiedSince = req.getDateHeader(HEADER_IFMODSINCE);
            if (ifModifiedSince < lastModified) {
                // If the servlet mod time is later, call doGet()
                // Round down to the nearest second for a proper compare
                // A ifModifiedSince of -1 will always be less
                maybeSetLastModified(resp, lastModified);
                // 我们以处理GET请求为例
                // 这里其实调用的是FrameworkServlet中的doGet方法
                doGet(req, resp);
            } else {
                resp.setStatus(HttpServletResponse.SC_NOT_MODIFIED);
            }
        }
    } else if (method.equals(METHOD_HEAD)) {
        long lastModified = getLastModified(req);
        maybeSetLastModified(resp, lastModified);
        doHead(req, resp);
    } else if (method.equals(METHOD_POST)) {
        doPost(req, resp);

    } else if (method.equals(METHOD_PUT)) {
        doPut(req, resp);

    } else if (method.equals(METHOD_DELETE)) {
        doDelete(req, resp);

    } else if (method.equals(METHOD_OPTIONS)) {
        doOptions(req,resp);

    } else if (method.equals(METHOD_TRACE)) {
        doTrace(req,resp);

    } else {
        //
        // Note that this means NO servlet supports whatever
        // method was requested, anywhere on this server.
        //
        String errMsg = lStrings.getString("http.method_not_implemented");
        Object[] errArgs = new Object[1];
        errArgs[0] = method;
        errMsg = MessageFormat.format(errMsg, errArgs);

        resp.sendError(HttpServletResponse.SC_NOT_IMPLEMENTED, errMsg);
    }
}
FrameworkServlet.java
@Override
protected final void doGet(HttpServletRequest request, HttpServletResponse response)
        throws ServletException, IOException {

    processRequest(request, response);
}
FrameworkServlet.java
protected final void processRequest(HttpServletRequest request, HttpServletResponse response)
        throws ServletException, IOException {
    long startTime = System.currentTimeMillis();
    Throwable failureCause = null;
    LocaleContext previousLocaleContext = LocaleContextHolder.getLocaleContext();
    LocaleContext localeContext = buildLocaleContext(request);
    RequestAttributes previousAttributes = RequestContextHolder.getRequestAttributes();
    ServletRequestAttributes requestAttributes = buildRequestAttributes(request, response, previousAttributes);
    WebAsyncManager asyncManager = WebAsyncUtils.getAsyncManager(request);
    asyncManager.registerCallableInterceptor(FrameworkServlet.class.getName(), new RequestBindingInterceptor());
    initContextHolders(request, localeContext, requestAttributes);
    try {
        // 这里就调用了DispatcherServlet的doService方法,正式进入到Spring MVC处理请求的流程中来
        doService(request, response);
    }
    catch (ServletException | IOException ex) {
        failureCause = ex;
        throw ex;
    }
    catch (Throwable ex) {
        failureCause = ex;
        throw new NestedServletException("Request processing failed", ex);
    }
    finally {
        resetContextHolders(request, previousLocaleContext, previousAttributes);
        if (requestAttributes != null) {
            requestAttributes.requestCompleted();
        }
        logResult(request, response, failureCause, asyncManager);
        publishRequestHandledEvent(request, response, startTime, failureCause);
    }
}
请求到达DispatcherServlet前端控制器的第一站doService()方法,所有发送到Spring MVC的请求都会先进入这个方法,做些准备工作。
DispatcherServlet.java
/**
 * Exposes the DispatcherServlet-specific request attributes and delegates to {@link #doDispatch}
 * for the actual dispatching.
 */
@Override
protected void doService(HttpServletRequest request, HttpServletResponse response) throws Exception {
   if (logger.isDebugEnabled()) {
      String requestUri = urlPathHelper.getRequestUri(request);
      logger.debug("DispatcherServlet with name '" + getServletName() + "' processing " + request.getMethod() +
            " request for [" + requestUri + "]");
   }
   // 保护现场
   // Keep a snapshot of the request attributes in case of an include,
   // to be able to restore the original attributes after the include.
   Map<String, Object> attributesSnapshot = null;
   if (WebUtils.isIncludeRequest(request)) {
      logger.debug("Taking snapshot of request attributes before include");
      attributesSnapshot = new HashMap<String, Object>();
      Enumeration<?> attrNames = request.getAttributeNames();
      while (attrNames.hasMoreElements()) {
         String attrName = (String) attrNames.nextElement();
         if (this.cleanupAfterInclude || attrName.startsWith("org.springframework.web.servlet")) {
            attributesSnapshot.put(attrName, request.getAttribute(attrName));
         }
      }
   }
   // 将框架相关信息存储至request,方便后面的处理器和视图用到
   // Make framework objects available to handlers and view objects.
   request.setAttribute(WEB_APPLICATION_CONTEXT_ATTRIBUTE, getWebApplicationContext());
   request.setAttribute(LOCALE_RESOLVER_ATTRIBUTE, this.localeResolver);
   request.setAttribute(THEME_RESOLVER_ATTRIBUTE, this.themeResolver);
   request.setAttribute(THEME_SOURCE_ATTRIBUTE, getThemeSource());
   FlashMap inputFlashMap = this.flashMapManager.retrieveAndUpdate(request, response);
   if (inputFlashMap != null) {
      request.setAttribute(INPUT_FLASH_MAP_ATTRIBUTE, Collections.unmodifiableMap(inputFlashMap));
   }
   request.setAttribute(OUTPUT_FLASH_MAP_ATTRIBUTE, new FlashMap());
   request.setAttribute(FLASH_MAP_MANAGER_ATTRIBUTE, this.flashMapManager);
   // 请求分发
   try {
      // 调用DispatcherServlet类的doDispatch()方法,这是核心逻辑实现,真正处理请求的方法
      doDispatch(request, response);
   }
   finally {
      // Restore the original attribute snapshot, in case of an include.
      if (attributesSnapshot != null) {
         restoreAttributesAfterInclude(request, attributesSnapshot);
      }
   }
}
2.2.2.2 处理请求
下面开始处理请求。doService()中的核心逻辑由doDispatch()实现,源代码如下:
DispatcherServlet.java
/** 中央控制器,控制请求的转发 **/
protected void doDispatch(HttpServletRequest request, HttpServletResponse response) throws Exception {
    HttpServletRequest processedRequest = request;
    // 声明处理器执行链对象
    HandlerExecutionChain mappedHandler = null;
    boolean multipartRequestParsed = false;
    WebAsyncManager asyncManager = WebAsyncUtils.getAsyncManager(request);
    try {
        ModelAndView mv = null;
        Exception dispatchException = null;
        try {
            // 1.检查是否是文件上传的请求
            processedRequest = checkMultipart(request);
            multipartRequestParsed = (processedRequest != request);

            // Determine handler for the current request.
            // 2.通过请求的url在HandlerMapping的成员属性HandlerMap中取得处理当前请求的Controller,这里也称为hanlder处理器。
            // 这里并不是直接返回Controller,而是返回的HandlerExecutionChain处理器执行链对象,
            // 该对象封装了handler处理器和AdapterIntercepters拦截器.
            // 【下面笔记中的整个1章节都是讲解这一步流程的】
            mappedHandler = getHandler(processedRequest);
            if (mappedHandler == null) {
                noHandlerFound(processedRequest, response);
                return;
            }

            // Determine handler adapter for the current request.
            // 3.根据HandlerExecutionChain中的处理器Handler来获取处理request的处理器适配器HandlerAdapter
            // 【下面笔记中的整个2章节都是讲解这一步流程的】
            HandlerAdapter ha = getHandlerAdapter(mappedHandler.getHandler());

            // Process last-modified header, if supported by the handler.
            // 处理last-modified 请求头
            String method = request.getMethod();
            boolean isGet = "GET".equals(method);
            if (isGet || "HEAD".equals(method)) {
                long lastModified = ha.getLastModified(request, mappedHandler.getHandler());
                if (logger.isDebugEnabled()) {
                    logger.debug("Last-Modified value for [" + getRequestUri(request) + "] is: " + lastModified);
                }
                if (new ServletWebRequest(request, response).checkNotModified(lastModified) && isGet) {
                    return;
                }
            }

            // 3.1 获取拦截器,并执行拦截器处理方法。这里会去判断当前请求需不需要执行相应的拦截器方法,如果需要就去执行拦截器逻辑
            // 在执行处理请求的handle方法之前,执行相应的拦截器方法
            if (!mappedHandler.applyPreHandle(processedRequest, response)) {
                return;
            }

            // Actually invoke the handler.
            // 4.通过处理器适配器HandlerApapter来调用处理器完成对请求的处理,返回结果视图对象
            // 【下面笔记中的整个3章节都是讲解这一步流程的】
            mv = ha.handle(processedRequest, response, mappedHandler.getHandler());
            if (asyncManager.isConcurrentHandlingStarted()) {
                return;
            }

            // 设置默认视图。到这里还没有开始视图解析阶段,只是简单设置了一下默认视图名字(设置了一下mv对象的ViewName属性)
            applyDefaultViewName(processedRequest, mv);
            // 在执行处理请求的handle方法之后,执行拦截器的postHandle方法
            mappedHandler.applyPostHandle(processedRequest, response, mv);
        } catch (Exception ex) {
            dispatchException = ex;
        } catch (Throwable err) {
            // As of 4.3, we're processing Errors thrown from handler methods as well,
            // making them available for @ExceptionHandler methods and other scenarios.
            dispatchException = new NestedServletException("Handler dispatch failed", err);
        }

        // 5.视图解析渲染
        // 使用视图解析器对ModelAndView对象进行解析,将model数据渲染到页面中返回给客户端
        // 其中会调用view.render方法做视图渲染,获得最终要展示的页面
        // 【下面笔记中的整个2.2.2.3小节都是讲解这一步流程的】
        processDispatchResult(processedRequest, response, mappedHandler, mv, dispatchException);
    } catch (Exception ex) {
        triggerAfterCompletion(processedRequest, response, mappedHandler, ex);
    } catch (Throwable err) {
        triggerAfterCompletion(processedRequest, response, mappedHandler,
                new NestedServletException("Handler processing failed", err));
    } finally {
        if (asyncManager.isConcurrentHandlingStarted()) {
            // Instead of postHandle and afterCompletion
            if (mappedHandler != null) {
                // 请求成功响应之后的方法
                mappedHandler.applyAfterConcurrentHandlingStarted(processedRequest, response);
            }
        } else {
            // Clean up any resources used by a multipart request.
            if (multipartRequestParsed) {
                cleanupMultipart(processedRequest);
            }
        }
    }
}
1 getHandler(HttpServletRequest request) 获取处理器执行链(处理器+拦截器)
该方法通过HandlerMapping对象获取HandlerExecutionChain(处理器和拦截器)。
DispatcherServlet.java
/**
 * Return the HandlerExecutionChain for this request.
 * <p>Tries all handler mappings in order.
 * @param request current HTTP request
 * @return the HandlerExecutionChain, or {@code null} if no handler could be found
 */
@Nullable
protected HandlerExecutionChain getHandler(HttpServletRequest request) throws Exception {
   if (this.handlerMappings != null) {
      // 遍历当前存在的所有的HandlerMapping,尝试从遍历到的HandlerMapping获取当前请求url对应的处理器执行链
      // 这里遍历当前Spring中已经被加载的全部HandlerMapping,就是上面我们讲的那些。
      for (HandlerMapping mapping : this.handlerMappings) {
         // 尝试从当前的HandlerMapping获取当前请求url的处理器执行链
         // 之前讲过了不同处理器映射器的匹配方法不同,这个取决于我们的Controller是怎么实现的
         // 这里会尝试从每一个处理器映射器中获取当前请求对应的handler处理器,如果能找到,就说明此时遍历到的处理器映射器就是我们要的
         // 我们现在最常用的处理器映射器是RequestMappingHandlerMapping,它根据@Controller注解和@RequestMapping注解来确定请求的处理程序,这也是当前最流行的编写Controller的方法
         HandlerExecutionChain handler = mapping.getHandler(request);
         // 如果能找到当前url对应的处理器执行链,就直接返回
         if (handler != null) {
            return handler;
         }
      }
   }
   return null;
}
handlerMappings是DispatcherServlet的成员属性,里面记录着当前所有的处理器映射器:
private List<HandlerMapping> handlerMappings;
现在我们最常用的编写处理器Controller的方式就是使用@Controller和@RequestMapping注解,而这种方式对应的处理器映射器是RequestMappingHandlerMapping,对应的处理器适配器是RequestMappingHandlerAdapter,对应的处理器是HandlerMethod。后面我们就基于这些实现类来进行源码分析。
1.1 getHandler(HttpServletRequest request)
这个方法指的是上面讲的DispatcherServlet#getHandler()方法内调用的HandlerMapping#getHandler()方法。该方法是在接口HandlerMapping中定义的,由实现该接口的抽象类AbstractHandlerMapping实现的。
该方法通过request获取处理器Handler,获取处理器Handler后,再获取拦截器,最后组成HandlerExecutionChain并将其返回。
AbstractHandlerMapping.java
/**
 * Look up a handler for the given request, falling back to the default
 * handler if no specific one is found.
 * @param request current HTTP request
 * @return the corresponding handler instance, or the default handler
 * @see #getHandlerInternal
 */
public final HandlerExecutionChain getHandler(HttpServletRequest request) throws Exception {
   // 首先根据request获取handler
   Object handler = getHandlerInternal(request);
   // 如果没有指定handler,就使用默认的
   if (handler == null) {
      handler = getDefaultHandler();
   }
   if (handler == null) {
      return null;
   }
   // Bean name or resolved handler?
   if (handler instanceof String) {
      String handlerName = (String) handler;
      handler = getApplicationContext().getBean(handlerName);
   }
   // 获取到了handler之后,再去获取拦截器,将两者封装到处理器执行链中返回
   return getHandlerExecutionChain(handler, request);
}
1.1.1 getHandlerInternal(HttpServletRequest request)获取Handler
我们使用最常用的RequestMappingHandlerMapping映射器为例,这个方法是通过RequestMappingHandlerMapping继承的父类RequestMappingInfoHandlerMapping实现的。
RequestMappingInfoHandlerMapping.java
@Override
@Nullable
protected HandlerMethod getHandlerInternal(HttpServletRequest request) throws Exception {
    request.removeAttribute(PRODUCIBLE_MEDIA_TYPES_ATTRIBUTE);
    try {
        // 调用父类的getHandlerInternal方法。该父类就是AbstractHandlerMethodMapping
        return super.getHandlerInternal(request);
    }
    finally {
        ProducesRequestCondition.clearMediaTypesAttribute(request);
    }
}
这里返回的就是HandlerMethod处理器,因为我们用最常用的基于@RequestMapping注解实现的处理器为例,对应的处理器实现类就是HandlerMethod。
AbstractHandlerMethodMapping<T>就是RequestMappingInfoHandlerMapping的父类。这是一个泛型类,T指的就是匹配条件的类型。我们平时最常用的匹配条件类型就是RequestMappingInfo(也就是T -> RequestMappingInfo)。
AbstractHandlerMethodMapping.java
/**
 * Look up a handler method for the given request.
 */
@Override
@Nullable
protected HandlerMethod getHandlerInternal(HttpServletRequest request) throws Exception {
    // 解析请求路径Url
    String lookupPath = getUrlPathHelper().getLookupPathForRequest(request);
    request.setAttribute(LOOKUP_PATH, lookupPath);
    // 加只读锁
    this.mappingRegistry.acquireReadLock();
    try {
        // 根据请求路径找到要处理该请求的方法(controller & method)
        HandlerMethod handlerMethod = lookupHandlerMethod(lookupPath, request);
        // 如果可以找到handlerMethod则调用createWithResolvedBean方法创建新的HandlerMethod
        return (handlerMethod != null ? handlerMethod.createWithResolvedBean() : null);
    }
    finally {
        // 释放只读锁
        this.mappingRegistry.releaseReadLock();
    }
}
1.1.1.1 lookupHandler(lookupPath, request)根据给定url path和request获取Handler
AbstractHandlerMethodMapping.java
protected HandlerMethod lookupHandlerMethod(String lookupPath, HttpServletRequest request) throws Exception {
    // 先创建一个match集合,match是AbstractHandlerMethodMapping的内部类,用于保存匹配条件和HandlerMethod
    // 这个匹配条件在后面会从mappingRegistry中获取,
    // mappingRegistry是AbstractHandlerMethodMapping的内部类MappingRegistry,它里面存储了很多url和处理器的映射关系,以后我们会详细讲一下这个类
    List<Match> matches = new ArrayList<Match>();

    /**
     * 当前我们是以AbstractHandlerMethodMapping为例来讲解源码,所以这里说的匹配条件就是指RequestMappingInfo
     * 我们只是用URL是不太够用的,因为请求还会有很多其他的信息,RequestMappingInfo里面会存储请求 URL、请求方法、URI 模板变量、请求参数、请求头等信息。
     * 所以我们就用这个对象来表示当前的请求
     */
    // 1. 根据lookupPath获取到匹配条件(RequestMappingInfo),有可能拿到很多匹配条件,所以这里创建的是一个匹配条件类型的集合
    // getMappingsByUrl()方法是MappingRegistry的方法,它是利用MappingRegistry的成员属性urlLookup(它是一个map,存储了url和匹配信息的映射关系),根据url来获取对应的匹配条件信息(RequestMappingInfo)
    // url和匹配条件之间的关系此时已经被缓存到了mappingRegistry中,可以通过url快速获取到对应的匹配条件
    // 以我们当前的例子,directPathMatches就是一个RequestMappingInfo集合
    List<T> directPathMatches = this.mappingRegistry.getMappingsByUrl(lookupPath);

    // 如果成功获取到url对应的匹配条件,则将匹配条件添加到matches
    if (directPathMatches != null) {
        // 将匹配到的匹配条件directPathMatches添加到matches
        /**
         * 这里简单讲解一下
         * Match类中有两个属性,一个是mapping,一个是handlerMethod。分别保存匹配条件(其实就是标识请求的信息,可以简单理解为url,当前的例子其实应该是RequestMappingInfo类型)和对应的处理器信息
         *
         * addMatchingMappings()方法就是遍历传入的directPathMatches(RequestMappingInfo集合)
         * 先将当前遍历到的RequestMappingInfo和请求的request封装成一个新的RequestMappingInfo对象(match),
         * 然后尝试利用mappingRegistry的mappingLookup,根据当前遍历到的RequestMappingInfo来获取对应的处理器(handlerMethod),其实就可以简单理解为通过url获取对应的handlerMethod
         * (mappingRegistry在初始化的时候已经建立好了所有url和handlerMethod的映射关系,这里我们就直接认为这些信息都已经有了)
         * 如果成功找到了当前请求对应的处理器handlerMethod,就将刚才封装的新的RequestMappingInfo对象和找到的对应的处理器handlerMethod封装成Match对象,添加到matches集合中
         *
         * 这样,addMatchingMappings()方法就将当前请求url和其对应的处理器都映射保存到了match中,我们也就找到了要处理当前请求的具体方法是什么了。
         *
         */
        addMatchingMappings(directPathMatches, matches, request);
    }

    // 如果到了这里matches为空,说明不能直接使用lookupPath得到匹配条件,则将所有匹配条件加入到matches
    if (matches.isEmpty()) {
        // No choice but to go through all mappings...
        // 将mappingRegistry中的所有匹配条件都拿出来,然后添加到matches
        // 这里的mappingRegistry.getMappings()返回的是一个mappingLookup,
        // 这是一个Map,key是匹配条件(RequestMappingInfo),value是对应的处理器(HandlerMethod)
        // 这里就将所有的匹配条件都拿出来,使用addMatchingMappings方法将其添加到matches
        addMatchingMappings(this.mappingRegistry.getMappings().keySet(), matches, request);
    }

    // 至此,matches中已经保存了所有匹配条件和对应的处理器(也就是存储了请求路径url和对应的要处理该请求的处理器方法之间的映射关系),接下来就是从matches中找到最佳匹配的处理器了
    // 对matches进行排序,并取第一个作为bestMatch(最佳匹配),如果前面两个排序相同则抛出异常
    if (!matches.isEmpty()) {
        // 创建比较器
        Comparator<Match> comparator = new MatchComparator(getMappingComparator(request));
        // 对matches进行排序
        Collections.sort(matches, comparator);
        if (logger.isTraceEnabled()) {
            logger.trace("Found " + matches.size() + " matching mapping(s) for [" +
                    lookupPath + "] : " + matches);
        }
        // 获取排序后的第一个matche(这里面存储了匹配条件和HandlerMethod处理器)
        Match bestMatch = matches.get(0);
        if (matches.size() > 1) {
            if (CorsUtils.isPreFlightRequest(request)) {
                return PREFLIGHT_AMBIGUOUS_MATCH;
            }
            // 如果matches有多个匹配的,则将第2个和第一个进行比较,看顺序是否一样,如果是的话,则抛出异常
            Match secondBestMatch = matches.get(1);
            if (comparator.compare(bestMatch, secondBestMatch) == 0) {
                Method m1 = bestMatch.handlerMethod.getMethod();
                Method m2 = secondBestMatch.handlerMethod.getMethod();
                throw new IllegalStateException("Ambiguous handler methods mapped for HTTP path '" +
                        request.getRequestURL() + "': {" + m1 + ", " + m2 + "}");
            }
        }
        // 在返回前做一些处理,默认实现是将lookupPath设置到request的属性,
        // 子类RequestMappingInfoHandlerMapping进行了重写,将更多的参数设置到了request,主要是为了以后使用时方便
        handleMatch(bestMatch.mapping, lookupPath, request);
        // 最终返回的是 Match.handlerMethod 对象,也就是我们需要的handler
        return bestMatch.handlerMethod;
    }
    else {
        return handleNoMatch(this.mappingRegistry.getMappings().keySet(), lookupPath, request);
    }
}
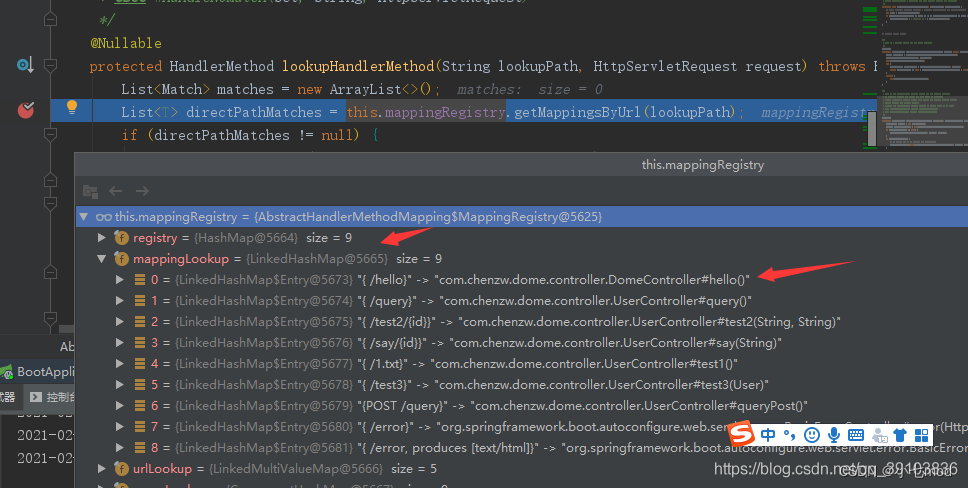
可以通过在这里打断点发现,Spring MVC在底层缓存了url和HandlerMethod之间的对应关系,该映射关系被mappingRegistry所保存,当有请求来时,可以直接通过url获取HandlerMethod对象。
那url和HandlerMethod之间的映射关系是何时建立的呢?Spring MVC是如何解析@RequestMapping注解的,这个我们留到后面再单独分析。
1.1.1.1.1 Match内部类
在上面的源码中,涉及到了Match类型,我们可能不太明白这是个啥,这里介绍一下这个类。
Match 是 AbstractHandlerMethodMapping 内部类,用于存储处理程序方法和请求 URL 之间的映射关系。它包含了请求 URL、处理程序方法、URI 模板变量、请求参数、请求头等信息。在 Spring MVC 中,AbstractHandlerMethodMapping 是一个抽象类,它的子类可以根据不同的 URL 映射策略来实现请求 URL 和处理程序方法之间的映射关系。Match 类的作用是在请求到达时,根据请求 URL 和请求方法,找到对应的处理程序方法。
Match 类中的 mapping 属性存储了请求 URL 和处理程序方法之间的映射关系。具体来说,mapping 属性是一个泛型,它的类型取决于 AbstractHandlerMethodMapping 的子类实现。例如,如果是 RequestMappingHandlerMapping,则 mapping 属性的类型是 RequestMappingInfo,它包含了请求 URL、请求方法、URI 模板变量、请求参数、请求头等信息。在 Match 类的构造方法中,将 mapping 属性和对应的 HandlerMethod 对象一起传入,表示这个 Match 对象对应了一个请求 URL 和处理程序方法之间的映射关系。因此,Match 类中存储了请求 URL 和处理程序方法之间的映射关系。
源码:
private class Match {
    // 用于存储匹配条件(请求 URL、请求方法、URI 模板变量、请求参数、请求头等信息)
    private final T mapping;

    // 存储处理器(Controller 中对应的方法)
    private final HandlerMethod handlerMethod;

    public Match(T mapping, HandlerMethod handlerMethod) {
        this.mapping = mapping;
        this.handlerMethod = handlerMethod;
    }

    @Override
    public String toString() {
        return this.mapping.toString();
    }
}
1.1.1.1.2 getMappingsByUrl()
AbstractHandlerMethodMapping.java
public List<T> getMappingsByUrl(String urlPath) {
    // urlLookup 是一个 Map 类型的变量,通过 urlPath 直接返回 RequestMappingInfo 对象实例
    return this.urlLookup.get(urlPath);
}
从上面的代码分析我们应该已经知道,要获取对应请求的后端处理器 Handler,首先需要获取到请求路径信息,这个直接可以从 Request 对象中获取到。然后 AbstractHandlerMethodMapping 维护了一个 MappingRegistry 类型的变量,该变量又维护了 MultiValueMap<String, T> urlLookup 类型的变量,通过请求路径信息可以得到一个RequestMappingInfo集合,而我们就可以通过这个集合获得Match,进而便得到了请求对应的 Handler。可见 urlLookup 是至关重要的,它什么时候保存了请求路径和 Handler 的对应关系呢?这个在这里已经分析过了AbstractHandlerMethodMapping的初始化,本文还是主要把目光放在请求过程中。我们目前就认为 urLookup 对象已经存在,且已经有了我们需要的映射关系,它应该是在启动容器的时候就完成了这一步,但是我们目前先不管它。
1.1.1.1.3 addMatchingMappings()
// org.springframework.web.servlet.handler.AbstractHandlerMethodMapping#addMatchingMappings
// 过滤请求的逻辑
private void addMatchingMappings(Collection<T> mappings, List<Match> matches, HttpServletRequest request) {
    for (T mapping : mappings) {
        // 查看这个方法是否匹配这个请求
        T match = getMatchingMapping(mapping, request);
        if (match != null) {
            matches.add(new Match(match, this.mappingRegistry.getMappings().get(mapping)));
        }
    }
}
遍历getMappingsByUrl()方法返回过来的mappings集合,在当前的例子中就是RequestMappingInfo集合,每一个mapping就是一个RequestMappingInfo对象(匹配条件),然后再向这个匹配条件mapping中添加request信息,创建更加符合Match要求的匹配条件对象,将其赋值给match(仍然是RequestMappingInfo类型)。然后我们就可以去构造Match类型对象,将其加入到matches集合中了。
此时match对象就是匹配条件RequestMappingInfo,然后再通过mappingRegistry中的mappingLookup类型的Map,利用匹配条件mapping查询对应的处理器HandlerMethod,这样就将匹配调价和处理器都封装到了Match对象中。
// org.springframework.web.servlet.handler.AbstractHandlerMethodMapping#getMatchingMapping
// 校验当前的handler是否适合这个当前请求,主要匹配逻辑在getMatchingCondition中。
@Override
protected RequestMappingInfo getMatchingMapping(RequestMappingInfo info, HttpServletRequest request) {
    return info.getMatchingCondition(request);
}
我们从这里看到,过滤请求的主要逻辑在RequestMappingInfo 的getMatchingCondition中。我们再进去看看。
//org.springframework.web.servlet.mvc.method.RequestMappingInfo#getMatchingCondition
public RequestMappingInfo getMatchingCondition(HttpServletRequest request) {
    //首先匹配请求方法
    RequestMethodsRequestCondition methods = this.methodsCondition.getMatchingCondition(request);
    //匹配请求参数
    ParamsRequestCondition params = this.paramsCondition.getMatchingCondition(request);
    //匹配请求头
    HeadersRequestCondition headers = this.headersCondition.getMatchingCondition(request);
    //匹配可以接受请求的数据类型
    ConsumesRequestCondition consumes = this.consumesCondition.getMatchingCondition(request);
    //匹配可以发送的响应类型
    ProducesRequestCondition produces = this.producesCondition.getMatchingCondition(request);
    //上面任何一个没有匹配到都直接返回null,表示没有匹配
    if (methods == null || params == null || headers == null || consumes == null || produces == null) {
        return null;
    }

    //查询url路径的匹配
    PatternsRequestCondition patterns = this.patternsCondition.getMatchingCondition(request);
    if (patterns == null) {
        return null;
    }
    //spring 留下的扩展口,可以自定义匹配逻辑
    RequestConditionHolder custom = this.customConditionHolder.getMatchingCondition(request);
    if (custom == null) {
        return null;
    }

    return new RequestMappingInfo(this.name, patterns,
            methods, params, headers, consumes, produces, custom.getCondition());
}
这里说明了,我们在编写handler的时候,不仅可以用方法进行区分,还可以用参数,header,consumer,produce中的任何一个来加以分区调用不同的方法的。例如不想要某个参数,只需要用前面加上!即可。如@RequestMapping(param="!name")就表示匹配没有参数是name的所有请求。header也可以这么处理。还有匹配@RequestMapping(param="!name=张三")就是匹配所有name不等于张三的所有请求。这种表达式逻辑只有param和head有。其他几种都没有。
具体的匹配逻辑如下:
//匹配param是否符合表达式的处理逻辑。主要逻辑在match中
//org.springframework.web.servlet.mvc.condition.ParamsRequestCondition#getMatchingCondition
public ParamsRequestCondition getMatchingCondition(HttpServletRequest request) {
    for (ParamExpression expression : this.expressions) {
        if (!expression.match(request)) {
            return null;
        }
    }
    return this;
}

//org.springframework.web.servlet.mvc.condition.AbstractNameValueExpression#match
//先匹配表达式有没有这个值,有的话先按照值的方式处理
//如果没有值,则匹配有没有名字
//最后匹配是不是反向选择,isNegated就是配置的!的逻辑。
public final boolean match(HttpServletRequest request) {
    boolean isMatch;
    if (this.value != null) {
        isMatch = matchValue(request);
    }
    else {
        isMatch = matchName(request);
    }
    return (this.isNegated ? !isMatch : isMatch);
}
匹配到了,就把当前的RequestMappingInfo 返回。表示匹配到这个条件。
1.1.1.1.4 对于多个请求匹配后的排序,获取最合适的那一个
我们回到最开始的获取到所有的匹配方法之后,还需要进行排序。MatchComparator是用于排序的比较器。
// 主要对于多个请求的匹配之后的排序逻辑
// org.springframework.web.servlet.mvc.method.RequestMappingInfo#compareTo
public int compareTo(RequestMappingInfo other, HttpServletRequest request) {
    int result;
    // Automatic vs explicit HTTP HEAD mapping
    // 如果是head请求,则按照方法进行处理。
    if (HttpMethod.HEAD.matches(request.getMethod())) {
        result = this.methodsCondition.compareTo(other.getMethodsCondition(), request);
        if (result != 0) {
            return result;
        }
    }
    //然后按照路径进行处理
    result = this.patternsCondition.compareTo(other.getPatternsCondition(), request);
    if (result != 0) {
        return result;
    }
    //按照参数进行排序
    result = this.paramsCondition.compareTo(other.getParamsCondition(), request);
    if (result != 0) {
        return result;
    }
    //按照header进行排序
    result = this.headersCondition.compareTo(other.getHeadersCondition(), request);
    if (result != 0) {
        return result;
    }
    //按照consumes可以接受的参数进行排序
    result = this.consumesCondition.compareTo(other.getConsumesCondition(), request);
    if (result != 0) {
        return result;
    }
    //按照produces可以接受的参数进行排序
    result = this.producesCondition.compareTo(other.getProducesCondition(), request);
    if (result != 0) {
        return result;
    }
    // Implicit (no method) vs explicit HTTP method mappings
    //最后再按照方法来排序。
    result = this.methodsCondition.compareTo(other.getMethodsCondition(), request);
    if (result != 0) {
        return result;
    }
    result = this.customConditionHolder.compareTo(other.customConditionHolder, request);
    if (result != 0) {
        return result;
    }
    return 0;
}
从这里我们看到,主要是先按照路径,然后是参数,然后是header进行排序的。方法反而是最后一个。所以在设计多个方法匹配相同带有通配符url的时候,应当优先按照参数处理,而不是方法。
至此,我们就拿到了处理当前请求的处理器HandlerMethod(处理该请求的Controller中的方法)。下面我们再去分析创建处理器执行链的源码。
1.1.2 getHandlerExecutionChain(Object handler, HttpServletRequest request)
根据查找到的处理器Handler和request来获取拦截器AdaptedInterceptors,将其和Handler封装到处理器执行链HandlerExecutionChain中返回。
AbstractHandlerMapping.java
protected HandlerExecutionChain getHandlerExecutionChain(Object handler, HttpServletRequest request) {
    // 创建处理器执行链,先将handler放入处理器执行链中
    HandlerExecutionChain chain = (handler instanceof HandlerExecutionChain ?
            (HandlerExecutionChain) handler : new HandlerExecutionChain(handler));

    // 获取请求的路径
    String lookupPath = this.urlPathHelper.getLookupPathForRequest(request, LOOKUP_PATH);

    // 遍历拦截器,将拦截器放入处理器执行链中。adaptedInterceptors是一个拦截器列表,包含了所有的拦截器
    for (HandlerInterceptor interceptor : this.adaptedInterceptors) {
        // 如果拦截器是MappedInterceptor类型,那么就判断拦截器是否匹配请求路径,如果匹配就将拦截器放入处理器执行链中
        // MappedInterceptor是HandlerInterceptor的实现类,MappedInterceptor的matches方法用于判断拦截器是否匹配请求路径
        if (interceptor instanceof MappedInterceptor) {
            MappedInterceptor mappedInterceptor = (MappedInterceptor) interceptor;
            // 如果拦截器匹配请求路径,那么就将拦截器放入处理器执行链中
            if (mappedInterceptor.matches(lookupPath, this.pathMatcher)) {
                chain.addInterceptor(mappedInterceptor.getInterceptor());
            }
        }
        // 如果拦截器不是MappedInterceptor类型,那么就直接将拦截器放入处理器执行链中
        else {
            chain.addInterceptor(interceptor);
        }
    }

    // 上面的这个写法虽然会把请求路径不匹配的拦截器也加入到处理器执行链中,但是能保证所有请求路径匹配的拦截器都加入到处理器执行链中
    return chain;
}
1.1.2.1 HandlerExecutionChain处理器执行链
该方法返回了HandlerExecutionChain对象。HandlerExecutionChain是Handler执行链,包括Handler本身和HandlerInterceptor拦截器。其在HandlerExecutionChain中的定义如下:
// 处理器
private final Object handler;
// 拦截器数组
@Nullable
private HandlerInterceptor[] interceptors;
// 拦截器集合
@Nullable
private List<HandlerInterceptor> interceptorList;
1.1.2.1.1 HandlerInterceptor拦截器
HandlerInterceptor是一个拦截器,其可以在Spring MVC的请求过过程中在不同的时机回调不同的接口。HandlerInterceptor接口的定义如下:
public interface HandlerInterceptor {
    /**
     * 拦截处理程序的执行。在HandlerMapping确定适当的处理程序对象之后调用,但在HandlerAdapter调用处理程序之前调用。
     *
     * DispatcherServlet在执行链中处理一个处理程序,该处理程序由任意数量的拦截器组成,处理程序本身位于执行链的末端。
     * 使用此方法,每个拦截器可以决定中止执行链,通常是发送HTTP错误或编写自定义响应。
     *
     * 异步请求处理需要特殊考虑。 默认返回true
     *
     * 如果执行链应该继续下一个拦截器或处理程序本身,则返回@return {@code true}。
     * 否则,DispatcherServlet假设这个拦截器已经处理了响应本身。
     *
     */
    default boolean preHandle(HttpServletRequest request, HttpServletResponse response, Object handler)
            throws Exception {
        return true;
    }

    /**
     * 拦截处理程序的执行。在HandlerAdapter实际调用处理程序之后调用,但在DispatcherServlet呈现视图之前调用。
     * 可以通过给定的ModelAndView向视图公开其他模型对象。
     */
    default void postHandle(HttpServletRequest request, HttpServletResponse response, Object handler,
            @Nullable ModelAndView modelAndView) throws Exception {
    }

    /**
     * 请求处理完成后的回调,即呈现视图后的回调。将在处理程序执行的任何结果上调用,因此允许吗
     */
    default void afterCompletion(HttpServletRequest request, HttpServletResponse response, Object handler,
            @Nullable Exception ex) throws Exception {
    }
}
2 HandlerAdapter getHandlerAdapter(Object handler),根据Handler获取HandlerAdapter处理器适配器
现在我们已经获取到了 Handler 和拦截器,按理说直接调用处理器的业务方法不就好了么,干嘛还要找一下适配器,然后再通过适配器来调用Handler。
首先要理解一下什么是适配器,我们生活中也有很多使用适配器的场景,一个场景的例子就是电源适配器,我们知道有些手机因为品牌的不同,导致充电口都是不一样的。那么怎么解决这个问题呢?生产充电器的场景可以针对不同的手机品牌做不同的充电器,但是如果人家手机厂商又改变充电口模型了,那么你这生产充电器的厂家也要跟着变,这样很明显是有问题的。所以就又了适配器的产生,手机只管生产手机的事情,充电器也还按照之前的方式生产充电器,如果这两个不匹配了,搞一个转接头就好了。
那么 Handler 也是同理,其实有很多类型的 Handler, 如果是 Servlet,那么请求过来的时候需要调用 Servlet 的 Service 方法。如果是实现了 Controller 接口的 Handler,需要调用handleRequest 方法,如果是通过 @RequestMapping 注解类型的 Handler,那么它的类型就是 HandlerMethod,需要调用 handleInternal 方法,此外还有其它类型的 Handler,如果这些处理逻辑都交由 DispatcherServlet 来做,那么 DispatcherServlet 就会变得很臃肿,且免不了一些重复的代码。但是如果每种 Handler 都有对应的适配器,而不同的适配器暴露给 DispatcherServlet 的接口是一致了,那么就会使整个流程都更加清晰简洁,耦合性也跟着降低。其实AOP 拦截器链就使用到了适配器的概念,这些都是适配器模式在 Spring MVC 中的应用。
DispatcherServlet.java
/**
 * 找到处理该 handler 类型的适配器.
 * @param handler the handler object to find an adapter for
 * @throws ServletException if no HandlerAdapter can be found for the handler. This is a fatal error.
 */
protected HandlerAdapter getHandlerAdapter(Object handler) throws ServletException {
    // 遍历所有处理器适配器,调用各个适配器的 supports 方法验证是否匹配
    for (HandlerAdapter ha : this.handlerAdapters) {
       if (logger.isTraceEnabled()) {
          logger.trace("Testing handler adapter [" + ha + "]");
       }
       // 如果适配器支持该处理器,则返回该适配器
       if (ha.supports(handler)) {
          return ha;
       }
    }
    throw new ServletException("No adapter for handler [" + handler +
          "]: Does your handler implement a supported interface like Controller?");
 }
2.1 supports(Object handler)
我们最常使用@Controller注解和@RequestMapping注解,所以常用的处理器适配器为RequestMappingHandlerAdapter,这个类继承了AbstractHandlerMethodAdapter,supports()方法就是AbstractHandlerMethodAdapter类实现的。这里我们以AbstractHandlerMethodAdapter为例:
AbstractHandlerMethodAdapter.java
@Override
public final boolean supports(Object handler) {
    // 当前这个handler是否是HandlerMethod的实例
    return (handler instanceof HandlerMethod && supportsInternal((HandlerMethod) handler));
}
RequestMappingHandlerAdapter.java
// 总是返回true,没什么作用
@Override
protected boolean supportsInternal(HandlerMethod handlerMethod) {
    return true;
}
2.2 applyPreHandle() 应用前置拦截器
在获取到处理器适配器之后,调用处理器方法之前,会先去执行拦截器的preHandle方法。
HandlerExecutionChain.java
/**
 * 调用注册的HandlerInterceptor拦截器中的preHandle方法
 *
 * 1.preHandle:HandlerMapping确定适当的处理程序对象之后,在HandlerAdapter调用处理程序之前调用
 * 2.preHandle默认返回true,如果返回true,则DispatcherServlet假设这个拦截器已经处理了响应本身。
 *
 * Apply preHandle methods of registered interceptors.
 * @return {@code true} if the execution chain should proceed with the
 * next interceptor or the handler itself. Else, DispatcherServlet assumes
 * that this interceptor has already dealt with the response itself.
 */
boolean applyPreHandle(HttpServletRequest request, HttpServletResponse response) throws Exception {
    // 获取拦截器数组
    HandlerInterceptor[] interceptors = getInterceptors();
    // 如果拦截器数组为空,直接返回true
    if (!ObjectUtils.isEmpty(interceptors)) {
        // 遍历拦截器数组
        for (int i = 0; i < interceptors.length; i++) {
            HandlerInterceptor interceptor = interceptors[i];
            // 调用拦截器的preHandle方法
            // 如果preHandle()返回false,就直接返回false
            if (!interceptor.preHandle(request, response, this.handler)) {
                triggerAfterCompletion(request, response, null);
                return false;
            }
            this.interceptorIndex = i;
        }
    }
    return true;
}
这里要注意一下applyPreHandle的返回值,如果为true的话则表示DispatcherServlet已经完成了本次请求处理。
3 HandlerAdapter.handle() 利用处理器适配器,执行处理器方法完成对请求的处理
我们当前以使用@Controller + @RequestMapping创建处理器为例来讲解源码,所以这里使用AbstractHandlerMethodAdapter和RequsetMappingHandlerAdapter这两个处理器适配器为例来进行讲解。
因为不同的处理器实现方法(编写Controller层代码)会对应不同的处理器类型,为了能够统一暴露给Spring MVC的DispatcherServlet(如果不自己手动添加,那么Spring MVC就只会有这一个Servlet)相同的调用接口来调用处理器的方法,所以就需要用的处理器适配器来调用处理器的处理方法。
每个适配器都会有 handle(HttpServletRequest request, HttpServletResponse response, Object handler) 方法,这就是 DispatcherServlet 调用适配器方法的入口(mv = ha.handle(processedRequest, response, mappedHandler.getHandler()))。我们现在已经通过getHandlerAdapter(mappedHandler.getHandler())方法获取到了RequestMappingHandlerAdapter 适配器对象ha,但是它又没有该方法,所以一定是它的父类有该方法,所以看一下 AbstractHandlerMethodAdapter.handle 方法。
AbstractHandlerMethodAdapter.java
// 该方法是在DispatcherServlet中调用的,用于处理请求,
// 它会根据请求找到Handler,然后调用对应HandlerAdapter的handle方法,最后返回一个ModelAndView对象,用于渲染视图。
public final ModelAndView handle(HttpServletRequest request, HttpServletResponse response, Object handler)
        throws Exception {

    // 该方法是处理请求的真正逻辑。handleInternal()是AbstractHandlerMethodAdapter抽象类中定义的抽象方法,由它的子类RequsetMappingHandlerAdapter实现
    return handleInternal(request, response, (HandlerMethod) handler);
}
3.1 handleInternal(HttpServletRequest,HttpServletResponse,HandlerMethod)
RequsetMappingHandlerAdapter.java
protected ModelAndView handleInternal(HttpServletRequest request,
        HttpServletResponse response, HandlerMethod handlerMethod) throws Exception {
    ModelAndView mav;
    checkRequest(request);
    // Execute invokeHandlerMethod in synchronized block if required.
    // 其实这个方法的主要逻辑就是调用了 invokeHandlerMethod 方法来执行处理器方法并获取 ModelAndView 对象。
    if (this.synchronizeOnSession) {
        HttpSession session = request.getSession(false);
        if (session != null) {
            Object mutex = WebUtils.getSessionMutex(session);
            synchronized (mutex) {
                mav = invokeHandlerMethod(request, response, handlerMethod);
            }
        }
        else {
            // No HttpSession available -> no mutex necessary
            mav = invokeHandlerMethod(request, response, handlerMethod);
        }
    }
    else {
        // No synchronization on session demanded at all...
        mav = invokeHandlerMethod(request, response, handlerMethod);
    }
    if (!response.containsHeader(HEADER_CACHE_CONTROL)) {
        if (getSessionAttributesHandler(handlerMethod).hasSessionAttributes()) {
            applyCacheSeconds(response, this.cacheSecondsForSessionAttributeHandlers);
        }
        else {
            prepareResponse(response);
        }
    }
    return mav;
}
3.1.1 invokeHandlerMethod(HttpServletRequest,HttpServletResponse,HandlerMethod)
RequsetMappingHandlerAdapter.java
// 获取处理请求的方法,执行处理器方法并返回结果视图
protected ModelAndView invokeHandlerMethod(HttpServletRequest request,
        HttpServletResponse response, HandlerMethod handlerMethod) throws Exception {

    ServletWebRequest webRequest = new ServletWebRequest(request, response);
    try {
        WebDataBinderFactory binderFactory = getDataBinderFactory(handlerMethod);
        ModelFactory modelFactory = getModelFactory(handlerMethod, binderFactory);
        // Handler类型转换, 由 HandlerMethod 类型转换为 ServletInvocableHandlerMethod 类型
        ServletInvocableHandlerMethod invocableMethod = createInvocableHandlerMethod(handlerMethod);
        if (this.argumentResolvers != null) {
            // 设置参数解析器
            invocableMethod.setHandlerMethodArgumentResolvers(this.argumentResolvers);
        }
        if (this.returnValueHandlers != null) {
            invocableMethod.setHandlerMethodReturnValueHandlers(this.returnValueHandlers);
        }
        invocableMethod.setDataBinderFactory(binderFactory);
        invocableMethod.setParameterNameDiscoverer(this.parameterNameDiscoverer);
        // 下面非主线逻辑,可以暂时忽略
        // 创建模型和视图容器
        ModelAndViewContainer mavContainer = new ModelAndViewContainer();
        mavContainer.addAllAttributes(RequestContextUtils.getInputFlashMap(request));
        // 初始化模型
        modelFactory.initModel(webRequest, mavContainer, invocableMethod);
        mavContainer.setIgnoreDefaultModelOnRedirect(this.ignoreDefaultModelOnRedirect);
        AsyncWebRequest asyncWebRequest = WebAsyncUtils.createAsyncWebRequest(request, response);
        asyncWebRequest.setTimeout(this.asyncRequestTimeout);
        WebAsyncManager asyncManager = WebAsyncUtils.getAsyncManager(request);
        asyncManager.setTaskExecutor(this.taskExecutor);
        asyncManager.setAsyncWebRequest(asyncWebRequest);
        asyncManager.registerCallableInterceptors(this.callableInterceptors);
        asyncManager.registerDeferredResultInterceptors(this.deferredResultInterceptors);
        if (asyncManager.hasConcurrentResult()) {
            Object result = asyncManager.getConcurrentResult();
            mavContainer = (ModelAndViewContainer) asyncManager.getConcurrentResultContext()[0];
            asyncManager.clearConcurrentResult();
            LogFormatUtils.traceDebug(logger, traceOn -> {
                String formatted = LogFormatUtils.formatValue(result, !traceOn);
                return "Resume with async result [" + formatted + "]";
            });
            invocableMethod = invocableMethod.wrapConcurrentResult(result);
        }

        // 调用处理器的方法
        invocableMethod.invokeAndHandle(webRequest, mavContainer);
        if (asyncManager.isConcurrentHandlingStarted()) {
            return null;
        }
        // 由上一步的结果进一步组装 ModelAndView 对象
        return getModelAndView(mavContainer, modelFactory, webRequest);
    }
    finally {
        webRequest.requestCompleted();
    }
}
3.1.1.1 invokeAndHandle(ServletWebRequest,ModelAndViewContainer,Object)
ServletInvocableHandlerMethod.java
public void invokeAndHandle(ServletWebRequest webRequest, ModelAndViewContainer mavContainer,
        Object... providedArgs) throws Exception {

    // 调用父类的方法执行处理器方法
    Object returnValue = invokeForRequest(webRequest, mavContainer, providedArgs);

    // 后面都不是主流程代码,可以暂时忽略
    setResponseStatus(webRequest);
    if (returnValue == null) {
        if (isRequestNotModified(webRequest) || getResponseStatus() != null || mavContainer.isRequestHandled()) {
            disableContentCachingIfNecessary(webRequest);
            mavContainer.setRequestHandled(true);
            return;
        }
    }
    else if (StringUtils.hasText(getResponseStatusReason())) {
        mavContainer.setRequestHandled(true);
        return;
    }
    mavContainer.setRequestHandled(false);
    Assert.state(this.returnValueHandlers != null, "No return value handlers");
    try {
        this.returnValueHandlers.handleReturnValue(
                returnValue, getReturnValueType(returnValue), mavContainer, webRequest);
    }
    catch (Exception ex) {
        if (logger.isTraceEnabled()) {
            logger.trace(formatErrorForReturnValue(returnValue), ex);
        }
        throw ex;
    }
}
invocableMethod.invokeAndHandle()最终要实现的目的就是:完成Request 中的参数和方法参数上数据的绑定。Spring MVC 中提供两种Request 参数到方法中参数的绑定方式:
- 通过注解进行绑定,@RequestParam。
- 使用注解进行绑定,我们只要在方法参数前面声明@RequestParam("name"),就可以将request 中参数name 的值绑定到方法的该参数上。
- 通过参数名称进行绑定。
- 使用参数名称进行绑定,就是会把request中传过来的参数,根据参数名是否相同,匹配赋值到方法的参数上。这样做的前提是必须要获取方法中参数的名称,Java 反射只提供了获取方法的参数的类型,并没有提供获取参数名称的方法。Spring MVC 解决这个问题的方法是用asm 框架读取字节码文件,来获取方法的参数名称。asm 框架是一个字节码操作框架,关于asm 更多介绍可以参考其官网。个人建议,使用注解来完成参数绑定,这样就可以省去asm 框架的读取字节码的操作。
3.1.1.1.1 invokeForRequest(NativeWebRequest,ModelAndViewContainer,Object)
InvocableHandlerMethod.java
public Object invokeForRequest(NativeWebRequest request, @Nullable ModelAndViewContainer mavContainer,
        Object... providedArgs) throws Exception {
    // 从request获取调用处理器方法需要的参数
    Object[] args = getMethodArgumentValues(request, mavContainer, providedArgs);
    if (logger.isTraceEnabled()) {
        logger.trace("Arguments: " + Arrays.toString(args));
    }
    // 传入参数,调用处理器方法
    return doInvoke(args);
}
到这里,方法的参数值列表也获取到了,就可以直接进行方法的调用了。
3.1.1.1.1.1 getMethodArgumentValues(request) 解析出request对象中要传入处理器方法的参数
InvocableHandlerMethod.java
private Object[] getMethodArgumentValues(NativeWebRequest request, ModelAndViewContainer mavContainer,
        Object... providedArgs) throws Exception {
    // 获取所有执行的方法的参数信息
    MethodParameter[] parameters = getMethodParameters();
    Object[] args = new Object[parameters.length];
    for (int i = 0; i < parameters.length; i++) {
        MethodParameter parameter = parameters[i];
        parameter.initParameterNameDiscovery(this.parameterNameDiscoverer);
        // 如果之前有预先设置值的话,则取预先设置好的值
        args[i] = resolveProvidedArgument(parameter, providedArgs);
        if (args[i] != null) {
            continue;
        }
        // 获取能解析出方法参数值的参数解析器类
        if (this.argumentResolvers.supportsParameter(parameter)) {
            try {
                // 解析出参数值
                args[i] = this.argumentResolvers.resolveArgument(
                        parameter, mavContainer, request, this.dataBinderFactory);
                continue;
            }
            catch (Exception ex) {
                throw ex;
            }
        }
        // 如果没有能解析方法参数的类,抛出异常
        if (args[i] == null) {
            throw new IllegalStateException("Could not resolve method parameter at index " +
                    parameter.getParameterIndex() + " in " + parameter.getMethod().toGenericString() +
                    ": " + getArgumentResolutionErrorMessage("No suitable resolver for", i));
        }
    }
    return args;
}
InvocableHandlerMethod.getMethodArgumentValues() 主要工作:
- 获取方法参数 MethodParameter
- 遍历每个参数找到对应 supportsParameter 的resolver
- 执行参数解析 resolveArgument 封装到 args
- 返回解析后的参数 args
这里需要说的是argumentResolvers这个对象是HandlerMethodArgumentResolverComposite这个类。所有参数的解析都是委托这个类来完成的,HandlerMethodArgumentResolverComposite 是所有参数解析器的一个集合项目启动时会将所有的参数解析器放到HandlerMethodArgumentResolverComposite。这个类会调用真正的请求参数的解析的类。
这个解析参数的过程再往下就很底层了,现在可以先不做详细深入的研究,感兴趣的可以看这篇博客:SpringMVC之分析HandlerMethodArgumentResolver请求对应处理器方法参数的解析过程(一)_resolveargument-CSDN博客
3.1.1.1.1.2 doInvoke(args) 传入从request解析出来的参数值,去执行处理器方法
InvocableHandlerMethod.java
// 调用处理器中用于处理该请求的方法
protected Object doInvoke(Object... args) throws Exception {
    ReflectionUtils.makeAccessible(getBridgedMethod());
    try {
        // 通过方法的反射调用该方法
        // getBridgedMethod()获取一个Method对象(bridgedMethod)。HandlerMethod类的bridgedMethod属性一般都跟 method 这个属性的值一样,目的也就是为了找到要执行的目标方法
        // Method.invoke(obj, args) 通过反射机制调用处理器方法
        return getBridgedMethod().invoke(getBean(), args);
    }
    catch (IllegalArgumentException ex) {
        assertTargetBean(getBridgedMethod(), getBean(), args);
        String text = (ex.getMessage() != null ? ex.getMessage() : "Illegal argument");
        throw new IllegalStateException(formatInvokeError(text, args), ex);
    }
    catch (InvocationTargetException ex) {
        // Unwrap for HandlerExceptionResolvers ...
        Throwable targetException = ex.getTargetException();
        if (targetException instanceof RuntimeException) {
            throw (RuntimeException) targetException;
        }
        else if (targetException instanceof Error) {
            throw (Error) targetException;
        }
        else if (targetException instanceof Exception) {
            throw (Exception) targetException;
        }
        else {
            throw new IllegalStateException(formatInvokeError("Invocation failure", args), targetException);
        }
    }
}
3.1.1.2 getModelAndView(mavContainer, modelFactory, webRequest)
// 根据前面创建出来的ModelAndViewContainer和ModelFactory,进一步构建ModelAndView对象
private ModelAndView getModelAndView(ModelAndViewContainer mavContainer,
        ModelFactory modelFactory, NativeWebRequest webRequest) throws Exception {

    // 1.更新模型
    modelFactory.updateModel(webRequest, mavContainer);
    if (mavContainer.isRequestHandled()) {
        return null;
    }
    // 2.获取ModelMap并创建ModelAndView
    ModelMap model = mavContainer.getModel();
    // 构建ModelAndView对象
    ModelAndView mav = new ModelAndView(mavContainer.getViewName(), model, mavContainer.getStatus());
    // 3.处理引用类型视图和转发类型视图
    if (!mavContainer.isViewReference()) {
        mav.setView((View) mavContainer.getView());
    }
    if (model instanceof RedirectAttributes) {
        Map<String, ?> flashAttributes = ((RedirectAttributes) model).getFlashAttributes();
        HttpServletRequest request = webRequest.getNativeRequest(HttpServletRequest.class);
        if (request != null) {
            RequestContextUtils.getOutputFlashMap(request).putAll(flashAttributes);
        }
    }
    return mav;
}
至此,我们就将1~7处理请求的流程源码讲解完了。此时就完成了请求的处理,并且返回了一个ModelAndView。后面会再继续执行视图解析阶段。
2.2.2.3 视图解析
视图解析是Spring MVC响应HTTP请求的最后一步,即将handler处理结果转换为对应的视图返回给客户端,而所谓的视图可以是模板,如freemarker,也可以是HTML或者JSP等。
前面的例子请求处理方法执行完成后,最终返回一个 ModelAndView 对象。对于那些返回 String,View 或 ModeMap 等类型的处理器方法,Spring MVC 也会在内部将它们装配成一个 ModelAndView 对象,ModelAndView类型包含了逻辑名和模型对象的视图 。
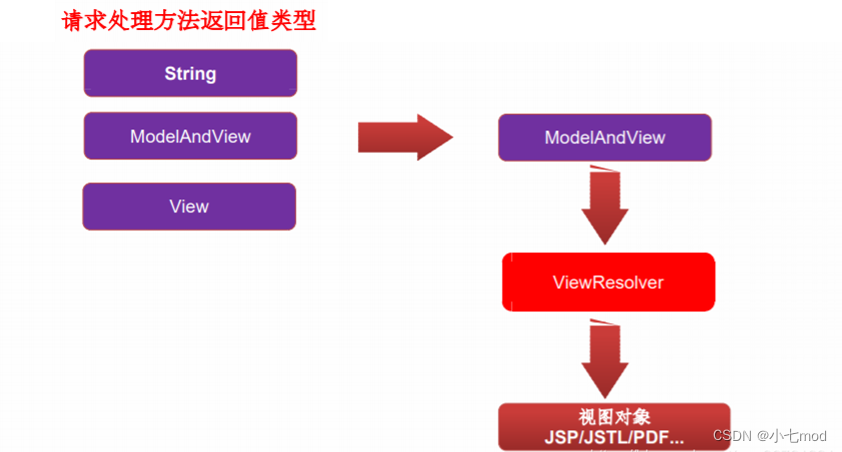
拿到ModelAndView 对象后,Spring MVC 借助视图解析器(ViewResolver)去解析ModelAndView 对象来得到最终的视图对象(View),最终的视图可以是 JSP ,也可能是 Excel、JFreeChart 等各种表现形式的视图 。
对于最终究竟采取何种视图对象对模型数据进行渲染,处理器并不关心,处理器工作重点聚焦在生产模型数据的工 作上,从而实现 MVC 的充分解耦。
我们首先讲一下视图解析过程中三个重要的组件:ModelAndView、视图解析器(ViewResolver)、视图(View)。
2.2.2.3.1 ModelAndView
ModelAndView的作用就是用于存放视图View和要渲染到视图中的数据ModelMap。
public class ModelAndView {
    /** View视图对象或者View视图名称的字符串. */
    @Nullable
    private Object view;
    /** Model Map.  存放渲染到视图上的数据*/
    @Nullable
    private ModelMap model;
    @Nullable
    private HttpStatus status;
    /** 当前模型和视图是否已经被标识为清空 */
    private boolean cleared = false;
}
2.2.2.3.2 视图解析器(ViewResolver)
视图解析器的作用比较单一:将逻辑视图解析为一个具体的视图对象。简单点说就是根据逻辑视图名称找到对应的视图文件(例如jsp、html),然后创建对应的View对象。
Spring MVC 为逻辑视图名的解析提供了不同的策略,可以在 Spring WEB 上下文中配置一种或多种解析策略,并指定他们之间的先后顺序。每一种映射策略对应一个具体的视图解析器实现类。
所有的视图解析器都必须实现 ViewResolver 接口:
public interface ViewResolver {
    // 根据逻辑视图名和用户地区信息生成View视图对象
    @Nullable
    View resolveViewName(String viewName, Locale locale) throws Exception;
}
常用的视图解析器实现类:

• 程序员可以选择一种视图解析器或混用多种视图解析器。
• 每个视图解析器都实现了 Ordered 接口并开放出一个 order 属性,可 以通过 order 属性指定解析器的优先顺序,order 越小优先级越高。
• Spring MVC 会按视图解析器顺序的优先顺序对逻辑视图名进行解析,直到解析成功并返回视图对象,否则将抛出 ServletException 异常。
视图解析器继承体系:

各种视图解析器的源码详解:Spring MVC学习(4)—ViewSolvsolver视图解析器的详细介绍与使用案例_viewsolver视图解析器-CSDN博客
2.2.2.3.3 视图(View)
视图(View)的作用是渲染模型(Model)数据,将模型里的数据渲染到页面中,以某种形式呈现给客户。
为了实现视图模型和具体实现技术的解耦,Spring 在 org.springframework.web.servlet 包中定义了一个高度抽象的 View 接口:
public interface View {
    String RESPONSE_STATUS_ATTRIBUTE = View.class.getName() + ".responseStatus";

    String PATH_VARIABLES = View.class.getName() + ".pathVariables";

    String SELECTED_CONTENT_TYPE = View.class.getName() + ".selectedContentType";

    // 获取返回值的contentType
    @Nullable
    default String getContentType() {
        return null;
    }

    // 用于视图渲染
    // 通过用户提供的模型数据(model)与视图信息渲染视图
    void render(@Nullable Map<String, ?> model, HttpServletRequest request, HttpServletResponse response)
            throws Exception;
}
视图对象(View)由视图解析器(ViewResolver)负责实例化。由于视图是无状态的,所以他们不会有线程安全的问题。
常用的视图实现类:

下面我们就正式进入到视图解析流程的源码分析。
1 DispatcherServlet类中的processDispatchResult()方法
我们先要明确一下视图解析的时机:在统一异常处理结束后进行视图解析(因为异常处理handler也可能返回视图)。
下面直接看代码,在DispatcherServlet中,获取到handler的返回结果后(以我们现在的例子就是ModelAndView对象)交给processDispatchResult方法来处理,而在这个方法里面包含两个逻辑:1.异常处理;2.视图处理。
DispatcherServlet.java
private void processDispatchResult(HttpServletRequest request, HttpServletResponse response,
        @Nullable HandlerExecutionChain mappedHandler, @Nullable ModelAndView mv,
        @Nullable Exception exception) throws Exception {
    boolean errorView = false;

    // 1.异常处理
    // 如果在解析过程中出现异常, 这里会对异常进行处理
    if (exception != null) {
        // 如果是默认异常,则获取异常视图
        if (exception instanceof ModelAndViewDefiningException) {
            logger.debug("ModelAndViewDefiningException encountered", exception);
            mv = ((ModelAndViewDefiningException) exception).getModelAndView();
        }
        // 如果是自定义异常, 则获取异常处理器, 进行解析
        else {
            Object handler = (mappedHandler != null ? mappedHandler.getHandler() : null);
            // 异常视图解析
            mv = processHandlerException(request, response, handler, exception);
            errorView = (mv != null);
        }
    }
    // 2.视图处理
    // 尝试解析视图和模型;
    // wasCleared:判断当前模型和视图是否已经被标识为清空,且当前视图和模型是否同时为空
    // Did the handler return a view to render?
    if (mv != null && !mv.wasCleared()) {
        // 解析并渲染视图【这个是处理视图的核心方法】
        render(mv, request, response);
        if (errorView) {
            WebUtils.clearErrorRequestAttributes(request);
        }
    }
    else {
        //-- 日志 --
        if (logger.isTraceEnabled()) {
            logger.trace("No view rendering, null ModelAndView returned.");
        }
    }
    // 异步请求的开始
    if (WebAsyncUtils.getAsyncManager(request).isConcurrentHandlingStarted()) {
        // Concurrent handling started during a forward
        return;
    }
    // handler处理完成回调
    if (mappedHandler != null) {
        // 处理注册的后置完成拦截器
        // Exception (if any) is already handled..
        mappedHandler.triggerAfterCompletion(request, response, null);
    }
}
processDispatchResult() 方法:
- 如果出现异常,则解析异常视图
- 解析ModelAndView
通过源码可以看到render方法是处理视图的核心。
1.1 DispatcherServlet类中的processHandlerException()方法
用于解析异常视图。
DispatcherServlet.java
@Nullable
protected ModelAndView processHandlerException(HttpServletRequest request, HttpServletResponse response,
        @Nullable Object handler, Exception ex) throws Exception {
    ModelAndView exMv = null;
    if (this.handlerExceptionResolvers != null) {
        // 遍历所有的异常解析器, 尝试对异常进行解析, 如果解析成功,跳出循焕
        for (HandlerExceptionResolver handlerExceptionResolver : this.handlerExceptionResolvers) {
            exMv = handlerExceptionResolver.resolveException(request, response, handler, ex);
            if (exMv != null) {
                break;
            }
        }
    }
    if (exMv != null) {
        if (exMv.isEmpty()) {
            request.setAttribute(EXCEPTION_ATTRIBUTE, ex);
            return null;
        }
        // 对于简单的错误模型,我们可能仍需要视图名称转换
        if (!exMv.hasView()) {
            String defaultViewName = getDefaultViewName(request);
            if (defaultViewName != null) {
                exMv.setViewName(defaultViewName);
            }
        }
        if (logger.isDebugEnabled()) {
            logger.debug("Handler execution resulted in exception - forwarding to resolved error view: " + exMv, ex);
        }
        // 设置错误请求的相关属性
        WebUtils.exposeErrorRequestAttributes(request, ex, getServletName());
        return exMv;
    }
    throw ex;
}
1.2 DispatcherServlet类中的render()方法
DispatcherServlet.java
protected void render(ModelAndView mv, HttpServletRequest request, HttpServletResponse response) throws Exception {
    // 确定请求的区域设置并将其应用于响应。
    Locale locale =
            (this.localeResolver != null ? this.localeResolver.resolveLocale(request) : request.getLocale());
    response.setLocale(locale);
    View view;
    // 获取视图名
    // getViewName()方法返回值:路径名,就是我们在Controller写的方法,最后return的String
    String viewName = mv.getViewName();
    if (viewName != null) {
        // 1、解析视图名,使用视图逻辑名解析出来View对象
        // viewResolver的作用是根据视图逻辑名(Controller方法返回的String)得到view对象。ViewResolver是一个接口,里面只声明了一个resolveViewName方法 .
        view = resolveViewName(viewName, mv.getModelInternal(), locale, request);
        if (view == null) {
            throw new ServletException("Could not resolve view with name '" + mv.getViewName() +
                    "' in servlet with name '" + getServletName() + "'");
        }
    }
    // 获取到视图名,再次判断当前ModelAndView对象中是否包含真正的View对象,
    // 因为接下来需要调用View对象的render方法
    else {
        view = mv.getView();
        if (view == null) {
            throw new ServletException("ModelAndView [" + mv + "] neither contains a view name nor a " +
                    "View object in servlet with name '" + getServletName() + "'");
        }
    }
    // Delegate to the View object for rendering.
    if (logger.isDebugEnabled()) {
        logger.debug("Rendering view [" + view + "] in DispatcherServlet with name '" + getServletName() + "'");
    }
    try {
        // 设置返回状态码
        if (mv.getStatus() != null) {
            response.setStatus(mv.getStatus().value());
        }
        // 2、调用View对象的render方法完成视图渲染,实际调用的是AbstractView类的方法
        view.render(mv.getModelInternal(), request, response);
    }
    catch (Exception ex) {
        if (logger.isDebugEnabled()) {
            logger.debug("Error rendering view [" + view + "] in DispatcherServlet with name '" +
                    getServletName() + "'", ex);
        }
        throw ex;
    }
}
ModelAndView视图解析可以分为两个重要步骤:
- 解析视图名称来创建View实例
- 根据View实例渲染视图
注意:要区分解析和渲染,这是两个步骤:
- 解析指的是解析视图的逻辑名称,找到对应真实的视图文件(html、jsp等),然后创建出View实例。
- 渲染指的实是使用View例来渲染视图,将model中的数据渲染到视图页面上。
1.2.1 DispatcherServlet类中的resolveViewName()方法
ViewResolver有很多实现,其中一个就是我们常用在spring-servlet.xml配置的 InternalResourceViewResolver。

这里我们就以最常用的InternalResourceViewResolver视图解析器为例来进行源码分析。
DispatcherServlet.java
// 根据视图名称创建View实例
@Nullable
protected View resolveViewName(String viewName, @Nullable Map<String, Object> model,
        Locale locale, HttpServletRequest request) throws Exception {

    if (this.viewResolvers != null) {
        // 这里遍历所有的ViewResolver(视图解析器),就会拿到上述InternalResourceViewResolver实现。因为我没在配置文件中配了,如果没有配,就用默认的
        for (ViewResolver viewResolver : this.viewResolvers) {
            // 这里的视图解析器就是我们在配置文件中配置的那个
            // 调用视图解析器的resolveViewName()方法,对视图名进行解析,生成View实例
            View view = viewResolver.resolveViewName(viewName, locale);
            if (view != null) {
                return view;
            }
        }
    }
    return null;
}
1.2.1.1 AbstractCachingViewResolver类中的resolveViewName()方法
此时我们的例子是使用的InternalResourceViewResolver视图解析器,但是上面调用的viewResolver.resolveViewName(viewName, locale)方法,是使用的其父类AbstractCachingViewResolver中的resolveViewName()方法。
AbstractCachingViewResolver.java
public View resolveViewName(String viewName, Locale locale) throws Exception {
    // 判断缓存是否可用
    if (!isCache()) {
        // 如果缓存不可用, 则直接创建视图
        return createView(viewName, locale);
    }
    else {
        // 如果缓存可用, 则先尝试从缓存中获取
        // 生成缓存Key
        Object cacheKey = getCacheKey(viewName, locale);
        // 尝试从缓存中获取视图
        View view = this.viewAccessCache.get(cacheKey);
        if (view == null) {
            // 如果从缓存中获取视图失败, 则尝试从viewCreationCache缓存中获取
            synchronized (this.viewCreationCache) {
                // 让子类创建View对象, 留给子类扩展[扩展开放,修改关闭原则]
                view = this.viewCreationCache.get(cacheKey);
                // 如果仍然从缓存中获取不到View,则自己创建
                if (view == null) {
                    // 这里cacheUnresolved指的是是否缓存默认的空视图,UNRESOLVED_VIEW是一个没有任何内容的View
                    view = createView(viewName, locale);
                    if (view == null && this.cacheUnresolved) {
                        view = UNRESOLVED_VIEW;
                    }
                    if (view != null) {
                        // 将创建的view视图加入缓存
                        this.viewAccessCache.put(cacheKey, view);
                        this.viewCreationCache.put(cacheKey, view);
                        if (logger.isTraceEnabled()) {
                            logger.trace("Cached view [" + cacheKey + "]");
                        }
                    }
                }
            }
        }
        return (view != UNRESOLVED_VIEW ? view : null);
    }
}
resolveViewName()中一个核心方法就是 createView(viewName, locale);
解释:InternalResourceViewResolver 继承了 UrlBasedViewResolver,UrlBasedViewResolver 继承了 AbstractCachingViewResolver,AbstractCachingViewResolver声明了 createView() 方法,UrlBasedViewResolver 重写了 createView() 方法。重写这个方法的作用就是为了处理转发和重定向的请求。
1.2.1.1.1 UrlBasedViewResolver类中的createView()方法
UrlBasedViewResolver.java
@Override
protected View createView(String viewName, Locale locale) throws Exception {
    if (!canHandle(viewName, locale)) {
        return null;
    }
     // 检查特殊的"redirect:"前缀 REDIRECT_URL_PREFIX = "redirect:"
     // 如果Controller返回的字符串是以"redirect:" 开头, 说明该视图是重定向
    if (viewName.startsWith(REDIRECT_URL_PREFIX)) {
        String redirectUrl = viewName.substring(REDIRECT_URL_PREFIX.length());
        RedirectView view = new RedirectView(redirectUrl,
                isRedirectContextRelative(), isRedirectHttp10Compatible());
        String[] hosts = getRedirectHosts();
        if (hosts != null) {
            view.setHosts(hosts);
        }
        return applyLifecycleMethods(REDIRECT_URL_PREFIX, view);
    }
    // 检查特殊的"forward:"前缀 FORWARD_URL_PREFIX = "forward:"
    // 如果Controller返回的字符串是以"forward:" 开头, 说明该视图是请求转发
    if (viewName.startsWith(FORWARD_URL_PREFIX)) {
        String forwardUrl = viewName.substring(FORWARD_URL_PREFIX.length());
        return new InternalResourceView(forwardUrl);
    }
    // 如果没有前缀,说明是普通视图, 就默认使用父类创建一个View对象
    return super.createView(viewName, locale);
}
AbstractCachingViewResolver.java
protected View createView(String viewName, Locale locale) throws Exception {
    return loadView(viewName, locale);
}
UrlBasedViewResolver.java
@Override
protected View loadView(String viewName, Locale locale) throws Exception {
    // 使用逻辑视图名按照指定规则生成View对象
    AbstractUrlBasedView view = buildView(viewName);
    // 应用声明周期函数,也就是调用View对象的初始化函数和Spring用于切入bean创建的
    View result = applyLifecycleMethods(viewName, view);
    // 检查view的准确性,这里默认始终返回true
    return (view.checkResource(locale) ? result : null);
}
1.2.1.1.1.1 UrlBasedViewResolver类中的buildView()方法
protected AbstractUrlBasedView buildView(String viewName) throws Exception {
    // 对于InternalResourceViewResolver而言,其返回的View对象的具体类型是InternalResourceView
    Class<?> viewClass = getViewClass();
    Assert.state(viewClass != null, "No view class");
    // 使用反射生成InternalResourceView对象实例
    AbstractUrlBasedView view = (AbstractUrlBasedView) BeanUtils.instantiateClass(viewClass);
    // 根据前缀和后缀拼接视图路径信息
    view.setUrl(getPrefix() + viewName + getSuffix());
    // 设置View的contentType属性
    String contentType = getContentType();
    if (contentType != null) {
        view.setContentType(contentType);
    }
    // 设置contextAttribute和attributeMap等属性
    view.setRequestContextAttribute(getRequestContextAttribute());
    view.setAttributesMap(getAttributesMap());
    // pathVariables表示request请求url中的属性,这里主要是设置是否将这些属性暴露到视图中
    Boolean exposePathVariables = getExposePathVariables();
    if (exposePathVariables != null) {
        view.setExposePathVariables(exposePathVariables);
    }
    // 这里设置的是是否将Spring的bean暴露在视图中,以供给前端调用
    Boolean exposeContextBeansAsAttributes = getExposeContextBeansAsAttributes();
    if (exposeContextBeansAsAttributes != null) {
        view.setExposeContextBeansAsAttributes(exposeContextBeansAsAttributes);
    }
    // 设置需要暴露给前端页面的bean名称
    String[] exposedContextBeanNames = getExposedContextBeanNames();
    if (exposedContextBeanNames != null) {
        view.setExposedContextBeanNames(exposedContextBeanNames);
    }
    return view;
}
1.2.1.1.1.2 UrlBasedViewResolver类中的applyLifecycleMethods()方法
protected View applyLifecycleMethods(String viewName, AbstractUrlBasedView view) {
    ApplicationContext context = getApplicationContext();
    if (context != null) {
        // 对生成的View对象应用初始化方法,主要包括InitializingBean.afterProperties()和一些Processor、Aware方法
        Object initialized = context.getAutowireCapableBeanFactory().initializeBean(view, viewName);
        if (initialized instanceof View) {
            return (View) initialized;
        }
    }
    return view;
}
源码到这里,就将View实例创建出来了。
小结:视图解析器得到View对象的流程就是,所有配置的视图解析器都来尝试根据视图名(就是自己自定义Controller类下个各个方法的返回值,String路径名)得到VIew(视图)对象,如果能得到就返回,得不到就换下一个视图解析器。
Spring MVC拿到了View对象后又做了什么?我们继续往下分析
1.2.2 AbstractView类中的render()方法
接下来,会调用render()方法,来进行页面的渲染,将model中的数据渲染到页面上。注意是使用的View接口的实现类——抽象类AbstractView的render()方法。

AbstractView.java
@Override
public void render(@Nullable Map<String, ?> model, HttpServletRequest request,
        HttpServletResponse response) throws Exception {
    if (logger.isDebugEnabled()) {
        logger.debug("View " + formatViewName() +
                ", model " + (model != null ? model : Collections.emptyMap()) +
                (this.staticAttributes.isEmpty() ? "" : ", static attributes " + this.staticAttributes));
    }
    // 将model、request、response中的数据合并为一个Map对象,以供给后面对视图的渲染使用
    Map<String, Object> mergedModel = createMergedOutputModel(model, request, response);
    // 判断当前View对象的类型是否为文件下载类型,如果是文件下载类型,则设置response的响应头信息
    prepareResponse(request, response);
    // 开始view视图渲染,渲染要给页面输出的所有数据以及数据输出整理
    renderMergedOutputModel(mergedModel, getRequestToExpose(request), response);
}
1.2.2.1 InternalResourceView类中的renderMergedOutputModel()方法

InternalResourceView 实现了 AbstractView声明的renderMergedOutputModel()方法,代码如下:
InternalResourceView.java
@Override
protected void renderMergedOutputModel(
        Map<String, Object> model, HttpServletRequest request, HttpServletResponse response) throws Exception {
    // 将Model中的键值对数据全部写进RequestScope(请求域)中
    exposeModelAsRequestAttributes(model, request);
    // 提供的一个hook方法,默认是空实现,用于用户进行request属性的自定义使用
    exposeHelpers(request);
    // 确定请求分配器的路径
    String dispatcherPath = prepareForRendering(request, response);
    // 获取可应用于 forward/include 的RequestDispatcher
    RequestDispatcher rd = getRequestDispatcher(request, dispatcherPath);
    if (rd == null) {
        throw new ServletException("Could not get RequestDispatcher for [" + getUrl() +
                "]: Check that the corresponding file exists within your web application archive!");
    }
    // 判断当前是否为include请求,如果是,则调用RequestDispatcher.include()方法进行文件引入
    if (useInclude(request, response)) {
        response.setContentType(getContentType());
        if (logger.isDebugEnabled()) {
            logger.debug("Including resource [" + getUrl() + "] in InternalResourceView '" + getBeanName() + "'");
        }
        rd.include(request, response);
    }
    // 请求转发
    // 使用forward跳转则后面的response输出则不会执行,而用include来跳转,
    // 则include的servlet执行完后,再返回到原来的servlet执行response的输出(如果有)
    else {
        if (logger.isDebugEnabled()) {
            logger.debug("Forwarding to resource [" + getUrl() + "] in InternalResourceView '" + getBeanName() + "'");
        }
        // 如果当前不是include()请求,则直接使用forward请求将当前请求转发到目标文件路径中,从而渲染该视图
        // Servlet 原生的转发请求
        rd.forward(request, response);
    }
}
至此,整个视图解析渲染阶段完成。
小结:视图解析器(ViewResolver)只是为了得到视图对象(View);视图对象(View)才能真正的转发(将模型数据全部放在请求域中)或重定向到页面。视图对象(View)才能真正的渲染视图。
三、总结
现在我们分析完了Spring MVC的全部执行流程。最后我们再来梳理一下Spring MVC 核心组件的关联关系(如下图):

时序图:
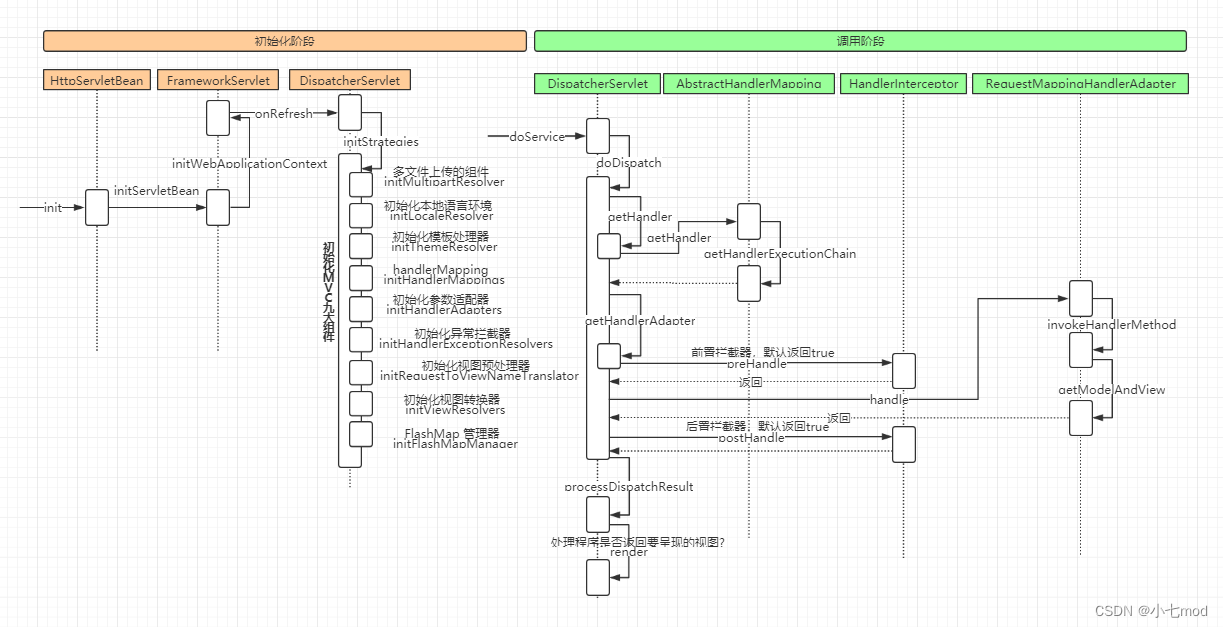
相关文章: 【Spring MVC】Spring MVC框架的介绍及其使用方法
