需求背景:
在开发的过程中,总会遇到一些功能需要使用到弹窗进行信息的输入和修改,如用户个人信息的修改;在UI设计上每个App通常都会有各自的样式,而不是使用系统的标准样式,所以通常我们需要进行自定义弹窗来实现信息填写需求
模块介绍
在ArkTs中,CustomDialogController提供这个对应功能,如下是在官方文档中的介绍:
通过CustomDialogController类显示自定义弹窗。使用弹窗组件时,可优先考虑自定义弹窗,便于自定义弹窗的样式与内容。
样式展示
先进行样式展示一下,然后根据这个样式进行代码编写
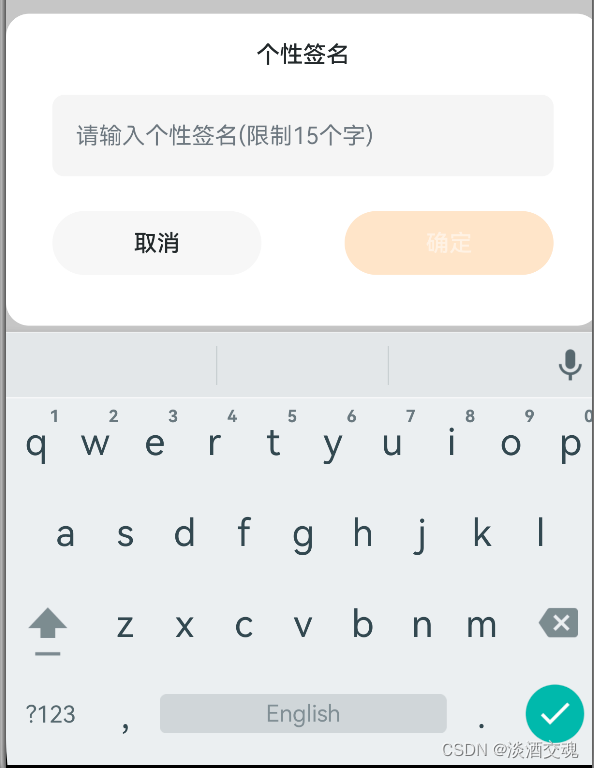
这是当输入有误时的样式,当输入超过限制字符数量时,会展示错误提示,并且不能继续添加输入,当删除后字数小于限制字数时,错误提示消失

实践操作
该自定义弹窗需要复用,需要用时给于修改昵称和修改个性签名使用,所以在标题,输入框提示语等内容上会有所不同
1.创建自定义弹窗样式
需要使用@CustomDialog装饰器来表达这是一个自定义弹窗
@CustomDialog
struct UserInputDialogView {
  // 弹窗标题
  @State dialogViewTitle: string = ''
  // 输入框提示语
  @State placeHolderContent: string = ''
  // 是否展示错误提示
  @State isShowErrorMsg: boolean = false
  // 是否超过了字数限制
  @State MoreMaxLength: boolean = false
  // 输入的内容
  @State textValue: string = ''
  // 最大输入字符数字
  inputMaxNumber: number
  controller: CustomDialogController
  // 取消方法回调
  cancel: () => void
  // 确认方法回调
  confirm: (text: string) => void

  build() {
    Column() {
      Row() {
        Text(this.dialogViewTitle)
          .fontSize(16)
          .fontColor($r('app.color.24292B'))
          .fontWeight(FontWeight.Medium)
      }
      .justifyContent(FlexAlign.Center)
      .alignItems(VerticalAlign.Center)
      .width(BaseUtils.screenWidth - 38)
      .height(24)
      .margin({top: 16})

      // 直接引用输入框提示内容和输入内容
      TextInput({placeholder: this.placeHolderContent, text: this.textValue})
        .width(BaseUtils.screenWidth - 64)
        .height(56)
        .backgroundColor($r('app.color.F5F5F5'))
        .caretColor($r('app.color.FF8000'))
        .borderRadius(8)
        .margin({top: 16})
        .type(InputType.Normal)
        // 用于打开弹窗后,焦点直接落在弹窗上,以便于直接弹出输入键盘
        .key('popUpKeyboard')
        .onFocus(() => {
          sendEventByKey('popUpKeyboard', 10, '弹出键盘')
        })
        .onChange((value) => {
          this.textValue = value
          if (value.length > this.inputMaxNumber) {
          	// 如果输入内容超过限制字符,展示错误提示
            this.MoreMaxLength = true
            this.textValue = this.textValue.substring(0,this.inputMaxNumber)

          } else if (value.length == this.inputMaxNumber) {
           	// 如果输入内容长度等于限制字符
           	// 如果为刚好等于则不展示
           	// 如果已超出限制字符则展示错误提示
            if (this.MoreMaxLength) {
              this.isShowErrorMsg = true
            }

          } else {
            this.isShowErrorMsg = false
            this.MoreMaxLength = false
          }
        })

	  // 错误提示
      if (this.isShowErrorMsg) {
        Text(`最多不超过${this.inputMaxNumber}个字`)
          .fontSize(12)
          .fontColor($r('app.color.F7313B'))
          .fontWeight(FontWeight.Regular)
          .textAlign(TextAlign.Start)
          .width(BaseUtils.screenWidth - 72)
          .margin({top: 2})
      }

      Flex({direction: FlexDirection.Row, alignItems: ItemAlign.Center, justifyContent: FlexAlign.SpaceBetween}) {
        Button('取消')
          .fontSize(16)
          .fontColor($r('app.color.24292B'))
          .fontWeight(FontWeight.Medium)
          .backgroundColor($r('app.color.F7F7F7'))
          .size({width: 144, height: 44})
          .borderRadius(22)
          .onClick(() => {
            this.controller.close()
            this.cancel()
          })

        Button('确定')
          .fontSize(16)
          .fontColor(this.textValue.length == 0 ? $r('app.color.FFFFFF_50') : $r('app.color.FFFFFF'))
          .fontWeight(FontWeight.Medium)
          .backgroundColor(this.textValue.length == 0 ? $r('app.color.FF8000_50') : $r('app.color.FF8000'))
          .size({width: 144, height: 44})
          .borderRadius(22)
          .enabled(this.textValue.length == 0 ? false : true)
          .margin({left: 25})
          .onClick(() => {
          	// 确认按钮 返回输入文本内容,并且关闭自定义弹窗
            this.confirm(this.textValue)
            this.controller.close()
          })
      }
      .width(BaseUtils.screenWidth - 64)
      .height(44)
      .margin({top: this.isShowErrorMsg ? 8 : 24})
    }
    .alignItems(HorizontalAlign.Center)
    .width(BaseUtils.screenWidth)
    .backgroundColor($r('app.color.FFFFFF'))
    .height(215)
    .borderRadius(16)
  }
}
2.初始化自定义弹窗
以修改个性签名弹窗为例
userSignDialogController: CustomDialogController = new CustomDialogController({
    builder: UserInputDialogView({
      dialogViewTitle: '个性签名',
      placeHolderContent: '请输入个性签名(限制15个字)',
      inputMaxNumber: 15,
      cancel: () => {},
      confirm: (text: string) => {
      	// 修改个性签名请求
        HttpApiManager.getInstance().updateUserInfo(new UserInfoBean(null, null, text))
          .then((data: UserInfoBean) => {
            this.userInfo = data
            // 用户数据更新通知
            // 具体可见我《EventHub事件通知详细使用方法》文章
            EventHubUtil.emit('updateUserInfo')
            ToastUtil.getInstance().showToast('修改成功')

          })
          .catch(error => {
            ToastUtil.getInstance().showToast(error.message)
          })
      },
    }),
    // 是否点击弹窗其他地方蒙层关闭
    autoCancel: true,
    // 弹窗在竖直方向上的对齐方式
    alignment: DialogAlignment.Default,
    // 是否使用自定义样式
    customStyle: true
  })
3.销毁自定义弹窗
在页面销毁前,需销毁自定义弹窗,以避免系统资源浪费
aboutToDisappear() {
    delete this.userSignDialogController,
    this.userSignDialogController = undefined
  }
4.调用/打开自定义弹窗
在摁钮或者View的onClick方法中进行调用方法以实现点击打开
if (this.userSignDialogController != undefined) {
    this.userSignDialogController.open()
}
5.关闭自定义弹窗
这个在自定义弹窗的取消和确认按钮中有写入该方法
//  取消按钮的点击事件
.onClick(() => {
   // 关闭自定义弹窗
   this.controller.close()
   this.cancel()
})
参考文档
自定义弹窗API
自定义弹窗(CustomDialog)指南
当前HarmonyOs仍在初步学习过程中,大家如果感兴趣或者有问题可以一起沟通交流
如果该文章对你有所帮助的话,可以点赞、收藏并关注一下!后续会持续更新更多技术内容

