光照系统
- 前言
- 平行光
- 点光源
- 衰减
- 衰减的实现
- 聚光
- 平滑/软化边缘
- 多光源
前言
介绍三种光源类型:平行光(Directional Light)、点光源(Point Light)、聚光灯(Spot Light)。
- 平行光(Directional Light):只有一个方向的光源。它被建模为不管距离有多长所有光束都是平行而且其方向向量在整个场景中保持不变。
- 点光源(Point Light):一个在场景中有位置的,光线逐渐衰减的光源。
- 衰减(Attenuation):光随着距离减少强度减小的过程,通常使用在点光源和聚光下。
- 聚光(Spotlight):一个被定义为在某一个方向上的锥形的光源。
- GLSL Uniform数组(GLSL Uniform Array):一个uniform值数组。它的工作原理和C语言数组大致一样,只是不能动态分配内存。
平行光
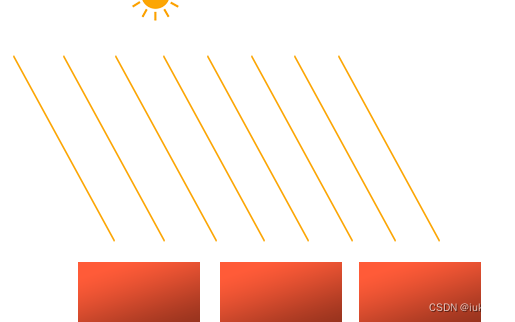
平行光,也叫定向光,当一个光源处于很远的地方时,来自光源的每条光线就会近似于互相平行。不论物体和/或者观察者的位置,看起来好像所有的光都来自于同一个方向。因为它的所有光线都有着相同的方向,它与光源的位置是没有关系的。
平行光可以照亮的范围是没有限制的,它通常是作为太阳这样的角色在场景中出现的。
我们可以定义一个光线方向向量模拟一个定向光:
struct Light {
    // vec3 position; // 使用定向光就不再需要了
    vec3 direction;

    vec3 ambient;
    vec3 diffuse;
    vec3 specular;
};
...
void main()
{
  vec3 lightDir = normalize(-light.direction);
  ...
}
注意,我们对light.direction向量取反。我们目前使用的光照计算需求一个从片段至光源的光线方向,但人们更习惯定义定向光为一个从光源出发的全局方向。所以我们需要对全局光照方向向量取反来改变它的方向,它现在是一个指向光源的方向向量了。而且,记得对向量进行标准化。
脚本实现
我们把平行光加到之前的场景中:
修改顶点和片元着色器
Direct_light_casters.vs
#version 330 core
layout (location = 0) in vec3 aPos;
layout (location = 1) in vec3 aNormal;
layout (location = 2) in vec2 aTexCoords;

out vec3 FragPos;
out vec3 Normal;
out vec2 TexCoords;

uniform mat4 model;
uniform mat4 view;
uniform mat4 projection;

void main()
{
    FragPos = vec3(model * vec4(aPos, 1.0));
    Normal = mat3(transpose(inverse(model))) * aNormal;
    TexCoords = aTexCoords;

    gl_Position = projection * view * vec4(FragPos, 1.0);
}
Direct_light_casters.fs
#version 330 core
out vec4 FragColor;

struct Material {
    sampler2D diffuse;
    sampler2D specular;
    float shininess;
};
//创建一个结构体,用来存储光源的各种属性
struct Light {
    vec3 direction;

    vec3 ambient;
    vec3 diffuse;
    vec3 specular;
};

in vec3 FragPos;
in vec3 Normal;
in vec2 TexCoords;

uniform vec3 viewPos;
uniform Material material;
uniform Light light;

void main()
{
    // ambient
    vec3 ambient = light.ambient * texture(material.diffuse, TexCoords).rgb;

    // diffuse
    vec3 norm = normalize(Normal);
    // vec3 lightDir = normalize(light.position - FragPos);
    vec3 lightDir = normalize(-light.direction);
    float diff = max(dot(norm, lightDir), 0.0);
    vec3 diffuse = light.diffuse * diff * texture(material.diffuse, TexCoords).rgb;

    // specular
    vec3 viewDir = normalize(viewPos - FragPos);
    vec3 reflectDir = reflect(-lightDir, norm);
    float spec = pow(max(dot(viewDir, reflectDir), 0.0), material.shininess);
    vec3 specular = light.specular * spec * texture(material.specular, TexCoords).rgb;

    vec3 result = ambient + diffuse + specular;
    FragColor = vec4(result, 1.0);
}
完整源码
#include <glad/glad.h>
#include <GLFW/glfw3.h>

#include <glm/glm.hpp>
#include <glm/gtc/matrix_transform.hpp>
#include <glm/gtc/type_ptr.hpp>

#define STB_IMAGE_IMPLEMENTATION
#include <stb_image.h>

// https://learnopengl.com/code_viewer_gh.php?code=includes/learnopengl/shader_m.h
#include <shader_s.h>
// https://learnopengl.com/code_viewer_gh.php?code=includes/learnopengl/camera.h
#include <camera.h>
#include <iostream>
void InitGLFW();
bool CreateWindow();
bool InitGLAD();

// 窗口大小改变时调用
void framebuffer_size_callback(GLFWwindow *window, int width, int height);
void mouse_callback(GLFWwindow *window, double xposIn, double yposIn);
void scroll_callback(GLFWwindow *window, double xoffset, double yoffset);
void processInput(GLFWwindow *window);
unsigned int loadTexture(const char *path);

// settings 窗口宽高
const unsigned int SCR_WIDTH = 800;
const unsigned int SCR_HEIGHT = 600;

// 相机
Camera camera(glm::vec3(0.0f, 0.0f, 6.0f));
float lastX = static_cast<float>(SCR_WIDTH) / 2.0;
float lastY = static_cast<float>(SCR_HEIGHT) / 2.0;
bool firstMouse = true;

// timing
float deltaTime = 0.0f; // time between current frame and last frame
float lastFrame = 0.0f;


GLFWwindow *window;

int main()
{
    InitGLFW(); // 初始化GLFW

    bool isCreated = CreateWindow(); // 创建一个窗口对象
    if (!isCreated)
        return -1;
    bool isGLAD = InitGLAD(); // 初始化GLAD,传入加载系统相关opengl函数指针的函数
    if (!isGLAD)
        return -1;

    // 启用深度测试
    glEnable(GL_DEPTH_TEST);

    // 构建和编译着色程序
    // https://learnopengl.com/code_viewer_gh.php?code=src/2.lighting/5.1.light_casters_directional/5.1.light_casters.vs
    // https://learnopengl.com/code_viewer_gh.php?code=src/2.lighting/5.1.light_casters_directional/5.1.light_casters.fs
    Shader lightingShader("shader/P1_Basic/09_LightSystem/Direct_light_casters.vs", "shader/P1_Basic/09_LightSystem/Direct_light_casters.fs");
    // https://learnopengl.com/code_viewer_gh.php?code=src/2.lighting/5.1.light_casters_directional/5.1.light_cube.vs
    // https://learnopengl.com/code_viewer_gh.php?code=src/2.lighting/5.1.light_casters_directional/5.1.light_cube.fs
    Shader lightCubeShader("shader/P1_Basic/09_LightSystem/light_cube.vs", "shader/P1_Basic/09_LightSystem/light_cube.fs");

    // 设置顶点数据(和缓冲区)并配置顶点属性
    // 1.设置立方体顶点输入  一共需要36个顶点
    float vertices[] = {
        // positions          // normals           // texture coords
        -0.5f, -0.5f, -0.5f, 0.0f, 0.0f, -1.0f, 0.0f, 0.0f,
        0.5f, -0.5f, -0.5f, 0.0f, 0.0f, -1.0f, 1.0f, 0.0f,
        0.5f, 0.5f, -0.5f, 0.0f, 0.0f, -1.0f, 1.0f, 1.0f,
        0.5f, 0.5f, -0.5f, 0.0f, 0.0f, -1.0f, 1.0f, 1.0f,
        -0.5f, 0.5f, -0.5f, 0.0f, 0.0f, -1.0f, 0.0f, 1.0f,
        -0.5f, -0.5f, -0.5f, 0.0f, 0.0f, -1.0f, 0.0f, 0.0f,

        -0.5f, -0.5f, 0.5f, 0.0f, 0.0f, 1.0f, 0.0f, 0.0f,
        0.5f, -0.5f, 0.5f, 0.0f, 0.0f, 1.0f, 1.0f, 0.0f,
        0.5f, 0.5f, 0.5f, 0.0f, 0.0f, 1.0f, 1.0f, 1.0f,
        0.5f, 0.5f, 0.5f, 0.0f, 0.0f, 1.0f, 1.0f, 1.0f,
        -0.5f, 0.5f, 0.5f, 0.0f, 0.0f, 1.0f, 0.0f, 1.0f,
        -0.5f, -0.5f, 0.5f, 0.0f, 0.0f, 1.0f, 0.0f, 0.0f,

        -0.5f, 0.5f, 0.5f, -1.0f, 0.0f, 0.0f, 1.0f, 0.0f,
        -0.5f, 0.5f, -0.5f, -1.0f, 0.0f, 0.0f, 1.0f, 1.0f,
        -0.5f, -0.5f, -0.5f, -1.0f, 0.0f, 0.0f, 0.0f, 1.0f,
        -0.5f, -0.5f, -0.5f, -1.0f, 0.0f, 0.0f, 0.0f, 1.0f,
        -0.5f, -0.5f, 0.5f, -1.0f, 0.0f, 0.0f, 0.0f, 0.0f,
        -0.5f, 0.5f, 0.5f, -1.0f, 0.0f, 0.0f, 1.0f, 0.0f,

        0.5f, 0.5f, 0.5f, 1.0f, 0.0f, 0.0f, 1.0f, 0.0f,
        0.5f, 0.5f, -0.5f, 1.0f, 0.0f, 0.0f, 1.0f, 1.0f,
        0.5f, -0.5f, -0.5f, 1.0f, 0.0f, 0.0f, 0.0f, 1.0f,
        0.5f, -0.5f, -0.5f, 1.0f, 0.0f, 0.0f, 0.0f, 1.0f,
        0.5f, -0.5f, 0.5f, 1.0f, 0.0f, 0.0f, 0.0f, 0.0f,
        0.5f, 0.5f, 0.5f, 1.0f, 0.0f, 0.0f, 1.0f, 0.0f,

        -0.5f, -0.5f, -0.5f, 0.0f, -1.0f, 0.0f, 0.0f, 1.0f,
        0.5f, -0.5f, -0.5f, 0.0f, -1.0f, 0.0f, 1.0f, 1.0f,
        0.5f, -0.5f, 0.5f, 0.0f, -1.0f, 0.0f, 1.0f, 0.0f,
        0.5f, -0.5f, 0.5f, 0.0f, -1.0f, 0.0f, 1.0f, 0.0f,
        -0.5f, -0.5f, 0.5f, 0.0f, -1.0f, 0.0f, 0.0f, 0.0f,
        -0.5f, -0.5f, -0.5f, 0.0f, -1.0f, 0.0f, 0.0f, 1.0f,

        -0.5f, 0.5f, -0.5f, 0.0f, 1.0f, 0.0f, 0.0f, 1.0f,
        0.5f, 0.5f, -0.5f, 0.0f, 1.0f, 0.0f, 1.0f, 1.0f,
        0.5f, 0.5f, 0.5f, 0.0f, 1.0f, 0.0f, 1.0f, 0.0f,
        0.5f, 0.5f, 0.5f, 0.0f, 1.0f, 0.0f, 1.0f, 0.0f,
        -0.5f, 0.5f, 0.5f, 0.0f, 1.0f, 0.0f, 0.0f, 0.0f,
        -0.5f, 0.5f, -0.5f, 0.0f, 1.0f, 0.0f, 0.0f, 1.0f};

    // positions all containers
    glm::vec3 cubePositions[] = {
        glm::vec3(0.0f, 0.0f, 0.0f),
        glm::vec3(2.0f, 5.0f, -15.0f),
        glm::vec3(-1.5f, -2.2f, -2.5f),
        glm::vec3(-3.8f, -2.0f, -12.3f),
        glm::vec3(2.4f, -0.4f, -3.5f),
        glm::vec3(-1.7f, 3.0f, -7.5f),
        glm::vec3(1.3f, -2.0f, -2.5f),
        glm::vec3(1.5f, 2.0f, -2.5f),
        glm::vec3(1.5f, 0.2f, -1.5f),
        glm::vec3(-1.3f, 1.0f, -1.5f)};
    // 2.设置索引缓冲对象
    unsigned int VBO, cubeVAO;
    glGenVertexArrays(1, &cubeVAO);
    glGenBuffers(1, &VBO);

    glBindBuffer(GL_ARRAY_BUFFER, VBO);
    glBufferData(GL_ARRAY_BUFFER, sizeof(vertices), vertices, GL_STATIC_DRAW);

    glBindVertexArray(cubeVAO);
    glVertexAttribPointer(0, 3, GL_FLOAT, GL_FALSE, 8 * sizeof(float), (void *)0);
    glEnableVertexAttribArray(0);
    glVertexAttribPointer(1, 3, GL_FLOAT, GL_FALSE, 8 * sizeof(float), (void *)(3 * sizeof(float)));
    glEnableVertexAttribArray(1);
    glVertexAttribPointer(2, 2, GL_FLOAT, GL_FALSE, 8 * sizeof(float), (void *)(6 * sizeof(float)));
    glEnableVertexAttribArray(2);

    // second, configure the light's VAO (VBO stays the same; the vertices are the same for the light object which is also a 3D cube)
    unsigned int lightCubeVAO;
    glGenVertexArrays(1, &lightCubeVAO);
    glBindVertexArray(lightCubeVAO);

    glBindBuffer(GL_ARRAY_BUFFER, VBO);
    // note that we update the lamp's position attribute's stride to reflect the updated buffer data
    glVertexAttribPointer(0, 3, GL_FLOAT, GL_FALSE, 8 * sizeof(float), (void *)0);
    glEnableVertexAttribArray(0);

    // 加载纹理
    // https://learnopengl-cn.github.io/img/02/04/container2.png
    unsigned int diffuseMap = loadTexture("image/04_Textures/container2.png");
    // https://learnopengl-cn.github.io/img/02/04/container2_specular.png
    unsigned int specularMap = loadTexture("image/04_Textures/container2_specular.png");

    // shader configuration
    // --------------------
    lightingShader.use();
    lightingShader.setInt("material.diffuse", 0);
    lightingShader.setInt("material.specular", 1);

    // 循环渲染
    while (!glfwWindowShouldClose(window))
    {
        // 计算帧间隔时间
        float currentFrame = static_cast<float>(glfwGetTime());
        deltaTime = currentFrame - lastFrame;
        lastFrame = currentFrame;

        // 输入
        processInput(window);

        // 渲染
        // 清除颜色缓冲
        glClearColor(0.1f, 0.1f, 0.1f, 1.0f);
        // 清除深度缓冲
        glClear(GL_COLOR_BUFFER_BIT | GL_DEPTH_BUFFER_BIT);

        // 确信激活着色器
        lightingShader.use();
        lightingShader.setVec3("light.direction", -0.2f, -1.0f, -0.3f);
        lightingShader.setVec3("viewPos", camera.Position);

        // 灯光属性
        lightingShader.setVec3("light.ambient", 0.2f, 0.2f, 0.2f);
        lightingShader.setVec3("light.diffuse", 0.5f, 0.5f, 0.5f);
        lightingShader.setVec3("light.specular", 1.0f, 1.0f, 1.0f);

        // 材质属性
        lightingShader.setFloat("material.shininess", 32.0f);

        // 观察矩阵 透视矩阵
        glm::mat4 projection = glm::perspective(glm::radians(camera.Zoom), (float)SCR_WIDTH / (float)SCR_HEIGHT, 0.1f, 100.0f);
        glm::mat4 view = camera.GetViewMatrix();
        lightingShader.setMat4("projection", projection);
        lightingShader.setMat4("view", view);

        // 世界坐标系变换
        glm::mat4 model = glm::mat4(1.0f);
        lightingShader.setMat4("model", model);

        // 绑定漫反射贴图
        glActiveTexture(GL_TEXTURE0);
        glBindTexture(GL_TEXTURE_2D, diffuseMap);
        // 绑定镜面贴图
        glActiveTexture(GL_TEXTURE1);
        glBindTexture(GL_TEXTURE_2D, specularMap);

        // render the cube
        glBindVertexArray(cubeVAO);
        for (unsigned int i = 1; i < 10; i++)
        {
            // 计算模型矩阵
            model = glm::mat4(1.0f);
            model = glm::translate(model, cubePositions[i]);
            float angle = 20.0f * i;
            model = glm::rotate(model, glm::radians(angle) * (float)glfwGetTime(), glm::vec3(1.0f, 0.3f, 0.5f));
            lightingShader.setMat4("model", model);

            glDrawArrays(GL_TRIANGLES, 0, 36);
        }

        glfwSwapBuffers(window);
        glfwPollEvents();
    }

    // 可选:一旦资源超出其用途,就取消分配所有资源:
    glDeleteVertexArrays(1, &cubeVAO);
    glDeleteVertexArrays(1, &lightCubeVAO);
    glDeleteBuffers(1, &VBO);
    // 释放/删除之前的分配的所有资源
    glfwTerminate();
    return 0;
}

void InitGLFW()
{
    // 初始化GLFW
    glfwInit();
    // 配置GLFW  第一个参数代表选项的名称,我们可以从很多以GLFW_开头的枚举值中选择;
    // 第二个参数接受一个整型,用来设置这个选项的值。
    glfwWindowHint(GLFW_CONTEXT_VERSION_MAJOR, 3);
    glfwWindowHint(GLFW_CONTEXT_VERSION_MINOR, 3);
    glfwWindowHint(GLFW_OPENGL_PROFILE, GLFW_OPENGL_CORE_PROFILE);
    // glfwWindowHint(GLFW_OPENGL_FORWARD_COMPAT, GL_TRUE);
}
bool CreateWindow()
{
    // 创建一个窗口对象
    window = glfwCreateWindow(800, 600, "LearnOpenGL", NULL, NULL);
    if (window == NULL)
    {
        std::cout << "Failed to create GLFW window" << std::endl;
        // 创建失败,终止程序
        glfwTerminate();
        return false;
    }
    // 将我们窗口的上下文设置为当前线程的主上下文
    glfwMakeContextCurrent(window);
    // 设置窗口大小改变时的回调函数
    glfwSetFramebufferSizeCallback(window, framebuffer_size_callback);
    // 设置鼠标移动回调函数
    glfwSetCursorPosCallback(window, mouse_callback);
    // 设置滚轮滚动回调函数
    glfwSetScrollCallback(window, scroll_callback);

    // 隐藏并捕捉鼠标
    // glfwSetInputMode(window, GLFW_CURSOR, GLFW_CURSOR_DISABLED);

    return true;
}
bool InitGLAD()
{
    // 初始化GLAD,传入加载系统相关opengl函数指针的函数
    if (!gladLoadGLLoader((GLADloadproc)glfwGetProcAddress))
    {
        std::cout << "Failed to initialize GLAD" << std::endl;
        // 初始化失败,终止程序
        return false;
    }
    return true;
}

// 窗口大小改变时调用
void framebuffer_size_callback(GLFWwindow *window, int width, int height)
{
    // 设置窗口的维度
    glViewport(0, 0, width, height);
}

// 输入
void processInput(GLFWwindow *window)
{
    // 当用户按下esc键,我们设置window窗口的windowShouldClose属性为true
    // 关闭应用程序
    if (glfwGetKey(window, GLFW_KEY_ESCAPE) == GLFW_PRESS)
        glfwSetWindowShouldClose(window, true);

    if (glfwGetKey(window, GLFW_KEY_W) == GLFW_PRESS)
        camera.ProcessKeyboard(FORWARD, deltaTime);
    if (glfwGetKey(window, GLFW_KEY_S) == GLFW_PRESS)
        camera.ProcessKeyboard(BACKWARD, deltaTime);
    if (glfwGetKey(window, GLFW_KEY_A) == GLFW_PRESS)
        camera.ProcessKeyboard(LEFT, deltaTime);
    if (glfwGetKey(window, GLFW_KEY_D) == GLFW_PRESS)
        camera.ProcessKeyboard(RIGHT, deltaTime);
}

// 鼠标移动回调函数
void mouse_callback(GLFWwindow *window, double xposIn, double yposIn)
{
    // 长按T键,鼠标才能控制相机
    if (glfwGetKey(window, GLFW_KEY_1) != GLFW_PRESS)
        return;

    float xpos = static_cast<float>(xposIn);
    float ypos = static_cast<float>(yposIn);

    if (firstMouse)
    {
        lastX = xpos;
        lastY = ypos;
        firstMouse = false;
    }

    float xoffset = xpos - lastX;
    float yoffset = lastY - ypos; // reversed since y-coordinates go from bottom to top

    lastX = xpos;
    lastY = ypos;

    camera.ProcessMouseMovement(xoffset, yoffset);
}

// 鼠标滚轮滚动回调函数
void scroll_callback(GLFWwindow *window, double xoffset, double yoffset)
{
    camera.ProcessMouseScroll(static_cast<float>(yoffset));
}
unsigned int loadTexture(char const *path)
{
    unsigned int textureID;
    glGenTextures(1, &textureID);

    int width, height, nrComponents;
    unsigned char *data = stbi_load(path, &width, &height, &nrComponents, 0);
    if (data)
    {
        GLenum format;
        if (nrComponents == 1)
            format = GL_RED;
        else if (nrComponents == 3)
            format = GL_RGB;
        else if (nrComponents == 4)
            format = GL_RGBA;

        glBindTexture(GL_TEXTURE_2D, textureID);
        glTexImage2D(GL_TEXTURE_2D, 0, format, width, height, 0, format, GL_UNSIGNED_BYTE, data);
        glGenerateMipmap(GL_TEXTURE_2D);

        glTexParameteri(GL_TEXTURE_2D, GL_TEXTURE_WRAP_S, GL_REPEAT);
        glTexParameteri(GL_TEXTURE_2D, GL_TEXTURE_WRAP_T, GL_REPEAT);
        glTexParameteri(GL_TEXTURE_2D, GL_TEXTURE_MIN_FILTER, GL_LINEAR_MIPMAP_LINEAR);
        glTexParameteri(GL_TEXTURE_2D, GL_TEXTURE_MAG_FILTER, GL_LINEAR);

        stbi_image_free(data);
    }
    else
    {
        std::cout << "Texture failed to load at path: " << path << std::endl;
        stbi_image_free(data);
    }

    return textureID;
}
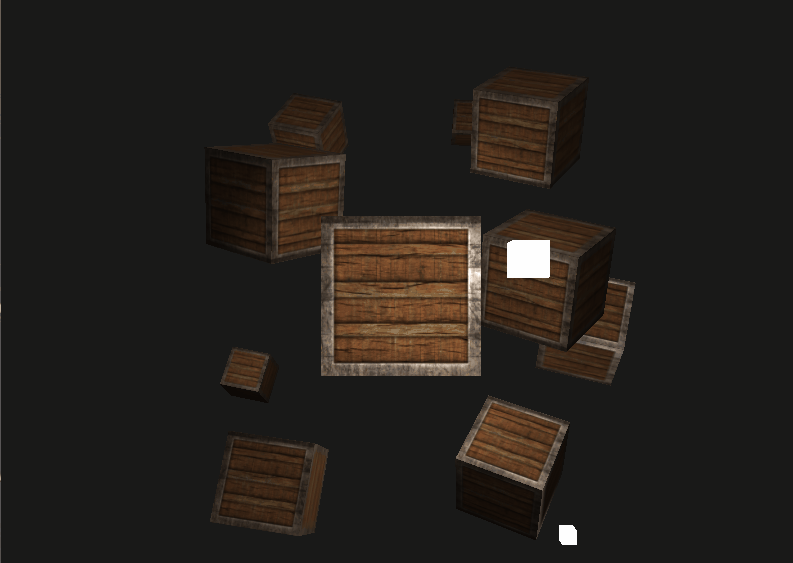
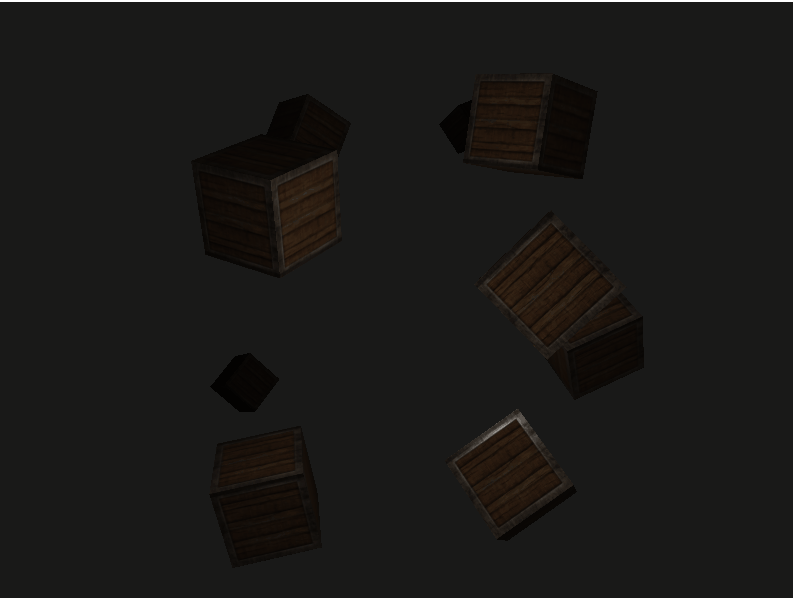
运行效果:

点光源
点光源的照亮空间则是有限的,它是由空间中的一个球体定义的。点光源可以表示由一个点发出的、向所有方向延伸的光 。

在大部分的3D模拟中,我们都希望模拟的光源(衰减的光线)仅照亮光源附近的区域而不是整个场景。
衰减
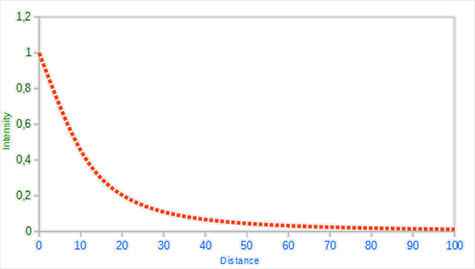
随着光线传播距离的增长逐渐削减光的强度通常叫做衰减(Attenuation)。下面这个公式根据片段距光源的距离计算了衰减值,之后我们会将它乘以光的强度向量:
F
a
t
t
=
1.0
K
c
+
K
l
∗
d
+
K
q
∗
d
2
F_{att}=\frac{1.0}{K_c+K_l*d+K_q*d^2}
Fatt=Kc+Kl∗d+Kq∗d21.0
在这里
d
d
d代表了片段距光源的距离。
接下来为了计算衰减值,我们定义3个(可配置的)项:
- 常数项 K c K_c Kc:通常保持为1.0。
- 一次项 K l K_l Kl:会与距离值相乘,以线性的方式减少强度。
- 二次项 K q K_q Kq:会与距离的平方相乘,让光源以二次递减的方式减少强度。二次项在距离比较小的时候影响会比一次项小很多,但当距离值比较大的时候它就会比一次项更大了。
由于二次项的存在,光线会在大部分时候以线性的方式衰退,直到距离变得足够大,让二次项超过一次项,光的强度会以更快的速度下降。
这样的结果就是,光在近距离时亮度很高,但随着距离变远亮度迅速降低,最后会以更慢的速度减少亮度。
下面这张图显示了在100的距离内衰减的效果:
如何设置正确的值??
正确地设定它们的值取决于很多因素:环境、希望光覆盖的距离、光的类型等。在大多数情况下,这都是经验的问题,以及适量的调整。
这里有个Ogre3D的Wiki所提供链接可供参考。
衰减的实现
为了实现衰减,在片段着色器中我们还需要三个额外的值:也就是公式中的常数项、一次项和二次项。它们最好储存在之前定义的Light结构体中:
struct Light {
    vec3 position;

    vec3 ambient;
    vec3 diffuse;
    vec3 specular;

    float constant;//常数项
    float linear;//一次项
    float quadratic;//二次项
};
然后,我们根据Ogre3D提供的参考值设置 覆盖50的距离:
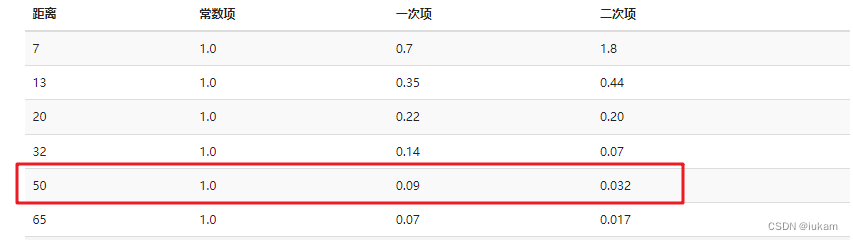
lightingShader.setFloat("light.constant",  1.0f);
lightingShader.setFloat("light.linear",    0.09f);
lightingShader.setFloat("light.quadratic", 0.032f);
之后,代入衰减公式中:
float distance    = length(light.position - FragPos);
float attenuation = 1.0 / (light.constant + light.linear * distance +
                light.quadratic * (distance * distance));
接下来,我们将包含这个衰减值到光照计算中,将它分别乘以环境光、漫反射和镜面光颜色。
ambient  *= attenuation;
diffuse  *= attenuation;
specular *= attenuation;
完整代码实现
顶点着色器和平行光一样的,只需修改片元着色器:
#version 330 core
out vec4 FragColor;

struct Material {
    sampler2D diffuse;
    sampler2D specular;
    float shininess;
};

struct Light {
    vec3 position;

    vec3 ambient;
    vec3 diffuse;
    vec3 specular;

    float constant;
    float linear;
    float quadratic;
};

in vec3 FragPos;
in vec3 Normal;
in vec2 TexCoords;

uniform vec3 viewPos;
uniform Material material;
uniform Light light;

void main()
{
    // ambient
    vec3 ambient = light.ambient * texture(material.diffuse, TexCoords).rgb;

    // diffuse
    vec3 norm = normalize(Normal);
    vec3 lightDir = normalize(light.position - FragPos);
    float diff = max(dot(norm, lightDir), 0.0);
    vec3 diffuse = light.diffuse * diff * texture(material.diffuse, TexCoords).rgb;

    // specular
    vec3 viewDir = normalize(viewPos - FragPos);
    vec3 reflectDir = reflect(-lightDir, norm);
    float spec = pow(max(dot(viewDir, reflectDir), 0.0), material.shininess);
    vec3 specular = light.specular * spec * texture(material.specular, TexCoords).rgb;

    // attenuation
    float distance    = length(light.position - FragPos);
    float attenuation = 1.0 / (light.constant + light.linear * distance + light.quadratic * (distance * distance));

    ambient  *= attenuation;
    diffuse   *= attenuation;
    specular *= attenuation;

    vec3 result = ambient + diffuse + specular;
    FragColor = vec4(result, 1.0);
}
完整代码:
#include <glad/glad.h>
#include <GLFW/glfw3.h>

#include <glm/glm.hpp>
#include <glm/gtc/matrix_transform.hpp>
#include <glm/gtc/type_ptr.hpp>

#define STB_IMAGE_IMPLEMENTATION
#include <stb_image.h>

// https://learnopengl.com/code_viewer_gh.php?code=includes/learnopengl/shader_m.h
#include <shader_s.h>
// https://learnopengl.com/code_viewer_gh.php?code=includes/learnopengl/camera.h
#include <camera.h>
#include <iostream>
void InitGLFW();
bool CreateWindow();
bool InitGLAD();

// 窗口大小改变时调用
void framebuffer_size_callback(GLFWwindow *window, int width, int height);
void mouse_callback(GLFWwindow *window, double xposIn, double yposIn);
void scroll_callback(GLFWwindow *window, double xoffset, double yoffset);
void processInput(GLFWwindow *window);
unsigned int loadTexture(const char *path);

// settings 窗口宽高
const unsigned int SCR_WIDTH = 800;
const unsigned int SCR_HEIGHT = 600;

// 相机
Camera camera(glm::vec3(0.0f, 0.0f, 6.0f));
float lastX = static_cast<float>(SCR_WIDTH) / 2.0;
float lastY = static_cast<float>(SCR_HEIGHT) / 2.0;
bool firstMouse = true;

// timing
float deltaTime = 0.0f; // time between current frame and last frame
float lastFrame = 0.0f;

GLFWwindow *window;

int main()
{
    InitGLFW(); // 初始化GLFW

    bool isCreated = CreateWindow(); // 创建一个窗口对象
    if (!isCreated)
        return -1;
    bool isGLAD = InitGLAD(); // 初始化GLAD,传入加载系统相关opengl函数指针的函数
    if (!isGLAD)
        return -1;

    // 启用深度测试
    glEnable(GL_DEPTH_TEST);

    // 构建和编译着色程序
    // https://learnopengl.com/code_viewer_gh.php?code=src/2.lighting/5.2.light_casters_point/5.2.light_casters.vs
    // https://learnopengl.com/code_viewer_gh.php?code=src/2.lighting/5.2.light_casters_point/5.2.light_casters.fs
    Shader lightingShader("shader/P1_Basic/09_LightSystem/Point_light_casters.vs", "shader/P1_Basic/09_LightSystem/Point_light_casters.fs");
    // https://learnopengl.com/code_viewer_gh.php?code=src/2.lighting/5.1.light_casters_directional/5.1.light_cube.vs
    // https://learnopengl.com/code_viewer_gh.php?code=src/2.lighting/5.1.light_casters_directional/5.1.light_cube.fs
    Shader lightCubeShader("shader/P1_Basic/09_LightSystem/light_cube.vs", "shader/P1_Basic/09_LightSystem/light_cube.fs");

    // 设置顶点数据(和缓冲区)并配置顶点属性
    // 1.设置立方体顶点输入  一共需要36个顶点
    float vertices[] = {
        // positions          // normals           // texture coords
        -0.5f, -0.5f, -0.5f, 0.0f, 0.0f, -1.0f, 0.0f, 0.0f,
        0.5f, -0.5f, -0.5f, 0.0f, 0.0f, -1.0f, 1.0f, 0.0f,
        0.5f, 0.5f, -0.5f, 0.0f, 0.0f, -1.0f, 1.0f, 1.0f,
        0.5f, 0.5f, -0.5f, 0.0f, 0.0f, -1.0f, 1.0f, 1.0f,
        -0.5f, 0.5f, -0.5f, 0.0f, 0.0f, -1.0f, 0.0f, 1.0f,
        -0.5f, -0.5f, -0.5f, 0.0f, 0.0f, -1.0f, 0.0f, 0.0f,

        -0.5f, -0.5f, 0.5f, 0.0f, 0.0f, 1.0f, 0.0f, 0.0f,
        0.5f, -0.5f, 0.5f, 0.0f, 0.0f, 1.0f, 1.0f, 0.0f,
        0.5f, 0.5f, 0.5f, 0.0f, 0.0f, 1.0f, 1.0f, 1.0f,
        0.5f, 0.5f, 0.5f, 0.0f, 0.0f, 1.0f, 1.0f, 1.0f,
        -0.5f, 0.5f, 0.5f, 0.0f, 0.0f, 1.0f, 0.0f, 1.0f,
        -0.5f, -0.5f, 0.5f, 0.0f, 0.0f, 1.0f, 0.0f, 0.0f,

        -0.5f, 0.5f, 0.5f, -1.0f, 0.0f, 0.0f, 1.0f, 0.0f,
        -0.5f, 0.5f, -0.5f, -1.0f, 0.0f, 0.0f, 1.0f, 1.0f,
        -0.5f, -0.5f, -0.5f, -1.0f, 0.0f, 0.0f, 0.0f, 1.0f,
        -0.5f, -0.5f, -0.5f, -1.0f, 0.0f, 0.0f, 0.0f, 1.0f,
        -0.5f, -0.5f, 0.5f, -1.0f, 0.0f, 0.0f, 0.0f, 0.0f,
        -0.5f, 0.5f, 0.5f, -1.0f, 0.0f, 0.0f, 1.0f, 0.0f,

        0.5f, 0.5f, 0.5f, 1.0f, 0.0f, 0.0f, 1.0f, 0.0f,
        0.5f, 0.5f, -0.5f, 1.0f, 0.0f, 0.0f, 1.0f, 1.0f,
        0.5f, -0.5f, -0.5f, 1.0f, 0.0f, 0.0f, 0.0f, 1.0f,
        0.5f, -0.5f, -0.5f, 1.0f, 0.0f, 0.0f, 0.0f, 1.0f,
        0.5f, -0.5f, 0.5f, 1.0f, 0.0f, 0.0f, 0.0f, 0.0f,
        0.5f, 0.5f, 0.5f, 1.0f, 0.0f, 0.0f, 1.0f, 0.0f,

        -0.5f, -0.5f, -0.5f, 0.0f, -1.0f, 0.0f, 0.0f, 1.0f,
        0.5f, -0.5f, -0.5f, 0.0f, -1.0f, 0.0f, 1.0f, 1.0f,
        0.5f, -0.5f, 0.5f, 0.0f, -1.0f, 0.0f, 1.0f, 0.0f,
        0.5f, -0.5f, 0.5f, 0.0f, -1.0f, 0.0f, 1.0f, 0.0f,
        -0.5f, -0.5f, 0.5f, 0.0f, -1.0f, 0.0f, 0.0f, 0.0f,
        -0.5f, -0.5f, -0.5f, 0.0f, -1.0f, 0.0f, 0.0f, 1.0f,

        -0.5f, 0.5f, -0.5f, 0.0f, 1.0f, 0.0f, 0.0f, 1.0f,
        0.5f, 0.5f, -0.5f, 0.0f, 1.0f, 0.0f, 1.0f, 1.0f,
        0.5f, 0.5f, 0.5f, 0.0f, 1.0f, 0.0f, 1.0f, 0.0f,
        0.5f, 0.5f, 0.5f, 0.0f, 1.0f, 0.0f, 1.0f, 0.0f,
        -0.5f, 0.5f, 0.5f, 0.0f, 1.0f, 0.0f, 0.0f, 0.0f,
        -0.5f, 0.5f, -0.5f, 0.0f, 1.0f, 0.0f, 0.0f, 1.0f};

    // positions all containers
    glm::vec3 cubePositions[] = {
        glm::vec3(0.0f, 0.0f, 0.0f),
        glm::vec3(2.0f, 5.0f, -15.0f),
        glm::vec3(-1.5f, -2.2f, -2.5f),
        glm::vec3(-3.8f, -2.0f, -12.3f),
        glm::vec3(2.4f, -0.4f, -3.5f),
        glm::vec3(-1.7f, 3.0f, -7.5f),
        glm::vec3(1.3f, -2.0f, -2.5f),
        glm::vec3(1.5f, 2.0f, -2.5f),
        glm::vec3(1.5f, 0.2f, -1.5f),
        glm::vec3(-1.3f, 1.0f, -1.5f)};
    // 2.设置索引缓冲对象
    unsigned int VBO, cubeVAO;
    glGenVertexArrays(1, &cubeVAO);
    glGenBuffers(1, &VBO);

    glBindBuffer(GL_ARRAY_BUFFER, VBO);
    glBufferData(GL_ARRAY_BUFFER, sizeof(vertices), vertices, GL_STATIC_DRAW);

    glBindVertexArray(cubeVAO);
    glVertexAttribPointer(0, 3, GL_FLOAT, GL_FALSE, 8 * sizeof(float), (void *)0);
    glEnableVertexAttribArray(0);
    glVertexAttribPointer(1, 3, GL_FLOAT, GL_FALSE, 8 * sizeof(float), (void *)(3 * sizeof(float)));
    glEnableVertexAttribArray(1);
    glVertexAttribPointer(2, 2, GL_FLOAT, GL_FALSE, 8 * sizeof(float), (void *)(6 * sizeof(float)));
    glEnableVertexAttribArray(2);

    // second, configure the light's VAO (VBO stays the same; the vertices are the same for the light object which is also a 3D cube)
    unsigned int lightCubeVAO;
    glGenVertexArrays(1, &lightCubeVAO);
    glBindVertexArray(lightCubeVAO);

    glBindBuffer(GL_ARRAY_BUFFER, VBO);
    // note that we update the lamp's position attribute's stride to reflect the updated buffer data
    glVertexAttribPointer(0, 3, GL_FLOAT, GL_FALSE, 8 * sizeof(float), (void *)0);
    glEnableVertexAttribArray(0);

    // 加载纹理
    // https://learnopengl-cn.github.io/img/02/04/container2.png
    unsigned int diffuseMap = loadTexture("image/04_Textures/container2.png");
    // https://learnopengl-cn.github.io/img/02/04/container2_specular.png
    unsigned int specularMap = loadTexture("image/04_Textures/container2_specular.png");

    // shader configuration
    // --------------------
    lightingShader.use();
    lightingShader.setInt("material.diffuse", 0);
    lightingShader.setInt("material.specular", 1);

    // 循环渲染
    while (!glfwWindowShouldClose(window))
    {
        // 计算帧间隔时间
        float currentFrame = static_cast<float>(glfwGetTime());
        deltaTime = currentFrame - lastFrame;
        lastFrame = currentFrame;

        // 输入
        processInput(window);

        // 渲染
        // 清除颜色缓冲
        glClearColor(0.1f, 0.1f, 0.1f, 1.0f);
        // 清除深度缓冲
        glClear(GL_COLOR_BUFFER_BIT | GL_DEPTH_BUFFER_BIT);

        // 确信激活着色器
        lightingShader.use();
        lightingShader.setVec3("light.direction", -0.2f, -1.0f, -0.3f);
        lightingShader.setVec3("viewPos", camera.Position);

        // 灯光属性
        lightingShader.setVec3("light.ambient", 0.2f, 0.2f, 0.2f);
        lightingShader.setVec3("light.diffuse", 0.5f, 0.5f, 0.5f);
        lightingShader.setVec3("light.specular", 1.0f, 1.0f, 1.0f);
        //设置衰减值
        lightingShader.setFloat("light.constant", 1.0f);
        lightingShader.setFloat("light.linear", 0.09f);
        lightingShader.setFloat("light.quadratic", 0.032f);

        // 材质属性
        lightingShader.setFloat("material.shininess", 32.0f);

        // 观察矩阵 透视矩阵
        glm::mat4 projection = glm::perspective(glm::radians(camera.Zoom), (float)SCR_WIDTH / (float)SCR_HEIGHT, 0.1f, 100.0f);
        glm::mat4 view = camera.GetViewMatrix();
        lightingShader.setMat4("projection", projection);
        lightingShader.setMat4("view", view);

        // 世界坐标系变换
        glm::mat4 model = glm::mat4(1.0f);
        lightingShader.setMat4("model", model);

        // 绑定漫反射贴图
        glActiveTexture(GL_TEXTURE0);
        glBindTexture(GL_TEXTURE_2D, diffuseMap);
        // 绑定镜面贴图
        glActiveTexture(GL_TEXTURE1);
        glBindTexture(GL_TEXTURE_2D, specularMap);

        // render the cube
        glBindVertexArray(cubeVAO);
        for (unsigned int i = 1; i < 10; i++)
        {
            // 计算模型矩阵
            model = glm::mat4(1.0f);
            model = glm::translate(model, cubePositions[i]);
            float angle = 20.0f * i;
            model = glm::rotate(model, glm::radians(angle) * (float)glfwGetTime(), glm::vec3(1.0f, 0.3f, 0.5f));
            lightingShader.setMat4("model", model);

            glDrawArrays(GL_TRIANGLES, 0, 36);
        }

        glfwSwapBuffers(window);
        glfwPollEvents();
    }

    // 可选:一旦资源超出其用途,就取消分配所有资源:
    glDeleteVertexArrays(1, &cubeVAO);
    glDeleteVertexArrays(1, &lightCubeVAO);
    glDeleteBuffers(1, &VBO);
    // 释放/删除之前的分配的所有资源
    glfwTerminate();
    return 0;
}

void InitGLFW()
{
    // 初始化GLFW
    glfwInit();
    // 配置GLFW  第一个参数代表选项的名称,我们可以从很多以GLFW_开头的枚举值中选择;
    // 第二个参数接受一个整型,用来设置这个选项的值。
    glfwWindowHint(GLFW_CONTEXT_VERSION_MAJOR, 3);
    glfwWindowHint(GLFW_CONTEXT_VERSION_MINOR, 3);
    glfwWindowHint(GLFW_OPENGL_PROFILE, GLFW_OPENGL_CORE_PROFILE);
    // glfwWindowHint(GLFW_OPENGL_FORWARD_COMPAT, GL_TRUE);
}
bool CreateWindow()
{
    // 创建一个窗口对象
    window = glfwCreateWindow(800, 600, "LearnOpenGL", NULL, NULL);
    if (window == NULL)
    {
        std::cout << "Failed to create GLFW window" << std::endl;
        // 创建失败,终止程序
        glfwTerminate();
        return false;
    }
    // 将我们窗口的上下文设置为当前线程的主上下文
    glfwMakeContextCurrent(window);
    // 设置窗口大小改变时的回调函数
    glfwSetFramebufferSizeCallback(window, framebuffer_size_callback);
    // 设置鼠标移动回调函数
    glfwSetCursorPosCallback(window, mouse_callback);
    // 设置滚轮滚动回调函数
    glfwSetScrollCallback(window, scroll_callback);

    // 隐藏并捕捉鼠标
    // glfwSetInputMode(window, GLFW_CURSOR, GLFW_CURSOR_DISABLED);

    return true;
}
bool InitGLAD()
{
    // 初始化GLAD,传入加载系统相关opengl函数指针的函数
    if (!gladLoadGLLoader((GLADloadproc)glfwGetProcAddress))
    {
        std::cout << "Failed to initialize GLAD" << std::endl;
        // 初始化失败,终止程序
        return false;
    }
    return true;
}

// 窗口大小改变时调用
void framebuffer_size_callback(GLFWwindow *window, int width, int height)
{
    // 设置窗口的维度
    glViewport(0, 0, width, height);
}

// 输入
void processInput(GLFWwindow *window)
{
    // 当用户按下esc键,我们设置window窗口的windowShouldClose属性为true
    // 关闭应用程序
    if (glfwGetKey(window, GLFW_KEY_ESCAPE) == GLFW_PRESS)
        glfwSetWindowShouldClose(window, true);

    if (glfwGetKey(window, GLFW_KEY_W) == GLFW_PRESS)
        camera.ProcessKeyboard(FORWARD, deltaTime);
    if (glfwGetKey(window, GLFW_KEY_S) == GLFW_PRESS)
        camera.ProcessKeyboard(BACKWARD, deltaTime);
    if (glfwGetKey(window, GLFW_KEY_A) == GLFW_PRESS)
        camera.ProcessKeyboard(LEFT, deltaTime);
    if (glfwGetKey(window, GLFW_KEY_D) == GLFW_PRESS)
        camera.ProcessKeyboard(RIGHT, deltaTime);
}

// 鼠标移动回调函数
void mouse_callback(GLFWwindow *window, double xposIn, double yposIn)
{
    // 长按T键,鼠标才能控制相机
    if (glfwGetKey(window, GLFW_KEY_1) != GLFW_PRESS)
        return;

    float xpos = static_cast<float>(xposIn);
    float ypos = static_cast<float>(yposIn);

    if (firstMouse)
    {
        lastX = xpos;
        lastY = ypos;
        firstMouse = false;
    }

    float xoffset = xpos - lastX;
    float yoffset = lastY - ypos; // reversed since y-coordinates go from bottom to top

    lastX = xpos;
    lastY = ypos;

    camera.ProcessMouseMovement(xoffset, yoffset);
}

// 鼠标滚轮滚动回调函数
void scroll_callback(GLFWwindow *window, double xoffset, double yoffset)
{
    camera.ProcessMouseScroll(static_cast<float>(yoffset));
}
unsigned int loadTexture(char const *path)
{
    unsigned int textureID;
    glGenTextures(1, &textureID);

    int width, height, nrComponents;
    unsigned char *data = stbi_load(path, &width, &height, &nrComponents, 0);
    if (data)
    {
        GLenum format;
        if (nrComponents == 1)
            format = GL_RED;
        else if (nrComponents == 3)
            format = GL_RGB;
        else if (nrComponents == 4)
            format = GL_RGBA;

        glBindTexture(GL_TEXTURE_2D, textureID);
        glTexImage2D(GL_TEXTURE_2D, 0, format, width, height, 0, format, GL_UNSIGNED_BYTE, data);
        glGenerateMipmap(GL_TEXTURE_2D);

        glTexParameteri(GL_TEXTURE_2D, GL_TEXTURE_WRAP_S, GL_REPEAT);
        glTexParameteri(GL_TEXTURE_2D, GL_TEXTURE_WRAP_T, GL_REPEAT);
        glTexParameteri(GL_TEXTURE_2D, GL_TEXTURE_MIN_FILTER, GL_LINEAR_MIPMAP_LINEAR);
        glTexParameteri(GL_TEXTURE_2D, GL_TEXTURE_MAG_FILTER, GL_LINEAR);

        stbi_image_free(data);
    }
    else
    {
        std::cout << "Texture failed to load at path: " << path << std::endl;
        stbi_image_free(data);
    }

    return textureID;
}
运行效果:
聚光
聚光(Spotlight):聚光灯是这三种光源类型中最复杂的一种。它的照亮空间同样是有限的,但不再是简单的球体,而是由空间中的一块锥形区域定义的 。聚光灯可 以用于表示由一个特定位置出发、向特定方向延伸的光。
聚光很好的例子就是路灯或手电筒。
OpenGL中聚光是用一个世界空间位置、一个方向和一个切光角(Cutoff Angle)来表示的,切光角指定了聚光的半径(译注:是圆锥的半径不是距光源距离那个半径)。
下面这张图会让你明白聚光是如何工作的: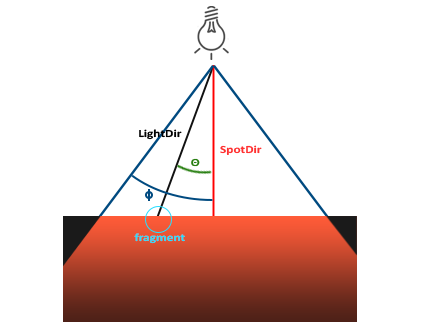
- LightDir \fbox {LightDir} LightDir:从片段指向光源的向量。
- SpotDir \fbox {SpotDir} SpotDir:聚光所指向的方向。
- Φ \Phi Φ:指定了聚光半径的切光角。落在这个角度之外的物体都不会被这个聚光所照亮。
- Θ \Theta Θ:LightDir向量和SpotDir向量之间的夹角。在聚光内部的话 θ \theta θ值应该比 ϕ \phi ϕ值小。
所以我们要做的就是计算LightDir向量和SpotDir向量之间的点积,并将它与切光角 Φ \Phi Φ值对比。
首先,在片段着色器中设置我们需要的值有聚光的位置向量:
struct Light {
    vec3  position;
    vec3  direction;
    float cutOff;
    ...
};
接下来就是计算 θ \theta θ值,并将它和切光角 ϕ \phi ϕ对比,来决定是否在聚光的内部:
float theta = dot(lightDir, normalize(-light.direction));

if(theta > light.cutOff)
{
  // 执行光照计算
}
else  // 否则,使用环境光,让场景在聚光之外时不至于完全黑暗
  color = vec4(light.ambient * vec3(texture(material.diffuse, TexCoords)), 1.0);
完整代码实现
和上面一样的,只需修改片元着色器:
Flash_light_casters.fs
#version 330 core
out vec4 FragColor;

struct Material {
    sampler2D diffuse;
    sampler2D specular;
    float shininess;
};

struct Light {
    vec3 position;
    vec3 direction;
    float cutOff;
    float outerCutOff;

    vec3 ambient;
    vec3 diffuse;
    vec3 specular;

    float constant;
    float linear;
    float quadratic;
};

in vec3 FragPos;
in vec3 Normal;
in vec2 TexCoords;

uniform vec3 viewPos;
uniform Material material;
uniform Light light;

void main()
{
    vec3 lightDir = normalize(light.position - FragPos);

    // check if lighting is inside the spotlight cone
    float theta = dot(lightDir, normalize(-light.direction));

    if(theta > light.cutOff) // remember that we're working with angles as cosines instead of degrees so a '>' is used.
    {
        // ambient
        vec3 ambient = light.ambient * texture(material.diffuse, TexCoords).rgb;

        // diffuse
        vec3 norm = normalize(Normal);
        float diff = max(dot(norm, lightDir), 0.0);
        vec3 diffuse = light.diffuse * diff * texture(material.diffuse, TexCoords).rgb;

        // specular
        vec3 viewDir = normalize(viewPos - FragPos);
        vec3 reflectDir = reflect(-lightDir, norm);
        float spec = pow(max(dot(viewDir, reflectDir), 0.0), material.shininess);
        vec3 specular = light.specular * spec * texture(material.specular, TexCoords).rgb;

        // attenuation
        float distance    = length(light.position - FragPos);
        float attenuation = 1.0 / (light.constant + light.linear * distance + light.quadratic * (distance * distance));

        // ambient  *= attenuation; // remove attenuation from ambient, as otherwise at large distances the light would be darker inside than outside the spotlight due the ambient term in the else branch
        diffuse   *= attenuation;
        specular *= attenuation;

        vec3 result = ambient + diffuse + specular;
        FragColor = vec4(result, 1.0);
    }
    else
    {
        // else, use ambient light so scene isn't completely dark outside the spotlight.
        FragColor = vec4(light.ambient * texture(material.diffuse, TexCoords).rgb, 1.0);
    }
}
完整代码:
#version 330 core
out vec4 FragColor;

struct Material {
    sampler2D diffuse;
    sampler2D specular;
    float shininess;
};

struct Light {
    vec3 position;
    vec3 direction;
    float cutOff;
    float outerCutOff;

    vec3 ambient;
    vec3 diffuse;
    vec3 specular;

    float constant;
    float linear;
    float quadratic;
};

in vec3 FragPos;
in vec3 Normal;
in vec2 TexCoords;

uniform vec3 viewPos;
uniform Material material;
uniform Light light;

void main()
{
    vec3 lightDir = normalize(light.position - FragPos);

    // check if lighting is inside the spotlight cone
    float theta = dot(lightDir, normalize(-light.direction));

    if(theta > light.cutOff) // remember that we're working with angles as cosines instead of degrees so a '>' is used.
    {
        // ambient
        vec3 ambient = light.ambient * texture(material.diffuse, TexCoords).rgb;

        // diffuse
        vec3 norm = normalize(Normal);
        float diff = max(dot(norm, lightDir), 0.0);
        vec3 diffuse = light.diffuse * diff * texture(material.diffuse, TexCoords).rgb;

        // specular
        vec3 viewDir = normalize(viewPos - FragPos);
        vec3 reflectDir = reflect(-lightDir, norm);
        float spec = pow(max(dot(viewDir, reflectDir), 0.0), material.shininess);
        vec3 specular = light.specular * spec * texture(material.specular, TexCoords).rgb;

        // attenuation
        float distance    = length(light.position - FragPos);
        float attenuation = 1.0 / (light.constant + light.linear * distance + light.quadratic * (distance * distance));

        // ambient  *= attenuation; // remove attenuation from ambient, as otherwise at large distances the light would be darker inside than outside the spotlight due the ambient term in the else branch
        diffuse   *= attenuation;
        specular *= attenuation;

        vec3 result = ambient + diffuse + specular;
        FragColor = vec4(result, 1.0);
    }
    else
    {
        // else, use ambient light so scene isn't completely dark outside the spotlight.
        FragColor = vec4(light.ambient * texture(material.diffuse, TexCoords).rgb, 1.0);
    }
}
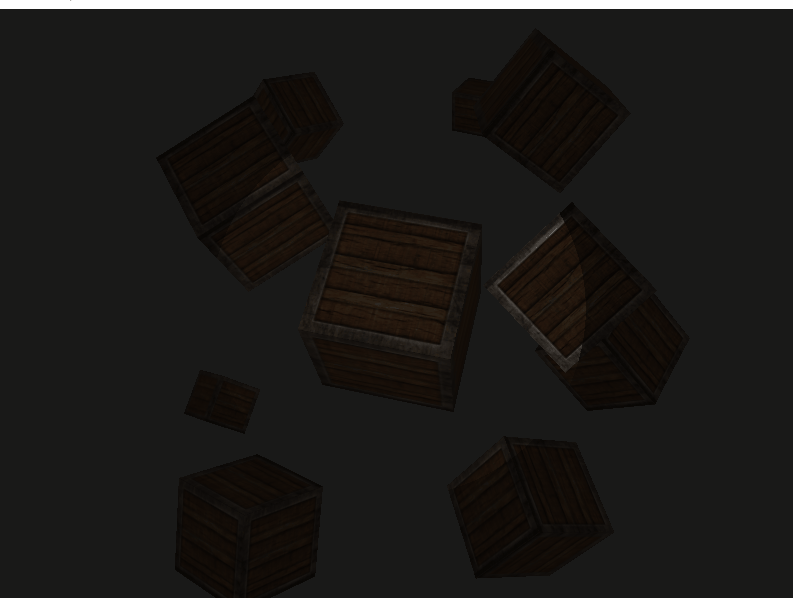
运行效果:
平滑/软化边缘
为了创建一种看起来边缘平滑的聚光,我们需要模拟聚光有一个内圆锥(Inner Cone)和一个外圆锥(Outer Cone)。我们可以将内圆锥设置为上一部分中的那个圆锥,但我们也需要一个外圆锥,来让光从内圆锥逐渐减暗,直到外圆锥的边界。
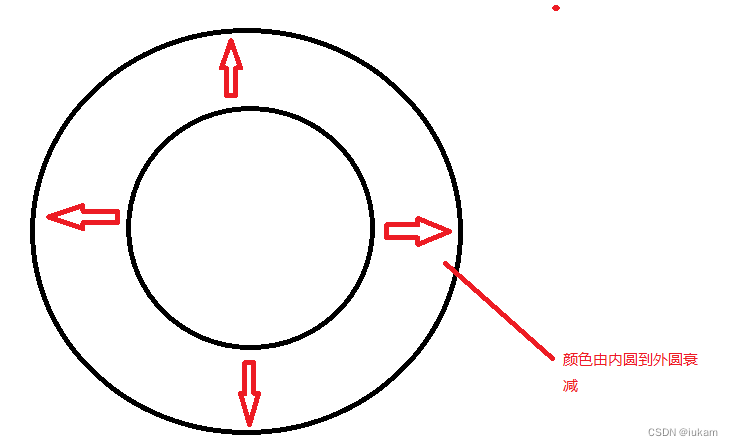
为了创建一个外圆锥,我们只需要再定义一个余弦值来代表聚光方向向量和外圆锥向量(等于它的半径)的夹角。然后,如果一个片段处于内外圆锥之间,将会给它计算出一个0.0到1.0之间的强度值。
如果片段在内圆锥之内,它的强度就是1.0,如果在外圆锥之外强度值就是0.0。
我们可以用下面这个公式来计算这个值:
I
=
θ
−
γ
ϵ
I=\frac{\theta-\gamma}{\epsilon}
I=ϵθ−γ
这里
ϵ
\epsilon
ϵ(Epsilon)是内(
ϕ
\phi
ϕ)和外圆锥(
γ
\gamma
γ)之间的余弦值差(
ϵ
=
ϕ
−
γ
\epsilon=\phi−\gamma
ϵ=ϕ−γ)。最终的
I
I
I值就是在当前片段聚光的强度。
很难去表现这个公式是怎么工作的,所以我们用一些实例值来看看:

有了公式,然后我们通过脚本实现:
float theta     = dot(lightDir, normalize(-light.direction));
float epsilon   = light.cutOff - light.outerCutOff;
float intensity = clamp((theta - light.outerCutOff) / epsilon, 0.0, 1.0);  //clamp把第一个参数约束(Clamp)在了0.0到1.0之间
...
// 将不对环境光做出影响,让它总是能有一点光
diffuse  *= intensity;
specular *= intensity;
...
完整代码实现
和上面一样的,只需修改片元着色器:
#version 330 core
out vec4 FragColor;

struct Material {
    sampler2D diffuse;
    sampler2D specular;
    float shininess;
};

struct Light {
    vec3 position;
    vec3 direction;
    float cutOff;
    float outerCutOff;

    vec3 ambient;
    vec3 diffuse;
    vec3 specular;

    float constant;
    float linear;
    float quadratic;
};

in vec3 FragPos;
in vec3 Normal;
in vec2 TexCoords;

uniform vec3 viewPos;
uniform Material material;
uniform Light light;

void main()
{
    // ambient
    vec3 ambient = light.ambient * texture(material.diffuse, TexCoords).rgb;

    // diffuse
    vec3 norm = normalize(Normal);
    vec3 lightDir = normalize(light.position - FragPos);
    float diff = max(dot(norm, lightDir), 0.0);
    vec3 diffuse = light.diffuse * diff * texture(material.diffuse, TexCoords).rgb;

    // specular
    vec3 viewDir = normalize(viewPos - FragPos);
    vec3 reflectDir = reflect(-lightDir, norm);
    float spec = pow(max(dot(viewDir, reflectDir), 0.0), material.shininess);
    vec3 specular = light.specular * spec * texture(material.specular, TexCoords).rgb;

    // spotlight (soft edges)
    float theta = dot(lightDir, normalize(-light.direction));
    float epsilon = (light.cutOff - light.outerCutOff);
    float intensity = clamp((theta - light.outerCutOff) / epsilon, 0.0, 1.0);
    diffuse  *= intensity;
    specular *= intensity;

    // attenuation
    float distance    = length(light.position - FragPos);
    float attenuation = 1.0 / (light.constant + light.linear * distance + light.quadratic * (distance * distance));
    ambient  *= attenuation;
    diffuse   *= attenuation;
    specular *= attenuation;

    vec3 result = ambient + diffuse + specular;
    FragColor = vec4(result, 1.0);
}
完整脚本C++和上面一样的
运行效果:
多光源
创建一个包含六个光源的场景。我们将模拟一个类似太阳的定向光(Directional Light)光源,四个分散在场景中的点光源(Point Light),以及一个手电筒(Flashlight)。
首先,把光照计算封装到GLSL函数,减少代码复杂程度。
然后,在场景中使用多个光源时,通常使用以下方法:我们需要有一个单独的颜色向量代表片段的输出颜色。对于每一个光源,它对片段的贡献颜色将会加到片段的输出颜色向量上。所以场景中的每个光源都会计算它们各自对片段的影响,并结合为一个最终的输出颜色。大体的结构会像是这样:
out vec4 FragColor;

void main()
{
  // 定义一个输出颜色值
  vec3 output;
  // 将定向光的贡献加到输出中
  output += someFunctionToCalculateDirectionalLight();
  // 对所有的点光源也做相同的事情
  for(int i = 0; i < nr_of_point_lights; i++)
    output += someFunctionToCalculatePointLight();
  // 也加上其它的光源(比如聚光)
  output += someFunctionToCalculateSpotLight();

  FragColor = vec4(output, 1.0);
}
之后,在片元着色器分别定义一个平行光、点光源和聚光的结构体:
//平行光
struct DirLight {
    vec3 direction;

    vec3 ambient;
    vec3 diffuse;
    vec3 specular;
};
//点光源
struct PointLight {
    vec3 position;

    float constant;
    float linear;
    float quadratic;

    vec3 ambient;
    vec3 diffuse;
    vec3 specular;
};
//聚光
struct SpotLight {
    vec3 position;
    vec3 direction;
    float cutOff;
    float outerCutOff;

    float constant;
    float linear;
    float quadratic;

    vec3 ambient;
    vec3 diffuse;
    vec3 specular;
};
最后,合并结果输出:
void main()
{
    // 属性
    vec3 norm = normalize(Normal);
    vec3 viewDir = normalize(viewPos - FragPos);

    // 第一阶段:定向光照
    vec3 result = CalcDirLight(dirLight, norm, viewDir);
    // 第二阶段:点光源
    for(int i = 0; i < NR_POINT_LIGHTS; i++)
        result += CalcPointLight(pointLights[i], norm, FragPos, viewDir);
    // 第三阶段:聚光
    //result += CalcSpotLight(spotLight, norm, FragPos, viewDir);

    FragColor = vec4(result, 1.0);
}
完整代码实现
和上面一样的,只需修改片元着色器:
#include <glad/glad.h>
#include <GLFW/glfw3.h>

#include <glm/glm.hpp>
#include <glm/gtc/matrix_transform.hpp>
#include <glm/gtc/type_ptr.hpp>

#define STB_IMAGE_IMPLEMENTATION
#include <stb_image.h>

// https://learnopengl.com/code_viewer_gh.php?code=includes/learnopengl/shader_m.h
#include <shader_s.h>
// https://learnopengl.com/code_viewer_gh.php?code=includes/learnopengl/camera.h
#include <camera.h>
#include <iostream>
void InitGLFW();
bool CreateWindow();
bool InitGLAD();

// 窗口大小改变时调用
void framebuffer_size_callback(GLFWwindow *window, int width, int height);
void mouse_callback(GLFWwindow *window, double xposIn, double yposIn);
void scroll_callback(GLFWwindow *window, double xoffset, double yoffset);
void processInput(GLFWwindow *window);
unsigned int loadTexture(const char *path);

// settings 窗口宽高
const unsigned int SCR_WIDTH = 800;
const unsigned int SCR_HEIGHT = 600;

// 相机
Camera camera(glm::vec3(0.0f, 0.0f, 6.0f));
float lastX = static_cast<float>(SCR_WIDTH) / 2.0;
float lastY = static_cast<float>(SCR_HEIGHT) / 2.0;
bool firstMouse = true;

// timing
float deltaTime = 0.0f; // time between current frame and last frame
float lastFrame = 0.0f;

GLFWwindow *window;

int main()
{
    InitGLFW(); // 初始化GLFW

    bool isCreated = CreateWindow(); // 创建一个窗口对象
    if (!isCreated)
        return -1;
    bool isGLAD = InitGLAD(); // 初始化GLAD,传入加载系统相关opengl函数指针的函数
    if (!isGLAD)
        return -1;

    // 启用深度测试
    glEnable(GL_DEPTH_TEST);

    // 构建和编译着色程序
    // https://learnopengl.com/code_viewer_gh.php?code=src/2.lighting/6.multiple_lights/6.multiple_lights.vs
    // https://learnopengl.com/code_viewer_gh.php?code=src/2.lighting/6.multiple_lights/6.multiple_lights.fs
    Shader lightingShader("shader/P1_Basic/09_LightSystem/Flash_light_casters.vs", "shader/P1_Basic/09_LightSystem/multiple_lights.fs");
    // https://learnopengl.com/code_viewer_gh.php?code=src/2.lighting/5.1.light_casters_directional/5.1.light_cube.vs
    // https://learnopengl.com/code_viewer_gh.php?code=src/2.lighting/5.1.light_casters_directional/5.1.light_cube.fs
    Shader lightCubeShader("shader/P1_Basic/09_LightSystem/light_cube.vs", "shader/P1_Basic/09_LightSystem/light_cube.fs");

    // 设置顶点数据(和缓冲区)并配置顶点属性
    // 1.设置立方体顶点输入  一共需要36个顶点
    float vertices[] = {
        // positions          // normals           // texture coords
        -0.5f, -0.5f, -0.5f, 0.0f, 0.0f, -1.0f, 0.0f, 0.0f,
        0.5f, -0.5f, -0.5f, 0.0f, 0.0f, -1.0f, 1.0f, 0.0f,
        0.5f, 0.5f, -0.5f, 0.0f, 0.0f, -1.0f, 1.0f, 1.0f,
        0.5f, 0.5f, -0.5f, 0.0f, 0.0f, -1.0f, 1.0f, 1.0f,
        -0.5f, 0.5f, -0.5f, 0.0f, 0.0f, -1.0f, 0.0f, 1.0f,
        -0.5f, -0.5f, -0.5f, 0.0f, 0.0f, -1.0f, 0.0f, 0.0f,

        -0.5f, -0.5f, 0.5f, 0.0f, 0.0f, 1.0f, 0.0f, 0.0f,
        0.5f, -0.5f, 0.5f, 0.0f, 0.0f, 1.0f, 1.0f, 0.0f,
        0.5f, 0.5f, 0.5f, 0.0f, 0.0f, 1.0f, 1.0f, 1.0f,
        0.5f, 0.5f, 0.5f, 0.0f, 0.0f, 1.0f, 1.0f, 1.0f,
        -0.5f, 0.5f, 0.5f, 0.0f, 0.0f, 1.0f, 0.0f, 1.0f,
        -0.5f, -0.5f, 0.5f, 0.0f, 0.0f, 1.0f, 0.0f, 0.0f,

        -0.5f, 0.5f, 0.5f, -1.0f, 0.0f, 0.0f, 1.0f, 0.0f,
        -0.5f, 0.5f, -0.5f, -1.0f, 0.0f, 0.0f, 1.0f, 1.0f,
        -0.5f, -0.5f, -0.5f, -1.0f, 0.0f, 0.0f, 0.0f, 1.0f,
        -0.5f, -0.5f, -0.5f, -1.0f, 0.0f, 0.0f, 0.0f, 1.0f,
        -0.5f, -0.5f, 0.5f, -1.0f, 0.0f, 0.0f, 0.0f, 0.0f,
        -0.5f, 0.5f, 0.5f, -1.0f, 0.0f, 0.0f, 1.0f, 0.0f,

        0.5f, 0.5f, 0.5f, 1.0f, 0.0f, 0.0f, 1.0f, 0.0f,
        0.5f, 0.5f, -0.5f, 1.0f, 0.0f, 0.0f, 1.0f, 1.0f,
        0.5f, -0.5f, -0.5f, 1.0f, 0.0f, 0.0f, 0.0f, 1.0f,
        0.5f, -0.5f, -0.5f, 1.0f, 0.0f, 0.0f, 0.0f, 1.0f,
        0.5f, -0.5f, 0.5f, 1.0f, 0.0f, 0.0f, 0.0f, 0.0f,
        0.5f, 0.5f, 0.5f, 1.0f, 0.0f, 0.0f, 1.0f, 0.0f,

        -0.5f, -0.5f, -0.5f, 0.0f, -1.0f, 0.0f, 0.0f, 1.0f,
        0.5f, -0.5f, -0.5f, 0.0f, -1.0f, 0.0f, 1.0f, 1.0f,
        0.5f, -0.5f, 0.5f, 0.0f, -1.0f, 0.0f, 1.0f, 0.0f,
        0.5f, -0.5f, 0.5f, 0.0f, -1.0f, 0.0f, 1.0f, 0.0f,
        -0.5f, -0.5f, 0.5f, 0.0f, -1.0f, 0.0f, 0.0f, 0.0f,
        -0.5f, -0.5f, -0.5f, 0.0f, -1.0f, 0.0f, 0.0f, 1.0f,

        -0.5f, 0.5f, -0.5f, 0.0f, 1.0f, 0.0f, 0.0f, 1.0f,
        0.5f, 0.5f, -0.5f, 0.0f, 1.0f, 0.0f, 1.0f, 1.0f,
        0.5f, 0.5f, 0.5f, 0.0f, 1.0f, 0.0f, 1.0f, 0.0f,
        0.5f, 0.5f, 0.5f, 0.0f, 1.0f, 0.0f, 1.0f, 0.0f,
        -0.5f, 0.5f, 0.5f, 0.0f, 1.0f, 0.0f, 0.0f, 0.0f,
        -0.5f, 0.5f, -0.5f, 0.0f, 1.0f, 0.0f, 0.0f, 1.0f};

    // positions all containers
    glm::vec3 cubePositions[] = {
        glm::vec3(0.0f, 0.0f, 0.0f),
        glm::vec3(2.0f, 5.0f, -15.0f),
        glm::vec3(-1.5f, -2.2f, -2.5f),
        glm::vec3(-3.8f, -2.0f, -12.3f),
        glm::vec3(2.4f, -0.4f, -3.5f),
        glm::vec3(-1.7f, 3.0f, -7.5f),
        glm::vec3(1.3f, -2.0f, -2.5f),
        glm::vec3(1.5f, 2.0f, -2.5f),
        glm::vec3(1.5f, 0.2f, -1.5f),
        glm::vec3(-1.3f, 1.0f, -1.5f)};

    // 灯光位置
    glm::vec3 pointLightPositions[] = {
        glm::vec3(0.7f, 0.2f, 2.0f),
        glm::vec3(2.3f, -3.3f, -4.0f),
        glm::vec3(-4.0f, 2.0f, -12.0f),
        glm::vec3(0.0f, 0.0f, -3.0f)};
    // 2.设置索引缓冲对象
    unsigned int VBO, cubeVAO;
    glGenVertexArrays(1, &cubeVAO);
    glGenBuffers(1, &VBO);

    glBindBuffer(GL_ARRAY_BUFFER, VBO);
    glBufferData(GL_ARRAY_BUFFER, sizeof(vertices), vertices, GL_STATIC_DRAW);

    glBindVertexArray(cubeVAO);
    glVertexAttribPointer(0, 3, GL_FLOAT, GL_FALSE, 8 * sizeof(float), (void *)0);
    glEnableVertexAttribArray(0);
    glVertexAttribPointer(1, 3, GL_FLOAT, GL_FALSE, 8 * sizeof(float), (void *)(3 * sizeof(float)));
    glEnableVertexAttribArray(1);
    glVertexAttribPointer(2, 2, GL_FLOAT, GL_FALSE, 8 * sizeof(float), (void *)(6 * sizeof(float)));
    glEnableVertexAttribArray(2);

    // second, configure the light's VAO (VBO stays the same; the vertices are the same for the light object which is also a 3D cube)
    unsigned int lightCubeVAO;
    glGenVertexArrays(1, &lightCubeVAO);
    glBindVertexArray(lightCubeVAO);

    glBindBuffer(GL_ARRAY_BUFFER, VBO);
    // note that we update the lamp's position attribute's stride to reflect the updated buffer data
    glVertexAttribPointer(0, 3, GL_FLOAT, GL_FALSE, 8 * sizeof(float), (void *)0);
    glEnableVertexAttribArray(0);

    // 加载纹理
    // https://learnopengl-cn.github.io/img/02/04/container2.png
    unsigned int diffuseMap = loadTexture("image/04_Textures/container2.png");
    // https://learnopengl-cn.github.io/img/02/04/container2_specular.png
    unsigned int specularMap = loadTexture("image/04_Textures/container2_specular.png");

    // shader configuration
    // --------------------
    lightingShader.use();
    lightingShader.setInt("material.diffuse", 0);
    lightingShader.setInt("material.specular", 1);

    // 循环渲染
    while (!glfwWindowShouldClose(window))
    {
        // 计算帧间隔时间
        float currentFrame = static_cast<float>(glfwGetTime());
        deltaTime = currentFrame - lastFrame;
        lastFrame = currentFrame;

        // 输入
        processInput(window);

        // 渲染
        // 清除颜色缓冲
        glClearColor(0.1f, 0.1f, 0.1f, 1.0f);
        // 清除深度缓冲
        glClear(GL_COLOR_BUFFER_BIT | GL_DEPTH_BUFFER_BIT);

        lightingShader.use();
        lightingShader.setVec3("viewPos", camera.Position);
        lightingShader.setFloat("material.shininess", 32.0f);
        /*
        这里我们为5/6种类型的灯设置了所有的制服。我们必须手动设置它们并索引数组中适当的PointLight结构体来设置每个统一变量。
        这样做可以使代码更友好通过将光类型定义为类并在其中设置它们的值,或者通过使用更有效的统一方法
        通过使用“统一缓冲对象”,但这是我们将在“高级GLSL”教程中讨论的内容。*/

        // directional light
        lightingShader.setVec3("dirLight.direction", -0.2f, -1.0f, -0.3f);
        lightingShader.setVec3("dirLight.ambient", 0.05f, 0.05f, 0.05f);
        lightingShader.setVec3("dirLight.diffuse", 0.4f, 0.4f, 0.4f);
        lightingShader.setVec3("dirLight.specular", 0.5f, 0.5f, 0.5f);
        // point light 1
        lightingShader.setVec3("pointLights[0].position", pointLightPositions[0]);
        lightingShader.setVec3("pointLights[0].ambient", 0.05f, 0.05f, 0.05f);
        lightingShader.setVec3("pointLights[0].diffuse", 0.8f, 0.8f, 0.8f);
        lightingShader.setVec3("pointLights[0].specular", 1.0f, 1.0f, 1.0f);
        lightingShader.setFloat("pointLights[0].constant", 1.0f);
        lightingShader.setFloat("pointLights[0].linear", 0.09f);
        lightingShader.setFloat("pointLights[0].quadratic", 0.032f);
        // point light 2
        lightingShader.setVec3("pointLights[1].position", pointLightPositions[1]);
        lightingShader.setVec3("pointLights[1].ambient", 0.05f, 0.05f, 0.05f);
        lightingShader.setVec3("pointLights[1].diffuse", 0.8f, 0.8f, 0.8f);
        lightingShader.setVec3("pointLights[1].specular", 1.0f, 1.0f, 1.0f);
        lightingShader.setFloat("pointLights[1].constant", 1.0f);
        lightingShader.setFloat("pointLights[1].linear", 0.09f);
        lightingShader.setFloat("pointLights[1].quadratic", 0.032f);
        // point light 3
        lightingShader.setVec3("pointLights[2].position", pointLightPositions[2]);
        lightingShader.setVec3("pointLights[2].ambient", 0.05f, 0.05f, 0.05f);
        lightingShader.setVec3("pointLights[2].diffuse", 0.8f, 0.8f, 0.8f);
        lightingShader.setVec3("pointLights[2].specular", 1.0f, 1.0f, 1.0f);
        lightingShader.setFloat("pointLights[2].constant", 1.0f);
        lightingShader.setFloat("pointLights[2].linear", 0.09f);
        lightingShader.setFloat("pointLights[2].quadratic", 0.032f);
        // point light 4
        lightingShader.setVec3("pointLights[3].position", pointLightPositions[3]);
        lightingShader.setVec3("pointLights[3].ambient", 0.05f, 0.05f, 0.05f);
        lightingShader.setVec3("pointLights[3].diffuse", 0.8f, 0.8f, 0.8f);
        lightingShader.setVec3("pointLights[3].specular", 1.0f, 1.0f, 1.0f);
        lightingShader.setFloat("pointLights[3].constant", 1.0f);
        lightingShader.setFloat("pointLights[3].linear", 0.09f);
        lightingShader.setFloat("pointLights[3].quadratic", 0.032f);
        // spotLight
        lightingShader.setVec3("spotLight.position", camera.Position);
        lightingShader.setVec3("spotLight.direction", camera.Front);
        lightingShader.setVec3("spotLight.ambient", 0.0f, 0.0f, 0.0f);
        lightingShader.setVec3("spotLight.diffuse", 1.0f, 1.0f, 1.0f);
        lightingShader.setVec3("spotLight.specular", 1.0f, 1.0f, 1.0f);
        lightingShader.setFloat("spotLight.constant", 1.0f);
        lightingShader.setFloat("spotLight.linear", 0.09f);
        lightingShader.setFloat("spotLight.quadratic", 0.032f);
        lightingShader.setFloat("spotLight.cutOff", glm::cos(glm::radians(12.5f)));
        lightingShader.setFloat("spotLight.outerCutOff", glm::cos(glm::radians(15.0f)));

        // 观察矩阵 透视矩阵
        glm::mat4 projection = glm::perspective(glm::radians(camera.Zoom), (float)SCR_WIDTH / (float)SCR_HEIGHT, 0.1f, 100.0f);
        glm::mat4 view = camera.GetViewMatrix();
        lightingShader.setMat4("projection", projection);
        lightingShader.setMat4("view", view);

        // 世界坐标系变换
        glm::mat4 model = glm::mat4(1.0f);
        lightingShader.setMat4("model", model);

        // 绑定漫反射贴图
        glActiveTexture(GL_TEXTURE0);
        glBindTexture(GL_TEXTURE_2D, diffuseMap);
        // 绑定镜面贴图
        glActiveTexture(GL_TEXTURE1);
        glBindTexture(GL_TEXTURE_2D, specularMap);

        // render the cube
        glBindVertexArray(cubeVAO);
        for (unsigned int i = 0; i < 10; i++)
        {
            // 计算模型矩阵
            model = glm::mat4(1.0f);
            model = glm::translate(model, cubePositions[i]);
            float angle = 20.0f * i;
            if (i == 0)
            {
                model = glm::scale(model, glm::vec3(1.2f));
            }

            model = glm::rotate(model, glm::radians(angle) * (float)glfwGetTime(), glm::vec3(1.0f, 0.3f, 0.5f));
            lightingShader.setMat4("model", model);

            glDrawArrays(GL_TRIANGLES, 0, 36);
        }

        // also draw the lamp object(s)
        lightCubeShader.use();
        lightCubeShader.setMat4("projection", projection);
        lightCubeShader.setMat4("view", view);

        // we now draw as many light bulbs as we have point lights.
        glBindVertexArray(lightCubeVAO);
        for (unsigned int i = 0; i < 4; i++)
        {
            model = glm::mat4(1.0f);
            model = glm::translate(model, pointLightPositions[i]);
            model = glm::scale(model, glm::vec3(0.2f)); // Make it a smaller cube
            lightCubeShader.setMat4("model", model);
            glDrawArrays(GL_TRIANGLES, 0, 36);
        }

        glfwSwapBuffers(window);
        glfwPollEvents();
    }

    // 可选:一旦资源超出其用途,就取消分配所有资源:
    glDeleteVertexArrays(1, &cubeVAO);
    glDeleteVertexArrays(1, &lightCubeVAO);
    glDeleteBuffers(1, &VBO);
    // 释放/删除之前的分配的所有资源
    glfwTerminate();
    return 0;
}

void InitGLFW()
{
    // 初始化GLFW
    glfwInit();
    // 配置GLFW  第一个参数代表选项的名称,我们可以从很多以GLFW_开头的枚举值中选择;
    // 第二个参数接受一个整型,用来设置这个选项的值。
    glfwWindowHint(GLFW_CONTEXT_VERSION_MAJOR, 3);
    glfwWindowHint(GLFW_CONTEXT_VERSION_MINOR, 3);
    glfwWindowHint(GLFW_OPENGL_PROFILE, GLFW_OPENGL_CORE_PROFILE);
    // glfwWindowHint(GLFW_OPENGL_FORWARD_COMPAT, GL_TRUE);
}
bool CreateWindow()
{
    // 创建一个窗口对象
    window = glfwCreateWindow(800, 600, "LearnOpenGL", NULL, NULL);
    if (window == NULL)
    {
        std::cout << "Failed to create GLFW window" << std::endl;
        // 创建失败,终止程序
        glfwTerminate();
        return false;
    }
    // 将我们窗口的上下文设置为当前线程的主上下文
    glfwMakeContextCurrent(window);
    // 设置窗口大小改变时的回调函数
    glfwSetFramebufferSizeCallback(window, framebuffer_size_callback);
    // 设置鼠标移动回调函数
    glfwSetCursorPosCallback(window, mouse_callback);
    // 设置滚轮滚动回调函数
    glfwSetScrollCallback(window, scroll_callback);

    // 隐藏并捕捉鼠标
    // glfwSetInputMode(window, GLFW_CURSOR, GLFW_CURSOR_DISABLED);

    return true;
}
bool InitGLAD()
{
    // 初始化GLAD,传入加载系统相关opengl函数指针的函数
    if (!gladLoadGLLoader((GLADloadproc)glfwGetProcAddress))
    {
        std::cout << "Failed to initialize GLAD" << std::endl;
        // 初始化失败,终止程序
        return false;
    }
    return true;
}

// 窗口大小改变时调用
void framebuffer_size_callback(GLFWwindow *window, int width, int height)
{
    // 设置窗口的维度
    glViewport(0, 0, width, height);
}

// 输入
void processInput(GLFWwindow *window)
{
    // 当用户按下esc键,我们设置window窗口的windowShouldClose属性为true
    // 关闭应用程序
    if (glfwGetKey(window, GLFW_KEY_ESCAPE) == GLFW_PRESS)
        glfwSetWindowShouldClose(window, true);

    if (glfwGetKey(window, GLFW_KEY_W) == GLFW_PRESS)
        camera.ProcessKeyboard(FORWARD, deltaTime);
    if (glfwGetKey(window, GLFW_KEY_S) == GLFW_PRESS)
        camera.ProcessKeyboard(BACKWARD, deltaTime);
    if (glfwGetKey(window, GLFW_KEY_A) == GLFW_PRESS)
        camera.ProcessKeyboard(LEFT, deltaTime);
    if (glfwGetKey(window, GLFW_KEY_D) == GLFW_PRESS)
        camera.ProcessKeyboard(RIGHT, deltaTime);
}

// 鼠标移动回调函数
void mouse_callback(GLFWwindow *window, double xposIn, double yposIn)
{
    // 长按T键,鼠标才能控制相机
    if (glfwGetKey(window, GLFW_KEY_1) != GLFW_PRESS)
        return;

    float xpos = static_cast<float>(xposIn);
    float ypos = static_cast<float>(yposIn);

    if (firstMouse)
    {
        lastX = xpos;
        lastY = ypos;
        firstMouse = false;
    }

    float xoffset = xpos - lastX;
    float yoffset = lastY - ypos; // reversed since y-coordinates go from bottom to top

    lastX = xpos;
    lastY = ypos;

    camera.ProcessMouseMovement(xoffset, yoffset);
}

// 鼠标滚轮滚动回调函数
void scroll_callback(GLFWwindow *window, double xoffset, double yoffset)
{
    camera.ProcessMouseScroll(static_cast<float>(yoffset));
}
unsigned int loadTexture(char const *path)
{
    unsigned int textureID;
    glGenTextures(1, &textureID);

    int width, height, nrComponents;
    unsigned char *data = stbi_load(path, &width, &height, &nrComponents, 0);
    if (data)
    {
        GLenum format;
        if (nrComponents == 1)
            format = GL_RED;
        else if (nrComponents == 3)
            format = GL_RGB;
        else if (nrComponents == 4)
            format = GL_RGBA;

        glBindTexture(GL_TEXTURE_2D, textureID);
        glTexImage2D(GL_TEXTURE_2D, 0, format, width, height, 0, format, GL_UNSIGNED_BYTE, data);
        glGenerateMipmap(GL_TEXTURE_2D);

        glTexParameteri(GL_TEXTURE_2D, GL_TEXTURE_WRAP_S, GL_REPEAT);
        glTexParameteri(GL_TEXTURE_2D, GL_TEXTURE_WRAP_T, GL_REPEAT);
        glTexParameteri(GL_TEXTURE_2D, GL_TEXTURE_MIN_FILTER, GL_LINEAR_MIPMAP_LINEAR);
        glTexParameteri(GL_TEXTURE_2D, GL_TEXTURE_MAG_FILTER, GL_LINEAR);

        stbi_image_free(data);
    }
    else
    {
        std::cout << "Texture failed to load at path: " << path << std::endl;
        stbi_image_free(data);
    }

    return textureID;
}
运行效果: