前言
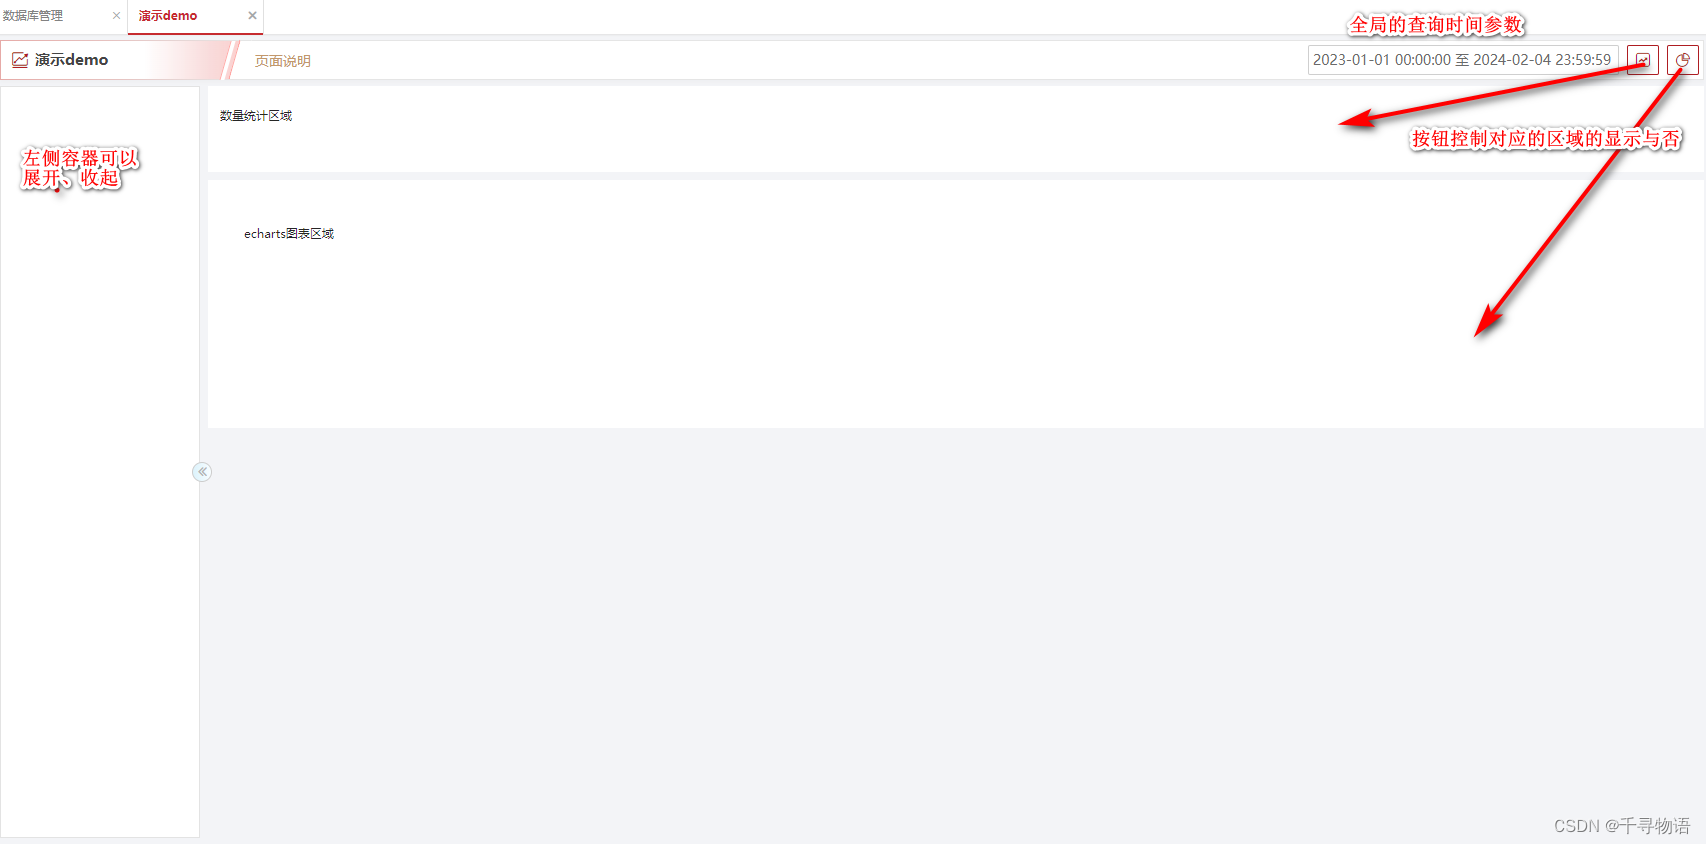
如果有一系列的页面布局很类似,为了节省时间,我们可以把这些类似的页面所通用的属性和方法抽离成一个BaseView,让其它页面继承该基础页面,同时将一些经常改变的属性和差异的属性写到配置文件里。例如树容器初始时是否展开、某些图表是否显示等都可以写到配置文件里面。本文将带你实现该功能,抽离出BaseView页面组件,鉴于json文件无法写注释的情况,配置文件采取yml的格式
页面设计
组件抽离
BaseViewComponent
import { Injectable, OnDestroy, OnInit } from "@angular/core";

import { ConfigService } from "@app/core/config/config.service";
import { Subject } from "rxjs";
import { takeUntil } from "rxjs/operators";
import { deepMergeKey } from "../utils";
import { HandlebarCalendarModelType } from "./baseView.type";
import { TimeRange } from "topdsm-lib/core/util"

import dayjs from 'dayjs';
var customParseFormat = require('dayjs/plugin/advancedFormat')


@Injectable()
export class BaseViewComponent implements OnInit, OnDestroy {

    /** 页面通用属性 */
    pageNum = 1
    pageSize = 10
    tableData = []
    tableTotal = 0


    public unsubscribe$ = new Subject<void>();
    /** 原始config */
    public originalConfig: Record<string, any> = null

    /** 页面config */
    public config: Record<string, any> = {
        leftPanelExpand: true,
        handlebarCalendarModel: [],
        query: {}
    }
    constructor(
        public viewKey: string, // 页面唯一key
        public configService: ConfigService // 用来读取json配置文件
    ) {
        console.log("BaseViewComponent constructor");

    }
    ngOnInit(): void {
        console.log();

        this.configService.change.pipe(takeUntil(this.unsubscribe$)).subscribe(async (config) => {
            console.log(config);
            if (config) {
                this.originalConfig = config
                if (this['configServiceReaderBefore']) {
                    await this['configServiceReaderBefore'](config)
                }
                this.handleConfig()
                if (this['configServiceReaderAfter']) {
                    await this['configServiceReaderAfter'](config)
                }
            }
        });
    }
    ngOnDestroy(): void {
        const { unsubscribe$ } = this;
        unsubscribe$.next();
        unsubscribe$.complete();
    }

    handleConfig() {
        deepMergeKey(this.config, true, this.originalConfig.global, this.originalConfig?.modules?.[this.viewKey])
        this.handleCalendarTime()
        this.handleBarBtn()
        console.log(this.config);
    }

    /**
    * handlebar 日历组件初始值处理,
    * 获取开始时间和结束时间,该逻辑可以根据自己的业务场景自定义
    */
    handleCalendarTime() {
        let tg = {
            start: "",
            end: ""
        }
        switch (this.config.handlebarCalendarModelType) {
            case HandlebarCalendarModelType.CUSTOM:
                if (this.config.handlebarCalendarModel.length === 1) {
                    tg.start = this.config.handlebarCalendarModel[0]
                    tg.end = dayjs(new Date()).format("YYYY-MM-DD HH:mm:ss").substring(0, 10) + " 23:59:59"
                } else if (this.config.handlebarCalendarModel.length === 2) {
                    tg.start = this.config.handlebarCalendarModel[0]
                    tg.end = this.config.handlebarCalendarModel[1]
                }
                break;
            case HandlebarCalendarModelType.LASTYEAY: // 上一年
                tg = TimeRange.getLastYearRange()
                break;
            case HandlebarCalendarModelType.LASTQUATER: // 上一季度
                tg = TimeRange.getLastQuarterRange()
                break;
            case HandlebarCalendarModelType.LASTMONTH: // 上一月
                tg = TimeRange.getLastMonthRange()
                break;

            case HandlebarCalendarModelType.LAST7DAY: // 近7天
                tg = {
                    start: TimeRange.getLast7dayRange().start,
                    end: dayjs(new Date()).format("YYYY-MM-DD HH:mm:ss").substring(0, 10) + " 23:59:59"
                }
                break;
            case HandlebarCalendarModelType.MONTH: // 本月
                tg = TimeRange.getMonthRange()
                break;

            case HandlebarCalendarModelType.QUATER: // 本年度
                tg = TimeRange.getQuarterRange()
                break;

            case HandlebarCalendarModelType.YEAR: // 本年度
                tg = TimeRange.getYearRange()
                break;
            default:
                break;
        }

        if (tg.start !== "" && tg.end !== "") {
            tg.start = tg.start.substring(0, 10) + " 00:00:00"
            tg.end = tg.end.substring(0, 10) + " 23:59:59"
        }
        this.config.query.startTimeStr = tg.start
        this.config.query.endTimeStr = tg.end

        if (tg.start !== "" && tg.end !== "") {
            this.config.handlebarCalendarModel = [
                dayjs(this.config.query.startTimeStr, "YYYY-MM-DD HH:mm:ss").toDate(),
                dayjs(this.config.query.endTimeStr, "YYYY-MM-DD HH:mm:ss").toDate(),
            ]
        } else {
            this.config.handlebarCalendarModel = []
        }
    }

    handleBarBtn() {
        let btnSelected = {

        }
        this.config.handlebarRightBtn = this.config.handlebarRightBtn.filter(item => item.show)

        this.config.handlebarRightBtn.forEach(item => {
            btnSelected[item.key] = item.selected
        })
        this.config.handlebarRightBtnSelected = btnSelected
    }
}
时间段枚举
export enum HandlebarCalendarModelType {
    /** 自定义 */
    CUSTOM = "0",
    /** 上一年 */
    LASTYEAY = "1",
    /** 上一季度 */
    LASTQUATER = "2",
    /** 上一月 */
    LASTMONTH = "3",
    /** 上一周 */
    LASTWEEK = "4",
    /** 本周 */
    WEEK = "5",
    /** 本月 */
    MONTH = "6",
    /** 本季度 */
    QUATER = "7",
    /** 本年度 */
    YEAR = "8",
    /** 近7天 */
    LAST7DAY = "9"
}
属性合并的函数
/**
 * Deep merge object.
 *
 * 深度合并对象
 *
 * @param original 原始对象
 * @param arrayProcessMethod 数组处理方式
 *  - `true` 表示替换新值,不管新值为哪种类型
 *  - `false` 表示会合并整个数组(将旧数据与新数据合并成新数组)
 * @param objects 要合并的对象
 */
 export function deepMergeKey(original: unknown, arrayProcessMethod: boolean, ...objects: NzSafeAny[]): NzSafeAny {
  if (Array.isArray(original) || typeof original !== 'object') return original;

  const isObject = (v: unknown): boolean => typeof v === 'object';

  const merge = (target: NzSafeAny, obj: NzSafeAny): NzSafeAny => {
    Object.keys(obj)
      .filter(key => key !== '__proto__' && Object.prototype.hasOwnProperty.call(obj, key))
      .forEach(key => {
        const fromValue = obj[key];
        const toValue = target[key];
        if (Array.isArray(toValue)) {
          target[key] = arrayProcessMethod ? fromValue : [...toValue, ...fromValue];
        } else if (typeof fromValue === 'function') {
          target[key] = fromValue;
        } else if (fromValue != null && isObject(fromValue) && toValue != null && isObject(toValue)) {
          target[key] = merge(toValue, fromValue);
        } else {
          target[key] = deepCopy(fromValue);
        }
      });
    return target;
  };

  objects.filter(v => v != null && isObject(v)).forEach(v => merge(original, v));

  return original;
}
ConfigService
读取yml配置文件
import { Injectable } from "@angular/core";
import { environment } from "@env/environment";
import { BehaviorSubject, Observable } from "rxjs";
import yaml from "js-yaml"
import axios from "axios"
@Injectable({
    providedIn: 'root'
})
export class ConfigService {
    private change$ = new BehaviorSubject(null);
    constructor() {
        this.getGlobalConfig()
    }

    get change(): Observable<any> {
        return this.change$.asObservable();
    }

    getGlobalConfig() {
        return new Promise((resolve, reject) => {
            let url = "/assets/config.yml"
            if(environment.production){
                url = environment.assetBaseUrl + "/assets/config.yml"
            }
            axios.get(url).then(res => {
                const config = yaml.load(res.data)
                this.change$.next(config);
            }).catch(err => {
                reject(err)
            })
        })
    }
}
config.yml
global:
  handlebarCalendarModelType: "0"
  handlebarCalendarModel:
     - "2023-01-01 00:00:00"
  leftPanelWidth: "200px" # 左侧树容器宽度
  leftPanelExpand: true   # 左侧容器初始是否展开 true: 展开  false: 收起
  handlebarRight: true # 是否展示 handlebar右侧的操作按钮
  handlebarRightBtn: # hanlebar右侧操作按钮 控制图标统计区域的显示与否
    - selected: true      # 是否选中
      show: true          # 是否显示
      label: "总量统计"
      icon: "icon-proxy"
      key: "cardNumStatis" # 每个按钮都应该有唯一的key
    - selected: true
      show: true
      label: "对比统计"
      icon: "icon-pie1"
      key: "pieAndBar"
    - selected: true
      show: false
      label: "趋势统计"
      icon: "icon-pie1"
      key: "lineTrend"

  barStyleConfig:
    grid:
      bottom: 30
    xAxis:
      axisLabel:
        width: 80

modules:
  demoPage:
    leftPanelExpand: true
    barStyleConfig:
      grid:
        bottom: 45
      xAxis:
        axisLabel:
          overflow: "truncate" # 截断
          rotate: 330  # 旋转度数
demo
demo-component.ts
import { Component, OnDestroy, OnInit, ViewChild } from "@angular/core";
import { ActivatedRoute, NavigationEnd, Router, RouterEvent } from "@angular/router";
import { BaseViewComponent } from "@app/core/config/base-view.component";
import { ConfigService } from "@app/core/config/config.service";
import { DEMOPAGE } from "@app/core/config/view-key";
import { removeNullProperty } from "@app/core/utils";
import { AccountAssetService } from "@app/services/data-asset-management/account-asset/account-asset.service";
import { format } from "date-fns";

@Component({
  selector: 'app-demo',
  templateUrl: './demo.component.html',
  styleUrls: ['./demo.component.less']
})
export class DemoComponent extends BaseViewComponent {

  q = {

  }

  constructor(
    private router: Router,
    public activatedRoute: ActivatedRoute,
    public configService: ConfigService,
    private apiService: AccountAssetService,
  ) {
    super(DEMOPAGE, configService)
    console.log("DemoComponent constructor");
  }

  ngOnInit(): void {
    console.log("DemoComponent ngOnInit");

    super.ngOnInit()
  }
  ngOnDestroy(): void {
    console.log("DemoComponent ngOnDestroy");
    super.ngOnDestroy()
  }

  configServiceReaderAfter(config) {
    console.log("configServiceReaderAfter...");
    return new Promise(async (resolve, reject) => {
      this.refsh()
      resolve(null)
    })
  }

  async refsh() {
    //await this.getAccountTypeTreeL1()
    if (this.config.handlebarRight) {
      this.getPieChart1Data()
      this.getPieChart2Data()
      this.getBarChartData()
      this.getAccountCard()
    }

    this.getData()
  }

  getAccountCard() {

  }

  getPieChart1Data() {

  }

  getPieChart2Data() {

  }

  getBarChartData() {

  }

  getData() {

    let params: { [key: string]: any } = {
      ...this.q,
      pageNum: this.pageNum,
      pageSize: this.pageSize,
    }

    if (this.config.handlebarRight) {
      params.startTimeStr = this.config.query.startTimeStr
      params.endTimeStr = this.config.query.endTimeStr
    }
    this.apiService.getAccountListByPageApi(removeNullProperty(params)).then((res: resType) => {
      if (res.resultStat == "0") {
        this.tableData = res.data.list
        this.tableTotal = res.data.total
      }
    })
  }

   /** handlebar 操作栏 */
   handleChange(e: any) {
    console.log(e);
    if(e.type === "button"){
      this.config.handlebarRightBtnSelected[e.data.key] = e.data.selected
    }else if(e.type === "calendar"){
      if(e.data.length === 2){
          this.config.query = {
            startTimeStr: format(e.data[0], 'yyyy-MM-dd HH:mm:ss').substring(0,10)+ " 00:00:00",
            endTimeStr: format(e.data[1], 'yyyy-MM-dd HH:mm:ss').substring(0,10)+ " 23:59:59",
          }
      }else{
        this.config.query = {
          startTimeStr: "",
          endTimeStr: ""
        }
      }
      this.refsh()
    }

  }

}
合并后的配置对象config
{
    "leftPanelExpand": true,
    "handlebarCalendarModel": [
        "2022-12-31T16:00:00.000Z",
        "2024-02-04T15:59:59.000Z"
    ],
    "query": {
        "startTimeStr": "2023-01-01 00:00:00",
        "endTimeStr": "2024-02-04 23:59:59"
    },
    "handlebarCalendarModelType": "0",
    "leftPanelWidth": "200px",
    "handlebarRight": true,
    "handlebarRightBtn": [
        {
            "selected": true,
            "show": true,
            "label": "总量统计",
            "icon": "icon-proxy",
            "key": "cardNumStatis"
        },
        {
            "selected": true,
            "show": true,
            "label": "对比统计",
            "icon": "icon-pie1",
            "key": "pieAndBar"
        }
    ],
    "barStyleConfig": {
        "grid": {
            "bottom": 45
        },
        "xAxis": {
            "axisLabel": {
                "width": 80,
                "overflow": "truncate",
                "rotate": 330
            }
        }
    },
    "handlebarRightBtnSelected": {
        "cardNumStatis": true,
        "pieAndBar": true
    }
}
