mac环境下,
首选需要安装gitlab-runner和fastlane
brew install gitlab-runner
brew install fastlane
安装完成,来到我们在gitlab下新建的Android项目,我们开始创建gitlab-runner
1、创建runner
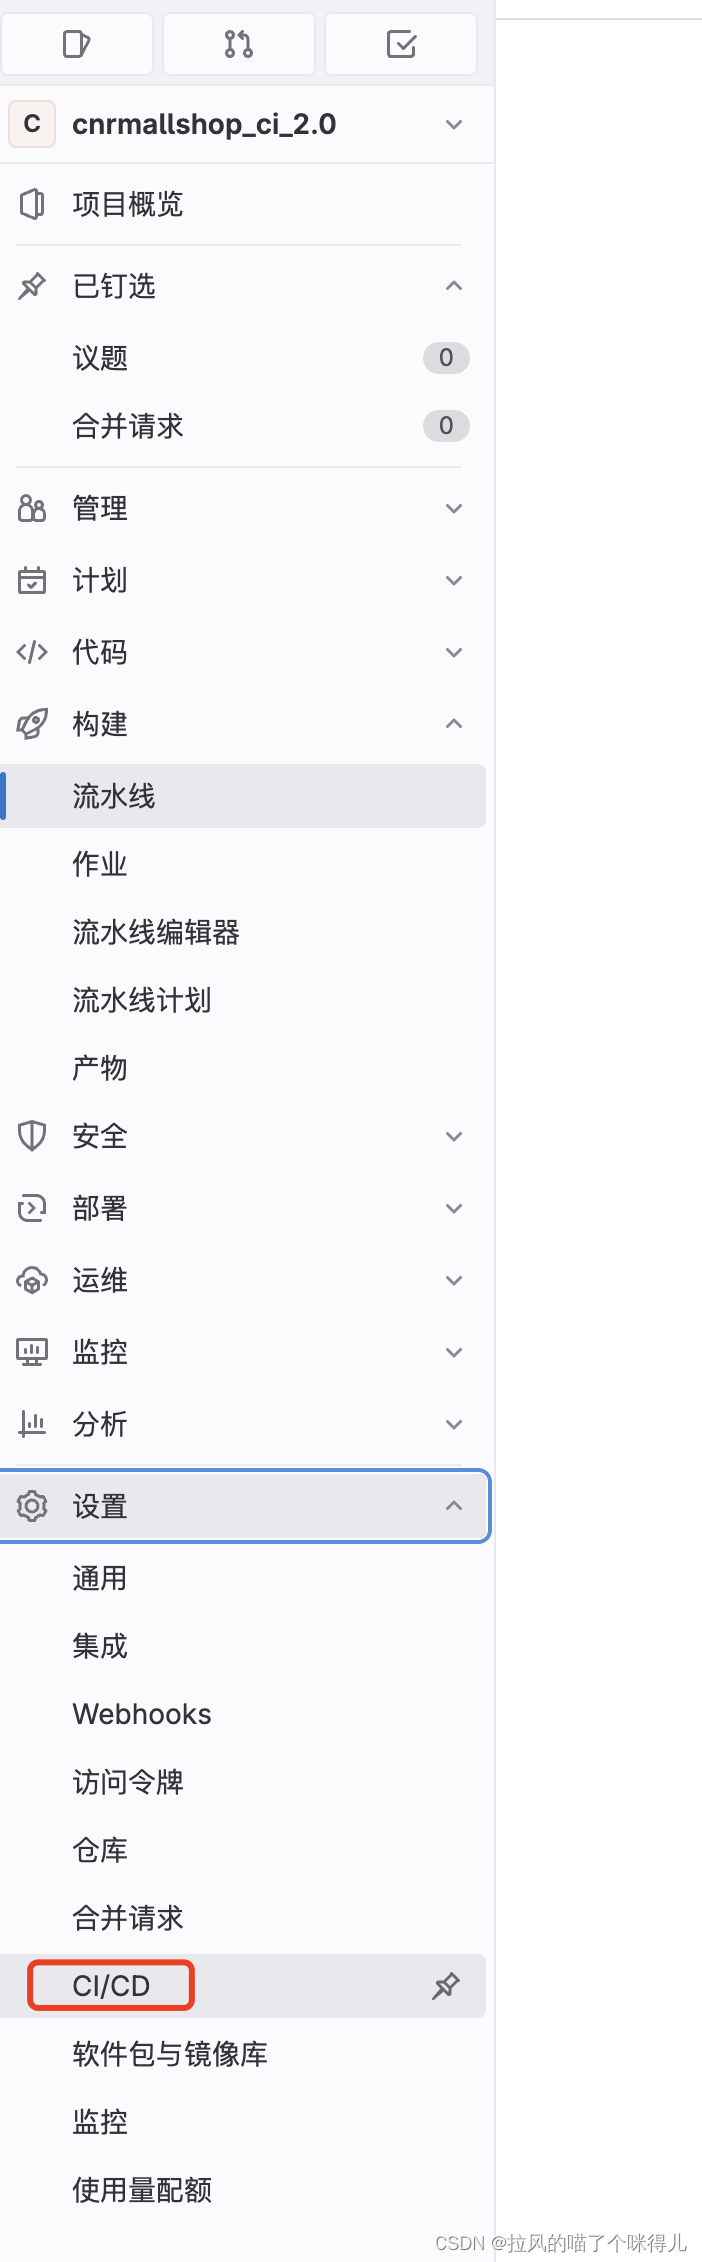
点开runner,点击新建runner

选择macos,自定义一个标签,把运行未打标签的作业也够选上,点击创建runner

然后来到这个页面,开始在终端挨个执行命令

执行命令,一定要选择shell,可以看到这时候就创建runner成功了
testrunner就是这个runner的名字

gitlab-runner list
执行这个命令可以看到电脑上所有的runner
gitlab-runner status 可以查看gitlab-runner的状态
如果状态不在线,可以调用gitlab-runner install 命令 再调用gitlab-runner start
2、fastlane
cd到项目跟目录下,使用fastlane init
根目录下就会创建fastlane文件夹
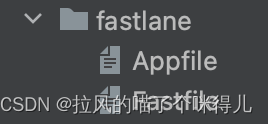
我们要写的代码都在Fastfile中
# This file contains the fastlane.tools configuration
# You can find the documentation at https://docs.fastlane.tools
#
# For a list of all available actions, check out
#
#     https://docs.fastlane.tools/actions
#
# For a list of all available plugins, check out
#
#     https://docs.fastlane.tools/plugins/available-plugins
#

# Uncomment the line if you want fastlane to automatically update itself
# update_fastlane

default_platform(:android)
APK_TIME = Time.now.strftime("%Y%m%d")
app_versionName  = "1.0.0"


BUILD_NAME = ""
# OUTPUT_NAME_PATCH = "#{BUILD_NAME}_#{PLIST_INFO_VERSION}_#{APK_TIME}"
platform :android do
  desc "给测试用单渠道cnrmall_official的包"
  puts "APK_TIME=== #{APK_TIME}"
  channel = "cnrmall_official"
  lane :debug_cnrmall_official do
  BUILD_NAME = "android_Debug_#{channel}"
      gradle(
        task: "clean assemble#{channel}",
        build_type: "Debug"
      )
     mk_cp_apk
     pgyer_upload(channel: "#{channel}")
  end

#debug全渠道包
lane :debug do
  channel = "cnrmall_official"
  BUILD_NAME = "android_Debug"
      gradle(
        task: "clean assemble",
        build_type: "Debug"
      )
     pgyer_upload(channel: "#{channel}")
  end

#release全渠道包
  lane :release do
    channel = "cnrmall_official"
  BUILD_NAME = "android_Release"
      gradle(
        task: "clean assemble",
        build_type: "Release"
      )
     pgyer_upload(channel: "#{channel}")
  end

# 执行创建文件夹 copy apk 到最外面目录
lane :mk_cp_apk do
  puts "mk out_apk cp apk"
  gradle(task: "customBuild")
    end

lane :get_version do
  puts "Update Android version in build.gradle"
  app_version = gradle(task: "getVersionName")
      # 获取版本号
#       puts "app_version:#{versionCode}"
    end

  desc "Submit a new Beta Build to Crashlytics Beta"
  lane :beta do
    gradle(task: "clean assembleRelease")
    crashlytics

    # sh "your_script.sh"
    # You can also use other beta testing services here
  end

  desc "Deploy a new version to the Google Play"
  lane :deploy do
    gradle(task: "clean assembleRelease")
    upload_to_play_store
  end


  #
   #上传蒲公英

     lane :pgyer_upload do |option|
     sh 'ls'
     pyg_get_channel = option[:channel]
     puts "上传蒲公英channel= #{pyg_get_channel}"
#      ENV['outPutPath'] = '../app/build/outputs/apk/'+"#{pyg_get_channel}"+"/debug/cnrmall_"+"#{APK_TIME}"+"_"+"#{app_versionName}"+"_"+"#{pyg_get_channel}"+".apk"

     ENV['outPutPath'] = '../out_apk/cnrmall_'+"#{APK_TIME}"+"_"+"#{app_versionName}"+"_"+"#{pyg_get_channel}"+".apk"

     puts "outPutPath路径- #{ENV['outPutPath']}"
#      ENV['outPutPath'] = '../app/build/outputs/apk/option/debug/cnrmall_#{APK_TIME}_1.0.0_cnrmall_official.apk'
#      sh "open ../app/build/outputs/apk/debug/"
     sh "./pgyer_upload.sh  -k 4df7384110457be3f5bce0c391ef1cd3  #{ENV['outPutPath']} "
  end


end
上传蒲公英脚本
#!/bin/bash
#
# 通过shell脚本来实现将本地app文件通过API上传到蒲公英
# https://www.pgyer.com/doc/view/api#fastUploadApp
#
# Display log. 1=enable, 0=disable
LOG_ENABLE=1
printHelp() {
echo "Usage: $0 -k <api_key> [OPTION]... file"
echo "Upload iOS or Android app package file to PGYER."
echo "Example: $0 -k xxxxxxxxxxxxxxx /data/app.apk"
echo ""
echo "Description:"
echo " -k api_key (required) api key from PGYER"
echo " -t buildInstallType build install type, 1=public, 2=password, 3=invite"
echo " -p buildPassword build password, required if buildInstallType=2"
echo " -d buildUpdateDescription build update description"
echo " -e buildInstallDate build install date, 1=buildInstallStartDate~buildInstallEndDate, 2=forever"
echo " -s buildInstallStartDate build install start date, format: yyyy-MM-dd"
echo " -e buildInstallEndDate build install end date, format: yyyy-MM-dd"
echo " -c buildChannelShortcut build channel shortcut"
echo " -h help show this help"
echo ""
echo "Report bugs to: <https://github.com/PGYER/pgyer_api_example/issues>"
echo "Project home page: <https://github.com/PGYER/pgyer_api_example>"
exit 1
}
while getopts 'k:t:p:d:s:e:c:h' OPT; do
case $OPT in
k) api_key="$OPTARG";;
t) buildInstallType="$OPTARG";;
p) buildPassword="$OPTARG";;
d) buildUpdateDescription="$OPTARG";;
e) buildInstallDate="$OPTARG";;
s) buildInstallStartDate="$OPTARG";;
e) buildInstallEndDate="$OPTARG";;
c) buildChannelShortcut="$OPTARG";;
?) printHelp;;
esac
done
shift $(($OPTIND - 1))
readonly file=$1
# check api_key exists
if [ -z "$api_key" ]; then
echo "api_key is empty"
printHelp
fi
# check file exists
if [ ! -f "$file" ]; then
echo "file not exists"
printHelp
fi
# check ext supported
buildType=${file##*.}
if [ "$buildType" != "" ] && [ "$buildType" != "apk" ]; then
echo "file ext is not supported"
printHelp
fi
# ---------------------------------------------------------------
# functions
# ---------------------------------------------------------------
log() {
[ $LOG_ENABLE -eq 1 ] && echo "[$(date +'%Y-%m-%d %H:%M:%S')] $*"
}
logTitle() {
log "-------------------------------- $* --------------------------------"
}
execCommand() {
log "$@"
result=$(eval $@)
}
# ---------------------------------------------------------------
# 获取上传凭证
# ---------------------------------------------------------------
logTitle "获取凭证"
command="curl -s"
[ -n "$api_key" ] && command="${command} --form-string '_api_key=${api_key}'";
[ -n "$buildType" ] && command="${command} --form-string 'buildType=${buildType}'";
[ -n "$buildInstallType" ] && command="${command} --form-string 'buildInstallType=${buildInstallType}'";
[ -n "$buildPassword" ] && command="${command} --form-string 'buildPassword=${buildPassword}'";
[ -n "$buildUpdateDescription" ] && command="${command} --form-string $'buildUpdateDescription=${buildUpdateDescription}'";
[ -n "$buildInstallDate" ] && command="${command} --form-string 'buildInstallDate=${buildInstallDate}'";
[ -n "$buildInstallStartDate" ] && command="${command} --form-string 'buildInstallStartDate=${buildInstallStartDate}'";
[ -n "$buildInstallEndDate" ] && command="${command} --form-string 'buildInstallEndDate=${buildInstallEndDate}'";
[ -n "$buildChannelShortcut" ] && command="${command} --form-string 'buildChannelShortcut=${buildChannelShortcut}'";
command="${command} http://www.pgyer.com/apiv2/app/getCOSToken";
execCommand $command
[[ "${result}" =~ \"endpoint\":\"([\:\_\.\/\\A-Za-z0-9\-]+)\" ]] && endpoint=`echo ${BASH_REMATCH[1]} | sed 's!\\\/!/!g'`
[[ "${result}" =~ \"key\":\"([\.a-z0-9]+)\" ]] && key=`echo ${BASH_REMATCH[1]}`
[[ "${result}" =~ \"signature\":\"([\=\&\_\;A-Za-z0-9\-]+)\" ]] && signature=`echo ${BASH_REMATCH[1]}`
[[ "${result}" =~ \"x-cos-security-token\":\"([\_A-Za-z0-9\-]+)\" ]] && x_cos_security_token=`echo ${BASH_REMATCH[1]}`
if [ -z "$key" ] || [ -z "$signature" ] || [ -z "$x_cos_security_token" ] || [ -z "$endpoint" ]; then
log "get upload token failed"
exit 1
fi
# ---------------------------------------------------------------
# 上传文件
# ---------------------------------------------------------------
logTitle "上传文件"
file_name=${file##*/}
execCommand "curl --progress-bar -o /dev/null -w '%{http_code}' \
--form-string 'key=${key}' \
--form-string 'signature=${signature}' \
--form-string 'x-cos-security-token=${x_cos_security_token}' \
--form-string 'x-cos-meta-file-name=${file_name}' \
-F 'file=@${file}' ${endpoint}"
if [ $result -ne 204 ]; then # if http code != 204, upload failed
log "Upload failed"
exit 1
fi
# ---------------------------------------------------------------
# 检查结果
# ---------------------------------------------------------------
logTitle "检查结果"
# 获取 .apk 文件所在的目录
Directory=$(dirname "$file")
echo "获取 .apk 文件所在的目录 $Directory"
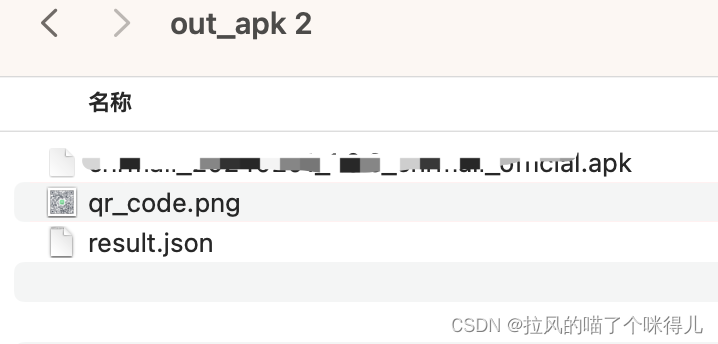
jsonFilePath="$Directory/result.json"
qrCodeFilePath="$Directory/qr_code.png"
for i in {1..60}; do
execCommand "curl -s http://www.pgyer.com/apiv2/app/buildInfo?_api_key=${api_key}\&buildKey=${key}"
[[ "${result}" =~ \"code\":([0-9]+) ]] && code=`echo ${BASH_REMATCH[1]}`
if [ $code -eq 0 ]; then
echo $result
echo $result > "$jsonFilePath" # 将 JSON 保存到文件
# 提取 buildQRCodeURL 的值
# qrCodeURL=$(jq -r '.data.buildQRCodeURL' <<< "$result")
qrCodeURL=$(echo "$result" | grep -o '"buildQRCodeURL":"[^"]*' | cut -d '"' -f 4 | sed 's/\\//g')
# 使用 curl 下载并保存 QR Code 文件
echo "Downloading QR Code from: $qrCodeURL"
# curl -s "$qrCodeURL" -o "$qrCodeFilePath"
curl --location-trusted -o "$qrCodeFilePath" "$qrCodeURL"
echo "curl Result: $curlResult"
break
else
sleep 1
fi
done.gitlab-ci.yml,只需要写上执行哪个fastlane即可 ,debug_cnrmall_official是fastlane名字
在Android studio中的Terminal中,也可以使用命令去执行某一个fastlane
如:fastlane lane:debug_cnrmall_official
stages:
  - build

job:
  stage: build
  script:
    - echo "开始打包4"
    - ls -a
    # - ./build.sh
    - fastlane debug_cnrmall_official

  artifacts:
    paths:
      - out_apk/*
项目跟目录的build.gradle文件中,还自定义了一个task
因为Android默认打包完的apk位置太深了,所以把它复制到外面一点,方便测试拿到
cnrmallshop_ci_2.0是项目名 out_apk是创建的文件夹
task customBuild(type: Exec) {
    def date = new SimpleDateFormat("yyyyMMdd").format(new Date())
    def versionName = rootProject.android.versionName
    commandLine 'sh','-c','mkdir -p ../cnrmallshop_ci_2.0/out_apk && cp app/build/outputs/apk/cnrmall_official/debug/cnrmall_'+date+'_'+versionName+'_cnrmall_official.apk ../cnrmallshop_ci_2.0/out_apk/cnrmall_'+date+'_'+versionName+'_cnrmall_official.apk'
}
最后可以在流水线上中看到构建成功的流水线,可以点击下载按钮下载产物
产物中有apk有二维码