小程序API Promise化
wx.requet
官网入口
默认情况下,小程序官方异步API都是基于回调函数实现的
wx.request({
  method: '',
  url: '',
  data: {},
  header: {
    'content-type': 'application/json' // 默认值
  },
  success (res) {
    console.log(res.data)
  },
  fail () {},
  complete () { }
})
缺点:容易造成回调地域,代码可读性可维护性差。
实现API Promise化
API Promise化依赖 miniprogram-api-promise 第三方npm包
安装
npm i --save miniprogram-api-promise
安装完之后点击 工具->构建npm
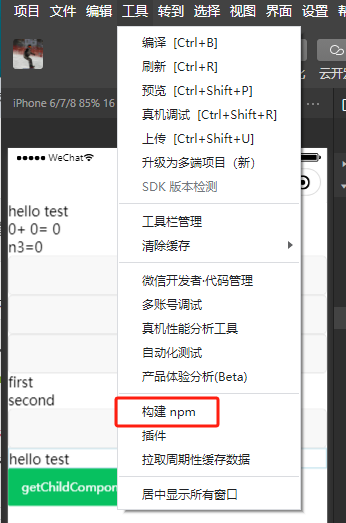
查看miniprogram_npm文件夹中包是否存在
实现API Promise化
小程序入口文件app.ts,调用一次promisifyAll()
app.ts
import { promisifyAll } from 'miniprogram-api-promise'
const wxp = wx.p = {}
promisifyAll(wx, wxp)

App<IAppOption>({
	...
})
使用:异步获取api
wxml
<van-button bind:tap="getInfo" type="primary">getInfo</van-button>
ts
	async getInfo() {
		const { data: res } = await wx.p.request({
			method: 'GET',
			url: 'https://applet-base-api-t.itheima.net/api/get',
			data: { name: 'zs', age: 22 }
		})
		console.log(res);
	},
全局数据共享
全局数据共享(又叫:状态管理),为了解决组件之间数据共享的问题
常用的方案如:vuex 、 redux
小程序中使用mobx-miniprogram配合mobx-miniprogram-bindings实现全局数据共享
- mobx-miniprogram用来创建store实例对象
- mobx-miniprogram-bindings把store中的共享数据或者方法绑定到页面或组件中
安装
yarn add mobx-miniprogram mobx-miniprogram-bindings
npm i --save mobx-miniprogram mobx-miniprogram-bindings
安装完之后点击 工具->构建npm
查看miniprogram_npm文件夹中包是否存在
创建store实例 定义get计算属性和action方法
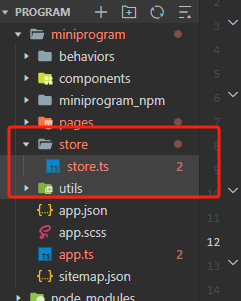
import { action, observable } from 'mobx-miniprogram'

export const store = observable({
	numA: 1,
	numB: 2,
	getSum() {
		return this.numA + this.numB
	},
	//action 函数用来修改store中数据的值
	updateNumA: action(function (step) {
		this.numA += step
	}),
	updateNumB: action(function (step) {
		this.numB += step
	})
})
页面中使用store
wxml
<view>
	{{numA}}+{{numB}}={{sum}}
</view>
<van-button bind:tap="btnHandler" data-step="{{1}}">numA+1</van-button>
ts
import { createStoreBindings } from 'mobx-miniprogram-bindings'
import { store } from '../../store/store'

Page({
	btnHandler(e: WechatMiniprogram.CustomEvent) {
		console.log(e.target.dataset.step);
		this.updateNumA(e.target.dataset.step)
	},
	/**
	 * 生命周期函数--监听页面加载
	 */
	onLoad() {
		this.storeBindings = createStoreBindings(this, {
			store,
			fields: ['numA', 'numB', 'sum'],
			actions: ['updateNumA']
		})
	},
	onUnload() {
		this.storeBindings.destoryStoreBindings()
	},
})
组件中使用store
wxml
<view>
	{{numA}}+{{numB}}={{sum}}
</view>
<van-button bind:tap="btnHandler" data-step="{{1}}">numA+1</van-button>
ts
import { storeBindingsBehavior } from 'mobx-miniprogram-bindings'
import { store } from '../../store/store'

// components/test/test.ts
var myBehavior = require('../../behaviors/my-behavior');
Component({
	behaviors: [myBehavior, storeBindingsBehavior],
	storeBindings: {
		store,
		fields: {
			numA: () => store.numA,
			numB: () => store.numB,
			sum: () => store.sum,
		},
		actions: {
			updateNumA: 'updateNumA'
		}
	},
	methods: {
		btnHandler(e: WechatMiniprogram.CustomEvent) {
			console.log(e.target.dataset.step);
			this.updateNumA(e.target.dataset.step)
		},
	},
})
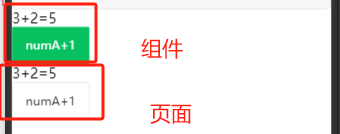
点击btn按钮numA会自增,同时sum会重新计算,page和组件的数据会同时改变。
分包
官网入口
独立分包和普通分包区别
独立分包可以独立于主包和其他分包单独运行 ,不下载主包的情况下,独立运行
普通分包 依赖主包才能运行
配置方法
假设小程序目录结构如下:
├── app.js
├── app.json
├── app.wxss
├── moduleA
│   └── pages
│       ├── rabbit
│       └── squirrel
├── moduleB
│   └── pages
│       ├── pear
│       └── pineapple
├── pages
│   ├── index
│   └── logs
└── utils
开发者通过在app.json的subpackages字段中对应的分包配置项中定义independent字段声明对应分包为独立分包。
{
  "pages": [
    "pages/index",
    "pages/logs"
  ],
  "subpackages": [
    {
      "root": "moduleA",
      "pages": [
        "pages/rabbit",
        "pages/squirrel"
      ]
    }, {
      "root": "moduleB",
      "pages": [
        "pages/pear",
        "pages/pineapple"
      ],
      "independent": true
    }
  ]
}
- 独立分包中不能依赖主包和其他分包中的内容,包括 js 文件、template、wxss、自定义组件、插件等(使用 分包异步化 时 js 文件、自定义组件、插件不受此条限制)
- 主包中的 app.wxss 对独立分包无效,应避免在独立分包页面中使用 app.wxss 中的样式;
- App 只能在主包内定义,独立分包中不能定义 App,会造成无法预期的行为;
- 独立分包中暂时不支持使用插件
分包预下载
在进入小程序某个页面时,由框架自动预下载可能需要的分包,提升进入后续分包页面时的启动速度。对于独立分包,也可以预下载主包。
配置方法
预下载分包行为在进入某个页面时触发,通过在 app.json 增加 preloadRule 配置来控制。
{
  "pages": ["pages/index"],
  "subpackages": [
    {
      "root": "important",
      "pages": ["index"],
    },
    {
      "root": "sub1",
      "pages": ["index"],
    },
    {
      "name": "hello",
      "root": "path/to",
      "pages": ["index"]
    },
    {
      "root": "sub3",
      "pages": ["index"]
    },
    {
      "root": "indep",
      "pages": ["index"],
      "independent": true
    }
  ],
  "preloadRule": {
    "pages/index": {
      "network": "all",
      "packages": ["important"]
    },
    "sub1/index": {
      "packages": ["hello", "sub3"]
    },
    "sub3/index": {
      "packages": ["path/to"]
    },
    "indep/index": {
      "packages": ["__APP__"]
    }
  }
}
自定义tabBar
官网入口
配置信息
在 app.json 中的 tabBar 项指定
custom字段,同时其余 tabBar 相关配置也补充完整。
所有 tab 页的 json 里需声明 usingComponents 项,也可以在 app.json 全局开启。
添加代码文件
在代码根目录下添加入口文件:
custom-tab-bar/index.js
custom-tab-bar/index.json
custom-tab-bar/index.wxml
custom-tab-bar/index.wxss
编写tabbar代码
引入vant tabbar组件
index.json
{
	"usingComponents": {
		"van-tabbar": "@vant/weapp/tabbar/index",
		"van-tabbar-item": "@vant/weapp/tabbar-item/index"
	}
}
wxml使用组件
<van-tabbar active="{{ active }}" bind:change="onChange">
  <van-tabbar-item icon="home-o">标签</van-tabbar-item>
  <van-tabbar-item icon="chat-o" info="5">标签</van-tabbar-item>
  <van-tabbar-item icon="setting-o">标签</van-tabbar-item>
</van-tabbar>
ts
Component({
	options: {
	},
	/**
	 * 组件的属性列表
	 */
	properties: {
	},
	/**
	 * 组件的初始数据
	 */
	data: {
		active: 0,
	},

	/**
	 * 组件的方法列表
	 */
	methods: {
		onChange(event) {
			// event.detail 的值为当前选中项的索引
			this.setData({ active: event.detail });
		},
	},
	observers: {
	}

})
结果

修改vant样式
官网入口
在自定义组件中使用 Vant Weapp 组件时,需开启
styleIsolation: 'shared'
修改tabbar组件图标与文字直接距离
ts
Component({
	behaviors: [storeBindingsBehavior],
	options: {
		styleIsolation: 'shared'
	},
	/**
	 * 组件的属性列表
	 */
	properties: {
	},
	/**
	 * 组件的初始数据
	 */
	data: {
		active: 0,
	},

	/**
	 * 组件的方法列表
	 */
	methods: {
		onChange(event) {
			// event.detail 的值为当前选中项的索引
			this.setData({ active: event.detail });
		},
	},
	observers: {
	}
})
scss
.van-tabbar-item {
	--tabbar-item-margin-bottom: 0px
}

共享数据
引入mobx获取store中的数据
将numA显示在徽章图标上
ts
import { storeBindingsBehavior } from 'mobx-miniprogram-bindings'
import { store } from '../store/store'

Component({
	behaviors: [storeBindingsBehavior],
	options: {
		styleIsolation: 'shared'
	},
	/**
	 * 组件的属性列表
	 */
	properties: {
	},
	/**
	 * 组件的初始数据
	 */
	data: {
		active: 0,
	},
	storeBindings: {
		store,
		fields: {
			numA: () => store.numA,
		},
	},
	/**
	 * 组件的方法列表
	 */
	methods: {
		onChange(event) {
			// event.detail 的值为当前选中项的索引
			this.setData({ active: event.detail });
		},
	},
	observers: {
	}

})
wxml
<van-tabbar active="{{ active }}" bind:change="onChange">
  <van-tabbar-item icon="home-o">标签</van-tabbar-item>
  <van-tabbar-item icon="chat-o" info="{{numA}}">标签</van-tabbar-item>
  <van-tabbar-item icon="setting-o">标签</van-tabbar-item>
</van-tabbar>

页面切换
使用wx.switchTab()进行切换
ts
import { storeBindingsBehavior } from 'mobx-miniprogram-bindings'
import { store } from '../store/store'

// components/test/test.ts
// var myBehavior = require('../../behaviors/my-behavior');
Component({
	behaviors: [storeBindingsBehavior],
	options: {
		styleIsolation: 'shared'
	},
	/**
	 * 组件的属性列表
	 */
	properties: {
	},
	/**
	 * 组件的初始数据
	 */
	data: {
		active: 0,
		list: [{
			"pagePath": "/pages/home/home",
			"text": "首页"
		}, {
			"pagePath": "/pages/message/message",
			"text": "消息"
		}, {
			"pagePath": "/pages/contact/contact",
			"text": "联系我"
		}]
	},
	storeBindings: {
		store,
		fields: {
			numA: () => store.numA,
		},
	},
	/**
	 * 组件的方法列表
	 */
	methods: {
		onChange(event) {
			// event.detail 的值为当前选中项的索引
			this.setData({ active: event.detail });
			wx.switchTab({ url: this.data.list[event.detail].pagePath })
		},
	},
	observers: {
	}

})```
