文章目录
- CSS3 滤镜效果
- 概述
- 说明
- 使用
- 案例
- 鬼屋效果
- 代码下载
CSS3 滤镜效果
概述
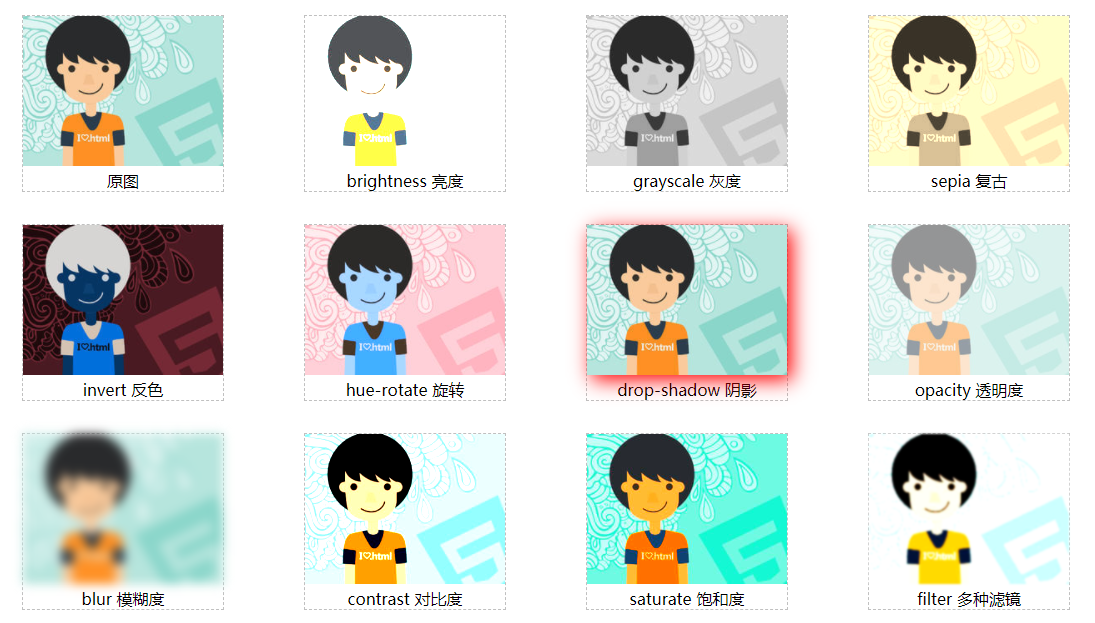
在CSS3中,新增了滤镜效果,可以轻松实现黑白效果、复古效果、亮度效果等。
说明
语法
filter: 取值;
filter属性取值
| 属性值 | 说明 |
|---|---|
| brightness(百分比) | 亮度 brightness()方法的取值是一个百分比,其中0%~100%表示减弱图片的亮度,例如0%就是完全黑色;100%以上表示增强图片的亮度,例如200%就是将亮度提高2倍。 |
| grayscale(百分比) | 灰度 grayscale()方法的取值是一个百分比,其中0%表示不做任何修改,100%表示完全灰度(即黑白图片)。 |
| sepia(百分比) | 复古 sepia()方法的取值是一个百分比,取值范围为0%~100%。其中,0%表示没有转换,100%表示复古效果。 |
| invert(百分比) | 反色 invert()方法的取值是一个百分比,取值范围为0%~100%。其中,0%表示没有转换,100%表示反转所有颜色。 |
| hue-rotate(度数) | 旋转(色相) hue-rotate()方法的取值是一个度数,单位为deg(即degree的缩写)。其中,0deg表示不旋转,360deg表示旋转360°,也就是相当于一个循环。 |
| drop-shadow(x-offset y-offset blur color) | 阴影 drop-shadow()方法的参数有4个,每一个参数说明如下。▶ x-offset:定义水平阴影的偏移距离,可以使用负值。由于CSS3采用的是W3C坐标系(如图23-6所示),因此x-offset取值为正时,向右偏移;取值为负时,向左偏移。▶ y-offset:定义垂直阴影的偏移距离,可以使用负值。由于CSS3采用的是W3C坐标系,因此y-offset取值为正时,向下偏移;取值为负时,向上偏移。▶ blur:定义阴影的模糊半径,只能为正值。▶ color:定义阴影的颜色。 |
| opacity(百分比) | 透明度 opacity()方法的取值是一个百分比,取值范围为0%~100%。其中,0%表示完全透明,100%表示完全不透明。 |
| blur(像素) | 模糊度 blur()方法的取值是一个像素值,取值越大,模糊效果越明显。 |
| contrast(百分比) | 对比度 contrast()方法的取值是一个百分比。其中,0%~100%表示减弱对比度,例如0%则是灰度图片;100%以上表示增强对比度,例如200%表示增强对比度为原来的2倍 |
| saturate(百分比) | 饱和度 saturate()方法的取值是一个百分比。其中,0%~100%表示减弱饱和度,100%以上表示增强饱和度。 |
使用
<!DOCTYPE html>
<html>
	<head>
		<meta charset="utf-8" />
		<title></title>
		<style type="text/css">
			figure {
				float: left;
				width: 200px;
				text-align: center;
				border: 1px dashed silver;
			}

			figure img {
				width: 100%;
			}

			.brightness {
				filter: brightness(200%);
			}

			.grayscale {
				filter: grayscale(100%);
			}

			.sepia {
				filter: sepia(100%);
			}

			.invert {
				filter: invert(100%);
			}

			.hue-rotate {
				filter: hue-rotate(180deg);
			}

			.drop-shadow {
				filter: drop-shadow(5px 5px 10px red);
			}

			.opacity {
				filter: opacity(50%);
			}

			.blur {
				filter: blur(5px);
			}

			.contrast {
				filter: contrast(200%);
			}

			.saturate {
				filter: saturate(300%);
			}

			.filter {
				filter: brightness(120%) contrast(200%) blur(1px);
			}
		</style>
	</head>
	<body>
		<figure>
			<img src="img/person.png" alt="" />
			<figcaption>原图</figcaption>
		</figure>
		<figure>
			<img class="brightness" src="img/person.png" alt="" />
			<figcaption>brightness 亮度</figcaption>
		</figure>
		<figure>
			<img class="grayscale" src="img/person.png" alt="" />
			<figcaption>grayscale 灰度</figcaption>
		</figure>
		<figure>
			<img class="sepia" src="img/person.png" alt="" />
			<figcaption>sepia 复古</figcaption>
		</figure>
		<figure>
			<img class="invert" src="img/person.png" alt="" />
			<figcaption>invert 反色</figcaption>
		</figure>
		<figure>
			<img class="hue-rotate" src="img/person.png" alt="" />
			<figcaption>hue-rotate 旋转</figcaption>
		</figure>
		<figure>
			<img class="drop-shadow" src="img/person.png" alt="" />
			<figcaption>drop-shadow 阴影</figcaption>
		</figure>
		<figure>
			<img class="opacity" src="img/person.png" alt="" />
			<figcaption>opacity 透明度</figcaption>
		</figure>
		<figure>
			<img class="blur" src="img/person.png" alt="" />
			<figcaption>blur 模糊度</figcaption>
		</figure>
		<figure>
			<img class="contrast" src="img/person.png" alt="" />
			<figcaption>contrast 对比度</figcaption>
		</figure>
		<figure>
			<img class="saturate" src="img/person.png" alt="" />
			<figcaption>saturate 饱和度</figcaption>
		</figure>
		<figure>
			<img class="filter" src="img/person.png" alt="" />
			<figcaption>filter 多种滤镜</figcaption>
		</figure>
	</body>
</html>
案例
鬼屋效果
<!DOCTYPE html>
<html>
	<head>
		<meta charset="utf-8" />
		<title>鬼屋效果</title>
		<style type="text/css">
			body {
				text-align: center;
			}

			/*调用动画*/
			img {
				animation: haunted 5s infinite;
			}

			/*定义动画*/
			@keyframes haunted {
				0% {
					-webkit-filter: brightness(20%);
					filter: brightness(20%);
				}

				40% {
					-webkit-filter: brightness(20%);
					filter: brightness(20%);
				}

				50% {
					-webkit-filter: sepia(1) contrast(2) brightness(200%);
					filter: sepia(1) contrast(2) brightness(200%);
				}

				60% {
					-webkit-filter: sepia(1) contrast(2) brightness(200%);
					filter: sepia(1) contrast(2) brightness(200%);
				}

				62% {
					-webkit-filter: brightness(20%);
					filter: brightness(20%);
				}

				96% {
					-webkit-filter: brightness(20%);
					filter: brightness(20%);
				}

				96% {
					-webkit-filter: brightness(400%);
					filter: brightness(400%);
				}
			}
		</style>
	</head>
	<body>
		<img src="../img/house.png" alt="" />
	</body>
</html>


