WPF通过样式,不仅可以方便的设置控件元素的展示方式,给用户呈现多样化的体验,还简化配置,避免重复设置元素的属性,以达到节约成本,提高工作效率的目的,样式也是资源的一种表现形式。本文以一个简单的小例子,简述如何设置WPF的样式以及资源的应用,仅供学习分享使用,如有不足之处,还请指正。
什么是样式?
样式(Style)是组织和重用格式化选项的重要工具。不是使用重复的标记填充XAML,以便设置外边距、内边距、颜色以及字体等细节,而是创建一系列封装所有这些细节的样式,然后再需要之处通过属性来应用样式。
样式是可应用于元素的属性值集合。使用资源的最常见原因之一就是样式。
基础样式
1. 通过TargetType设置样式
通过控件类型,统一设置样式【如:字体,大小,边距等】,以便于形成统一的风格。如下所示:
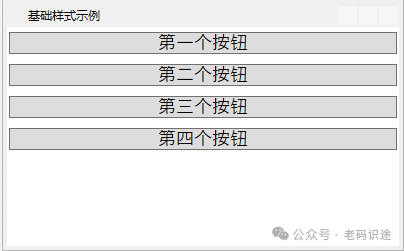
通过设置样式的TargetType="Button",则可以使所有的按钮应用同一个样式,统一风格。如下所示:
<Window x:Class="WpfApp1.SevenWindow"
        xmlns="http://schemas.microsoft.com/winfx/2006/xaml/presentation"
        xmlns:x="http://schemas.microsoft.com/winfx/2006/xaml"
        xmlns:d="http://schemas.microsoft.com/expression/blend/2008"
        xmlns:mc="http://schemas.openxmlformats.org/markup-compatibility/2006"
        xmlns:local="clr-namespace:WpfApp1"
        mc:Ignorable="d"
        Title="基础样式示例" Height="250" Width="400">
    <Window.Resources>
        <Style  TargetType="Button"  >
            <Setter Property="Button.Margin" Value="2,5,2,5"></Setter>
            <Setter Property="Control.FontFamily" Value="SimSun-ExtB"></Setter>
            <Setter Property="Control.FontSize" Value="18"></Setter>
</Style>
    </Window.Resources>
    <StackPanel>
        <Button x:Name="button1" Content="第一个按钮"></Button>
        <Button x:Name="button2" Content="第二个按钮" ></Button>
        <Button x:Name="button3" Content="第三个按钮"></Button>
        <Button x:Name="button4" Content="第四个按钮" ></Button>
    </StackPanel>
</Window>
2. 通过Key设置样式
如果需要对每一个控件元素,都设置不同的样式,则可以通过不同的Key加以区分,如下所示:
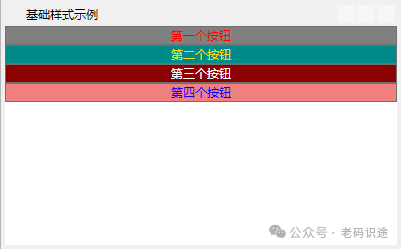
分别设置不同的样式,每一个样式都有一个唯一的Key,然后分别绑定到各个元素的Style属性上,如下所示:
<Window x:Class="WpfApp1.SevenWindow"
        xmlns="http://schemas.microsoft.com/winfx/2006/xaml/presentation"
        xmlns:x="http://schemas.microsoft.com/winfx/2006/xaml"
        xmlns:d="http://schemas.microsoft.com/expression/blend/2008"
        xmlns:mc="http://schemas.openxmlformats.org/markup-compatibility/2006"
        xmlns:local="clr-namespace:WpfApp1"
        mc:Ignorable="d"
        Title="基础样式示例" Height="250" Width="400">
    <Window.Resources>
        <Style TargetType="Button" >
            <Setter Property="Button.Margin" Value="2,5,2,5"></Setter>
            <Setter Property="Control.FontFamily" Value="SimSun-ExtB"></Setter>
            <Setter Property="Control.FontSize" Value="16"></Setter>
        </Style>
        <Style x:Key="first">
            <Setter Property="Control.Foreground" Value="Red"></Setter>
            <Setter Property="Control.Background" Value="Gray"></Setter>
        </Style>
        <Style x:Key="second">
            <Setter Property="ItemsControl.Foreground" Value="Gold"></Setter>
            <Setter Property="ItemsControl.Background" Value="DarkCyan"></Setter>
        </Style>
        <Style x:Key="third">
            <Setter Property="ItemsControl.Foreground" Value="White"></Setter>
            <Setter Property="ItemsControl.Background" Value="DarkRed"></Setter>
        </Style>
        <Style x:Key="four">
            <Setter Property="ItemsControl.Foreground" Value="Blue"></Setter>
            <Setter Property="ItemsControl.Background" Value="LightCoral"></Setter>
        </Style>
    </Window.Resources>
    <StackPanel>
        <Button x:Name="button1" Content="第一个按钮" Style="{StaticResource first}"></Button>
        <Button x:Name="button2" Content="第二个按钮" Style="{StaticResource second}"></Button>
        <Button x:Name="button3" Content="第三个按钮" Style="{StaticResource third}"></Button>
        <Button x:Name="button4" Content="第四个按钮" Style="{StaticResource four}"></Button>
    </StackPanel>
</Window>
3. 样式继承
通过仔细观察发现,在设置了单独样式以后,统一的样式失去了作用,说明每一个元素控件,只能绑定一个样式,那怎么办才能让统一样式起作用呢?答案就是面向对象思想中的继承。
在WPF中,通过设置BasedOn来继承父样式,如下所示:

在每一个样式通过BasedOn属性继承父样式,如下所示:
<Window x:Class="WpfApp1.SevenWindow"
        xmlns="http://schemas.microsoft.com/winfx/2006/xaml/presentation"
        xmlns:x="http://schemas.microsoft.com/winfx/2006/xaml"
        xmlns:d="http://schemas.microsoft.com/expression/blend/2008"
        xmlns:mc="http://schemas.openxmlformats.org/markup-compatibility/2006"
        xmlns:local="clr-namespace:WpfApp1"
        mc:Ignorable="d"
        Title="基础样式示例" Height="250" Width="400">
    <Window.Resources>
        <Style x:Key="base" >
            <Setter Property="Control.Margin" Value="2,5,2,5"></Setter>
            <Setter Property="Control.FontFamily" Value="SimSun-ExtB"></Setter>
            <Setter Property="Control.FontSize" Value="18"></Setter>
        </Style>
        <Style x:Key="first" BasedOn="{StaticResource base}">
            <Setter Property="Control.Foreground" Value="Red"></Setter>
            <Setter Property="Control.Background" Value="Gray"></Setter>
        </Style>
        <Style x:Key="second" BasedOn="{StaticResource base}">
            <Setter Property="ItemsControl.Foreground" Value="Gold"></Setter>
            <Setter Property="ItemsControl.Background" Value="DarkCyan"></Setter>
        </Style>
        <Style x:Key="third" BasedOn="{StaticResource base}">
            <Setter Property="ItemsControl.Foreground" Value="White"></Setter>
            <Setter Property="ItemsControl.Background" Value="DarkRed"></Setter>
        </Style>
        <Style x:Key="four" BasedOn="{StaticResource base}">
            <Setter Property="ItemsControl.Foreground" Value="Blue"></Setter>
            <Setter Property="ItemsControl.Background" Value="LightCoral"></Setter>
        </Style>
    </Window.Resources>
    <StackPanel>
        <Button x:Name="button1" Content="第一个按钮" Style="{StaticResource first}"></Button>
        <Button x:Name="button2" Content="第二个按钮" Style="{StaticResource second}"></Button>
        <Button x:Name="button3" Content="第三个按钮" Style="{StaticResource third}"></Button>
        <Button x:Name="button4" Content="第四个按钮" Style="{StaticResource four}"></Button>
    </StackPanel>
</Window>注意:如果样式要被其他样式继承,则最好不要使用TargetType指定。一般情况下,可能为报错【只能根据带有基类型“IFrameworkInputElement”的目标类型的 Style。】
4. 样式中绑定事件
在WPF中的样式中,通过EventSetter进行事件绑定,如下所示:
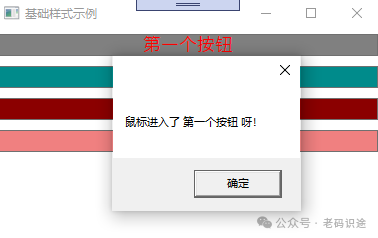
在样式中,通过EventSetter设置事件,如下所示:
<Window x:Class="WpfApp1.SevenWindow"
        xmlns="http://schemas.microsoft.com/winfx/2006/xaml/presentation"
        xmlns:x="http://schemas.microsoft.com/winfx/2006/xaml"
        xmlns:d="http://schemas.microsoft.com/expression/blend/2008"
        xmlns:mc="http://schemas.openxmlformats.org/markup-compatibility/2006"
        xmlns:local="clr-namespace:WpfApp1"
        mc:Ignorable="d"
        Title="基础样式示例" Height="250" Width="400">
    <Window.Resources>
        <Style x:Key="base">
            <Setter Property="Control.Margin" Value="2,5,2,5"></Setter>
            <Setter Property="Control.FontFamily" Value="SimSun-ExtB"></Setter>
            <Setter Property="Control.FontSize" Value="18"></Setter>
        </Style>
        <Style x:Key="first" BasedOn="{StaticResource base}">
            <Setter Property="Control.Foreground" Value="Red"></Setter>
            <Setter Property="Control.Background" Value="Gray"></Setter>
            <EventSetter Event="Button.MouseEnter" Handler="FirstButton_MouseEnter"></EventSetter>
        </Style>
    </Window.Resources>
    <StackPanel>
        <Button x:Name="button1" Content="第一个按钮" Style="{StaticResource first}"></Button>
    </StackPanel>
</Window>其中FirstButton_MouseEnter,文后台定义的一个事件函数,如下所示:
private void FirstButton_MouseEnter(object sender,MouseEventArgs e)
{
      Button btn = (Button)sender;
      MessageBox.Show("鼠标进入了 "+btn.Content.ToString()+" 呀!");
}
触发器
使用触发器可自动完成简单的样式的改变,不需要使用代码,也可以完成不少工作。触发器通过Style.Trigger集合链接到样式。每个样式可以有任意多个触发器。每个触发器都是System.Windows.TriggerBase的实例。
TriggerBase的子类
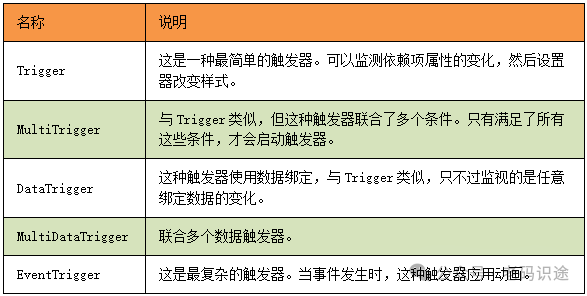
1. 基础触发器
触发器,是指当满足一定条件,然后触发相关的样式设置,如下所示:
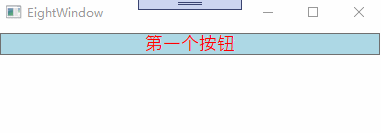
示例中设置了两个触发器:1.Control.IsMouseOver鼠标覆盖在按钮上时,设置对应的样式。2. Control.IsFocused,控件聚焦时,设置对应的样式。如下所示:
<Window x:Class="WpfApp1.EightWindow"
        xmlns="http://schemas.microsoft.com/winfx/2006/xaml/presentation"
        xmlns:x="http://schemas.microsoft.com/winfx/2006/xaml"
        xmlns:d="http://schemas.microsoft.com/expression/blend/2008"
        xmlns:mc="http://schemas.openxmlformats.org/markup-compatibility/2006"
        xmlns:local="clr-namespace:WpfApp1"
        mc:Ignorable="d"
        Title="EightWindow" Height="350" Width="400">
    <Window.Resources>
        <Style x:Key="first">
            <Setter Property="Control.Margin" Value="2,5,2,5"></Setter>
            <Setter Property="Control.FontFamily" Value="SimSun-ExtB"></Setter>
            <Setter Property="Control.FontSize" Value="18"></Setter>
            <Setter Property="Control.Foreground" Value="Red"></Setter>
            <Setter Property="Control.Background" Value="LightBlue"></Setter>
            <Style.Triggers>
                <Trigger Property="Control.IsMouseOver" Value="True">
                    <Setter Property="ItemsControl.Background" Value="AliceBlue"></Setter>
                    <Setter Property="Control.FontSize" Value="28"></Setter>
                </Trigger>
                <Trigger Property="Control.IsFocused" Value="True">
                    <Setter Property="ItemsControl.Background" Value="DarkGoldenrod"></Setter>
                    <Setter Property="Control.FontSize" Value="28"></Setter>
                </Trigger>
            </Style.Triggers>
        </Style>
    </Window.Resources>
    <StackPanel>
        <Button x:Name="button1" Content="第一个按钮" Style="{StaticResource first}"></Button>
    </StackPanel>
</Window>注意:如果样式触发器,设置了多个,且条件相互覆盖时,以最后的设置为准。
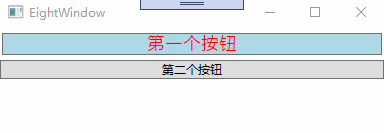
2. 多条件触发器
如果需要多个条件同时满足,才能设置对应的样式,则可以通过MultiTrigger来设置,如下所示:
<Window x:Class="WpfApp1.EightWindow"
        xmlns="http://schemas.microsoft.com/winfx/2006/xaml/presentation"
        xmlns:x="http://schemas.microsoft.com/winfx/2006/xaml"
        xmlns:d="http://schemas.microsoft.com/expression/blend/2008"
        xmlns:mc="http://schemas.openxmlformats.org/markup-compatibility/2006"
        xmlns:local="clr-namespace:WpfApp1"
        mc:Ignorable="d"
        Title="EightWindow" Height="350" Width="400">
    <Window.Resources>
        <Style x:Key="first">
            <Setter Property="Control.Margin" Value="2,5,2,5"></Setter>
            <Setter Property="Control.FontFamily" Value="SimSun-ExtB"></Setter>
            <Setter Property="Control.FontSize" Value="18"></Setter>
            <Setter Property="Control.Foreground" Value="Red"></Setter>
            <Setter Property="Control.Background" Value="LightBlue"></Setter>
            <Style.Triggers>
                <MultiTrigger>
                    <MultiTrigger.Conditions>
                        <Condition Property="Control.IsMouseOver" Value="True"></Condition>
                        <Condition Property="Control.IsFocused" Value="True"></Condition>
                    </MultiTrigger.Conditions>
                    <MultiTrigger.Setters>
                        <Setter Property="ItemsControl.Background" Value="Gainsboro"></Setter>
                        <Setter Property="Control.FontSize" Value="20"></Setter>
                    </MultiTrigger.Setters>
                </MultiTrigger>
            </Style.Triggers>
        </Style>
    </Window.Resources>
    <StackPanel>
        <Button x:Name="button1" Content="第一个按钮" Style="{StaticResource first}"></Button>
        <Button x:Name="button2" Content="第二个按钮" ></Button>
    </StackPanel>
</Window>
3. 事件触发器
事件触发器,是指某一个事件发生时,触发的相关动作,主要用于动画,如下所示:
当鼠标进入时,字体变大,当鼠标离开时,字体恢复,如下所示:
<Window x:Class="WpfApp1.EightWindow"
        xmlns="http://schemas.microsoft.com/winfx/2006/xaml/presentation"
        xmlns:x="http://schemas.microsoft.com/winfx/2006/xaml"
        xmlns:d="http://schemas.microsoft.com/expression/blend/2008"
        xmlns:mc="http://schemas.openxmlformats.org/markup-compatibility/2006"
        xmlns:local="clr-namespace:WpfApp1"
        mc:Ignorable="d"
        Title="EightWindow" Height="350" Width="400">
    <Window.Resources>
        <Style x:Key="first">
           <Setter Property="Control.Margin" Value="2,5,2,5"></Setter>
           <Setter Property="Control.FontFamily" Value="SimSun-ExtB"></Setter>
           <Setter Property="Control.FontSize" Value="18"></Setter>
           <Setter Property="Control.Foreground" Value="Red"></Setter>
           <Setter Property="Control.Background" Value="LightBlue"></Setter>
           <Style.Triggers>
               <EventTrigger RoutedEvent="Mouse.MouseEnter" >
                   <EventTrigger.Actions>
                       <BeginStoryboard>
                           <Storyboard>
                               <DoubleAnimation Duration="00:00:02" To="28" From="12" Storyboard.TargetProperty="FontSize"></DoubleAnimation>
                            </Storyboard>
                        </BeginStoryboard>
                   </EventTrigger.Actions>
                </EventTrigger>
                <EventTrigger RoutedEvent="Mouse.MouseLeave">
                    <EventTrigger.Actions>
                        <BeginStoryboard>
                            <Storyboard>
                                <DoubleAnimation Duration="00:00:01" Storyboard.TargetProperty="FontSize" To="18"  />
                            </Storyboard>
                        </BeginStoryboard>
                   </EventTrigger.Actions>
                </EventTrigger>
            </Style.Triggers>
        </Style>
    </Window.Resources>
    <StackPanel>
        <Button x:Name="button1" Content="第一个按钮" Style="{StaticResource first}"></Button>
        <Button x:Name="button2" Content="第二个按钮" ></Button>
    </StackPanel>
</Window>
什么是资源?
资源是可以在应用程序中的不同位置重复使用的对象。WPF不仅支持传统的程序级的资源,还有独具特色的对象级资源,每一个界面元素,都可以拥有自己的资源,并被子元素共享。
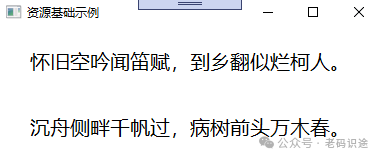
资源基础用法
通常情况下,资源是在Window.Resources节点下,便于Window下所有的子元素共享,如下示例所示:

定义一个字符串类型的资源,在TextBlock中通过Text="{StaticResource default}"的方式进行引用。如下所示:
<Window x:Class="WpfApp1.TenWindow"
        xmlns="http://schemas.microsoft.com/winfx/2006/xaml/presentation"
        xmlns:x="http://schemas.microsoft.com/winfx/2006/xaml"
        xmlns:d="http://schemas.microsoft.com/expression/blend/2008"
        xmlns:mc="http://schemas.openxmlformats.org/markup-compatibility/2006"
        xmlns:local="clr-namespace:WpfApp1"
        xmlns:sys="clr-namespace:System;assembly=mscorlib"
        mc:Ignorable="d"
        Title="资源基础示例" Height="250" Width="400">
    <Window.Resources>
        <sys:String x:Key="default">
            沉舟侧畔千帆过,病树前头万木春
        </sys:String>
    </Window.Resources>
    <Grid>
        <TextBlock x:Name="tbInfo" Text="{StaticResource default}" FontSize="20" Margin="10" Padding="10" VerticalAlignment="Center" HorizontalAlignment="Center"></TextBlock>
    </Grid>
</Window>
资源层级
WPF资源是采用从内到外,逐层进行查找的,如果在当前窗口未检索到资源,则继续到App.xaml中继续查找,示例如下所示:
在App.xaml中定义资源,然后在Window中应用资源,如下所示:
<Application x:Class="WpfApp1.App"
             xmlns="http://schemas.microsoft.com/winfx/2006/xaml/presentation"
             xmlns:x="http://schemas.microsoft.com/winfx/2006/xaml"
             xmlns:local="clr-namespace:WpfApp1"
             xmlns:sys="clr-namespace:System;assembly=mscorlib"
             StartupUri="TenWindow.xaml">
    <Application.Resources>
        <sys:String x:Key="story">
            怀旧空吟闻笛赋,到乡翻似烂柯人。
        </sys:String>
    </Application.Resources>
</Application>在Window窗口中调用,和调用本地资源是一样的,如下所示:
<Window x:Class="WpfApp1.TenWindow"
        xmlns="http://schemas.microsoft.com/winfx/2006/xaml/presentation"
        xmlns:x="http://schemas.microsoft.com/winfx/2006/xaml"
        xmlns:d="http://schemas.microsoft.com/expression/blend/2008"
        xmlns:mc="http://schemas.openxmlformats.org/markup-compatibility/2006"
        xmlns:local="clr-namespace:WpfApp1"
        xmlns:sys="clr-namespace:System;assembly=mscorlib"
        mc:Ignorable="d"
        Title="资源基础示例" Height="250" Width="400">
    <Window.Resources>
        <sys:String x:Key="default">
            沉舟侧畔千帆过,病树前头万木春。
        </sys:String>
    </Window.Resources>
    <Grid>
        <Grid.RowDefinitions>
            <RowDefinition></RowDefinition>
            <RowDefinition></RowDefinition>
        </Grid.RowDefinitions>
        <TextBlock x:Name="tbInfo1" Grid.Row="0" Text="{StaticResource story}" FontSize="20" Margin="10" Padding="10" VerticalAlignment="Center" HorizontalAlignment="Center"></TextBlock>
        <TextBlock x:Name="tbInfo2" Grid.Row="1" Text="{StaticResource default}" FontSize="20" Margin="10" Padding="10" VerticalAlignment="Center" HorizontalAlignment="Center"></TextBlock>
    </Grid>
</Window>
资源分类
根据资源的加载时间点,资源分为两类,如下所示:
-
静态资源:静态资源是在程序启动初始化时进行加载且只加载一次的资源。
-
动态资源:动态资源是在程序执行过程中,动态的去访问资源,会随着资源的改变而改变,所以动态资源对系统的消耗相对比较大。
动态资源
上述的基础示例,采用的是静态资源的方式。动态资源则是在程序执行过程中随着资源的改变而改变。
两个按钮使用同一个资源【背景图片】,只是一个采用静态资源引用,一个采用动态资源引用,当资源发生改变时,一个不改变,一个实时变化。如下所示:
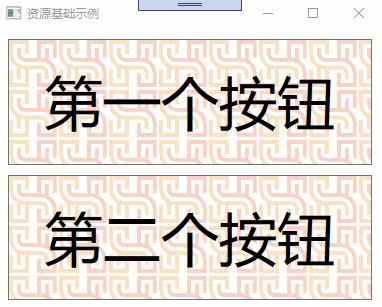
示例源码,如下所示:
<Window x:Class="WpfApp1.NineWindow"
        xmlns="http://schemas.microsoft.com/winfx/2006/xaml/presentation"
        xmlns:x="http://schemas.microsoft.com/winfx/2006/xaml"
        xmlns:d="http://schemas.microsoft.com/expression/blend/2008"
        xmlns:mc="http://schemas.openxmlformats.org/markup-compatibility/2006"
        xmlns:local="clr-namespace:WpfApp1"
        mc:Ignorable="d"
        Title="资源基础示例" Height="320" Width="400">
    <Window.Resources>
        <!--ViewportUnits——设置平铺的相对/绝对坐标,即图片在哪平铺。-->
        <ImageBrush x:Key="one" Viewport="0 0 50 50" ViewportUnits="Absolute" TileMode="Tile" ImageSource="alan_logo.png" Opacity="0.3"></ImageBrush>
    </Window.Resources>
    <StackPanel Margin="5" x:Name="stackpanel1">
        <Button Content="第一个按钮" Name="first" Margin="5" Padding="25" FontSize="58" Background="{ StaticResource one}"></Button>
        <Button Content="第二个按钮" Name="second" Margin="5" Padding="25" FontSize="58" Background="{ DynamicResource one}" Click="second_Click" ></Button>
    </StackPanel>
</Window>
后台修改资源的代码如下所示:
private void second_Click(object sender, RoutedEventArgs e)
{
       var img = this.FindResource("one") as ImageBrush ;
       img = new ImageBrush(new BitmapImage(new Uri(@"imgs/alan_logo1.png", UriKind.Relative)));
       img.TileMode = TileMode.Tile;
       img.Opacity = 0.3;
       img.Viewport = new Rect(0, 0, 50, 50);
       img.ViewportUnits = BrushMappingMode.Absolute;
       this.Resources["one"] = img;
       //注意:此处是直接重写覆盖资源key=one的对象,并不是对原资源设置ImageSoure属性。两者效果不同
}
资源文件
资源文件位于Properties/Resources.resx中,如果想要在程序中访问资源文件的内容,则必须将访问修饰符设置成public,如下所示:
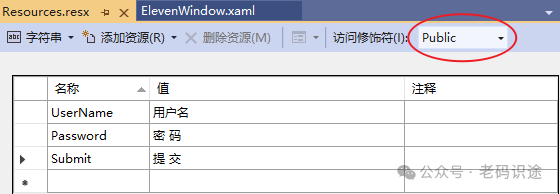
在WPF中,通过Text="{x:Static prop:Resources.Password}"的方式,进行访问资源内容,示例如下:

示例源码如下:
<Window x:Class="WpfApp1.ElevenWindow"
        xmlns="http://schemas.microsoft.com/winfx/2006/xaml/presentation"
        xmlns:x="http://schemas.microsoft.com/winfx/2006/xaml"
        xmlns:d="http://schemas.microsoft.com/expression/blend/2008"
        xmlns:mc="http://schemas.openxmlformats.org/markup-compatibility/2006"
        xmlns:local="clr-namespace:WpfApp1"
        xmlns:prop="clr-namespace:WpfApp1.Properties"
        mc:Ignorable="d"
        Title="资源文件示例" Height="150" Width="400">
    <Grid>
        <Grid.RowDefinitions>
            <RowDefinition></RowDefinition>
            <RowDefinition></RowDefinition>
            <RowDefinition></RowDefinition>
        </Grid.RowDefinitions>
        <Grid.ColumnDefinitions>
            <ColumnDefinition Width="1*"></ColumnDefinition>
            <ColumnDefinition Width="2*"></ColumnDefinition>
        </Grid.ColumnDefinitions>
        <TextBlock x:Name="tbUserName" Text="{x:Static prop:Resources.UserName}" VerticalAlignment="Center" HorizontalAlignment="Right"  Grid.Row="0" Grid.Column="0" Margin="5"></TextBlock>
        <TextBox x:Name="txtUserName" Grid.Row="0" Grid.Column="1" Margin="5"></TextBox>
        <TextBlock x:Name="tbPassword" Text="{x:Static prop:Resources.Password}"  VerticalAlignment="Center" HorizontalAlignment="Right"   Grid.Row="1" Grid.Column="0" Margin="5"></TextBlock>
        <TextBox x:Name="txtPassword" Grid.Row="1" Grid.Column="1" Margin="5"></TextBox>
        <Button x:Name="btnSubmit" Content="{x:Static prop:Resources.Submit}" Grid.Row="2" Grid.Column="0" Grid.ColumnSpan="2" Width="150" Margin="5"></Button>
    </Grid>
</Window>
资源字典
资源字典可以实现资源的共享,一份定义,多处使用的效果。具有可维护性,高效,适应性等优势。
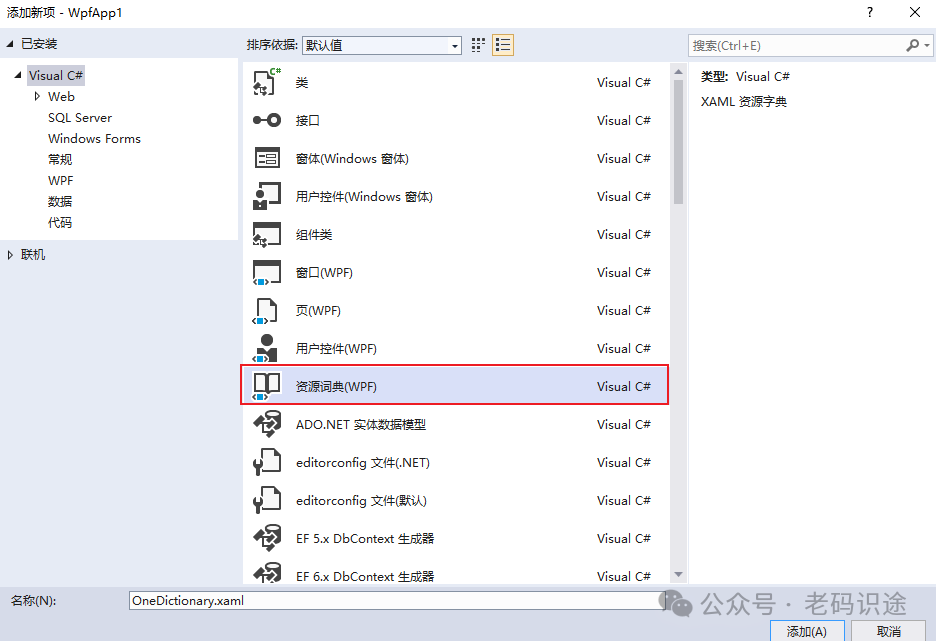
首先创建资源字典文件,通过程序右键--添加--资源字典,打开资源字典对话框,创建名称为OneDictionary.xaml,如下所示:
资源字典中创建了五个资源,如下所示:
<ResourceDictionary xmlns="http://schemas.microsoft.com/winfx/2006/xaml/presentation"
                    xmlns:x="http://schemas.microsoft.com/winfx/2006/xaml"
                    xmlns:sys="clr-namespace:System;assembly=mscorlib"
                    xmlns:local="clr-namespace:WpfApp1">
    <sys:String x:Key="story0">酬乐天扬州初逢席上见赠</sys:String>
    <sys:String x:Key="story1">【作者】刘禹锡 【朝代】唐</sys:String>
    <sys:String x:Key="story2">巴山楚水凄凉地,二十三年弃置身。</sys:String>
    <sys:String x:Key="story3">怀旧空吟闻笛赋,到乡翻似烂柯人。</sys:String>
    <sys:String x:Key="story4">沉舟侧畔千帆过,病树前头万木春。</sys:String>
    <sys:String x:Key="story5">今日听君歌一曲,暂凭杯酒长精神。</sys:String>
</ResourceDictionary>
在对应窗口中,包含资源文件的路径即可,如下所示:
<Window x:Class="WpfApp1.TwelveWindow"
xmlns="http://schemas.microsoft.com/winfx/2006/xaml/presentation"
xmlns:x="http://schemas.microsoft.com/winfx/2006/xaml"
xmlns:d="http://schemas.microsoft.com/expression/blend/2008"
xmlns:mc="http://schemas.openxmlformats.org/markup-compatibility/2006"
xmlns:local="clr-namespace:WpfApp1"
mc:Ignorable="d"
Title="资源字典示例" Height="350" Width="400">
<Window.Resources>
<ResourceDictionary>
<ResourceDictionary.MergedDictionaries>
<ResourceDictionary Source="OneDictionary.xaml"></ResourceDictionary>
</ResourceDictionary.MergedDictionaries>
</ResourceDictionary>
</Window.Resources>
<StackPanel Margin="5" HorizontalAlignment="Center">
<TextBlock x:Name="tbStory0" Margin="5" Padding="5" FontSize="20" Text="{StaticResource story0}"></TextBlock>
<TextBlock x:Name="tbStory1" Margin="5" Padding="5" FontSize="20" Text="{StaticResource story1}"></TextBlock>
<TextBlock x:Name="tbStory2" Margin="5" Padding="5" FontSize="20" Text="{StaticResource story2}"></TextBlock>
<TextBlock x:Name="tbStory3" Margin="5" Padding="5" FontSize="20" Text="{StaticResource story3}"></TextBlock>
<TextBlock x:Name="tbStory4" Margin="5" Padding="5" FontSize="20" Text="{StaticResource story4}"></TextBlock>
<TextBlock x:Name="tbStory5" Margin="5" Padding="5" FontSize="20" Text="{StaticResource story5}"></TextBlock>
</StackPanel>
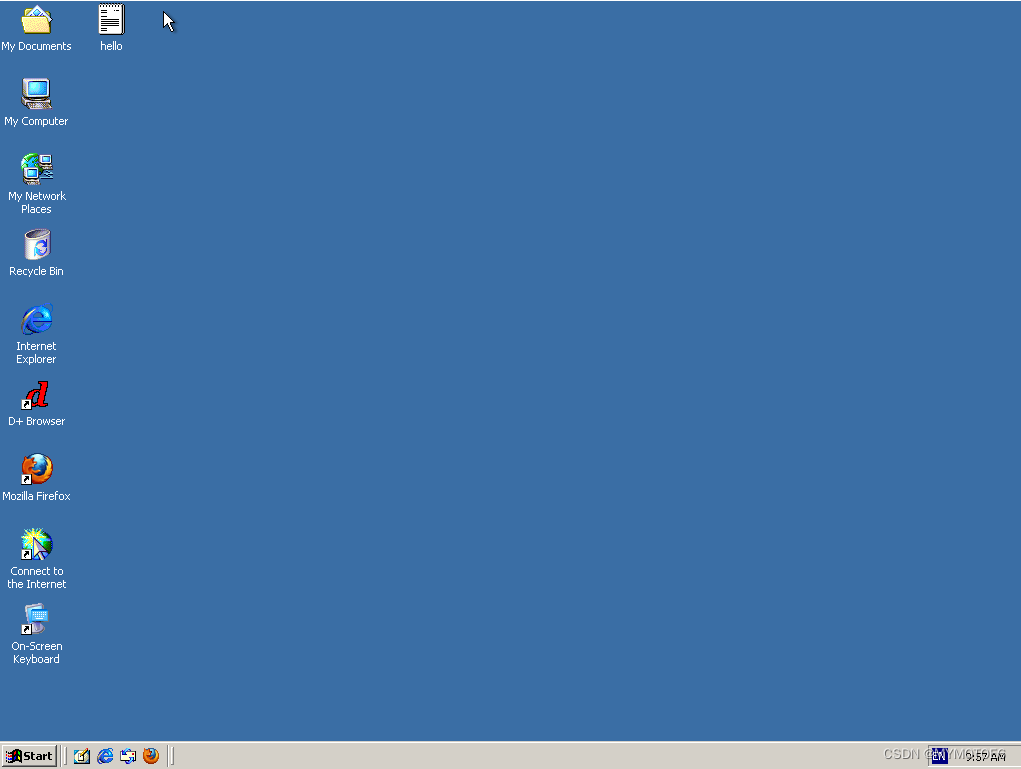
</Window>示例截图如下:

以上就是【浅谈WPF之样式与资源】的全部内容,关于更多详细内容,可参考官方文档。希望能够一起学习,共同进步。


![[HTML]Web前端开发技术18(HTML5、CSS3、JavaScript )HTML5 基础与CSS3 应用——喵喵画网页](https://img-blog.csdnimg.cn/direct/86a845efc263486d9bdc47f20dc9c864.png)