系列文章目录
TensorRT英伟达官方示例解析(一)
TensorRT英伟达官方示例解析(二)
文章目录
- 系列文章目录
- 前言
- 一、03-BuildEngineByTensorRTAPI
- 1.1 建立 Logger(日志记录器)
- 1.2 Builder 引擎构建器
- 1.3 Network 网络具体构造
- 1.4 Profile 指定输入张量大小范围
- 1.5 BuilderConfig 网络属性选项
- 1.6 Explicit Batch 模式 v.s. Implicit Batch 模式
- 1.7 Dynamic Shape 模式
- 二、calibrator.py
- 三、C++
- 四、构建引擎基础步骤
- 总结
前言
继TensorRT英伟达官方示例解析(一)https://blog.csdn.net/m0_70420861/article/details/135761090?spm=1001.2014.3001.5501
一、03-BuildEngineByTensorRTAPI
使用 API 完整搭建一个 MNIST 手写识别模型的示例
基本流程:
➢ TensorFlow / pyTorch 中创建并训练一个网络
➢ 提取网络权重,保存为 para.npz
➢ TensorRT 中逐层重建该网络并加载 para.npz 中的权重
➢ 生成推理引擎
➢ 用引擎做实际推理
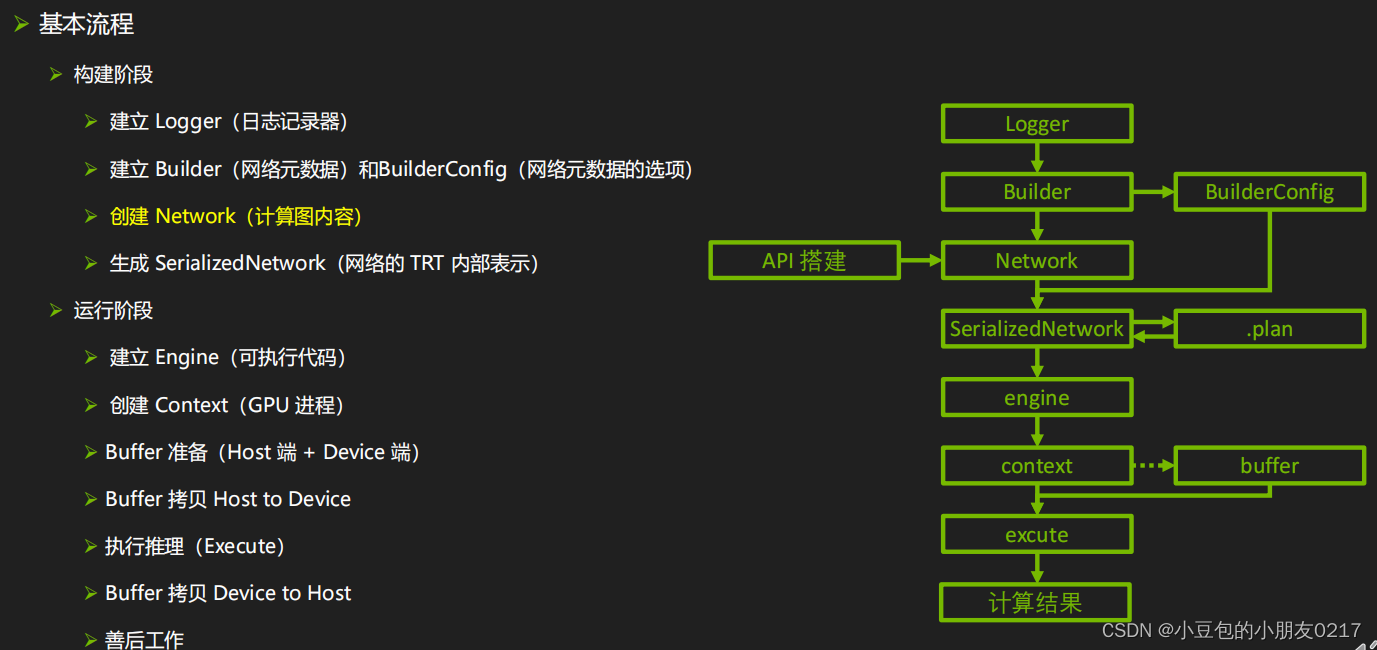
以/MNISTExample-pyTorch项目为例
main.py
#
# Copyright (c) 2021-2023, NVIDIA CORPORATION. All rights reserved.
#
# Licensed under the Apache License, Version 2.0 (the "License");
# you may not use this file except in compliance with the License.
# You may obtain a copy of the License at
#
#     http://www.apache.org/licenses/LICENSE-2.0
#
# Unless required by applicable law or agreed to in writing, software
# distributed under the License is distributed on an "AS IS" BASIS,
# WITHOUT WARRANTIES OR CONDITIONS OF ANY KIND, either express or implied.
# See the License for the specific language governing permissions and
# limitations under the License.
#

import os
from datetime import datetime as dt
from glob import glob

import calibrator
import cv2
import numpy as np
import tensorrt as trt
import torch as t
import torch.nn.functional as F
from cuda import cudart
from torch.autograd import Variable

np.random.seed(31193)
t.manual_seed(97)
t.cuda.manual_seed_all(97)
t.backends.cudnn.deterministic = True
nTrainBatchSize = 128
nHeight = 28
nWidth = 28
paraFile = "./para.npz"
trtFile = "./model.plan"
dataPath = os.path.dirname(os.path.realpath(__file__)) + "/../../00-MNISTData/"
trainFileList = sorted(glob(dataPath + "train/*.jpg"))
testFileList = sorted(glob(dataPath + "test/*.jpg"))
inferenceImage = dataPath + "8.png"

# for FP16 mode
bUseFP16Mode = False
# for INT8 model
bUseINT8Mode = False
nCalibration = 1
cacheFile = "./int8.cache"
calibrationDataPath = dataPath + "test/"

os.system("rm -rf ./*.npz ./*.plan ./*.cache")
np.set_printoptions(precision=3, linewidth=200, suppress=True)
cudart.cudaDeviceSynchronize()

# Create network and train model in pyTorch ------------------------------------
class Net(t.nn.Module):

    def __init__(self):
        super(Net, self).__init__()
        self.conv1 = t.nn.Conv2d(1, 32, (5, 5), padding=(2, 2), bias=True)
        self.conv2 = t.nn.Conv2d(32, 64, (5, 5), padding=(2, 2), bias=True)
        self.fc1 = t.nn.Linear(64 * 7 * 7, 1024, bias=True)
        self.fc2 = t.nn.Linear(1024, 10, bias=True)

    def forward(self, x):
        x = F.max_pool2d(F.relu(self.conv1(x)), (2, 2))
        x = F.max_pool2d(F.relu(self.conv2(x)), (2, 2))
        x = x.reshape(-1, 64 * 7 * 7)
        x = F.relu(self.fc1(x))
        y = self.fc2(x)
        z = F.softmax(y, dim=1)
        z = t.argmax(z, dim=1)
        return y, z

class MyData(t.utils.data.Dataset):

    def __init__(self, isTrain=True):
        if isTrain:
            self.data = trainFileList
        else:
            self.data = testFileList

    def __getitem__(self, index):
        imageName = self.data[index]
        data = cv2.imread(imageName, cv2.IMREAD_GRAYSCALE)
        label = np.zeros(10, dtype=np.float32)
        index = int(imageName[-7])
        label[index] = 1
        return t.from_numpy(data.reshape(1, nHeight, nWidth).astype(np.float32)), t.from_numpy(label)

    def __len__(self):
        return len(self.data)

model = Net().cuda()
ceLoss = t.nn.CrossEntropyLoss()
opt = t.optim.Adam(model.parameters(), lr=0.001)
trainDataset = MyData(True)
testDataset = MyData(False)
trainLoader = t.utils.data.DataLoader(dataset=trainDataset, batch_size=nTrainBatchSize, shuffle=True)
testLoader = t.utils.data.DataLoader(dataset=testDataset, batch_size=nTrainBatchSize, shuffle=True)

for epoch in range(10):
    for xTrain, yTrain in trainLoader:
        xTrain = Variable(xTrain).cuda()
        yTrain = Variable(yTrain).cuda()
        opt.zero_grad()
        y_, z = model(xTrain)
        loss = ceLoss(y_, yTrain)
        loss.backward()
        opt.step()

    with t.no_grad():
        acc = 0
        n = 0
        for xTest, yTest in testLoader:
            xTest = Variable(xTest).cuda()
            yTest = Variable(yTest).cuda()
            y_, z = model(xTest)
            acc += t.sum(z == t.matmul(yTest, t.Tensor([0, 1, 2, 3, 4, 5, 6, 7, 8, 9]).to("cuda:0"))).cpu().numpy()
            n += xTest.shape[0]
        print("%s, epoch %2d, loss = %f, test acc = %f" % (dt.now(), epoch + 1, loss.data, acc / n))

para = {}  # save weight as file
for name, parameter in model.named_parameters():
    #print(name, parameter.detach().cpu().numpy().shape)
    para[name] = parameter.detach().cpu().numpy()
np.savez(paraFile, **para)

del para
print("Succeeded building model in pyTorch!")

# Rebuild network, load weights and do inference in TensorRT -------------------
logger = trt.Logger(trt.Logger.ERROR)
builder = trt.Builder(logger)
network = builder.create_network(1 << int(trt.NetworkDefinitionCreationFlag.EXPLICIT_BATCH))
profile = builder.create_optimization_profile()
config = builder.create_builder_config()
if bUseFP16Mode:
    config.set_flag(trt.BuilderFlag.FP16)
if bUseINT8Mode:
    config.set_flag(trt.BuilderFlag.INT8)
    config.int8_calibrator = calibrator.MyCalibrator(calibrationDataPath, nCalibration, (1, 1, nHeight, nWidth), cacheFile)

inputTensor = network.add_input("inputT0", trt.float32, [-1, 1, nHeight, nWidth])
profile.set_shape(inputTensor.name, [1, 1, nHeight, nWidth], [4, 1, nHeight, nWidth], [8, 1, nHeight, nWidth])
config.add_optimization_profile(profile)

para = np.load(paraFile)

w = np.ascontiguousarray(para["conv1.weight"])
b = np.ascontiguousarray(para["conv1.bias"])
_0 = network.add_convolution_nd(inputTensor, 32, [5, 5], trt.Weights(w), trt.Weights(b))
_0.padding_nd = [2, 2]
_1 = network.add_activation(_0.get_output(0), trt.ActivationType.RELU)
_2 = network.add_pooling_nd(_1.get_output(0), trt.PoolingType.MAX, [2, 2])
_2.stride_nd = [2, 2]

w = np.ascontiguousarray(para["conv2.weight"])
b = np.ascontiguousarray(para["conv2.bias"])
_3 = network.add_convolution_nd(_2.get_output(0), 64, [5, 5], trt.Weights(w), trt.Weights(b))
_3.padding_nd = [2, 2]
_4 = network.add_activation(_3.get_output(0), trt.ActivationType.RELU)
_5 = network.add_pooling_nd(_4.get_output(0), trt.PoolingType.MAX, [2, 2])
_5.stride_nd = [2, 2]

_6 = network.add_shuffle(_5.get_output(0))
_6.reshape_dims = (-1, 64 * 7 * 7)

w = np.ascontiguousarray(para["fc1.weight"].transpose())
b = np.ascontiguousarray(para["fc1.bias"].reshape(1, -1))
_7 = network.add_constant(w.shape, trt.Weights(w))
_8 = network.add_matrix_multiply(_6.get_output(0), trt.MatrixOperation.NONE, _7.get_output(0), trt.MatrixOperation.NONE)
_9 = network.add_constant(b.shape, trt.Weights(b))
_10 = network.add_elementwise(_8.get_output(0), _9.get_output(0), trt.ElementWiseOperation.SUM)
_11 = network.add_activation(_10.get_output(0), trt.ActivationType.RELU)

w = np.ascontiguousarray(para["fc2.weight"].transpose())
b = np.ascontiguousarray(para["fc2.bias"].reshape(1, -1))
_12 = network.add_constant(w.shape, trt.Weights(w))
_13 = network.add_matrix_multiply(_11.get_output(0), trt.MatrixOperation.NONE, _12.get_output(0), trt.MatrixOperation.NONE)
_14 = network.add_constant(b.shape, trt.Weights(b))
_15 = network.add_elementwise(_13.get_output(0), _14.get_output(0), trt.ElementWiseOperation.SUM)

_16 = network.add_softmax(_15.get_output(0))
_16.axes = 1 << 1

_17 = network.add_topk(_16.get_output(0), trt.TopKOperation.MAX, 1, 1 << 1)

network.mark_output(_17.get_output(1))

engineString = builder.build_serialized_network(network, config)
if engineString == None:
    print("Failed building engine!")
    exit()
print("Succeeded building engine!")
with open(trtFile, "wb") as f:
    f.write(engineString)
engine = trt.Runtime(logger).deserialize_cuda_engine(engineString)
nIO = engine.num_io_tensors
lTensorName = [engine.get_tensor_name(i) for i in range(nIO)]
nInput = [engine.get_tensor_mode(lTensorName[i]) for i in range(nIO)].count(trt.TensorIOMode.INPUT)

context = engine.create_execution_context()
context.set_input_shape(lTensorName[0], [1, 1, nHeight, nWidth])
for i in range(nIO):
    print("[%2d]%s->" % (i, "Input " if i < nInput else "Output"), engine.get_tensor_dtype(lTensorName[i]), engine.get_tensor_shape(lTensorName[i]), context.get_tensor_shape(lTensorName[i]), lTensorName[i])

bufferH = []
data = cv2.imread(inferenceImage, cv2.IMREAD_GRAYSCALE).astype(np.float32).reshape(1, 1, nHeight, nWidth)
bufferH.append(np.ascontiguousarray(data))
for i in range(nInput, nIO):
    bufferH.append(np.empty(context.get_tensor_shape(lTensorName[i]), dtype=trt.nptype(engine.get_tensor_dtype(lTensorName[i]))))
bufferD = []
for i in range(nIO):
    bufferD.append(cudart.cudaMalloc(bufferH[i].nbytes)[1])

for i in range(nInput):
    cudart.cudaMemcpy(bufferD[i], bufferH[i].ctypes.data, bufferH[i].nbytes, cudart.cudaMemcpyKind.cudaMemcpyHostToDevice)

for i in range(nIO):
    context.set_tensor_address(lTensorName[i], int(bufferD[i]))

context.execute_async_v3(0)

for i in range(nInput, nIO):
    cudart.cudaMemcpy(bufferH[i].ctypes.data, bufferD[i], bufferH[i].nbytes, cudart.cudaMemcpyKind.cudaMemcpyDeviceToHost)

for i in range(nIO):
    print(lTensorName[i])
    print(bufferH[i])

for b in bufferD:
    cudart.cudaFree(b)

print("Succeeded running model in TensorRT!")
pip install -i https://pypi.tuna.tsinghua.edu.cn/simple/ opencv-python
python main.py
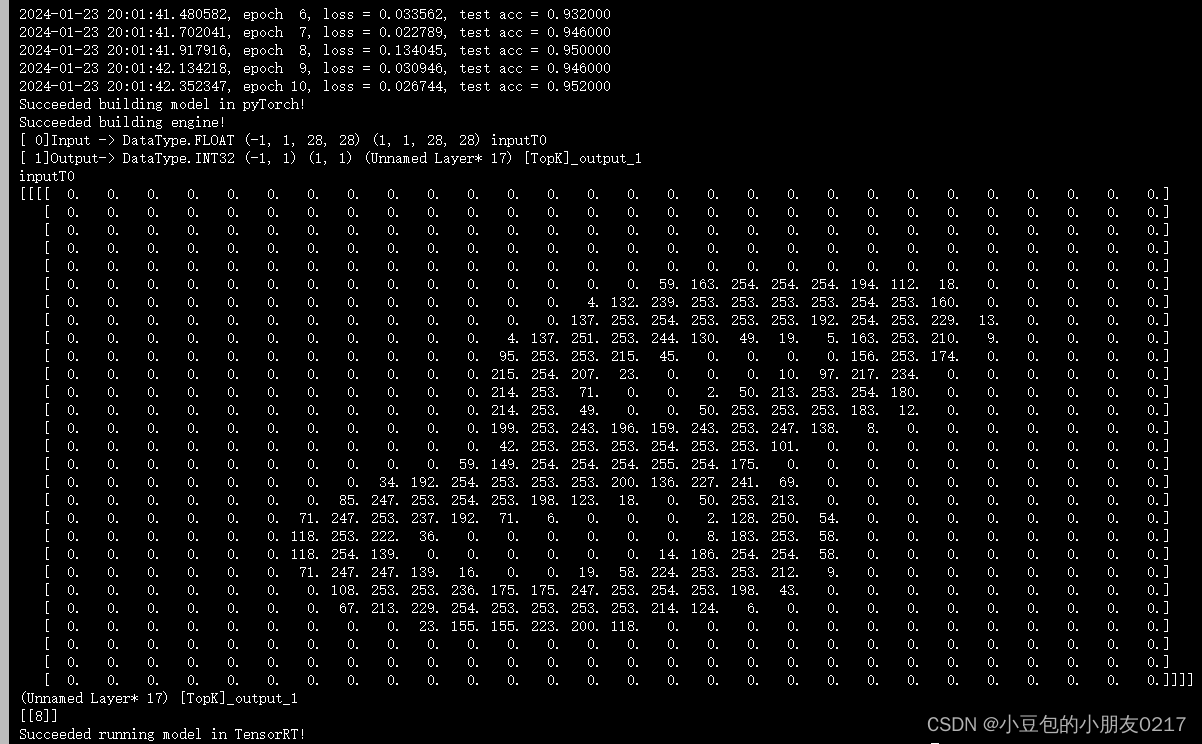
输出下面内容并得到para.nzp文件和model.plan
1.1 建立 Logger(日志记录器)
文件中使用
logger = trt.Logger(trt.Logger.ERROR)
来建立日志记录器
logger = trt.Logger(trt.Logger.VERBOSE)
➢ 可选参数:VERBOSE, INFO, WARNING, ERROR, INTERNAL_ERROR,产生不同等级的日志,由详细到简略
- VERBOSE: 这是最详细的日志级别,用于记录图构建和优化完成的时间。
- INFO:这个级别提供了关于模型中检测到的输入和输出网络张量的信息。
- WARNING:这个级别用于警告信息,例如在构建时发现未标记为输入或输出的张量的数据类型。
- ERROR: 这个级别表示错误信息,例如在反序列化CUDA引擎时出现了无效的配置。
- INTERNAL_ERROR:这个级别表示内部错误信息,例如在计算操作的代价时无法找到节点的实现
1.2 Builder 引擎构建器
文件中使用
builder = trt.Builder(logger)
来构建引擎器
常用API
➢ builder.create_network(…) 创建 TensorRT 网络对象
➢ builder.create_optimization_profile() 创建用于 Dyanmic Shape 输入的配置器
➢ Dynamic Shape 模式必须改用 builderConfig 来进行这些设置
1.3 Network 网络具体构造
使用这个
network = builder.create_network(1 << int(trt.NetworkDefinitionCreationFlag.EXPLICIT_BATCH))
构建网络
常用参数:
1 << int(tensorrt.NetworkDefinitionCreationFlag.EXPLICIT_BATCH),使用 Explicit Batch 模式
一般都使用Explicit Batch显式模式
常用方法
➢ network.add_input( ‘oneTensor’ ,trt.float32, (3,4,5)) 标记网络输入张量
➢ convLayer = network.add_convolution_nd(XXX) 添加各种网络层
➢ network.mark_output(convLayer.get_output(0)) 标记网络输出张量
常用获取网络信息的成员:
➢ network.name / network.num_layers / network.num_inputs / network.num_outputs
➢ network.has_implicit_batch_dimension / network.has_explicit_precision
1.4 Profile 指定输入张量大小范围
#TensorRT 中用于创建优化配置文件的方法。优化配置文件包含了网络优化相关的信息,
#例如输入张量的最小、最优和最大尺寸,以及动态形状的配置。
profile = builder.create_optimization_profile()
常用方法:
➢ profile.set_shape(tensorName, minShape, commonShape, maxShape)
给定输入张量的最小、最常见、最大尺寸
➢ config.add_optimization_profile(profile) 将设置的 profile 传递给 config 以创建网络
1.5 BuilderConfig 网络属性选项
#用于创建 TensorRT 构建器配置的方法。构建器配置对象用于设置构建 TensorRT 引擎时的一些选项和参
#数,例如最大工作空间大小、精度模式等。
config = builder.create_builder_config()
常用成员:
➢config.config.set_memory_pool_limit(trt.MemoryPoolType.WORKSPAC E, 1 << 30) 指定构建
期可用显存(单位:Byte)
➢ config.flag = … 设置标志位开关,如启闭 FP16/INT8 模式,Refit 模式,手工数据类型限制等
➢ config.int8_calibrator = … 指定 INT8-PTQ 的校正器
➢ config.add_optimization_profile(…) 添加用于 Dynamic Shape 输入的配置器
➢ config.set_tactic_sources/set_timing_cache/set_preview_feature/ …
1.6 Explicit Batch 模式 v.s. Implicit Batch 模式
Explicit Batch 为 TensorRT 主流 Network 构建方法,Implicit Batch 模式(builder.create_network(0))仅用作后向兼容。需要使用 builder.create_network(1 << int(tensorrt.NetworkDefinitionCreationFlag.EXPLICIT_BATCH))
Explicit Batch 模式能做、Implicit Batch 模式不能做的事情:
➢ Batch Normalization(视频教程的录音中说成了 Layer Normalization)
➢ Reshape/Transpose/Reduce over batch dimension
➢ Dynamic shape 模式
➢ Loop 结构
➢ 一些 Layer 的高级用法(如 ShufleLayer.set_input)
从 Onnx 导入的模型也默认使用 Explicit Batch 模式
1.7 Dynamic Shape 模式
➢ 适用于输入张量形状在推理时才决定网络
➢ 除了 Batch 维,其他维度也可以推理时才决定
➢ 需要 Explicit Batch 模式
➢ 需要 Optimazation Profile 帮助网络优化
➢ 需用 context.set_input_shape 绑定实际输入数据形状
二、calibrator.py
这段代码是一个使用 TensorRT 进行 INT8 量化校准的示例
#
# Copyright (c) 2021-2023, NVIDIA CORPORATION. All rights reserved.
#
# Licensed under the Apache License, Version 2.0 (the "License");
# you may not use this file except in compliance with the License.
# You may obtain a copy of the License at
#
#     http://www.apache.org/licenses/LICENSE-2.0
#
# Unless required by applicable law or agreed to in writing, software
# distributed under the License is distributed on an "AS IS" BASIS,
# WITHOUT WARRANTIES OR CONDITIONS OF ANY KIND, either express or implied.
# See the License for the specific language governing permissions and
# limitations under the License.
#

import os
from glob import glob

import cv2
import numpy as np
import tensorrt as trt
from cuda import cudart


class MyCalibrator(trt.IInt8EntropyCalibrator2):

    def __init__(self, calibrationDataPath, nCalibration, inputShape, cacheFile):
        trt.IInt8EntropyCalibrator2.__init__(self)
        self.imageList = glob(calibrationDataPath + "*.jpg")[:100]
        self.nCalibration = nCalibration
        self.shape = inputShape  # (N,C,H,W)
        self.buffeSize = trt.volume(inputShape) * trt.float32.itemsize
        self.cacheFile = cacheFile
        _, self.dIn = cudart.cudaMalloc(self.buffeSize)
        self.oneBatch = self.batchGenerator()

        print(int(self.dIn))

    def __del__(self):
        cudart.cudaFree(self.dIn)

    def batchGenerator(self):
        for i in range(self.nCalibration):
            print("> calibration %d" % i)
            subImageList = np.random.choice(self.imageList, self.shape[0], replace=False)
            yield np.ascontiguousarray(self.loadImageList(subImageList))

    def loadImageList(self, imageList):
        res = np.empty(self.shape, dtype=np.float32)
        for i in range(self.shape[0]):
            res[i, 0] = cv2.imread(imageList[i], cv2.IMREAD_GRAYSCALE).astype(np.float32)
        return res

    def get_batch_size(self):  # necessary API
        return self.shape[0]

    def get_batch(self, nameList=None, inputNodeName=None):  # necessary API
        try:
            data = next(self.oneBatch)
            cudart.cudaMemcpy(self.dIn, data.ctypes.data, self.buffeSize, cudart.cudaMemcpyKind.cudaMemcpyHostToDevice)
            return [int(self.dIn)]
        except StopIteration:
            return None

    def read_calibration_cache(self):  # necessary API
        if os.path.exists(self.cacheFile):
            print("Succeed finding cahce file: %s" % (self.cacheFile))
            with open(self.cacheFile, "rb") as f:
                cache = f.read()
                return cache
        else:
            print("Failed finding int8 cache!")
            return

    def write_calibration_cache(self, cache):  # necessary API
        with open(self.cacheFile, "wb") as f:
            f.write(cache)
        print("Succeed saving int8 cache!")
        return

if __name__ == "__main__":
    cudart.cudaDeviceSynchronize()
    m = MyCalibrator("../../00-MNISTData/test/", 5, (1, 1, 28, 28), "./int8.cache")
    m.get_batch("FakeNameList")
    m.get_batch("FakeNameList")
    m.get_batch("FakeNameList")
    m.get_batch("FakeNameList")
    m.get_batch("FakeNameList")
在这段代码中,主要的类是 MyCalibrator 类。这个类继承自 TensorRT 中的 trt.IInt8EntropyCalibrator2 类,它定义了一些必需的方法,用于实现 INT8 校准功能。这些方法包括:
- get_batch_size 方法:用于返回数据批次的大小。
- get_batch 方法:用于返回指向 GPU 内存中数据批次的指针。
- read_calibration_cache 方法:用于尝试读取之前保存的校准缓存文件。
- write_calibration_cache方法:用于将校准缓存写入到文件中。
创建了一个 MyCalibrator 对象,并传入了一些参数,包括校准数据的路径 calibrationDataPath、校准数据的数量 nCalibration、输入张量的形状 inputShape 和缓存文件的路径 cacheFile。然后,调用了 get_batch 方法多次,以演示校准过程。( def init(self, calibrationDataPath, nCalibration, inputShape, cacheFile)
调用如下
m = MyCalibrator("../../00-MNISTData/test/", 5, (1, 1, 28, 28), "./int8.cache")
最后运行一下
python calibrator.py
得到输出

三、C++
cd C++
make test
编译得到可执行文件main.exe
./main.exe
输出

四、构建引擎基础步骤
构建 TensorRT 引擎需要以下步骤:
- 创建 TensorRT Builder 对象:
import tensorrt as trt
builder = trt.Builder(trt.Logger(trt.Logger.INFO))
- 创建 TensorRT 网络对象:
network = builder.create_network()
- 构建网络结构,添加网络层:
# 添加输入层
input_shape = (3, 224, 224)
input_tensor = network.add_input(name="input", dtype=trt.float32, shape=input_shape)

# 添加其他层,例如卷积层、池化层等
conv_layer = network.add_convolution(input_tensor, num_output_maps=16, kernel_shape=(3, 3), stride=(1, 1), padding=(1, 1))

# 设置其他层的参数和属性

# 添加输出层
output = network.add_output(name="output", tensor=conv_layer.get_output(0))
- 创建优化器配置器(可选):
builder_config = builder.create_builder_config()
- 如果使用 Dynamic Shape 模式,则创建优化配置器
if dynamic_shape_mode:
    profile = builder.create_optimization_profile()
    # 配置输入层的最小和最大尺寸
    profile.set_shape("input", min=(1, 3, 224, 224), opt=(4, 3, 224, 224), max=(16, 3, 224, 224))
    builder_config.add_optimization_profile(profile)
- 设置编译选项和配置(可选):
builder_config.max_workspace_size = 1 << 30  # 设置最大的工作空间大小
builder_config.set_flag(trt.BuilderFlag.GPU_FALLBACK)  # 启用 GPU 回退模式
- 还可以设置其他编译选项和配置,例如 DLA 模式、FP16 精度等 构建 TensorRT 引擎:
engine = builder.build_engine(network, builder_config)
总结
继TensorRT英伟达官方示例解析(一)https://blog.csdn.net/m0_70420861/article/details/135761090?spm=1001.2014.3001.5501


