入门案例之前我们先介绍一下:zookeeper。
Zookeeper是Apacahe Hadoop的子项目,可以为分布式应用程序协调服务,适合作为Dubbo服务的注册中心,负责服务地址的注册与查找,相当于目录服务,服务提供者和消费者只在启动时与注册中心交互。

就不用安装了,我会上传一个安装包。
总结:
1、什么是zookeeper?
zookeeper:负责管理ip和port,是服务提供者和服务消费者的注册中心
2、zookeeper的安装和启动
安装:
解压即安装
启动:
双击bin/zkServer.cmd
开始入门案例:(项目结构)
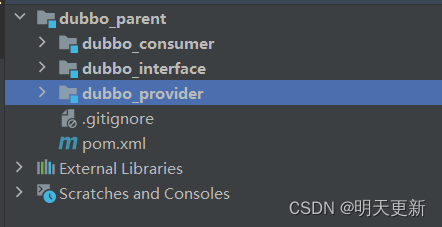
父工程的pom.xml
 <parent>
        <groupId>org.springframework.boot</groupId>
        <artifactId>spring-boot-starter-parent</artifactId>
        <version>2.3.2.RELEASE</version>
    </parent>
<dependencies>
        <dependency>
            <groupId>org.springframework.boot</groupId>
            <artifactId>spring-boot-starter-web</artifactId>
        </dependency>
        <!-- Dubbo Spring Boot Starter -->
        <dependency>
            <groupId>com.alibaba.boot</groupId>
            <artifactId>dubbo-spring-boot-starter</artifactId>
            <version>0.1.0</version>
        </dependency>
        <!-- 由于使⽤了zookeeper作为注册中⼼,则需要加⼊zookeeper的客户端jar包: -->
        <dependency>
            <groupId>com.101tec</groupId>
            <artifactId>zkclient</artifactId>
            <version>0.10</version>
        </dependency>
    </dependencies>
1、dobbo_interface模块
这个模块中我们就只写一个接口模拟一下就可以.
在com.by.service中写一个HelloService接口
/*
 * Copyright (c) 2020, 2024,  All rights reserved.
 *
 */
package com.by.service;

/**
 * <p>Project: dubbo_parent - HelloService</p>
 * <p>Powered by scl On 2024-01-17 13:56:01</p>
 * <p>描述:<p>
 *
 * @author 孙臣龙 [1846080280@qq.com]
 * @version 1.0
 * @since 17
 */
public interface HelloService {
    String hello();
}
2、dobbo_provider模块
在这个模块中我们需要做:实现上个模块的接口,创建spring boot的启动类,创建配置类
pom.xml:
<dependencies>
        <dependency>
            <groupId>com.by</groupId>
            <artifactId>dubbo_interface</artifactId>
            <version>1.0-SNAPSHOT</version>
        </dependency>
    </dependencies>
HelloServiceImpl:(注意这个@Service注解是dubbo下的)
/*
 * Copyright (c) 2020, 2024,  All rights reserved.
 *
 */
package com.by.service;

import com.alibaba.dubbo.config.annotation.Service;

/**
 * <p>Project: dubbo_parent - HelloServiceImpl</p>
 * <p>Powered by scl On 2024-01-17 13:57:42</p>
 * <p>描述:<p>
 *
 * @author 孙臣龙 [1846080280@qq.com]
 * @version 1.0
 * @since 17
 */
@Service
public class HelloServiceImpl implements HelloService{
    @Override
    public String hello() {
        return "你好啊!!!";
    }
}
启动类:DubboProviderApp:
/*
 * Copyright (c) 2020, 2024,  All rights reserved.
 *
 */
package com.by;

import com.alibaba.dubbo.config.spring.context.annotation.EnableDubbo;
import org.springframework.boot.SpringApplication;
import org.springframework.boot.autoconfigure.SpringBootApplication;

/**
 * <p>Project: dubbo_parent - DubboProviderApp</p>
 * <p>Powered by scl On 2024-01-17 13:59:35</p>
 * <p>描述:<p>
 *
 * @author 孙臣龙 [1846080280@qq.com]
 * @version 1.0
 * @since 17
 */
@SpringBootApplication
@EnableDubbo //让dubbo去扫描dubbo的注解
public class DubboProviderApp {
    public static void main(String[] args) {
        SpringApplication.run(DubboProviderApp.class,args);
    }
}
application.properties:
#zookeeper\u7684\u5730\u5740
dubbo.registry.address=zookeeper://127.0.0.1:2181
#\u901A\u8BAF\u534F\u8BAE\uFF1Armi\u3001http\u3001dubbo
dubbo.protocol.name=dubbo
#\u5F53\u524D\u670D\u52A1\u7684\u540D\u79F0
dubbo.application.name=dubbo-provider
3、dobbo_consumer模块
在这个模块中我们需要测试一下我们的功能。实现上个模块的接口,创建spring boot的启动类,创建配置类。
pom.xml:
<dependencies>
        <dependency>
            <groupId>com.by</groupId>
            <artifactId>dubbo_interface</artifactId>
            <version>1.0-SNAPSHOT</version>
        </dependency>
    </dependencies>
HelloController:(注意:@Reference也是dubbo下的)
/*
 * Copyright (c) 2020, 2024,  All rights reserved.
 *
 */
package com.by.controller;

import com.alibaba.dubbo.config.annotation.Reference;
import com.by.service.HelloService;
import org.springframework.stereotype.Controller;
import org.springframework.web.bind.annotation.RequestMapping;
import org.springframework.web.bind.annotation.ResponseBody;
/**
 * <p>Project: dubbo_parent - HelloController</p>
 * <p>Powered by scl On 2024-01-17 15:02:44</p>
 * <p>描述:<p>
 *
 * @author 孙臣龙 [1846080280@qq.com]
 * @version 1.0
 * @since 17
 */
@Controller
public class HelloController {

    @Reference
    private HelloService helloService;

    @RequestMapping("/hello")
    @ResponseBody
    public String hello(){
        return helloService.hello();
    }
}
启动类:DubboConsumerApplication:
/*
 * Copyright (c) 2020, 2024,  All rights reserved.
 *
 */
package com.by;

import com.alibaba.dubbo.config.spring.context.annotation.EnableDubbo;
import org.springframework.boot.SpringApplication;
import org.springframework.boot.autoconfigure.SpringBootApplication;

/**
 * <p>Project: dubbo_parent - DubboConsumerApplication</p>
 * <p>Powered by scl On 2024-01-17 15:00:04</p>
 * <p>描述:<p>
 *
 * @author 孙臣龙 [1846080280@qq.com]
 * @version 1.0
 * @since 17
 */
@SpringBootApplication
@EnableDubbo
public class DubboConsumerApplication {
    public static void main(String[] args) {
        SpringApplication.run(DubboConsumerApplication.class,args);
    }
}
配置文件:application.porperties
#zookeeper\u7684\u5730\u5740
dubbo.registry.address=zookeeper://127.0.0.1:2181
#\u901A\u8BAF\u534F\u8BAE\uFF1Armi\u3001http\u3001dubbo
dubbo.protocol.name=dubbo
#\u5F53\u524D\u670D\u52A1\u7684\u540D\u79F0
dubbo.application.name=dubbo-consumer
server.port=80
注意:
1、zookeeper必须启动
2、 @Reference 和 @Service必须到dubbo的包
3、必须先启动provider再起consumer
4、模块provider和consumer的端口号要区分开
结果展示:


