Vue+ElementUI+Axios实现携带参数的文件上传(数据校验+进度条)
可以实现对上传文件的类型,大小进行数据校验,以及对上传文件所要携带的数据也进行的校验,也有文件上传进度的进度条。
一、Vue 结构部分
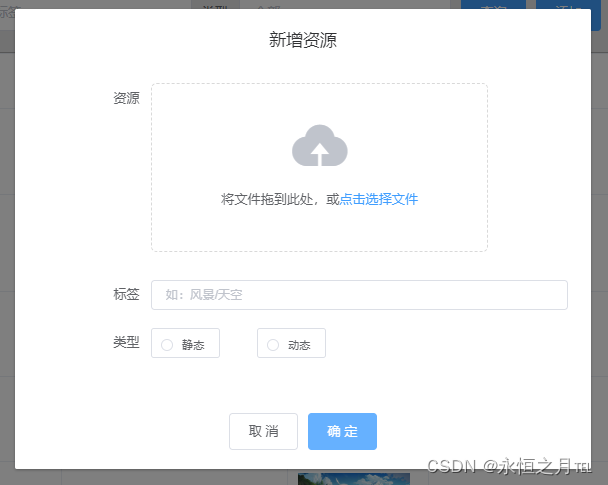
弹窗显示(文件上传框+文本框+单选按钮)
<template>
    <!-- 控制子组件显示还是隐藏: :visible.sync="isShow"  -->
    <div>
      <!-- 弹窗 -->
      <el-dialog width="30%" :modal="true" title="新增资源" :modal-append-to-body="true" :visible.sync="isShowAdd"
        :close-on-click-modal="false" :close-on-press-escape='false' :show-close="false" center>
            <!-- 需要上传的表单::model 和 ref 的值尽量保持一致,ref在的值在提交数据时进行对提交的数据进行校验 -->
        <el-form :model="ResourceInfo" ref="ResourceInfo" :rules="rules"  size="small" label-width="120px" label-position="right" key="1" :hide-required-asterisk="true">
          <el-form-item label="资源" >
            <!-- 文件上传:http-request这里用来获取到要上传的文件。limit限制文件个数。on-exceed:用来校验文件个数 ,before-remove:删除上传列表时提示用户-->
            <el-upload
            class="upload-demo" action="" ref="upload"  :http-request="httprequest" :limit=1 :drag="true" :on-exceed="handleExceed" :before-remove="beforeRemove">
                  <i class="el-icon-upload"></i>
                 <div class="el-upload__text">将文件拖到此处,或<em>点击选择文件</em></div>
                 </el-upload>
          </el-form-item>

          <!-- 文本框用来填写要上传一个参数,这里是为了给文件打标签 -->
          <el-form-item prop="tag"  label="标签">
            <el-input v-model="ResourceInfo.tag" ref="tag" maxlength="30" autocomplete="off"  placeholder="如:风景/天空"></el-input>
          </el-form-item>
          <!-- 单选框,也是文件的一个参数 -->
          <el-form-item prop="type" label="类型" >
            <el-radio-group v-model="ResourceInfo.type" ref="type">
              <el-radio border label="静态"></el-radio>
              <el-radio border label="动态"></el-radio>
            </el-radio-group>
          </el-form-item>
        </el-form>
       <!--进度条:只有上传时才显示-->
      <div v-if="loading" >
      <el-progress type="line" :percentage="percentage" class="progress" :show-text="true"></el-progress>
      </div>

      <!-- 上传和取消按钮 -->
        <div slot="footer" class="dialog-footer">
          <el-button @click="quxiao()">取 消</el-button>
          <!-- 调用上传文件方法,将填写的表单数据做为参数 -->
    <el-button type="primary" @click="submitFileInfo(ResourceInfo)">确 定</el-button>
        </div>
      </el-dialog>
    </div>
  </template>
二、JS部分
1、数据和数据校验部分
 <script>
export default {
    name:"ResourceAdd",
    //组件是否显示(父组件传过来的)
    props: {
      isShowAdd: {
        type: Boolean,
        default: false
      },

    },

    data() {

      //数据校验
      var Type = (rule, value, callback) => {
              if (value === '') {
                  callback(new Error('请选择壁纸类型'));
                  this.islose = true;
              } else {
                  this.islose = false
                  callback();
              }
          };
     //数据校验
      var Tag = (rule, value, callback) => {
              if (value === '') {
                  callback(new Error('请添加标签'));
                  this.islose = true;
              } else if (value.length < 4) {
                  callback(new Error('最少输入4个字'));
                  this.islose = true;
              } else {
                  this.islose = false;
                  callback();
              }
          };


      return {
        resouceFileImg:null,
            loading:false,  //进度条是否隐藏
            percentage:0,   //进度条数值
            dialogVisible:false,  //是否上传完备
            //要上传文件的信息
        ResourceInfo: {
          "file":"",
          "tag":"",
          "type":""
        },

        //要校验的表单信息
        rules: {
                  type: [
                      { validator: Type, trigger: 'blur'}
                  ],
                  tag: [
                  { validator: Tag, trigger: 'blur' }
                  ],
              },
      };

    },
 </script>
2、方法部分
<script>
  export default {
    methods: {
          submitFileInfo(resourceInfo){
            //调用文件类型判断方法,检查上传文件类型是否合法(返回Boolean类型)
           let fileTypeCheck=this.fileTypeCheck(resourceInfo.file)
          //  判断文件是否合法
           if(fileTypeCheck){
           //文件通过校验,校验其它要上传里其它参数是否合法
           this.$refs.ResourceInfo.validate((valid) => {
            if(valid){
              //如果都合法
            // 直接通过new来创建FormData对象,用来装文件对象和其它参数()
           let UpResourceInfo = new FormData();
           //通过append将数据添加到FormData中(数据是键值对类型)
           //注意:键要和后端接收的参数列表一一对应。
            UpResourceInfo.append('file', resourceInfo.file);
            UpResourceInfo.append("email",window.sessionStorage.getItem("Account"));
            UpResourceInfo.append("tag",resourceInfo.tag);
            UpResourceInfo.append("type",resourceInfo.type);

            //计算过上传进度
            // 进度条的实现主要依靠axios中提供的onUploadProgress函数
            //该函数提供了文件已上传部分的大小progressEvent.loaded和文件总大小progressEvent.total,利用这两个数据我们就可以计算出已经上传文件的进度。
            let config = {
              onUploadProgress: progressEvent => {
                //progressEvent.loaded:已上传文件大小
                //progressEvent.total:被上传文件的总大小
                let complete = (progressEvent.loaded / progressEvent.total ).toFixed(2) * 100 ;
                this.percentage = complete;   //上传进度
                if (this.percentage >= 100){
                  this.dialogVisible = true  //上传完毕
                }
               }
              };

            //显示进度条
            this.loading = true;
            //通过axios对后端接口发起请求,并将上面的FormData对象参数发送过去,已经。
            axios.post("http://localhost:8888/resources/uploadResource",UpResourceInfo,config)
              .then((res)=>{
                if(res.data.flag==true){
                  //清空表单信息
                  this.ResourceInfo={
                            "file":"",
                           "tag":"",
                           "type":""
                           }
                    //清除上传文件列表
                  this.$refs.upload.clearFiles();
                  this.loading=false; //隐藏进度条
                  this.$message.success("添加成功!")
                 //调用父组件的方法隐藏弹窗
                 // this.$parent.AddSuccessColse();
                }
              })
              .catch((err)=>{
                this.$message.error(err)
                //清空表单信息
                this.ResourceInfo={};
                    //清除上传文件列表
                  this.$refs.upload.clearFiles();
                 //调用父组件的方法隐藏弹窗
                 //this.$parent.AddSuccessColse();
              })
            }
           });}
          },

          // 文件类型、大小数据校验
          fileTypeCheck(file) {
              const isJPG = file.type === 'image/jpg';
              const isJPEG = file.type === 'image/jpeg';
              const isPNG = file.type === 'image/png';
              const isMP4 = file.type === 'video/mp4';
              const isLt30M = file.size / 1024 / 1024 < 30;
              if (!isJPG && !isJPEG && !isPNG && !isMP4) {
                  this.$message.error('请上传 JPG、PNG、MP4格式文件!');
              } else
              if (!isLt30M) {
                  this.$message.error('大小不能超过 30MB!');
              }
              return (isJPG || isPNG || isMP4 || isJPEG) && isLt30M;
          },

       //将上传的文件对象赋值到要上传的键值对中
       httprequest(param) {
        //将通过钩子函数函数,传过来的文件上传信息,中的文件赋值到要上传的键值对中
        this.ResourceInfo.file = param.file;
        },

       //取消时调用的方法
      quxiao() {
        this.$message.info("取消添加!");
        //清空表单信息
        this.ResourceInfo={
          "file":"",
          "tag": "",
          "type":""
        }
        this.$refs.upload.clearFiles();
        //通过调用父组件的方法来隐藏子组件(子组件无法修改父组件的值)
          this.$parent.AddQuXiaoColse();
      },

      //文件数量超过1个时自动调用的
      handleExceed(files, fileList) {
        this.$message.warning(`当前限制选择 1 个文件,本次选择了 ${files.length} 个文件,共选择了 ${files.length + fileList.length} 个文件`);
      },
      //是否删除文件列表中的文件(删除时自动调用)
      beforeRemove(file) {
        let isDel=this.$confirm(`确定移除 ${ file.name }?`);
        console.log(isDel)
        return isDel;
      }

    },
  }
  </script>
三、后端代码(Springboot)
1、接口层方法(Controller)
 //资源上传接口
    @PostMapping("/uploadResource")
    public Result uploadResource(MultipartFile file,String email,String tag,String type){
        //生成UUID用来重新命名文件和做rid
        String uuid= UUID.randomUUID().toString().replaceAll("-","");
        Resource resource =new Resource();
        resource.setRid(uuid);
        resource.setEmail(email);
        resource.setTag(tag);
        resource.setType(type);
        return new Result(iResourceService.uploadResource(file,resource));
    }
2、服务层方法(Service)
//上传资源方法
    @Override
    public Boolean uploadResource(MultipartFile file, Resource resource) {

        if(!file.isEmpty()){
            String  fullName = file.getOriginalFilename();  //获取全文件名
            String type = fullName.substring(file.getOriginalFilename().lastIndexOf(".")); //获取文件后缀
            String fileName=resource.getRid()+type;  //拼接新文件名
            //获取上传目录路径
            ApplicationHome applicationHome=new ApplicationHome(this.getClass());
            String pre=applicationHome.getDir().getParentFile().getParentFile()+
                    "\\src\\main\\resources\\static\\wallpaper\\";
            //拼接上传路径
            String path=pre+fileName;
            try {
                //将文件上传到指定目录
                file.transferTo(new File(path));
                //将文件拼接成可访问的在线链接,并赋值到对象的setRUrl属性中
                resource.setRUrl("http://localhost:8888/static/wallpaper/"+fileName);
            }catch (IOException e){
                e.printStackTrace();
            }
        }
        //将图像信息插入到数据库中
        return resourceDao.insert(resource)==1;

    }
3、数据库数据

四、前端组件全部代码(ResourceAdd.vue)
效果图如下:
<template>
    <!-- 控制子组件显示还是隐藏: :visible.sync="isShow"  -->
    <div>
      <!-- 弹窗 -->
      <el-dialog width="30%" :modal="true" title="新增资源" :modal-append-to-body="true" :visible.sync="isShowAdd"
        :close-on-click-modal="false" :close-on-press-escape='false' :show-close="false" center>
            <!-- 需要上传的表单::model 和 ref 的值尽量保持一致,ref在的值在提交数据时进行对提交的数据进行校验 -->
        <el-form :model="ResourceInfo" ref="ResourceInfo" :rules="rules"  size="small" label-width="120px" label-position="right" key="1" :hide-required-asterisk="true">
          <el-form-item label="资源" >
            <!-- 文件上传:http-request这里用来获取到要上传的文件。limit限制文件个数。on-exceed:用来校验文件个数 ,before-remove:删除上传列表时提示用户-->
            <el-upload
            class="upload-demo" action="" ref="upload"  :http-request="httprequest" :limit=1 :drag="true" :on-exceed="handleExceed" :before-remove="beforeRemove">
                  <i class="el-icon-upload"></i>
                 <div class="el-upload__text">将文件拖到此处,或<em>点击选择文件</em></div>
                 </el-upload>
          </el-form-item>

          <!-- 文本框用来填写要上传一个参数,这里是为了给文件打标签 -->
          <el-form-item prop="tag"  label="标签">
            <el-input v-model="ResourceInfo.tag" ref="tag" maxlength="30" autocomplete="off"  placeholder="如:风景/天空"></el-input>
          </el-form-item>
          <!-- 单选框,也是文件的一个参数 -->
          <el-form-item prop="type" label="类型" >
            <el-radio-group v-model="ResourceInfo.type" ref="type">
              <el-radio border label="静态"></el-radio>
              <el-radio border label="动态"></el-radio>
            </el-radio-group>
          </el-form-item>
        </el-form>
       <!--进度条:只有上传时才显示-->
      <div v-if="loading" >
      <el-progress type="line" :percentage="percentage" class="progress" :show-text="true"></el-progress>
      </div>

      <!-- 上传和取消按钮 -->
        <div slot="footer" class="dialog-footer">
          <el-button @click="quxiao()">取 消</el-button>
          <!-- 调用上传文件方法,将填写的表单数据做为参数 -->
          <el-button type="primary" @click="submitFileInfo(ResourceInfo)">确 定</el-button>
        </div>
      </el-dialog>
    </div>
  </template>

  <script>
  export default {
    name:"ResourceAdd",
    //组件是否显示(父组件传过来的)
    props: {
      isShowAdd: {
        type: Boolean,
        default: false
      },

    },

    data() {

      //数据校验
      var Type = (rule, value, callback) => {
              if (value === '') {
                  callback(new Error('请选择壁纸类型'));
                  this.islose = true;
              } else {
                  this.islose = false
                  callback();
              }
          };
     //数据校验
      var Tag = (rule, value, callback) => {
              if (value === '') {
                  callback(new Error('请添加标签'));
                  this.islose = true;
              } else if (value.length < 4) {
                  callback(new Error('最少输入4个字'));
                  this.islose = true;
              } else {
                  this.islose = false;
                  callback();
              }
          };


      return {
        resouceFileImg:null,
            loading:false,  //进度条是否隐藏
            percentage:0,   //进度条数值
            dialogVisible:false,  //是否上传完备
            //要上传文件的信息
        ResourceInfo: {
          "file":"",
          "tag":"",
          "type":""
        },

        //要校验的表单信息
        rules: {
                  type: [
                      { validator: Type, trigger: 'blur'}
                  ],
                  tag: [
                  { validator: Tag, trigger: 'blur' }
                  ],
              },
      };

    },
    methods: {
          submitFileInfo(resourceInfo){
            //调用文件类型判断方法,检查上传文件类型是否合法(返回Boolean类型)
           let fileTypeCheck=this.fileTypeCheck(resourceInfo.file)
          //  判断文件是否合法
           if(fileTypeCheck){
           //文件通过校验,校验其它要上传里其它参数是否合法
           this.$refs.ResourceInfo.validate((valid) => {
            if(valid){
              //如果都合法
            // 直接通过new来创建FormData对象,用来装文件对象和其它参数()
           let UpResourceInfo = new FormData();
           //通过append将数据添加到FormData中(数据是键值对类型)
           //注意:键要和后端接收的参数列表一一对应。
            UpResourceInfo.append('file', resourceInfo.file);
            UpResourceInfo.append("email",window.sessionStorage.getItem("Account"));
            UpResourceInfo.append("tag",resourceInfo.tag);
            UpResourceInfo.append("type",resourceInfo.type);

            //计算过上传进度
            // 进度条的实现主要依靠axios中提供的onUploadProgress函数
            //该函数提供了文件已上传部分的大小progressEvent.loaded和文件总大小progressEvent.total,利用这两个数据我们就可以计算出已经上传文件的进度。
            let config = {
              onUploadProgress: progressEvent => {
                //progressEvent.loaded:已上传文件大小
                //progressEvent.total:被上传文件的总大小
                let complete = (progressEvent.loaded / progressEvent.total ).toFixed(2) * 100 ;
                this.percentage = complete;   //上传进度
                if (this.percentage >= 100){
                  this.dialogVisible = true  //上传完毕
                }
               }
              };

            //显示进度条
            this.loading = true;
            //通过axios对后端接口发起请求,并将上面的FormData对象参数发送过去,已经。
            axios.post("http://localhost:8888/resources/uploadResource",UpResourceInfo,config)
              .then((res)=>{
                if(res.data.flag==true){
                  //清空表单信息
                  this.ResourceInfo={
                            "file":"",
                           "tag":"",
                           "type":""
                           }
                    //清除上传文件列表
                  this.$refs.upload.clearFiles();
                  this.loading=false; //隐藏进度条
                  this.$message.success("添加成功!")
                 //调用父组件的方法隐藏弹窗
                 // this.$parent.AddSuccessColse();
                }
              })
              .catch((err)=>{
                this.$message.error(err)
                //清空表单信息
                this.ResourceInfo={};
                    //清除上传文件列表
                  this.$refs.upload.clearFiles();
                 //调用父组件的方法隐藏弹窗
                 //this.$parent.AddSuccessColse();
              })
            }
           });}
          },

          // 文件类型、大小数据校验
          fileTypeCheck(file) {
              const isJPG = file.type === 'image/jpg';
              const isJPEG = file.type === 'image/jpeg';
              const isPNG = file.type === 'image/png';
              const isMP4 = file.type === 'video/mp4';
              const isLt30M = file.size / 1024 / 1024 < 30;
              if (!isJPG && !isJPEG && !isPNG && !isMP4) {
                  this.$message.error('请上传 JPG、PNG、MP4格式文件!');
              } else
              if (!isLt30M) {
                  this.$message.error('大小不能超过 30MB!');
              }
              return (isJPG || isPNG || isMP4 || isJPEG) && isLt30M;
          },

       //将上传的文件对象赋值到要上传的键值对中
       httprequest(param) {
        //将通过钩子函数函数,传过来的文件上传信息,中的文件赋值到要上传的键值对中
        this.ResourceInfo.file = param.file;
        },

       //取消时调用的方法
      quxiao() {
        this.$message.info("取消添加!");
        //清空表单信息
        this.ResourceInfo={
          "file":"",
          "tag": "",
          "type":""
        }
        this.$refs.upload.clearFiles();
        //通过调用父组件的方法来隐藏子组件(子组件无法修改父组件的值)
          this.$parent.AddQuXiaoColse();
      },

      //文件数量超过1个时自动调用的
      handleExceed(files, fileList) {
        this.$message.warning(`当前限制选择 1 个文件,本次选择了 ${files.length} 个文件,共选择了 ${files.length + fileList.length} 个文件`);
      },
      //是否删除文件列表中的文件(删除时自动调用)
      beforeRemove(file) {
        let isDel=this.$confirm(`确定移除 ${ file.name }?`);
        console.log(isDel)
        return isDel;
      }

    },
  }
  </script>
![[每周一更]-(第82期):认识自然处理语言(NLP)](https://img-blog.csdnimg.cn/direct/92a86b286d9440acbccd06ccafa7949a.png#pic_center)