文章目录
- halcon 案例 基于缩放比
- halcon 案例 测单个剃须刀片
- Halcon 案例创建匹配模板
- Halcon 通过图像处理创建模型 ROI模型
- Halcon 亚像素识别
- Halcon 识别不等比例的图像
- Halcon 匹配包装袋案例
- Halcon 创建模板进行匹配
- Halcon 案例模板匹配与测量
- Halcon 多模板与多图像的匹配
halcon 案例 基于缩放比
算子
创建匹配模板1.create_scaled_shape_model(Template : : NumLevels, AngleStart, AngleExtent, AngleStep, ScaleMin, ScaleMax, ScaleStep, Optimization, Metric, Contrast,MinContrast : ModelID)
示例:create_scaled_shape_model (ImageReduced1, 'auto', 0, rad(360), 'auto',  0.2,  1.5, 'auto', 'auto', 'use_polarity', 'auto', 'auto', ModelID)

ImageReduced1(输入对象):输入图像对象

'auto'(输入控制参数1):默认自动获取

0(输入控制参数2):创建模板的起始角度(弧度)

rad(360) (输入控制参数3):创建模板的终止角度(弧度)

'auto'(输入控制参数4):默认自动获取

0.2(输入控制参数5):缩放最小比例

1.5(输入控制参数6):缩放最大比例

'auto'(输入控制参数7):默认自动获取

'auto'(输入控制参数8):默认自动获取

'use_polarity'(输入控制参数9):设置模板优化和模板创建方法

'auto'(输入控制参数10):默认自动获取

'auto'(输入控制参数11):默认自动获取

ModelID(输出控制参数):输出模板句柄
2.发现模板find_scaled_shape_model
算子:find_scaled_shape_model(Image : : ModelID, AngleStart, AngleExtent, ScaleMin, ScaleMax, MinScore, NumMatches, MaxOverlap, SubPixel, NumLevels, Greediness :Row, Column, Angle, Scale, Score)

示例:find_scaled_shape_model (Image, ModelID, 0, rad(360),  0.2, 1.9, 0.8, 4, 0.8, 'least_squares', 0, 0.9, Row, Column, Angle, Scale, Score)

Image(输入对象):输入需要找寻的图像

ModelID(输入控制参数1):输入模和句柄

0(输入控制参数2):找寻的起始角度

rad(360)(输入控制参数3):找寻的终止角度

0.2(输入控制参数4):找寻的最小缩放比

1.9(输入控制参数5):找寻的最大缩放比

0.8(输入控制参数6):最小匹配分数

4(输入控制参数7):找寻的最大个数

0.8(输入控制参数8):最大覆盖率还可以发现系数值

'least_squares'(输入控制参数9):计算精度的设置

0(输入控制参数10):搜索时金字塔的层数

0.9(输入控制参数11):贪婪度  一般设置为0.9 速度快 容易出现找不到的情况

Row(输出控制参数1):匹配位置的行坐标

Column(输出控制参数2):匹配位置的列坐标

Angle(输出控制参数3):匹配位置的角度

Scale(输出控制参数4):默认值Score(输出控制参数5):匹配位置的得分
3.获取模板的轮廓进行查看get_shape_model_contours
算子:get_shape_model_contours( : ModelContours : ModelID, Level : )

示例:get_shape_model_contours (ModelContours, ModelID, 1)

ModelContours(输出对象):输出模板轮廓

ModelID (输入控制参数):输入模板句柄

1(输入控制参数):输入显示数量

4. 显示找到的结果dev_display_shape_matching_results

算子:dev_display_shape_matching_results( : : ModelID, Color, Row, Column, Angle, ScaleR, ScaleC, Model : )

示例:dev_display_shape_matching_results (ModelID, 'red', Row, Column, Angle, 1, 1, 0))

ModelID(输入控制参数1):输入模型的句柄

'red'(输入控制参数2):设定显示颜色

Row(输出控制参数3):输入显示的行坐标

Column(输入控制参数4):输入显示的列坐标

Angle(输入控制参数5):输入显示的角度

1(输入控制参数6):水平方向的缩放比例

1(输入控制参数7):垂直方向的缩放比例

0(输入控制参数8):找到的模型实例的索引

4. 显示找到的结果dev_display_shape_matching_results
- 清除句柄
算子:clear_shape_model( : : ModelID : )

示例:clear_shape_model(ModelID)
 ModelID(输入控制参数):输入模型句柄

预处理
* This example program shows how to find scaled and rotated shape models.
dev_update_pc ('off')
dev_update_window ('off')
dev_update_var ('off')
read_image (Image, 'green-dot')
get_image_size (Image, Width, Height)
dev_close_window ()
dev_open_window (0, 0, Width, Height, 'black', WindowHandle)
dev_set_color ('red')
dev_display (Image)
threshold (Image, Region, 0, 128)
*形成单独的连通域
connection (Region, ConnectedRegions)
*选中面积大小
select_shape (ConnectedRegions, SelectedRegions, 'area', 'and', 10000, 20000)
*进行填充
fill_up (SelectedRegions, RegionFillUp)
*进行膨胀
dilation_circle (RegionFillUp, RegionDilation, 5.5)
*裁剪掉膨胀区域
reduce_domain (Image, RegionDilation, ImageReduced)
创建模板获取轮廓
*创建模板
create_scaled_shape_model (ImageReduced, 5, rad(-45), rad(90), 'auto', 0.8, 1.0, 'auto', 'none', 'ignore_global_polarity', 40, 10, ModelID)
*获取模板轮廓
get_shape_model_contours (Model, ModelID, 1)
*获取区域中心点
area_center (RegionFillUp, Area, RowRef, ColumnRef)
*仿射运算
vector_angle_to_rigid (0, 0, 0, RowRef, ColumnRef, 0, HomMat2D)
affine_trans_contour_xld (Model, ModelTrans, HomMat2D)
dev_display (Image)
dev_display (ModelTrans)
read_image (ImageSearch, 'green-dots')
dev_display (ImageSearch)
寻找模板显示
*寻找模板
find_scaled_shape_model (ImageSearch, ModelID, rad(-45), rad(90), 0.8, 1.0, 0.5, 0, 0.5, 'least_squares', 5, 0.8, Row, Column, Angle, Scale, Score)
for I := 0 to |Score| - 1 by 1
    *用于显示
    *初始化一个空的仿射变换矩阵
    hom_mat2d_identity (HomMat2DIdentity)
    *平移
    hom_mat2d_translate (HomMat2DIdentity, Row[I], Column[I], HomMat2DTranslate)
    *旋转
    hom_mat2d_rotate (HomMat2DTranslate, Angle[I], Row[I], Column[I], HomMat2DRotate)
    *缩放
    hom_mat2d_scale (HomMat2DRotate, Scale[I], Scale[I], Row[I], Column[I], HomMat2DScale)
    *对XLD轮廓(contour)进行一个任意二维仿射变换
    affine_trans_contour_xld (Model, ModelTrans, HomMat2DScale)
    dev_display (ModelTrans)
endfor

halcon 案例 测单个剃须刀片

图片的显示设置
dev_update_window ('off')
* image acquisition and window size
read_image (ModelImage, 'razors1')
*返回指向图像Image的第一个通道的指针
get_image_pointer1 (ModelImage, Pointer, Type, Width, Height)
dev_close_window ()
dev_open_window (0, 0, Width, Height, 'white', WindowHandle)
*修改要显示的图像部分
dev_set_part (0, 0, Height - 1, Width - 1)
dev_display (ModelImage)
* colors and other settings for the visualization
dev_set_color ('cyan')
dev_set_draw ('margin')
dev_set_line_width (2)
获取上顶部和下底部的位置
Row1 := 46
Column1 := 57
Row2 := 79
Column2 := 94
gen_rectangle1 (ROIPart1, Row1, Column1, Row2, Column2)
gen_rectangle1 (ROIPart2, Row1 + 364, Column1 + 13, Row2 + 364, Column2 + 13)
union2 (ROIPart1, ROIPart2, ModelROI)
area_center (ModelROI, Area, CenterROIRow, CenterROIColumn)
dev_display (ModelImage)
dev_display (ModelROI)
stop ()

创建模型
 inspect_shape_model 和 create_shape_model 是 Halcon 中用于形状模型的函数,它们在形状匹配和检测中扮演不同的角色。

create_shape_model:
create_shape_model 用于创建一个形状模型,该模型将用于后续的形状匹配。在使用 create_shape_model 函数时,需要提供以下参数:

    模板图像:即作为形状模型的参考的模板图像。
    配置参数:用于指定形状模型的创建参数,如平移不变性、旋转不变性等。

函数会根据给定的模板图像和配置参数生成一个形状模型,该模型包含了模板图像的形状信息。

inspect_shape_model:
inspect_shape_model 用于检查已创建的形状模型,并获取有关模型参数的信息。通过使用 inspect_shape_model 函数,你可以获取形状模型的相关属性,如模型的分辨率、角度范围、平移范围等。

函数返回的信息可以帮助你理解形状模型的特性,并在后续形状匹配的过程中进行相应的调整和优化。

总结来说,create_shape_model 用于创建形状模型,而 inspect_shape_model 则用于检查已创建的形状模型并获得其属性信息。这两个函数通常一起使用,先通过 create_shape_model 创建模型,然后使用 inspect_shape_model 检查模型并对其进行调整。
inspect_shape_model(图像,得到金字塔图像,得到对应的区域,金字塔层数,对比度)
* -> create the model
reduce_domain (ModelImage, ModelROI, ImageROI)
*创建形状模型
create_shape_model (ImageROI, 4, 0, 0, 'auto', 'none', 'use_polarity', 30, 10, ModelID)
*创建形状模型的表示
inspect_shape_model (ImageROI, ShapeModelImage, ShapeModelRegion, 1, 30)
get_shape_model_contours (ShapeModel, ModelID, 1)
dev_clear_window ()
dev_set_color ('blue')
dev_display (ShapeModelRegion)
stop ()

获取竖直条
Rect1Row := 244
Rect1Col := 73
DistColRect1Rect2 := 17
Rect2Row := Rect1Row
Rect2Col := Rect1Col + DistColRect1Rect2
RectPhi := rad(90)
RectLength1 := 122
RectLength2 := 2
gen_rectangle2 (MeasureROI1, Rect1Row, Rect1Col, RectPhi, RectLength1, RectLength2)
gen_rectangle2 (MeasureROI2, Rect2Row, Rect2Col, RectPhi, RectLength1, RectLength2)
dev_display (ModelImage)
dev_set_color ('yellow')
dev_display (MeasureROI1)
dev_display (MeasureROI2)
将测量区域沿着 XLD 模型的方向进行平移,以便后续进行测量操作
* translate measurement ROIs to lie on XLD model (without clipping!)
*获取当前系统中用于裁剪图像的默认区域
get_system ('clip_region', OriginalClipRegion)
*设置当前系统中用于裁剪图像的默认区域为“false”,即不使用任何区域进行裁剪。
set_system ('clip_region', 'false')
*将区域移动到指定的位置
move_region (MeasureROI1, MeasureROI1Ref, -CenterROIRow, -CenterROIColumn)
move_region (MeasureROI2, MeasureROI2Ref, -CenterROIRow, -CenterROIColumn)
set_system ('clip_region', OriginalClipRegion)
DistRect1CenterRow := Rect1Row - CenterROIRow
DistRect1CenterCol := Rect1Col - CenterROIColumn
DistRect2CenterRow := Rect2Row - CenterROIRow
DistRect2CenterCol := Rect2Col - CenterROIColumn
if (USING_TRANSLATE_MEASURE != 0)
    * -> measure objects are created only once in advance and then translated later
    gen_measure_rectangle2 (Rect1Row, Rect1Col, RectPhi, RectLength1, RectLength2, Width, Height, 'bilinear', MeasureHandle1)
    gen_measure_rectangle2 (Rect2Row, Rect2Col, RectPhi, RectLength1, RectLength2, Width, Height, 'bilinear', MeasureHandle2)
endif
stop ()

查找到模板进行匹配显示,进行每一个锯齿进行匹配,先找头部,找到头部后找锯齿个数
* step 2: find the objects in another image
read_image (SearchImage, 'razors2')
dev_display (SearchImage)
find_shape_model (SearchImage, ModelID, 0, 0, 0.8, 0, 0.5, 'least_squares', 0, 0.7, RowCheck, ColumnCheck, AngleCheck, Score)
if (|Score| > 0)
    for i := 0 to |Score| - 1 by 1
        * step 3: determine the affine transformation
        vector_angle_to_rigid (0, 0, 0, RowCheck[i], ColumnCheck[i], AngleCheck[i], MovementOfObject)
        affine_trans_contour_xld (ShapeModel, ModelAtNewPosition, MovementOfObject)
        dev_display (ModelAtNewPosition)
        * step 4: measure width and distance of the teeth
        * -> display the moved ROIs
        affine_trans_region (MeasureROI1Ref, MeasureROI1AtNewPosition, MovementOfObject, 'constant')
        affine_trans_region (MeasureROI2Ref, MeasureROI2AtNewPosition, MovementOfObject, 'constant')
        dev_display (MeasureROI1AtNewPosition)
        dev_display (MeasureROI2AtNewPosition)
        affine_trans_pixel (MovementOfObject, DistRect1CenterRow, DistRect1CenterCol, Rect1RowCheck, Rect1ColCheck)
        affine_trans_pixel (MovementOfObject, DistRect2CenterRow, DistRect2CenterCol, Rect2RowCheck, Rect2ColCheck)
        if (USING_TRANSLATE_MEASURE != 0)
            * -> translate the already created measure objects
            translate_measure (MeasureHandle1, Rect1RowCheck, Rect1ColCheck)
            translate_measure (MeasureHandle2, Rect2RowCheck, Rect2ColCheck)
            measure_pairs (SearchImage, MeasureHandle1, 2, 25, 'negative', 'all', RowEdge11, ColEdge11, Amp11, RowEdge21, ColEdge21, Amp21, Width1, Distance1)
            measure_pairs (SearchImage, MeasureHandle2, 2, 25, 'negative', 'all', RowEdge12, ColEdge12, Amp12, RowEdge22, ColEdge22, Amp22, Width2, Distance2)
        else
            * -> create new measure objects and destroy them after the measurement
            RectPhiCheck := RectPhi + AngleCheck[i]
            gen_measure_rectangle2 (Rect1RowCheck, Rect1ColCheck, RectPhiCheck, RectLength1, RectLength2, Width, Height, 'bilinear', MeasureHandle1)
            gen_measure_rectangle2 (Rect2RowCheck, Rect2ColCheck, RectPhiCheck, RectLength1, RectLength2, Width, Height, 'bilinear', MeasureHandle2)
            * step 5: perform the measurement
            measure_pairs (SearchImage, MeasureHandle1, 2, 25, 'negative', 'all', RowEdge11, ColEdge11, Amp11, RowEdge21, ColEdge21, Amp21, Width1, Distance1)
            measure_pairs (SearchImage, MeasureHandle2, 2, 25, 'negative', 'all', RowEdge12, ColEdge12, Amp12, RowEdge22, ColEdge22, Amp22, Width2, Distance2)
            close_measure (MeasureHandle1)
            close_measure (MeasureHandle2)
        endif
        * step 6: check for too short or missing teeth
        NumberTeeth1 := |Width1|
        NumberTeeth2 := |Width2|
        dev_set_color ('red')
        if (NumberTeeth1 < 37)
            for j := 0 to NumberTeeth1 - 2 by 1
                if (Distance1[j] > 4.0)
                    RowFault := round(0.5 * (RowEdge11[j + 1] + RowEdge21[j]))
                    ColFault := round(0.5 * (ColEdge11[j + 1] + ColEdge21[j]))
                    disp_rectangle2 (WindowHandle, RowFault, ColFault, 0, 4, 4)
                    dev_open_window (0, Width + 20, 80, 80, 'black', WindowHandleZoom)
                    dev_set_part (RowFault - 10, ColFault - 10, RowFault + 10, ColFault + 10)
                    dev_display (SearchImage)
                    disp_rectangle2 (WindowHandleZoom, RowFault, ColFault, 0, 4, 4)
                    stop ()
                    dev_close_window ()
                    dev_set_part (0, 0, Height - 1, Width - 1)
                endif
            endfor
        endif
        if (NumberTeeth2 < 37)
            for j := 0 to NumberTeeth2 - 2 by 1
                if (Distance2[j] > 4.0)
                    RowFault := round(0.5 * (RowEdge12[j + 1] + RowEdge22[j]))
                    ColFault := round(0.5 * (ColEdge12[j + 1] + ColEdge22[j]))
                    disp_rectangle2 (WindowHandle, RowFault, ColFault, 0, 4, 4)
                    dev_open_window (0, Width + 20, 80, 80, 'black', WindowHandleZoom)
                    dev_set_part (RowFault - 10, ColFault - 10, RowFault + 10, ColFault + 10)
                    dev_display (SearchImage)
                    disp_rectangle2 (WindowHandleZoom, RowFault, ColFault, 0, 4, 4)
                    stop ()
                    dev_close_window ()
                    dev_set_part (0, 0, Height - 1, Width - 1)
                endif
            endfor
        endif
        dev_set_color ('yellow')
        stop ()
    endfor
endif
* -------------------  end of the application  -----------------
* clean up
if (USING_TRANSLATE_MEASURE != 0)
    close_measure (MeasureHandle1)
    close_measure (MeasureHandle2)
endif
dev_update_window ('on')
clear_shape_model (ModelID)
Halcon 案例创建匹配模板
获取图片
dev_update_off ()
dev_close_window ()
*
* Acquire image
read_image (Image, 'green-dot')
dev_open_window_fit_image (Image, 0, 0, -1, -1, WindowHandle)
dev_display (Image)
*
* Set display settings
set_display_font (WindowHandle, 16, 'mono', 'true', 'false')
dev_set_draw ('margin')
dev_set_color ('green')
dev_set_line_width (3)
Message := 'This example shows how to create a shape model'
Message[1] := 'for scale invariant matching and how to save'
Message[2] := 'it in a file.'
disp_message (WindowHandle, Message, 'window', 12, 12, 'black', 'true')
disp_continue_message (WindowHandle, 'black', 'true')
stop ()
分析出匹配区域
* Segment the template region
threshold (Image, Region, 0, 128)
connection (Region, ConnectedRegions)
select_shape (ConnectedRegions, SelectedRegions, 'area', 'and', 10000, 20000)
fill_up (SelectedRegions, RegionFillUp)
dilation_circle (RegionFillUp, RegionDilation, 5.5)
dev_display (Image)
dev_display (RegionDilation)
disp_message (WindowHandle, 'Template region', 'window', 12, 12, 'black', 'true')
disp_continue_message (WindowHandle, 'black', 'true')
stop ()
创建模板模型,保存到文件中
* Create the shape model
reduce_domain (Image, RegionDilation, ImageReduced)
inspect_shape_model (ImageReduced, ModelImages, ModelRegions, 1, 40)
create_scaled_shape_model (ImageReduced, 5, rad(-45), rad(90), 0, 0.8, 1.0, 0, ['none','no_pregeneration'], 'ignore_global_polarity', 40, 10, ModelID)
dev_display (Image)
dev_display (ModelRegions)
disp_message (WindowHandle, 'Regions of the shape model', 'window', 12, 12, 'black', 'true')
disp_continue_message (WindowHandle, 'black', 'true')
stop ()
*
* Save the model in a file
write_shape_model (ModelID, 'green-dot.shm')
Message := 'The shape model has been saved in the file'
Message[1] := '\'green-dot.shm\'.'
disp_message (WindowHandle, Message, 'window', 12, 12, 'black', 'true')
disp_end_of_program_message (WindowHandle, 'black', 'true')
*
* Clear the model
clear_shape_model (ModelID)
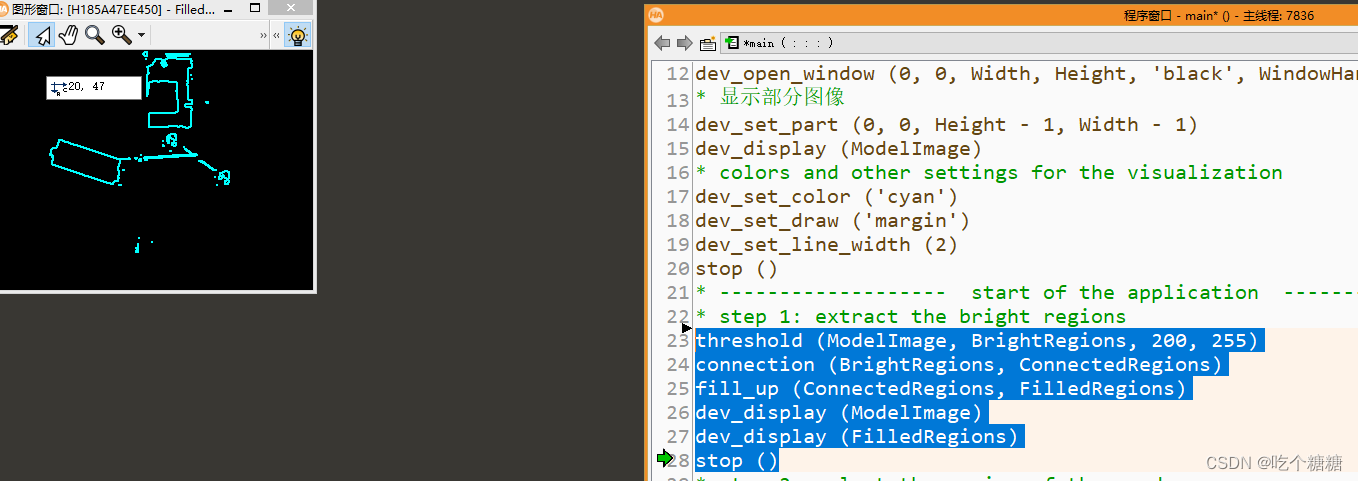
Halcon 通过图像处理创建模型 ROI模型
获取图片
* general configuration of HDevelop
dev_update_window ('off')
* image acquisition and window size
open_framegrabber ('File', 1, 1, 0, 0, 0, 0, 'default', -1, 'default', -1, 'default', 'pendulum/pendulum.seq', 'default', -1, 1, FGHandle)
grab_image (ModelImage, FGHandle)
* 获取图片指针
get_image_pointer1 (ModelImage, Pointer, Type, Width, Height)
dev_close_window ()
dev_open_window (0, 0, Width, Height, 'black', WindowHandle)
* 显示部分图像
dev_set_part (0, 0, Height - 1, Width - 1)
dev_display (ModelImage)
* colors and other settings for the visualization
dev_set_color ('cyan')
dev_set_draw ('margin')
dev_set_line_width (2)
stop ()
获取提取到的区域
threshold (ModelImage, BrightRegions, 200, 255)
connection (BrightRegions, ConnectedRegions)
fill_up (ConnectedRegions, FilledRegions)
dev_display (ModelImage)
dev_display (FilledRegions)
stop ()
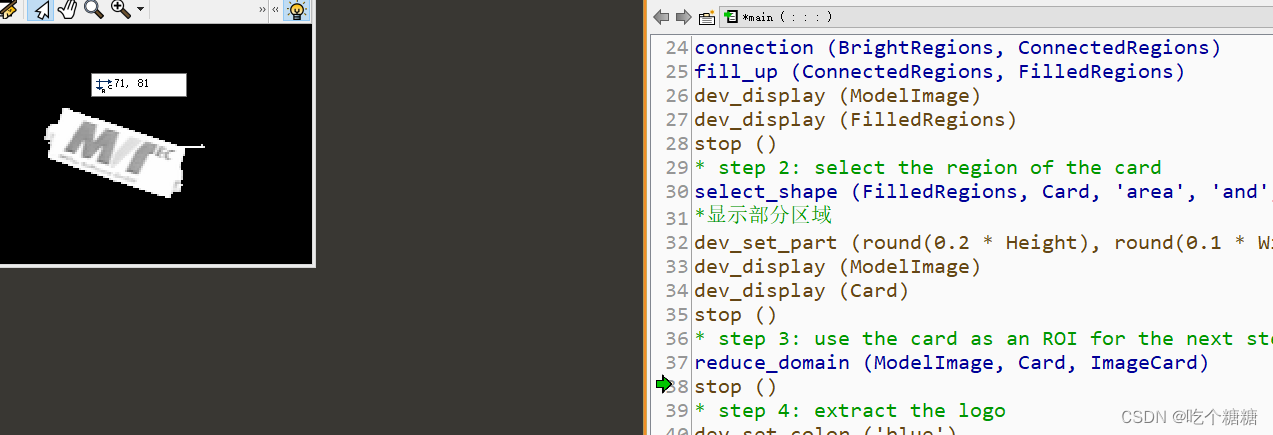
选择要识别的区域
select_shape (FilledRegions, Card, 'area', 'and', 1800, 1900)
*显示部分区域
dev_set_part (round(0.2 * Height), round(0.1 * Width) - 1, round(0.7 * Height) - 1, round(0.6 * Width) - 1)
dev_display (ModelImage)
dev_display (Card)
stop ()

将选择区域裁剪
reduce_domain (ModelImage, Card, ImageCard)
提取出字符
dev_set_color ('blue')
threshold (ImageCard, DarkRegions, 0, 230)
connection (DarkRegions, ConnectedRegions)
select_shape (ConnectedRegions, Characters, 'area', 'and', 150, 450)
union1 (Characters, CharacterRegion)
dev_display (ModelImage)
dev_display (CharacterRegion)
stop ()
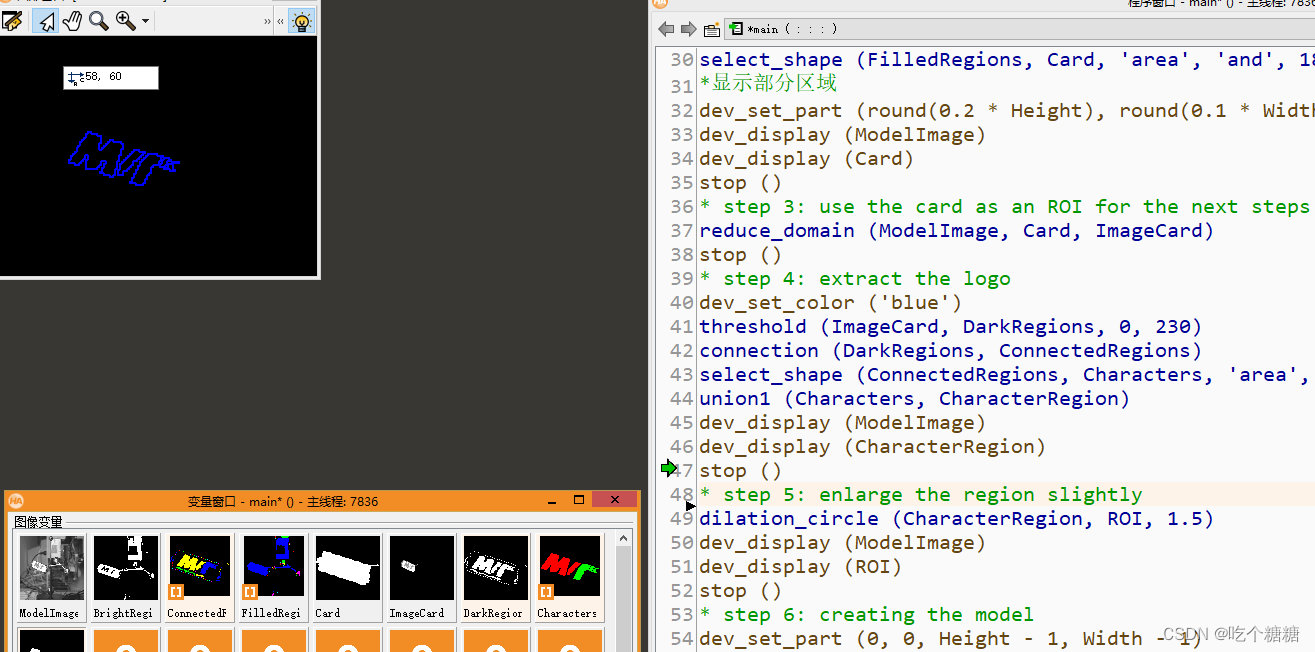
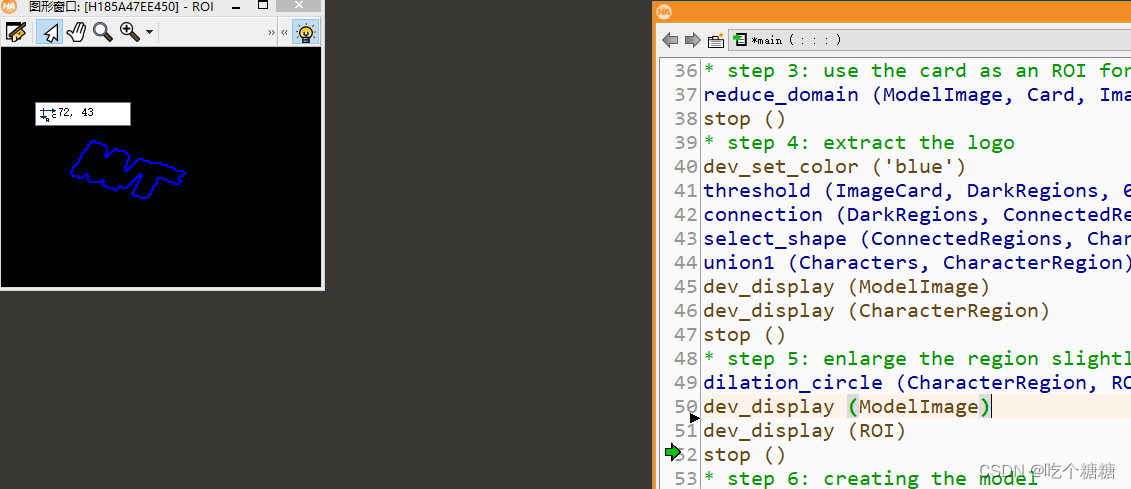
将字符膨胀处理
dilation_circle (CharacterRegion, ROI, 1.5)
dev_display (ModelImage)
dev_display (ROI)
stop ()
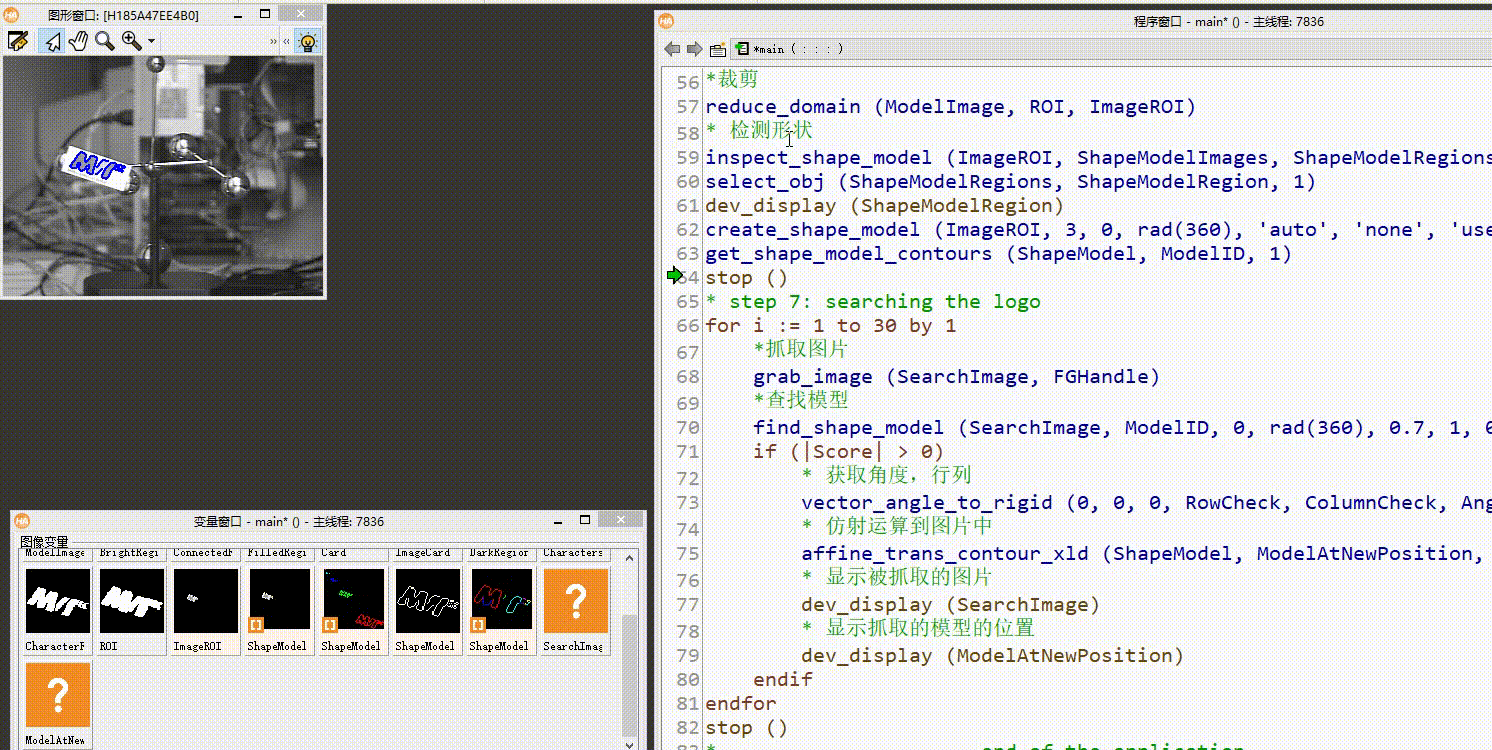
获取形状创建模板
dev_set_part (0, 0, Height - 1, Width - 1)
dev_display (ModelImage)
*裁剪
reduce_domain (ModelImage, ROI, ImageROI)
* 检测形状
inspect_shape_model (ImageROI, ShapeModelImages, ShapeModelRegions, 5, 25)
select_obj (ShapeModelRegions, ShapeModelRegion, 1)
dev_display (ShapeModelRegion)
create_shape_model (ImageROI, 3, 0, rad(360), 'auto', 'none', 'use_polarity', 30, 10, ModelID)
get_shape_model_contours (ShapeModel, ModelID, 1)
stop ()

for i := 1 to 30 by 1
    *抓取图片
    grab_image (SearchImage, FGHandle)
    *查找模型
    find_shape_model (SearchImage, ModelID, 0, rad(360), 0.7, 1, 0.5, 'least_squares', 0, 0.5, RowCheck, ColumnCheck, AngleCheck, Score)
    if (|Score| > 0)
        * 获取角度,行列
        vector_angle_to_rigid (0, 0, 0, RowCheck, ColumnCheck, AngleCheck, MovementOfObject)
        * 仿射运算到图片中
        affine_trans_contour_xld (ShapeModel, ModelAtNewPosition, MovementOfObject)
        * 显示被抓取的图片
        dev_display (SearchImage)
        * 显示抓取的模型的位置
        dev_display (ModelAtNewPosition)
    endif
endfor
stop ()
* -------------------  end of the application  -----------------
* clean up
dev_update_window ('on')
clear_shape_model (ModelID)
close_framegrabber (FGHandle)
Halcon 亚像素识别
提取亚像素轮廓
read_image (Image, 'brake_disk/brake_disk_part_01')
dev_update_off ()
dev_close_window ()
dev_open_window_fit_image (Image, 0, 0, 640, 640, WindowHandle)
set_display_font (WindowHandle, 16, 'mono', 'true', 'false')
dev_set_color ('lime green')
dev_set_line_width (3)
*快速二值化选择亮的区域
binary_threshold (Image, Region, 'smooth_histo', 'light', UsedThreshold)
*形成单个连通域
connection (Region, Holes)
*选择面积小的圆
select_shape (Holes, SmallHoles, 'area', 'and', 5000, 10000)
*二值化处理
boundary (SmallHoles, RegionBorder, 'inner_filled')
*膨胀
dilation_circle (RegionBorder, RegionBorderDilation, 3.5)
*四个圆形成一个整体
union1 (RegionBorderDilation, ROI)
*将整体从原图裁剪出来
reduce_domain (Image, ROI, ImageReduced)
*亚像素获取图片圆圈的边沿
edges_sub_pix (ImageReduced, Edges, 'canny', 0.5, 20, 40)
*把检测到的一组点或轮廓线拟合成一个圆形
fit_circle_contour_xld (Edges, 'algebraic', -1, 0, 0, 3, 2, RowCenter, ColumnCenter, Radius, StartPhi, EndPhi, PointOrder)
dev_display (Image)
dev_display (Edges)
disp_message (WindowHandle, 'Extracted edges', 'window', 12, 12, 'lime green', 'false')
disp_continue_message (WindowHandle, 'black', 'true')
stop ()
获取平均半径画出圆圈
* Create the circular XLD contour.
dev_clear_window ()
disp_message (WindowHandle, 'First example:\nCreate a shape model from one circular contour', 'window', 12, 12, 'lime green', 'false')
disp_continue_message (WindowHandle, 'black', 'true')
stop ()
*获取平均半径
MeanRadius := mean(Radius)
* 画一个亚像素的圆
gen_circle_contour_xld (ContCircle, 300, 300, MeanRadius, 0, 6.28318, 'positive', 1)
dev_clear_window ()
dev_display (ContCircle)
disp_message (WindowHandle, 'Circular XLD contour from which the\nshape model is created that will be used\nto find individual circles:', 'window', 12, 12, 'lime green', 'false')
disp_continue_message (WindowHandle, 'black', 'true')
stop ()
模板匹配
*创建亚像素模型
create_shape_model_xld (ContCircle, 'auto', 0, 0, 'auto', 'auto', 'ignore_local_polarity', 10, ModelID)
*获取模型参数
get_shape_model_params (ModelID, NumLevels, AngleStart, AngleExtent, AngleStep, ScaleMin, ScaleMax, ScaleStep, Metric, MinContrast)
*
* Try to find the holes in the brake disc.
*寻找模板
find_shape_model (Image, ModelID, 0, 0, 0.7, 0, 0, 'least_squares', 0, 0.9, Row, Column, Angle, Score)
显示匹配结果
* Determine which of the found matches represent the desired holes,
* i.e., which of the circles have a brighter interior.
* 确定找到的匹配项中哪些代表所需的孔、
* 即哪个圆的内部更亮。
IsHole := []
SeamWidth := 5
for Index := 0 to |Row| - 1 by 1
    *转换成极坐标
    polar_trans_image_ext (Image, ImagePolar, Row[Index] + 0.5, Column[Index] + 0.5, 0, 6.28319, 0, MeanRadius + SeamWidth, 1, MeanRadius + SeamWidth + 1, 'nearest_neighbor')
    SequenceInner := [round(MeanRadius) - SeamWidth:round(MeanRadius) - 1]
    *获取灰度值
    get_grayval (ImagePolar, SequenceInner, gen_tuple_const(|SequenceInner|,0), GrayvalInner)
    SequenceOuter := [round(MeanRadius) + 1:round(MeanRadius) + SeamWidth]
    get_grayval (ImagePolar, SequenceOuter, gen_tuple_const(|SequenceOuter|,0), GrayvalOuter)
    if (mean(GrayvalInner) > mean(GrayvalOuter))
        IsHole := [IsHole,true]
    else
        IsHole := [IsHole,false]
    endif
endfor
HoleIndices := find(IsHole,true)
NoHoleIndices := find(IsHole,false)
*
* Visualize results.
dev_display (Image)
dev_display_shape_matching_results (ModelID, 'lime green', subset(Row,HoleIndices), subset(Column,HoleIndices), Angle, 1.0, 1.0, 0)
dev_display_shape_matching_results (ModelID, 'red', subset(Row,NoHoleIndices), subset(Column,NoHoleIndices), Angle, 1.0, 1.0, 0)
disp_message (WindowHandle, 'Undesired result\ndue to missing\npolarity information', 'image', Row[NoHoleIndices[0]] - 2 * MeanRadius, Column[NoHoleIndices[0]] + 1.1 * MeanRadius, 'red', 'false')
disp_continue_message (WindowHandle, 'black', 'true')
stop ()
*
* Determine the polarity information from one correct match.
get_hom_mat2d_from_matching_result (Row[HoleIndices[0]], Column[HoleIndices[0]], Angle[HoleIndices[0]], 1, 1, HomMat2D)
set_shape_model_metric (Image, ModelID, HomMat2D, 'use_polarity')
find_shape_model (Image, ModelID, 0, 0, 0.7, 0, 0, 'least_squares', 0, 0.9, Row, Column, Angle, Score)
dev_display (Image)
dev_display_shape_matching_results (ModelID, 'lime green', Row, Column, Angle, 1.0, 1.0, 0)
disp_message (WindowHandle, 'Results using the polarity information', 'window', 12, 12, 'lime green', 'false')
disp_continue_message (WindowHandle, 'black', 'true')
stop ()
Halcon 识别不等比例的图像
首先创建一个多边形区域
dev_update_off ()
dev_close_window ()
*
* For visualization purposes, we specify the number of significant
* bits in the uint2 images.  We do this because this information
* cannot be stored in the image files themselves.
* 设置halcon系统参数
set_system ('int2_bits', 10)
read_image (Image, 'smd/smd_capacitors_01')
get_image_size (Image, Width, Height)
dev_open_window_fit_image (Image, 0, 0, -1, -1, WindowHandle)
dev_display (Image)
set_display_font (WindowHandle, 16, 'mono', 'true', 'false')
Message := 'This program shows how to use shape-based matching'
Message[1] := 'to find SMD capacitors that exhibit independent'
Message[2] := 'size changes in the row and column direction in'
Message[3] := 'images with a depth of 10 bits.'
Message[4] := 'First a synthetic model for the SMD capacitors'
Message[5] := 'is created. In the next step the created model'
Message[6] := 'is used to find the SMD capacitors.'
disp_message (WindowHandle, Message, 'window', 12, 12, 'black', 'true')
disp_continue_message (WindowHandle, 'black', 'true')
stop ()
dev_close_window ()
dev_open_window (0, 0, Width, Height, 'black', WindowHandle)
dev_set_color ('green')
dev_set_line_width (3)
*
* Create a synthetic model for the SMD capacitors.  This is just
* a rectangle with rounded corners.
* 形成一个多边形区域
gen_contour_polygon_rounded_xld (Contour, [50,100,100,50,50], [50,50,150,150,50], [6,6,6,6,6], 1)
* 形成一个新的空白图像
gen_image_const (Image, 'byte', 200, 150)
* 绘制图像灰度值为128
paint_xld (Contour, Image, ImageModel, 128)
通过多边形区域创建模板
* 创建不等比例模型
create_aniso_shape_model (ImageModel, 'auto', -rad(10), rad(20), 'auto', 0.9, 1.7, 'auto', 0.9, 1.1, 'auto', 'none', 'use_polarity', 'auto', 20, ModelID)
*获取模型轮廓
get_shape_model_contours (ModelContours, ModelID, 1)
set_display_font (WindowHandle, 16, 'mono', 'true', 'false')
显示
* Find the models for the SMD capacitors in the images
* and display the number of found models an the recognition time
* and the model's scale
for J := 1 to 4 by 1
    read_image (Image, 'smd/smd_capacitors_' + J$'02d')
    dev_display (Image)
    *计算时间
    count_seconds (S1)
    *匹配
    find_aniso_shape_model (Image, ModelID, -rad(10), rad(20), 0.9, 1.7, 0.9, 1.1, 0.7, 0, 0.5, 'least_squares', 0, 0.8, Row, Column, Angle, ScaleR, ScaleC, Score)
    count_seconds (S2)
    *计算时间
    Time := (S2 - S1) * 1000
    Num := |Score|
    * Display the found models and the recognition time
    disp_message (WindowHandle, Num$'d' + ' models found in ' + Time$'5.2f' + ' ms', 'window', 12, 12, 'black', 'true')
    *平均列
    MeanColumn := mean(Column)
    for I := 0 to Num - 1 by 1
        * Display the found model.
        *初始化一个空的仿射变换矩阵
        hom_mat2d_identity (HomMat2D)
        hom_mat2d_scale (HomMat2D, ScaleR[I], ScaleC[I], 0, 0, HomMat2D)
        hom_mat2d_rotate (HomMat2D, Angle[I], 0, 0, HomMat2D)
        hom_mat2d_translate (HomMat2D, Row[I], Column[I], HomMat2D)
        affine_trans_contour_xld (ModelContours, ContoursTrans, HomMat2D)
        dev_display (ContoursTrans)
        *
        * Display the model's scale next to the found model
        ScaleRowStr := 'ScaleRow=' + ScaleR[I]$'5.3f'
        ScaleColStr := 'ScaleCol=' + ScaleC[I]$'5.3f'
        get_string_extents (WindowHandle, ScaleRowStr, AscentStr, DescentStr, WidthStr, HeightStr)
        if (Column[I] <= MeanColumn)
            disp_message (WindowHandle, [ScaleRowStr,ScaleColStr], 'image', Row[I] - 20, Column[I] - 60 - WidthStr, 'green', 'false')
        else
            disp_message (WindowHandle, [ScaleRowStr,ScaleColStr], 'image', Row[I] - 20, Column[I] + 60, 'green', 'false')
        endif
    endfor
    * Deactivate the following lines to run the programm without breaks
    if (J < 4)
        disp_continue_message (WindowHandle, 'black', 'true')
        stop ()
    endif
endfor
* Reset the number of significant bits of uint2 images to unknown.
set_system ('int2_bits', -1)
Halcon 匹配包装袋案例

创建窗口
dev_update_off ()
read_image (ModelImage, 'food/cocoa_package_model')
dev_close_window ()
dev_open_window_fit_image (ModelImage, 0, 0, -1, -1, WindowHandle)
set_display_font (WindowHandle, 16, 'mono', 'true', 'false')
创建模型
*创建匹配模型
create_shape_model (ModelImage, 'auto', rad(-20), rad(40), 'auto', 'auto', 'use_polarity', [40,60,'auto_min_size'], 10, ModelID)
*获取匹配形状
get_shape_model_contours (ModelContours, ModelID, 1)
area_center (ModelImage, Area, Row, Column)
*进行仿射运算
hom_mat2d_identity (HomMat2DIdentity)
hom_mat2d_translate (HomMat2DIdentity, Row, Column, HomMat2DTranslate)
affine_trans_contour_xld (ModelContours, ContoursAffineTrans, HomMat2DTranslate)
dev_set_line_width (2)
dev_set_color ('yellow')
dev_display (ModelImage)
dev_display (ContoursAffineTrans)
disp_message (WindowHandle, 'Model image and contours', 'window', 12, 12, 'black', 'true')
disp_continue_message (WindowHandle, 'black', 'true')
stop ()

对图像进行匹配
NumImages := 13
for Index := 1 to NumImages by 1
    read_image (Image, 'food/cocoa_packages_' + Index$'02')
    * Reduce the image resolution for a speed-up
    dev_resize_window_fit_image (Image, 0, 0, -1, -1)
    dev_display (Image)
    disp_message (WindowHandle, 'Search...', 'window', 12, 12, 'black', 'true')
    count_seconds (S1)
    * Find the deformed model in the search image
    * and display the results
    * 查找模板
    find_shape_model (Image, ModelID, rad(-20), rad(40), 0.6, 0, 0.5, ['least_squares','max_deformation 16'], 0, 0.4, Row, Column, Angle, Score)
    * 计算匹配时间
    count_seconds (S2)
    Time := (S2 - S1) * 1000
    *设置颜色
    dev_set_color ('green')
    *展示匹配结果
    dev_display_shape_matching_results (ModelID, 'green', Row, Column, Angle, 1, 1, 0)
    *展示匹配的时间
    disp_message (WindowHandle, |Score| + ' matches found in ' + Time$'3.1f' + ' ms', 'window', 12, 12, 'black', 'true')
    *展示匹配的相似度
    disp_message (WindowHandle, 'Score: ' + Score$'.2f', 'image', 350, Column - 80, 'black', 'true')
    if (Index < NumImages)
        disp_continue_message (WindowHandle, 'black', 'true')
        stop ()
    endif
endfor
Halcon 创建模板进行匹配

* --------------------------------------------------------
* This example program shows how to reuse a created model.
* --------------------------------------------------------
* general configuration of HDevelop
dev_update_window ('off')
* image acquisition and window size
read_image (ModelImage, 'rings_and_nuts')
get_image_pointer1 (ModelImage, Pointer, Type, Width, Height)
dev_close_window ()
dev_open_window (0, 0, Width, Height, 'white', WindowHandle)
dev_set_part (0, 0, Height - 1, Width - 1)
dev_display (ModelImage)
* colors and other settings for the visualization
dev_set_color ('cyan')
dev_set_draw ('margin')
dev_set_line_width (2)
set_display_font (WindowHandle, 14, 'mono', 'true', 'false')
disp_continue_message (WindowHandle, 'black', 'true')
stop ()
* ------------  start of the first application  ------------
* -> create the model
Row := 324
Column := 279
Radius := 60
gen_circle (ROI1, Row, Column, Radius)
gen_circle (ROI2, Row, Column, 0.5 * Radius)
* 获取两个区域的交集
difference (ROI1, ROI2, ModelROI)
* 将原图和相交的图片裁剪出来获得ImageROI
reduce_domain (ModelImage, ModelROI, ImageROI)
* 创建匹配模板
create_scaled_shape_model (ImageROI, 'auto', -rad(30), rad(60), 'auto', 0.6, 1.4, 'auto', 'none', 'use_polarity', 60, 10, ModelID)
* 检查已创建的形状模型,并获取有关模型参数的信息
inspect_shape_model (ImageROI, ShapeModelImage, ShapeModelRegion, 1, 30)
dev_clear_window ()
dev_display (ShapeModelRegion)
disp_continue_message (WindowHandle, 'black', 'true')
stop ()
* step 1: store the model (including the XLD)
ModelFile := 'model_nut.sbm'
* 写入模板图像
write_shape_model (ModelID, ModelFile)
* -> additionally, we store the model region
ModelRegionFile := 'model_region_nut.png'
write_image (ImageROI, 'png', 0, ModelRegionFile)
* -> now we destroy the model and start anew
clear_shape_model (ModelID)
* ------------  start of the second application  ------------
* step 2: read the model from file
* 读取模板
read_shape_model (ModelFile, ReusedModelID)
* -> access the parameters used for creating the model
* 获取轮廓
get_shape_model_contours (ReusedShapeModel, ReusedModelID, 1)
* 获取原点参数
get_shape_model_origin (ReusedModelID, ReusedRefPointRow, ReusedRefPointCol)
* 获取参数
get_shape_model_params (ReusedModelID, NumLevels, AngleStart, AngleExtent, AngleStep, ScaleMin, ScaleMax, ScaleStep, Metric, MinContrast)
* -> access the model region
read_image (ImageModelRegion, 'model_region_nut.png')
* 由图像获取到对应的区域
get_domain (ImageModelRegion, DomainModelRegion)
dev_display (ImageModelRegion)
dev_display (DomainModelRegion)
stop ()
* step 3: search for the objects
read_image (SearchImage, 'rings_and_nuts')
dev_display (SearchImage)
* 查找到模板
find_scaled_shape_model (SearchImage, ReusedModelID, AngleStart, AngleExtent, ScaleMin, ScaleMax, 0.65, 0, 0, 'least_squares', 0, 0.8, RowCheck, ColumnCheck, AngleCheck, ScaleCheck, Score)
for i := 0 to |Score| - 1 by 1
    get_hom_mat2d_from_matching_result (RowCheck[i], ColumnCheck[i], AngleCheck[i], ScaleCheck[i], ScaleCheck[i], MoveAndScalingOfObject)
    affine_trans_contour_xld (ReusedShapeModel, ModelAtNewPosition, MoveAndScalingOfObject)
    dev_display (ModelAtNewPosition)
endfor
disp_continue_message (WindowHandle, 'black', 'true')
stop ()
clear_shape_model (ModelID)
* ------------  end of the application  ------------
* clean up
dev_update_window ('on')
Halcon 案例模板匹配与测量
思路:
1.先进行模板匹配找出要匹配的模板(如案例中的字符)
2.获取模板的角度位置
3.得到角度、位置后对物体进行测量
* This example program shows the use of pattern matching with shape models
* to locate an object.  Furthermore, it shows how to use the detected position
* and rotation of the object to construct search spaces for inspection tasks.
* In this particular example, the print on an IC is used to find the IC.  From the
* found position and rotation, two measurement rectangles are constructed to
* measure the spacing between the leads of the IC.  Because of the lighting
* used in this example, the leads have the saturated gray value of 255 at several
* positions and rotations, which enlarges the apparent width of the leads, and
* hence seems to reduce the spacing between the leads, although the same
* board is used in all images.
dev_update_pc ('off')
dev_update_window ('off')
dev_update_var ('off')
open_framegrabber ('File', 1, 1, 0, 0, 0, 0, 'default', -1, 'default', -1, 'default', 'board/board.seq', 'default', -1, 1, FGHandle)
grab_image (Image, FGHandle)
get_image_size (Image, Width, Height)
dev_close_window ()
dev_open_window (0, 0, Width, Height, 'black', WindowHandle)
dev_open_window (Height + 70, 0, Width, 120, 'black', WindowHandleText)
dev_set_window (WindowHandle)
set_display_font (WindowHandle, 16, 'mono', 'true', 'false')
set_display_font (WindowHandleText, 16, 'mono', 'true', 'false')
dev_set_color ('red')
dev_display (Image)
Row1 := 188
Column1 := 182
Row2 := 298
Column2 := 412
gen_rectangle1 (Rectangle, Row1, Column1, Row2, Column2)
area_center (Rectangle, Area, Row, Column)
Rect1Row := -102
Rect1Col := 5
Rect2Row := 107
Rect2Col := 5
RectPhi := 0
RectLength1 := 170
RectLength2 := 5
gen_rectangle2 (Rectangle1, Row + Rect1Row, Column + Rect1Col, RectPhi, RectLength1, RectLength2)
gen_rectangle2 (Rectangle2, Row + Rect2Row, Column + Rect2Col, RectPhi, RectLength1, RectLength2)
reduce_domain (Image, Rectangle, ImageReduced)
create_shape_model (ImageReduced, 4, 0, rad(360), rad(1), 'none', 'use_polarity', 30, 10, ModelID)
get_shape_model_contours (ShapeModel, ModelID, 1)
hom_mat2d_identity (HomMat2DIdentity)
hom_mat2d_translate (HomMat2DIdentity, Row, Column, HomMat2DTranslate)
affine_trans_contour_xld (ShapeModel, ShapeModelTrans, HomMat2DTranslate)
dev_display (Image)
dev_set_color ('green')
dev_display (ShapeModelTrans)
dev_set_color ('blue')
dev_set_draw ('margin')
dev_set_line_width (3)
dev_display (Rectangle1)
dev_display (Rectangle2)
dev_set_draw ('fill')
dev_set_line_width (1)
dev_set_color ('yellow')
disp_message (WindowHandle, ['Press left button to start','and stop the demo'], 'window', 12, 12, 'black', 'true')
get_mbutton (WindowHandle, Row3, Column3, Button1)
wait_seconds (0.5)
Button := 0
while (Button != 1)
    dev_set_window (WindowHandle)
    dev_set_part (0, 0, Height - 1, Width - 1)
    grab_image (ImageCheck, FGHandle)
    dev_display (ImageCheck)
    count_seconds (S1)
    find_shape_model (ImageCheck, ModelID, 0, rad(360), 0.7, 1, 0.5, 'least_squares', 4, 0.7, RowCheck, ColumnCheck, AngleCheck, Score)
    count_seconds (S2)
    dev_display (ImageCheck)
    if (|Score| > 0)
        dev_set_color ('green')
        hom_mat2d_identity (HomMat2DIdentity)
        hom_mat2d_translate (HomMat2DIdentity, RowCheck, ColumnCheck, HomMat2DTranslate)
        hom_mat2d_rotate (HomMat2DTranslate, AngleCheck, RowCheck, ColumnCheck, HomMat2DRotate)
        affine_trans_contour_xld (ShapeModel, ShapeModelTrans, HomMat2DRotate)
        dev_display (ShapeModelTrans)
        affine_trans_pixel (HomMat2DRotate, Rect1Row, Rect1Col, Rect1RowCheck, Rect1ColCheck)
        affine_trans_pixel (HomMat2DRotate, Rect2Row, Rect2Col, Rect2RowCheck, Rect2ColCheck)
        gen_rectangle2 (Rectangle1Check, Rect1RowCheck, Rect1ColCheck, AngleCheck, RectLength1, RectLength2)
        gen_rectangle2 (Rectangle2Check, Rect2RowCheck, Rect2ColCheck, AngleCheck, RectLength1, RectLength2)
        dev_set_color ('blue')
        dev_set_draw ('margin')
        dev_set_line_width (3)
        dev_display (Rectangle1Check)
        dev_display (Rectangle2Check)
        dev_set_draw ('fill')
        count_seconds (S3)
        gen_measure_rectangle2 (Rect1RowCheck, Rect1ColCheck, AngleCheck, RectLength1, RectLength2, Width, Height, 'bilinear', MeasureHandle1)
        gen_measure_rectangle2 (Rect2RowCheck, Rect2ColCheck, AngleCheck, RectLength1, RectLength2, Width, Height, 'bilinear', MeasureHandle2)
        measure_pairs (ImageCheck, MeasureHandle1, 2, 90, 'positive', 'all', RowEdgeFirst1, ColumnEdgeFirst1, AmplitudeFirst1, RowEdgeSecond1, ColumnEdgeSecond1, AmplitudeSecond1, IntraDistance1, InterDistance1)
        measure_pairs (ImageCheck, MeasureHandle2, 2, 90, 'positive', 'all', RowEdgeFirst2, ColumnEdgeFirst2, AmplitudeFirst2, RowEdgeSecond2, ColumnEdgeSecond2, AmplitudeSecond2, IntraDistance2, InterDistance2)
        count_seconds (S4)
        dev_set_color ('red')
        disp_line (WindowHandle, RowEdgeFirst1 - RectLength2 * cos(AngleCheck), ColumnEdgeFirst1 - RectLength2 * sin(AngleCheck), RowEdgeFirst1 + RectLength2 * cos(AngleCheck), ColumnEdgeFirst1 + RectLength2 * sin(AngleCheck))
        disp_line (WindowHandle, RowEdgeSecond1 - RectLength2 * cos(AngleCheck), ColumnEdgeSecond1 - RectLength2 * sin(AngleCheck), RowEdgeSecond1 + RectLength2 * cos(AngleCheck), ColumnEdgeSecond1 + RectLength2 * sin(AngleCheck))
        disp_line (WindowHandle, RowEdgeFirst2 - RectLength2 * cos(AngleCheck), ColumnEdgeFirst2 - RectLength2 * sin(AngleCheck), RowEdgeFirst2 + RectLength2 * cos(AngleCheck), ColumnEdgeFirst2 + RectLength2 * sin(AngleCheck))
        disp_line (WindowHandle, RowEdgeSecond2 - RectLength2 * cos(AngleCheck), ColumnEdgeSecond2 - RectLength2 * sin(AngleCheck), RowEdgeSecond2 + RectLength2 * cos(AngleCheck), ColumnEdgeSecond2 + RectLength2 * sin(AngleCheck))
        dev_set_line_width (1)
        NumLeads := |IntraDistance1| + |IntraDistance2|
        MinDistance := min([InterDistance1,InterDistance2])
        dev_set_window (WindowHandleText)
        dev_set_part (0, 0, 119, Width - 1)
        dev_clear_window ()
        disp_message (WindowHandleText, 'Matching: Time: ' + ((S2 - S1) * 1000)$'5.2f' + 'ms , Score: ' + Score$'7.5f', 'image', 20, 20, 'green', 'false')
        disp_message (WindowHandleText, 'Measure:  Time: ' + ((S4 - S3) * 1000)$'5.2f' + ' ms, Num. leads: ' + NumLeads$'2d', 'image', 50, 20, 'red', 'false')
        disp_message (WindowHandleText, '          Min. lead dist: ' + MinDistance$'6.3f', 'image', 80, 20, 'red', 'false')
    endif
    dev_error_var (Error, 1)
    dev_set_check ('~give_error')
    get_mposition (WindowHandle, R, C, Button)
    dev_error_var (Error, 0)
    dev_set_check ('give_error')
    if (Error != H_MSG_TRUE)
        Button := 0
    endif
endwhile
dev_set_window (WindowHandleText)
dev_close_window ()
close_framegrabber (FGHandle)
Halcon 多模板与多图像的匹配

* This example program shows how to use HALCON's shape-based matching
* to find multiple different models in one call to find_shape_models.  Note that this
* is one mode of operation that is frequently useful.  However, the number of
* applications that can be solved with this mechanism is much larger.  For
* another application where finding multiple models in one call is useful are
* applications where the same object can only occur in small angle ranges
* around a discrete set of angles, e.g., 0°, 90°, 180°, and 270°.  In these cases,
* it would be wasteful to train the model for the full 360° rotation range and to
* match the model in this range.  Instead, four models using the small angle
* ranges around the discrete set of angles should be generated from the same
* model image and used in the matching stage using four different angle ranges.
dev_update_pc ('off')
dev_update_window ('off')
dev_update_var ('off')
dev_close_window ()
dev_open_window (0, 0, 646, 482, 'black', WindowHandle)
dev_set_part (0, 0, 481, 645)
set_display_font (WindowHandle, 20, 'mono', 'true', 'false')
dev_set_draw ('margin')
dev_set_line_width (3)
* These colors will be used to graphically discern the different models in the
* visualization code below.
Colors := ['red','green','cyan']
* The models will be generated from hard-coded rectangles given by the
* following coordinates:
Row1 := [135,150,185]
Column1 := [250,170,220]
Row2 := [375,310,335]
Column2 := [355,395,375]
* The object Models will hold a set of XLD contours that represent the different
* models.  They are used below to overlay the found models on the current
* image.  XLD contours are used because they can be transformed much faster
* than regions.  This creates a slight problem because in general multiple XLD
* contours will represent one model.  Therefore, the start and end indices of the
* different models will be stored in IndexS and IndexE, respectively.
* 产生一个空的轮廓
gen_empty_obj (Models)
IndexS := []
IndexE := []
* The variable ModelIDs holds the different models that are created below.
ModelIDs := []
* Likewise, RowsRef and ColumnsRef store the reference points of the different
* models.  They are necessary to transform the models to the found instances
* in the current image.

* 准备模板
for J := 1 to 3 by 1
    read_image (Image, 'metal-parts/metal-part-model-' + J$'02d')
    dev_display (Image)
    dev_set_color ('green')
    * 设置显示位置
    set_tposition (WindowHandle, 20, 20)
    * 写入字体
    write_string (WindowHandle, 'Generating shape model ' + J$'d')
    * 绘制矩形ROI
    gen_rectangle1 (Rectangle, Row1[J - 1], Column1[J - 1], Row2[J - 1], Column2[J - 1])
    * 获取中心区域
    area_center (Rectangle, Area, Row, Column)
    * 将区域裁剪
    reduce_domain (Image, Rectangle, ImageReduced)
    * Although we will use get_shape_model_contours below to obtain the
    * representation of the model, we extract a model representation here using
    * inspect_shape_model because this enables us to display the representation
    * of the model while the model is being created.
    * 检测模型特性  inspect_shape_model(图像,得到金字塔图像,得到对应的区域,金字塔层数,对比度)
    inspect_shape_model (Image, ModelImages, ModelRegions, 1, 30)
    * Since the shape models contain a few extraneous edges, they will be
    * removed here to give a slightly nicer visualization.
    * 断成不同的连通域
    connection (ModelRegions, ConnectedRegions)
    * 选择区域
    select_shape (ConnectedRegions, SelectedRegions, 'area', 'and', 20, 100000)
    * 将选择的区域联合
    union1 (SelectedRegions, ModelRegions)
    * 转换骨架到XLD轮廓
    gen_contours_skeleton_xld (ModelRegions, ModelContours, 1, 'filter')
    dev_set_color ('red')
    dev_display (ModelContours)
    * 创建形状模板
    create_shape_model (ImageReduced, 5, rad(0), rad(360), 'auto', 'pregeneration', 'use_polarity', 30, 7, ModelID)
    * 获取形状轮廓
    get_shape_model_contours (ModelCont, ModelID, 1)
    * 根据特征,选择特定的亚像素轮廓或多边形
    select_shape_xld (ModelCont, ModelContours, 'contlength', 'and', 20, 1000)
    * Count how many XLD contours there are in the current model and in the
    * already stored models.  This is necessary to compute IndexS and IndexE.
    * 计算轮廓数量
    count_obj (ModelContours, NumModel)
    * 计算空的轮廓
    count_obj (Models, NumModels)
    * 将原有的轮廓放入新的轮廓中
    concat_obj (Models, ModelContours, Models)
    * 轮廓起始索引,轮廓数量增加 IndexS:=[1,5,10]
    IndexS := [IndexS,NumModels + 1]
    * 轮廓的个数,第一个轮廓有4个,第二个有4+5个,第三个有4+5+2个   IndexE:=[4,9,11]
    IndexE := [IndexE,NumModels + NumModel]
    * 模型句柄增加  ModelIDs :=[0,1,2]
    ModelIDs := [ModelIDs,ModelID]
endfor
dev_set_color ('yellow')
set_tposition (WindowHandle, 50, 20)
write_string (WindowHandle, 'Press left button to start')
set_tposition (WindowHandle, 80, 20)
write_string (WindowHandle, 'and stop the demo.')
get_mbutton (WindowHandle, Row3, Column3, Button1)
wait_seconds (0.5)
dev_set_color ('red')
Button := 0
ImgNo := 1
* 点击开始识别
while (Button != 1)
    * 读取图片
    read_image (Image, 'metal-parts/metal-parts-' + ImgNo$'02d')
    * 计算秒数
    count_seconds (S1)
    * find_shape_models查找模板Model:=0 查找到 ModelIDs数组中的第一个模板
    find_shape_models (Image, ModelIDs, rad(0), rad(360), 0.5, 0, 0.5, 'least_squares', 0, 0.8, Row, Column, Angle, Score, Model)
    count_seconds (S2)
    Time := (S2 - S1) * 1000
    dev_display (Image)
    Num := |Score|
    for J := 0 to Num - 1 by 1
        * Select the correct XLD contours from the Models object.
        * 复制一个目标到模板中
        copy_obj (Models, ModelSelected, IndexS[Model[J]], IndexE[Model[J]] - IndexS[Model[J]] + 1)
        * Compute the transformation from the model object to the current instance.
        * Row[J], Column[J], Angle[J] 对应117行的行列角度
        vector_angle_to_rigid (0, 0, 0, Row[J], Column[J], Angle[J], HomMat2D)
        affine_trans_contour_xld (ModelSelected, ModelTrans, HomMat2D)
        dev_set_color (Colors[Model[J]])
        dev_display (ModelTrans)
    endfor
    * 显示
    dev_set_color ('yellow')
    set_tposition (WindowHandle, 20, 20)
    if (Num == 1)
        write_string (WindowHandle, Num$'1d' + ' object found in ' + Time$'4.2f' + 'ms')
    else
        write_string (WindowHandle, Num$'1d' + ' objects found in ' + Time$'4.2f' + 'ms')
    endif
    ImgNo := ImgNo + 1
    if (ImgNo > 15)
        ImgNo := 1
    endif
    dev_error_var (Error, 1)
    dev_set_check ('~give_error')
    get_mposition (WindowHandle, R, C, Button)
    dev_error_var (Error, 0)
    dev_set_check ('give_error')
    if (Error != H_MSG_TRUE)
        Button := 0
    endif
endwhile