UI制作
qrc
注意调用UI前把样式表里绑定的资源(qrc)转换成py导入进去
xxx.qrc转xxx.py 两种方法
1命令
pyrcc5 -o icons_rc.py icons.qrc
2外部工具pyrcc
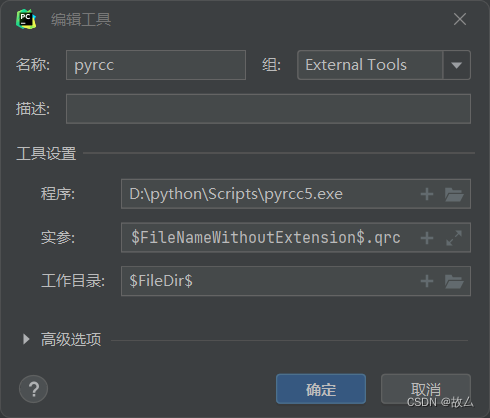
实参
-o $FileNameWithoutExtension$.py $FileNameWithoutExtension$.qrc
sdz.qrc→→sdaz.py
在代码里写
import sdz1.调用UI无交互函数
import sys
from PyQt5.QtWidgets import QApplication, QWidget
from PyQt5 import uic
from PyQt5.QtCore import Qt, QPoint
import sdz      #qrc转成的py
class DraggableWindow(QWidget):
    def __init__(self):
        super().__init__()
        uic.loadUi("./史迪仔.ui", self)   #保存的UI名
        # 设置窗口标志
        self.setWindowFlag(Qt.FramelessWindowHint)
        # 设置半透明背景
        self.setAttribute(Qt.WA_TranslucentBackground)
        # 记录鼠标按下的初始位置
        self.offset = QPoint()
    def mousePressEvent(self, event):
        # 记录鼠标按下的初始位置
        self.offset = event.pos()
    def mouseMoveEvent(self, event):
        # 移动窗口位置
        if event.buttons() == Qt.LeftButton:
            self.move(self.pos() + event.pos() - self.offset)
if __name__ == '__main__':
    app = QApplication(sys.argv)
    # 创建可拖动窗口实例
    ui = DraggableWindow()
    # 显示窗口
    ui.show()
    # 启动应用程序事件循环
    sys.exit(app.exec_())
2.UI按钮绑定函数
pushButton_3在UI里查看
import sys
from PyQt5.QtWidgets import QApplication, QWidget
from PyQt5 import uic
from PyQt5.QtCore import Qt, QPoint
import sdz      #qrc转成的py
class guWindow(QWidget):
    def __init__(self):
        super().__init__()
        self.gu=uic.loadUi("./史迪仔.ui", self)               #加载UI  命名self+任意
        an = self.gu.pushButton_3  # 按钮
        an.clicked.connect(self.gumou)  # 给按钮绑定函数

    # ✦✦✦✦✦✦✦✦✦✦设置无边框 和可拖动✦✦✦✦✦✦✦✦✦✦✦✦✦固定代码
        self.gu.setWindowOpacity(0.90)  # 设置窗口透明度
        self.gu.setWindowFlag(Qt.FramelessWindowHint)  # 去除边框
        self.gu.setAttribute(Qt.WA_TranslucentBackground)  # 去除白色背景

        self.offset = QPoint()     # 记录鼠标按下的初始位置
    def mousePressEvent(self, event):
        self.offset = event.pos()
    def mouseMoveEvent(self, event):
        if event.buttons() == Qt.LeftButton:
            self.move(self.pos() + event.pos() - self.offset)    # 移动窗口位置
    # ✦✦✦✦✦✦✦✦✦✦✦✦✦✦✦✦✦✦✦✦✦✦✦✦✦✦✦✦✦✦✦✦✦✦✦✦✦✦✦✦✦✦✦✦✦

    def gumou(self):  # 按钮绑定的函数 功能
        print("顾某")
if __name__ == '__main__':
    app = QApplication(sys.argv)
    # 创建可拖动窗口实例
    ui = guWindow()        #函数
    # 显示窗口
    ui.show()
    # 启动应用程序事件循环
    sys.exit(app.exec_())
3.UI按钮绑定函数 开启子线程
在子线程运行期间 UI不卡顿
把UI转换成py导入进去
xxx.ui转xxx.py 两种方法
1.命令行
pyuic5 -o ui.py ui.ui2.外部工具pyuic
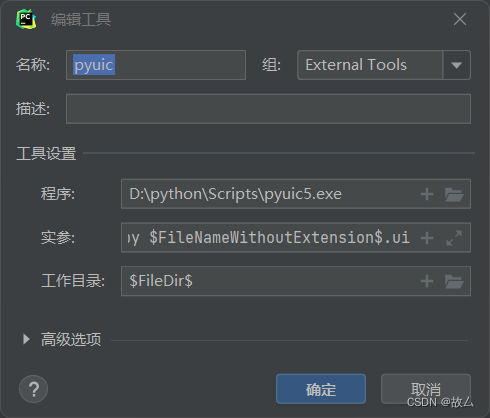
-o $FileNameWithoutExtension$.py $FileNameWithoutExtension$.ui调用UI
sdz.ui已经转换为sdz.py
from sdz import Ui_Form   #UI  UI的主函数
class guWindow(QWidget):
    def __init__(self):
        super().__init__()
        self.gu = Ui_Form()
        self.gu.setupUi(self)
任务栏图标LOGO
设置logo.qrc转为logo.py
logo.qrc里不要放其他东西
<RCC>
  <qresource>
    <file>123.ico</file>
  </qresource>
</RCC>
导入库
from PyQt5 import QtGui
import logo  #任务栏图标qrc
import ctypes#设置任务栏图标
ctypes.windll.shell32.SetCurrentProcessExplicitAppUserModelID("com.example.myapp")
在主函数加上两行代码 ✦✦✦
if __name__ == '__main__':
    app = QApplication(sys.argv)

    icon = QtGui.QIcon(':/123.ico')    #✦✦✦
    app.setWindowIcon(icon)            #✦✦✦

    ui = guWindow()
参数传递
在按钮绑定的函数中开始线程
    def gumou(self):  # 按钮绑定的函数 功能
        self.my_thread = MyThread(url)  # 创建线程
        self.my_thread.progress_updated.connect(self.update_progress)  # 连接数字信号
        self.my_thread.name_received.connect(self.receive_name)          # 连接文字信号
        self.my_thread.start()  # 开始线程
在进程中定义信号
class MyThread(QThread):
    progress_updated = pyqtSignal(int)    # 定义信号,传递 int 类型的参数
    name_received = pyqtSignal(str)       # 定义信号,传递 str 类型的参数
    def __init__(self,url):
        super().__init__()
        self.url = url                    #参数
    def run(self):
        try:
接收信号
    def receive_name(self, name):    #接收name
        self.gu.textBrowser.clear()
        self.gu.textBrowser.append(name)

    def update_progress(self, percent): #更新数字
        self.gu.progressBar.setValue(percent)
完整代码
import sys
from PyQt5 import QtGui
from PyQt5.QtWidgets import QApplication, QWidget
from PyQt5.QtCore import Qt, QPoint, QThread,pyqtSignal
from gui import Ui_Form   #UI
import sdz     #qrc生成的py #样式表
import logo  #任务栏图标
#设置任务栏图标
import ctypes
ctypes.windll.shell32.SetCurrentProcessExplicitAppUserModelID("com.example.myapp")

#子线程下载
class MyThread(QThread):
    progress_updated = pyqtSignal(int)    # 定义信号,传递 int 类型的参数
    name_received = pyqtSignal(str)       # 定义信号,传递 str 类型的参数
    def __init__(self,url):
        super().__init__()
        self.url = url                    #参数
    def run(self):
        try:
            self.name_received.emit(code)        #发送获取信号
            self.progress_updated.emit(percent)  # 发送下载进度信号
        except :
            self.name_received.emit(f'错误')
class guWindow(QWidget):
    def __init__(self):
        super().__init__()
        self.gu = Ui_Form()
        self.gu.setupUi(self)
        an = self.gu.pushButton_3  # 按钮
        self.gu.lineEdit.returnPressed.connect(self.gumou)    #lineEdit回车运行
        an.clicked.connect(self.gumou)  # 给按钮绑定函数
		self.user_name_qwidget = self.gu.lineEdit

        # ✦✦✦✦✦✦✦✦✦✦设置无边框 和可拖动✦✦✦✦✦✦✦✦✦✦✦✦✦固定代码
        self.setWindowOpacity(0.90)  # 设置窗口透明度
        self.setWindowFlag(Qt.FramelessWindowHint)  # 去除边框
        self.setAttribute(Qt.WA_TranslucentBackground)  # 去除白色背景
        self.offset = QPoint()     # 记录鼠标按下的初始位置
    def mousePressEvent(self, event):
        self.offset = event.pos()
    def mouseMoveEvent(self, event):
        if event.buttons() == Qt.LeftButton:
            self.move(self.pos() + event.pos() - self.offset)    # 移动窗口位置

    def gumou(self):  # 按钮绑定的函数 功能
        s = self.user_name_qwidget.text()
        url="开始"+s
        self.my_thread = MyThread(url)  # 创建线程
        self.my_thread.progress_updated.connect(self.update_progress)  # 连接数字信号
        self.my_thread.name_received.connect(self.receive_name)          # 连接文字信号
        self.my_thread.start()  # 开始线程

    def receive_name(self, name):    #接收name
        self.gu.textBrowser.clear()
        self.gu.textBrowser.append(name)

    def update_progress(self, percent): #更新数字
        self.gu.progressBar.setValue(percent)

if __name__ == '__main__':
    app = QApplication(sys.argv)

    icon = QtGui.QIcon(':/ks.png')
    app.setWindowIcon(icon)

    ui = guWindow()           # 创建窗口实例
    ui.show()                 # 显示窗口
    sys.exit(app.exec_())     # 启动应用程序事件循环