Rapberry Pi 4 安装VxWorks笔记
本文章发表与我的github page:
Rapberry Pi 4 安装VxWorks笔记 | Hi, I am watershade. Welcome to my pages.
在github page会有更好体验和更多文章。
一、概述
ROS2推荐的操作系统是ubuntu,众所周知,linux并不是实时操作系统。即便是RTLinux,它的实时性在各种报道中似乎也不正面(我没有用过RTLinux,所以不具备发言权)。刚好在某个新闻中看到VxWorks提供了对Rapberry Pi的免费支持。这对我这种穷苦码农来说确实是正规接触VxWorks的一个机会。另一方面VxWorks对ROS2也有一定的支持,这也给我尝试在RPI4(Rapberry Pi 4 后面简写为RPI4)上安装VX(VxWorks后面简写做VX)很大的动力。当然后面如果可能我们尝试Micro-ROS on ThreadX也不是不可以。只是还要一直ThreadX,然后安装Micro-ROS,想想都觉得有难度。
二、跟着官方教程按图索骥
官方提供了几个BSP,号称是Open Source的。后来终于在Vx的官网某处搜到了详细的安装资源。
2.1 安装官方提到的依赖项目
我当前使用的是ubuntu22.04 amd64版本,官方提到的依赖其实已经默认安装了。不过这里还是转述一下:
sudo apt install build-essential libc6:i386因为当前版本安装的是python3,如果只是需要一个ftp不需要安装python2版本的pip。我的操作如下:
sudo apt install python3-pip
sudo pip install pyftpdlib
2.2 下载RPI4的firmware
这个firmware托管在github,网址是https://github.com/raspberrypi/firmware/。。官方没有做成release版本的,所以直接点击tags就可以找到最近的你想下载的那个版本的firmware。我下载的是最新的1.20230405。 下载完成之后解压,然后copy或者剪切整个boot目录到sd卡即可。这里用{sd根目录}表示我的sd卡挂载的位置。
tar -xzf firmware-1.20230405.tar.gz
cd firmware-1.20230405
cp -rL boot/*  {sd根目录}
#剪切完成之后,确认一下
ls {sd根目录}
解压会比较快,但是剪切过程会需要一定的时间。
2.3 编译u-boot
U-Boot的托管仓库有两个一个是denx一个是github。你根据需要下载。具体的教程可以查看u-boot docs. 我这里没有将整个仓库克隆下载,而是直接下载2023年10月份的版本。下载完之后解压:
tar -xzf u-boot-2023.10.tar.gz
cd u-boot-2023.10
使用u-boot需要安装交叉编译环境,安装一下:
sudo apt install gcc-aarch64-linux-gn

## 官方文档提供的额外包安装,我暂时没有全部安装
sudo apt-get install bc bison build-essential coccinelle \
  device-tree-compiler dfu-util efitools flex gdisk graphviz imagemagick \
  liblz4-tool libgnutls28-dev libguestfs-tools libncurses-dev \
  libpython3-dev libsdl2-dev libssl-dev lz4 lzma lzma-alone openssl \
  pkg-config python3 python3-asteval python3-coverage python3-filelock \
  python3-pkg-resources python3-pycryptodome python3-pyelftools \
  python3-pytest python3-pytest-xdist python3-sphinxcontrib.apidoc \
  python3-sphinx-rtd-theme python3-subunit python3-testtools \
  python3-virtualenv swig uuid-dev

# 上面的包我没有都安装,根据后面的错误提示我额外安装了bison和flex
sudo apt-get install bison flex
接着配置u-boot,可参照官方针对rpi的配置说明和build 说明。其实命令很简单,但是我的出现了错误提示。之后我又重新clone了一下u-boot仓库,接着配置:
# 下载很慢
git clone https://source.denx.de/u-boot/u-boot.git
# 改用github
git clone https://github.com/u-boot/u-boot.git

cd u-boot
# 选择版本
git checkout v2023.10

# config/配置
CROSS_COMPILE=aarch64-linux-gnu- make rpi_4_defconfig

# build/编译
CROSS_COMPILE=aarch64-linux-gnu- make

# copy or move/复制到sd卡中,并更名为u-boot-64.bin
cp u-boot.bin {sd根目录}/u-boot-64.bin

#检查文件是否存在
ls {sd根目录}
2.4 拷贝
在第二章的开头提到了那个官方的raspberry pi相关的VX7 sdk资源。我选择了下载VxWorks SDK for Raspberry Pi 4 v1.5.1。[注:点击前面的链接就可跳转到下载资源]
这个版本是VX 23.03,如图所示.
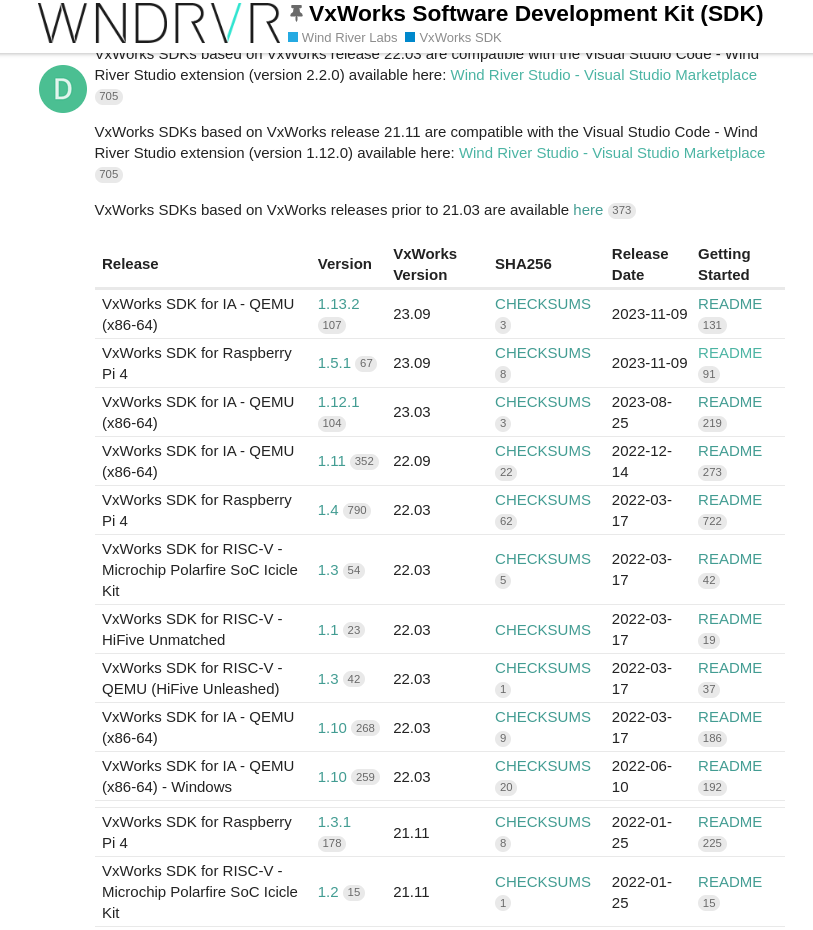
图1 VX7 SDK for RPI
然后我们解压文件,并拷贝必要目录到SD卡。
## 解压时间也较长,毕竟压缩包都八百多兆。
tar -xjf wrsdk-vxworks7-raspberrypi4b-1.5.1.tar.bz2
cd wrsdk-vxworks7-raspberrypi4b
ls -al
# 可以看到有一个vxsdk的目录,进入
cd vxsdk
ls -al
## 这里面有4个文件夹,其中的sdcard和bsps就是我们待会要用到的目录。
## 拷贝的时间会稍长,需要耐心等待
cp -rL sdcard/*  {sd根目录}

## 官方的readme说法是只复制uVxWorks
cp bsps/rpi_4_0_1_3_0/uVxWorks {sd根目录}

## 我的做法是将整个rpi_4_0_1_3_0目录复制过去
cp -rL bsps/rpi_4_0_1_3_0/* {sd根目录}
需要说明的是,拷贝的时候不要将sdcard和rpi_4_0_1_3_0目录拷贝进去,而是将这两个目录的内容拷贝到sd卡的根目录下。
2.5 启动
连接RPI4的8,9,10三个引脚到USB串口(TTL电平)上。具体请查看下图:

图2 树莓派引脚信号图
- 8:GPIO14(TXD) 连接串口的RXD
- 9:GND 连接串口的GND
- 10:GPIO15(RXD) 连接串口的TXD 你会发现输出如下所示:
U-Boot 2023.10 (Jan 06 2024 - 19:32:58 +0800)

DRAM:  948 MiB (effective 1.9 GiB)
RPI 4 Model B (0xb03112)
Core:  209 devices, 15 uclasses, devicetree: board
MMC:   mmcnr@7e300000: 1, mmc@7e340000: 0
Loading Environment from FAT... OK
In:    serial,usbkbd
Out:   serial,vidconsole
Err:   serial,vidconsole
Net:
Warning: ethernet@7d580000 MAC addresses don’t match:
Address in DT is                dc:a6:32:c8:21:09
Address in environment is       dc:a6:32:07:b3:a4
eth0: ethernet@7d580000
Hit any key to stop autoboot:  0
15767528 bytes read in 677 ms (22.2 MiB/s)
## Booting kernel from Legacy Image at 00100000 ...
   Image Name:   vxworks
   Image Type:   AArch64 VxWorks Kernel Image (uncompressed)
   Data Size:    15767464 Bytes = 15 MiB
   Load Address: 00100000
   Entry Point:  00100000
   Verifying Checksum ... OK
Working FDT set to 0
   Loading Kernel Image
   !!! WARNING !!! Using legacy DTB
## Starting vxWorks at 0x00100000, device tree at 0x00000000 ...
Instantiating /ram0 as rawFs,  device = 0x1
Formatting /ram0 for HRFS v1.2
Instantiating /ram0 as rawFs, device = 0x1
Formatting...OK.
Target Name: vxTarget
Instantiating /tmp as rawFs,  device = 0x10001
Formatting /tmp for HRFS v1.2
Instantiating /tmp as rawFs, device = 0x10001
Formatting...OK.

 _________            _________
 \........\          /......../
  \........\        /......../
   \........\      /......../
    \........\    /......../
     \........\   \......./
      \........\   \...../              VxWorks SMP 64-bit
       \........\   \.../
        \........\   \./     Release version: 23.09
         \........\   -      Build date: Sep 19 2023 16:16:34
          \........\
           \......./         Copyright Wind River Systems, Inc.
            \...../   -                 1984-2023
             \.../   /.\
              \./   /...\
               -   -------

                   Board: Raspberry Pi 4 Model B - ARMv8
               CPU Count: 4
          OS Memory Size: ~883MB
        ED&R Policy Mode: Deployed
     Debug Agent: Started (always)
         Stop Mode Agent: Not started
              BSP Status: *** UNSUPPORTED ***

Instantiating /ram as rawFs,  device = 0x50001
Formatting /ram for DOSFS
Instantiating /ram as rawFs, device = 0x50001
Formatting...Retrieved old volume params with %38 confidence:
Volume Parameters: FAT type: FAT32, sectors per cluster 0
  0 FAT copies, 0 clusters, 0 sectors per FAT
  Sectors reserved 0, hidden 0, FAT sectors 0
  Root dir entries 0, sysId (null)  , serial number 5b0000
  Label:"           " ...
Disk with 64 sectors of 512 bytes will be formatted with:
Volume Parameters: FAT type: FAT12, sectors per cluster 1
  2 FAT copies, 54 clusters, 1 sectors per FAT
  Sectors reserved 1, hidden 0, FAT sectors 2
  Root dir entries 112, sysId VXDOS12 , serial number 5b0000
  Label:"           " ...
OK.
Thu Jan  1 00:00:01 1970: ipnet[44a0f0]: Error: ipcom_getsockaddrbyaddr failed gw: dhcp

 Adding 22707 symbols for standalone.

->
2.6 启动
如果你连接HDMI到屏幕上,屏幕会显示如下信息:
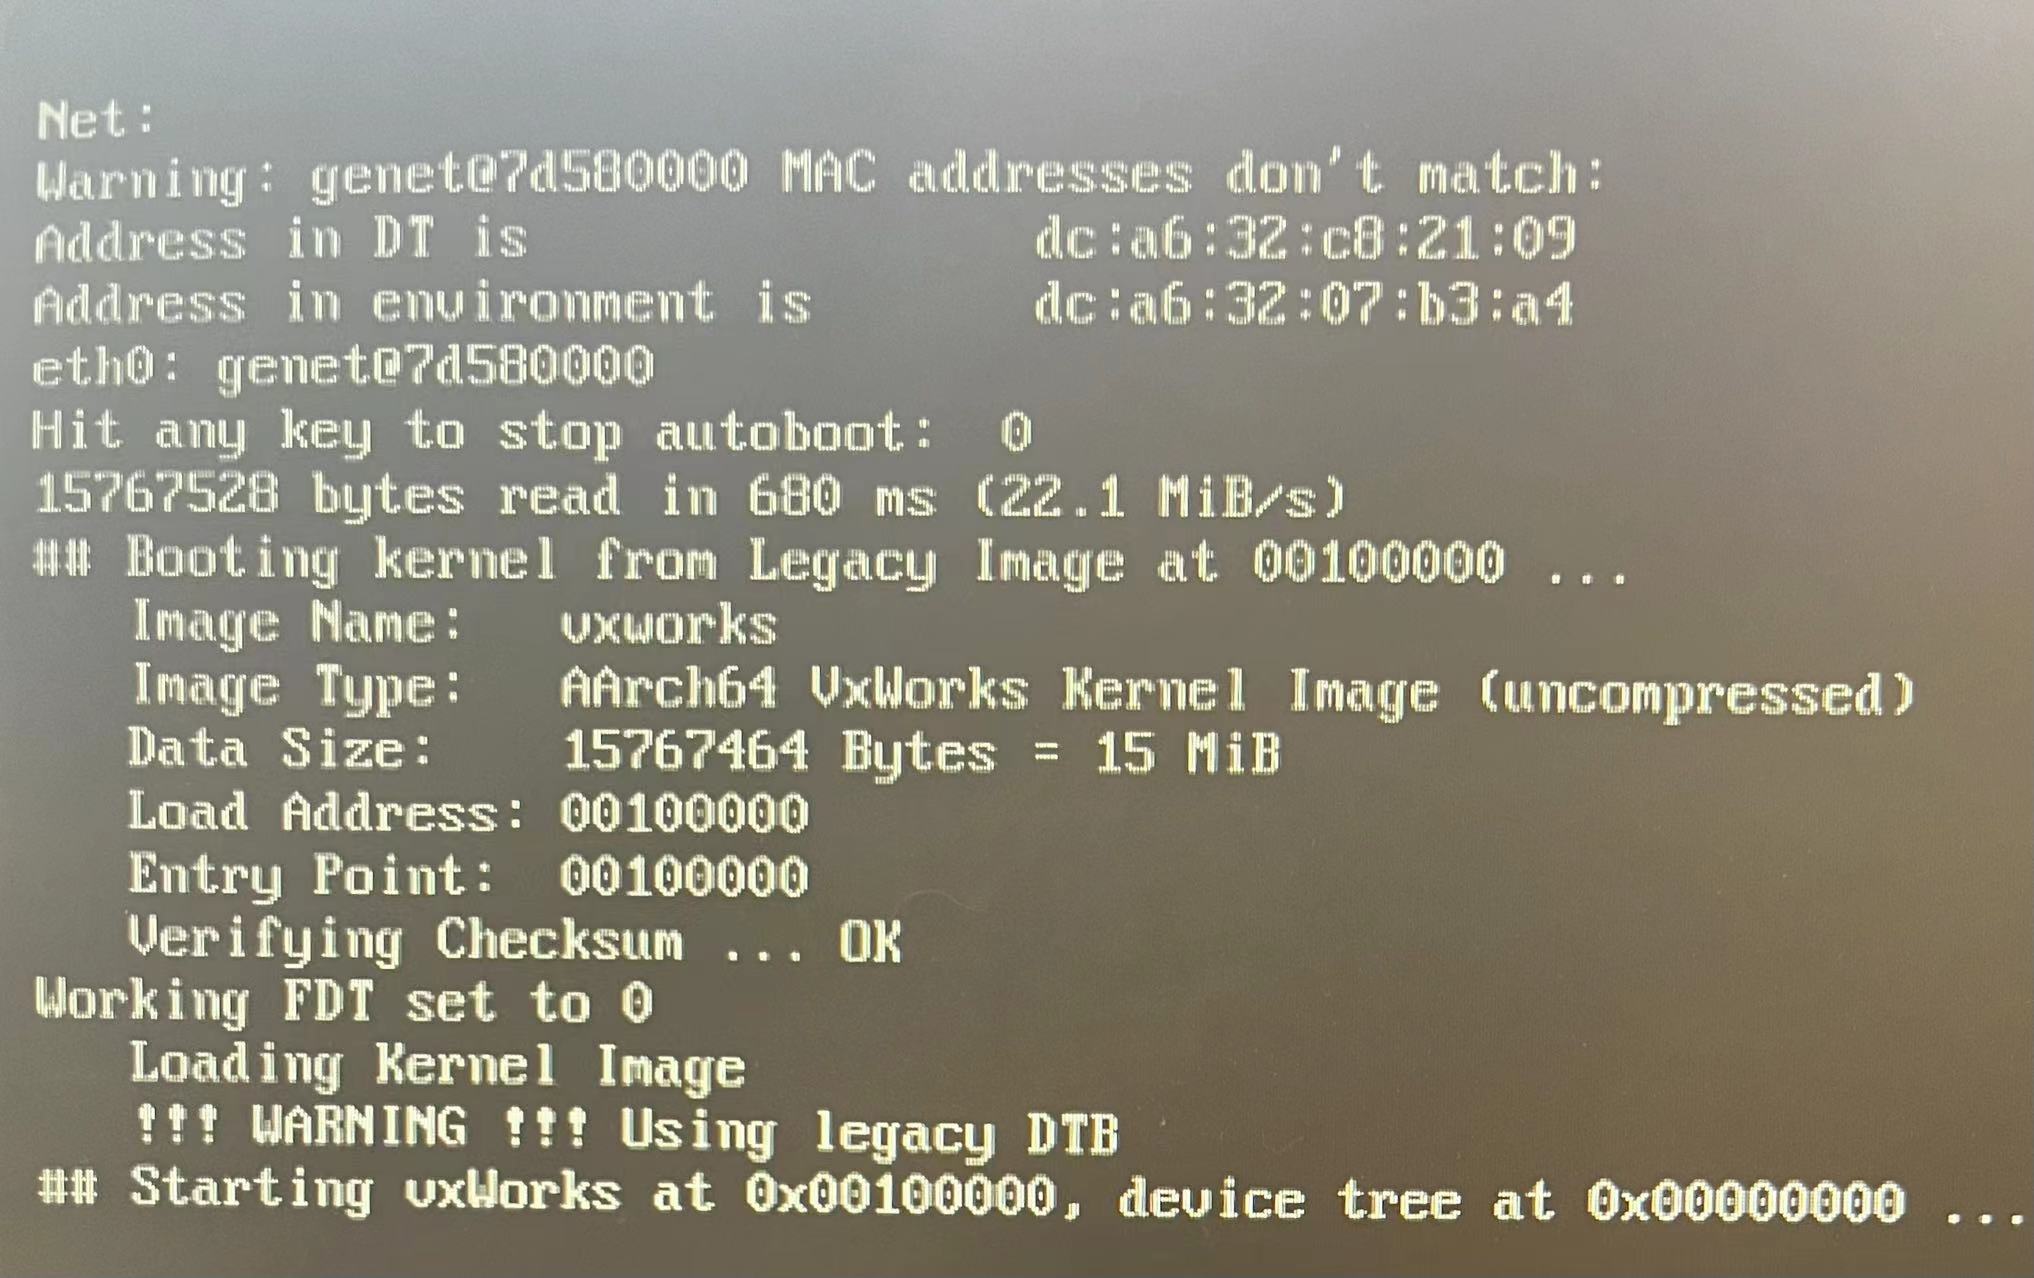
图3 通过HDMI显示
可以看到通过HDMI并没有显示完整的信息。
在这一个步骤我以为折腾了很久,发现如果更改为串口连接就可以。(串口连接之前也出错了,所以没排查出来问题。)
三、后续测试
在开始测试之前,需要执行如下操作,以配置必要的环境变量等信息。
## 切换到你的vx7 sdk解压位置,比如我的位置在~/Workspaces/Vxworks_RPI/wrsdk-vxworks7-raspberrypi4b
cd ~/Workspaces/Vxworks_RPI/wrsdk-vxworks7-raspberrypi4b

## 配置
source  sdkenv.sh

## 检查一下cmake版本,这样便于自己在编写CMakeLists.txt使用过高的版本
cmake --version
在开始之前需要说明一下,VxWorks的RTP和DKM的区别。
-
RTP: Real-Time Process.An executable application that runs in user-space as a process. RTPs run in its own environment which cannot directly interact with other resources not mapped on to it, adding robustness. RTPs produce a VXE which can be loaded from a target file system (RomFS, NFS, SD card) or directly from a WRDBG debug connection.
-
DKM: Downloadable Kernel Module.A kernel application that runs in kernel-mode as tasks, with full access to the system hardware. DKMs produce a relocatable object module that can be statically linked with the VxWorks kernel at VIP build time, dynamically loaded from a target file system (RomFS, SD card), or loaded directly from a WRDBG debug connection.
上面的内容简单翻译一下就是RTP是实时运行进程,运行在用户空间。RTP在其自己的环境中运行,无法直接与未映射到其上的其他资源交互,从而增加了鲁棒性。RTP程序编译生成VXE文件,它能够被加载到目标机的文件系统中,或通过 WRDBG调试连接加载。下面的3.1和3.2生成的程序就是VXE程序。
而DKM称作可下载内核模块,作为任务在内核模式下运行的内核应用程序,可以完全访问系统硬件。 DKM 生成可重定位的目标模块,该模块可以在 VIP 构建时与 VxWorks 内核静态链接、从目标文件系统(RomFS、SD 卡)动态加载,或直接通过WRDBG调试连接加载。
RTP类似安卓机上的应用程序,而DKM类似于内核模块。
官方教程有关于两者编译和执行的详细信息。
3.2 尝试使用cmake编译RTP例程
我们这里直接使用官方的example来生成。(现在我们已经处于sdk的根目录下)
## 我们先尝试build例程中的hello_cmake_rtp
cd  examples/rtp/hello_cmake_rtp/

## 为了原始目录干净,创建build文件夹
mkdir build
cd build

## 这里的cmake需要指定工具链,这里使用RTP工具链接
cmake -D CMAKE_TOOLCHAIN_FILE=${WIND_SDK_HOME}/vxsdk/sysroot/mk/rtp.toolchain.cmake ..

## 此时应该成功编译,显示类似如下信息
CMake Deprecation Warning at CMakeLists.txt:19 (cmake_minimum_required):
  Compatibility with CMake < 2.8.12 will be removed from a future version of
  CMake.

  Update the VERSION argument <min> value or use a ...<max> suffix to tell
  CMake that the project does not need compatibility with older versions.


-- The C compiler identification is Clang 16.0.0
-- The CXX compiler identification is Clang 16.0.0
-- The ASM compiler identification is Clang with MSVC-like command-line
-- Found assembler: /home/xxxxx/Workspaces/Vxworks_RPI/wrsdk-vxworks7-raspberrypi4b/vxsdk/host/x86_64-linux/bin/wr-cc
-- Detecting C compiler ABI info
-- Detecting C compiler ABI info - done
-- Check for working C compiler: /home/xxxxx/Workspaces/Vxworks_RPI/wrsdk-vxworks7-raspberrypi4b/vxsdk/host/x86_64-linux/bin/wr-cc - skipped
-- Detecting C compile features
-- Detecting C compile features - done
-- Detecting CXX compiler ABI info
-- Detecting CXX compiler ABI info - done
-- Check for working CXX compiler: /home/xxxxx/Workspaces/Vxworks_RPI/wrsdk-vxworks7-raspberrypi4b/vxsdk/host/x86_64-linux/bin/wr-c++ - skipped
-- Detecting CXX compile features
-- Detecting CXX compile features - done
-- Configuring done (0.6s)
-- Generating done (0.0s)
-- Build files have been written to: /home/xxxxx/Workspaces/Vxworks_RPI/wrsdk-vxworks7-raspberrypi4b/examples/rtp/hello_cmake_rtp/build

## 生成的文件中包含了makefile,这时候你make一下即可
make
3.3 尝试使用cmake编译DKM例程
我们这里直接使用官方的example来生成。(现在我们已经处于sdk的根目录下)
## 我们先尝试build例程中的hello_cmake_rtp
cd  examples/dkm/hello_cmake_dkm

## 为了原始目录干净,创建build文件夹
mkdir build
cd build

## 这里的cmake需要指定工具链,这里使用RTP工具链接
cmake -D CMAKE_TOOLCHAIN_FILE=${WIND_SDK_HOME}/vxsdk/sysroot/mk/dkm.toolchain.cmake ..

## 此时应该成功编译,显示类似如下信息
CMake Deprecation Warning at CMakeLists.txt:18 (cmake_minimum_required):
  Compatibility with CMake < 2.8.12 will be removed from a future version of
  CMake.

  Update the VERSION argument <min> value or use a ...<max> suffix to tell
  CMake that the project does not need compatibility with older versions.


-- The C compiler identification is Clang 16.0.0
-- The CXX compiler identification is Clang 16.0.0
-- The ASM compiler identification is Clang with MSVC-like command-line
-- Found assembler: /home/xxxxx/Workspaces/Vxworks_RPI/wrsdk-vxworks7-raspberrypi4b/vxsdk/host/x86_64-linux/bin/wr-cc
-- Detecting C compiler ABI info
-- Detecting C compiler ABI info - done
-- Check for working C compiler: /home/xxxxx/Workspaces/Vxworks_RPI/wrsdk-vxworks7-raspberrypi4b/vxsdk/host/x86_64-linux/bin/wr-cc - skipped
-- Detecting C compile features
-- Detecting C compile features - done
-- Detecting CXX compiler ABI info
-- Detecting CXX compiler ABI info - done
-- Check for working CXX compiler: /home/xxxxx/Workspaces/Vxworks_RPI/wrsdk-vxworks7-raspberrypi4b/vxsdk/host/x86_64-linux/bin/wr-c++ - skipped
-- Detecting CXX compile features
-- Detecting CXX compile features - done
-- Configuring done (0.4s)
-- Generating done (0.0s)
-- Build files have been written to: /home/xxxxx/Workspaces/Vxworks_RPI/wrsdk-vxworks7-raspberrypi4b/examples/dkm/hello_cmake_dkm/build

## 生成的文件中包含了makefile,这时候你make一下即可
make
3.4 FTP连接折腾记
在文章的最开始安装了FTP服务,名称叫做pyftpdlib。而目前VX的默认用户名叫做”target”,默认密码是“vxTarget”。VX目前支持的命令可以通过“help”指令来查看。比如使用“whoami”,就会显示用户名。可以通过iam来设置用户名和密码。
iam       "user"[,"passwd"]    Set user name and passwd, possibly in
                               an interactive manner
另外下面用到的指令netDevCreate具体用法如下:
# 这个指令是通过netHelp查询到的
netDevCreate "devname","hostname",protocol
                                   - create an I/O device to access files
                                     on the specified host
这个指令会建立一个通过主机进入文件的I/O设备。
3.4.1 初试FTP连接,遭遇不能创建I/O设备问题
好了言归正传。先建立FTP传输通道:
## 官方的做法
sudo python3 -m pyftpdlib -p 21 -u target -P vxTarget -d $HOME &
## 因为官方的hello是建立在$HOME目录下,但是我的不是。我的在sdk的example里面
## 之前 “source  sdkenv.sh”之后实际上$$WIND_SDK_HOME已经指向了sdk
## 你可以通过echo命令确认一下
cd $WIND_SDK_HOME/examples/rtp/hello_cmake_rtp/build
## 如果正常你应该已经进入了build目录,我们将上面的$HOME替换为我们需要的路径,如下
sudo python3 -m pyftpdlib -p 21 -u target -P vxTarget -d $WIND_SDK_HOME/examples/rtp/hello_cmake_rtp/build &

## 查看自己的IP地址
 ip address
我这里主机目前显示的IP地址是192.168.0.105。所以需要创建一个IO设备:
# 先建立IO通道,请注意我这里的命令是错误的“wrs”前面少了"/",后面有描述
netDevCreate ("wrs", "192.168.0.105", 1)
# 进入cmd环境,请注意推出cmd的指令是大写字母C,如果指令没有运行可以按CTRL+C推出执行
cmd
# 然后查看自己的IP(RPI4B)
ipconfig -a
# 我这里显示的IP地址是192.168.0.102,所以在同一个网段

## 我卡在了这一步,因为在最初其实出现了提示:
## Thu Jan  1 00:00:01 1970: ipnet[44a0f0]: Error: ipcom_getsockaddrbyaddr failed gw: dhcp
cd wrs
需要说明的是这条指令不是运行在主机的终端中,而是需要输入到刚才通过serial连接的RPI4的终端中。(我推荐使用优美的tabby来连接RPI4.)
正如我上面所说的,我的FTP配置失败了。其实在输完netDevCreate ("wrs", "192.168.0.105", 1)之后的返回值是0xffffffff的时候,我就预感到了。我尝试开启dhcp服务:
# 在cmd模式下,如果是C interpreter模式,需要先输入cmd切换到cmd模式
# “[vxWorks *]#” 开头表示的是cmd模式下用户输入命令。返回的信息不带上述开头。
[vxWorks *]# ifconfig dhcp
ifconfig: interface dhcp not found
不知道什么原因dhcp服务不能开启。尽管我也能主机和目标机可以相互ping通。但不知道为什么不能开启FTP通道。
3.4.2 误入歧途,无效的折腾了一遍网络连接
现在我们回头看看要怎么解决这个问题。在搜索了一圈之后,我考虑借助这篇帖子的做法。文中的回答说建议使用1.20200212这个版本的firmware,后面如果我要创建一个新版本的时候,可能会考虑。现在就按照文中提到的另一种方法开始吧。
## 查看一下自己的ip情况,注意还是在cmd模式下。
# “[vxWorks *]#” 开头表示的是cmd模式下用户输入命令。返回的信息不带上述开头。
[vxWorks *]# ifconfig genet0 -dhcp
lo0     Link type:Local loopback
        inet 127.0.0.1  mask 255.255.255.255
        inet6 unicast fe80::1%lo0  prefixlen 64  automatic
        inet6 unicast ::1  prefixlen 128
        UP RUNNING LOOPBACK MULTICAST NOARP ALLMULTI
        MTU:1500  metric:1  VR:0  ifindex:1
        RX packets:1721 mcast:3 errors:0 dropped:0
        TX packets:1721 mcast:3 errors:0
        collisions:0 unsupported proto:0
        RX bytes:310678 (310 k)  TX bytes:310678 (310 k)
genet0  Link type:Ethernet  HWaddr dc:a6:32:c8:21:09
        inet 192.168.0.102  mask 255.255.255.0  broadcast 192.168.0.255
        inet6 unicast fe80::dea6:32ff:fec8:2109%genet0  prefixlen 64  automatic
        UP RUNNING SIMPLEX BROADCAST MULTICAST DHCP
        MTU:1500  metric:1  VR:0  ifindex:2
        RX packets:1390 mcast:0 errors:0 dropped:0
        TX packets:726 mcast:10 errors:0
        collisions:0 unsupported proto:0
        RX bytes:129067 (129 k)  TX bytes:206348 (206 k)
## disable gnet0的DHCP服务
[vxWorks *]# ifconfig genet0 -dhcp
[vxWorks *]# ifconfig genet0 192.168.0.102
[vxWorks *]# ifconfig -a
lo0     Link type:Local loopback
        inet 127.0.0.1  mask 255.255.255.255
        inet6 unicast fe80::1%lo0  prefixlen 64  automatic
        inet6 unicast ::1  prefixlen 128
        UP RUNNING LOOPBACK MULTICAST NOARP ALLMULTI
        MTU:1500  metric:1  VR:0  ifindex:1
        RX packets:1770 mcast:3 errors:0 dropped:0
        TX packets:1770 mcast:3 errors:0
        collisions:0 unsupported proto:0
        RX bytes:315706 (315 k)  TX bytes:315706 (315 k)

genet0  Link type:Ethernet  HWaddr dc:a6:32:c8:21:09
        inet 192.168.0.102  mask 255.255.255.0  broadcast 192.168.0.255
        inet6 unicast fe80::dea6:32ff:fec8:2109%genet0  prefixlen 64  automatic
        UP RUNNING SIMPLEX BROADCAST MULTICAST
        MTU:1500  metric:1  VR:0  ifindex:2
        RX packets:1448 mcast:0 errors:0 dropped:0
        TX packets:735 mcast:10 errors:0
        collisions:0 unsupported proto:0
        RX bytes:133933 (133 k)  TX bytes:207956 (207 k)
# 尝试ping通设备
[vxWorks *]# ping -c 3  192.168.0.102

# 推出cmd模式,再次进入C interpreter模式
[vxWorks *]# C
->
然我们再次尝试尝试建立I/O连接。
-> netDevCreate ("wrs", "192.168.0.105", 1)
value = 4294967295 = 0xffffffff
经过这一番搜索,还是不能建立I/O连接。我挺失落的。明日再战。
3.4.3 柳暗花明,又遇障碍
我又仔细的看了一遍官方的说明,忽然意识到我犯了一个很小的错误:我少了一个“/”.看起来我确实不是斜杠青年。
# 后来我终于发现我前面的操作是无效的,只是因为我的命令有误。正确的命令"wrs"前面有"/"
-> netDevCreate ("/wrs", "192.168.0.105", 1)
value = 0 = 0x0
这3.4小节中,我的糊涂属性再次enable。就因为一个"/"害得我折腾了又一个下午。
朋友们,你们看到的文章里面包含了血泪史。到现在两个错误已经折腾了我一整天的时间。
其实你以为这样我就可以顺利完成整个测试了吗?其实还有一道坎,属实折腾另外我半天。且听我娓娓道来。
# 既然这次成功建立了IO设备,那么我们就乘胜追击,继续下一步
# 切换到cmd
> cmd
[vxWorks *]# cd wrs/
[vxWorks *]# pwd
/wrs
# 这一步官方的显示是/wrs/我的稍有不同
[vxWorks *]# cd opt
[vxWorks *]# ls
# 我的没有回应,官方的会显示很多文件后面我又反复折腾了很久。终是无果。但是在我在ubuntu的shell里面操作的时候无意间使用ip address的时候发现了蹊跷:
$ ip address
[1]+  Stopped                 sudo python3 -m pyftpdlib -p 21 -u target -P vxTarget -d $HOME
## 应该是我反复尝试多次导致的,总之目前的ftp是无法启动的
3.4.4 细细思索,追查原因
我后来又苦苦寻找了很久的带GUI的FTP Server,结果都没有。所以我决定按照pyftpdlib的教程写一个简单的python程序,看一下返回值。 程序如下:
from pyftpdlib.authorizers import DummyAuthorizer
from pyftpdlib.handlers import FTPHandler
from pyftpdlib.servers import FTPServer

authorizer = DummyAuthorizer()
authorizer.add_user("target", "vxTarget", "/home/xxxxx/", perm="elradfmwMT")
authorizer.add_anonymous("/home/xxxxx/")

handler = FTPHandler
handler.authorizer = authorizer

server = FTPServer(("192.168.0.105", 21), handler)
server.serve_forever()
然后我执行程序之后,有如下反应。切记,需要以sudo方式安装pyftpdlib.否则在执行sudo命令时会提示找不到pyftpdlib。
$ sudo python3 simple_ftp_server.py
Traceback (most recent call last):
  File "/home/x x x x x/Workspaces/Test/pyftp_simple/simple_ftp_server.py", line 12, in <module>
    server = FTPServer(("192.168.0.105", 21), handler)
  File "/usr/local/lib/python3.10/dist-packages/pyftpdlib/servers.py", line 117, in __init__
    self.bind_af_unspecified(address_or_socket)
  File "/usr/local/lib/python3.10/dist-packages/pyftpdlib/ioloop.py", line 1030, in bind_af_unspecified
    raise socket.error(err)
OSError: [Errno 98] Address already in use
可以看到提示了吧。又找了一圈问题,基本确定是这个端口被之前没有办法关掉的ftp服务占用了。pyftpdlib又没看到具体的关闭指令,所以我就索性关掉这个进程。又是一番搜索,找到了解决办法。
# 通过netstat寻找正在使用21接口的pid
$ sudo netstat -tunlp
Active Internet connections (only servers)
Proto Recv-Q Send-Q Local Address           Foreign Address         State       PID/Program name
tcp        0      0 0.0.0.0:2049            0.0.0.0:*               LISTEN      -
tcp        0      0 0.0.0.0:35743           0.0.0.0:*               LISTEN      2969/rpc.mountd
tcp        0      0 0.0.0.0:36015           0.0.0.0:*               LISTEN      2969/rpc.mountd
tcp        0      0 0.0.0.0:111             0.0.0.0:*               LISTEN      1/init
tcp        0      0 0.0.0.0:21              0.0.0.0:*               LISTEN      40899/python3
tcp        0      0 127.0.0.1:9090          0.0.0.0:*               LISTEN      32012/clash
# 上图的0.0.0.0:21 ,有时是::::21,总之端口是21的那个就是你需要锁定的,记下它的pid
# 比如我的pid是40899,后面使用kill命令关闭它
$ sudo kill -9 40899
$ sudo python3 simple_ftp_server.py
[I 2024-01-08 20:10:02] concurrency model: async
[I 2024-01-08 20:10:02] masquerade (NAT) address: None
[I 2024-01-08 20:10:02] passive ports: None
[I 2024-01-08 20:10:02] >>> starting FTP server on 192.168.0.105:21, pid=41454 <<<
看起来一切OK。后面测试一路顺利。
3.5 运行RTP程序
前面3.4描述了详细建立RTP连接折腾的过程。因为比较曲折,直接了当的信息不多。所以这里随着3.5节的内容,完整浮现一下我的操作。为了方便后续的操作,需要你先锁定一下你的vxworks sdk的examples目录.或者你建立一个hello world的程序,然后尝试编译成RTP程序。具体的操作这里不再赘述。
3.5.1 获取ip地址
确保连接正常,主机和RPI4能够ping通。 在主机的shell中运行
$ ip address这时候会显示你的ip地址,记下你的ip地址,比如我的是192.168.0.105。后续我就会以这个IP作为我后续描述中主机的ip地址。
在与RPI4连接的串口终端中输入:
-> cmd
[vxWorks *]# ifconfig -a
这时候会显示你的RPI4的ip地址,比如我的是192.168.0.102.后续我就会以这个IP作为我后续描述中目标机RPI4的ip地址。
3.5.2 在主机运行FTP serer服务器
我建议编写python程序,而不是使用命令行来操作。因为命令行不好推出FTP服务。当然如果你有好的FTP服务器也是可以的。 你可以参照我的python程序修改成你的。程序请参照3.4.4来编写。注意你只需要将IP改成你自己的主机IP。比如我这里是我的主机IP:192.168.0.105.另外你需要根据你的需要设置进入的目录,我这里的”/home/xxxxx/”就是我的home目录。 在主机的shell中运行
$ cd {你的python文件目录下}
$ sudo python3 simple_ftp_server.py
这时候程序应该顺利运行,如果不能成功运行。可以参照3.4.4的解决办法。
3.5.3 在目标机RPI4上创建IO设备并切换到examples目录下。
如果你已经按照3.2小节make过程序,这时候你就可以按照我的方法执行下一步。 在与RPI4连接的串口终端中输入:
# 如果你当前处于cmd状态下,输入大写C切换到C解析模式
[vxWorks *]# C
# 目前你处于C解析模式,创建FTP访问IO设备
-> netDevCreate ("/wrs", "192.168.0.105", 1)
# 这时候返回值应该是0,而不是0xffffffff。切换到cmd模式
-> cmd
[vxWorks *]# cd /wrs
#这时候你应该进入了你最初设置的"/home/xxxxx/"目录
[vxWorks *]# cd {你的examples所在的目录}
[vxWorks *]# ls
dkm
rtp
#此时显示你的文件目录,如果是examples应该有dkm和rtp
[vxWorks *]# cd rtp/hello_cmake_rtp/build
# 使用ls查看一下是否包含hello_cmake
[vxWorks *]# ls
[vxWorks *]# hello_cmake
Launching process 'hello_cmake' ...
Process 'hello_cmake' (process Id = 0xffff8000004fded0) launched.
Hello cpp - IntListItem constructed: 1
Hello cpp - IntListItem constructed: 2

Hello world from user space!
argv[0]=./hello_cmake
Hello cpp - number one: 1
Hello Static Library
Hello assembler: 1+1=2
到此,我们已经完成了整体的测试.最后上一张测试图封箱。

图3 通过HDMI显示
四、镜像资源
为了后面方便浮现和烧写,我将整个镜像放置在github上。你可以尽情享用。
- 仓库链接.
你需要将SD卡格式化为FAT32,然后将clone的仓库文件全部拷贝到SD卡中即可。理论上git文件不影响启动。但是如果你想要干净的系统,那么你在copy的时候不用拷贝“.”开头的文件和文件夹。拷贝过去之后,文件大概如下所示:
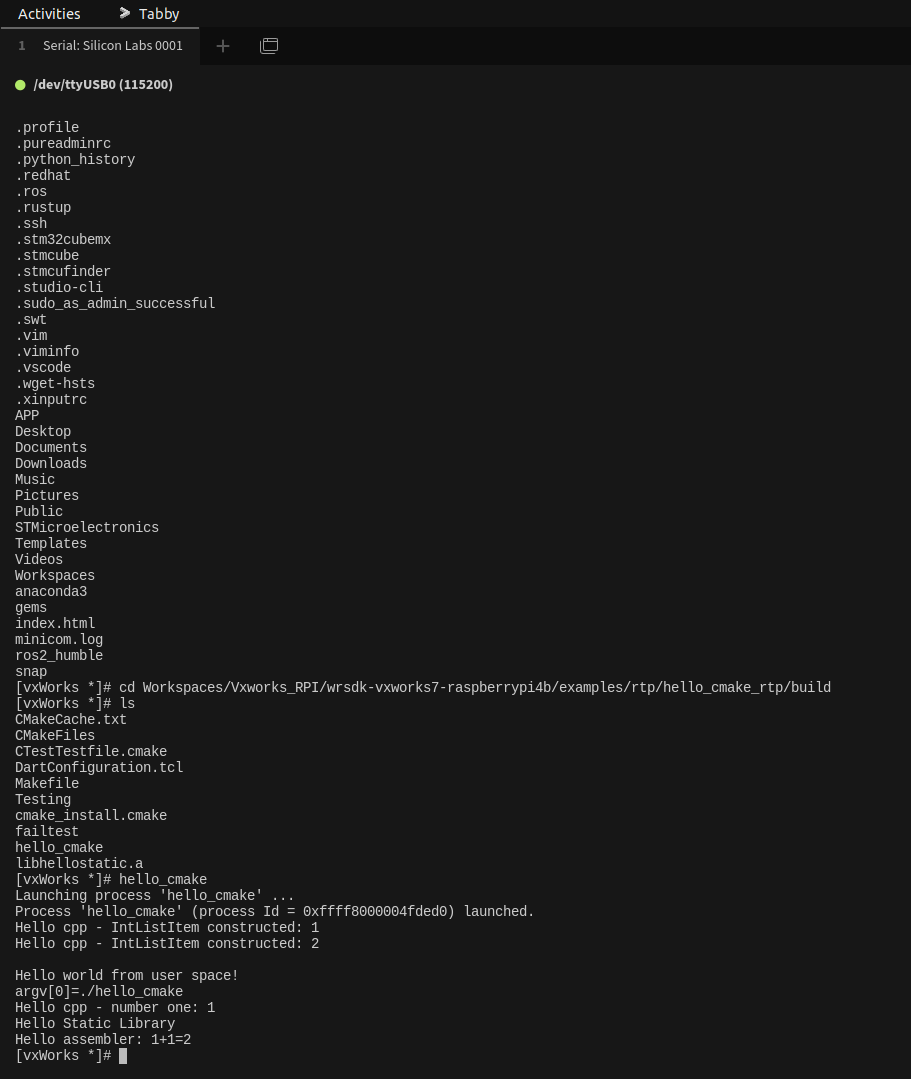
图5 RPI4终端测试图
五、关于在VxWorks上运行ROS2
看官方的示例,似乎是在docker上运行的ROS2.不知道这是否有意义。或者是我的理解有误。
六、关于VxWorks感想
其实很早就知道VxWorks,很多重要场合的数字仪表和控制系统会使用VxWorks。之前以为它的功能相比与Linux和Windows应该差很远。当然,目前也确实如此。但是我没有想到的是它的功能其实非常完善了。RUST的很多程序可以直接编译使用,这是我想不到的。还看到了对boost库的支持。目前VxWorks官方似乎支持C/C++中经典编程语言,还支持RUST和Python。甚至ROS和docker都能在上面直接用。这种封闭环境的实时嵌入式操作系统竟然发展的还挺完善,确实对我有一定吸引力。QNX也是实时操作系统,不知道这个在汽车仪表上使用很广泛的操作系统目前的完善性如何。 看起来只要用户范围足够广,生态土壤足够好,就可以建立一个很好的开发环境。
目前的汽车市场已经开始接受Linux甚至Android,甚至人类在火星上第一台飞行器也是Linux的。这些选择我最初看来,总觉得有一种草草了事的感觉。目前看来似乎也是一种对于生态的妥协。包括ROS选择了使用用户广泛的Ubuntu作为tire1,也不能不说是一种妥协.但是未来能不能有一款开放而且强大的实时操作系统可以担负RTOS界的Linux呐?Wind River除非变成一个开放的基金会,否则Vx和Wind River Linux应该都不能担此重任。ThreadX挺好的,目前微软将它贡献给了eclipse基金会,不知道未来会不会有更加好的生态支持。还有没其它系统呐?我暂时还不知道。不过我还是由衷的希望这个局面早日来到。
<全文完/2024.01.08>
附件
- 官方下载链接
- VxWorks 7 SDK for Raspberry Pi 4
- micro-ROS
- ROS 2 for VxWorks Developer Brief
- vxworks7-ros2-build github repository
- vxworks7-layer-for-ros2 github repository
- ROS 2 ON VXWORKS present
- ROS2 on VxWroks Discuss
- VxWorks应用开发教程
