目录
一:Bean基本注解开发
二:Bean依赖注入注解开发
三:非自定义Bean注解开发
四:Bean配置类的注解开发
五:Spring配置其他注解
六:Spring注解的解析原理
一:Bean基本注解开发
Spring除了xml配置文件进行配置之外, 还可以使用注解方式进行配置, 注解方式慢慢成为xml配置的替代方案。我 们有了xml开发的经验, 学习注解开发就方便了许多, 注解开发更加快捷方便。 Spring提供的注解有三个版本:
-
2.0时代, Spring开始出现注解
-
2.5时代, Spring的Bean配置可以使用注解完成
-
3.0时代, Spring其他配置也可以使用注解完成, 我们进入全注解时代
基本Bean注解, 主要是使用注解的方式替代原有xml的<bean>标签及其标签属性的配置
<bean  id="" name=""  class=""scope=""   lazy-init="" init-method=""destroy-method=""
abstract=""   autowire="" factory-bean="" factory-method=""></bean>
@Component注解
使用@Component注解替代<bean>标签
| xml配置 | 注解 | 描述 |
|---|---|---|
| <bean id=""class=""> | @Component | 被该注解标识的类, 会在指定扫描范围内被Spring加载并实例化 |
案例:
<bean id="userService" class="com.tangyuan.service.UserServiceImpl"></bean>

@Component(value="userService")//value可以省略不写
----需要使用的类-------
public class UserServiceImpl implements UserService{

}
@Component("userDao")
----需要使用的类-------
public class UserDaoImpl implements UserDao{
}ps:如果@Component注解中什么内容都不写的话,那就会以类的名称,并且首字母小写作为beanName
@Component注解的源代码
package org.springframework.stereotype;
import...
@Target({ElementType.TYPE} )
@Retention(Retention Policy.RUNTIME)
@Documented
@Indexed
public  @interface Component{
    String    value()   default "";
}
applicationContext.xml
<!--注解组件扫描:扫描指定的基本包及其子包下的类,识别使用@Component注解-->
<context:component-scan base-package="com.tangyuan"/>
测试:
//创建ApplicationContext,加载配置文件,实例化容器
ClassPathXmlApplicationContext applicationContext=new ClassPathXmlApplicationContext("applicationContext.xml");
Object  aa=applicationContext.getBean("userService");
UserDao  bb=applicationContext.getBean(userDao.class);
  System.out.println(aa);
  System.out.println(bb);
@Scope注解
@Component就单纯一个value属性, 那么xml配置<bean>时那些属性怎么进行配置呢?Spring是通过注解方式去配置的之前<bean>标签中的那些属性, 例如:@Scope
<bean  id="" name=""  class=""scope=""   lazy-init="" init-method=""destroy-method=""
abstract=""   autowire="" factory-bean="" factory-method=""></bean>
使用@Component注解替代<bean>标签
| xml配置 | 注解 | 描述 |
|---|---|---|
| <bean scope=""> | @Scope | 在类上或使用了@Bean标注的方法上, 标注Bean的作用范围, 取值为singleton或prototype |
| <bean lazy-init=""> | @Lazy | 在类上或使用了@Bean标注的方法上, 标注Bean是否延迟加载, 取值为<true和false |
| <bean init-method=""> | @PostConstruct | 在方法上使用, 标注Bean的实例化后执行的方法 |
| <bean destroy-method=""> | @PreDestroy | 在方法上使用, 标注Bean的销毁前执行方法 |
 @Scope注解的源代码
 import...
@Target({ElementType.TYPE,ElementType.METHOD})
@Retention(RetentionPolicy.RUNTIME)
@Documented
public@interface Scope{
@AliasFor("scopeName")
String value() default"";

 @AliasFor("value")
 String scopeName() default "";

ScopedProxyMode proxyMode() default ScopedProxyMode.DEFAULT;
 }
Lazy注解的源代码
package org.springframework.context.annotation;
import java.lang.annotation.Documented;
import java.lang.annotation.ElementType;
import java.lang.annotation.Retention;
import java.lang.annotation.RetentionPolicy;
import java.lang.annotation.Target;
@Target({ElementType.TYPE, ElementType.METHOD, ElementType.CONSTRUCTOR, ElementType.PARAMETER, ElementType.FIELD})
@Retention(RetentionPolicy.RUNTIME)
@Documented
public @interface Lazy {
boolean value() default true;
}-
由于Java EE开发是分层的, 为了每层Bean标识的注解语义化更加明确, @Component又衍生出如下三个注解:
| @Component衍生注解 | 描述 |
|---|---|
| @Repository | 在Dao层类上使用 |
| @Service | 在Service层类上使用 |
| @Controller | 在Web层类上使用 |
@Repository("userDao")
public class UserDaoImpl implements UserDao{}

@Service("userService")
public class UserServiceImpl implements UserService{}

@Controller("userService")
public class UserController{}
@Repository注解
//
// Source code recreated from a .class file by IntelliJ IDEA
// (powered by Fernflower decompiler)
//
package org.springframework.stereotype;
import java.lang.annotation.Documented;
import java.lang.annotation.ElementType;
import java.lang.annotation.Retention;
import java.lang.annotation.RetentionPolicy;
import java.lang.annotation.Target;
import org.springframework.core.annotation.AliasFor;
@Target({ElementType.TYPE})
@Retention(RetentionPolicy.RUNTIME)
@Documented
@Component
public @interface Repository {
@AliasFor(
annotation = Component.class
)
String value() default "";
}二:Bean依赖注入注解开发
Bean依赖注入的注解, 主要是使用注解的方式替代xml的<property>标签完成属性的注入操作
<bean id=" "   class="">
     <property name=""value=""/>
     <property name=""ref="" />
</bean>
Spring主要提供如下注解, 用于在Bean内部进行属性注入的:
| 属性注入注解 | 描述 |
|---|---|
| @Value | 使用在字段或方法上,用于注入普通数据 |
| @Autowired | 使用在字段或方法上, 用于根据类型(byType) 注入引用数据 |
| @Qualifier | 使用在字段或方法上, 结合@Autowired, 根据名称注入 |
| @Resource | 使用在字段或方法上,根据类型或名称进行注入 |
public class UserDaoImpl implements UserDao{

    // @Value("李太白")
    @Value("${jdbc.driver}")
    private String username;

    //@Autowired //根据类型进行注入,如果同一类型的Bean有多个,尝试根据名字进行二次匹配,匹配不成功再报错
    //expected single matching bean but found 2
    //@Qualifier("userDao2")//种此,结合 @Autowired一起使用,作用根据名称注入相应的Bean
    @Resource(name="userDao2")//不指定名称参数时,根据类型注入,指定名称就根据名称注入
    private UserDao userDao;

    @Autowired
    public void setUserDao(UserDao userDao){
        this.userDao=userDao;
    }

     @Autowired //根据参数类型进行匹配
    public void xxx(UserDao userDao){
        System.out.println("xxx:"+userDao);
    }

      @Autowired //从容器中寻找UserDao类型的Bean,结果保存在对应的集合中
    public void yyy(List<UserDao> userDaoList){
        System.out.println("yyy:"+userDaoList);
    }
}三:非自定义Bean注解开发
非自定义Bean不能像自定义Bean一样使用@Component进行管理, 非自定义Bean要通过工厂的方式进行实例化,使用@Bean标注方法即可, @Bean的属性为beanName, 如不指定为当前工厂方法名称
//将方法返回值Bean实例以@Bean注解指定的名称存储到Spring容器中
@Bean("dataSource")//当Bean没有设置值时,会以方法名作为BeanName
public DataSource dataSource() {
DruidDataSource dataSource=new DruidDataSource() ;
dataSource.setDriver ClassName("com.mysql.jdbc.Driver") ;
dataSource.setUrl("jdbc:mysql://localhost:3306/mybatis") ;
dataSource.setUsername("root") ;
dataSource.setPassword("1234") ;
return dataSource;
}

//活参数时
public DataSource dataSource(
    @Value("${jdbc.driver}")  String driverClassName,
    //@Autowired UserDao userDao
    @Qualifier("userDao2") UserDao userDao
                            ) {}
PS:工厂方法所在类必须要被Spring管理,要放在一个类里面,并加上@Component注解
如果@Bean工厂方法需要参数的话, 则有如下几种注入方式:
-
使用@Autowired根据类型自动进行Bean的匹配, @Autowired可以省略
-
使用@Qualifier根据名称进行Bean的匹配;
-
使用@Value根据名称进行普通数据类型匹配。
@Bean
@Autowired//根据类型匹配参数
public Object objectDemo01(UserDao userDao) {
      System.out.println(userDao) ;
       return new Object() ;
}

@Bean
public Object objectDemo02(@Qualifier("userDao") UserDao userDao,@Value("S{jdbc.username} ") String username) {
           System.out.println(userDao) ;
           System.out.println(username) ;
            return new Object() ;
}
四:Bean配置类的注解开发
@Component等注解替代了<bean>标签, 但是像<import>、<context:componentScan>等非<bean>标签怎样去使用注解替代呢?
<!--加载properties文件>
<context:property-placeholder location="classpath:jdbc.properties"/>
<!--组件扫描-->
<context:component-scan base-package="com.tangyuan"/>
<!--引入其他xml文件-->
<import resource="classpath:beans.xml"/>
定义一个配置类替代原有的xml配置文件, <bean>标签以外的标签, 一般都是在配置类上使用注解完成的
@Configuration //标注当前类是一个配置类(替代配置文件)+@Component
//<context:component-scan base-package="com.tangyuan"/>
//@ComponentScan(basePackages={"com.tangyuan"})//多个
@ComponentScan(com.tangyuan)
//<context:property-placeholder location="classpath:jdbc.properties"/>
@PropertySource("classpath:jdbc.properties")//多个加上中括号,用逗号隔开
//<import resource="classpath:beans.xml"/>
@Import(XXX.class)
public class SpringConfig{


}

测试:
//xml方式的Spring容器
  ClassPathXmlApplicationContext applicationContext=new ClassPathXmlApplicationContext("applicationContext.xml");
  //注解方式加载Spring的核心配置类
    ApplicationContext applicationContext1=new AnnotationConfigApplicationContext( SpringConfig.class);
@Configuration注解的源代码
package org.springframework.context.annotation;

import java.lang.annotation.Documented;
import java.lang.annotation.ElementType;
import java.lang.annotation.Retention;
import java.lang.annotation.RetentionPolicy;
import java.lang.annotation.Target;
import org.springframework.core.annotation.AliasFor;
import org.springframework.stereotype.Component;

@Target({ElementType.TYPE})
@Retention(RetentionPolicy.RUNTIME)
@Documented
@Component
public @interface Configuration {
    @AliasFor(
        annotation = Component.class
    )
    String value() default "";

    boolean proxyBeanMethods() default true;
}
@ComponentScan注解的源代码
package org.springframework.context.annotation;
import java.lang.annotation.Documented;
import java.lang.annotation.ElementType;
import java.lang.annotation.Repeatable;
import java.lang.annotation.Retention;
import java.lang.annotation.RetentionPolicy;
import java.lang.annotation.Target;
import org.springframework.beans.factory.support.BeanNameGenerator;
import org.springframework.core.annotation.AliasFor;
@Retention(RetentionPolicy.RUNTIME)
@Target({ElementType.TYPE})
@Documented
@Repeatable(ComponentScans.class)
public @interface ComponentScan {
@AliasFor("basePackages")
String[] value() default {};
@AliasFor("value")
String[] basePackages() default {};
Class<?>[] basePackageClasses() default {};
Class<? extends BeanNameGenerator> nameGenerator() default BeanNameGenerator.class;
Class<? extends ScopeMetadataResolver> scopeResolver() default AnnotationScopeMetadataResolver.class;
ScopedProxyMode scopedProxy() default ScopedProxyMode.DEFAULT;
String resourcePattern() default "**/*.class";
boolean useDefaultFilters() default true;
ComponentScan.Filter[] includeFilters() default {};
ComponentScan.Filter[] excludeFilters() default {};
boolean lazyInit() default false;
@Retention(RetentionPolicy.RUNTIME)
@Target({})
public @interface Filter {
FilterType type() default FilterType.ANNOTATION;
@AliasFor("classes")
Class<?>[] value() default {};
@AliasFor("value")
Class<?>[] classes() default {};
String[] pattern() default {};
}
}@PropertySource注解的源代码
package org.springframework.context.annotation;
import java.lang.annotation.Documented;
import java.lang.annotation.ElementType;
import java.lang.annotation.Repeatable;
import java.lang.annotation.Retention;
import java.lang.annotation.RetentionPolicy;
import java.lang.annotation.Target;
import org.springframework.core.io.support.PropertySourceFactory;
@Target({ElementType.TYPE})
@Retention(RetentionPolicy.RUNTIME)
@Documented
@Repeatable(PropertySources.class)
public @interface PropertySource {
String name() default "";
String[] value();
boolean ignoreResourceNotFound() default false;
String encoding() default "";
Class<? extends PropertySourceFactory> factory() default PropertySourceFactory.class;
}
@Import注解的源代码
package org.springframework.context.annotation;

import java.lang.annotation.Documented;
import java.lang.annotation.ElementType;
import java.lang.annotation.Retention;
import java.lang.annotation.RetentionPolicy;
import java.lang.annotation.Target;

@Target({ElementType.TYPE})
@Retention(RetentionPolicy.RUNTIME)
@Documented
public @interface Import {
    Class<?>[] value();
}
@Configuration注解标识的类为配置类, 替代原有xml配置文件, 该注解第一个作用是标识该类是一个配置类,第 二个作用是具备@Component作用
@Configuration
public class ApplicationContext Config{}
@ComponentScan组件扫描配置, 替代原有xml文件中的<context:componenit-scan base-package=""/>
@Configuration
@ComponentS can({"com.tangyuan.service", "com.tangyuan.dao"} )
public class ApplicationContext Config{}
base-package的配置方式:
-
指定一个或多个包名:扫描指定包及其子包下使用注解的类
-
不配置包名:扫描当前@componentScan注解配置类所在包及其子包下的类
@PropertySource注解用于加载外部properties资源配置, 替代原有xml中的<context:property- placeholder location=" "/>配置
@Configuration
@ComponentScan
@Property Source({"classpath:jdbc.properties", "classpath:xxx.properties"} )
public class ApplicationContextConfig{}
@lmport用于加载其他配置类, 替代原有xml中的<import resource="classpath:beans.xml”/>配置
@Configuration
@ComponentScan
@Property Source("classpath:jdbc.properties")
@Import(OtherConfig.class)
public class ApplicationContext Config{}
五:Spring配置其他注解
扩展:@Primary注解用于标注相同类型的Bean优先被使用权, @Primary是Spring3.0引入的, 与@Component 和@Bean一起使用, 标注该Bean的优先级更高, 则在通过类型获取Bean或通过@Autowired根据类型进行注入时, 会选用优先级更高的
@Repository("userDao")
public class UserDaoImpl implements UserDao{}

@Repository("userDao2")
@Primary
public class UserDaoImpl2 implements UserDao{}
@Bean
public UserDao userDao01() {
return new UserDaoImpl() ;
}
@Bean
@Primary
public UserDao userDao02() {
return new UserDaoImpl2() ;
}扩展:@Profile注解的作用同于xml配置时学习profile属性, 是进行环境切换使用的
<beans profile="test">注解@Profile标注在类或方法上, 标注当前产生的Bean从属于哪个环境, 只有激活了当前环境, 被标注的Bean才 能被注册到Spring容器里, 不指定环境的Bean, 任何环境下都能注册到Spring容器里
@Repository("userDao")
@Profile("test")
public class UserDaoImpl implements UserDao{}

@Repository("userDao2")
public class UserDaoImpl2 implements UserDao{}
可以使用以下两种方式指定被激活的环境:
-
使用命令行动态参数, 虚拟机参数位置加载-Dspring.profiles.active=test
-
使用代码的方式设置环境变量System.setProperty("spring.profiles.active", "test") ;
六:Spring注解的解析原理

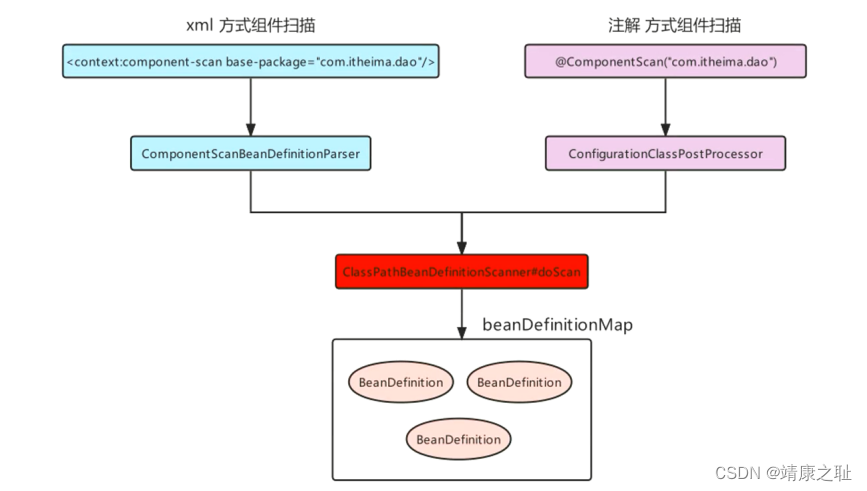
使用@Component等注解配置完毕后, 要配置组件扫描才能使注解生效
-
xml配置组件扫描:
<context:component-scan base-package="com.tangyuan"/>-
配置类配置组件扫描:
@Configuration
@ComponentScan("com.tangyuan")
public class AppConfig{ }
使用xml方式配置组件扫描, 而component-scan是一个context命名空间下的自定义标签, 所以要找到对应的命名 空间处理器NamespaceHandler和解析器, 查看spring-context包下的spring.handlers文件
http\://www.springframework.org/schema/context=org.springframework.context.config.ContextNames
paceHandler
查看Context NamespaceHandler类
public void init(){
       this.registerBeanDefinitionParser("component-scan",new
       ComponentScanBeanDefinitionParser() ) ;
}
将ComponentScanBeanDefinitionParser进行了注册, 对其源码进行跟踪, 最终将标注的@Component的类, 生成对应的BeanDefiition进行了注册