LUT (Look-Up Table)查找表转换,是对原始图像的像素数值进行快速转换,以实现图像的像素压缩目的。LUT()函数的官方定义如下:
public static void LUT(
    IInputArray src,  // 输入图像
    IInputArray lut, // 查找表
    IOutputArray dst, // 输出图像
)
根据网上的各位大神,结合我的理解,LUT()实现像素压缩的原理是:以颜色深度为Cv8U的单通道灰度图来说,图像中像素数值只能在[0,255]区间内分布。如果我定义一个256个长度的一维数组LUT[256]原始图像映射到目标图像的方法是:
- 像素值为0 的点,用LUT[0]代替;
- 像素值为1 的点,用LUT[1]代替;
- 像素值为2 的点,用LUT[2]代替;
- ...
- 像素值为254 的点,用LUT[254]代替;
- 像素值为255 的点,用LUT[255]代替;
LUT[256]数组的值,是由用户自己定义的,如果LUT[0] = 255,LUT[1] = 255 ,其余全是0,你看看,是不是把图像压缩成只有255和0了。其中原始图像的像素值是0和1的,转换成255,剩余全部转换成0,这么说简单吧。
1、图像压缩
举个例子,原始图像是这个均匀分布的灰度图:

如果我想压缩像素值,让目标图像的值只输出0、35、70、105、140、175、210、245,也就是原始图像在0到34之间,变成0;35到69之间,变成35;70到104之间,变成70;105到139之间变成105;140到174之间变成140;175到209之间变成175;210到244之间变成210;245及以上变成245,代码如下:
Mat tempMat = srcMat.Clone(); // 深拷贝
CvInvoke.CvtColor(tempMat, tempMat, ColorConversion.Bgr2Gray);
Matrix<byte> matrixLUT = new Matrix<byte>(1, 256, 1);
for (int n = 0; n < 256; n++)
{
    matrixLUT.Data[0, n] = (byte)(n / 35 * 35);
}

Mat dstMat = new Mat(tempMat.Rows, tempMat.Cols, DepthType.Cv8U, 1);
CvInvoke.LUT(tempMat, matrixLUT, dstMat);
CvInvoke.Imshow("Gray Mat, " + tempMat.Size.ToString(), tempMat);
CvInvoke.Imshow("LUT process Mat, " + dstMat.Size.ToString(), dstMat);
标准的灰度图和LUT()函数压缩后的图像如下所示,效果很明显吧:

2、颜色取反
之前的文章也讲过颜色取反,其实LUT()函数也可以,但是不常用,代码如下:
Mat dstMat = srcMat.Clone(); // 深拷贝
Mat tempMat = srcMat.Clone(); // 深拷贝
Matrix<byte> matrixLUT = new Matrix<byte>(1, 256, 1);
for (int n = 0; n < 256; n++)
{
    matrixLUT.Data[0, n] = (byte)(255 - n);
}

dstMat = new Mat(tempMat.Rows, tempMat.Cols, Emgu.CV.CvEnum.DepthType.Cv8U, 3);

// tempMat为原始图像
CvInvoke.LUT(tempMat, matrixLUT, dstMat);
CvInvoke.Imshow("LUT process Mat, " + dstMat.Size.ToString(), dstMat);
效果用户自己试一试。注意哈:
- 查找表必须是Matrix<byte>格式的。
- 压缩效果就看用户自己定义,颜色取反,就是255减去原始像素值。
- 目标图像,必须是和原始图像大小、颜色深度、通道数完全相同。
3、彩色图像压缩
上面两个例子是对灰度的图操作,查找表参数matrixLUT定义方法如下:
Matrix<byte> matrixLUT = new Matrix<byte>(1, 256, 1);如果是直接操作三通道的彩色图像,查找表参数matrixLUT就需要这样定义了:
Matrix<byte> matrixLUT = new Matrix<byte>(1, 256, 3);假如Blue通道值压缩为0、22、44、66... 220、242,Green通道值压缩为0、50、100、150、200、250,Red通道值压缩为9、129、249,代码如下:
Mat tempMat = srcMat.Clone(); // 深拷贝
Matrix<byte> matrixLUT = new Matrix<byte>(1, 256, 3);
for (int n = 0; n < 256; n++)
{
    matrixLUT.Data[0, n * 3] = (byte)(n / 22 * 22);
    matrixLUT.Data[0, (n * 3) + 1] = (byte)(n / 50 * 50);
    if (n <= 100)
    {
        matrixLUT.Data[0, (n * 3) + 2] = 9;
    }

    if (n > 100 && n <= 200)
    {
        matrixLUT.Data[0, (n * 3) + 2] = 129;
    }

    if (n > 200)
    {
        matrixLUT.Data[0, (n * 3) + 2] = 249;
    }
}

Mat dstMat = new Mat(tempMat.Rows, tempMat.Cols, DepthType.Cv8U, 3);
CvInvoke.LUT(tempMat, matrixLUT, dstMat);
CvInvoke.Imshow("LUT process Mat, " + dstMat.Size.ToString(), dstMat);
原始图像和压缩后的图像,对比如下:

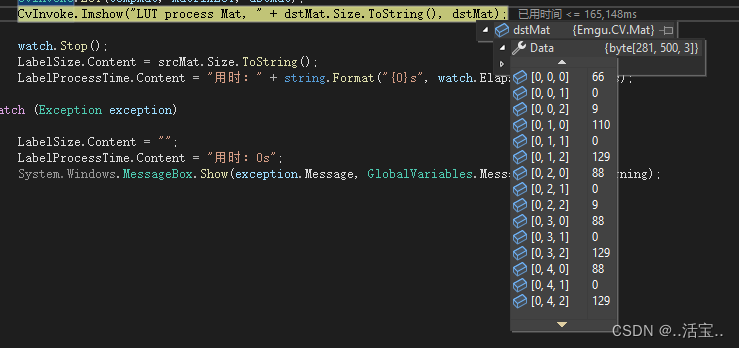
原本图像是均匀过渡的,LUT压缩后,颜色少了很多,出现了明显的轮廓痕迹。可以在VS2022里看以下目标图像的像素点值,是不是符合咱们定义的规律。
经过上面的三个例子,LUT()函数的用法应该很熟悉了吧,但在具体的工程项目中,这个函数到底用处有多大,欢迎大家相互讨论啊。
原创不易,请勿抄袭。共同进步,相互学习。

