在本地创建一个test数据库,并在test数据库中创建一个student表;表中的数据如下:
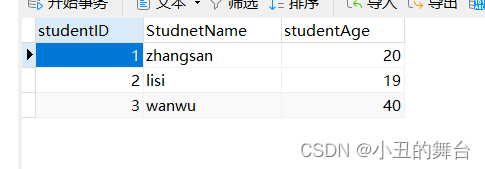
创建表:
DROP TABLE IF EXISTS
student;
CREATE TABLEstudent(
studentIDint NOT NULL AUTO_INCREMENT,
StudnetNamevarchar(20) CHARACTER SET utf8mb4 COLLATE utf8mb4_0900_ai_ci NOT NULL,
studentAgeint NOT NULL,
PRIMARY KEY (studentID) USING BTREE
) ENGINE = InnoDB AUTO_INCREMENT = 3 CHARACTER SET = utf8mb4 COLLATE = utf8mb4_0900_ai_ci ROW_FORMAT = Dynamic;
添加数据:
INSERT INTO
student(studentID,StudnetName,studentAge) VALUES (1, ‘zhangsan’, 20);
INSERT INTOstudent(studentID,StudnetName,studentAge) VALUES (2, ‘lisi’, 19);
INSERT INTOstudent(studentID,StudnetName,studentAge) VALUES (3, ‘wanwu’, 40);
上面表格创建完毕:下面开始我们的逆向工程:
第一步:创建一个maven项目并导入依赖:
 <build>
        <plugins>
            <!--逆向工程-->
            <plugin>
                <!--导入逆向工程中用到的插件-->
                <groupId>org.mybatis.generator</groupId>
                <artifactId>mybatis-generator-maven-plugin</artifactId>
                <version>1.3.0</version>
                <!--导入逆向工程插件用到的依赖-->
                <dependencies>
                    <!--逆向工程的核心依赖-->
                    <dependency>
                        <groupId>org.mybatis.generator</groupId>
                        <artifactId>mybatis-generator-core</artifactId>
                        <version>1.3.2</version>
                    </dependency>
                    <!--数据库连接池-->
                    <dependency>
                        <groupId>com.alibaba</groupId>
                        <artifactId>druid</artifactId>
                        <version>1.2.12</version>
                    </dependency>
                    <!--MySQL驱动-->
                    <dependency>
                        <groupId>mysql</groupId>
                        <artifactId>mysql-connector-java</artifactId>
                        <version>8.0.29</version>
                    </dependency>
                </dependencies>
            </plugin>
        </plugins>
    </build>
    <dependencies>
        <!--1.导入mybatis坐标-->
        <dependency>
            <groupId>org.mybatis</groupId>
            <artifactId>mybatis</artifactId>
            <version>3.5.7</version>
        </dependency>
        <!-- log4j日志 -->
        <dependency>
            <groupId>log4j</groupId>
            <artifactId>log4j</artifactId>
            <version>1.2.17</version>
        </dependency>
        <dependency>
            <groupId>mysql</groupId>
            <artifactId>mysql-connector-java</artifactId>
            <version>8.0.16</version>
            <scope>runtime</scope>
        </dependency>
        <!--junit版本要等于或高于4.12-->
        <dependency>
            <groupId>junit</groupId>
            <artifactId>junit</artifactId>
            <version>4.13</version>
            <scope>provided</scope>
        </dependency>
    </dependencies>
第二步:配置文件generatorConfiguration.xml;
注意:配置文件的名称一定要是generatorConfiguration.xml,不能是其他名称
<?xml version="1.0" encoding="UTF-8"?>
<!DOCTYPE generatorConfiguration
PUBLIC "-//mybatis.org//DTD MyBatis Generator Configuration 1.0//EN"
"http://mybatis.org/dtd/mybatis-generator-config_1_0.dtd">
<generatorConfiguration>
<!--
targetRuntime: 执行生成的逆向工程的版本
MyBatis3Simple: 生成基本的CRUD(清新简洁版)
MyBatis3: 生成带条件的CRUD(奢华尊享版)
-->
<context id="DB2Tables" targetRuntime="MyBatis3">
<!-- 数据库的连接信息 -->
<jdbcConnection
driverClass="com.mysql.jdbc.Driver"
connectionURL="jdbc:mysql://localhost:3306/test?characterEncoding=UTF-8&useSSL=false&avfeval=true&serverTimezone=UTC"
userId="root"
password="sa123">
</jdbcConnection>
<!-- javaBean的生成策略--><!--实体类的生成策列-->
<javaModelGenerator targetPackage="com.mybatis.bean" targetProject=".\src\main\java">
<property name="enableSubPackages" value="true" />
<property name="trimStrings" value="true" />
</javaModelGenerator>
<!-- SQL映射文件的生成策略 -->
<sqlMapGenerator targetPackage="com.mybatis.mapper" targetProject=".\src\main\resources">
<property name="enableSubPackages" value="true" />
</sqlMapGenerator>
<!-- Mapper接口的生成策略 -->
<javaClientGenerator type="XMLMAPPER" targetPackage="com.mybatis.mapper" targetProject=".\src\main\java">
<property name="enableSubPackages" value="true" />
</javaClientGenerator>
<!-- 逆向分析的表 -->
<!-- tableName设置为*号,可以对应所有表,此时不写domainObjectName -->
<!-- domainObjectName属性指定生成出来的实体类的类名 -->
<table tableName="student" domainObjectName="StudentEntry"/>
</context>
</generatorConfiguration>
第三步:在maven插件中mybatis-generator-maven-plugin插件的generate目标,
![[外链图片转存失败,源站可能有防盗链机制,建议将图片保存下来直接上传(img-lLd5vHIY-1668670281814)(img/逆向工程执行.png)]](https://img-blog.csdnimg.cn/f05014ac96464c43a5d8dfab7e8c56d1.png)
1.逆向工程生成的效果:

在上面效果中我们发现生成的实体类有俩个:StudentEntry和StudentEntryExample;StudentEntryExample是用来事项条件查询的;如果我们在配置文件generatorConfiguration.xml中配置生成的逆向工程为只有基本的CRUD的MyBatis3Simple(清新简洁版)就不会生成StudentEntryExample这个实体类;
下面我们来看一下逆向工程生成的方法:
首先如果看到方法名称上面存在Example这个词,那么这个方法就是根据条件查询
 /**

	 *根据条件获取总记录数
     */
    int countByExample(StudentEntryExample example);

    /**
 	 *根据条件进行删除,可以把任意一个字段作为条件
     */
    int deleteByExample(StudentEntryExample example);

    /**
     *根据主键进行删除
     */
    int deleteByPrimaryKey(Integer studentid);

    /**
     *普通添加:如果条件中有一个字段为空,那么就会在数据库中将这个字段以null作为属性进行添加
     */
    int insert(StudentEntry record);

    /**
     *选择性添加:如果实体类有一个属性为空,那么这个字段就不会出现在添加中
     */
    int insertSelective(StudentEntry record);

    /**
     *根据条件进行查询
     */
    List<StudentEntry> selectByExample(StudentEntryExample example);

    /**
     *根据主键进行查询
     */
    StudentEntry selectByPrimaryKey(Integer studentid);

    /**
     *根据条件选择性修改
     */
    int updateByExampleSelective(@Param("record") StudentEntry record, @Param("example") StudentEntryExample example);

    /**
     *根据条件进行修改
     */
    int updateByExample(@Param("record") StudentEntry record, @Param("example") StudentEntryExample example);

    /**
     *根据主键选择性修改
     */
    int updateByPrimaryKeySelective(StudentEntry record);

    /**
     *根据主键修改
     */
    int updateByPrimaryKey(StudentEntry record);
下面我们来测试一下逆向工程中的方法到底能不能用:
第一步:配置database.properties(用来配置数据源的配置文件,名字叫什么无所谓)和log4j.xml文件
database.properties:
jdbc.driver = com.mysql.cj.jdbc.Driver

jdbc.url = jdbc:mysql://localhost:3306/test?useUnicode=true&characterEncoding=utf-8&serverTimezone=GMT%2B8

jdbc.username = root

jdbc.password = sa123
log4j.xml:
<?xml version="1.0" encoding="UTF-8" ?>
<!DOCTYPE log4j:configuration SYSTEM "log4j.dtd">

<log4j:configuration xmlns:log4j="http://jakarta.apache.org/log4j/">

    <appender name="STDOUT" class="org.apache.log4j.ConsoleAppender">
        <param name="Encoding" value="UTF-8"/>
        <layout class="org.apache.log4j.PatternLayout">
            <param name="ConversionPattern" value="%-5p %d{MM-dd HH:mm:ss,SSS} %m  (%F:%L) \n"/>
        </layout>
    </appender>
    <logger name="java.sql">
        <level value="debug"/>
    </logger>
    <logger name="org.apache.ibatis">
        <level value="info"/>
    </logger>
    <root>
        <level value="debug"/>
        <appender-ref ref="STDOUT"/>
    </root>
</log4j:configuration>
第二步:创建mybatis-config.xml配置文件:
<?xml version="1.0" encoding="UTF-8" ?>
<!DOCTYPE configuration
PUBLIC "-//MyBatis.org//DTD Config 3.0//EN"
"http://myBatis.org/dtd/MyBatis-3-config.dtd">
<configuration>
<!--引入properties文件,此时就可以${属性名}的方式访问属性值-->
<properties resource="database.properties"></properties>
<!-- <typeAliases>-->
<!-- <!–以包为单位,设置改包下所有的类型都拥有默认的别名,即类名且不区分大小写–>-->
<!-- <package name="com.mybatis.bean"/>-->
<!-- </typeAliases>-->
<environments default="development">
<environment id="development">
<transactionManager type="JDBC"/>
<dataSource type="POOLED">
<property name="driver" value="${jdbc.driver}"/>
<property name="url" value="${jdbc.url}"/>
<property name="username" value="${jdbc.username}"/>
<property name="password" value="${jdbc.password}"/>
</dataSource>
</environment>
</environments>
<!--引入映射文件-->
<mappers>
<package name="com.mybatis.mapper"/>
</mappers>
</configuration>
第四步:在test/java中创建一个测试类:MBGTest;
public class MBGTest {

    @Test
    public void testMBG() throws IOException {
        InputStream is = Resources.getResourceAsStream("mybatis-config.xml");
        SqlSession sqlSession = new SqlSessionFactoryBuilder().build(is).openSession(true);
        StudentEntryMapper mapper = sqlSession.getMapper(StudentEntryMapper.class);
        //查询所有数据:
        List<StudentEntry> list = mapper.selectByExample(null);
        list.forEach(lit-> System.out.println(lit));

    }
}
执行后控制台输出:
StudentEntry{studentid=1, studnetname='zhangsan', studentage=20}
StudentEntry{studentid=2, studnetname='lisi', studentage=19}
StudentEntry{studentid=3, studnetname='wanwu', studentage=40}
如果输出的是三个地址,则去实体类中重写toString方法就可以实现上面的效果了;
我们发现mapper.selectByExample方法的参数为StudentEntryExample;
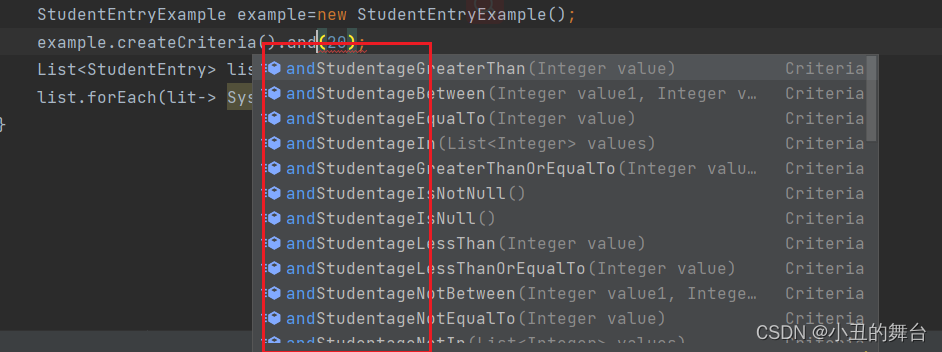
其实我们的条件查询可以为QBC风格的查询,QBC查询最大的特点就是将SQL语句中的WHERE子句进行了组件化的封装,让我们可以通过调用Criteria对象的方法自由的拼装查询条件。拼装为Criteria.andxxx;
如果想添加or条件则:Criteria.or().andxxx;
 @Test
public void testMBG() throws IOException {
    InputStream is = Resources.getResourceAsStream("mybatis-config.xml");
    SqlSession sqlSession = new SqlSessionFactoryBuilder().build(is).openSession(true);
    StudentEntryMapper mapper = sqlSession.getMapper(StudentEntryMapper.class);
    //查询所有数据:
    //        List<StudentEntry> list = mapper.selectByExample(null);
    //        list.forEach(lit-> System.out.println(lit));
    StudentEntryExample example=new StudentEntryExample();
    example.createCriteria().andStudentageGreaterThan(20);
    List<StudentEntry> list = mapper.selectByExample(example);
    list.forEach(lit-> System.out.println(lit));
}
