目录
1🥞.什么是duboo
2🌭.架构图
3.🍿快速入门
4.🧇浅浅理解
1.什么是duboo🤶🤶🤶
Dubbo是一个由阿里巴巴开发的基于Java的开源RPC框架。它提供了高性能、透明化的远程方法调用,以及服务自动注册和发现、负载均衡、容错、限流、监控等功能,使得分布式应用开发变得更加简单。Dubbo广泛应用于阿里巴巴内部服务化架构,也是国内外很多大型互联网公司的首选框架之一。
2.架构图🤶🤶🤶
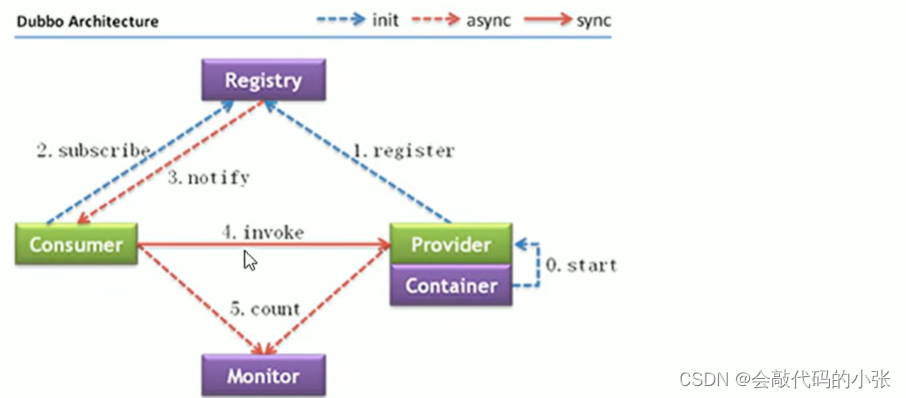
- Provider:暴露服务的服务提供方
- Container:服务运行容器
- Consumer:调用远程服务的服务消费方
- Registry:服务注册与发现的注册中心
- Monitor:统计服务的调用次数和调用时间的监控中心
3.快速入门 🤶🤶🤶
基本步骤:
- ①创建服务提供者Provider模块
- ②创建服务消费者Consumer模块
- ③在服务提供者模块编写UserServicelmpl 提供服务
- ④在服务消费者中的UserController远程调用UserServicelmpl 提供的服务
- ⑤分别启动两个服务,测试

3.1user-api 💕💕
创建一个模块作为公共接口
public interface UserService {
    public String say();
}

3.2user-service 💕💕
创建逻辑模块
1.导入依赖:
1.引入user-api,
2.tomcat端口为9000
   <properties>
        <spring.version>5.1.9.RELEASE</spring.version>
        <dubbo.version>2.7.4.1</dubbo.version>
        <zookeeper.version>4.0.0</zookeeper.version>
    </properties>

    <dependencies>
        <dependency>
            <groupId>javax.servlet</groupId>
            <artifactId>javax.servlet-api</artifactId>
            <version>3.1.0</version>
            <scope>provided</scope>
        </dependency>

        <dependency>
            <groupId>org.springframework</groupId>
            <artifactId>spring-context</artifactId>
            <version>${spring.version}</version>
        </dependency>
        <dependency>
            <groupId>org.springframework</groupId>
            <artifactId>spring-webmvc</artifactId>
            <version>${spring.version}</version>
        </dependency>
        <dependency>
            <groupId>org.slf4j</groupId>
            <artifactId>slf4j-api</artifactId>
            <version>1.7.21</version>
        </dependency>
        <dependency>
            <groupId>org.slf4j</groupId>
            <artifactId>slf4j-log4j12</artifactId>
            <version>1.7.21</version>
        </dependency>
        <dependency>
            <groupId>org.apache.dubbo</groupId>
            <artifactId>dubbo</artifactId>
            <version>${dubbo.version}</version>
        </dependency>
        <dependency>
            <groupId>org.apache.curator</groupId>
            <artifactId>curator-framework</artifactId>
            <version>${zookeeper.version}</version>
        </dependency>
        <dependency>
            <groupId>org.apache.curator</groupId>
            <artifactId>curator-recipes</artifactId>
            <version>${zookeeper.version}</version>
        </dependency>

        <dependency>
            <groupId>org.example</groupId>
            <artifactId>user-api</artifactId>
            <version>1.0-SNAPSHOT</version>
        </dependency>
    </dependencies>


    <build>
        <plugins>
            <plugin>
                <groupId>org.apache.tomcat.maven</groupId>
                <artifactId>tomcat7-maven-plugin</artifactId>
                <version>2.1</version>
                <configuration>
                    <port>9000</port>
                    <path>/</path>
                </configuration>
            </plugin>
        </plugins>
    </build>
2.创建spring.xml:
配置zookeeper(注册中心)的 ip地址和端口
     <!--项目名称-->
    <dubbo:application name="dubbo-service"></dubbo:application>
    <!--注册中心zookeeper地址-->
    <dubbo:registry address="zookeeper://192.168.20.130:2181"></dubbo:registry>
    <dubbo:annotation package="com.xz.service.impl"></dubbo:annotation>
3.配置web.xml
    <context-param>
        <param-name>contextConfigLocation</param-name>
        <param-value>classpath*:spring*.xml</param-value>
    </context-param>
    <listener>
        <listener-class>org.springframework.web.context.ContextLoaderListener</listener-class>
    </listener>
4.逻辑代码实现
@Service//将这个类提供的方法,对外发布,将访问的地址 ip 端口,注册到注册中心中
public class UserServiceImpl implements UserService {
    @Override
    public String say() {
        return "hello xiaoZhang~";
    }
}
3.3user-web💕💕
创建一个模块,作为访问层接口
1.导入依赖
1.引入user-api,
2.tomcat端口为8000
    <properties>
        <spring.version>5.1.9.RELEASE</spring.version>
        <dubbo.version>2.7.4.1</dubbo.version>
        <zookeeper.version>4.0.0</zookeeper.version>
    </properties>

    <dependencies>
        <dependency>
            <groupId>javax.servlet</groupId>
            <artifactId>javax.servlet-api</artifactId>
            <version>3.1.0</version>
            <scope>provided</scope>
        </dependency>

        <dependency>
            <groupId>org.springframework</groupId>
            <artifactId>spring-context</artifactId>
            <version>${spring.version}</version>
        </dependency>
        <dependency>
            <groupId>org.springframework</groupId>
            <artifactId>spring-webmvc</artifactId>
            <version>${spring.version}</version>
        </dependency>
        <dependency>
            <groupId>org.slf4j</groupId>
            <artifactId>slf4j-api</artifactId>
            <version>1.7.21</version>
        </dependency>
        <dependency>
            <groupId>org.slf4j</groupId>
            <artifactId>slf4j-log4j12</artifactId>
            <version>1.7.21</version>
        </dependency>
        <dependency>
            <groupId>org.apache.dubbo</groupId>
            <artifactId>dubbo</artifactId>
            <version>${dubbo.version}</version>
        </dependency>
        <dependency>
            <groupId>org.apache.curator</groupId>
            <artifactId>curator-framework</artifactId>
            <version>${zookeeper.version}</version>
        </dependency>
        <dependency>
            <groupId>org.apache.curator</groupId>
            <artifactId>curator-recipes</artifactId>
            <version>${zookeeper.version}</version>
        </dependency>

        <dependency>
            <groupId>org.example</groupId>
            <artifactId>user-api</artifactId>
            <version>1.0-SNAPSHOT</version>
        </dependency>

    </dependencies>


    <build>
        <plugins>
            <plugin>
                <groupId>org.apache.tomcat.maven</groupId>
                <artifactId>tomcat7-maven-plugin</artifactId>
                <version>2.1</version>
                <configuration>
                    <port>8000</port>
                    <path>/</path>
                </configuration>
            </plugin>
        </plugins>
    </build>
2.配置web.xml
<!--springmvc-->
  <servlet>
    <servlet-name>springmvc</servlet-name>
    <servlet-class>org.springframework.web.servlet.DispatcherServlet</servlet-class>
    <init-param>
      <param-name>contextConfigLocation</param-name>
      <param-value>classpath:springmvc.xml</param-value>
    </init-param>
  </servlet>
  <servlet-mapping>
    <servlet-name>springmvc</servlet-name>
    <url-pattern>*.do</url-pattern>
  </servlet-mapping>
3.配置springmvc.xml
引入zookeeper(注册中心)的ip地址和端口,以及要扫描的包
  <mvc:annotation-driven/>
    <context:component-scan base-package="com.xz.controller"></context:component-scan>

    <!--项目名称-->
    <dubbo:application name="dubbo-web"></dubbo:application>
    <!--注册中心zookeeper地址-->
    <dubbo:registry address="zookeeper://192.168.20.130:2181"></dubbo:registry>
    <dubbo:annotation package="com.xz.controller"></dubbo:annotation>
4.controller接口实现
- @Reference的作用:
- 1.从zookeeper(注册中心)获取userService的访问url
- 2.进行远程调用RPC
- 3.将结果封装为代理对象,给变量赋值
@RestController
@RequestMapping("/user")
public class UserController {


    @Reference//远程注入
    private UserService userService;

    @RequestMapping("/say")
    public String say(){
        return userService.say();
    }

}
3.4加载运行插件💕💕
注意:在启动插件时,一定要先clear 和install 父项目的,然后依次执行,最后在启动tomcat7-run
不然你会痛苦的~

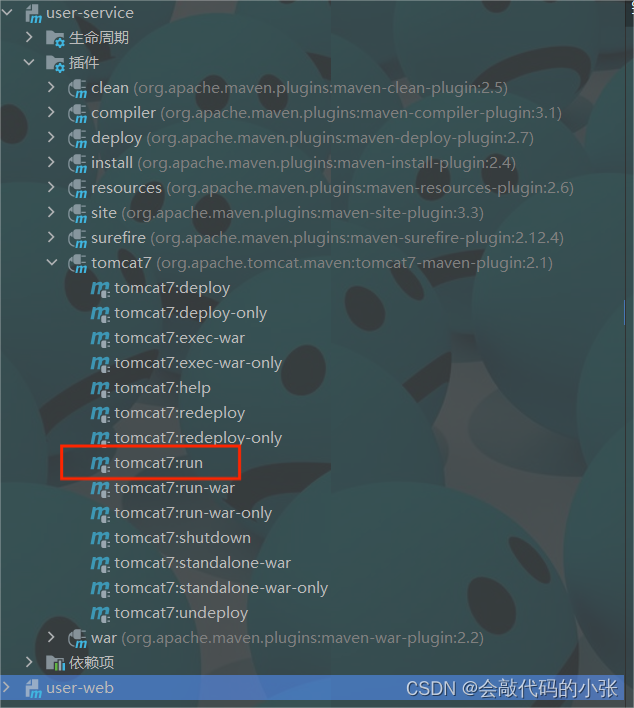

至此~dubbo部署成功!!!
4.浅浅理解🤶🤶🤶
对于服务与消费的理解:相对于之前的dao,service,controller的三层架构,如今服务就是service,controller就是消费者;与此同时,每个服务都可以独立开发、部署和维护


