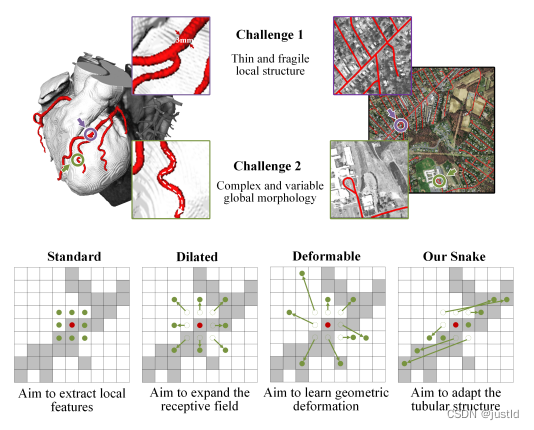
精确分割拓扑管状结构例如血管和道路,对医疗各个领域至关重要,可确保下游任务的准确性和效率。然而许多因素使分割任务变得复杂,包括细小脆弱的局部结构和复杂多变的全局形态。针对这个问题,作者提出了动态蛇卷积,该结构在管状分割任务上获得了极好的性能。
论文:Dynamic Snake Convolution based on Topological Geometric Constraints for Tubular Structure Segmentation
中文论文:拓扑几何约束管状结构分割的动态蛇卷积
代码:https://github.com/yaoleiqi/dscnet
一、适用场景
管状目标分割的特点是细长且复杂,标准卷积、空洞卷积无法更具目标特征调整关注区域,可变形卷积可以更具特征自适应学习感兴趣区域,但是对于管状目标,可变形卷积无法限制关注区域的连通性,而动态蛇卷积限制了关注区域的连通性,是的其更适合管状场景。
二、动态蛇卷积
对于一个标准3x3的2D卷积核K,其表示为:

为了赋予卷积核更多灵活性,使其能够聚焦于目标 的复杂几何特征,受到可变形卷积的启发,引入了变形偏 移 ∆。然而,如果模型被完全自由地学习变形偏移,感知场往往会偏离目标,特别是在处理细长管状结构的情 况下。因此,作者采用了一个迭代策略(下图),依次选 择每个要处理的目标的下一个位置进行观察,从而确保关注的连续性,不会由于大的变形偏移而将感知范围扩 散得太远。
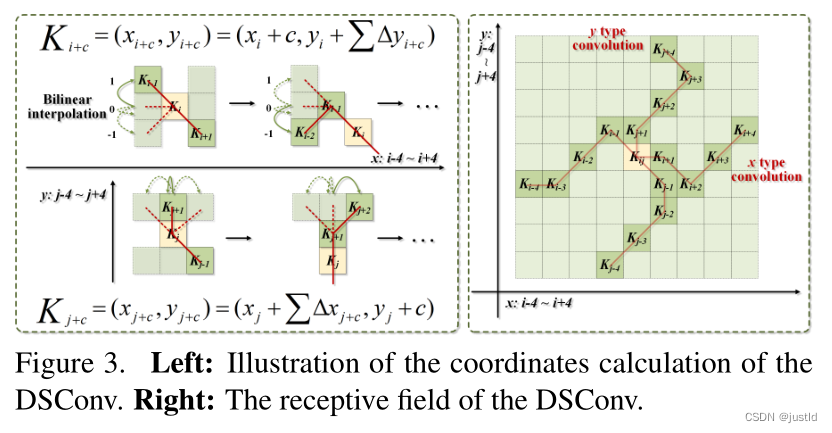
在动态蛇形卷积中,作者将标准卷积核在 x 轴和 y 轴方向都进行了直线化。考虑一个大小为 9 的卷积 核,以 x 轴方向为例,K 中每个网格的具体位置表示 为:Ki±c = (xi±c, yi±c),其中 c = 0, 1, 2, 3, 4 表示距离 中心网格的水平距离。卷积核 K 中每个网格位置 Ki±c 的选择是一个累积过程。从中心位置 Ki 开始,远离中 心网格的位置取决于前一个网格的位置:Ki+1 相对于 Ki 增加了偏移量 ∆ = {δ|δ ∈ [−1, 1]}。因此,偏移量 需要进行累加 Σ,从而确保卷积核符合线性形态结构。 上图中 x 轴方向的变化为:

y轴方向的变化为:

由于偏移量 ∆ 通常是小数,然而坐标通常是整数 形式,因此采用双线性插值,表示为:

其中,K 表示方程 2和方程 3的小数位置,K′ 列 举所有整数空间位置,B 是双线性插值核,可以分解为 两个一维核,即:

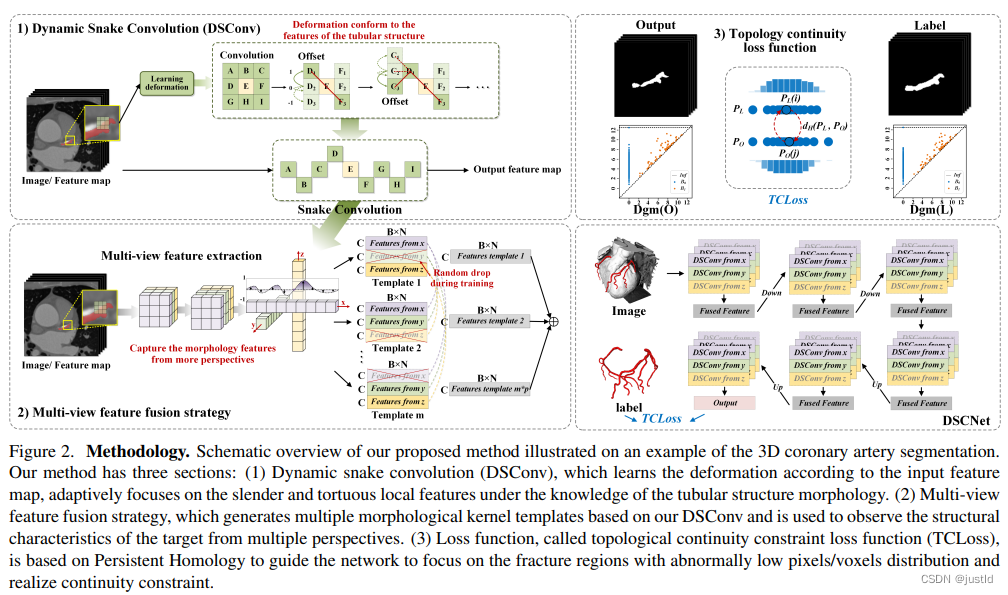
再给个整体图:
三、代码
蛇卷积的代码如下:
# -*- coding: utf-8 -*-
import os
import torch
from torch import nn
import einops


"""Dynamic Snake Convolution Module"""


class DSConv_pro(nn.Module):
    def __init__(
        self,
        in_channels: int = 1,
        out_channels: int = 1,
        kernel_size: int = 9,
        extend_scope: float = 1.0,
        morph: int = 0,
        if_offset: bool = True,
        device: str | torch.device = "cuda",
    ):
        """
        A Dynamic Snake Convolution Implementation

        Based on:

            TODO

        Args:
            in_ch: number of input channels. Defaults to 1.
            out_ch: number of output channels. Defaults to 1.
            kernel_size: the size of kernel. Defaults to 9.
            extend_scope: the range to expand. Defaults to 1 for this method.
            morph: the morphology of the convolution kernel is mainly divided into two types along the x-axis (0) and the y-axis (1) (see the paper for details).
            if_offset: whether deformation is required,  if it is False, it is the standard convolution kernel. Defaults to True.

        """

        super().__init__()

        if morph not in (0, 1):
            raise ValueError("morph should be 0 or 1.")

        self.kernel_size = kernel_size
        self.extend_scope = extend_scope
        self.morph = morph
        self.if_offset = if_offset
        self.device = torch.device(device)
        self.to(device)

        # self.bn = nn.BatchNorm2d(2 * kernel_size)
        self.gn_offset = nn.GroupNorm(kernel_size, 2 * kernel_size)
        self.gn = nn.GroupNorm(out_channels // 4, out_channels)
        self.relu = nn.ReLU(inplace=True)
        self.tanh = nn.Tanh()

        self.offset_conv = nn.Conv2d(in_channels, 2 * kernel_size, 3, padding=1)

        self.dsc_conv_x = nn.Conv2d(
            in_channels,
            out_channels,
            kernel_size=(kernel_size, 1),
            stride=(kernel_size, 1),
            padding=0,
        )
        self.dsc_conv_y = nn.Conv2d(
            in_channels,
            out_channels,
            kernel_size=(1, kernel_size),
            stride=(1, kernel_size),
            padding=0,
        )

    def forward(self, input: torch.Tensor):
        # Predict offset map between [-1, 1]
        offset = self.offset_conv(input)
        # offset = self.bn(offset)
        offset = self.gn_offset(offset)
        offset = self.tanh(offset)

        # Run deformative conv
        y_coordinate_map, x_coordinate_map = get_coordinate_map_2D(
            offset=offset,
            morph=self.morph,
            extend_scope=self.extend_scope,
            device=self.device,
        )
        deformed_feature = get_interpolated_feature(
            input,
            y_coordinate_map,
            x_coordinate_map,
        )

        if self.morph == 0:
            output = self.dsc_conv_x(deformed_feature)
        elif self.morph == 1:
            output = self.dsc_conv_y(deformed_feature)

        # Groupnorm & ReLU
        output = self.gn(output)
        output = self.relu(output)

        return output


def get_coordinate_map_2D(
    offset: torch.Tensor,
    morph: int,
    extend_scope: float = 1.0,
    device: str | torch.device = "cuda",
):
    """Computing 2D coordinate map of DSCNet based on: TODO

    Args:
        offset: offset predict by network with shape [B, 2*K, W, H]. Here K refers to kernel size.
        morph: the morphology of the convolution kernel is mainly divided into two types along the x-axis (0) and the y-axis (1) (see the paper for details).
        extend_scope: the range to expand. Defaults to 1 for this method.
        device: location of data. Defaults to 'cuda'.

    Return:
        y_coordinate_map: coordinate map along y-axis with shape [B, K_H * H, K_W * W]
        x_coordinate_map: coordinate map along x-axis with shape [B, K_H * H, K_W * W]
    """

    if morph not in (0, 1):
        raise ValueError("morph should be 0 or 1.")

    batch_size, _, width, height = offset.shape
    kernel_size = offset.shape[1] // 2
    center = kernel_size // 2
    device = torch.device(device)

    y_offset_, x_offset_ = torch.split(offset, kernel_size, dim=1)

    y_center_ = torch.arange(0, width, dtype=torch.float32, device=device)
    y_center_ = einops.repeat(y_center_, "w -> k w h", k=kernel_size, h=height)

    x_center_ = torch.arange(0, height, dtype=torch.float32, device=device)
    x_center_ = einops.repeat(x_center_, "h -> k w h", k=kernel_size, w=width)

    if morph == 0:
        """
        Initialize the kernel and flatten the kernel
            y: only need 0
            x: -num_points//2 ~ num_points//2 (Determined by the kernel size)
        """
        y_spread_ = torch.zeros([kernel_size], device=device)
        x_spread_ = torch.linspace(-center, center, kernel_size, device=device)

        y_grid_ = einops.repeat(y_spread_, "k -> k w h", w=width, h=height)
        x_grid_ = einops.repeat(x_spread_, "k -> k w h", w=width, h=height)

        y_new_ = y_center_ + y_grid_
        x_new_ = x_center_ + x_grid_

        y_new_ = einops.repeat(y_new_, "k w h -> b k w h", b=batch_size)
        x_new_ = einops.repeat(x_new_, "k w h -> b k w h", b=batch_size)

        y_offset_ = einops.rearrange(y_offset_, "b k w h -> k b w h")
        y_offset_new_ = y_offset_.detach().clone()

        # The center position remains unchanged and the rest of the positions begin to swing
        # This part is quite simple. The main idea is that "offset is an iterative process"

        y_offset_new_[center] = 0

        for index in range(1, center + 1):
            y_offset_new_[center + index] = (
                y_offset_new_[center + index - 1] + y_offset_[center + index]
            )
            y_offset_new_[center - index] = (
                y_offset_new_[center - index + 1] + y_offset_[center - index]
            )

        y_offset_new_ = einops.rearrange(y_offset_new_, "k b w h -> b k w h")

        y_new_ = y_new_.add(y_offset_new_.mul(extend_scope))

        y_coordinate_map = einops.rearrange(y_new_, "b k w h -> b (w k) h")
        x_coordinate_map = einops.rearrange(x_new_, "b k w h -> b (w k) h")

    elif morph == 1:
        """
        Initialize the kernel and flatten the kernel
            y: -num_points//2 ~ num_points//2 (Determined by the kernel size)
            x: only need 0
        """
        y_spread_ = torch.linspace(-center, center, kernel_size, device=device)
        x_spread_ = torch.zeros([kernel_size], device=device)

        y_grid_ = einops.repeat(y_spread_, "k -> k w h", w=width, h=height)
        x_grid_ = einops.repeat(x_spread_, "k -> k w h", w=width, h=height)

        y_new_ = y_center_ + y_grid_
        x_new_ = x_center_ + x_grid_

        y_new_ = einops.repeat(y_new_, "k w h -> b k w h", b=batch_size)
        x_new_ = einops.repeat(x_new_, "k w h -> b k w h", b=batch_size)

        x_offset_ = einops.rearrange(x_offset_, "b k w h -> k b w h")
        x_offset_new_ = x_offset_.detach().clone()

        # The center position remains unchanged and the rest of the positions begin to swing
        # This part is quite simple. The main idea is that "offset is an iterative process"

        x_offset_new_[center] = 0

        for index in range(1, center + 1):
            x_offset_new_[center + index] = (
                x_offset_new_[center + index - 1] + x_offset_[center + index]
            )
            x_offset_new_[center - index] = (
                x_offset_new_[center - index + 1] + x_offset_[center - index]
            )

        x_offset_new_ = einops.rearrange(x_offset_new_, "k b w h -> b k w h")

        x_new_ = x_new_.add(x_offset_new_.mul(extend_scope))

        y_coordinate_map = einops.rearrange(y_new_, "b k w h -> b w (h k)")
        x_coordinate_map = einops.rearrange(x_new_, "b k w h -> b w (h k)")

    return y_coordinate_map, x_coordinate_map


def get_interpolated_feature(
    input_feature: torch.Tensor,
    y_coordinate_map: torch.Tensor,
    x_coordinate_map: torch.Tensor,
    interpolate_mode: str = "bilinear",
):
    """From coordinate map interpolate feature of DSCNet based on: TODO

    Args:
        input_feature: feature that to be interpolated with shape [B, C, H, W]
        y_coordinate_map: coordinate map along y-axis with shape [B, K_H * H, K_W * W]
        x_coordinate_map: coordinate map along x-axis with shape [B, K_H * H, K_W * W]
        interpolate_mode: the arg 'mode' of nn.functional.grid_sample, can be 'bilinear' or 'bicubic' . Defaults to 'bilinear'.

    Return:
        interpolated_feature: interpolated feature with shape [B, C, K_H * H, K_W * W]
    """

    if interpolate_mode not in ("bilinear", "bicubic"):
        raise ValueError("interpolate_mode should be 'bilinear' or 'bicubic'.")

    y_max = input_feature.shape[-2] - 1
    x_max = input_feature.shape[-1] - 1

    y_coordinate_map_ = _coordinate_map_scaling(y_coordinate_map, origin=[0, y_max])
    x_coordinate_map_ = _coordinate_map_scaling(x_coordinate_map, origin=[0, x_max])

    y_coordinate_map_ = torch.unsqueeze(y_coordinate_map_, dim=-1)
    x_coordinate_map_ = torch.unsqueeze(x_coordinate_map_, dim=-1)

    # Note here grid with shape [B, H, W, 2]
    # Where [:, :, :, 2] refers to [x ,y]
    grid = torch.cat([x_coordinate_map_, y_coordinate_map_], dim=-1)

    interpolated_feature = nn.functional.grid_sample(
        input=input_feature,
        grid=grid,
        mode=interpolate_mode,
        padding_mode="zeros",
        align_corners=True,
    )

    return interpolated_feature


def _coordinate_map_scaling(
    coordinate_map: torch.Tensor,
    origin: list,
    target: list = [-1, 1],
):
    """Map the value of coordinate_map from origin=[min, max] to target=[a,b] for DSCNet based on: TODO

    Args:
        coordinate_map: the coordinate map to be scaled
        origin: original value range of coordinate map, e.g. [coordinate_map.min(), coordinate_map.max()]
        target: target value range of coordinate map,Defaults to [-1, 1]

    Return:
        coordinate_map_scaled: the coordinate map after scaling
    """
    min, max = origin
    a, b = target

    coordinate_map_scaled = torch.clamp(coordinate_map, min, max)

    scale_factor = (b - a) / (max - min)
    coordinate_map_scaled = a + scale_factor * (coordinate_map_scaled - min)

    return coordinate_map_scaled

