- 官方给出的集群部署架构图

- 集群部署说明 (nacos.io)
- 3个或3个以上nacos节点才能构成集群
- 当前示例中包含3个nacos节点,同时一个负载均衡器代理3个nacos,本示例中负载均衡器可使用的是nginx
- 准备并安装好正常运行的nginx,本示例略
- 准备并安装好正常运行的MySQL数据库,本示例略
- 3个nacos节点地址信息
-
节点 ip port nacos1 192.168.xxx.xxx 8841 nacos2 192.168.xxx.xxx 18841 nacos3 192.168.xxx.xxx 28841 - 根据自己的实际情况设置,端口建议不要设置为连续的,防止nacos启动时有可能存在端口冲突,最好不同nacos的节点的端口相差有一定的步数,步数大于1002以上
-
- 开始搭建nacos集群
- 下载nacos安装包
- https://github.com/alibaba/nacos/releases

- 本示例下载的压缩包为:nacos-server-2.3.0.tar.gz
- 通过ssh远程工具将压缩包上传到Linux服务器中,然后再解压
-
tar -zxvf nacos-server-2.3.0.tar.gz 
-
- 初始化nacos的数据库脚本
- 在解压的文件中的conf文件夹中找到mysql-schema.sql,这里是nacos建立数据库的相关SQL数据,使用数据库管理工具新建一个数据库名称为nacos的数据库,并将当前mysql-schema.sql的sql文件在nacos数据库中执行,结果如下所示

- 回到Linux服务中,进入nacos的conf目录,将配置文件cluster.conf.example,重命名为cluster.conf

-
mv cluster.conf.example cluster.conf 
- 将配置文件cluster.conf修改为以下信息,其中ip地址修改为自己的服务器ip地址,端口设定为自己设定的nacos的服务端口
-
#
# Copyright 1999-2021 Alibaba Group Holding Ltd.
#
# Licensed under the Apache License, Version 2.0 (the "License");
# you may not use this file except in compliance with the License.
# You may obtain a copy of the License at
#
#      http://www.apache.org/licenses/LICENSE-2.0
#
# Unless required by applicable law or agreed to in writing, software
# distributed under the License is distributed on an "AS IS" BASIS,
# WITHOUT WARRANTIES OR CONDITIONS OF ANY KIND, either express or implied.
# See the License for the specific language governing permissions and
# limitations under the License.
#

#it is ip
#example
192.168.xxx.xxx:8841
192.168.xxx.xxx:18841
192.168.xxx.xxx:28841
-
- 修改配置文件application.properties,添加数据库配置、开启鉴权等相关信息

-
### 是否开启鉴权功能
### If turn on auth system:
nacos.core.auth.enabled=true

### 配置自定义身份识别的key(不可为空)和value(不可为空)
### Since 1.4.1, worked when nacos.core.auth.enabled=true and nacos.core.auth.enable.userAgentAuthWhite=false.
### The two properties is the white list for auth and used by identity the request from other server.
nacos.core.auth.server.identity.key=exampleNacos
nacos.core.auth.server.identity.value=exampleNacos

### 默认鉴权插件用于生成用户登陆临时accessToken所使用的密钥,使用默认值有安全风险
### 自定义密钥时,推荐将配置项设置为Base64编码的字符串,且原始密钥长度不得低于32字符。 Base64 在线编码解码: https://base64.us/
### The default token (Base64 String):
nacos.core.auth.plugin.nacos.token.secret.key=SecretKey012345678901234567890123456789012345678901234567890123456789

# mysql数据库配置信息
### If use MySQL as datasource:
### Deprecated configuration property, it is recommended to use `spring.sql.init.platform` replaced.
# spring.datasource.platform=mysql
# 初始化使用的数据库为MySQL
spring.sql.init.platform=mysql

# 数据库连接数量
### Count of DB:
db.num=1

### Connect URL of DB:
# 连接mysql的url
db.url.0=jdbc:mysql://192.168.xxx.xxx:3333/nacos?characterEncoding=utf8&connectTimeout=1000&socketTimeout=3000&autoReconnect=true&useUnicode=true&useSSL=false&serverTimezone=UTC
# 连接mysql的用户
db.user.0=root
# 连接mysql的密码
db.password.0=123456
- 将解压之后的nacos的文件复制3份,分别为nacos1、nacos2、nacos3
-
cp -rf nacos ./nacos1 cp -rf nacos ./nacos2 cp -rf nacos ./nacos3 
-
- 分别修改nacos的application.properties,将里面的server.port修改为指定的端口
- nacos1
-
### Default web server port:
server.port=8841
-
- nacos2
-
### Default web server port:
server.port=18841
-
- nacos3
-
### Default web server port:
server.port=28841
-

- nacos1
- 分别给nacos1、nacos2、nacos3配置jdk环境,修改startup.sh文件

-
# 配置JDK环境,要求JDK 1.8+ export JAVA_HOME=/usr/local/project/openjdk-8 export JRE_HOME=$JAVA_HOME/jre export CLASSPATH=$JAVA_HOME/lib:$JRE_HOME/lib:$CLASSPATH export PATH=$JAVA_HOME/bin:$JRE_HOME/bin:$PATH 
- 然后分别启动nacos1、nacos2、nacos3的节点,启动脚本文件为startup.sh
-
/usr/local/project/nacos-group/nacos1/bin/startup.sh
/usr/local/project/nacos-group/nacos2/bin/startup.sh
/usr/local/project/nacos-group/nacos3/bin/startup.sh
-
- 访问地址http://192.168.xxx.xxx:8841/nacos/,输入默认账号密码:nacos/nacos登录可到达nacos控制台,三个节点状态都是up则说明启动成功

- 同时如果都启动成功,所有节点的端口的nacos的控制台都可以正常访问
- 下载nacos安装包
- 配置nginx的反向代理
- 默认端口占用情况
-
端口 与主端口的偏移量 描述 8848 0 主端口,客户端、控制台及OpenAPI所使用的HTTP端口 9848 1000 客户端gRPC请求服务端端口,用于客户端向服务端发起连接和请求 9849 1001 服务端gRPC请求服务端端口,用于服务间同步等 7848 -1000 Jraft请求服务端端口,用于处理服务端间的Raft相关请求 - 使用VIP/nginx请求时,需要配置成TCP转发,不能配置http2转发,否则连接会被nginx断开。 9849和7848端口为服务端之间的通信端口,请勿暴露到外部网络环境和客户端测。
-
- 根据主端口偏移量,可以计算出客户端gRPC请求服务端端口:
- 8841+1000=9841
- 18841+1000=19841
- 28841+1000=29841
- nginx监听的是80端口,则80+1000=1080
- 找到nginx的配置文件conf/nginx.conf
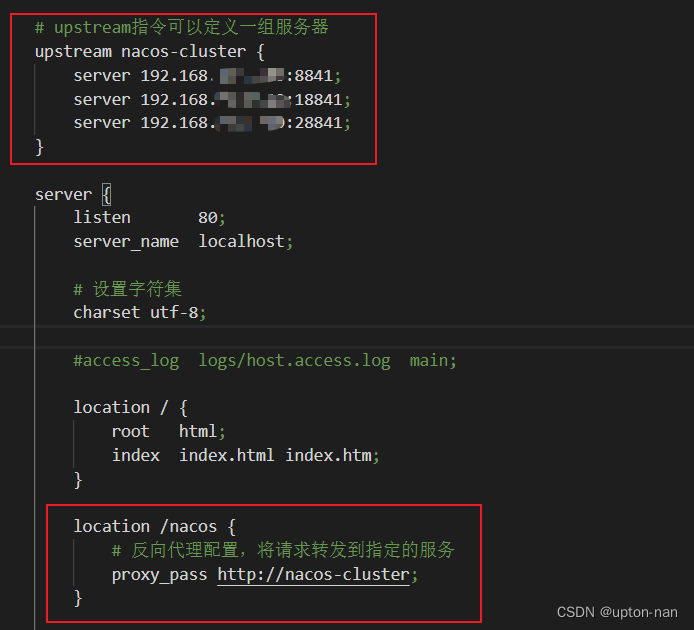
- 修改conf/nginx.conf的配置文件信息,添加以下配置
- 在http块内添加
-
    # upstream指令可以定义一组服务器
    upstream nacos-cluster {
        server 192.168.xxx.xxx:8841;
        server 192.168.xxx.xxx:18841;
        server 192.168.xxx.xxx:28841;
    }
-
- 在server块中添加
-
        location /nacos {
            # 反向代理配置,将请求转发到指定的服务
            proxy_pass http://nacos-cluster;
        }
-
- 在stream块用于做nacos的TCP转发
-
# stream块用于做nacos的TCP转发
stream {

    # upstream指令可以定义一组服务器
    upstream nacos-cluster {
        server 192.168.xxx.xxx:9841;
        server 192.168.xxx.xxx:19841;
        server 192.168.xxx.xxx:29841;
    }

    server {
        # 80+1000=1080
        listen 1080;
        proxy_connect_timeout 30s;
        proxy_timeout 5m;
        # 反向代理配置,将请求转发到指定的服务
        proxy_pass nacos-cluster;
    }

}
-

- 在http块内添加
- 启动nginx
-
sudo /usr/local/project/nginx/sbin/nginx - nginx监听的是80端口,所以需要管理员权限启动nginx
- 如果nginx启动报错类似于:nginx: [emerg] unknown directive "stream" in /usr/local/project/nginx/conf/nginx.conf:159,解决方案请参考作者当前博客链接:nginx启动报错nginx: [emerg] unknown directive “stream“ in /usr/local/project/nginx/conf/nginx.conf:159-CSDN博客
-
- 默认端口占用情况
- 浏览器访问nginx监听的端口,访问nacos,当前示例访问地址为http://192.168.xxx.xxx/nacos/

- 显示可以正常访问
- 项目中连接nacos实现服务注册和服务发现
-
server: port: 18080 spring: application: #应用的名称 name: nacos-user-service cloud: nacos: # Nacos Server 启动监听的ip地址和端口 server-addr: 192.168.163.100:80 discovery: # nacos开启鉴权之后的用户名 username: nacos # nacos开启鉴权之后的用户登录密码 password: nacos # 配置服务实例的集群名称 cluster-name: GD 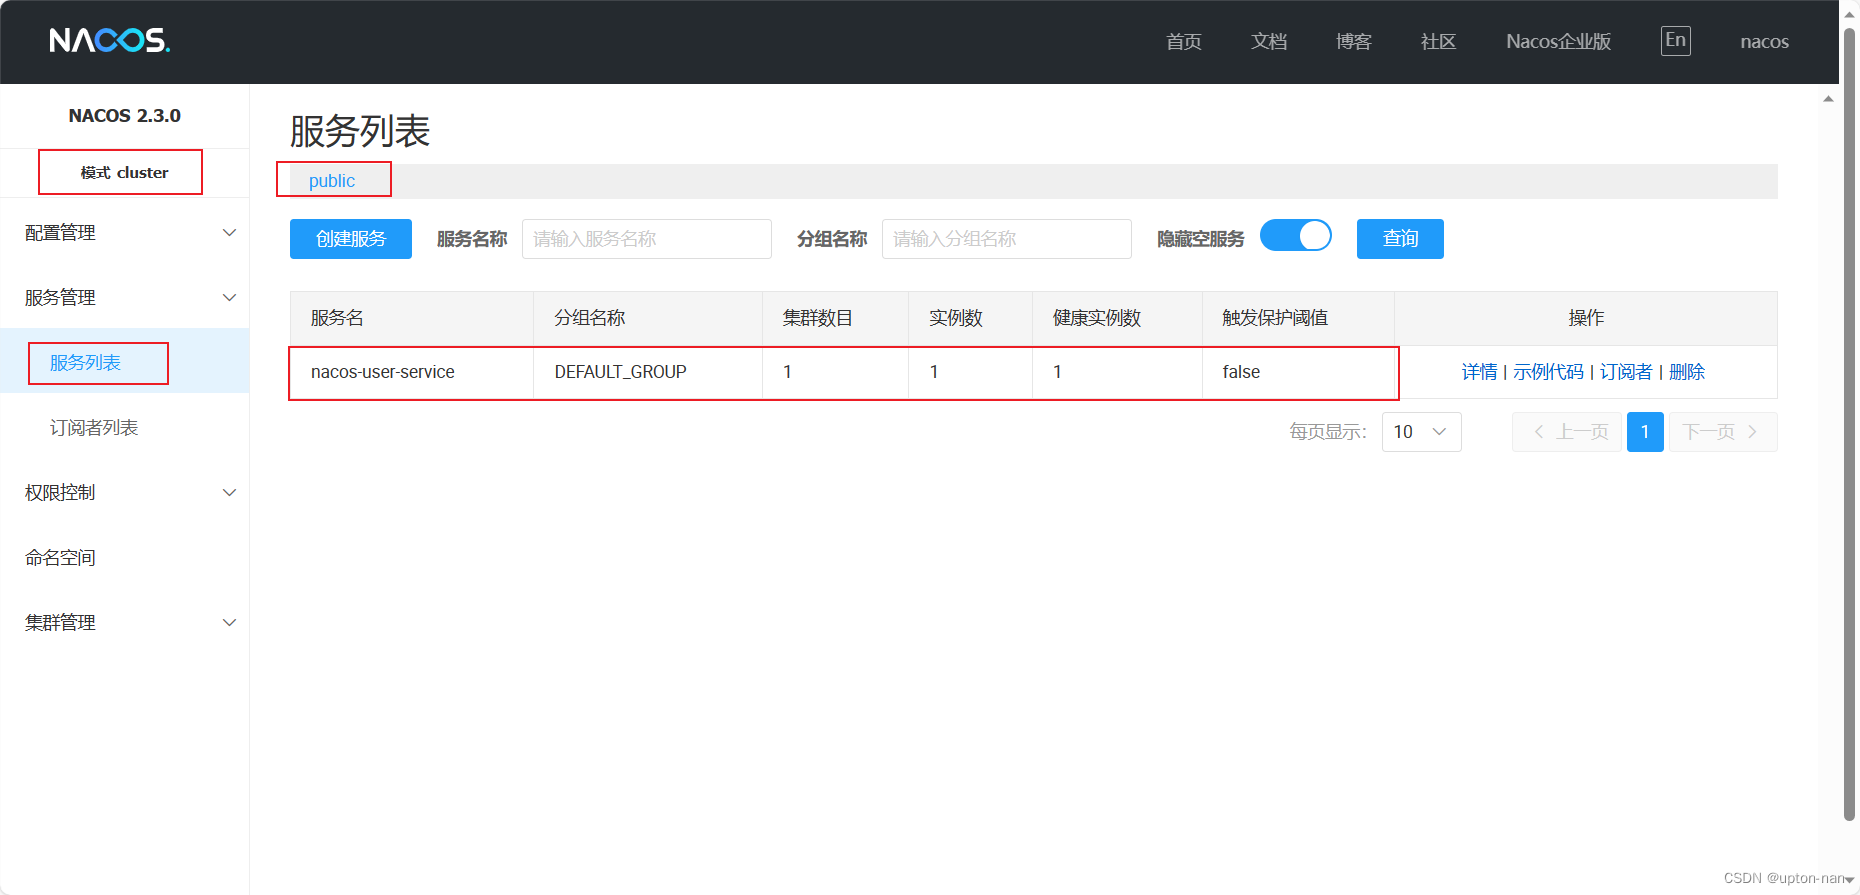
-
- 生产环境优化建议
- 实际部署时,我们最好给反向代理的nginx服务器设置一个域名,这样后续如果有服务器迁移,nacos的客户端也无需更改配置
- Nacos的各个节点应该部署到多个不同的服务器上,这样可以做到容灾和隔离
如何在Ubuntu的Linux系统上搭建nacos集群
news2026/2/15 2:49:10
本文来自互联网用户投稿,该文观点仅代表作者本人,不代表本站立场。本站仅提供信息存储空间服务,不拥有所有权,不承担相关法律责任。如若转载,请注明出处:http://www.coloradmin.cn/o/1311117.html
如若内容造成侵权/违法违规/事实不符,请联系多彩编程网进行投诉反馈,一经查实,立即删除!相关文章
自己动手写数据库: select 查询语句对应查询树的构造和执行
首先我们需要给原来代码打个补丁,在SelectScan 结构体初始化时需要传入 UpdateScan 接口对象,但很多时候我们需要传入的是 Scan 对象,因此我们需要做一个转换,也就是当初始化 SelectScan 时,如果传入的是 Scan 对象&am…
浅谈故障注入的主要功能是什么?
随着现代软件系统的复杂性不断增加,保障系统的可靠性变得愈发重要。在这一背景下,故障注入技术崭露头角,成为优化系统稳定性和鲁棒性的关键手段。本文将探讨故障注入的主要功能以及在提高系统可靠性方面的作用。 1. 故障模拟与验证 故障注入技…
项目管理系统在律师案件管理中的应用与策略
法律案件管理软件可以帮助律师事务所自动化其日常工作流程,例如查看任务、跟踪计费时间和日历。这有助于公司提高效率并最大化收入,从而发展业务。 使用Zoho Projects项目管理系统进行律师案件管理可以帮助您更好地组织和跟踪案件进程、提高团队协作效率…
【论文精读ICCV_2023】BlendFace: Re-designing Identity Encoders for Face-Swapping
【论文精读ICCV_2023】BlendFace: Re-designing Identity Encoders for Face-Swapping 一、前言Abstract1. Introduction2. Related Work3. Attribute Bias in Face Recognition Models3.1. Identity Distance Loss3.2. Analysis of Identity Similarity 4. BlendFace4.1. Pre-…
中低压MOS 适用于电子烟等产品—— 较小的开关损耗 过流能力好
工作原理: 当用户在吸嘴处抽吸时,气流经过进气孔,穿 过电路板上方的咪头,咪头即产生电信号,驱 动芯片板,让电池供电给雾化芯,雾化芯中的 发热丝将电能转化成热能,当温度达到雾化液…
Zibll子比主题最新学习版
Zibll子比主题5.7.1是一款为WordPress平台设计的优秀主题。它具有独特而富有吸引力的设计风格,同时提供了丰富的功能和卓越的性能,使您的网站在众多网站中脱颖而出。以下是对Zibll子比主题5.7.1的详细介绍。 (这是我在“布谷鸟网址导航”上看…
通俗理解什么是 LSTM 神经网络
大家好啊,我是董董灿。
刚开始做程序开发时,在公司提交代码前,都需要让大佬们 review(评审),大佬们看完,总会在评论区打出一串"LGTM"。
当时作为小白的我,天真地以为大佬觉得我提交的代码还不错…
浮动的魅力与挑战:如何在前端设计中巧妙运用浮动(下)
🤍 前端开发工程师(主业)、技术博主(副业)、已过CET6 🍨 阿珊和她的猫_CSDN个人主页 🕠 牛客高级专题作者、在牛客打造高质量专栏《前端面试必备》 🍚 蓝桥云课签约作者、已在蓝桥云…
【UE5.1 MetaHuman】使用mixamo_converter把Mixamo的动画重定向给MetaHuman使用
目录
前言
效果
步骤
一、下载mixamo_converter软件
二、Mixamo动画重定向
三、导入UE
四、动画重定向
五、使用重定向后的动画 前言
上一篇(【UE5】初识MetaHuman 创建虚拟角色)中我们已经制作了一个MetaHuman,本篇博文将介绍如何…
Unity 关于Rigidbody刚体组件的理解
一、基本了解
刚体Rigidbody因具体物理相关的属性,使得实际应用中更有真实感。应用也多:
Rigidbody它可以受到重力、碰撞或者力的作用,所以我们可以用它模拟物体的真实物理行为,如受到重力的作用、与其他刚体对象进行碰撞&#…
【infiniband】ibdump抓包
ibdump用于捕获和转储InfiniBand网络的流量。
这种工具通常用于调试和分析InfiniBand网络问题,包括性能瓶颈和配置错误。ibdump工具在Mellanox InfiniBand环境中较为常用,现由NVIDIA提供支持。
使用ibdump的基本步骤
请注意,您需要在安装了…
11.关注、取消关注 + 关注列表、粉丝列表
目录
1.关注、取消关注
1.1 把数据存到 Redis 中,构造 key
1.2 开发业务层
1.3 开发表现层
1.4 显示正确的关注数据
2.关注列表、粉丝列表
2.1 业务层
2.2 表现层 1.关注、取消关注
需求:开发关注、取消关注功能;统计用户的关注数…
飞天使-docker知识点5-资源限制与容器的不同状态
文章目录 cpu和内存的限制内存限制的部分参数容器的不同状态docker images 的分层docker registry制作镜像 cpu和内存的限制
默认情况下,容器没有资源限制,可以使用主机内核调度程序允许的尽可能多的
给定资源,Docker 提供了控制容器可以限制…
wordpress 修改社交图标
要去掉标记的图标,死活找不到在那里配置。后来找到了,下图(wordpress 小白,特此记录)
【开源软件】最好的开源软件-2023-第17名 Gravite
自我介绍 做一个简单介绍,酒架年近48 ,有20多年IT工作经历,目前在一家500强做企业架构.因为工作需要,另外也因为兴趣涉猎比较广,为了自己学习建立了三个博客,分别是【全球IT瞭望】,【…
事务--03---TCC空回滚、悬挂、幂等解决方案
提示:文章写完后,目录可以自动生成,如何生成可参考右边的帮助文档 文章目录 Seata TCC 模式设计思路TCC存在的问题1、空回滚以及解决方案解决方案: 2、幂等问题以及解决方案解决方案: 3、悬挂问题以及解决方案解决方案…
档案馆数字化建设实施方案
档案馆数字化建设实施方案主要包括以下几个方面的内容: 1. 目标与规划:明确数字化建设的目标和规划,确定数字化建设的优先领域和重点工作,制定长期和短期的发展规划。 2. 技术设施建设:建设专久智能数字化档案管理系统…
gradle-5.4.1-all下载时出现了Connect timed out
问题描述:最近在学习如何在手机端部署YOLO,出现了许多错误,其中之一的错误:gradle-5.4.1-all下载时出现了Connect timed out,大家都知道这是从国外网站下载网络问题导致的。
解决办法:
在我们创建项目中的一个路径下…


