首语
在Android系统中,DVM(Dalvik虚拟机)和ART、应用程序进程以及运行系统的关键服务的SystemServer进程都是由Zygote进程创建的,也可以将其称之为孵化器,它通过fork(复制进程)的形式来创建应用程序进程和SystemServer进程。
Zygote进程是在init进程启动时创建的,起初Zygote的进程名称为"app_process",在frameworks/base/cmds/app_process/Android.bp中定义,Zygote启动后,会将其名称转换为"zygote"或"zygote64"(后面分析源码会讲到)。
Zygote启动脚本
在init.rc文件中采用了Import类型的语句来引入Zygote启动脚本。
import /system/etc/init/hw/init.${ro.zygote}.rc
init.rc不会引入一个固定的rc文件,而是根据属性ro.zygote来引入不同的文件。ro.zygote属性的取值有以下3种:
- init.zygote32.rc
- init.zygote64.rc
- init.zygote64_32.rc
这些Zygote脚本都放在system/core/rootdir目录中。下面分别介绍这些Zygote启动脚本
init.zygote32.rc
表示支持纯32位程序,内容如下:
service zygote /system/bin/app_process -Xzygote /system/bin --zygote --start-system-server
    class main
    priority -20
    user root
    group root readproc reserved_disk
    socket zygote stream 660 root system
    socket usap_pool_primary stream 660 root system
    onrestart exec_background - system system -- /system/bin/vdc volume abort_fuse
    onrestart write /sys/power/state on
    onrestart restart audioserver
    onrestart restart cameraserver
    onrestart restart media
    onrestart restart media.tuner
    onrestart restart netd
    onrestart restart wificond
    task_profiles ProcessCapacityHigh
    critical window=${zygote.critical_window.minute:-off} target=zygote-fatal
根据在 init进程启动过程 文章中所描述的Service类型语句的格式,可知,Zygote进程名称为zygote,执行程序为app_process,classname为main,如果audioserver、cameraserver、media等进程终止,就需要restart.
init.zygote64.rc
表示支持64位程序,这个启动脚本在 init进程启动过程 文章中已经进行解释,不在重复讲述。
init.zygote64_32.rc
表示既支持64位程序也支持32位程序,64位为主,32位为辅。现在主流都是init.zygote64_32.rc。内容如下:
service zygote /system/bin/app_process64 -Xzygote /system/bin --zygote --start-system-server --socket-name=zygote
    class main
    priority -20
    user root
    group root readproc reserved_disk
    socket zygote stream 660 root system
    socket usap_pool_primary stream 660 root system
    onrestart exec_background - system system -- /system/bin/vdc volume abort_fuse
    onrestart write /sys/power/state on
    onrestart restart audioserver
    onrestart restart cameraserver
    onrestart restart media
    onrestart restart media.tuner
    onrestart restart netd
    onrestart restart wificond
    task_profiles ProcessCapacityHigh MaxPerformance
    critical window=${zygote.critical_window.minute:-off} target=zygote-fatal

service zygote_secondary /system/bin/app_process32 -Xzygote /system/bin --zygote --socket-name=zygote_secondary --enable-lazy-preload
    class main
    priority -20
    user root
    group root readproc reserved_disk
    socket zygote_secondary stream 660 root system
    socket usap_pool_secondary stream 660 root system
    onrestart restart zygote
    task_profiles ProcessCapacityHigh MaxPerformance
    disabled
脚本中由两个service类型语句,说明会启动两个Zygote进程,一个名称位zygote,执行程序为app_process64,作为主模式。另一个名称为zygote_secondary,执行程序为app_process32,作为辅模式。
Zygote进程启动过程
在 init进程启动过程 文章中我们知道init启动Zygote主要是调用app_main.cpp的main函数中的AndroidRuntime的start函数来启动Zygote进程的,首先从app_main.cpp的main函数分析。
Zygote进程都是通过fork自身来创建子进程,这样Zygote进程以及它的子进程都可以进入main函数,因此main函数有区分当前运行在那个进程,根据参数arg是否包含"–zygote"来判断,如果包含则说明当前运行在Zygote进程,zygote = true;,包含"–start-system-server"则说明当前运行在SystemServer进程,startSystemServer = true;。运行在Zygote进程,就会调用AndroidRuntime的start函数(AppRuntime继承于AndroidRuntime,没有实现start函数,所以直接查看AndroidRuntime。
源码路径:frameworks\base\cmds\app_process\app_main.cpp
#if defined(__LP64__)
static const char ABI_LIST_PROPERTY[] = "ro.product.cpu.abilist64";
static const char ZYGOTE_NICE_NAME[] = "zygote64";
#else
static const char ABI_LIST_PROPERTY[] = "ro.product.cpu.abilist32";
static const char ZYGOTE_NICE_NAME[] = "zygote";
#endif

int main(int argc, char* const argv[])
{
	...
    while (i < argc) {
        const char* arg = argv[i++];
        if (strcmp(arg, "--zygote") == 0) {
            //如果当前运行在Zygote进程中,则将zygote设置为true
            zygote = true;
            niceName = ZYGOTE_NICE_NAME;
        } else if (strcmp(arg, "--start-system-server") == 0) {
            //如果当前运行在SystemServer进程中,则将zygote设置为true
            startSystemServer = true;
        } else if (strcmp(arg, "--application") == 0) {
            application = true;
        } else if (strncmp(arg, "--nice-name=", 12) == 0) {
            niceName.setTo(arg + 12);
        } else if (strncmp(arg, "--", 2) != 0) {
            className.setTo(arg);
            break;
        } else {
            --i;
            break;
        }
    }
	...
    if (!niceName.isEmpty()) {
        //首语提到Zygote的进程名称为"app_process",启动后会修改为niceName=ZYGOTE_NICE_NAME,ZYGOTE_NICE_NAME会根据系统为zygote64或zygote
        runtime.setArgv0(niceName.string(), true /* setProcName */);
    }
  	//运行在Zygote进程
    if (zygote) {
            runtime.start("com.android.internal.os.ZygoteInit", args, zygote);
    } else if (className) {
        //application启动模式
        runtime.start("com.android.internal.os.RuntimeInit", args, zygote);
    } else {
        fprintf(stderr, "Error: no class name or --zygote supplied.\n");
        app_usage();
        LOG_ALWAYS_FATAL("app_process: no class name or --zygote supplied.");
    }
}
startVm函数创建虚拟机,再通过startReg注册JNI方法。将className的".“替换为”/",是为了找到ZygoteInit,再调用ZygoteInit的main方法,因为ZygoteInit的main方法是java语言实现的,所以需要通过JNI来调用java,这样Zygote就从Native进入了java框架层。
源码路径:frameworks/base/core/jni/AndroidRuntime.cpp
void AndroidRuntime::start(const char* className, const Vector<String8>& options, bool zygote)
{
   	...
    //启动java虚拟机
    if (startVm(&mJavaVM, &env, zygote, primary_zygote) != 0) {
        return;
    }
    onVmCreated(env);
	//为java虚拟机注册JNI方法
    if (startReg(env) < 0) {
        ALOGE("Unable to register all android natives\n");
        return;
    }
	...
    //classname=com.android.internal.os.ZygoteInit
    classNameStr = env->NewStringUTF(className);
    assert(classNameStr != NULL);
    env->SetObjectArrayElement(strArray, 0, classNameStr);
	...
    //将className的"."替换为"/"
    char* slashClassName = toSlashClassName(className != NULL ? className : "");
    //找到ZygoteInit
    jclass startClass = env->FindClass(slashClassName);
    if (startClass == NULL) {
        ALOGE("JavaVM unable to locate class '%s'\n", slashClassName);
        /* keep going */
    } else {
        //找到ZygoteInit的main方法
        jmethodID startMeth = env->GetStaticMethodID(startClass, "main",
            "([Ljava/lang/String;)V");
        if (startMeth == NULL) {
            ALOGE("JavaVM unable to find main() in '%s'\n", className);
            /* keep going */
        } else {
            //通过JNI调用ZygoteInit的main方法
            env->CallStaticVoidMethod(startClass, startMeth, strArray);
    ...
}
分析源码得知,main方法主要做了以下四件事情:
预加载类和资源
Zygote进程启动的时候将系统的一些class(frameworks/base/config/preloaded-classes)、resource(preloaded_drawables/preloaded_color_state_lists/)等加载,后面其它进程需要使用时不需要重新加载,直接调用,加快应用启动速度。加载细节可以深入查看源码。
源码路径:frameworks/base/core/java/com/android/internal/os/ZygoteInit.java
public static void main(String[] argv) {
    ...
    String zygoteSocketName = "zygote";
    final boolean isPrimaryZygote = zygoteSocketName.equals(Zygote.PRIMARY_SOCKET_NAME);
    ...
    if (!enableLazyPreload) {
        bootTimingsTraceLog.traceBegin("ZygotePreload");
        EventLog.writeEvent(LOG_BOOT_PROGRESS_PRELOAD_START,
                SystemClock.uptimeMillis
		//预加载类和资源
        preload(bootTimingsTraceLog);
        EventLog.writeEvent(LOG_BOOT_PROGRESS_PRELOAD_END,
                SystemClock.uptimeMillis());
       bootTimingsTraceLog.traceEnd(); // ZygotePreload
   }
    ...
	//调用ZygoteServer创建两个Server端的Socket
    zygoteServer = new ZygoteServer(isPrimaryZygote);
    if (startSystemServer) {
        //启动SystemServer进程
        Runnable r = forkSystemServer(abiList, zygoteSocketName, zygoteServer);

        // {@code r == null} in the parent (zygote) process, and {@code r != null} in the
        // child (system_server) process.
        if (r != null) {
       	    r.run();
            return;
        }
   }
   Log.i(TAG, "Accepting command socket connections");

   // The select loop returns early in the child process after a fork and
   // loops forever in the zygote.
   //等待AMS请求创建应用程序进程
   caller = zygoteServer.runSelectLoop(abiList);
   if (caller != null) {
         caller.run();
   }
}
 static void preload(TimingsTraceLog bootTimingsTraceLog) {
        Log.d(TAG, "begin preload");
        bootTimingsTraceLog.traceBegin("BeginPreload");
        beginPreload();
        bootTimingsTraceLog.traceEnd(); // BeginPreload
        bootTimingsTraceLog.traceBegin("PreloadClasses");
     	//预加载类
        preloadClasses();
        bootTimingsTraceLog.traceEnd(); // PreloadClasses
        bootTimingsTraceLog.traceBegin("CacheNonBootClasspathClassLoaders");
        cacheNonBootClasspathClassLoaders();
        bootTimingsTraceLog.traceEnd(); // CacheNonBootClasspathClassLoaders
        bootTimingsTraceLog.traceBegin("PreloadResources");
     	//预加载资源
        preloadResources();
        bootTimingsTraceLog.traceEnd(); // PreloadResources
        Trace.traceBegin(Trace.TRACE_TAG_DALVIK, "PreloadAppProcessHALs");
        nativePreloadAppProcessHALs();
        Trace.traceEnd(Trace.TRACE_TAG_DALVIK);
        Trace.traceBegin(Trace.TRACE_TAG_DALVIK, "PreloadGraphicsDriver");
        maybePreloadGraphicsDriver();
        Trace.traceEnd(Trace.TRACE_TAG_DALVIK);
        preloadSharedLibraries();
        preloadTextResources();
        // Ask the WebViewFactory to do any initialization that must run in the zygote process,
        // for memory sharing purposes.
        WebViewFactory.prepareWebViewInZygote();
        endPreload();
        warmUpJcaProviders();
        Log.d(TAG, "end preload");

        sPreloadComplete = true;
    }
调用ZygoteServer创建两个Server端的Socket
isPrimaryZygote为true,因为socketName都为zygote,拼接的socket name为"ANDROID_SOCKET_zygote"。完成创建LocalServerSocket。在Zygote进程将SystemServer进程启动后,就会在这个server端的socket等待AMS请求Zygote进程来创建新的应用程序进程。
源码路径:frameworks/base/core/java/com/android/internal/os/ZygoteServer.java
 ZygoteServer(boolean isPrimaryZygote) {
        mUsapPoolEventFD = Zygote.getUsapPoolEventFD();

        if (isPrimaryZygote) {
            mZygoteSocket = Zygote.createManagedSocketFromInitSocket(Zygote.PRIMARY_SOCKET_NAME);
            mUsapPoolSocket =
                    Zygote.createManagedSocketFromInitSocket(
                            Zygote.USAP_POOL_PRIMARY_SOCKET_NAME);
        } else {
            mZygoteSocket = Zygote.createManagedSocketFromInitSocket(Zygote.SECONDARY_SOCKET_NAME);
            mUsapPoolSocket =
                    Zygote.createManagedSocketFromInitSocket(
                            Zygote.USAP_POOL_SECONDARY_SOCKET_NAME);
        }

        mUsapPoolSupported = true;
        fetchUsapPoolPolicyProps();
    }
源码路径:frameworks/base/core/java/com/android/internal/os/Zygote.java
private static final String ANDROID_SOCKET_PREFIX = "ANDROID_SOCKET_";
public static final StringPRIMARY_SOCKET_NAME  = "zygote";
static LocalServerSocket createManagedSocketFromInitSocket(String socketName) {
        int fileDesc;
    	//拼接socket名称
        final String fullSocketName = ANDROID_SOCKET_PREFIX + socketName;

        try {
            //得到socket环境变量的值
            String env = System.getenv(fullSocketName);
            //转换为文件描述符的参数
            fileDesc = Integer.parseInt(env);
        } catch (RuntimeException ex) {
            throw new RuntimeException("Socket unset or invalid: " + fullSocketName, ex);
        }

        try {
            //创建文件描述符
            FileDescriptor fd = new FileDescriptor();
            fd.setInt$(fileDesc);
            //创建server端socket
            return new LocalServerSocket(fd);
        } catch (IOException ex) {
            throw new RuntimeException(
                "Error building socket from file descriptor: " + fileDesc, ex);
        }
    }
调用Zygote的forkSystemServer方法启动SystemServer进程。
从SystemServer进程的启动参数来看,SystemServer的进程用户id和用户组id被设置为1000,并且拥有用户组1001~1010、1018、1021、1023的权限,进程名为system_server,启动类名为com.android.server.SystemServer。之后将启动参数封装,并提供给Zygote的forkSystemServer方法,nativeForkSystemServer方法会通过fork函数为当前进程创建一个子进程,就是SystemServer进程,如果forkSystemServer返回的pid=0,表示当前代码运行在新创建的子进程中,执行handleSystemServerProcess方法来处理SystemServer进程。
源码路径:frameworks/base/core/java/com/android/internal/os/ZygoteInit.java
private static Runnable forkSystemServer(String abiList, String socketName,
            ZygoteServer zygoteServer) {
		...
        /* Hardcoded command line to start the system server */
        //SystemServer 启动参数
        String[] args = {
                "--setuid=1000",
                "--setgid=1000",
                "--setgroups=1001,1002,1003,1004,1005,1006,1007,1008,1009,1010,1018,1021,1023,"
                        + "1024,1032,1065,3001,3002,3003,3005,3006,3007,3009,3010,3011,3012",
                "--capabilities=" + capabilities + "," + capabilities,
                "--nice-name=system_server",
                "--runtime-args",
                "--target-sdk-version=" + VMRuntime.SDK_VERSION_CUR_DEVELOPMENT,
                "com.android.server.SystemServer",
        };
        ZygoteArguments parsedArgs;

        int pid;

        try {
            ZygoteCommandBuffer commandBuffer = new ZygoteCommandBuffer(args);
            try {
                //参数封装
                parsedArgs = ZygoteArguments.getInstance(commandBuffer);
            } catch (EOFException e) {
                throw new AssertionError("Unexpected argument error for forking system server", e);
            }
            commandBuffer.close();
            Zygote.applyDebuggerSystemProperty(parsedArgs);
            Zygote.applyInvokeWithSystemProperty(parsedArgs);

            if (Zygote.nativeSupportsMemoryTagging()) {
                String mode = SystemProperties.get("arm64.memtag.process.system_server", "");
                if (mode.isEmpty()) {
                  /* The system server has ASYNC MTE by default, in order to allow
                   * system services to specify their own MTE level later, as you
                   * can't re-enable MTE once it's disabled. */
                  mode = SystemProperties.get("persist.arm64.memtag.default", "async");
                }
                if (mode.equals("async")) {
                    parsedArgs.mRuntimeFlags |= Zygote.MEMORY_TAG_LEVEL_ASYNC;
                } else if (mode.equals("sync")) {
                    parsedArgs.mRuntimeFlags |= Zygote.MEMORY_TAG_LEVEL_SYNC;
                } else if (!mode.equals("off")) {
                    /* When we have an invalid memory tag level, keep the current level. */
                    parsedArgs.mRuntimeFlags |= Zygote.nativeCurrentTaggingLevel();
                    Slog.e(TAG, "Unknown memory tag level for the system server: \"" + mode + "\"");
                }
            } else if (Zygote.nativeSupportsTaggedPointers()) {
                /* Enable pointer tagging in the system server. Hardware support for this is present
                 * in all ARMv8 CPUs. */
                parsedArgs.mRuntimeFlags |= Zygote.MEMORY_TAG_LEVEL_TBI;
            }

            /* Enable gwp-asan on the system server with a small probability. This is the same
             * policy as applied to native processes and system apps. */
            parsedArgs.mRuntimeFlags |= Zygote.GWP_ASAN_LEVEL_LOTTERY;

            if (shouldProfileSystemServer()) {
                parsedArgs.mRuntimeFlags |= Zygote.PROFILE_SYSTEM_SERVER;
            }

            /* Request to fork the system server process */
            //创建一个进程,SystemServer进程
            pid = Zygote.forkSystemServer(
                    parsedArgs.mUid, parsedArgs.mGid,
                    parsedArgs.mGids,
                    parsedArgs.mRuntimeFlags,
                    null,
                    parsedArgs.mPermittedCapabilities,
                    parsedArgs.mEffectiveCapabilities);
        } catch (IllegalArgumentException ex) {
            throw new RuntimeException(ex);
        }

        /* For child process */
    	//运行在子进程
        if (pid == 0) {
            if (hasSecondZygote(abiList)) {
                waitForSecondaryZygote(socketName);
            }

            zygoteServer.closeServerSocket();
            //处理SystemServer进程,SystemServer进程启动过程中详细分析
            return handleSystemServerProcess(parsedArgs);
        }

        return null;
    }
源码路径:frameworks/base/core/java/com/android/internal/os/Zygote.java
    static int forkSystemServer(int uid, int gid, int[] gids, int runtimeFlags,
            int[][] rlimits, long permittedCapabilities, long effectiveCapabilities) {
        ZygoteHooks.preFork();

        int pid = nativeForkSystemServer(
                uid, gid, gids, runtimeFlags, rlimits,
                permittedCapabilities, effectiveCapabilities);

        // Set the Java Language thread priority to the default value for new apps.
        Thread.currentThread().setPriority(Thread.NORM_PRIORITY);

        ZygoteHooks.postForkCommon();
        return pid;
    }
等待AMS来请求Zygote创建新的应用程序进程。
启动SystemServer进程后,会执行ZygoteServer的runSelectLoop方法。
mZygoteSocket就是第二步中创建的Server端socket,获取该socket的fd字段的值添加到fd列表socketFDs中,下面无限循环用来等待AMS请求Zygote进程创建新的应用程序进程,如果pollIndex=0,Zygote进程与AMS建立了连接,通过acceptCommandPeer方法获取ZygoteConnection对象,接着将ZygoteConnection的fd添加到fd列表,以便接收AMS发送的请求,如果poIIIndex不为0,则说明AMS向Zygote进程发送了一个创建应用进程的请求,调用ZygoteConnection类的processCommand方法创建一个新的应用程序进程。
源码路径:frameworks/base/core/java/com/android/internal/os/ZygoteServer.java
Runnable runSelectLoop(String abiList) {
        ArrayList<FileDescriptor> socketFDs = new ArrayList<>();
        ArrayList<ZygoteConnection> peers = new ArrayList<>();
		//mZygoteSocket 就是第二步创建的socket
        socketFDs.add(mZygoteSocket.getFileDescriptor());
        peers.add(null);

        mUsapPoolRefillTriggerTimestamp = INVALID_TIMESTAMP;
		//无限循环等待AMS的请求
        while (true) {
            fetchUsapPoolPolicyPropsWithMinInterval();
            mUsapPoolRefillAction = UsapPoolRefillAction.NONE;

            int[] usapPipeFDs = null;
            StructPollfd[] pollFDs;

            if (mUsapPoolEnabled) {
                usapPipeFDs = Zygote.getUsapPipeFDs();
                pollFDs = new StructPollfd[socketFDs.size() + 1 + usapPipeFDs.length];
            } else {
                pollFDs = new StructPollfd[socketFDs.size()];
            }

            int pollIndex = 0;
            //socketFDs转存pollFDs
            for (FileDescriptor socketFD : socketFDs) {
                pollFDs[pollIndex] = new StructPollfd();
                pollFDs[pollIndex].fd = socketFD;
                pollFDs[pollIndex].events = (short) POLLIN;
                ++pollIndex;
            }

            final int usapPoolEventFDIndex = pollIndex;

            if (mUsapPoolEnabled) {
                pollFDs[pollIndex] = new StructPollfd();
                pollFDs[pollIndex].fd = mUsapPoolEventFD;
                pollFDs[pollIndex].events = (short) POLLIN;
                ++pollIndex;

                // The usapPipeFDs array will always be filled in if the USAP Pool is enabled.
                assert usapPipeFDs != null;
                for (int usapPipeFD : usapPipeFDs) {
                    FileDescriptor managedFd = new FileDescriptor();
                    managedFd.setInt$(usapPipeFD);

                    pollFDs[pollIndex] = new StructPollfd();
                    pollFDs[pollIndex].fd = managedFd;
                    pollFDs[pollIndex].events = (short) POLLIN;
                    ++pollIndex;
                }
            }

            int pollTimeoutMs;

            if (mUsapPoolRefillTriggerTimestamp == INVALID_TIMESTAMP) {
                pollTimeoutMs = -1;
            } else {
                long elapsedTimeMs = System.currentTimeMillis() - mUsapPoolRefillTriggerTimestamp;

                if (elapsedTimeMs >= mUsapPoolRefillDelayMs) {
                    pollTimeoutMs = 0;
                    mUsapPoolRefillTriggerTimestamp = INVALID_TIMESTAMP;
                    mUsapPoolRefillAction = UsapPoolRefillAction.DELAYED;

                } else if (elapsedTimeMs <= 0) {
                    pollTimeoutMs = mUsapPoolRefillDelayMs;

                } else {
                    pollTimeoutMs = (int) (mUsapPoolRefillDelayMs - elapsedTimeMs);
                }
            }

            int pollReturnValue;
            try {
                pollReturnValue = Os.poll(pollFDs, pollTimeoutMs);
            } catch (ErrnoException ex) {
                throw new RuntimeException("poll failed", ex);
            }

            if (pollReturnValue == 0) {
                mUsapPoolRefillTriggerTimestamp = INVALID_TIMESTAMP;
                mUsapPoolRefillAction = UsapPoolRefillAction.DELAYED;

            } else {
                boolean usapPoolFDRead = false;

                while (--pollIndex >= 0) {
                    if ((pollFDs[pollIndex].revents & POLLIN) == 0) {
                        continue;
                    }

                    if (pollIndex == 0) {
                        // Zygote server socket
                        //Zygote进程与AMS建立了连接
                        ZygoteConnection newPeer = acceptCommandPeer(abiList);
                        peers.add(newPeer);
                        //ZygoteConnection的fd添加到fd列表,接收来自AMS发送的请求
                        socketFDs.add(newPeer.getFileDescriptor());
                    } else if (pollIndex < usapPoolEventFDIndex) {
                        // Session socket accepted from the Zygote server socket

                        try {
                            ZygoteConnection connection = peers.get(pollIndex);
                            boolean multipleForksOK = !isUsapPoolEnabled()
                                    && ZygoteHooks.isIndefiniteThreadSuspensionSafe
                            //AMS向Zygote进程发送一个创建应用进程的请求
                            final Runnable command =
                                    connection.processCommand(this, multipleForksOK);

                            // TODO (chriswailes): Is this extra check necessary?
                            if (mIsForkChild) {
                                // We're in the child. We should always have a command to run at
                                // this stage if processCommand hasn't called "exec".
                                if (command == null) {
                                    throw new IllegalStateException("command == null");
                                }

                                return command;
                            } else {
                                // We're in the server - we should never have any commands to run.
                                if (command != null) {
                                    throw new IllegalStateException("command != null");
                                }
                                // We don't know whether the remote side of the socket was closed or
                                // not until we attempt to read from it from processCommand. This
                                // shows up as a regular POLLIN event in our regular processing
                                // loop.
                                if (connection.isClosedByPeer()) {
                                    connection.closeSocket();
                                    peers.remove(pollIndex);
                                    socketFDs.remove(pollIndex);
                                }
                            }
                            ...
        }
    }
Zygote的forkAndSpecialize方法会调用nativeForkAndSpecialize方法fork应用程序进程,应用程序进程创建完成,pid=0表示在子进程执行,最终执行handleChildProc方法处理应用程序进程,isZygote为false,它传递parsedArgs.mStartChildZygote,实际上应用程序进程启动没有传递"–start-child-zygote"参数,所以它为false。应用程序进程创建传递的参数会在应用程序进程启动文章中看到传递哪些参数,然后调用ZygoteInit类的zygoteInit方法。
源码路径:frameworks/base/core/java/com/android/internal/os/ZygoteConnection.java
Runnable processCommand(ZygoteServer zygoteServer, boolean multipleOK) {
				...
                if (parsedArgs.mInvokeWith != null || parsedArgs.mStartChildZygote
                        || !multipleOK || peer.getUid() != Process.SYSTEM_UID) {
                    //获取参数
                    parsedArgs = ZygoteArguments.getInstance(argBuffer);
                    // Continue using old code for now. TODO: Handle these cases in the other path.
                    //fork app进程
                    pid = Zygote.forkAndSpecialize(parsedArgs.mUid, parsedArgs.mGid,
                            parsedArgs.mGids, parsedArgs.mRuntimeFlags, rlimits,
                            parsedArgs.mMountExternal, parsedArgs.mSeInfo, parsedArgs.mNiceName,
                            fdsToClose, fdsToIgnore, parsedArgs.mStartChildZygote,
                            parsedArgs.mInstructionSet, parsedArgs.mAppDataDir,
                            parsedArgs.mIsTopApp, parsedArgs.mPkgDataInfoList,
                            parsedArgs.mAllowlistedDataInfoList, parsedArgs.mBindMountAppDataDirs,
                            parsedArgs.mBindMountAppStorageDirs);

                    try {
                        //新创建子进程执行
                        if (pid == 0) {
                            // in child
                            zygoteServer.setForkChild();

                            zygoteServer.closeServerSocket();
                            IoUtils.closeQuietly(serverPipeFd);
                            serverPipeFd = null;

                            return handleChildProc(parsedArgs, childPipeFd,
                                    parsedArgs.mStartChildZygote);
                        } else {
                            // In the parent. A pid < 0 indicates a failure and will be handled in
                            // handleParentProc.
                            IoUtils.closeQuietly(childPipeFd);
                            childPipeFd = null;
                            handleParentProc(pid, serverPipeFd);
                            return null;
                        }
                    } finally {
                        IoUtils.closeQuietly(childPipeFd);
                        IoUtils.closeQuietly(serverPipeFd);
                    }
                } else {
                    ZygoteHooks.preFork();
                    Runnable result = Zygote.forkSimpleApps(argBuffer,
                            zygoteServer.getZygoteSocketFileDescriptor(),
                            peer.getUid(), Zygote.minChildUid(peer), parsedArgs.mNiceName);
                    if (result == null) {
                        // parent; we finished some number of forks. Result is Boolean.
                        // We already did the equivalent of handleParentProc().
                        ZygoteHooks.postForkCommon();
                        // argBuffer contains a command not understood by forksimpleApps.
                        continue;
                    } else {
                        // child; result is a Runnable.
                        zygoteServer.setForkChild();
                        Zygote.setAppProcessName(parsedArgs, TAG);  // ??? Necessary?
                        return result;
                    }
                }
            }
        }
		...
    }
private Runnable handleChildProc(ZygoteArguments parsedArgs,
            FileDescriptor pipeFd, boolean isZygote) {
        closeSocket();

        Zygote.setAppProcessName(parsedArgs, TAG);

        // End of the postFork event.
        Trace.traceEnd(Trace.TRACE_TAG_ACTIVITY_MANAGER);
        if (parsedArgs.mInvokeWith != null) {
            WrapperInit.execApplication(parsedArgs.mInvokeWith,
                    parsedArgs.mNiceName, parsedArgs.mTargetSdkVersion,
                    VMRuntime.getCurrentInstructionSet(),
                    pipeFd, parsedArgs.mRemainingArgs);

            // Should not get here.
            throw new IllegalStateException("WrapperInit.execApplication unexpectedly returned");
        } else {
            if (!isZygote) {
                return ZygoteInit.zygoteInit(parsedArgs.mTargetSdkVersion,
                        parsedArgs.mDisabledCompatChanges,
                        parsedArgs.mRemainingArgs, null /* classLoader */);
            } else {
                return ZygoteInit.childZygoteInit(
                        parsedArgs.mRemainingArgs  /* classLoader */);
            }
        }
}
zygoteInit方法中主要做了两件事,首先调用nativeZygoteInit方法去启动Binder线程池(关于Binder线程池后续会讲到),然后调用RuntimeInit类的applicationInit方法。
源码路径:frameworks\base\core\java\com\android\internal\os\ZygoteInit.java
public static Runnable zygoteInit(int targetSdkVersion, long[] disabledCompatChanges,
            String[] argv, ClassLoader classLoader) {
        if (RuntimeInit.DEBUG) {
            Slog.d(RuntimeInit.TAG, "RuntimeInit: Starting application from zygote");
        }

        Trace.traceBegin(Trace.TRACE_TAG_ACTIVITY_MANAGER, "ZygoteInit");
        RuntimeInit.redirectLogStreams();

        RuntimeInit.commonInit();
    	//Binder线程池启动
        ZygoteInit.nativeZygoteInit();
        return RuntimeInit.applicationInit(targetSdkVersion, disabledCompatChanges, argv,
                classLoader);
}
applicationInit方法中开始设置参数,并获取应用程序进程的启动类,findStaticMain方法中通过反射获取启动类的main方法,返回MethodAndArgsCaller,最终在ZygoteInit类的main方法中,调用其run方法。
源码路径:frameworks/base/core/java/com/android/internal/os/RuntimeInit.java
protected static Runnable applicationInit(int targetSdkVersion, long[] disabledCompatChanges,
            String[] argv, ClassLoader classLoader) {
        // If the application calls System.exit(), terminate the process
        // immediately without running any shutdown hooks.  It is not possible to
        // shutdown an Android application gracefully.  Among other things, the
        // Android runtime shutdown hooks close the Binder driver, which can cause
        // leftover running threads to crash before the process actually exits.
        nativeSetExitWithoutCleanup(true);

        VMRuntime.getRuntime().setTargetSdkVersion(targetSdkVersion);
        VMRuntime.getRuntime().setDisabledCompatChanges(disabledCompatChanges);

        final Arguments args = new Arguments(argv);

        // The end of of the RuntimeInit event (see #zygoteInit).
        Trace.traceEnd(Trace.TRACE_TAG_ACTIVITY_MANAGER);

        // Remaining arguments are passed to the start class's static main
        return findStaticMain(args.startClass, args.startArgs, classLoader);
}
protected static Runnable findStaticMain(String className, String[] argv,
            ClassLoader classLoader) {
        Class<?> cl;

        try {
            cl = Class.forName(className, true, classLoader);
        } catch (ClassNotFoundException ex) {
            throw new RuntimeException(
                    "Missing class when invoking static main " + className,
                    ex);
        }

        Method m;
        try {
            //main方法反射
            m = cl.getMethod("main", new Class[] { String[].class });
        } catch (NoSuchMethodException ex) {
            throw new RuntimeException(
                    "Missing static main on " + className, ex);
        } catch (SecurityException ex) {
            throw new RuntimeException(
                    "Problem getting static main on " + className, ex);
        }

        int modifiers = m.getModifiers();
        if (! (Modifier.isStatic(modifiers) && Modifier.isPublic(modifiers))) {
            throw new RuntimeException(
                    "Main method is not public and static on " + className);
        }
        return new MethodAndArgsCaller(m, argv);
}
static class MethodAndArgsCaller implements Runnable {
        /** method to call */
        private final Method mMethod;

        /** argument array */
        private final String[] mArgs;

        public MethodAndArgsCaller(Method method, String[] args) {
            mMethod = method;
            mArgs = args;
        }

        public void run() {
            try {
                mMethod.invoke(null, new Object[] { mArgs });
        ...
补充
在Zygote进程启动过程第中,等待AMS来请求Zygote进程创建新的应用程序进程,其中有说到Binder线程池通过ZygoteInit类的nativeZygoteInit方法启动,下面分析下Binder线程池的启动过程。
Binder线程池启动过程
Binder线程池在Android中扮演着重要的角色,它是Android操作系统的一种进程间通信(IPC)机制。从源码可以看出nativeZygoteInit方法是一个JNI方法(关于JNI,请查看之前文章使用Android Studio开发第一个NDK程序),
源码路径:frameworks\base\core\java\com\android\internal\os\ZygoteInit.java
public static Runnable zygoteInit(int targetSdkVersion, long[] disabledCompatChanges,
            String[] argv, ClassLoader classLoader) {
        if (RuntimeInit.DEBUG) {
            Slog.d(RuntimeInit.TAG, "RuntimeInit: Starting application from zygote");
        }

        Trace.traceBegin(Trace.TRACE_TAG_ACTIVITY_MANAGER, "ZygoteInit");
        RuntimeInit.redirectLogStreams();

        RuntimeInit.commonInit();
        ZygoteInit.nativeZygoteInit();
        return RuntimeInit.applicationInit(targetSdkVersion, disabledCompatChanges, argv,
                classLoader);
    }
private static native void nativeZygoteInit();
它对应的C函数是什么呢?在AndroidRuntime类中,从JNINativeMethod数组中可以得知它所对应的函数为com_android_internal_os_ZygoteInit_nativeZygoteInit,在其函数中,gCurRuntime为AndroidRuntime类型的指针,在AndroidRuntime初始化时就创建了,
源码路径:frameworks\base\core\jni\AndroidRuntime.cpp
static AndroidRuntime* gCurRuntime = NULL;
int register_com_android_internal_os_ZygoteInit_nativeZygoteInit(JNIEnv* env)
{
    const JNINativeMethod methods[] = {
        { "nativeZygoteInit", "()V",
            (void*) com_android_internal_os_ZygoteInit_nativeZygoteInit },
    };
    return jniRegisterNativeMethods(env, "com/android/internal/os/ZygoteInit",
        methods, NELEM(methods));
}
static void com_android_internal_os_ZygoteInit_nativeZygoteInit(JNIEnv* env, jobject clazz)
{
    gCurRuntime->onZygoteInit();
}
AndroidRuntime::AndroidRuntime(char* argBlockStart, const size_t argBlockLength) :
        mExitWithoutCleanup(false),
        mArgBlockStart(argBlockStart),
        mArgBlockLength(argBlockLength)
{
    init_android_graphics();

    // Pre-allocate enough space to hold a fair number of options.
    mOptions.setCapacity(20);

    assert(gCurRuntime == NULL);        // one per process
    gCurRuntime = this;
}
AppRuntime继承自AndroidRuntime,AppRuntime创建时会调用AndroidRuntime的构造函数,gCurRuntime就会被初始化,它指向AppRuntime,查看AppRuntime的onZygoteInit函数,AppRuntime在app_main类中实现,onZygoteInit函数中调用ProcessState类的
startThreadPool函数启动Binder线程池。
源码路径:frameworks\base\cmds\app_process\app_main.cpp
class AppRuntime : public AndroidRuntime
{
    virtual void onZygoteInit()
    {
        sp<ProcessState> proc = ProcessState::self();
        ALOGV("App process: starting thread pool.\n");
        proc->startThreadPool();
    }
}
支持Binder通信的进程都有一个ProcessState类,它里面有一个mThreadPoolStarted变量,用来表示Binder线程池是否已经被启动过,默认值为false,每次调用startThreadPool函数都会先检查这个变量,确保Binder 线程池只会被启动一次,如果未启动,则会将mThreadPoolStarted设置为true,然后调用spawnPooledThread函数来创建线程池的第一个线程,也就是线程池的主线程。可以看到Binder线程池为一个PoolThread,然后调用run函数来启动一个新的线程。
PoolThread类继承了Thread类,调用IPCThreadState的joinThreadPool函数,将当前线程注册到Binder驱动程序中,这样创建的线程就被加入到Binder线程池中,新创建的应用程序进程就可以支持Binder进程间通信了。
源码路径:frameworks/native/libs/binder/ProcessState.cpp
void ProcessState::startThreadPool(
{
    AutoMutex _l(mLock);
    if (!mThreadPoolStarted) {
        if (mMaxThreads == 0) {
            ALOGW("Extra binder thread started, but 0 threads requested. Do not use "
                  "*startThreadPool when zero threads are requested.");
        }

        mThreadPoolStarted = true;
        spawnPooledThread(true);
    }
}
void ProcessState::spawnPooledThread(bool isMain)
{
    if (mThreadPoolStarted) {
        String8 name = makeBinderThreadName();
        ALOGV("Spawning new pooled thread, name=%s\n", name.string());
        sp<Thread> t = sp<PoolThread>::make(isMain);
        t->run(name.string());
    }
}
class PoolThread : public Thread
{
public:
    explicit PoolThread(bool isMain)
        : mIsMain(isMain)
    {
    }

protected:
    virtual bool threadLoop()
    {
        IPCThreadState::self()->joinThreadPool(mIsMain);
        return false;
    }

    const bool mIsMain;
};
总结
Zygote进程启动过程的时序图如下:
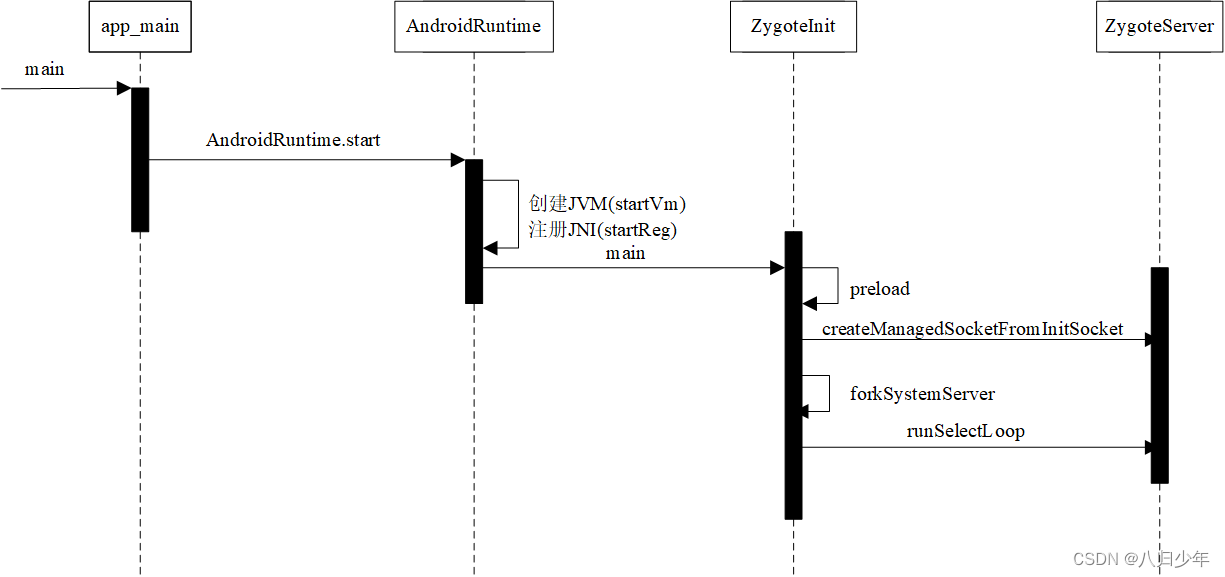
Zygote进程启动主要做了如下事情:
- 创建AndroidRuntime并调用start函数,启动Zygote进程。
- 创建Java虚拟机并为Java虚拟机注册JNI方法。
- 通过JNI调用ZygoteInit的main函数进入Zygote的Java框架层。、
- 启动SystemServer进程。
- 注册socket,并通过runSelectLoop方法等待AMS的请求来创建新的应用程序进程。