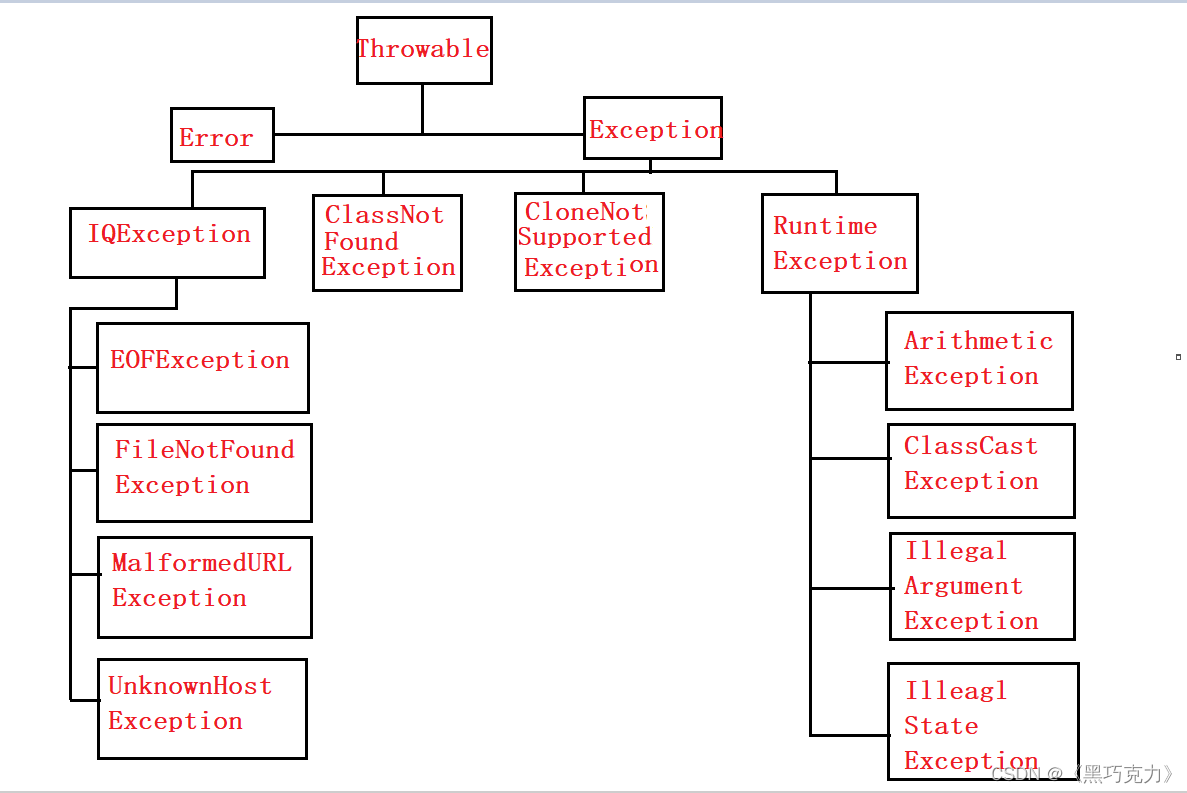
Docker
概念
docker和虚拟机的差异
* docker是一个系统进程;虚拟机是在操作系统中的操作系统
* docker体积小,启动速度,性能好,虚拟机体积大,启动速度慢,性能一般
镜像和容器
镜像(image) : Docker将应用程序极其所需的依赖,数据库,环境,配置等文件打包在一起,称为镜像。
容器(Container):镜像中的应用程序运行后形成的进程就是容器,只是Docker会给容器做隔离,对外不可见。
DockerHub
* DockerHub:DockerHub是一个Docker镜像的托管平台,这样的平台称为Docker Registry。
Docker架构
Docker是一个CS架构的程序,由两部分组成:
* 服务端(server):Docker守护进程,负责处理Docker指令,管理镜像,容器等。
* 客户端(client) : 通过命令或RestAPI 向Docker服务端发送指令,可以在本地或远程服务端发送指令。

镜像,容器命令
拉取nginx镜像:docker pull nginx

查看拉取到的镜像:docker images

压缩镜像:docker save -o nginx.tar nginx:latest

删除镜像:docker rmi nginx:latest

读取镜像:docker load -i nginx.tar


创建容器:docker run --name mn -p 80:80 -d nginx

查看容器状态: docker ps

查看虚拟机id地址:ifconfig  -a

查看容器日志: docker logs mn(容器名称)
持续跟踪日志:docker logs  -f mn(容器名称)

进入容器:docker exec -it mn bash

退出容器:exit

停止容器:docker stop mn

启动容器:docker start

删除容器:docker rm
强制删除运行中的容器: docker rm -f mn
创建运行一个Nginx容器

修改Nginx容器的html文件内容

容器地址:

 进入html文件 :cd /usr/share/nginx/html

修改内容:sed -i -e 's#Welcome to nginx#传智教育欢迎您#g' -e 's#<head>#<head><meta charset="utf-8">#g' index.html
创建运行一个redis容器
拉取redis容器:docker pull redis

创建容器:docker run --name mr -p 6379:6379 -d redis redis-server --appendonly yes

进入容器:  docker exec -it mr bash

进入redis : redis-cli
数据卷
数据与容器耦合的问题


数据卷命令
启动docker :systemctl start docker

查看停止的容器:docker ps -a

docker volume [command]

创建一个数据卷:docker volume create html [名字]

查看个数的数据卷命令:docker volume ls

查看数据卷位置: docker volume inspect html

移除未使用的数据卷:docker volume prune

删除使用的数据卷:docker volume rm html

将容器挂载到数据卷上: docker run -d -p 80:80 --name mn2 -v html:/usr/share/html nginx

查看数据卷信息:docker inspect html
Dockerfile自定义镜像
镜像是将应用程序极其需要的系统函数库,环境,配置,依赖打包而成。
镜像是分层结构,每一层称为一个Layer
* BaseImage层,包含基本的系统函数库,环境变量,文件系统
* Emtrypoint: 入口,是镜像中应用启动的命令
* 其它:在BaseImage基础上添加依赖,安装程序,完成整个应用的安装和配置
自定义镜像
什么是Dockerfile
Dockerfile就是一个文本文件,其中包含一个个的指令(Instruection),用指令说明要执行什么操作来构建镜像,每一个指令都会形成一层Layer.

MQ
什么是MQ?
MQ(MessageQueue),中文是消息队列,字面来看就是存放消息的队列,也就是事件驱动架构中的Broker.
安装:
步骤:
加载Mq镜像:docker load -i mq.tar

运行Mq容器:docker run \
 -e RABBITMQ_DEFAULT_USER=itcast \
 -e RABBITMQ_DEFAULT_PASS=123321 \
 --name mq \
 --hostname mq1 \
 -p 15672:15672 \
 -p 5672:5672 \
 -d \
 rabbitmq:3-management

访问页面:http://192.168.74.128:15672/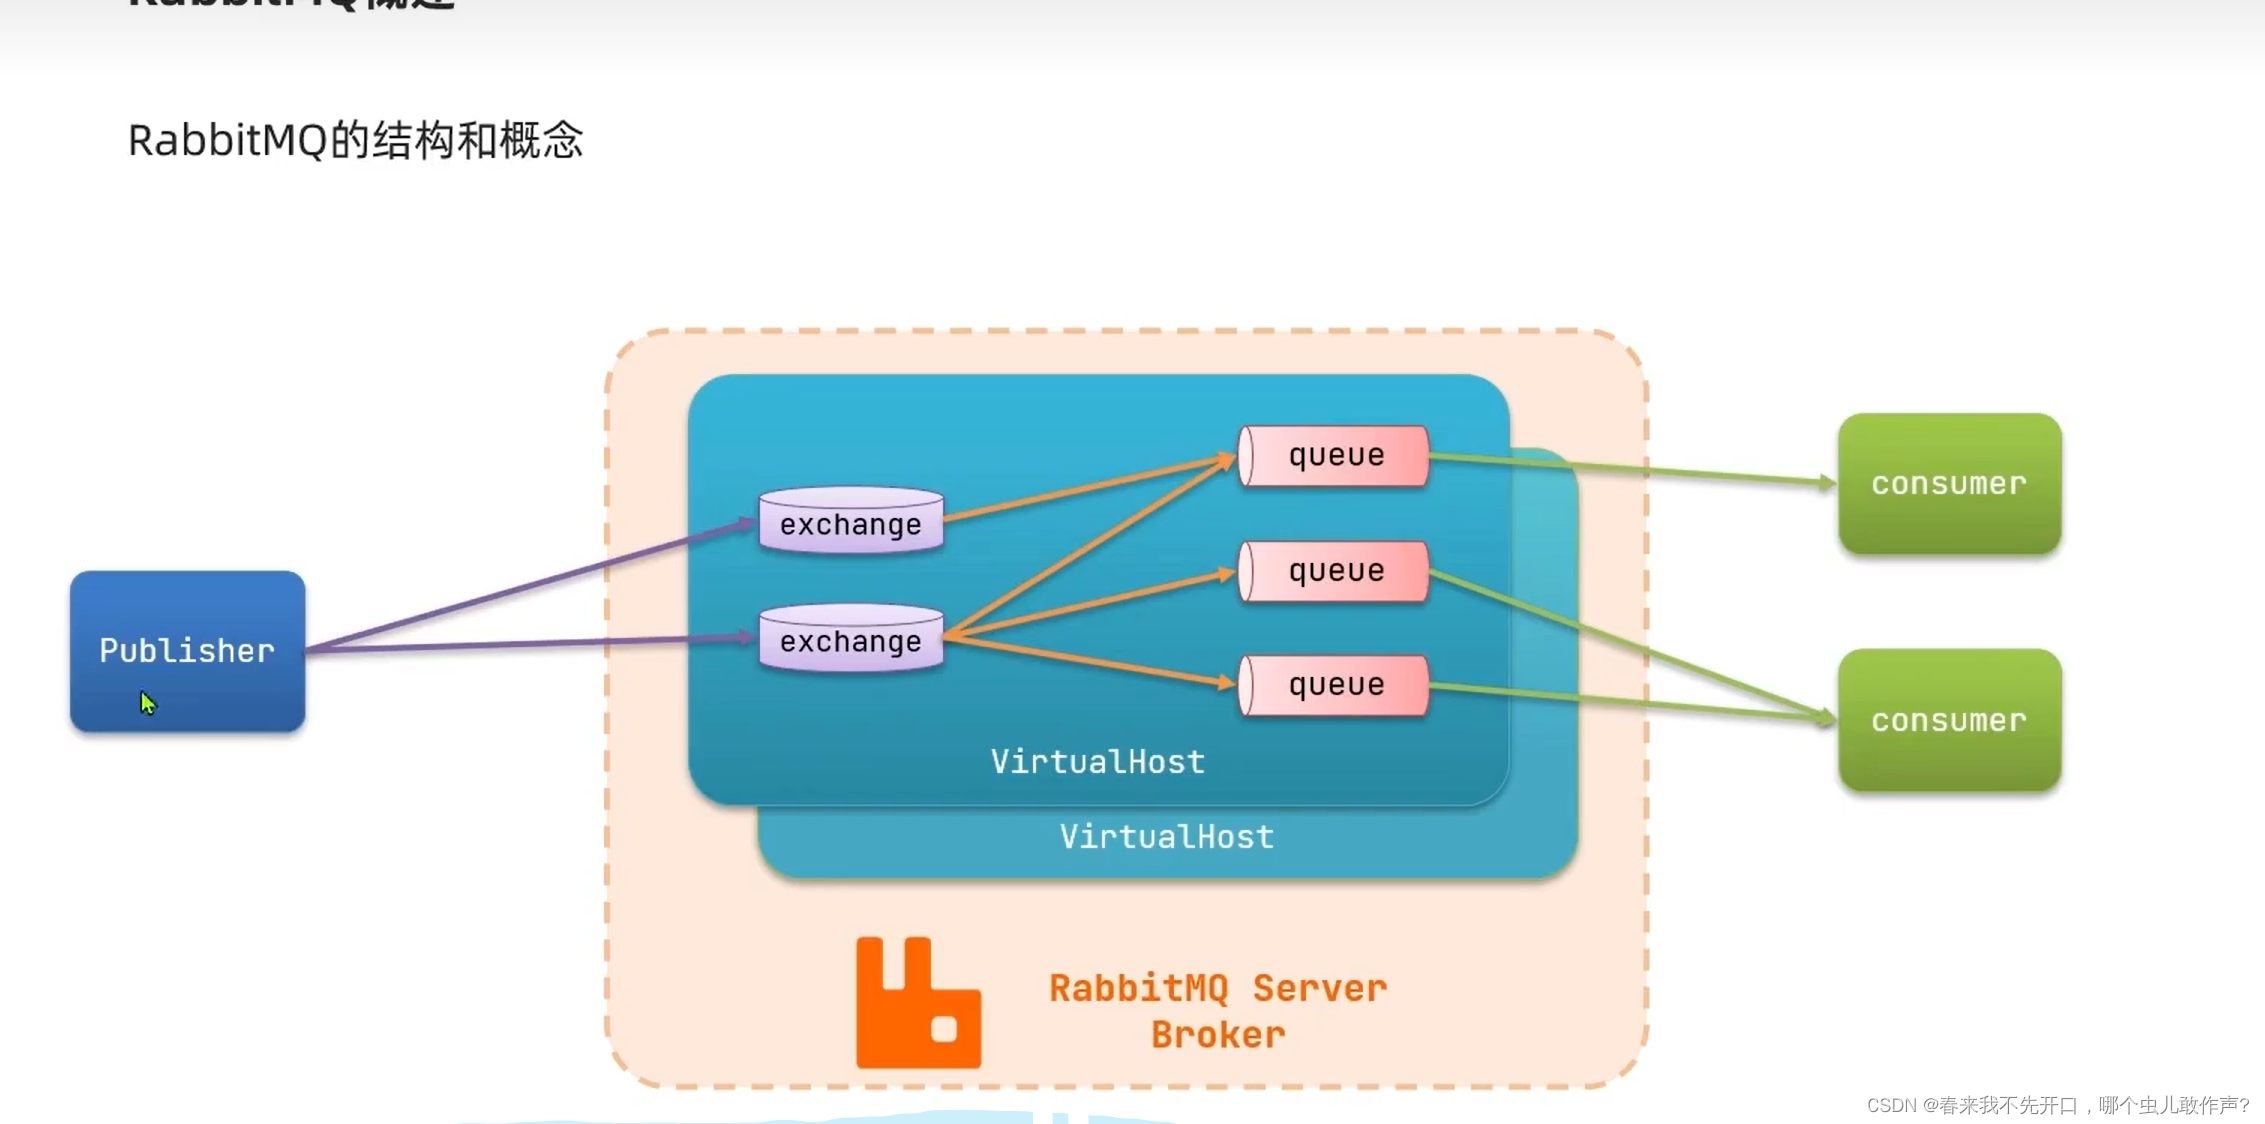
* channel:操作MQ的工具
exchange:路由消息队列中
queue:缓存消息
virtual host:虚拟主机,是对queue,exchange等资源的逻辑分组。

消息队列模型
publisher : 消息发布者,将教习发送到队列queue
queue:消息队列,负责接受并缓存消息
consumer:订阅队列,处理队列中的消息


SpringAMQP
SpringAMQP是基于RabbitMQ封装的一套模板,并且还利用SpringBoot对其实现了自动装配,使用起来非常方便。
SpringAMQP提供了三个功能:
-
自动声明队列、交换机及其绑定关系
-
基于注解的监听器模式,异步接收消息
-
封装了RabbitTemplate工具,用于发送消息
案例:发送和接收 信息
父工程依赖
<!--AMQP依赖,包含RabbitMQ-->
<dependency>
    <groupId>org.springframework.boot</groupId>
    <artifactId>spring-boot-starter-amqp</artifactId>
</dependency>
发送的yml配置
spring:
  rabbitmq:
    host: 192.168.74.128 # 主机名
    port: 5672 # 端口
    virtual-host: / # 虚拟主机
    username: itcast # 用户名
    password: 123321 # 密码
发送信息
package cn.itcast.mq.helloworld;

import org.junit.Test;
import org.junit.runner.RunWith;
import org.springframework.amqp.rabbit.core.RabbitTemplate;
import org.springframework.beans.factory.annotation.Autowired;
import org.springframework.boot.test.context.SpringBootTest;
import org.springframework.test.context.junit4.SpringRunner;

/**
 * @author Mtz
 * @version 1.0
 * @2023/10/1114:49
 * @function
 * @comment
 */
@RunWith(SpringRunner.class)
@SpringBootTest
public class SpringSMPQTest {

    @Autowired
    private RabbitTemplate rabbitTemplate;

    @Test
    public void testSimpleQueue() {
        // 队列名称
        String queueName = "simple.queue";
        // 消息
        String message = "hello, spring amqp!";
        // 发送消息
        rabbitTemplate.convertAndSend(queueName, message);
    }

}
接收的yml配置
spring:
  rabbitmq:
    host: 192.168.74.128 # 主机名
    port: 5672 # 端口
    virtual-host: / # 虚拟主机
    username: itcast # 用户名
    password: 123321 # 密码
接收信息的代码
package cn.itcast.mq.listener;

import org.springframework.amqp.rabbit.annotation.RabbitListener;
import org.springframework.stereotype.Component;

@Component
public class SpringRabbitListener {

    @RabbitListener(queues = "simple.queue")
    public void listenSimpleQueueMessage(String msg) throws InterruptedException {
        System.out.println("spring 消费者接收到消息:【" + msg + "】");
    }
}
模拟WorkQueue实现一个队列绑定多个消费者
发送者
package cn.itcast.mq.helloworld;

import org.junit.Test;
import org.junit.runner.RunWith;
import org.springframework.amqp.rabbit.core.RabbitTemplate;
import org.springframework.beans.factory.annotation.Autowired;
import org.springframework.boot.test.context.SpringBootTest;
import org.springframework.test.context.junit4.SpringRunner;

/**
 * @author Mtz
 * @version 1.0
 * @2023/10/1114:49
 * @function
 * @comment
 */
@RunWith(SpringRunner.class)
@SpringBootTest
public class SpringSMPQTest {

    @Autowired
    private RabbitTemplate rabbitTemplate;

    /**
     * workQueue
     * 向队列中不停发送消息,模拟消息堆积。
     */
    @Test
    public void testWorkQueue() throws InterruptedException {
        // 队列名称
        String queueName = "simple.queue";
        // 消息
        String message = "hello, message_";
        for (int i = 0; i < 50; i++) {
            // 发送消息
            rabbitTemplate.convertAndSend(queueName, message + i);
            Thread.sleep(20);
        }
    }

}
消费者
package cn.itcast.mq.listener;

import org.springframework.amqp.rabbit.annotation.RabbitListener;
import org.springframework.stereotype.Component;

import java.time.LocalTime;

@Component
public class SpringRabbitListener {

    @RabbitListener(queues = "simple.queue")
    public void listenWorkQueue1(String msg) throws InterruptedException {
        System.out.println("消费者1接收到消息:【" + msg + "】" + LocalTime.now());
        Thread.sleep(20);
    }

    @RabbitListener(queues = "simple.queue")
    public void listenWorkQueue2(String msg) throws InterruptedException {
        System.err.println("消费者2........接收到消息:【" + msg + "】" + LocalTime.now());
        Thread.sleep(200);
    }
}
FanoutExchange交换机
发布(Publish),订阅(Subscribe)
发布订阅模式与之前案例的区别就是允许将同意消息发送给多个消费者,实现方式是加入了exchange(交换机)
常见交换机类型包括:
* Fanout:广播
* Direct:路由
Topic:话题
注意:exchange负责消息路由,而不是存储,路由失败则消息丢失。
FanoutExchange
绑定队列和交换机
package cn.itcast.mq.listener;

import org.springframework.amqp.core.Binding;
import org.springframework.amqp.core.BindingBuilder;
import org.springframework.amqp.core.FanoutExchange;
import org.springframework.amqp.core.Queue;
import org.springframework.context.annotation.Bean;
import org.springframework.context.annotation.Configuration;

@Configuration
public class FanoutConfig {
    /**
     * 声明交换机
     * @return Fanout类型交换机
     */
    @Bean
    public FanoutExchange fanoutExchange(){
        return new FanoutExchange("itcast.fanout");
    }

    /**
     * 第1个队列
     */
    @Bean
    public Queue fanoutQueue1(){
        return new Queue("fanout.queue1");
    }

    /**
     * 绑定队列和交换机
     */
    @Bean
    public Binding bindingQueue1(Queue fanoutQueue1, FanoutExchange fanoutExchange){
        return BindingBuilder.bind(fanoutQueue1).to(fanoutExchange);
    }

    /**
     * 第2个队列
     */
    @Bean
    public Queue fanoutQueue2(){
        return new Queue("fanout.queue2");
    }

    /**
     * 绑定队列和交换机
     */
    @Bean
    public Binding bindingQueue2(Queue fanoutQueue2, FanoutExchange fanoutExchange){
        return BindingBuilder.bind(fanoutQueue2).to(fanoutExchange);
    }
}
接收信息
package cn.itcast.mq.listener;

import org.springframework.amqp.rabbit.annotation.RabbitListener;
import org.springframework.stereotype.Component;

import java.time.LocalTime;

@Component
public class SpringRabbitListener {
    @RabbitListener(queues = "fanout.queue1")
    public void listenFanoutQueue1(String msg) {
        System.out.println("消费者1接收到Fanout消息:【" + msg + "】");
    }

    @RabbitListener(queues = "fanout.queue2")
    public void listenFanoutQueue2(String msg) {
        System.out.println("消费者2接收到Fanout消息:【" + msg + "】");
    }
}
发送信息
    @Test
    public void testFanoutExchange() {
        // 队列名称
        String exchangeName = "itcast.fanout";
        // 消息
        String message = "hello, everyone!";
        rabbitTemplate.convertAndSend(exchangeName, "", message);
    }
DirectExchange交换机
DirectExchange会将接收的信息根据规则路由到指定的Queue,因此称为路由模式(routes)
@RabbitListener(bindings = @QueueBinding(
    value = @Queue(name = "direct.queue1"),
    exchange = @Exchange(name = "itcast.direct", type = ExchangeTypes.DIRECT),
    key = {"red", "blue"}
))
public void listenDirectQueue1(String msg){
    System.out.println("消费者接收到direct.queue1的消息:【" + msg + "】");
}

@RabbitListener(bindings = @QueueBinding(
    value = @Queue(name = "direct.queue2"),
    exchange = @Exchange(name = "itcast.direct", type = ExchangeTypes.DIRECT),
    key = {"red", "yellow"}
))
public void listenDirectQueue2(String msg){
    System.out.println("消费者接收到direct.queue2的消息:【" + msg + "】");
}
@Test
public void testSendDirectExchange() {
// 交换机名称
String exchangeName = "itcast.direct";
// 消息
String message = "红色警报!日本乱排核废水,导致海洋生物变异,惊现哥斯拉!";
// 发送消息
rabbitTemplate.convertAndSend(exchangeName, "red", message);
}TopicExchange交换机
/**
     * topicExchange
     */
@Test
public void testSendTopicExchange() {
    // 交换机名称
    String exchangeName = "itcast.topic";
    // 消息
    String message = "喜报!孙悟空大战哥斯拉,胜!";
    // 发送消息
    rabbitTemplate.convertAndSend(exchangeName, "china.news", message);
}
@RabbitListener(bindings = @QueueBinding(
value = @Queue(name = "topic.queue1"),
exchange = @Exchange(name = "itcast.topic", type = ExchangeTypes.TOPIC),
key = "china.#"
))
public void listenTopicQueue1(String msg){
System.out.println("消费者接收到topic.queue1的消息:【" + msg + "】");
}
@RabbitListener(bindings = @QueueBinding(
value = @Queue(name = "topic.queue2"),
exchange = @Exchange(name = "itcast.topic", type = ExchangeTypes.TOPIC),
key = "#.news"
))
public void listenTopicQueue2(String msg){
System.out.println("消费者接收到topic.queue2的消息:【" + msg + "】");
}消息转换器
发送SprignAMQP的发送方法中,接收消息的类型是Object,也就是说我们可以发送任意对象类型的消息,SpringAMQ会棒我们序列化为字节后发送。
<dependency>
    <groupId>com.fasterxml.jackson.dataformat</groupId>
    <artifactId>jackson-dataformat-xml</artifactId>
    <version>2.9.10</version>
</dependency>
启动类添加Bean
@Bean
public MessageConverter jsonMessageConverter(){
    return new Jackson2JsonMessageConverter();
}
elesticearch搜索引擎
概念
elesticsearch是elstic stack的核心,负责存储,搜索,分析数据。
数据可视化:kibana
存储,计算,搜索数据:Elasticsearch
数据抓取:logstash,beats
什么是elasticsearch?
一个开源的分布式搜索引擎,可以用来实现搜索,日志统计,分析,系统监控等功能。
什么是elstic stack(ELK)?
是以elasticearch为核心的技术栈,包括beats,logstach,kibana,elasticesearch
什么是Luaene?
是Apache的开源搜索引擎类库,提供了搜索引擎的核心API
正向索引和倒排索引
elasticsearch采用倒排索引:
文档(document):每条数据就是一个文档
词条(trem):文档按照语义分成的词语
elasticsearch概念
文档
elasticsearch是面向文档存储的,可以是数据库的一条商品数据,一个订单信息。
文档数据会被序列化为json格式后存储在elasticsearch。
索引
索引(index):相同类型的文档的集合
映射(mapping):索引中文档的字段约束信息,类似表的结构约束

架构
Mysql:擅长事务类型操作,可以确保数据的安全和一致性
Elasticsearch:擅长海量数据的搜索,分析,计算。
部署es
创建网络
部署kibana容器,因此需要es和kibana容器互联,这里创建一个网络:
docker network create es-net加载镜像
把压缩包导入tmp文件夹后加载镜像:docker load -i es.tar
                              docker load -i kibana.tar
运行
docker run -d \
	--name es \
    -e "ES_JAVA_OPTS=-Xms512m -Xmx512m" \
    -e "discovery.type=single-node" \
    -v es-data:/usr/share/elasticsearch/data \
    -v es-plugins:/usr/share/elasticsearch/plugins \
    --privileged \
    --network es-net \
    -p 9200:9200 \
    -p 9300:9300 \
elasticsearch:7.12.1
部署kibana
运行
docker run -d \
--name kibana \
-e ELASTICSEARCH_HOSTS=http://es:9200 \
--network=es-net \
-p 5601:5601  \
kibana:7.12.1
分词器
离线安装ik分词器
查看位置:docker volume inspect es-plugins

把id安装包放到 es目录中

重启es容器:docker restart es
测试分词器
# 最少切分
POST /_analyze
{
  "text": "黑马程序员学习太棒了"
  , "analyzer": "ik_smart"
}

# 最细切分

POST /_analyze
{
  "text": "黑马程序员学习太棒了"
  , "analyzer": "ik_max_word"
}
Mapping属性

创建索引库
Es中通过Resutful请求操作索引库,文档,请求内容用DSL语句表示。


创建索引库
PUT /heima
{
  "mappings": {
    "properties": {
      "info": {
        "type": "text",
        "analyzer": "ik_smart"
      },
      "email": {
        "type": "keyword",
        "index": false
      },
      "name": {
        "type": "object",
        "properties": {
          "firstName": {
            "type": "keyword"
          },
          "lastName":{
            "type":"keyword"
          }
        }
      }
    }
  }
}
查看,删除索引库
PUT /索引库名/_mapping
{
  "properties": {
    "新字段名":{
      "type": "integer"
    }
  }
}
语法
查看索引库语法:GET /索引库名
              GET  /heima

删除索引库语法: DELETE /索引库名
               DELETE  /heima
修改索引库
PUT /heima/_mapping
{
  "properties":{
    "age":{
      "type":"integer"
    }
  }
}
删除索引库
DELETE /索引库名文档
插入,查询,删除
插入文档:
POST /heima/_doc/1
{
 "info": "黑马程序员Java讲师",
"email": "zy@itcast.cn",
"name": {
"firstName": "云",
"lastName": "赵"
}
}

查询文档:GET /heima/_doc/1

删除文档:DELETE /heima/_doc/1
全量修改文档
先删后添加:
PUT /heima/_doc/1
{
 "info": "黑马程序员Java讲师",
"email": "ZhaoYun@itcast.cn",
"name": {
"firstName": "云",
"lastName": "赵"
}
}
局部修改文档字段
POST /heima/_update/1
{
  "doc":{
    "email":"liuzihao@itcast.cn"
  }
}
RestClient
用来操作ES,组装DSL语句,通过http请求发送给ES
Elasticsearch Clients | Elastic
初始化JavaRestClient
<properties>
    <java.version>1.8</java.version>
    <elasticsearch.version>7.12.1</elasticsearch.version>
</properties>


<dependency>
    <groupId>org.elasticsearch.client</groupId>
    <artifactId>elasticsearch-rest-high-level-client</artifactId>
</dependency>
测试
package cn.itcast.hotel;

import org.apache.http.HttpHost;
import org.elasticsearch.client.RestClient;
import org.elasticsearch.client.RestHighLevelClient;
import org.junit.jupiter.api.AfterEach;
import org.junit.jupiter.api.BeforeEach;
import org.junit.jupiter.api.Test;

import java.io.IOException;

public class HotelIndexTest {
    private RestHighLevelClient client;

    @Test
    void testInit(){
        System.out.println(client);
    }


    @BeforeEach
    void setUp() {
        this.client = new RestHighLevelClient(RestClient.builder(
                HttpHost.create("http://192.168.74.128:9200")
        ));
    }

    @AfterEach
    void tearDown() throws IOException {
        this.client.close();
    }
}
@Test
void createHotelIndex() throws IOException {
// 1.创建Request对象
CreateIndexRequest request = new CreateIndexRequest("hotel");
// 2.准备请求的参数:DSL语句
request.source(MAPPING_TEMPLATE, XContentType.JSON);
// 3.发送请求
client.indices().create(request, RequestOptions.DEFAULT);
}删除索引库
@Test
void testDeleteHotelIndex() throws IOException {
    // 1.创建Request对象
    DeleteIndexRequest request = new DeleteIndexRequest("hotel");
    // 2.发送请求
    client.indices().delete(request, RequestOptions.DEFAULT);
}
判断索引库是否存在
@Test
void testExistsHotelIndex() throws IOException {
    // 1.创建Request对象
    GetIndexRequest request = new GetIndexRequest("hotel");
    // 2.发送请求
    boolean exists = client.indices().exists(request, RequestOptions.DEFAULT);
    // 3.输出
    System.err.println(exists ? "索引库已经存在!" : "索引库不存在!");
}
java增删改查文档
package cn.itcast.hotel;

import cn.itcast.hotel.pojo.Hotel;
import cn.itcast.hotel.pojo.HotelDoc;
import cn.itcast.hotel.service.IHotelService;
import com.alibaba.fastjson.JSON;
import org.apache.http.HttpHost;
import org.elasticsearch.action.bulk.BulkRequest;
import org.elasticsearch.action.delete.DeleteRequest;
import org.elasticsearch.action.get.GetRequest;
import org.elasticsearch.action.get.GetResponse;
import org.elasticsearch.action.index.IndexRequest;
import org.elasticsearch.action.update.UpdateRequest;
import org.elasticsearch.client.RequestOptions;
import org.elasticsearch.client.RestClient;
import org.elasticsearch.client.RestHighLevelClient;
import org.elasticsearch.common.xcontent.XContentType;
import org.junit.jupiter.api.AfterEach;
import org.junit.jupiter.api.BeforeEach;
import org.junit.jupiter.api.Test;
import org.springframework.beans.factory.annotation.Autowired;
import org.springframework.boot.test.context.SpringBootTest;

import java.io.IOException;
import java.util.List;

@SpringBootTest
class HotelDocumentTest {

    private RestHighLevelClient client;

    @Autowired
    private IHotelService hotelService;

    @Test
    void testAddDocument() throws IOException {
        // 1.查询数据库hotel数据
        Hotel hotel = hotelService.getById(61083L);
        // 2.转换为HotelDoc
        HotelDoc hotelDoc = new HotelDoc(hotel);
        // 3.转JSON
        String json = JSON.toJSONString(hotelDoc);

        // 1.准备Request
        IndexRequest request = new IndexRequest("hotel").id(hotelDoc.getId().toString());
        // 2.准备请求参数DSL,其实就是文档的JSON字符串
        request.source(json, XContentType.JSON);
        // 3.发送请求
        client.index(request, RequestOptions.DEFAULT);
    }

    @Test
    void testGetDocumentById() throws IOException {
        // 1.准备Request      // GET /hotel/_doc/{id}
        GetRequest request = new GetRequest("hotel", "61083");
        // 2.发送请求
        GetResponse response = client.get(request, RequestOptions.DEFAULT);
        // 3.解析响应结果
        String json = response.getSourceAsString();

        HotelDoc hotelDoc = JSON.parseObject(json, HotelDoc.class);
        System.out.println("hotelDoc = " + hotelDoc);
    }

    @Test
    void testDeleteDocumentById() throws IOException {
        // 1.准备Request      // DELETE /hotel/_doc/{id}
        DeleteRequest request = new DeleteRequest("hotel", "61083");
        // 2.发送请求
        client.delete(request, RequestOptions.DEFAULT);
    }

    @Test
    void testUpdateById() throws IOException {
        // 1.准备Request
        UpdateRequest request = new UpdateRequest("hotel", "61083");
        // 2.准备参数
        request.doc(
                "price", "870"
        );
        // 3.发送请求
        client.update(request, RequestOptions.DEFAULT);
    }

    @Test
    void testBulkRequest() throws IOException {
        // 查询所有的酒店数据
        List<Hotel> list = hotelService.list();

        // 1.准备Request
        BulkRequest request = new BulkRequest();
        // 2.准备参数
        for (Hotel hotel : list) {
            // 2.1.转为HotelDoc
            HotelDoc hotelDoc = new HotelDoc(hotel);
            // 2.2.转json
            String json = JSON.toJSONString(hotelDoc);
            // 2.3.添加请求
            request.add(new IndexRequest("hotel").id(hotel.getId().toString()).source(json, XContentType.JSON));
        }

        // 3.发送请求
        client.bulk(request, RequestOptions.DEFAULT);
    }

    @BeforeEach
    void setUp() {
        client = new RestHighLevelClient(RestClient.builder(
                HttpHost.create("192.168.74.128:9200")
        ));
    }

    @AfterEach
    void tearDown() throws IOException {
        client.close();
    }


}
DSL查询
DSL查询语法
DSLQuery的分类
* 查询所有:一般测试用,例如:match_all
* 全文检索(full text)查询:充分利用分词器对用户输入内容分词,然后取倒排索引库中匹配,例如:
* match_query
* multi_match_query
* 精确查询:根据 精确词条值查找数据,一般是查找keyword,数值,日期,boolean等类型字段。
例如: ids , range , term
* 地理查询(geo): 根据经纬度查询。
例如:geo_distance , geo_bounding_box
* 复合(compound)查询:复合查询可以将上述各种查询条件组合起来,合并查询条件。
例如:bool, function_score
查询全部:

GET /hotel/_search
{
  "query":{
    "match_all":{}
  }
}

match_查询
GET /hotel/_search
{
  "query":{
      "match": {
        "all": "外滩"
      }
  }
}


multi_match 查询
GET /hotel/_search
{
   "query": {
     "multi_match": {
       "query": "外滩如家",
       "fields": ["brand","name","business"]
     }
   }
}


term查询
GET /hotel/_search
{
  "query":{
    "term":{
      "city": {
        "value": "上海"
      }
    }
  }
}


range范围查询
GET /hotel/_search
{
  "query":{
    "range": {
      "price": {
        "gte": 100,
        "lte": 300
      }
    }
  }
}

distance查询
GET /hotel/_search
{
  "query": {
    "geo_distance":{
      "distance":"15km",
      "location":"31.21,121.5"
    }
  }
}


 // 相关性算分查询
GET /hotel/_search
{
  "query": {
    "function_score": {
      "query": {  .... }, // 原始查询,可以是任意条件
      "functions": [ // 算分函数
        {
          "filter": { // 满足的条件,品牌必须是如家
            "term": {
              "brand": "如家"
            }
          },
          "weight": 2 // 算分权重为2
        }
      ],
      "boost_mode": "sum" // 加权模式,求和
    }
  }
}


GET /hotel/_search
{
  "query": {
    "bool": {
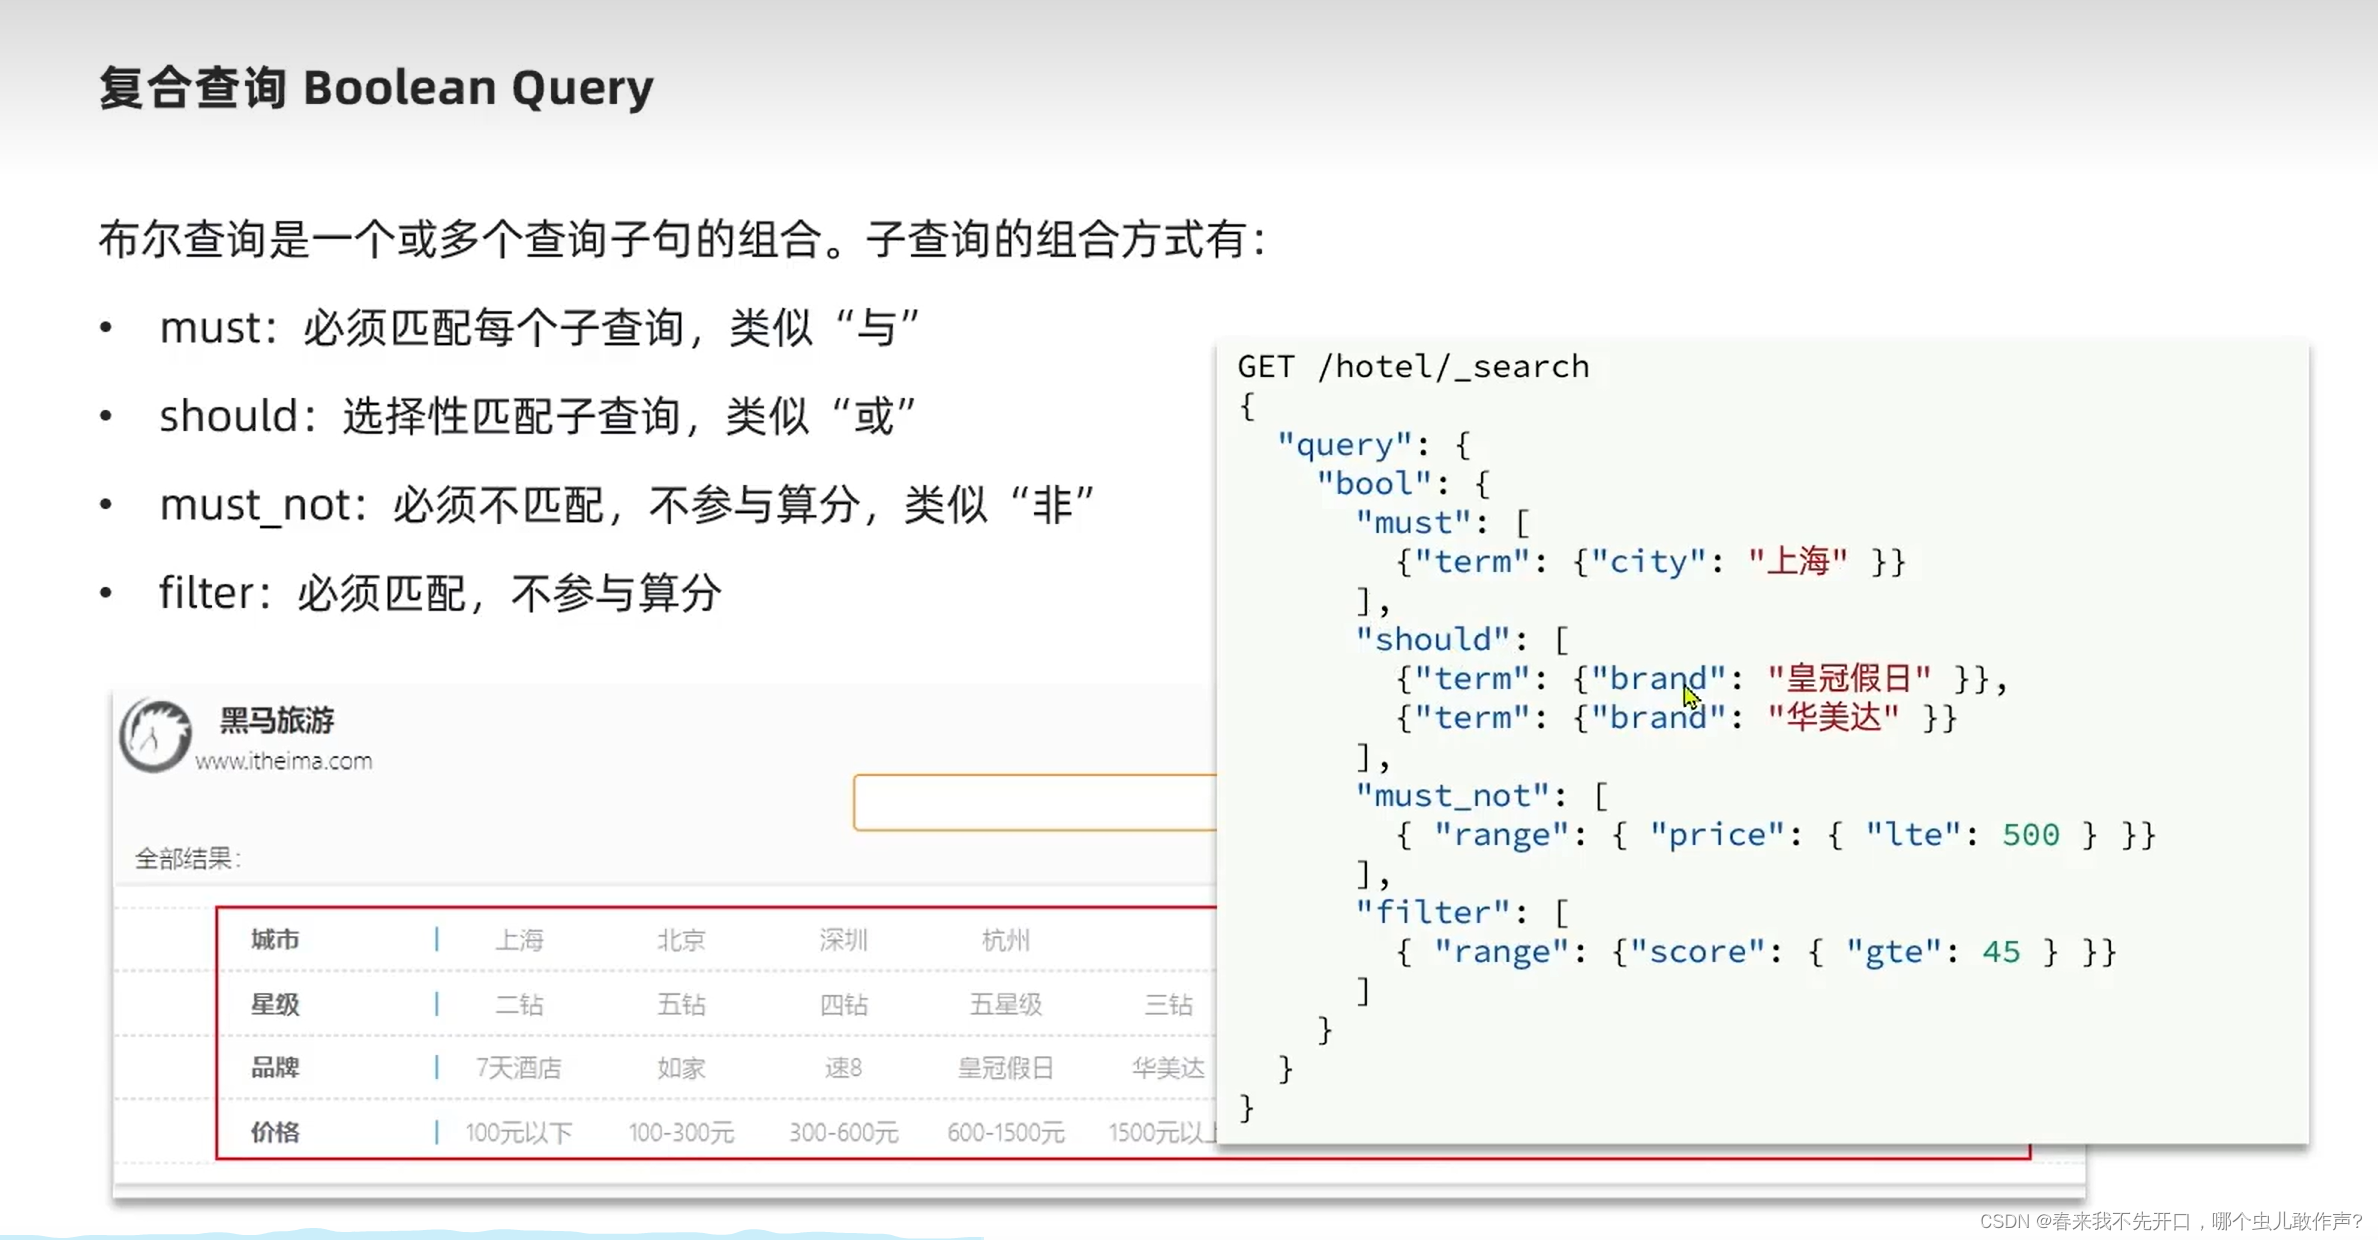
      "must": [
        {"term": {"city": "上海" }}
      ],
      "should": [
        {"term": {"brand": "皇冠假日" }},
        {"term": {"brand": "华美达" }}
      ],
      "must_not": [
        { "range": { "price": { "lte": 500 } }}
      ],
      "filter": [
        { "range": {"score": { "gte": 45 } }}
      ]
    }
  }
}


地理坐标排序
GET /indexName/_search
{
  "query": {
    "match_all": {}
  },
  "sort": [
    {
      "_geo_distance" : {
          "FIELD" : "纬度,经度", // 文档中geo_point类型的字段名、目标坐标点
          "order" : "asc", // 排序方式
          "unit" : "km" // 排序的距离单位
      }
    }
  ]
}

高亮显示
GET /hotel/_search
{
  "query": {
    "match": {
      "FIELD": "TEXT" // 查询条件,高亮一定要使用全文检索查询
    }
  },
  "highlight": {
    "fields": { // 指定要高亮的字段
      "FIELD": {
        "pre_tags": "<em>",  // 用来标记高亮字段的前置标签
        "post_tags": "</em>" // 用来标记高亮字段的后置标签
      }
    }
  }
}
相关性算分


符合查询
RestClient查询文档
package cn.itcast.hotel;

import cn.itcast.hotel.pojo.HotelDoc;
import com.alibaba.fastjson.JSON;
import com.baomidou.mybatisplus.core.toolkit.CollectionUtils;
import org.apache.http.HttpHost;
import org.elasticsearch.action.search.SearchRequest;
import org.elasticsearch.action.search.SearchResponse;
import org.elasticsearch.client.RequestOptions;
import org.elasticsearch.client.RestClient;
import org.elasticsearch.client.RestHighLevelClient;
import org.elasticsearch.index.query.BoolQueryBuilder;
import org.elasticsearch.index.query.QueryBuilders;
import org.elasticsearch.search.SearchHit;
import org.elasticsearch.search.SearchHits;
import org.elasticsearch.search.fetch.subphase.highlight.HighlightBuilder;
import org.elasticsearch.search.fetch.subphase.highlight.HighlightField;
import org.elasticsearch.search.sort.SortOrder;
import org.junit.jupiter.api.AfterEach;
import org.junit.jupiter.api.BeforeEach;
import org.junit.jupiter.api.Test;
import org.springframework.beans.factory.annotation.Autowired;
import org.springframework.boot.test.context.SpringBootTest;

import java.io.IOException;
import java.util.Map;

/**
 * @author Mtz
 * @version 1.0
 * @2023/10/1715:40
 * @function
 * @comment
 */
@SpringBootTest
public class testdemoRestClient {

    @Autowired
    private RestHighLevelClient client;

    @Test
    void testMatchAll() throws IOException {
        // 1.准备Request
        SearchRequest request = new SearchRequest("hotel");
        // 2.准备DSL
        request.source()
                .query(QueryBuilders.matchAllQuery());
        // 3.发送请求
        SearchResponse response = client.search(request, RequestOptions.DEFAULT);

        // 4.解析响应
        handleResponse(response);
    }

    private void handleResponse(SearchResponse response) {
        // 4.解析响应
        SearchHits searchHits = response.getHits();
        // 4.1.获取总条数
        long total = searchHits.getTotalHits().value;
        System.out.println("共搜索到" + total + "条数据");
        // 4.2.文档数组
        SearchHit[] hits = searchHits.getHits();
        // 4.3.遍历
        for (SearchHit hit : hits) {
            // 获取文档source
            String json = hit.getSourceAsString();
            // 反序列化
            HotelDoc hotelDoc = JSON.parseObject(json, HotelDoc.class);
            System.out.println("hotelDoc = " + hotelDoc);
        }
    }


    @Test
    void testMatch() throws IOException {
        // 1.准备Request
        SearchRequest request = new SearchRequest("hotel");
        // 2.准备DSL
        request.source()
                .query(QueryBuilders.matchQuery("all", "如家"));
        // 3.发送请求
        SearchResponse response = client.search(request, RequestOptions.DEFAULT);
        // 4.解析响应
        handleResponse(response);

    }


    @Test
    void testBool() throws IOException {
        // 1.准备Request
        SearchRequest request = new SearchRequest("hotel");
        // 2.准备DSL
        // 2.1.准备BooleanQuery
        BoolQueryBuilder boolQuery = QueryBuilders.boolQuery();
        // 2.2.添加term
        boolQuery.must(QueryBuilders.termQuery("city", "杭州"));
        // 2.3.添加range
        boolQuery.filter(QueryBuilders.rangeQuery("price").lte(250));

        request.source().query(boolQuery);
        // 3.发送请求
        SearchResponse response = client.search(request, RequestOptions.DEFAULT);
        // 4.解析响应
        handleResponse(response);

    }


    @Test
    void testTermMatch() throws IOException {
        // 1.准备Request
        SearchRequest request = new SearchRequest("hotel");
        // 2.准备DSL
//        request.source()
//                .query(QueryBuilders.termQuery("city","杭州"));

                request.source()
                .query(QueryBuilders.rangeQuery("price").gte(100).lte(150));

        // 3.发送请求
        SearchResponse response = client.search(request, RequestOptions.DEFAULT);
        // 4.解析响应
        handleResponse(response);

    }


    @Test
    void testPageAndSort() throws IOException {
        // 页码,每页大小
        int page = 1, size = 5;

        // 1.准备Request
        SearchRequest request = new SearchRequest("hotel");
        // 2.准备DSL
        // 2.1.query
        request.source().query(QueryBuilders.matchAllQuery());
        // 2.2.排序 sort
        request.source().sort("price", SortOrder.ASC);
        // 2.3.分页 from、size
        request.source().from((page - 1) * size).size(5);
        // 3.发送请求
        SearchResponse response = client.search(request, RequestOptions.DEFAULT);
        // 4.解析响应
        handleResponse(response);

    }


    @Test
    void testHighlight() throws IOException {
        // 1.准备Request
        SearchRequest request = new SearchRequest("hotel");
        // 2.准备DSL
        // 2.1.query
        request.source().query(QueryBuilders.matchQuery("all", "如家"));
        // 2.2.高亮
        request.source().highlighter(new HighlightBuilder().field("name").requireFieldMatch(false));
        // 3.发送请求
        SearchResponse response = client.search(request, RequestOptions.DEFAULT);
        // 4.解析响应
        handleResponse(response);

    }


    @BeforeEach
    void setUp() {
        client = new RestHighLevelClient(RestClient.builder(
                HttpHost.create("192.168.74.128:9200")
        ));
    }

    @AfterEach
    void tearDown() throws IOException {
        client.close();
    }
}


