大家好,今天主要和大家聊一聊,linux系统中的字符设备驱动实现的基本过程。
目录
第一:字符设备驱动简介
第二:字符设备驱动开发步骤
第三:编写字符设备驱动实验程序
第一:字符设备驱动简介
字符设备是Linux驱动中最基本的一类设备驱动,字符设备就是一个一个字节,按照字节流进行读写操作的设备,读写数据是分先后顺序的,比如我们常见的点灯、IIC、SPI等都是字符设备,这些设备的驱动叫做字符设备驱动。
在详细的学习字符设备驱动架构之前,我们先来简单的了解一下
Linux
下的应用程序是如
何调用驱动程序的,
Linux
应用程序对驱动程序的调用如下:
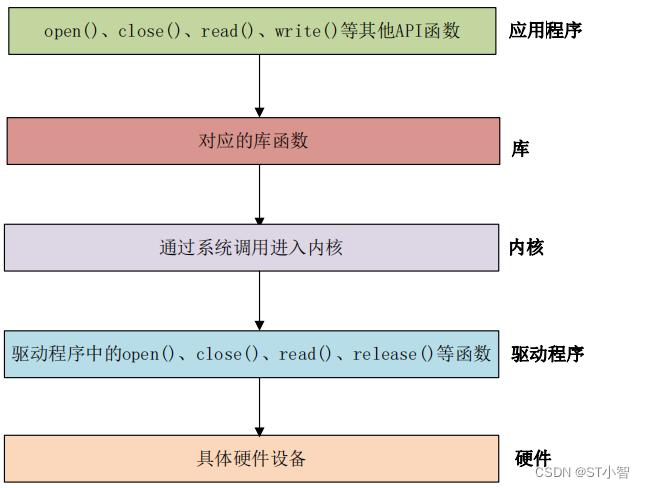
分析:
应用程序运行在用户空间,而
Linux
驱动属于内核的一部分,因此驱动运行于内核空间。
当我们在用户空间想要实现对内核的操作,比如使用
open
函数打开
/dev/led
这个驱动,因为用
户空间不能直接对内核进行操作,因此必须使用一个叫做“系统调用”的方法来实现从用户空
间“陷入”到内核空间,这样才能实现对底层驱动的操作。
open
、
close
、
write
和
read
等这些函
数是由
C
库提供的,在
Linux
系统中,系统调用作为
C
库的一部分。当我们调用
open
函数的
时候流程如图:

第二:字符设备驱动开发步骤
在linux驱动开发中肯定要初始化相应的外设寄存器,只是在linux驱动开发中,需要根据规定的框架来编写驱动,所以学linux驱动开发重点是学习框架。
linux驱动有两种运行方式,第一种就是将驱动编译进linux内核中,这样当linux内核启动的时候就会自动运行驱动程序。第二种将驱动编译成模块(linux下模块扩展名为.ko),在linux内核启动以后使用insmod命令加载驱动模块。
模块的加载和卸载函数注册函数如下:
module_init(xxx_init);    //注册模块加载函数
module_exit(xxx_exit);    //注册模块卸载函数
module_init 函数用来向 Linux 内核注册一个模块加载函数,参数 xxx_init 就是需要注册的具体函数,当使用“insmod”命令加载驱动的时候,xxx_init 这个函数就会被调用。module_exit() 函数用来向 Linux 内核注册一个模块卸载函数,参数 xxx_exit 就是需要注册的具体函数,当使 用“rmmod”命令卸载具体驱动的时候 xxx_exit 函数就会被调用。
第三:编写字符设备驱动实验程序
#include <linux/types.h>
#include <linux/kernel.h>
#include <linux/delay.h>
#include <linux/ide.h>
#include <linux/init.h>
#include <linux/module.h>


//声明对应的变量
#define CHRDEVBASE_MAJOR    200     //主设备号
#define CHRDEVBASE_NAME     "chrdevbase"

static char  readbuf[100];    //读缓冲区
static char  writebuf[100];   //写缓冲区
static char  kerneldata[]={"kernel data!"};


//打开设备
static int chrdevbase_open(struct inode *inode,struct file *file)
{
    return 0;
}

//从设备读取数据   filp---要打开的设备文件(文件描述符)
static ssize_t chrdevbase_read(struct file *filp,char __user *buf,size_t cnt,loff_t *offt)
{
    int retvalue = 0;

    //向用户空间发送数据
    memcpy(readbuf,kerneldata,sizeof(kerneldata));
    retvalue = copy_to_user(buf,readbuf,cnt);

   if(retvalue == 0){
        printk("kernel senddata ok!\r\n");
   }else {
       printk("kernel senddata failed\r\n");
  }

    return 0;
}


//向设备中写数据
static ssize_t chrdevbase_write(struct file *filp,const char __user *buf,size_t cnt, loff_t *offt )
{
    int retvalue = 0;
    //接收用户空间传递给内核的数据并且打印出来
    retvalue = copy_from_user(writebuf,buf,cnt);
    if(retvalue == 0)
    {
       printk("kernel recevdata:%s\r\n",writebuf);
    }else
    {
       printk("kernel recevdata failed!\r\n");
    }
      return 0;
}


//关闭释放设备
static int chrdevbase_release(struct inode *inode,struct file *filp)
{
    return 0;
}


//设备操作函数结构体
static struct file_operations chrdevbase_fops = {
    .owner = THIS_MODULE,
    .open = chrdevbase_open,
    .read = chrdevbase_read,
    .write = chrdevbase_write,
    .release = chrdevbase_release,
};

//驱动入口函数
static int __init chrdevbase_init(void)
{
    int retvalue =0 ;

    //注册字符设备驱动
    retvalue = register_chrdev(CHRDEVBASE_MAJOR, CHRDEVBASE_NAME,&chrdevbase_fops);

    return 0;
}


//驱动出口函数
static void __exit chrdevbase_exit(void)
{
   /* 注销字符设备驱动 */
     unregister_chrdev(CHRDEVBASE_MAJOR, CHRDEVBASE_NAME);
     printk("chrdevbase_exit()\r\n");
}

//将上面两个函数指定为驱动的入口函数和出口函数
module_init(chrdevbase_init);
module_exit(chrdevbase_exit);
MODULE_LINCENSE("GPL");
总结:本次实验详细描述了字符设备驱动的开发过程,带领大家完成了第一个字符设备驱动的开发。

