说明:本文是在一个机器内部用docker创建了三台centos,然后构建的pgxl集群
文章目录
- 1. 学习docker
- 2. 创建三台centos
- 3. 安装SSH
- 4. 创建新用户postgres
- 5. 关闭防火墙 关闭selinux
- 6. 配置免密登录
- 7. 下载并传输Postgres-XL的源码
- 8. 配置环境变量
- 10. 安装
- 11. 连接数据库
1. 学习docker
推荐B站的黑马程序员的视频
2023.9的哔哩哔哩视频
2019.9的哔哩哔哩视频
docker常用命令及ubuntu安装docker的文章
2. 创建三台centos
查看本机IP的命令
hostname -I
查看主机名的命令
hostname
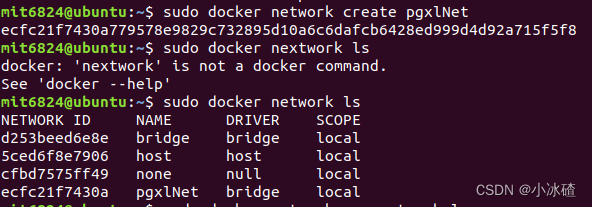
- 在docker中创建netWork
sudo docker network create 网络名
- 创建centos的命令
为什么这么长,因为都是踩过的坑
–network pgxlNet 是为了创建的容器都在一个网段内,这样三个容器可以互相Ping通,而且IP按照创建容器的先后顺序分配,后续不关停容器的话IP地址不变
–privilege=true 是为了用参数赋予容器特权,否则创建出来的centos类似systemctl之类的命令不能使用
–hostname gtm 是为了将创建出来的centos的主机名设置为 gtm。一般情况下后续可以通过命令或者修改配置文件等方式修改主机名,但是通过docker创建出来的容器不可以,所以需要在一开始创建的时候指定
启动命令需要是 /usr/sbin/init
sudo docker run -itd --network 网络名 --hostname 主机名 --privileged=true --name 容器名 镜像名:版本 /usr/sbin/init

3. 进入容器
sudo docker exec -it 容器名 /bin/bash

-
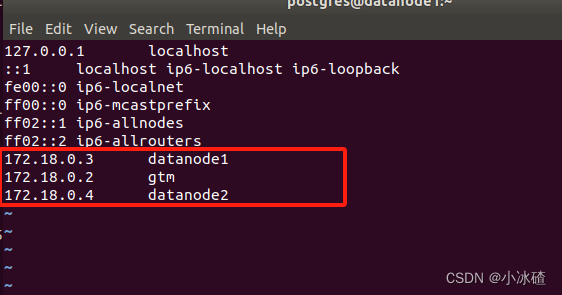
修改etc/hosts文件
vim /etc/hosts 或者 vi /etc/hosts
然后在文件里添加下面的内容,三个容器都要操作
-
综上所述,创建三个容器和进入三个容器的命令
sudo docker network create pgclNet

sudo docker run -itd --network pgxlNet --hostname gtm --privileged=true --name gtm centos:latest /usr/sbin/init
sudo docker run -itd --network pgxlNet --hostname datanode1 --privileged=true --name datanode1 centos:latest /usr/sbin/init
sudo docker run -itd --network pgxlNet --hostname datanode2 --privileged=true --name datanode2 centos:latest /usr/sbin/init

sudo docker exec -it gtm /bin/bash
sudo docker exec -it datanode1 /bin/bash
sudo docker exec -it datanode2 /bin/bash
3. 安装SSH
- 安装ssh之前,我们要先为root用户配置密码,因为后续切换回root用户时需要输入密码
passwd
回车输入密码即可,验证密码有无输入成功用ssh连接一下然后输入密码,看看能不能连接上就知道了
- 如果安装ssh时出现报错。No URLs in mirrorlist。则运行下面的代码或者看博客
别人的博客,如果有侵权马上删除
cd /etc/yum.repos.d/
sed -i 's/mirrorlist/#mirrorlist/g' /etc/yum.repos.d/CentOS-*
sed -i 's|#baseurl=http://mirror.centos.org|baseurl=http://vault.centos.org|g' /etc/yum.repos.d/CentOS-*
yum makecache
yum update -y
- 安装ssh
yum install openssh-server -y
yum install openssh-clients -y
service sshd restart
如果出现bash:service: command not found
yum install initscripts -y
4. 创建新用户postgres
为什么要创建新用户,在root用户下操作行不行? 不行。如果在root用户下安装,那么最后会发现,数据库无法初始化,无法启动,无法使用。因为postgre要求不能再root用户下操作,所以需要创建新的用户。切记切记
useradd 用户名
passwd 用户名
然后输入密码就是这个用户的密码了
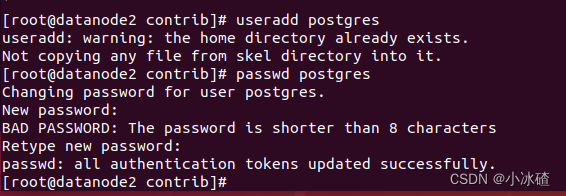
切换用户
注意 - 的前后都有一个空格
su - 用户名
5. 关闭防火墙 关闭selinux
docker创建的centos容器没有这些东西,所以这一步可以省略了。也可以自己验证一下,我这里时没有的。
6. 配置免密登录
注意,不仅要配置gtm到datanode1和datanode2的免密登录,还需要配置,gtm到gtm本身的免密登录
注意,要在postgres用户下配置。我现在root用户下配置了免密登录,发现不行。postgres用户下也要配置免密登录才行
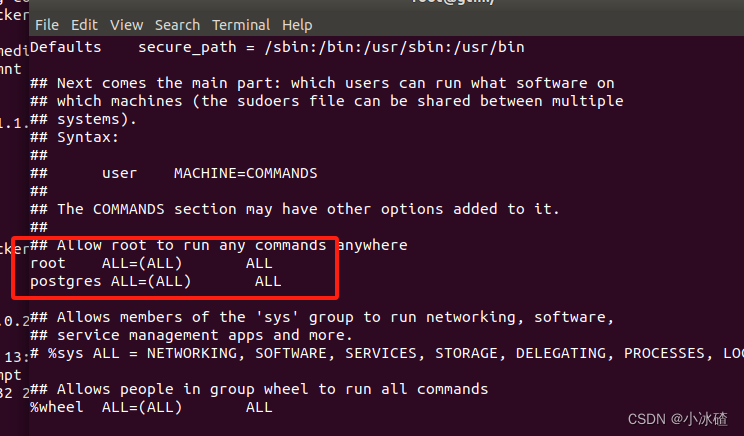
- postgres用户不能使用sudo的解决办法
报错:postgres is not in the sudoers file. This incident will be reported
解决办法:
su - root 切换回root用户
vi /etc/sudoers
然后在 root ALL=(ALL) ALL 这一行下面加上一行
postgres ALL=(ALL) ALL
注意:退出时用 wq!
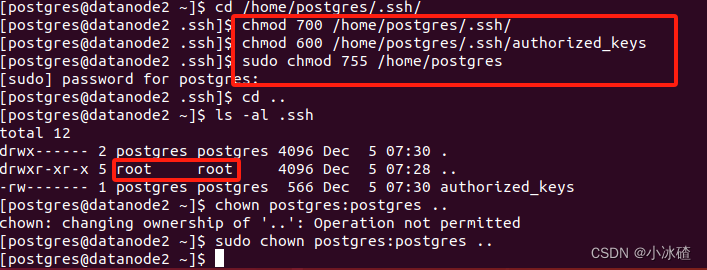
2. 配置免密登录的两个大坑,文件夹权限和属主问题。分别对应的命令时 chmod 和 chown 。查看的命令时 ls -al 文件/文件夹/啥也不带
切换到postgres用户
su - postgres
mkdir /home/postgres/.ssh 出现报错权限不足。
回到上级目录
sudo chmod -R 777 /home
mkdir /home/postgres/.ssh
修改权限和属主
修改权限和属主
sudo chmod 755 /home/postgres
chmod 700 /home/postgres/.ssh/
chmod 600 /home/postgres/.ssh/authorized_keys
chown postgres:postgres .. (把文件 .. 的owner从root改为postgres)
注意:修改属主这里不是一定的,要根据自己的情况看。命令就是 ls -al
属主,就是文件所属的用户,可以从图中看到 … 这里的属主是root不对劲,所以我将其改成了postgres。后来我为了方便,直接改了父文件将文件都改成了postgres用户的
chown -R postgres:postgres 文件夹名字
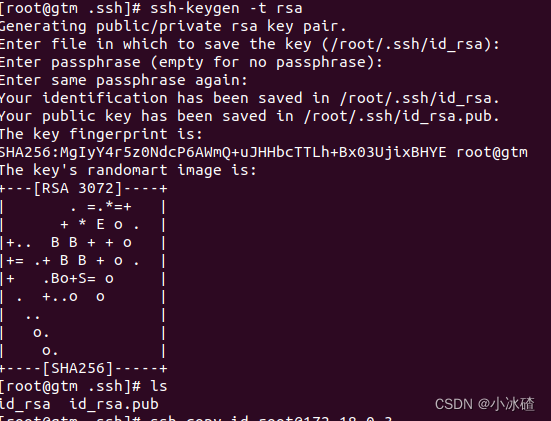
3. 配置免密登录
本文中的操作没有特别注明,基本都是在三个容器都需要操作的,只有下面的者四行命令命令只在gtm节点操作就可以了
ssh-keygen -t rsa  有三处需要输入的地方,全部enter键即可
ssh-copy-id 用户名@datanode1的IP
ssh-copy-id 用户名@datanode2的IP
ssh-copy-id 用户名@gtm的IP
下面这个是在root用户下配置免密登录的截图,postgres用户下的配置和这个一样。(在postgres用户下配置就可以)

7. 下载并传输Postgres-XL的源码
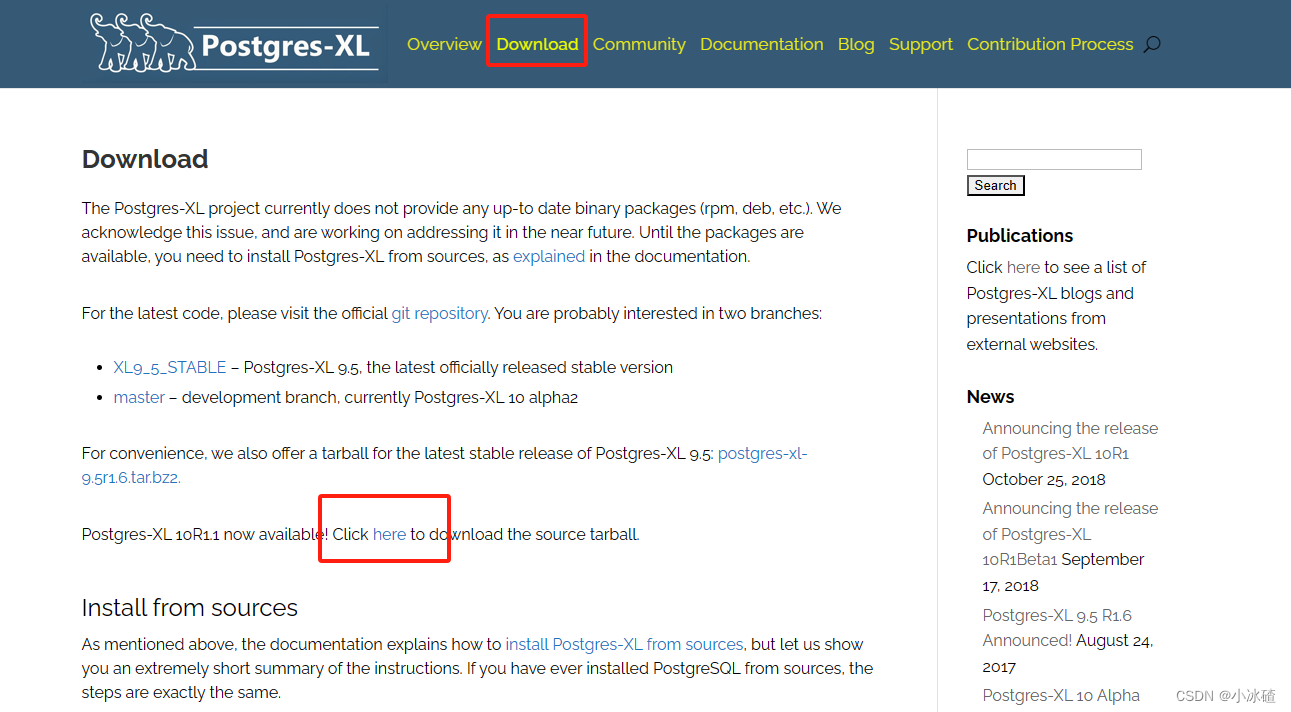
下载地址
https://www.postgres-xl.org/download/
下载地址
传输命令
scp 文件 服务器的用户名@IP:服务器上文件地址
也可以搜索专门的docker和宿主机之间传输文件的命令
8. 配置环境变量
- 解压缩
在home路径下 mkdir postgres
tar xf postgre........tar.gz -C /home/postgres
- 创建目录
#创建配置文件目录(所有节点,本文中的操作,大部分都是需要在三个节点都完成的)
mkdir -p /home/pg/pgxl
mkdir -p /home/pg/pgxc/nodes
mkdir -p /home/postgres/pgxc/conf
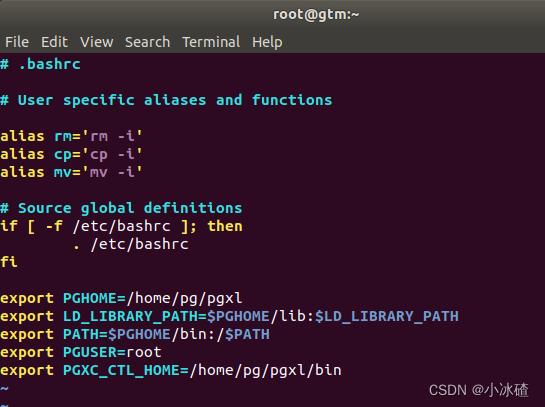
- 配置环境变量
vim /home/postgres/.bashrc
export PGHOME=/home/pg/pgxl
export LD_LIBRARY_PATH=$PGHOME/lib:$LD_LIBRARY_PATH
export PATH=$PGHOME/bin:$PATH
export PGUSER=postgres
export PGXC_CTL_HOME=/home/pg/pgxl/bin
source /home/postgres/.bashrc

如果修改后不能保存,就修改文件所属的权限。
chown -R postgres:postgres 文件夹名字
ls -al 查看文件属主等信息
图片中的root应该为postgres
10. 安装
yum install -y gcc zlib zlib-devel readline readline-devel flex
yum -y install gcc automake autoconf libtool make

cd /home/postgres/postgres-xl-10r1.1
./configure --prefix=/home/pg/pgxl
make -j4
make install
cd /home/postgres/postgres-xl-10r1.1/contrib
make -j4
make install

生成文件pxc_ctl.conf文件
pgxc
根据提示找到pxc_ctl.conf文件的位置,然后复制文件
cp 源文件 目的文件地址
修改pgxc_ctl.conf文件
我将pgxc_ctl.conf文件放到了 /home/postgres/pgxc/conf下面,注意要记住这个地址,因为后续开启数据库的时候要用到这个地址
修改配置文件,只需要修改里面的IP地址和节点数目就可以了
我是参考下面两篇博客修改的,需要注意的是其中cidr表示的地址哪里需要填自己的网段,剩下的就是把IP换成自己的IP即可
博客1 如有侵权请联系马上删除
博客2 如有侵权请联系马上删除
pgxcInstallDir=$HOME/pgxc
#---- OVERALL -----------------------------------------------------------------------------
#
pgxcOwner=$USER			# owner of the Postgres-XC databaseo cluster.  Here, we use this
						# both as linus user and database user.  This must be
						# the super user of each coordinator and datanode.
pgxcUser=$pgxcOwner		# OS user of Postgres-XC owner

tmpDir=/tmp					# temporary dir used in XC servers
localTmpDir=$tmpDir			# temporary dir used here locally

configBackup=n					# If you want config file backup, specify y to this value.
configBackupHost=pgxc-linker	# host to backup config file
configBackupDir=$HOME/pgxc		# Backup directory
configBackupFile=pgxc_ctl.bak	# Backup file name --> Need to synchronize when original changed.

#---- GTM ------------------------------------------------------------------------------------

# GTM is mandatory.  You must have at least (and only) one GTM master in your Postgres-XC cluster.
# If GTM crashes and you need to reconfigure it, you can do it by pgxc_update_gtm command to update
# GTM master with others.   Of course, we provide pgxc_remove_gtm command to remove it.  This command
# will not stop the current GTM.  It is up to the operator.


#---- GTM Master -----------------------------------------------

#---- Overall ----
gtmName=gtm
gtmMasterServer=172.18.0.2
gtmMasterPort=20001
gtmMasterDir=$HOME/pgxc/nodes/gtm

#---- Configuration ---
gtmExtraConfig=none			# Will be added gtm.conf for both Master and Slave (done at initilization only)
gtmMasterSpecificExtraConfig=none	# Will be added to Master's gtm.conf (done at initialization only)

#---- GTM Slave -----------------------------------------------

# Because GTM is a key component to maintain database consistency, you may want to configure GTM slave
# for backup.

#---- Overall ------
gtmSlave=n					# Specify y if you configure GTM Slave.   Otherwise, GTM slave will not be configured and
							# all the following variables will be reset.
gtmSlaveName=gtmSlave
gtmSlaveServer=node12		# value none means GTM slave is not available.  Give none if you don't configure GTM Slave.
gtmSlavePort=20001			# Not used if you don't configure GTM slave.
gtmSlaveDir=$HOME/pgxc/nodes/gtm	# Not used if you don't configure GTM slave.
# Please note that when you have GTM failover, then there will be no slave available until you configure the slave
# again. (pgxc_add_gtm_slave function will handle it)

#---- Configuration ----
gtmSlaveSpecificExtraConfig=none # Will be added to Slave's gtm.conf (done at initialization only)

#---- GTM Proxy -------------------------------------------------------------------------------------------------------
# GTM proxy will be selected based upon which server each component runs on.
# When fails over to the slave, the slave inherits its master's gtm proxy.  It should be
# reconfigured based upon the new location.
#
# To do so, slave should be restarted.   So pg_ctl promote -> (edit postgresql.conf and recovery.conf) -> pg_ctl restart
#
# You don't have to configure GTM Proxy if you dont' configure GTM slave or you are happy if every component connects
# to GTM Master directly.  If you configure GTL slave, you must configure GTM proxy too.

#---- Shortcuts ------
gtmProxyDir=$HOME/pgxc/nodes/gtm_pxy

#---- Overall -------
gtmProxy=y				# Specify y if you conifugre at least one GTM proxy.   You may not configure gtm proxies
						# only when you dont' configure GTM slaves.
						# If you specify this value not to y, the following parameters will be set to default empty values.
						# If we find there're no valid Proxy server names (means, every servers are specified
						# as none), then gtmProxy value will be set to "n" and all the entries will be set to
						# empty values.
gtmProxyNames=(gtm_pxy1 gtm_pxy2)	# No used if it is not configured
gtmProxyServers=(172.18.0.3 172.18.0.4)			# Specify none if you dont' configure it.
gtmProxyPorts=(20001 20001)				# Not used if it is not configured.
gtmProxyDirs=($gtmProxyDir $gtmProxyDir)	# Not used if it is not configured.

#---- Configuration ----
gtmPxyExtraConfig=none		# Extra configuration parameter for gtm_proxy.  Coordinator section has an example.
gtmPxySpecificExtraConfig=(none none)

#---- Coordinators ----------------------------------------------------------------------------------------------------

#---- shortcuts ----------
coordMasterDir=$HOME/pgxc/nodes/coord
coordSlaveDir=$HOME/pgxc/nodes/coord_slave
coordArchLogDir=$HOME/pgxc/nodes/coord_archlog

#---- Overall ------------
coordNames=(coord1 coord2)		# Master and slave use the same name
coordPorts=(20004 20005)			# Master ports
poolerPorts=(20010 20011)			# Master pooler ports
coordPgHbaEntries=(172.18.0.0/24)				# Assumes that all the coordinator (master/slave) accepts
												# the same connection
												# This entry allows only $pgxcOwner to connect.
												# If you'd like to setup another connection, you should
												# supply these entries through files specified below.
# Note: The above parameter is extracted as "host all all 0.0.0.0/0 trust".   If you don't want
# such setups, specify the value () to this variable and suplly what you want using coordExtraPgHba
# and/or coordSpecificExtraPgHba variables.
#coordPgHbaEntries=(::1/128)	# Same as above but for IPv6 addresses

#---- Master -------------
coordMasterServers=(172.18.0.3 172.18.0.4)		# none means this master is not available
coordMasterDirs=($coordMasterDir $coordMasterDir )
coordMaxWALsernder=5	# max_wal_senders: needed to configure slave. If zero value is specified,
						# it is expected to supply this parameter explicitly by external files
						# specified in the following.	If you don't configure slaves, leave this value to zero.
coordMaxWALSenders=($coordMaxWALsernder $coordMaxWALsernder)
						# max_wal_senders configuration for each coordinator.

#---- Slave -------------
coordSlave=n			# Specify y if you configure at least one coordiantor slave.  Otherwise, the following
						# configuration parameters will be set to empty values.
						# If no effective server names are found (that is, every servers are specified as none),
						# then coordSlave value will be set to n and all the following values will be set to
						# empty values.

coordUserDefinedBackupSettings=n	# Specify whether to update backup/recovery
									# settings during standby addition/removal.

coordSlaveSync=y		# Specify to connect with synchronized mode.
coordSlaveServers=(172.18.0.3 172.18.0.4)			# none means this slave is not available
coordSlavePorts=(20004 20005)			# Master ports
coordSlavePoolerPorts=(20010 20011)			# Master pooler ports
coordSlaveDirs=($coordSlaveDir $coordSlaveDir)
coordArchLogDirs=($coordArchLogDir $coordArchLogDir)

#---- Configuration files---
# Need these when you'd like setup specific non-default configuration
# These files will go to corresponding files for the master.
# You may supply your bash script to setup extra config lines and extra pg_hba.conf entries
# Or you may supply these files manually.
coordExtraConfig=coordExtraConfig	# Extra configuration file for coordinators.
						# This file will be added to all the coordinators'
						# postgresql.conf
# Pleae note that the following sets up minimum parameters which you may want to change.
# You can put your postgresql.conf lines here.
cat > $coordExtraConfig <<EOF
#================================================
# Added to all the coordinator postgresql.conf
# Original: $coordExtraConfig
log_destination = 'stderr'
logging_collector = on
log_directory = 'pg_log'
listen_addresses = '*'
max_connections = 100
EOF

# Additional Configuration file for specific coordinator master.
# You can define each setting by similar means as above.
coordSpecificExtraConfig=(none none)
coordExtraPgHba=none	# Extra entry for pg_hba.conf.  This file will be added to all the coordinators' pg_hba.conf
coordSpecificExtraPgHba=(none none none none)

#----- Additional Slaves -----
#
# Please note that this section is just a suggestion how we extend the configuration for
# multiple and cascaded replication.   They're not used in the current version.
#
coordAdditionalSlaves=n		# Additional slave can be specified as follows: where you
coordAdditionalSlaveSet=(cad1)		# Each specifies set of slaves.   This case, two set of slaves are
											# configured
cad1_Sync=n		  		# All the slaves at "cad1" are connected with asynchronous mode.
							# If not, specify "y"
							# The following lines specifies detailed configuration for each
							# slave tag, cad1.  You can define cad2 similarly.
cad1_Servers=(node08 node09 node06 node07)	# Hosts
cad1_dir=$HOME/pgxc/nodes/coord_slave_cad1
cad1_Dirs=($cad1_dir $cad1_dir $cad1_dir $cad1_dir)
cad1_ArchLogDir=$HOME/pgxc/nodes/coord_archlog_cad1
cad1_ArchLogDirs=($cad1_ArchLogDir $cad1_ArchLogDir $cad1_ArchLogDir $cad1_ArchLogDir)


#---- Datanodes -------------------------------------------------------------------------------------------------------

#---- Shortcuts --------------
datanodeMasterDir=$HOME/pgxc/nodes/dn_master
datanodeSlaveDir=$HOME/pgxc/nodes/dn_slave
datanodeArchLogDir=$HOME/pgxc/nodes/datanode_archlog

#---- Overall ---------------
#primaryDatanode=datanode1				# Primary Node.
# At present, xc has a priblem to issue ALTER NODE against the primay node.  Until it is fixed, the test will be done
# without this feature.
primaryDatanode=datanode1				# Primary Node.
datanodeNames=(datanode1 datanode2)
datanodePorts=(20008 20009)	# Master ports
datanodePoolerPorts=(20012 20013)	# Master pooler ports
datanodePgHbaEntries=(172.18.0.0/24)	# Assumes that all the coordinator (master/slave) accepts
										# the same connection
										# This list sets up pg_hba.conf for $pgxcOwner user.
										# If you'd like to setup other entries, supply them
										# through extra configuration files specified below.
# Note: The above parameter is extracted as "host all all 0.0.0.0/0 trust".   If you don't want
# such setups, specify the value () to this variable and suplly what you want using datanodeExtraPgHba
# and/or datanodeSpecificExtraPgHba variables.
#datanodePgHbaEntries=(::1/128)	# Same as above but for IPv6 addresses

#---- Master ----------------
datanodeMasterServers=(172.18.0.3 172.18.0.4)	# none means this master is not available.
													# This means that there should be the master but is down.
													# The cluster is not operational until the master is
													# recovered and ready to run.
datanodeMasterDirs=($datanodeMasterDir $datanodeMasterDir)
datanodeMaxWalSender=5								# max_wal_senders: needed to configure slave. If zero value is
													# specified, it is expected this parameter is explicitly supplied
													# by external configuration files.
													# If you don't configure slaves, leave this value zero.
datanodeMaxWALSenders=($datanodeMaxWalSender $datanodeMaxWalSender)
						# max_wal_senders configuration for each datanode

#---- Slave -----------------
datanodeSlave=n			# Specify y if you configure at least one coordiantor slave.  Otherwise, the following
						# configuration parameters will be set to empty values.
						# If no effective server names are found (that is, every servers are specified as none),
						# then datanodeSlave value will be set to n and all the following values will be set to
						# empty values.

datanodeUserDefinedBackupSettings=n	# Specify whether to update backup/recovery
									# settings during standby addition/removal.

datanodeSlaveServers=(172.18.0.3 172.18.0.4)	# value none means this slave is not available
datanodeSlavePorts=(20008 20009)	# value none means this slave is not available
datanodeSlavePoolerPorts=(20012 2001)	# value none means this slave is not available
datanodeSlaveSync=y		# If datanode slave is connected in synchronized mode
datanodeSlaveDirs=($datanodeSlaveDir $datanodeSlaveDir)
datanodeArchLogDirs=( $datanodeArchLogDir $datanodeArchLogDir )

# ---- Configuration files ---
# You may supply your bash script to setup extra config lines and extra pg_hba.conf entries here.
# These files will go to corresponding files for the master.
# Or you may supply these files manually.
datanodeExtraConfig=none	# Extra configuration file for datanodes.  This file will be added to all the
							# datanodes' postgresql.conf
datanodeSpecificExtraConfig=(none none)
datanodeExtraPgHba=none		# Extra entry for pg_hba.conf.  This file will be added to all the datanodes' postgresql.conf
datanodeSpecificExtraPgHba=(none none)

#----- Additional Slaves -----
datanodeAdditionalSlaves=n	# Additional slave can be specified as follows: where you
# datanodeAdditionalSlaveSet=(dad1 dad2)		# Each specifies set of slaves.   This case, two set of slaves are
											# configured
# dad1_Sync=n		  		# All the slaves at "cad1" are connected with asynchronous mode.
							# If not, specify "y"
							# The following lines specifies detailed configuration for each
							# slave tag, cad1.  You can define cad2 similarly.
# dad1_Servers=(node08 node09 node06 node07)	# Hosts
# dad1_dir=$HOME/pgxc/nodes/coord_slave_cad1
# dad1_Dirs=($cad1_dir $cad1_dir $cad1_dir $cad1_dir)
# dad1_ArchLogDir=$HOME/pgxc/nodes/coord_archlog_cad1
# dad1_ArchLogDirs=($cad1_ArchLogDir $cad1_ArchLogDir $cad1_ArchLogDir $cad1_ArchLogDir)

#---- WAL archives -------------------------------------------------------------------------------------------------
walArchive=n	# If you'd like to configure WAL archive, edit this section.
				# Pgxc_ctl assumes that if you configure WAL archive, you configure it
				# for all the coordinators and datanodes.
				# Default is "no".   Please specify "y" here to turn it on.
#
#		End of Configuration Section
#
#==========================================================================================================================

#========================================================================================================================
# The following is for extension.  Just demonstrate how to write such extension.  There's no code
# which takes care of them so please ignore the following lines.  They are simply ignored by pgxc_ctl.
# No side effects.
#=============<< Beginning of future extension demonistration >> ========================================================
# You can setup more than one backup set for various purposes, such as disaster recovery.
walArchiveSet=(war1 war2)
war1_source=(master)	# you can specify master, slave or ano other additional slaves as a source of WAL archive.
					# Default is the master
wal1_source=(slave)
wal1_source=(additiona_coordinator_slave_set additional_datanode_slave_set)
war1_host=node10	# All the nodes are backed up at the same host for a given archive set
war1_backupdir=$HOME/pgxc/backup_war1
wal2_source=(master)
war2_host=node11
war2_backupdir=$HOME/pgxc/backup_war2
#=============<< End of future extension demonistration >> ========================================================
11. 连接数据库
其中文件路径那里是方式刚才的pgxc_ctl.conf文件的路径
在连接数据库时,IP是协调节点的IP,端口也是,你可以对照刚才的conf文件看一下
始化数据库
pgxc_ctl -c /home/postgres/pgxc/conf/pgxc_ctl init all
启动数据库
pgxc_ctl -c /home/postgres/pgxc/conf/pgxc_ctl start all
连接数据库
psql -h 172.18.0.3 --port=20004 -U postgres -d postgres
退出数据
\q
