实验目的:
公司有一台CE12800的设备,管理地址位172.16.1.2,现在需要编写自动化脚本,通过SSH登陆到设备上配置netconf协议的用户名,密码以及netconf服务,并且通过netconf协议将设备的loopback0接口IP地址配置为1.1.1.1/32。
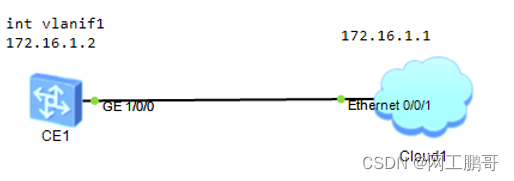
实验拓扑:
实验步骤:
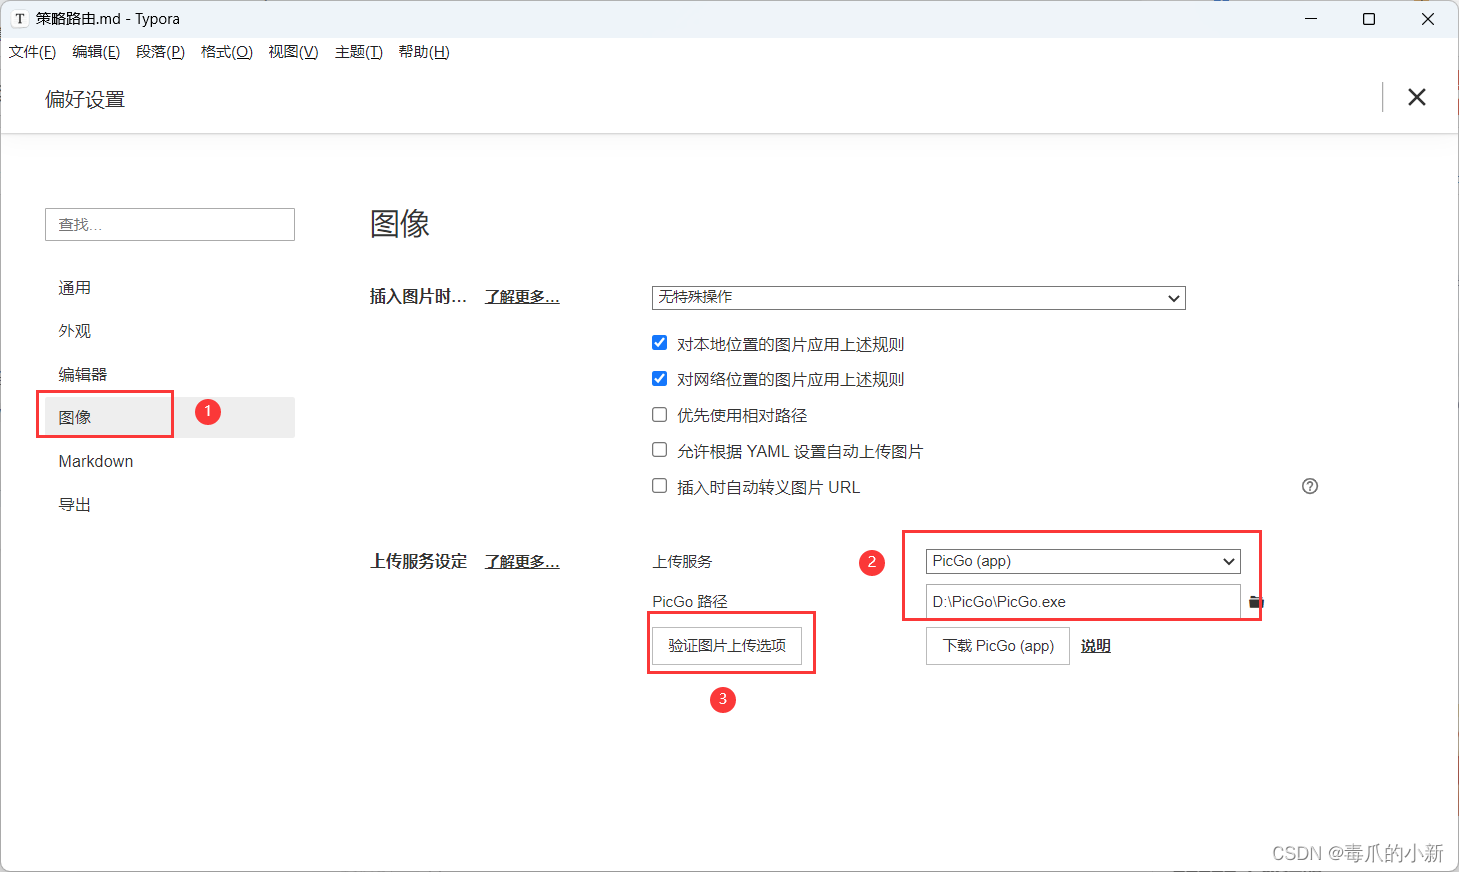
步骤1:将本地电脑和ensp的设备进行桥接,桥接配置如下图所示:

步骤2:配置交换机的IP地址。
<HUAWEI>system-view immediately

[HUAWEI]sysname CE1

[CE1]interface  Vlanif 1

[CE1-Vlanif1]ip address 172.16.1.2 24

[CE1-Vlanif1]quit

[CE1]interface  g1/0/0

[CE1-GE1/0/0]undo  shutdown
测试本地的cmd窗口与CE1设备的连通性。
C:\Users\xxx>ping 172.16.1.2


正在 Ping 172.16.1.2 具有 32 字节的数据:

来自 172.16.1.2 的回复: 字节=32 时间=19ms TTL=255

来自 172.16.1.2 的回复: 字节=32 时间=7ms TTL=255

来自 172.16.1.2 的回复: 字节=32 时间=5ms TTL=255

来自 172.16.1.2 的回复: 字节=32 时间=7ms TTL=255


172.16.1.2 的 Ping 统计信息:

    数据包: 已发送 = 4,已接收 = 4,丢失 = 0 (0% 丢失),

往返行程的估计时间(以毫秒为单位):

最短 = 5ms,最长 = 19ms,平均 = 9ms
步骤3:配置CE1的SSH登陆。
(1)创建SSH登陆的账号
[CE1]aaa

[CE1-aaa]local-user python password cipher Huawei@123

[CE1-aaa]local-user python user-group manage-ug

[CE1-aaa]local-user python service-type ssh

[CE1-aaa]local-user python level 3
(2)在CE1设备配置SSH用户的认证方式和服务类型。
[CE1]ssh user python

[CE1]ssh user python authentication-type password

[CE1]ssh user python service-type stelnet
(3)配置vty用于的登陆方式,及开启stenet服务
[CE1]stelnet server  enable

Info: Succeeded in starting the STelnet server.

[CE1]user-interface vty 0 4

[CE1-ui-vty0-4]authentication-mode  aaa

[CE1-ui-vty0-4]protocol  inbound ssh

[CE1-ui-vty0-4]user  privilege level  3

[CE1-ui-vty0-4]q
步骤4:编写python代码
完整代码:
from paramiko import  SSHClient,AutoAddPolicy

from ncclient import manager

from ncclient import operations

from time import  sleep


service_ip = '172.16.1.2'

ssh_user = 'python'

ssh_pass = 'Huawei@123'

netconf_user = 'netconf'

netconf_pass = 'Huawei@123'

port = '830'

XMLS = '''<config>

      <ethernet xmlns="http://www.huawei.com/netconf/vrp" content-version="1.0" format-version="1.0">

        <ethernetIfs>

          <ethernetIf operation="merge">

            <ifName>GE1/0/2</ifName>

            <l2Enable>disable</l2Enable>

          </ethernetIf>

        </ethernetIfs>

      </ethernet>

      <ifm xmlns="http://www.huawei.com/netconf/vrp" content-version="1.0" format-version="1.0">

        <interfaces>

          <interface operation="merge">

            <ifName>Loopback0</ifName>

            <ifDescr>Config by NETCONF</ifDescr>

            <ifmAm4>

              <am4CfgAddrs>

                <am4CfgAddr operation="create">

                  <subnetMask>255.255.255.255</subnetMask>

                  <addrType>main</addrType>

                  <ifIpAddr>1.1.1.1</ifIpAddr>

                </am4CfgAddr>

              </am4CfgAddrs>

            </ifmAm4>

          </interface>

        </interfaces>

      </ifm>

    </config>'''


class datacom():

    def __init__(self,ip,username,password):

        self.ip = ip

        self.username = username

        self.password = password

        self.ssh = self.ssh_connect()


    def ssh_connect(self):

        ssh = SSHClient()

        ssh.set_missing_host_key_policy(AutoAddPolicy)

        ssh.connect(self.ip,username=self.username,password=self.password)

        return ssh


    def ssh_config(self):

        shell = self.ssh.invoke_shell()

        shell.send('n\n')

        f = open("config_netconf.txt")

        cmd = f.readlines()

        for i in cmd:

            shell.send(i)

            sleep(2)


        dis_this = shell.recv(999999).decode()

        print(dis_this)

        self.ssh.close()


def netconf_connect(host, port, user, password):

    return manager.connect(host=host,

                       port=port,

                       username=user,

                       password=password,

                       hostkey_verify = False,

                       device_params={'name': "huawei"},

                       allow_agent = False,

                       look_for_keys = False)


if __name__ == '__main__':

    joinlabs = datacom(service_ip,ssh_user,ssh_pass)

    joinlabs.ssh_config()

    netconf = netconf_connect(service_ip,port,netconf_user,netconf_pass)

    netconf.edit_config(target='running',config=XMLS)
步骤5: 编译器执行

步骤6:查看输出结果
Warning: The initial password poses security risks.

The password needs to be changed. Change now? [Y/N]:n


Info: The max number of VTY users is 5, the number of current VTY users online is 1, and total number of terminal users online is 1.

      The current login time is 2023-11-09 20:09:21.

      The last login time is 2023-11-09 19:40:14 from 172.16.1.1 through SSH.

<CE1>system-view immediately

Enter system view, return user view with return command.

[CE1]aaa

[CE1-aaa]local-user netconf password irreversible-cipher Huawei@123

Info: A new user is added.

[CE1-aaa]local-user netconf service-type ssh

[CE1-aaa]local-user netconf level 3

[CE1-aaa]quit

[CE1]ssh user netconf authentication-type password

Info: Succeeded in adding a new SSH user.

[CE1]ssh user netconf service-type snetconf

[CE1]snetconf server enable

Info: Succeeded in starting the SNETCONF server on SSH port 22.

[CE1]netconf

[CE1-netconf]protocol inbound ssh port 830

Info: Succeeded in starting the ssh port 830 service.

[CE1-netconf]quit

[CE1]


进程已结束,退出代码0
登陆CE1查看loopback0接口配置
[CE1]interface  LoopBack 0

[CE1-LoopBack0]dis this


interface LoopBack0

 description Config by NETCONF

 ip address 1.1.1.1 255.255.255.255
代码解析:
- 在pycharm的本项目的python文件的同一目录下创建txt文档,用于配置netconf服务。
配置文件如下:

system-view immediately

aaa

local-user netconf password irreversible-cipher Huawei@123

local-user netconf service-type ssh

local-user netconf level 3

quit

ssh user netconf authentication-type password

ssh user netconf service-type snetconf

snetconf server enable

netconf

protocol inbound ssh port 830

quit- 导入库
from paramiko import  SSHClient,AutoAddPolicy

from ncclient import manager

from ncclient import operations

from time import  sleep
导入paramiko用于SSH远程登陆设备进行配置,导入ncclinet用于netconf的连接和配置。
- 定义变量
service_ip = '172.16.1.2'

ssh_user = 'python'

ssh_pass = 'Huawei@123'

netconf_user = 'netconf'

netconf_pass = 'Huawei@123'

port = '830'
将需要登陆设备的ip地址,ssh登陆用户名、密码以及netconf的用户名和密码定义为变量。
(4)构建XML配置文件
XMLS = '''<config>

      <ethernet xmlns="http://www.huawei.com/netconf/vrp" content-version="1.0" format-version="1.0">

        <ethernetIfs>

          <ethernetIf operation="merge">

            <ifName>GE1/0/2</ifName>

            <l2Enable>disable</l2Enable>

          </ethernetIf>

        </ethernetIfs>

      </ethernet>

      <ifm xmlns="http://www.huawei.com/netconf/vrp" content-version="1.0" format-version="1.0">

        <interfaces>

          <interface operation="merge">

            <ifName>Loopback0</ifName>

            <ifDescr>Config by NETCONF</ifDescr>

            <ifmAm4>

              <am4CfgAddrs>

                <am4CfgAddr operation="create">

                  <subnetMask>255.255.255.255</subnetMask>

                  <addrType>main</addrType>

                  <ifIpAddr>1.1.1.1</ifIpAddr>

                </am4CfgAddr>

              </am4CfgAddrs>

            </ifmAm4>

          </interface>

        </interfaces>

      </ifm>

    </config>'''
NETCONF通过XML文件传递配置信息。XML是一种非常常用的文本格式,可以<>不断嵌套展开数据。完整的NETCONF会话有传输层、消息层、操作层和内容层。在当前XML配置文件中传递的仅包含操作层和内容层。
本例中的XML文件意为将接口loopback 0接口IP地址改为1.1.1.1/32。
(5)定义构造函数
class datacom():

    def __init__(self,ip,username,password):

        self.ip = ip

        self.username = username

        self.password = password

        self.ssh = self.ssh_connect()
(6)定义def ssh_connect():方法,用于建立SSH连接,登陆网络设备
def ssh_connect(self):

        ssh = SSHClient()

        ssh.set_missing_host_key_policy(AutoAddPolicy)

        ssh.connect(self.ip,username=self.username,password=self.password)

        return ssh
(7)定义def ssh_config():方法,用于登陆设备,进行配置
  def ssh_config(self):

        shell = self.ssh.invoke_shell()

        shell.send('n\n')

        f = open("config_netconf.txt")

        cmd = f.readlines()

        for i in cmd:

            shell.send(i)

            sleep(2)


        dis_this = shell.recv(999999).decode()

        print(dis_this)

        self.ssh.close()
f = open("config_netconf.txt")代表打开文件config_netconf.txt;
cmd = f.readlines() 代表对config_netconf.txt这个文件内容进行逐行的读取;
 for i in cmd:

    shell.send(i)

            sleep(2)
代表定义一个循环语句,将config_netconf.txt的内容输入在设备的命令行,即配置设备的netconf服务。
(8)定义netconf_connect():方法,用于建立netconf连接
def netconf_connect(host, port, user, password):

    return manager.connect(host=host,

                       port=port,

                       username=user,

                       password=password,

                       hostkey_verify = False,

                       device_params={'name': "huawei"},

                       allow_agent = False,

                       look_for_keys = False)
定义函数netconf_connect(host, port, user, password)。函数输入四个参数为NETCONF主机的IP、端口、NETCONF用户名和密码。函数返回ncclient的manager.connect的方法。
manager.connect的作用是建立netconf连接。
(9)运行主函数
if __name__ == '__main__':

    joinlabs = datacom(service_ip,ssh_user,ssh_pass)

    joinlabs.ssh_config()

    netconf = netconf_connect(service_ip,port,netconf_user,netconf_pass)

    netconf.edit_config(target='running',config=XMLS)
首先执行joinlabs.ssh_config(),即调用datacom()这个类下的ssh_config这个方法。并且输入ssh登陆的ip、用户名及密码。
然后再执行netconf = netconf_connect(service_ip,port,netconf_user,netconf_pass)赋值为netconf,输入netconf的参数,建立netconf连接。
最后执行netconf.edit_config(target='running',config=XMLS),将在变量中定义的XMLS这个文件通过edit_config这个方法发生到设备的running配置文件。
