TensorFlow2的模型训练组件(1)
- 数据管道
- 构建数据通道
- 应用数据转换
- 提升管道性能
- 特征列
- 特征列用法简介
- 特征列使用示例
- 激活函数
- 常用激活函数
- 激活函数使用示例
- Tensorflow模型中的层
- 内置的层
- 自定义模型中的层
- 参考资料
Tensorflow中与模型训练相关的组件主要包括:数据管道(tf.data)、特征列(tf.feature_column)、激活函数(tf.nn)、模型层(tf.keras.layers)、损失函数(tf.keras.losses)、评估函数(tf.keras.metrics)、优化器(tf.keras.optimizers)、回调函数(tf.keras.callbacks)
数据管道
如果需要训练的数据大小不大,例如不到1G,那么可以直接全部读入内存中进行训练,这样一般效率最高。但如果需要训练的数据很大,例如超过10G,无法一次载入内存,那么通常需要在训练的过程中分批逐渐读入。使用tf.data API可以构建数据输入管道,处理大量的数据,不同的数据格式以及不同的数据转换。
构建数据通道
可以从Numpy array, Pandas DataFrame, Python generator, csv文件, 文本文件, 文件路径, tfrecords文件等方式构建数据管道。其中:
- 通过Numpy array, Pandas DataFrame, 文件路径构建数据管道是最常用的方法。
- 通过tfrecords文件方式构建数据管道较为复杂,需要对样本构建
tf.Example后压缩成字符串写到tfrecords文件,读取后再解析成tf.Example。但tfrecords文件的优点是压缩后文件较小,便于网络传播,加载速度较快。
- 从Numpy array构建数据管道
import numpy as np
import tensorflow as tf
from sklearn import datasets

iris = datasets.load_iris()

ds1 = tf.data.Dataset.from_tensor_slices((iris['data'], iris['target']))
for features, label in ds1.take(5):
    print(features, label)
'''
tf.Tensor([5.1 3.5 1.4 0.2], shape=(4,), dtype=float64) tf.Tensor(0, shape=(), dtype=int32)
tf.Tensor([4.9 3.  1.4 0.2], shape=(4,), dtype=float64) tf.Tensor(0, shape=(), dtype=int32)
tf.Tensor([4.7 3.2 1.3 0.2], shape=(4,), dtype=float64) tf.Tensor(0, shape=(), dtype=int32)
tf.Tensor([4.6 3.1 1.5 0.2], shape=(4,), dtype=float64) tf.Tensor(0, shape=(), dtype=int32)
tf.Tensor([5.  3.6 1.4 0.2], shape=(4,), dtype=float64) tf.Tensor(0, shape=(), dtype=int32)
'''
- 从Pandas DataFrame构建数据管道
import pandas as pd

dfiris = pd.DataFrame(iris['data'], columns=iris.feature_names)
ds2 = tf.data.Dataset.from_tensor_slices((dfiris.to_dict('list'), iris['target']))

for features.label in ds2.take(3):
    print(features, label)
'''
tf.Tensor([5.  3.6 1.4 0.2], shape=(4,), dtype=float64) tf.Tensor(0, shape=(), dtype=int32)
tf.Tensor([5.  3.6 1.4 0.2], shape=(4,), dtype=float64) tf.Tensor(0, shape=(), dtype=int32)
tf.Tensor([5.  3.6 1.4 0.2], shape=(4,), dtype=float64) tf.Tensor(0, shape=(), dtype=int32)
'''
- 从Python generator构建数据管道
import matplotlib.pyplot as plt
from tensorflow.keras.preprocessing.image import ImageDataGenerator
# 定义一个从文件中读取图片的generator
image_generator = ImageDataGenerator(rescale=1.0 / 255).flow_from_directory(
'../DemoData/cifar2/test',
target_size=(32, 32),
batch_size=20,
class_mode='binary'
)
classdict = image_generator.class_indices
print(classdict)
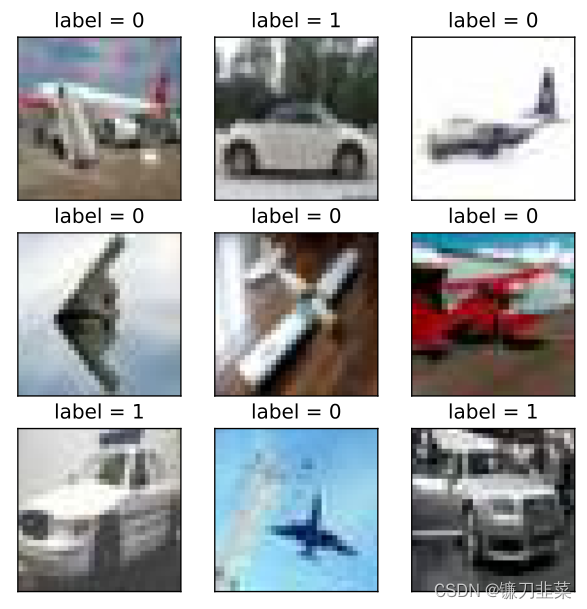
def generator():
for features, label in image_generator:
yield features, label
ds3 = tf.data.Dataset.from_generator(generator, output_types=(tf.float32, tf.int32))
可视化:
%matplotlib inline
%config InlineBackend.figure_format = 'svg'
plt.figure(figsize=(6, 6))
for i, (img, label) in enumerate(ds3.unbatch().take(9)):
    ax = plt.subplot(3, 3, i+1)
    ax.imshow(img.numpy())
    ax.set_title('label = %d'%label)
    ax.set_xticks([])
    ax.set_yticks([])
plt.show()
- 从csv文件构建数据管道
# 从csv文件构建数据管道
ds4 = tf.data.experimental.make_csv_dataset(
    file_pattern=['../DemoData/titanic/train.csv', '../DemoData/titanic/test.csv'],
    batch_size=3,
    label_name='Survived',
    na_value='',
    num_epochs=1,
    ignore_errors=True
)
for data, label in ds4.take(2):
    print(data, label)
'''
OrderedDict([('PassengerId', <tf.Tensor: shape=(3,), dtype=int32, numpy=array([470, 840, 760])>), ('Pclass', <tf.Tensor: shape=(3,), dtype=int32, numpy=array([3, 1, 1])>), ('Name', <tf.Tensor: shape=(3,), dtype=string, numpy=
array([b'Baclini, Miss. Helene Barbara', b'Marechal, Mr. Pierre',
       b'Rothes, the Countess. of (Lucy Noel Martha Dyer-Edwards)'],
      dtype=object)>), ('Sex', <tf.Tensor: shape=(3,), dtype=string, numpy=array([b'female', b'male', b'female'], dtype=object)>), ('Age', <tf.Tensor: shape=(3,), dtype=float32, numpy=array([ 0.75,  0.  , 33.  ], dtype=float32)>), ('SibSp', <tf.Tensor: shape=(3,), dtype=int32, numpy=array([2, 0, 0])>), ('Parch', <tf.Tensor: shape=(3,), dtype=int32, numpy=array([1, 0, 0])>), ('Ticket', <tf.Tensor: shape=(3,), dtype=string, numpy=array([b'2666', b'11774', b'110152'], dtype=object)>), ('Fare', <tf.Tensor: shape=(3,), dtype=float32, numpy=array([19.2583, 29.7   , 86.5   ], dtype=float32)>), ('Cabin', <tf.Tensor: shape=(3,), dtype=string, numpy=array([b'', b'C47', b'B77'], dtype=object)>), ('Embarked', <tf.Tensor: shape=(3,), dtype=string, numpy=array([b'C', b'C', b'S'], dtype=object)>)]) tf.Tensor([1 1 1], shape=(3,), dtype=int32)
OrderedDict([('PassengerId', <tf.Tensor: shape=(3,), dtype=int32, numpy=array([ 23, 586, 379])>), ('Pclass', <tf.Tensor: shape=(3,), dtype=int32, numpy=array([3, 1, 3])>), ('Name', <tf.Tensor: shape=(3,), dtype=string, numpy=
array([b'McGowan, Miss. Anna "Annie"', b'Taussig, Miss. Ruth',
       b'Betros, Mr. Tannous'], dtype=object)>), ('Sex', <tf.Tensor: shape=(3,), dtype=string, numpy=array([b'female', b'female', b'male'], dtype=object)>), ('Age', <tf.Tensor: shape=(3,), dtype=float32, numpy=array([15., 18., 20.], dtype=float32)>), ('SibSp', <tf.Tensor: shape=(3,), dtype=int32, numpy=array([0, 0, 0])>), ('Parch', <tf.Tensor: shape=(3,), dtype=int32, numpy=array([0, 2, 0])>), ('Ticket', <tf.Tensor: shape=(3,), dtype=string, numpy=array([b'330923', b'110413', b'2648'], dtype=object)>), ('Fare', <tf.Tensor: shape=(3,), dtype=float32, numpy=array([ 8.0292, 79.65  ,  4.0125], dtype=float32)>), ('Cabin', <tf.Tensor: shape=(3,), dtype=string, numpy=array([b'', b'E68', b''], dtype=object)>), ('Embarked', <tf.Tensor: shape=(3,), dtype=string, numpy=array([b'Q', b'S', b'C'], dtype=object)>)]) tf.Tensor([1 1 0], shape=(3,), dtype=int32)
'''
- 从文本文件构建数据管道
ds5 = tf.data.TextLineDataset(
    filenames=['../DemoData/titanic/train.csv','../DemoData/titanic/test.csv']
).skip(1) # 略去第一行header
for line in ds5.take(5):
    print(line)
'''
tf.Tensor(b'493,0,1,"Molson, Mr. Harry Markland",male,55.0,0,0,113787,30.5,C30,S', shape=(), dtype=string)
tf.Tensor(b'53,1,1,"Harper, Mrs. Henry Sleeper (Myna Haxtun)",female,49.0,1,0,PC 17572,76.7292,D33,C', shape=(), dtype=string)
tf.Tensor(b'388,1,2,"Buss, Miss. Kate",female,36.0,0,0,27849,13.0,,S', shape=(), dtype=string)
tf.Tensor(b'192,0,2,"Carbines, Mr. William",male,19.0,0,0,28424,13.0,,S', shape=(), dtype=string)
tf.Tensor(b'687,0,3,"Panula, Mr. Jaako Arnold",male,14.0,4,1,3101295,39.6875,,S', shape=(), dtype=string)
'''
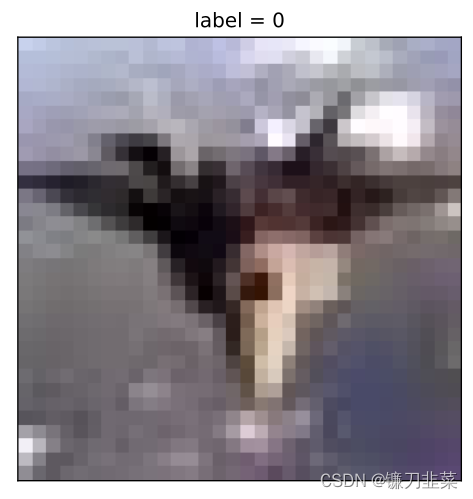
- 从文件路径构建数据管道
ds6 = tf.data.Dataset.list_files('../DemoData/cifar2/train/*/*.jpg')
for file in ds6.take(5):
    print(file)
'''
tf.Tensor(b'..\\DemoData\\cifar2\\train\\airplane\\2187.jpg', shape=(), dtype=string)
tf.Tensor(b'..\\DemoData\\cifar2\\train\\automobile\\2318.jpg', shape=(), dtype=string)
tf.Tensor(b'..\\DemoData\\cifar2\\train\\airplane\\2918.jpg', shape=(), dtype=string)
tf.Tensor(b'..\\DemoData\\cifar2\\train\\airplane\\1276.jpg', shape=(), dtype=string)
tf.Tensor(b'..\\DemoData\\cifar2\\train\\airplane\\109.jpg', shape=(), dtype=string)
'''
可视化:
%matplotlib inline
%config InlineBackend.figure_format = 'svg'

from matplotlib import pyplot as plt


def load_image(img_path, size=(32, 32)):
    label = 1 if tf.strings.regex_full_match(img_path, ".*/automobile/.*") else 0
    img = tf.io.read_file(img_path)
    img = tf.image.decode_jpeg(img)  #注意此处为jpeg格式
    img = tf.image.resize(img, size)
    return img, label


for i, (img, label) in enumerate(ds6.map(load_image).take(2)):
    plt.figure(1)
    plt.imshow((img / 255.0).numpy())
    plt.title('label = %d' %label)
    plt.xticks([])
    plt.yticks([])
- 从tfrecords文件构建数据管道
import os
import numpy as np
# inpath: 原始数据路径, outpath:TFRecord文件输出路径
def create_tfrecords(inpath, outpath):
writer = tf.io.TFRecordWriter(outpath)
dirs = os.listdir(inpath)
for index, name in enumerate(dirs):
class_path = inpath + "/" + name + "/"
for img_name in os.listdir(class_path):
img_path = class_path + img_name
img = tf.io.read_file(img_path)
#img = tf.image.decode_image(img)
#img = tf.image.encode_jpeg(img) #统一成jpeg格式压缩
example = tf.train.Example(
features=tf.train.Features(feature={
'label': tf.train.Feature(int64_list=tf.train.Int64List(value=[index])),
'img_raw': tf.train.Feature(bytes_list=tf.train.BytesList(value=[img.numpy()]))
}))
writer.write(example.SerializeToString())
writer.close()
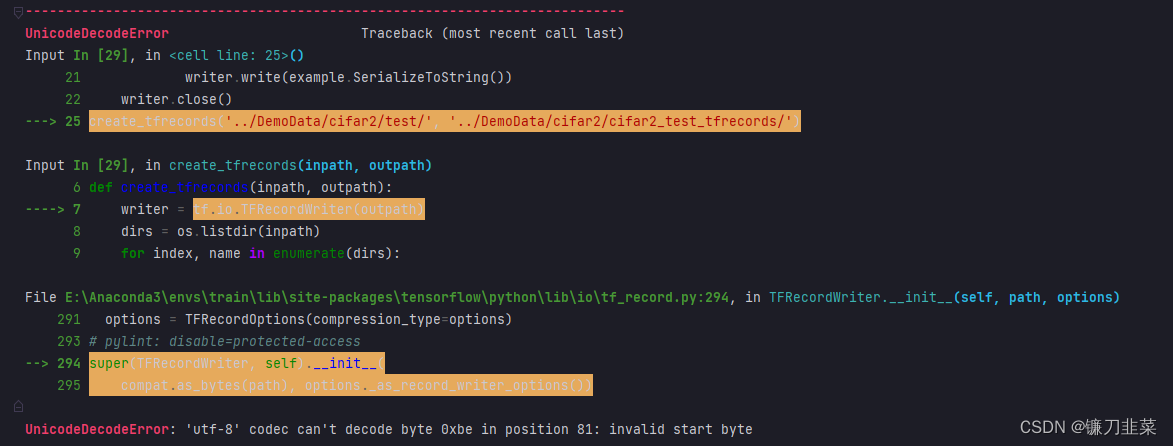
create_tfrecords('../DemoData/cifar2/test/', '../DemoData/cifar2/cifar2_test_tfrecords/')
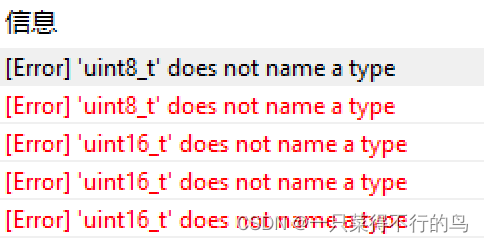
代码报错:
%matplotlib inline
%config InlineBackend.figure_format = 'svg'


from matplotlib import pyplot as plt


def parse_example(proto):
    description = {'img_raw': tf.io.FixedLenFeature([], tf.string),
                   'label': tf.io.FixedLenFeature([], tf.int64)}
    example = tf.io.parse_single_example(proto, description)
    img = tf.image.decode_jpeg(example["img_raw"])  #注意此处为jpeg格式
    img = tf.image.resize(img, (32, 32))
    label = example["label"]
    return img, label


ds7 = tf.data.TFRecordDataset("../DemoData/cifar2/cifar2_test_tfrecords").map(parse_example).shuffle(3000)

plt.figure(figsize=(6, 6))
for i, (img, label) in enumerate(ds7.take(9)):
    ax = plt.subplot(3, 3, i + 1)
    ax.imshow((img / 255.0).numpy())
    ax.set_title("label = %d" % label)
    ax.set_xticks([])
    ax.set_yticks([])
plt.show()
无法执行!!!
应用数据转换
Dataset数据结构应用非常灵活,因为它本质上是一个Sequece序列,其每个元素可以是各种类型,例如可以是张量,列表,字典,也可以是Dataset。
Dataset包含了非常丰富的数据转换功能:
map:将转换函数映射到数据集每一个元素。
#map:将转换函数映射到数据集每一个元素

ds = tf.data.Dataset.from_tensor_slices(["hello world", "hello China", "hello Beijing"])
ds_map = ds.map(lambda x: tf.strings.split(x, " "))
for x in ds_map:
    print(x)
'''
tf.Tensor([b'hello' b'world'], shape=(2,), dtype=string)
tf.Tensor([b'hello' b'China'], shape=(2,), dtype=string)
tf.Tensor([b'hello' b'Beijing'], shape=(2,), dtype=string)
'''
flat_map:将转换函数映射到数据集的每一个元素,并将嵌套的Dataset压平。
#flat_map:将转换函数映射到数据集的每一个元素,并将嵌套的Dataset压平。

ds = tf.data.Dataset.from_tensor_slices(["hello world", "hello China", "hello Beijing"])
ds_flatmap = ds.flat_map(lambda x: tf.data.Dataset.from_tensor_slices(tf.strings.split(x, " ")))
for x in ds_flatmap:
    print(x)
'''
tf.Tensor(b'hello', shape=(), dtype=string)
tf.Tensor(b'world', shape=(), dtype=string)
tf.Tensor(b'hello', shape=(), dtype=string)
tf.Tensor(b'China', shape=(), dtype=string)
tf.Tensor(b'hello', shape=(), dtype=string)
tf.Tensor(b'Beijing', shape=(), dtype=string)
'''
interleave:效果类似flat_map,但可以将不同来源的数据夹在一起。
# interleave: 效果类似flat_map,但可以将不同来源的数据夹在一起。

ds = tf.data.Dataset.from_tensor_slices(["hello world", "hello China", "hello Beijing"])
ds_interleave = ds.interleave(lambda x: tf.data.Dataset.from_tensor_slices(tf.strings.split(x, " ")))
for x in ds_interleave:
    print(x)
'''
tf.Tensor(b'hello', shape=(), dtype=string)
tf.Tensor(b'hello', shape=(), dtype=string)
tf.Tensor(b'hello', shape=(), dtype=string)
tf.Tensor(b'world', shape=(), dtype=string)
tf.Tensor(b'China', shape=(), dtype=string)
tf.Tensor(b'Beijing', shape=(), dtype=string)
'''
filter:过滤掉某些元素。
#filter:过滤掉某些元素。

ds = tf.data.Dataset.from_tensor_slices(["hello world", "hello China", "hello Beijing"])
#找出含有字母a或B的元素
ds_filter = ds.filter(lambda x: tf.strings.regex_full_match(x, ".*[a|B].*"))
for x in ds_filter:
    print(x)
'''
tf.Tensor(b'hello China', shape=(), dtype=string)
tf.Tensor(b'hello Beijing', shape=(), dtype=string)
'''
zip:将两个长度相同的Dataset横向绞合。
#zip:将两个长度相同的Dataset横向铰合。

ds1 = tf.data.Dataset.range(0, 3)
ds2 = tf.data.Dataset.range(3, 6)
ds3 = tf.data.Dataset.range(6, 9)
ds_zip = tf.data.Dataset.zip((ds1, ds2, ds3))
for x, y, z in ds_zip:
    print(x.numpy(), y.numpy(), z.numpy())
'''
0 3 6
1 4 7
2 5 8
'''
concatenate:将两个Dataset纵向连接。
#condatenate:将两个Dataset纵向连接。

ds1 = tf.data.Dataset.range(0, 3)
ds2 = tf.data.Dataset.range(3, 6)
ds_concat = tf.data.Dataset.concatenate(ds1, ds2)
for x in ds_concat:
    print(x)
'''
tf.Tensor(0, shape=(), dtype=int64)
tf.Tensor(1, shape=(), dtype=int64)
tf.Tensor(2, shape=(), dtype=int64)
tf.Tensor(3, shape=(), dtype=int64)
tf.Tensor(4, shape=(), dtype=int64)
tf.Tensor(5, shape=(), dtype=int64)
'''
reduce:执行归并操作
#reduce:执行归并操作。

ds = tf.data.Dataset.from_tensor_slices([1, 2, 3, 4, 5.0])
result = ds.reduce(0.0, lambda x, y: tf.add(x, y))
result
'''
<tf.Tensor: shape=(), dtype=float32, numpy=15.0>
'''
batch:构建批次,每次放一个批次。比原始数据增加一个维度。其逆操作为unbatch。
#batch:构建批次,每次放一个批次。比原始数据增加一个维度。 其逆操作为unbatch。

ds = tf.data.Dataset.range(12)
ds_batch = ds.batch(4)
for x in ds_batch:
    print(x)
'''
tf.Tensor([0 1 2 3], shape=(4,), dtype=int64)
tf.Tensor([4 5 6 7], shape=(4,), dtype=int64)
tf.Tensor([ 8  9 10 11], shape=(4,), dtype=int64)
'''
padded_batch:构建批次,类似batch,但可以填充到相同的形状。
#padded_batch:构建批次,类似batch, 但可以填充到相同的形状。

elements = [[1, 2], [3, 4, 5], [6, 7], [8]]
ds = tf.data.Dataset.from_generator(lambda: iter(elements), tf.int32)

ds_padded_batch = ds.padded_batch(2, padded_shapes=[4, ])
for x in ds_padded_batch:
    print(x)
'''
tf.Tensor(
[[1 2 0 0]
 [3 4 5 0]], shape=(2, 4), dtype=int32)
tf.Tensor(
[[6 7 0 0]
 [8 0 0 0]], shape=(2, 4), dtype=int32)
'''
window:构建滑动窗口,返回Dataset of Dataset。
#window:构建滑动窗口,返回Dataset of Dataset.

ds = tf.data.Dataset.range(12)
#window返回的是Dataset of Dataset,可以用flat_map压平
ds_window = ds.window(3, shift=1).flat_map(lambda x: x.batch(3, drop_remainder=True))
for x in ds_window:
    print(x)
'''
tf.Tensor([0 1 2], shape=(3,), dtype=int64)
tf.Tensor([1 2 3], shape=(3,), dtype=int64)
tf.Tensor([2 3 4], shape=(3,), dtype=int64)
tf.Tensor([3 4 5], shape=(3,), dtype=int64)
tf.Tensor([4 5 6], shape=(3,), dtype=int64)
tf.Tensor([5 6 7], shape=(3,), dtype=int64)
tf.Tensor([6 7 8], shape=(3,), dtype=int64)
tf.Tensor([7 8 9], shape=(3,), dtype=int64)
tf.Tensor([ 8  9 10], shape=(3,), dtype=int64)
tf.Tensor([ 9 10 11], shape=(3,), dtype=int64)
'''
shuffle:数据顺序洗牌
#shuffle:数据顺序洗牌。

ds = tf.data.Dataset.range(12)
ds_shuffle = ds.shuffle(buffer_size=5)
for x in ds_shuffle:
    print(x)
'''
tf.Tensor(0, shape=(), dtype=int64)
tf.Tensor(2, shape=(), dtype=int64)
tf.Tensor(5, shape=(), dtype=int64)
tf.Tensor(1, shape=(), dtype=int64)
tf.Tensor(8, shape=(), dtype=int64)
tf.Tensor(6, shape=(), dtype=int64)
tf.Tensor(7, shape=(), dtype=int64)
tf.Tensor(3, shape=(), dtype=int64)
tf.Tensor(4, shape=(), dtype=int64)
tf.Tensor(11, shape=(), dtype=int64)
tf.Tensor(10, shape=(), dtype=int64)
tf.Tensor(9, shape=(), dtype=int64)
'''
repeat:重复数据若干次,不带参数时,重复无数次
#repeat:重复数据若干次,不带参数时,重复无数次。

ds = tf.data.Dataset.range(3)
ds_repeat = ds.repeat(3)
for x in ds_repeat:
    print(x)
'''
tf.Tensor(0, shape=(), dtype=int64)
tf.Tensor(1, shape=(), dtype=int64)
tf.Tensor(2, shape=(), dtype=int64)
tf.Tensor(0, shape=(), dtype=int64)
tf.Tensor(1, shape=(), dtype=int64)
tf.Tensor(2, shape=(), dtype=int64)
tf.Tensor(0, shape=(), dtype=int64)
tf.Tensor(1, shape=(), dtype=int64)
tf.Tensor(2, shape=(), dtype=int64)
'''
shard:采样,从某个位置开始隔固定距离采样一个元素。
#shard:采样,从某个位置开始隔固定距离采样一个元素。

ds = tf.data.Dataset.range(12)
ds_shard = ds.shard(3, index=1)

for x in ds_shard:
    print(x)
'''
tf.Tensor(1, shape=(), dtype=int64)
tf.Tensor(4, shape=(), dtype=int64)
tf.Tensor(7, shape=(), dtype=int64)
tf.Tensor(10, shape=(), dtype=int64)
'''
take:采样,从开始位置取前几个元素。
#take:采样,从开始位置取前几个元素。

ds = tf.data.Dataset.range(12)
ds_take = ds.take(3)

list(ds_take.as_numpy_iterator())
'''
[0, 1, 2]
'''
提升管道性能
模型训练的耗时主要来自于两个部分,一部分来自数据准备,另一部分来自参数迭代。其中参数迭代过程的耗时通常依赖于GPU来提升。而数据准备过程的耗时则可以通过构建高效的数据管道进行提升。下面是一些构建高效数据管道的建议:
- 使用prefetch方法让数据准备和参数迭代两个过程相互并行;
import time

# 数据准备和参数迭代两个过程默认情况下是串行的。

# 模拟数据准备
def generator():
    for i in range(10):
        #假设每次准备数据需要2s
        time.sleep(2)
        yield i
ds = tf.data.Dataset.from_generator(generator,output_types = (tf.int32))

# 模拟参数迭代
def train_step():
    #假设每一步训练需要1s
    time.sleep(1)
串行训练:
%%time
# 训练过程预计耗时 10*2+10*1 = 30s
tf.print(tf.constant("start training..."))
for x in ds:
    train_step()
tf.print(tf.constant("end training..."))
'''
start training...
end training...
CPU times: total: 15.6 ms
Wall time: 30.2 s
'''
并行执行:
%%time
# 使用 prefetch 方法让数据准备和参数迭代两个过程相互并行。

# 训练过程预计耗时 max(10*2,10*1) = 20s
tf.print(tf.constant("start training with prefetch..."))
# tf.data.experimental.AUTOTUNE 可以让程序自动选择合适的参数
for x in ds.prefetch(buffer_size = tf.data.experimental.AUTOTUNE):
    train_step()
tf.print(tf.constant("end training..."))
'''
start training with prefetch...
end training...
CPU times: total: 15.6 ms
Wall time: 21.1 s
'''
- 使用interleave方法可以让数据读取过程多进程执行,并将不同来源数据夹在一起;
ds_files = tf.data.Dataset.list_files("../DemoData/titanic/*.csv")
ds = ds_files.flat_map(lambda x: tf.data.TextLineDataset(x).skip(1))
for line in ds.take(4):
    print(line)
'''
tf.Tensor(b'181,0,3,"Sage, Miss. Constance Gladys",female,,8,2,CA. 2343,69.55,,S', shape=(), dtype=string)
tf.Tensor(b'405,0,3,"Oreskovic, Miss. Marija",female,20.0,0,0,315096,8.6625,,S', shape=(), dtype=string)
tf.Tensor(b'635,0,3,"Skoog, Miss. Mabel",female,9.0,3,2,347088,27.9,,S', shape=(), dtype=string)
tf.Tensor(b'701,1,1,"Astor, Mrs. John Jacob (Madeleine Talmadge Force)",female,18.0,1,0,PC 17757,227.525,C62 C64,C', shape=(), dtype=string)
'''
ds_files = tf.data.Dataset.list_files("../DemoData/titanic/*.csv")
ds = ds_files.interleave(lambda x: tf.data.TextLineDataset(x).skip(1))
for line in ds.take(8):
    print(line)
'''
tf.Tensor(b'181,0,3,"Sage, Miss. Constance Gladys",female,,8,2,CA. 2343,69.55,,S', shape=(), dtype=string)
tf.Tensor(b'493,0,1,"Molson, Mr. Harry Markland",male,55.0,0,0,113787,30.5,C30,S', shape=(), dtype=string)
tf.Tensor(b'405,0,3,"Oreskovic, Miss. Marija",female,20.0,0,0,315096,8.6625,,S', shape=(), dtype=string)
tf.Tensor(b'53,1,1,"Harper, Mrs. Henry Sleeper (Myna Haxtun)",female,49.0,1,0,PC 17572,76.7292,D33,C', shape=(), dtype=string)
tf.Tensor(b'635,0,3,"Skoog, Miss. Mabel",female,9.0,3,2,347088,27.9,,S', shape=(), dtype=string)
tf.Tensor(b'388,1,2,"Buss, Miss. Kate",female,36.0,0,0,27849,13.0,,S', shape=(), dtype=string)
tf.Tensor(b'701,1,1,"Astor, Mrs. John Jacob (Madeleine Talmadge Force)",female,18.0,1,0,PC 17757,227.525,C62 C64,C', shape=(), dtype=string)
tf.Tensor(b'192,0,2,"Carbines, Mr. William",male,19.0,0,0,28424,13.0,,S', shape=(), dtype=string)
'''
- 使用map时设置num_parallel_calls让数据转换过程多进程执行;
ds = tf.data.Dataset.list_files("../DemoData/cifar2/train/*/*.jpg")


def load_image(img_path, size=(32, 32)):
    label = 1 if tf.strings.regex_full_match(img_path, ".*/automobile/.*") else 0
    img = tf.io.read_file(img_path)
    img = tf.image.decode_jpeg(img)  #注意此处为jpeg格式
    img = tf.image.resize(img, size)
    return img, label
单进程执行
%%time

#单进程转换
tf.print(tf.constant("start transformation..."))

ds_map = ds.map(load_image)
for _ in ds_map:
    pass
tf.print(tf.constant("end transformation..."))
'''
start transformation...
end transformation...
CPU times: total: 6.33 s
Wall time: 17.1 s
'''
多进程执行
%%time

#多进程转换
tf.print(tf.constant("start parallel transformation..."))

ds_map_parallel = ds.map(load_image, num_parallel_calls=tf.data.experimental.AUTOTUNE)
for _ in ds_map_parallel:
    pass

tf.print(tf.constant("end parallel transformation..."))
'''
start parallel transformation...
end parallel transformation...
CPU times: total: 8.22 s
Wall time: 1.95 s
'''
- 使用cache方法让数据在第一个epoch后缓存到内存中,仅限于数据集不大的情况;
%%time
import time


# 模拟数据准备
def generator():
    for i in range(5):
        #假设每次准备数据需要2s
        time.sleep(2)
        yield i

ds = tf.data.Dataset.from_generator(generator, output_types=(tf.int32))

# 模拟参数迭代
def train_step():
    #假设每一步训练需要0s
    pass

# 训练过程预计耗时 (5*2+5*0)*3 = 30s
tf.print(tf.constant("start training..."))
for epoch in tf.range(3):
    for x in ds:
        train_step()
    tf.print("epoch =", epoch, " ended")
tf.print(tf.constant("end training..."))
'''
start training...
epoch = 0  ended
epoch = 1  ended
epoch = 2  ended
end training...
CPU times: total: 62.5 ms
Wall time: 30.2 s
'''
使用cache之后:
%%time
import time

# 模拟数据准备
def generator():
    for i in range(5):
        #假设每次准备数据需要2s
        time.sleep(2)
        yield i

# 使用 cache 方法让数据在第一个epoch后缓存到内存中,仅限于数据集不大情形。
ds = tf.data.Dataset.from_generator(generator,output_types = (tf.int32)).cache()

# 模拟参数迭代
def train_step():
    #假设每一步训练需要0s
    time.sleep(0)

# 训练过程预计耗时 (5*2+5*0)+(5*0+5*0)*2 = 10s
tf.print(tf.constant("start training..."))
for epoch in tf.range(3):
    for x in ds:
        train_step()
    tf.print("epoch =",epoch," ended")

tf.print(tf.constant("end training..."))
'''
start training...
epoch = 0  ended
epoch = 1  ended
epoch = 2  ended
end training...
CPU times: total: 46.9 ms
Wall time: 10.1 s
'''
- 使用map转换时,先batch,然后采用向量化的转换方法对每个batch进行转换。
先map后batch:
%%time
#先map后batch
ds = tf.data.Dataset.range(100000)
ds_map_batch = ds.map(lambda x:x**2).batch(20)

tf.print(tf.constant("start scalar transformation..."))
for x in ds_map_batch:
    pass
tf.print(tf.constant("end scalar transformation..."))
'''
start scalar transformation...
end scalar transformation...
CPU times: total: 1.91 s
Wall time: 349 ms
'''
先batch后map:
%%time
#先batch后map
ds = tf.data.Dataset.range(100000)
ds_batch_map = ds.batch(20).map(lambda x:x**2)

tf.print(tf.constant("start vector transformation..."))
for x in ds_batch_map:
    pass
tf.print(tf.constant("end vector transformation..."))
'''
start vector transformation...
end vector transformation...
CPU times: total: 516 ms
Wall time: 315 ms
'''
特征列
特征列(feature_column)通常用于对结构化数据实施特征工程时候使用,图像或者文本数据一般不会用到特征列。
特征列用法简介
使用特征列可以①将类别特征转换为one-hot编码特征,②将连续特征构建分桶特征,以及③对多个特征生成交叉特征等等。
要创建特征列,需要调用tf.feature_column模块的函数。该模块中常用的九个函数如下图所示,所有九个函数都会返回一个Categorical-Column或一个Dense-Column 对象,但却不会返回bucketized_column,后者继承自这两个类。
注意:所有的Catogorical Column类型最终都要通过indicator_column转换成Dense Column类型才能传入模型!
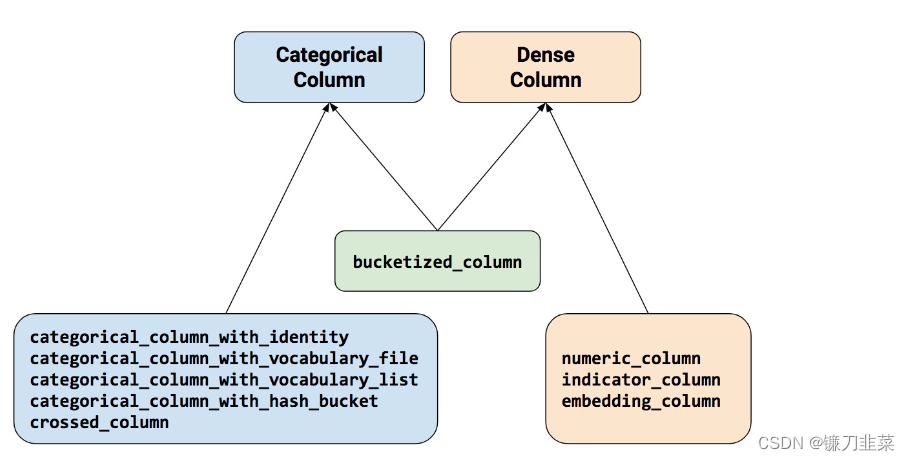
numeric_column数值列,最常用;bucketized_column分桶列,由数值列生成,可以由一个数值列出多个特征,one-hot编码;categorical_column_with_identity分类标识列,one-hot编码,相当于分桶列每个桶为1个整数的情况。categorical_column_with_vocabulary_list分类词汇列,one-hot编码,由list指定词典。categorical_column_with_vocabulary_file分类词汇列,由文件file指定词典。categorical_column_with_hash_bucket哈希列,整数或词典较大时采用。indicator_column指标列,由Categorical Column生成,one-hot编码embedding_column嵌入列,由Categorical Column生成,嵌入矢量分布参数需要学习。嵌入矢量维数建议取类别数量的 4 次方根。crossed_column交叉列,可以由除categorical_column_with_hash_bucket的任意分类列构成。
特征列使用示例
以一个使用特征列解决Titanic生存问题为例:
导入依赖包
import datetime
import numpy as np
import pandas as pd
import matplotlib.pyplot as plt
import tensorflow as tf
from tensorflow.keras import layers, models
构建数据管道:
print('Step1: Prepare dataset...')
dftrain_raw = pd.read_csv('../DemoData/titanic/train.csv')
dftest_raw = pd.read_csv('../DemoData/titanic/test.csv')

dfraw = pd.concat([dftrain_raw, dftest_raw])
def prepare_dfdata(dfraw):
    dfdata = dfraw.copy()
    dfdata.columns = [x.lower() for x in dfdata.columns]
    dfdata = dfdata.rename(columns={'survived':'label'})
    dfdata = dfdata.drop(['passengerid','name'],axis = 1)
    for col, dtype in dict(dfdata.dtypes).items():
        # 判断是否包含缺失值
        if dfdata[col].hasnans:
            # 添加标识是否缺失列
            dfdata[col + '_nan'] = pd.isna(dfdata[col]).astype('int32')
            # 填充
            if dtype not in [np.object, np.str, np.unicode]:
                dfdata[col].fillna(dfdata[col].mean(), inplace=True)
            else:
                dfdata[col].fillna('',inplace = True)
    return dfdata

dfdata = prepare_dfdata(dfraw)
dftrain = dfdata.iloc[0:len(dftrain_raw),:]
dftest = dfdata.iloc[len(dftrain_raw):,:]
从dataframe导入数据:
def df_to_dataset(df, shuffle=True, batch_size=32):
    dfdata = df.copy()
    if 'label' not in dfdata.columns:
        ds = tf.data.Dataset.from_tensor_slices(dfdata.to_dict(orient='list'))
    else:
        labels = dfdata.pop('label')
        ds = tf.data.Dataset.from_tensor_slices((dfdata.to_dict(orient='list'), labels))
    if shuffle:
        ds = ds.shuffle(buffer_size=len(dfdata))
    ds = ds.batch(batch_size)
    return ds

ds_train = df_to_dataset(dftrain)
ds_test = df_to_dataset(dftest)
定义特征列:
print('Step2: make feature columns...')
feature_columns = []

# 数值列
for col in ['age', 'fare', 'parch', 'sibsp'] + [c for c in dfdata.columns if c.endswith('_nan')]:
    feature_columns.append(tf.feature_column.numeric_column(col))

# 分桶列
age = tf.feature_column.numeric_column('age')
age_buckets = tf.feature_column.bucketized_column(age, boundaries=[18, 25, 30, 35, 40, 45, 50, 55, 60, 65])
feature_columns.append(age_buckets)

# 类别列
# 注意:所有的Catogorical Column类型最终都要通过indicator_column转换成Dense Column类型才能传入模型!!
sex = tf.feature_column.indicator_column(tf.feature_column.categorical_column_with_vocabulary_list(key='sex', vocabulary_list=["male", "female"]))
feature_columns.append(sex)

pclass = tf.feature_column.indicator_column(tf.feature_column.categorical_column_with_vocabulary_list(key='pclass', vocabulary_list=[1, 2, 3]))
feature_columns.append(pclass)

ticket = tf.feature_column.indicator_column(tf.feature_column.categorical_column_with_hash_bucket('ticket', 3))
feature_columns.append(ticket)

embarked = tf.feature_column.indicator_column(tf.feature_column.categorical_column_with_vocabulary_list(key='embarked', vocabulary_list=['S', 'C', 'B']))
feature_columns.append(embarked)

# 嵌入列
cabin = tf.feature_column.embedding_column(tf.feature_column.categorical_column_with_hash_bucket('cabin', 32), 2)
feature_columns.append(cabin)

# 交叉列
pclass_cate = tf.feature_column.categorical_column_with_vocabulary_list(key='pclass', vocabulary_list=[1, 2, 3])

crossed_feature = tf.feature_column.indicator_column(tf.feature_column.crossed_column([age_buckets, pclass_cate], hash_bucket_size=15))
feature_columns.append(crossed_feature)
定义模型:
print('Step3: define model...')

tf.keras.backend.clear_session()
model = tf.keras.Sequential([
    layers.DenseFeatures(feature_columns), # 将特征列放入到tf.keras.layers.DenseFeature中
    layers.Dense(64, activation='relu'),
    layers.Dense(64, activation='relu'),
    layers.Dense(1, activation='sigmoid')
])
训练模型:
print('Step4: train model...')
model.compile(optimizer='adam',loss='binary_crossentropy', metrics=['accuracy'])
history = model.fit(ds_train, validation_data=ds_test, epochs=10)
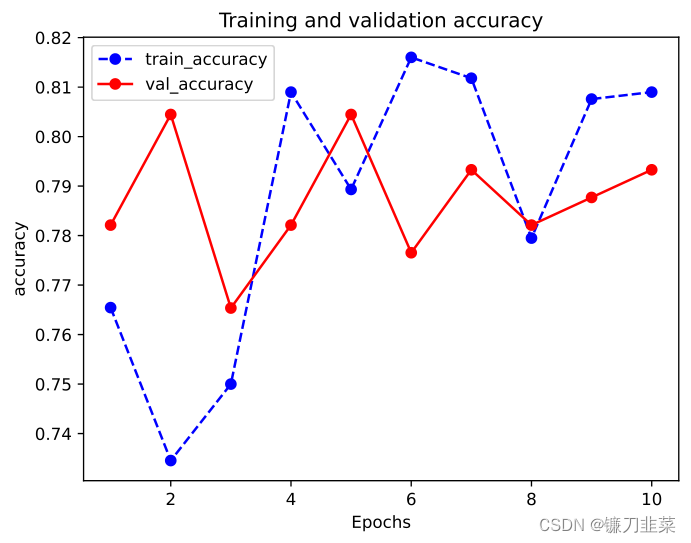
评估模型:
%matplotlib inline
%config InlineBackend.figure_format = 'svg'

# 评估模型
print('Step5: eval model...')
model.summary()


def plot_metric(history, metric):
    train_metrics = history.history[metric]
    val_metrics = history.history['val_' + metric]
    epochs = range(1, len(train_metrics) + 1)
    plt.plot(epochs, train_metrics, 'bo--')
    plt.plot(epochs, val_metrics, 'ro-')
    plt.title('Training and validation ' + metric)
    plt.xlabel("Epochs")
    plt.ylabel(metric)
    plt.legend(["train_" + metric, 'val_' + metric])
    plt.show()
plot_metric(history,'accuracy')
'''
Step5: eval model...
Model: "sequential"
_________________________________________________________________
 Layer (type)                Output Shape              Param #
=================================================================
 dense_features (DenseFeatur  multiple                 64
 es)

 dense (Dense)               multiple                  3008

 dense_1 (Dense)             multiple                  4160

 dense_2 (Dense)             multiple                  65

=================================================================
Total params: 7,297
Trainable params: 7,297
Non-trainable params: 0
_________________________________________________________________
'''
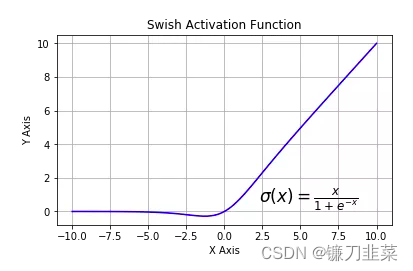
激活函数
激活函数(activation)在深度学习中扮演着非常重要的角色,它给网络赋予了非线性,从而使得神经网络能够拟合任意复杂的函数。目前,深度学习中最流行的激活函数为relu, 但也有其他的激活函数,例如swish、GELU 据称效果优于relu激活函数。
常用激活函数
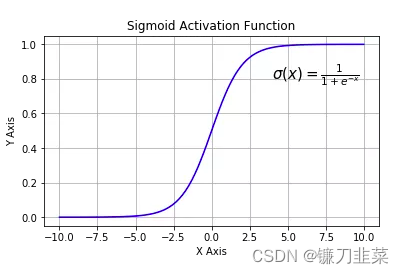
tf.nn.sigmoid:将实数压缩到0到1之间,一般只在二分类的最后输出层使用。主要缺陷为存在梯度消失问题,计算复杂度高,输出不以0为中心。
tf.nn.softmax:sigmoid的多分类扩展,一般只在多分类问题的最后输出层使用。
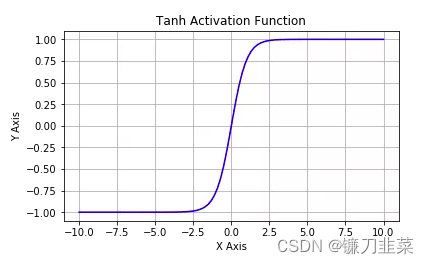
softmax ( x ) i = e x p ( x i ) ∑ j e x p ( x j ) \text{softmax}(x)_i=\frac{exp(x_i)}{\sum_j exp(x_j)} softmax(x)i=∑jexp(xj)exp(xi)tf.nn.tanh:将实数压缩到-1到1之间,输出期望为0。主要缺陷为存在梯度消失问题,计算复杂度高。
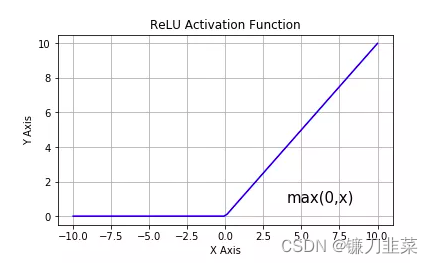
tf.nn.relu:修正线性单元,最流行的激活函数。一般隐藏层使用。主要缺陷是:输出不以0为中心,输入小于0时存在梯度消失问题(死亡relu)。
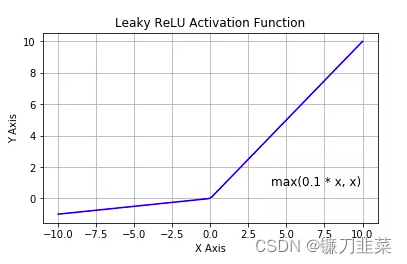
tf.nn.leaky_relu:对修正线性单元的改进,解决了死亡relu问题。
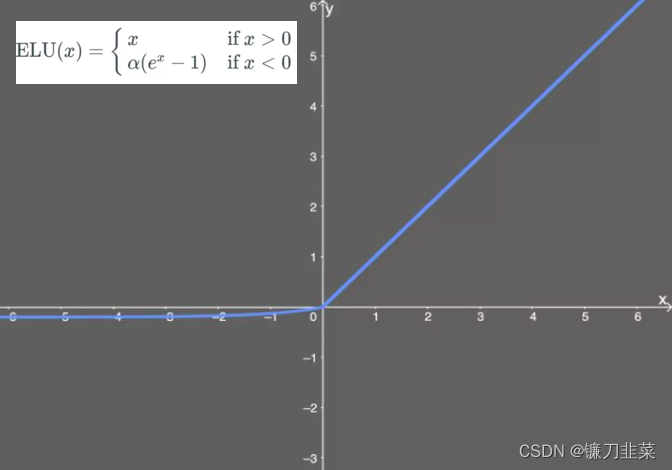
tf.nn.elu:指数线性单元。对relu的改进,能够缓解死亡relu问题。
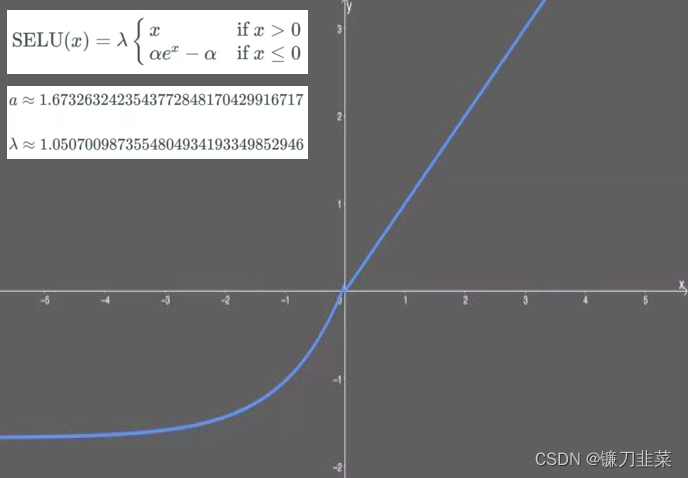
tf.nn.selu:扩展型指数线性单元。在权重(weight)用tf.keras.initializers.lecun_normal初始化前提下能够对神经网络进行自归一化。不可能出现梯度爆炸或者梯度消失问题。需要和Dropout的变种AlphaDropout一起使用。
tf.nn.swish:自门控激活函数。谷歌出品,相关研究指出用swish替代relu将获得轻微效果提升。
tf.nn.gelu:高斯误差线性单元激活函数。在Transformer中表现最好。
激活函数使用示例
import numpy as np
import pandas as pd
import tensorflow as tf
from tensorflow.keras import layers, models

tf.keras.backend.clear_session()

model = models.Sequential()
model.add(layers.Dense(32, input_shape=(None, 16), activation=tf.nn.gelu)) # #通过activation参数指定
model.add(layers.Dense(10))
model.add(layers.Activation(tf.nn.softmax)) # 显示添加layer.Activation激活层
model.summary()
Tensorflow模型中的层
深度学习模型一般由各种模型层(layers)组合而成。tf.keras.layers内置了非常丰富的各种功能的模型层。例如:
layers.Dense,layers.Flatten,layers.Input,layers.DenseFeature,layers.Dropoutlayers.Conv2D,layers.MaxPooling2D,layers.Conv1Dlayers.Embedding,layers.GRU,layers.LSTM,layers.Bidirectional等等。
如果这些内置模型层不能够满足需求,也可以通过编写tf.keras.Lambda匿名模型层或继承tf.keras.layers.Layer基类构建自定义的模型层。需要注意的是tf.keras.Lambda匿名模型层只适用于构造没有学习参数的模型层。
内置的层
常用的内置模型层简要介绍如下:
(1)基础层
- Dense:密集连接层,参数个数=输入层特征数×输出层特征数(weight)+输出层特征数(bias)
- Activation:激活函数层,一般放在Dense层后面,等价于在Dense层中指定activation
- Dropout:随机丢弃层,训练期间以一定的概率将输入置为0,是一种常见的正则化手段
- BatchNormalization:批处理标准化层。通过线性变换将输入批次缩放平移到稳定的均值和标准差,可以增强模型对输入不同分布的适应性,加快模型训练速度,有轻微正则化的效果。一般用在激活函数之前。
- SpatialDropout2D:空间随机丢弃层,训练期间以一定概率将整个特征图置为0,也是一种正则化手段,能够避免特征图之间过高的相关性。
- Input:输入层,通常使用Functional API方式构建模型时作为第一层。
- DenseFeature:特征列接入层,用于接收一个特征列列表并产生一个密集连接层。
- Flatten:压平层,用于将多维张量压缩为一维。
- Reshape:形状重塑层,改变输入张量的形状。
- Concatenate:拼接层,用于将多个张量在某个维度上拼接。
- Add:加法层
- Subtract:减法层
- Maximum:取最大值层
- Minimum:取最小值层
(2)卷积网络相关的层
- Conv1D:普通一维卷积,常用于文本数据。参数个数=输入通道数×卷积核尺寸(如3)×卷积核个数
- Conv2D:普通二维卷积,常用于图像数据。参数个数=输入通道数×卷积核尺寸(如3×3)×卷积核个数
- Conv3D:普通三维卷积,常用于视频数据。参数个数=输入通道数×卷积核尺寸(如3×3×3)×卷积核个数
- SeparableConv2D:二维深度可分离卷积层。不同于普通卷积同时对区域和通道操作,深度可分离卷积先操作区域,然后操作通道。即先对每个通道做独立卷积操作区域,再用1×1卷积跨通道组合操作通道。参数个数=输入通道数×卷积核尺寸+输入通道数×1×1×1输出通道数。深度可分离卷积的参数数量一般远小于普通卷积,效果一般也更好。
- DepthwiseConv2D:二维深度卷积层。仅有SeparableConv2D前半部分操作,即只操作区域,不操作通道,一般输出通道数和输入通道数相同,但也可以通过设置
depth_multiplier让输出通道为输入通道的若干倍数。输出通道数=输入通道数×depth_multiplier。参数个数=输入通道数×卷积核尺寸×depth_multiplier。 - Conv2DTranspose:二维卷积转置层,俗称
反卷积层。并非卷积的逆操作,但在卷积核相同的情况下,当其输入尺寸是卷积操作输出尺寸的情况下,卷积转置的输出尺寸恰好是卷积操作的输入尺寸。 - LocallyConnected2D:二维局部连接层。类似Conv2D,唯一的差别是没有空间上的权值共享,所以其参数个数远高于二维卷积。
- MaxPool2D:二维最大池化层,也称为下采样层。池化层无可训练参数,主要作用是降维。
- AveragePooling2D: 二维平均池化层。
- GlobalMaxPool2D: 全局最大池化层。每个通道仅保留一个值。一般从卷积层过渡到全连接层时使用,是Flatten的替代方案。
- GlobalAvgPool2D: 全局平均池化层。每个通道仅保留一个值。
(3)循环网络相关层
- Embedding:
嵌入层,一种比Onehot更加有效的对离散特征进行编码的方法,一般用于将输入中的单词映射为稠密向量。嵌入层的参数需要学习。 - LSTM:
长短记忆循环网络层。最普遍使用的循环网络层。可以较为有效地缓解梯度消失问题,从而能够适用长期依赖问题。设置return_sequences = True时可以返回各个中间步骤输出,否则只返回最终输出。 - GRU:门控循环网络层。LSTM的低配版,不具有携带轨道,参数数量少于LSTM,训练速度更快。
- SimpleRNN:简单循环网络层。容易存在梯度消失,不能够适用长期依赖问题。一般较少使用。
- ConvLSTM2D:卷积长短记忆循环网络层。结构上类似LSTM,但对输入的转换操作和对状态的转换操作都是卷积运算。
Bidirectional:双向循环网络包装器。可以将LSTM,GRU等层包装成双向循环网络。从而增强特征提取能力。- RNN:RNN基本层。接受一个循环网络单元或一个循环单元列表,通过调用
tf.keras.backend.rnn函数在序列上进行迭代从而转换成循环网络层。 LSTMCell:LSTM单元。和LSTM在整个序列上迭代相比,它仅在序列上迭代一步。可以简单理解LSTM即RNN基本层包裹LSTMCell。- GRUCell:GRU单元。和GRU在整个序列上迭代相比,它仅在序列上迭代一步。
- SimpleRNNCell:SimpleRNN单元。和SimpleRNN在整个序列上迭代相比,它仅在序列上迭代一步。
- AbstractRNNCell:抽象RNN单元。通过对它的子类化用户可以自定义RNN单元,再通过RNN基本层的包裹实现用户自定义循环网络层。
Attention:Dot-product类型注意力机制层。可以用于构建注意力模型。AdditiveAttention:Additive类型注意力机制层。可以用于构建注意力模型。- TimeDistributed:时间分布包装器。包装后可以将Dense、Conv2D等作用到每一个时间片段上。
自定义模型中的层
根据自定义模型层是否含有需要被训练的参数,可以分为两种情况:
- 如果自定义模型层没有需要被训练的参数,一般推荐使用Lamda层实现。
Lambda层由于没有需要被训练的参数,只需要定义正向传播逻辑即可,使用比Layer基类子类化更加简单。Lambda层的正向逻辑可以使用Python的lambda函数来表达,也可以用def关键字定义函数来表达。
import tensorflow as tf
from tensorflow.keras import layers, models, regularizers

mypower = layers.Lambda(lambda x:tf.math.pow(x, 2))
mypower(tf.range(5))
'''
<tf.Tensor: shape=(5,), dtype=int32, numpy=array([ 0,  1,  4,  9, 16])>
'''
- 如果自定义模型层有需要被训练的参数,则可以通过对Layer基类子类化实现。
Layer的子类化一般需要重新实现初始化方法,Build方法和Call方法。下面是一个简化的线性层的范例,类似Dense:
class Linear(layers.Layer):
    def __init__(self, units=32, **kwargs):
        super(Linear, self).__init__(**kwargs)
        self.units = units

    #build方法一般定义Layer需要被训练的参数
    def build(self, input_shape):
        self.w = self.add_weight('w', shape=(input_shape[-1], self.units), initializer='random_normal',
                                 trainable=True)  #注意必须要有参数名称"w"
        self.b = self.add_weight('b', shape=(self.units,), initializer='random_normal', trainable=True)
        super(Linear, self).build(input_shape)  #相当于设置self.built = True

    #call方法一般定义正向传播运算逻辑,__call__方便调用了它
    @tf.function
    def call(self, inputs):
        return tf.matmul(inputs, self.w) + self.b

    #如果要让自定义的Layer通过Functional API组合成模型时可以被保存为h5模型,需要自定义get_config方法
    def get_config(self):
        config = super(Linear, self).get_config()
        config.update({'units': self.units})
        return config

linear = Linear(units=8)
print(linear.built)
# 指定input_shape,显式调用build方法,第0维代表样本数量,用None填充
linear.build(input_shape=(None, 16))
print(linear.built)
'''
False
True
'''

linear = Linear(units = 8)
print(linear.built)
linear.build(input_shape = (None, 16))
print(linear.compute_output_shape(input_shape = (None, 16)))
'''
False
(None, 8)
'''
linear = Linear(units = 16)
print(linear.built)
#如果built = False,调用__call__时会先调用build方法, 再调用call方法。
linear(tf.random.uniform((100,64)))
print(linear.built)
config = linear.get_config()
print(config)
'''
False
True
{'name': 'linear_3', 'trainable': True, 'dtype': 'float32', 'units': 16}
'''
创建模型:
tf.keras.backend.clear_session()

model = models.Sequential()
#注意该处的input_shape会被模型加工,无需使用None代表样本数量维
model.add(Linear(units = 1,input_shape = (2,)))
print("model.input_shape: ",model.input_shape)
print("model.output_shape: ",model.output_shape)
model.summary()
'''
model.input_shape:  (None, 2)
model.output_shape:  (None, 1)
Model: "sequential"
_________________________________________________________________
 Layer (type)                Output Shape              Param #
=================================================================
 linear (Linear)             (None, 1)                 3

=================================================================
Total params: 3
Trainable params: 3
Non-trainable params: 0
_________________________________________________________________
'''
模型训练与保存:
model.compile(optimizer="sgd", loss="mse", metrics=["mae"])
print(model.predict(tf.constant([[3.0, 2.0], [4.0, 5.0]])))

# 保存成 h5模型
model.save("../Results/linear_model.h5", save_format="h5")
model_loaded_keras = tf.keras.models.load_model("../Results/linear_model.h5", custom_objects={"Linear": Linear})
print(model_loaded_keras.predict(tf.constant([[3.0, 2.0], [4.0, 5.0]])))

# 保存成 tf模型
model.save("../Results/linear_model", save_format="tf")
model_loaded_tf = tf.keras.models.load_model("../Results/linear_model")
print(model_loaded_tf.predict(tf.constant([[3.0, 2.0], [4.0, 5.0]])))
'''
1/1 [==============================] - 0s 81ms/step
[[-0.12120639]
 [-0.06796878]]
1/1 [==============================] - 0s 28ms/step
[[-0.12120639]
 [-0.06796878]]
INFO:tensorflow:Assets written to: ../Results/linear_model\assets
1/1 [==============================] - 0s 28ms/step
[[-0.12120639]
 [-0.06796878]]
'''
参考资料
[1] 《Tensorflow:实战Google深度学习框架》
[2] 《30天吃掉那只Tensorflow2》
[3] 一文概览深度学习中的激活函数
[4] 从ReLU到GELU,一文概览神经网络的激活函数


![[极客大挑战 2019]BuyFlag1(BUUCTF)](https://img-blog.csdnimg.cn/e4c32cee534e4932816d3ba0912fcc53.png)